How to Connect AirPods to an Apple TV |
- How to Connect AirPods to an Apple TV
- How to Disable Typing Indicators in Signal Private Messenger
- How to Enable Do Not Disturb During Workouts on Apple Watch
- How to Automatically Share Your Instagram Stories and Posts on Facebook
| How to Connect AirPods to an Apple TV Posted: 28 Feb 2021 08:19 AM PST  The Apple TV can send audio directly to your AirPods, AirPods Pro, or AirPods Max wireless headphones, letting you watch videos, play games, or work out with Apple Fitness+ without disturbing anyone else in the room. Here's how. AirPods Paired to an Apple ID Should "Just Work"When you pair your AirPods with an iPhone or iPad, iCloud shares that connection with your other linked devices. If you're signed in to another device using the same Apple ID, your AirPods should "just work" when you try to connect. This is also true for the Apple TV. With your AirPods already paired to your Apple ID, you can use a handy shortcut to quickly connect. However, this only works if you have the AirPods case open (so that they are awake) or in your ears already. (If you have AirPods Max, place them on your ears.)
To quickly connect, press and hold the Play button on your Apple TV remote. You should see a list of available wireless devices appear, including your AirPods. Select them to connect, and route audio via your headphones instead of your TV speakers or receiver. To disconnect, simply head back to this quick menu by holding Play on your remote, then choose "Apple TV" instead. This will reroute audio through the Apple TV. RELATED: How to Get Started With Apple Fitness+ Manually Pairing Your AirPods With the Apple TVIf you haven't yet paired your AirPods or you're encountering issues with the method outlined above, you can try manually pairing, as you would with any other Bluetooth device. To do this, head to Settings > Remotes and Devices > Bluetooth. Open the AirPods case and hold the small white pairing button on the back until the LED starts flashing. (With AirPods Max, take them out of the smart case, then press and hold the noise control button until the status light starts flashing white.) You should now see your AirPods appear under the "Other Devices" heading in the list of Bluetooth connections on-screen. Select this, then choose "Connect" to pair your AirPods. If all goes well, your AirPods are now paired with your Apple TV, and audio will route to your headphones rather than TV speakers or a receiver.
You can now use the quick menu by holding the Play button on your remote to quickly switch between "Apple TV" (no headphones) and your AirPods, or any other Bluetooth devices or smart speakers you have connected. To unpair your AirPods, head back to Settings > Remotes and Devices > Bluetooth and choose your AirPods, then select "Unpair Device" from the menu that appears. How to Control AirPods' Volume on Apple TV When you're using your AirPods with your Apple TV, you can control the sound volume using the volume controls on your remote. Your AirPods will also work just as they do with an iPhone or other similar device, pausing whatever is playing (whether it's music or YouTube) on the TV when you remove an AirPod. How to Improve ReliabilityWe tested original AirPods with the W1 chip and a fourth-generation (non-4K) Apple TV and found performance to be spotty. It's unclear whether interference was the cause, but the audio was patchy at best. Fortunately, YouTube videos remained in sync with the audio despite this. Your mileage may vary depending on the AirPods and the Apple TV you have, any wireless interference nearby, and the position of your Apple TV relative to your AirPods. If you have similar problems, you might want to try moving your Apple TV to a position that's more conducive for streaming wireless audio. It seems that placing it behind the TV or deep in an entertainment unit is a bad idea. The Apple TV 4K should perform better due to its more modern system-on-chip. More Than a Streaming BoxThe Apple TV can do more than simply stream video. You can use it to play games, mirror your MacBook's screen, and listen to music, podcast, or YouTube videos privately over wireless headphones. If you want to master your Apple TV, check out the most useful remote tips and tricks to better navigate tvOS. |
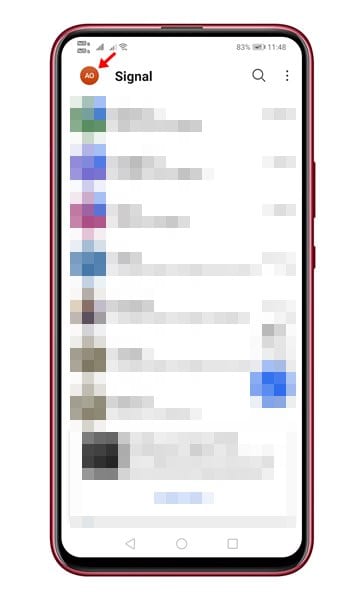
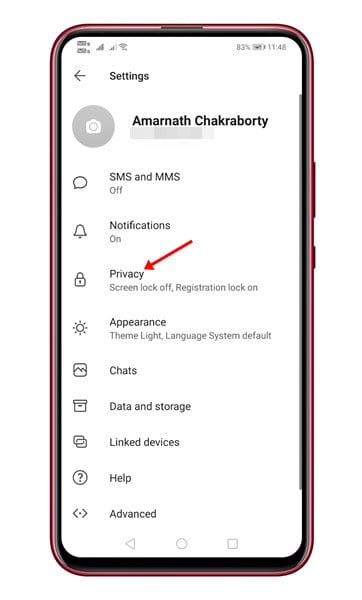
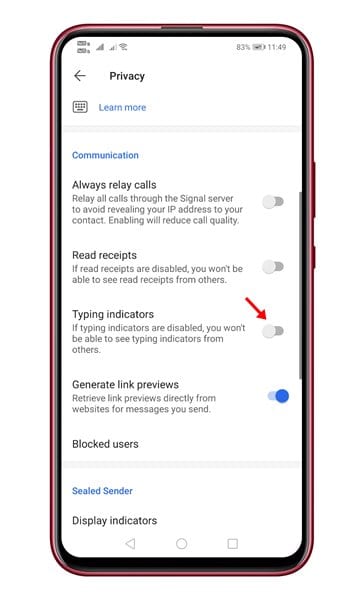
| How to Disable Typing Indicators in Signal Private Messenger Posted: 28 Feb 2021 01:37 AM PST The previous month, WhatsApp updated its privacy policy, and due to that, many users have considered migration to apps like Signal and Telegram. As of now, there are lots of WhatsApp alternatives available for Android, but out of all those, Signal Private Messenger seems to be the best one. We have already shared a detailed guide comparing WhatsApp, Telegram, and Signal. You can check out that article to know the difference between the apps. If you have ever used WhatsApp, you might know that the instant messaging app shows typing indicators when the other one types in a chat. The same feature is also seen in Signal Private Messenger. The Typing Indicators in Signal indicates that the recipient is typing something. They appear as animated dots that can be enabled or disabled at any time. While some may like these features, others may want to hide them from their contacts. Also Read: How to Send Disappearing Messages On Signal Private Messenger Steps to Disable Typing Indicators in Signal Private MessengerIn this article, we will share a detailed guide on how to disable the Typing indicators in Signal Private Messenger. The process is going to be very easy; just follow some of the simple steps given below. Let's check out. Step 1. First of all, open Signal Private Messenger on your Android device. Step 2. Now tap on your profile photo to open the Settings page. Step 3. On the Settings page, scroll down and tap on the 'Privacy' option. Step 4. Under the Privacy page, scroll down to the Communication section. Step 5. Now find the option 'Typing Indicators.' Use the toggle button behind it to enable/disable the feature. Important: If you disable the Typing indicators, your contacts will not see when you are typing. Also, the incoming typing indicators will not be displayed. If you have enabled the feature but can't see your friend's typing indicator, then your friend might have disabled the feature. That's it! You are done. This is how you can enable/disable Typing indicators on Signal Private Messenger. So, this article is all about how to disable Typing indicators in Signal Private Messenger. I hope this article helped you! Please share it with your friends also. If you have any doubts related to this, let us know in the comment box below. |
| How to Enable Do Not Disturb During Workouts on Apple Watch Posted: 27 Feb 2021 12:39 PM PST
If you're in the middle of a hard run or chill yoga session, you probably don't want your phone to ring (unless it's really important). By automatically enabling Do Not Disturb on your Apple Watch when you start a workout, you can make sure you don't get interrupted. Here's how. What Is Do Not Disturb Mode?Do Not Disturb is one of the (many) modes you can put your Apple Watch in. It stops notifications and alerts from appearing and playing sounds, although it doesn't stop any apps you're using from playing audio. Here are two key things about Do Not Disturb mode: You can put your Apple Watch or iPhone into Do Not Disturb mode at any time using the Control Center:
In either case, tap the "Moon" icon to turn on Do Not Disturb.  How to Automatically Turn on Do Not Disturb Mode When You WorkoutYou can also have Do Not Disturb automatically turn on whenever you start a workout, either in the Workouts app on your Apple Watch or in any other app you use for tracking workouts, like Strava, Intervals Pro, and the like. This means it works with Apple Fitness+ workouts, too. To do so, open the Watch app on your iPhone and go to General > Do Not Disturb.
Activate the "Workout Do Not Disturb" option.
Now, whenever you start a workout, Do Not Disturb will start, too. And when you finish a workout, your watch and iPhone will go back to whatever mode they were in before. If you want to, you can also turn off Do Not Disturb mode from the Control Center. If you're waiting for a phone call or text message, you don't need to worry about missing it. Just start a workout and turn off Do Not Disturb whenever you like. |
| How to Automatically Share Your Instagram Stories and Posts on Facebook Posted: 27 Feb 2021 10:19 AM PST  Facebook and Instagram are more in sync than ever. One of the perks of this integration is that you can cross-share your Instagram stories and posts to Facebook to easily boost your content's reach. Here's how to do it. For this to work, you'll first need to link your Facebook and Instagram accounts. Open the Instagram app on your Android smartphone or iPhone, then tap your profile picture in the bottom-right corner.
Select the three-line menu icon in the top-right corner of the tab to reveal a side menu and head into "Settings."
At the bottom, tap the blue link for "Accounts Center."
Visit the "Accounts and Profiles" section.
Here, tap "Add Accounts" and sign in to your Facebook profile.
Once you've authenticated yourself, the Instagram app will ask you whether you'd like to enable "connected experiences."
This will let you cross-post content and access other Facebook functionalities, such as Messenger's instant messaging features, via Instagram. When you do this, you also allow Facebook to club your data from both platforms to personalize ads and suggest new profiles to follow. Tap the "Continue" button, then "Finish Setting Up" to proceed.
Go back to the "Accounts Center" and select "Your Story and Posts."
Under the "Automatically Share" section, toggle on "Your Instagram Story" to cross-post each one of your future Instagram Stories to Facebook. The "Your Instagram Posts" option enables you to do the same for your grid posts.
Apart from a profile, you can even automatically forward your Instagram stories and posts to a Facebook page's timeline from the "Share to" menu. In addition to this, now you can also message a Facebook friend from Instagram and vice-versa. However, if you'd like to opt-out of this, you do have the option to block Facebook users from pinging you on Instagram. |
| You are subscribed to email updates from My Blog. To stop receiving these emails, you may unsubscribe now. | Email delivery powered by Google |
| Google, 1600 Amphitheatre Parkway, Mountain View, CA 94043, United States | |


0 nhận xét:
Đăng nhận xét