How to Add “Mark as Read” to Gmail Notifications on Android |
- How to Add “Mark as Read” to Gmail Notifications on Android
- How to Customize the Time and Date in the Mac Menu Bar
- How Auto-HDR Works on Xbox Series X|S (and How to Disable It)
- AMD Radeon RX 6800 XT Review
- How To Get Custom Status Bar Backgrounds Based on the Time of Day
- What’s New in Outlook 365 for Mac’s Fall 2020 Update
- How to Insert Bullet Points in an Excel Spreadsheet
| How to Add “Mark as Read” to Gmail Notifications on Android Posted: 20 Nov 2020 07:52 AM PST
The best way to stay on top of emails is to address them as they come in. On Android, Gmail notifications give you two options: "Archive" and "Reply." We'll show you how to add a "Mark as Read" option, too. "Archive" and "Reply" are useful, but marking an email as read also really comes in handy. There are many times when you can't reply to an email right away, but want to save it in your Inbox so you can answer it later. The ability to do this from the notification is also a big time-saver.
Gmail does allow you to choose if you want the second option to be "Archive" or "Delete," but that's where the customization ends. To add "Read," we're using a paid app called AutoNotification. The app intercepts Gmail notifications, replicates them, and adds a "Read" option. However, this is only possible if you allow the app to read your emails. This is a privacy trade-off you'll have to decide if you're comfortable with. To get started, download AutoNotification from the Google Play Store on your Android phone or tablet.
When you first open the app, you have to grant it permission to access the photos, media, and files on your device; tap "Allow."
You'll see an introduction explaining what the app can do. Use the Back gesture or button to close this message.
Next, tap "Gmail Buttons."
Tap "Add Account" to link your Google account to AutoNotification.
A warning appears letting you know the notification intercept service isn't running. This is how the app detects Gmail notifications, so tap "OK" to enable it.
You'll be redirected to Android's "Notification Access" settings; tap "AutoNotification."
Toggle-On the "Allow Notification Access" option.
If you're comfortable with what the app will be able to access, tap "Allow" in the confirmation pop-up message.
Tap the back arrows at the top left until you're back on the "Gmail Buttons" menu in the AutoNotification app. Tap "Add Account" once again.
Another warning will appear, explaining that this feature won't work with emails that contain labels. Tap "OK" to continue.
Here's where the cost comes in. You can tap "Start Trial" for a free seven-day trial to see if you like the app, or you can pay a one-time fee of 99 cents to unlock it forever.
After you start the trial or unlock the feature, you'll be asked to agree to the privacy policy. Tap "Read Policy," and then tap "Agree" whenever you're ready.
Finally, the "Choose an Account" window will appear. Select the Google account to which you want to add the "Read" option.
Tap "Allow" to grant AutoNotification permission to "View Your Email Messages and Settings" and "View and Modify But Not Delete Your Email." This is how the app replicates your Gmail notifications.
Tap "Allow" in the pop-up message to confirm.
You'll then receive some Google Security Alerts about AutoNotification having access to your Google account—these are normal.
The "Read" option will now be present in your Gmail notifications! You can stop here if you're satisfied.
"Read" isn't the only button you can add. To see more options, head back to the "Gmail Buttons" section in the AutoNotification app, and then tap "Buttons."
Select the checkbox next to any option you want to add to your Gmail notifications.
With these new options, your Inbox will never be out of control again! | |||||||||||||||||||||||||||||||||||||||||||||||||||||||||||||||||
| How to Customize the Time and Date in the Mac Menu Bar Posted: 20 Nov 2020 06:50 AM PST  By default, the Mac menu bar displays the time in a simple hour and minute digital format. However, you can customize it and add the day of the week, date, or even a second hand. You have a range of choices. If you prefer, you can keep it super minimal, and display only the hour and minute, as shown below.
Or, you can add the day and/or date, flashing separators, and seconds.
There's also an analog clock option that disables all the other features (including the day and date).
You can customize the time and date in the System Preferences menu. To do so, click the Apple at the top left, and then click "System Preferences."
If you're running macOS Big Sur or higher, click "Dock & Menu Bar."
In the sidebar, click "Clock."
On macOS Catalina or earlier, click "Date & Time," and then click "Clock." If you want to add the day of the week and/or the date, just select the checkboxes next to "Show the Day of the Week" and/or "Show Date."
Below that section, you'll see "Time Options." Here, you can select the radio button next to "Analog" to display an analog clock. To display a 24-hour clock, select the checkbox next to "Use a 24-hour Clock." Select the checkbox next to "Show am/pm" to display when it's morning and afternoon. You can also select "Flash the Time Separators" and/or "Display the Time with Seconds" here.
All changes happen live. On macOS Big Sur or higher, you'll see a preview of the current clock display at the top right of the "System Preferences" menu.
In addition to displaying the date in the menu bar, you can also add a drop-down calendar with Itsycal. Whenever you click it, you'll see your calendar with all your appointments. RELATED: How to Add a Drop-Down Calendar to the macOS Menu Bar Clock | |||||||||||||||||||||||||||||||||||||||||||||||||||||||||||||||||
| How Auto-HDR Works on Xbox Series X|S (and How to Disable It) Posted: 20 Nov 2020 05:25 AM PST  High-dynamic-range (HDR) video, is a game changer for movies, TV, and video games. Microsoft's Xbox Series X and S consoles both support a feature called Auto-HDR, which brings HDR visuals to older games that don't explicitly support it. But, is it any good, and do you have to use it? How Auto-HDR WorksHDR video is a step forward for display technology. It uses a wider range of colors and bright highlights to create a more realistic, natural-looking image. There are a handful of competing HDR formats, but the Xbox Series X and S use HDR10 by default. (Dolby Vision support will arrive at some point in the future.) To display HDR video, you also need a TV that supports it. If you've bought a TV in the last few years, there's a good chance Microsoft's HDR implementation will work just fine. However, if you're buying a TV specifically for gaming, make sure HDR is on your list of must-have features. Auto-HDR is a technology developed by Microsoft for the Xbox Series family of consoles. It uses artificial intelligence to convert a standard dynamic range (SDR) source to an HDR image. This is made possible by Microsoft's use of machine learning. It trains the Auto-HDR algorithm to have a good understanding of how an image should look.  This feature is primarily used to augment an SDR picture with HDR highlights. For example, the sun and other direct-light sources will be noticeably brighter than the rest of the image, just as they are in real life. Increased luminosity can also really make colors pop, creating a more vibrant image. The feature is available on a huge number of titles, including original Xbox and Xbox 360 games, as well as Xbox One games presented in SDR. Games that have already implemented HDR are unaffected by Auto-HDR, as they use their own implementation of "true" HDR. RELATED: HDR Formats Compared: HDR10, Dolby Vision, HLG, and Technicolor Calibrate Your Xbox FirstOne of the most important aspects of good HDR presentation is an accurately calibrated display. This tells the console what your TV is capable of in terms of highlights and black levels. Fortunately, there's an app for that! First, you have to make sure your TV is in Game mode. With your Xbox Series X or S turned on, tap the Xbox button on the controller. Then, use the bumper buttons to select Power & System > Settings > General > TV & Display Settings. From there, select "Calibrate HDR for Games" to begin the process.
Follow the on-screen directions to adjust the dials until everything looks just right. If you ever switch to a different TV or monitor, make sure you run the HDR calibration again. Also, if you adjust any settings on your TV, like the brightness or picture mode, you might also want to run the calibrator again. Once your TV is calibrated, it's time to boot up some games! RELATED: What Does “Game Mode” On My TV Or Monitor Mean? How Does Auto-HDR Perform?During our testing, Auto-HDR worked well, overall. Some games worked better than others, but nothing we encountered made us consider turning off the feature. Your experience could vary, though, depending on which title you're playing. Generally, the picture was punchier with more contrast. Surprisingly, Auto-HDR doesn't suffer from too many of the "fake HDR" issues you often see in TVs. You might get the odd in-game character with eyes that glow a bit too much, or a user interface (UI) element that's a bit too bright. Jeffrey Grubb from Games Beat (see video below) and Adam Fairclough from the YouTube channel HDTVTest, revealed that most games cap out at 1,000 nits of peak brightness. This level of luminosity is on par with what most modern televisions can reproduce. It's also something Microsoft can always tweak in the future as displays get even brighter. If your TV can't hit 1,000 nits of peak brightness, the image will be tone-mapped so it doesn't exceed the capabilities of your display. You won't miss out on much detail if you own an older TV or OLED, though, as neither of those hit the same peak brightness as the latest LEDs and LCDs. This feature makes almost all older games look better, which is why Microsoft has enabled Auto-HDR by default. However, the company has disabled the feature on games that weren't a good fit for the technology. These titles are few and far between, but they do include some classics, like Fallout: New Vegas. If you're having trouble with how a game is displayed, make changes at the system level first in the HDR calibration app to ensure everything is set up correctly. Adjusting the in-game gamma might introduce further issues, so it's best to leave that as a last resort. In some cases, Auto-HDR is truly transformative. In combination with resolution upscaling and a solid frame rate, the added eye candy, contrast, and peak brightness make for a much more pleasant experience. It even makes some games that were released 15 years ago look modern. It's not for everyone, though; if you're having a hard time with it, you can always disable the feature at the system level. How to Disable Auto-HDRIf you don't like the Auto-HDR effect, or you're having issues with a particular game, you can disable it. Unfortunately, there's no way to do this on a game-by-game basis, so make sure you remember to turn it on again before you start playing something else. To disable Auto-HDR, turn on your console, and then press the Xbox button on your controller. Select Power & System > Settings > General > TV & Display Options > Video Modes, and then uncheck "Auto HDR." You'll have to restart any games that are currently running for your changes to take effect.
You might also want to do this if you prefer playing a game in its original, unaltered state. If you find certain highlights (like UI elements) that pop more than they should distracting, turning off Auto-HDR will fix that, as well. Breathing New Life Into Old GamesAuto-HDR is a killer feature available at launch to help the Series X and S tread water at a time when new games are thin on the ground. If you already have a library of Xbox titles, or you're just jumping in with Game Pass, Auto-HDR applies a welcome layer of next-gen paint to older titles. Wondering which Xbox console is right for you? Be sure to check out our comparison. RELATED: Xbox Series X vs. Xbox Series S: Which Should You Buy? | |||||||||||||||||||||||||||||||||||||||||||||||||||||||||||||||||
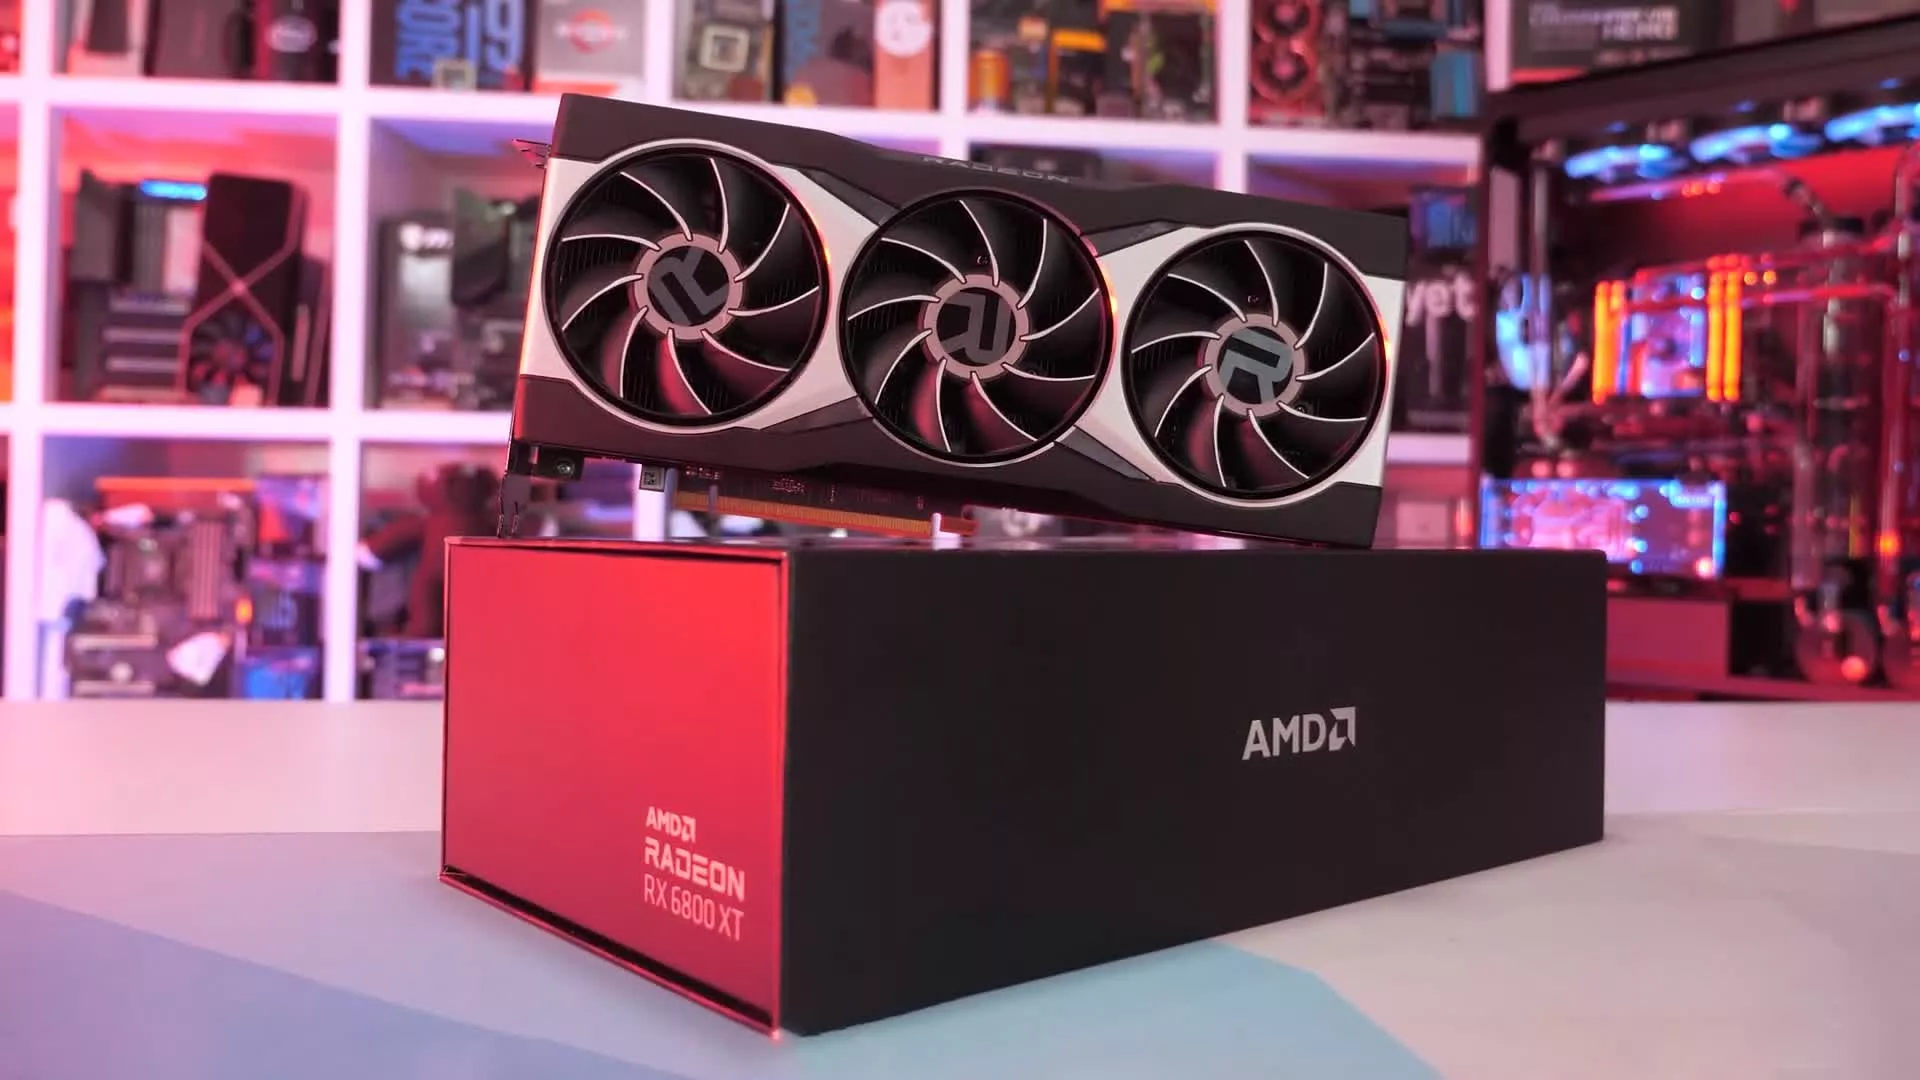
| Posted: 19 Nov 2020 02:37 PM PST The Radeon RX 6800 XT is AMD's new high-end gaming graphics card targeting the GeForce RTX 3080. We’ve had the card in our labs for a while, and today we can finally show you how the new GPU performs. In essence, AMD has claimed 3080-like performance at a $50 discount with the 6800 XT, while offering considerably more VRAM at 16 GB vs. the GeForce’s 10GB. The 6800 XT is based on the new RDNA2 architecture using TSMC's 7nm process. The GPU packs 4608 cores, 288 TMUs and 128 ROPs across 72 CUs. The cores clock at up to 2250 MHz, and with 16GB of 16Gbps GDDR6 memory on a 256-bit wide memory bus, it has 512GB/s of memory bandwidth to play with. It's rated at 300 watts TBP, and of course, supports PCI Express 4.0. There are some new features as well such as ray tracing support, 128MB of AMD Infinity Cache and Shared Access Memory. But we have covered all of that on paper, so we won’t repeat ourselves with the details.
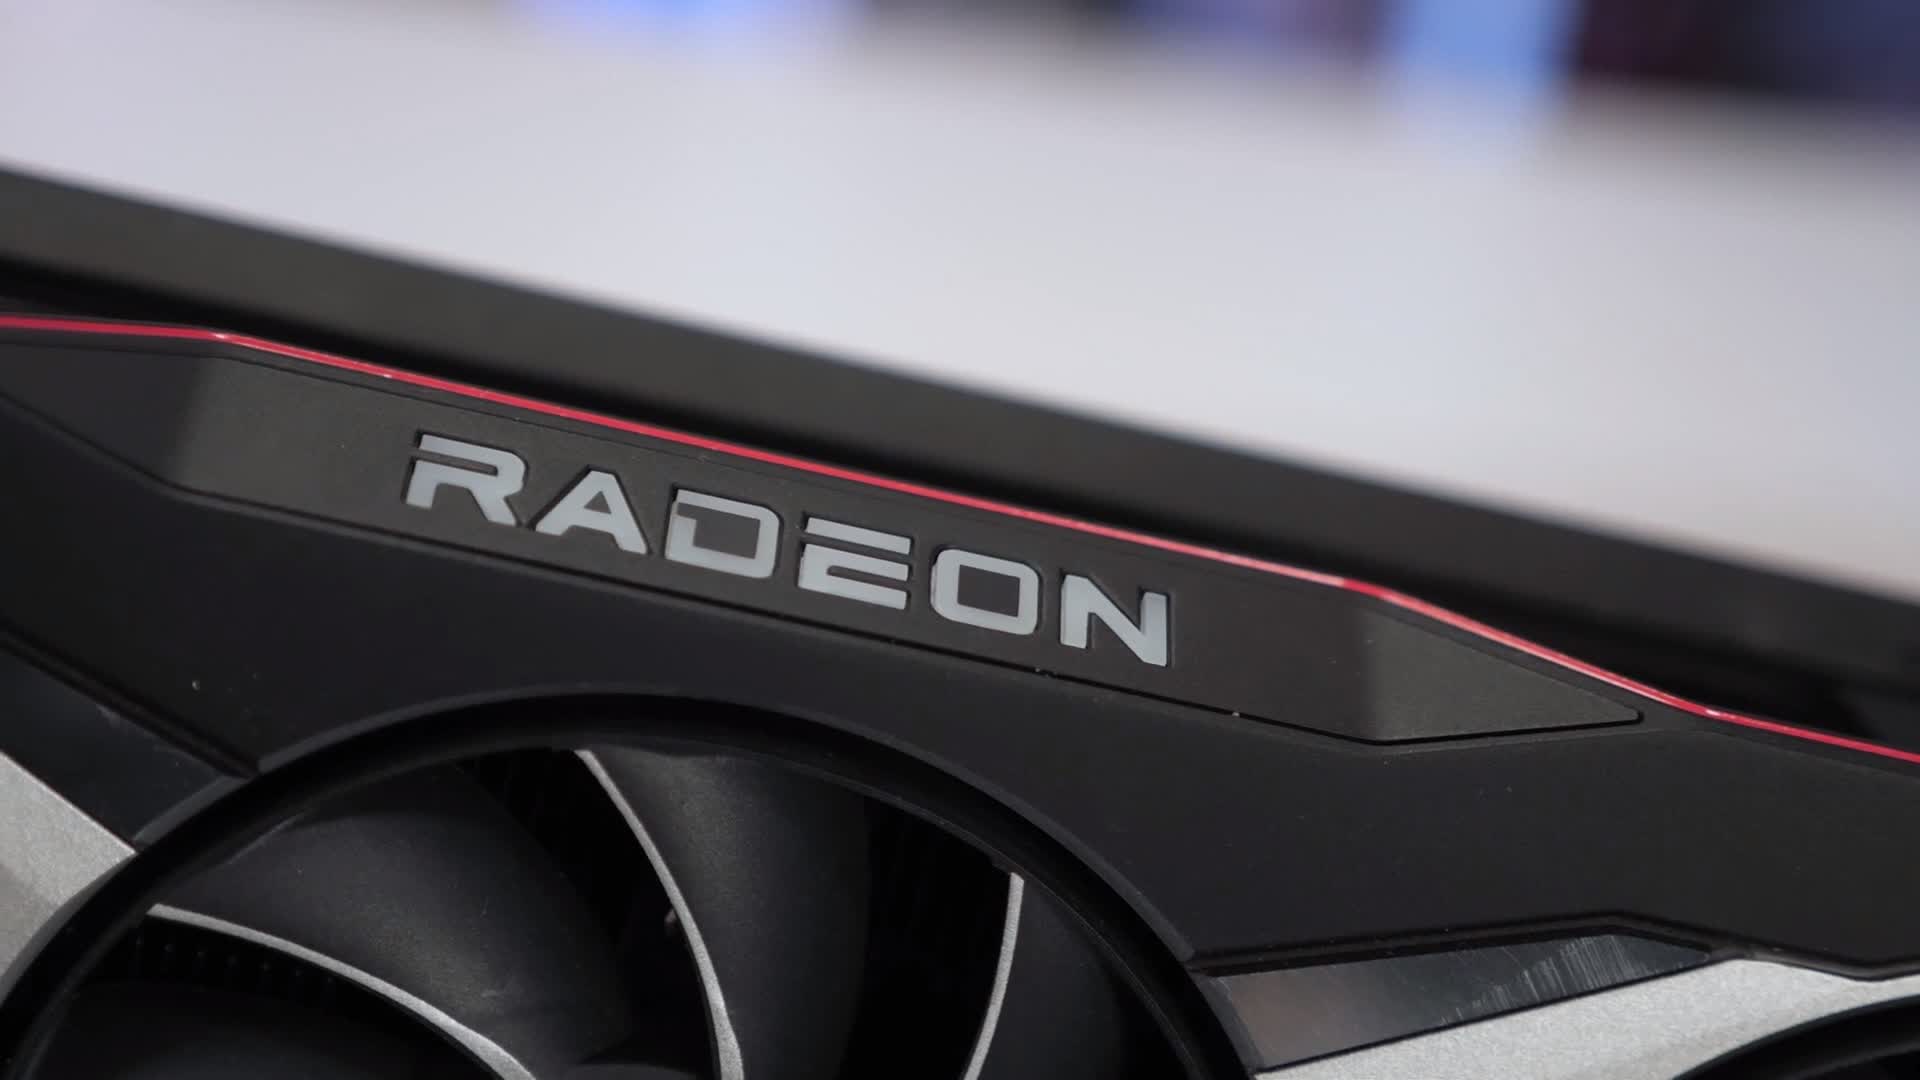
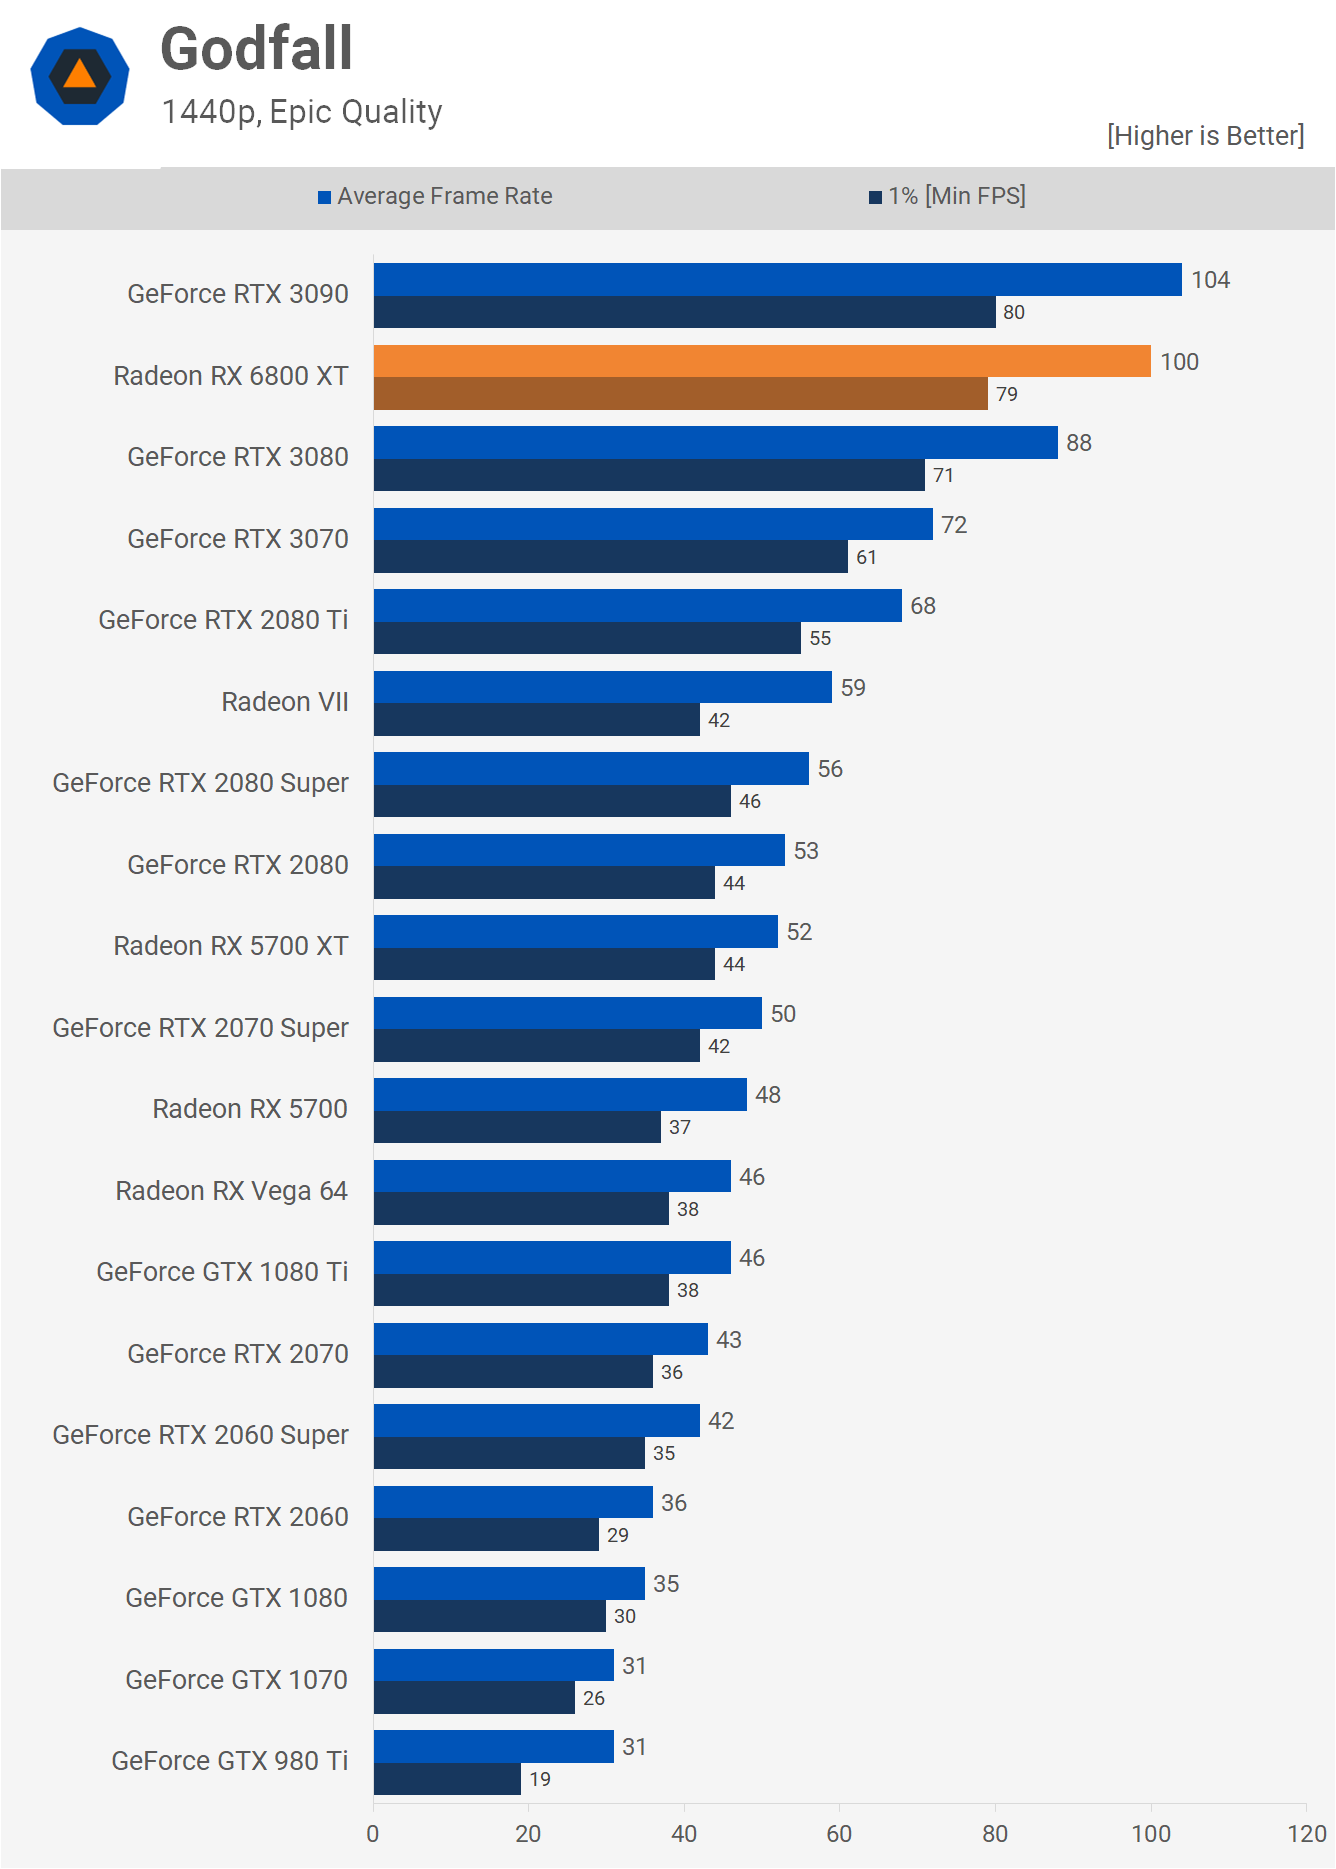
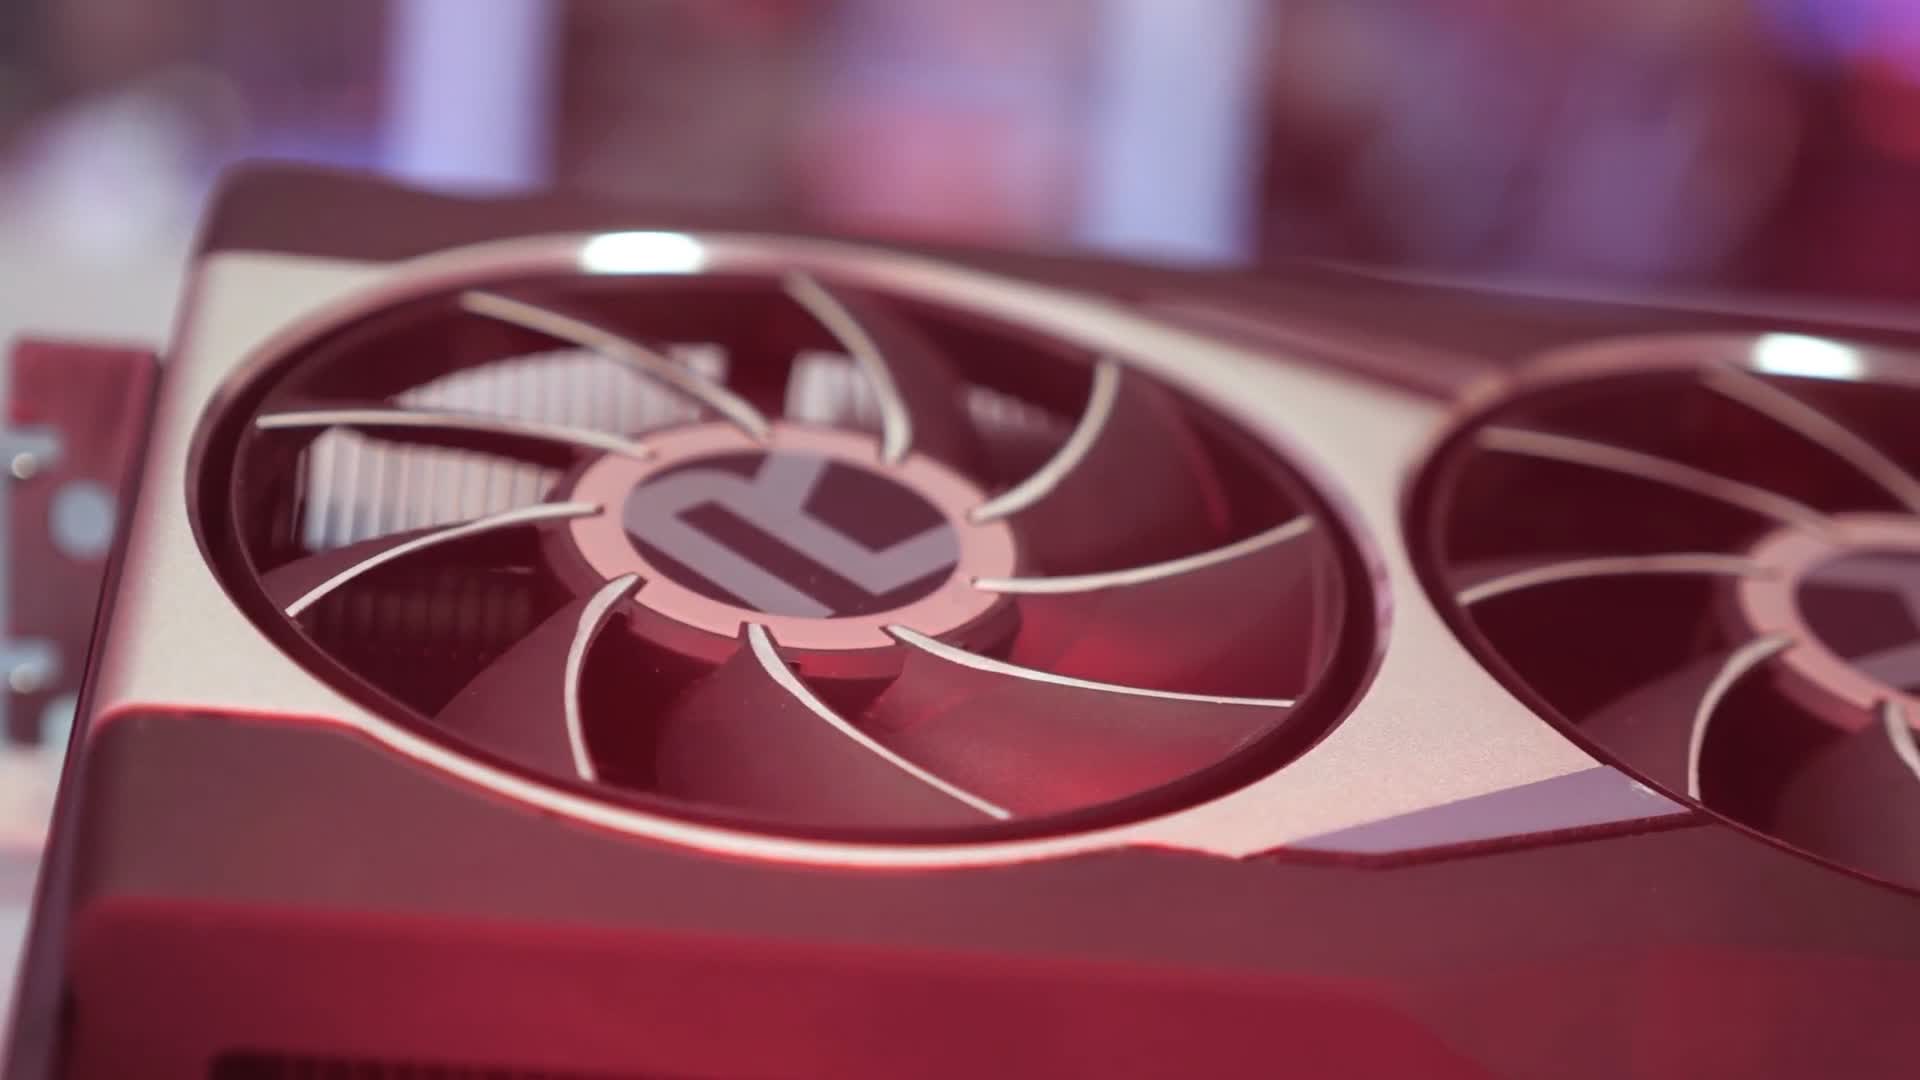
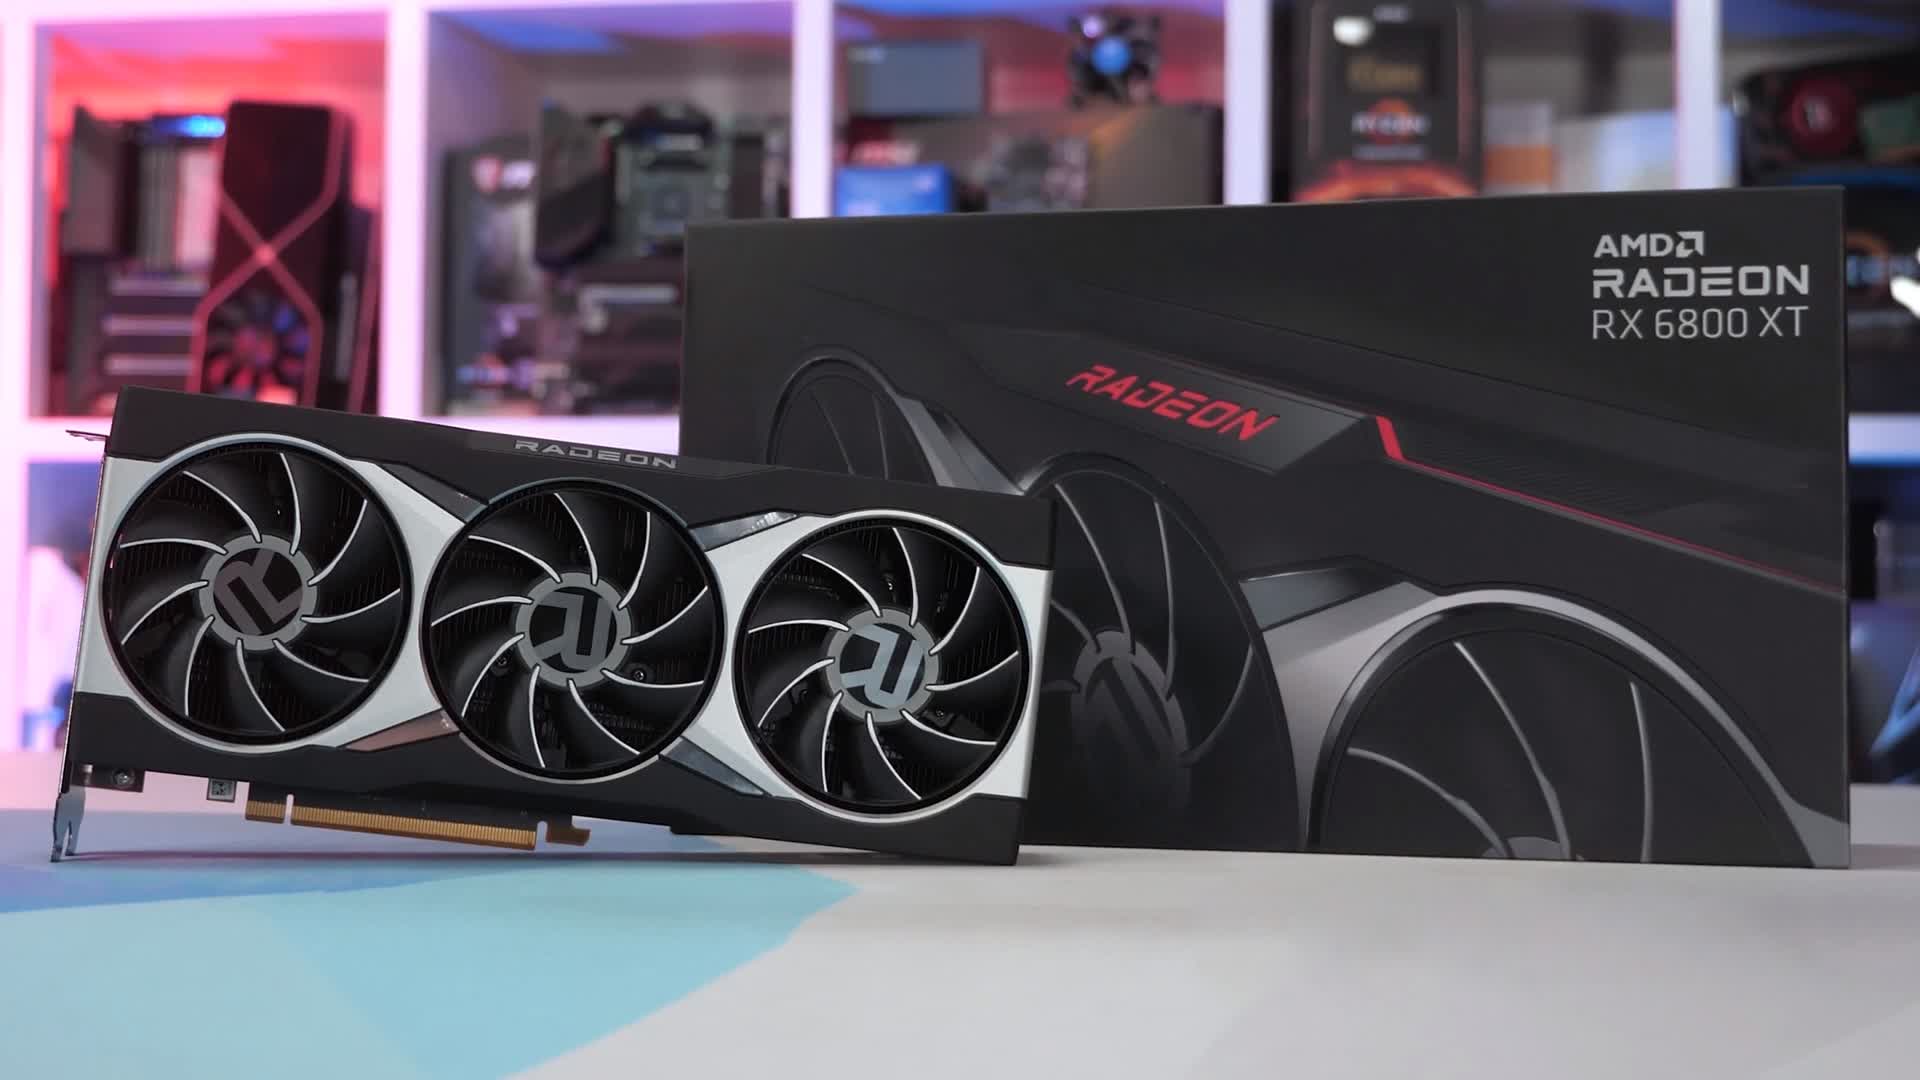
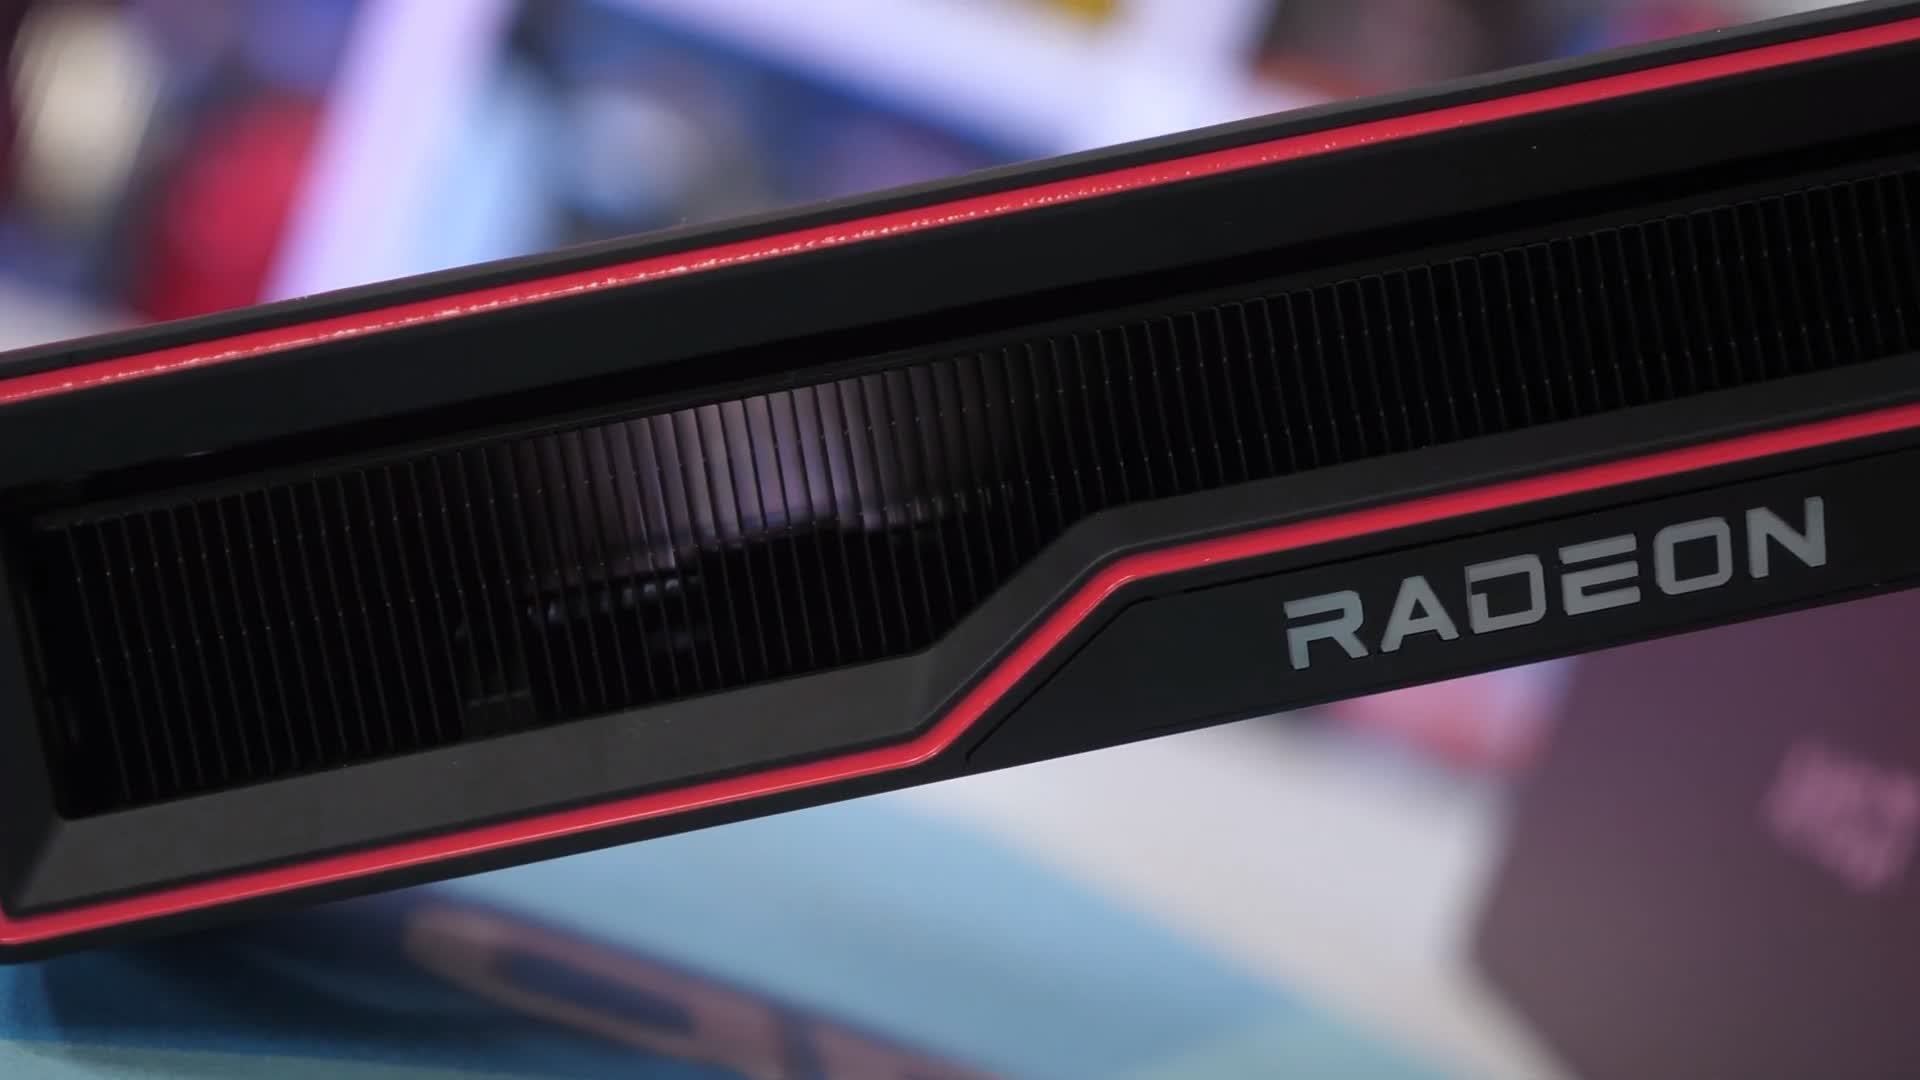
AMD is showing off a new Radeon reference card design which looks significantly better than anything we've seen from the company before. So let’s move to our testing notes and then jump into the blue bar graphs. We're using our Ryzen 9 3950X test system which we plan to update to the 5950X soon. Updating all our benchmark data will take a solid few weeks of testing, but it’s something we plan to work on as soon as possible. With that said, the 3950X has little influence on 1440p performance and doesn't limit the 4K results at all, so for the most part very little would change by moving to the 5950X. BenchmarksA brand new game to test with to get us started. Godfall at 1440p shows very strong performance from the Radeon RX 6800 XT, beating the RTX 3080 by a 14% margin to come in right behind the RTX 3090. When compared to the 5700 XT we see a 92% increase in frame rate from 52 fps to 100 fps, which is an immense jump. Of course, the 6800 XT is a more expensive GPU, but the 5700 XT was considered AMD's flagship gaming GPU from the previous generation.
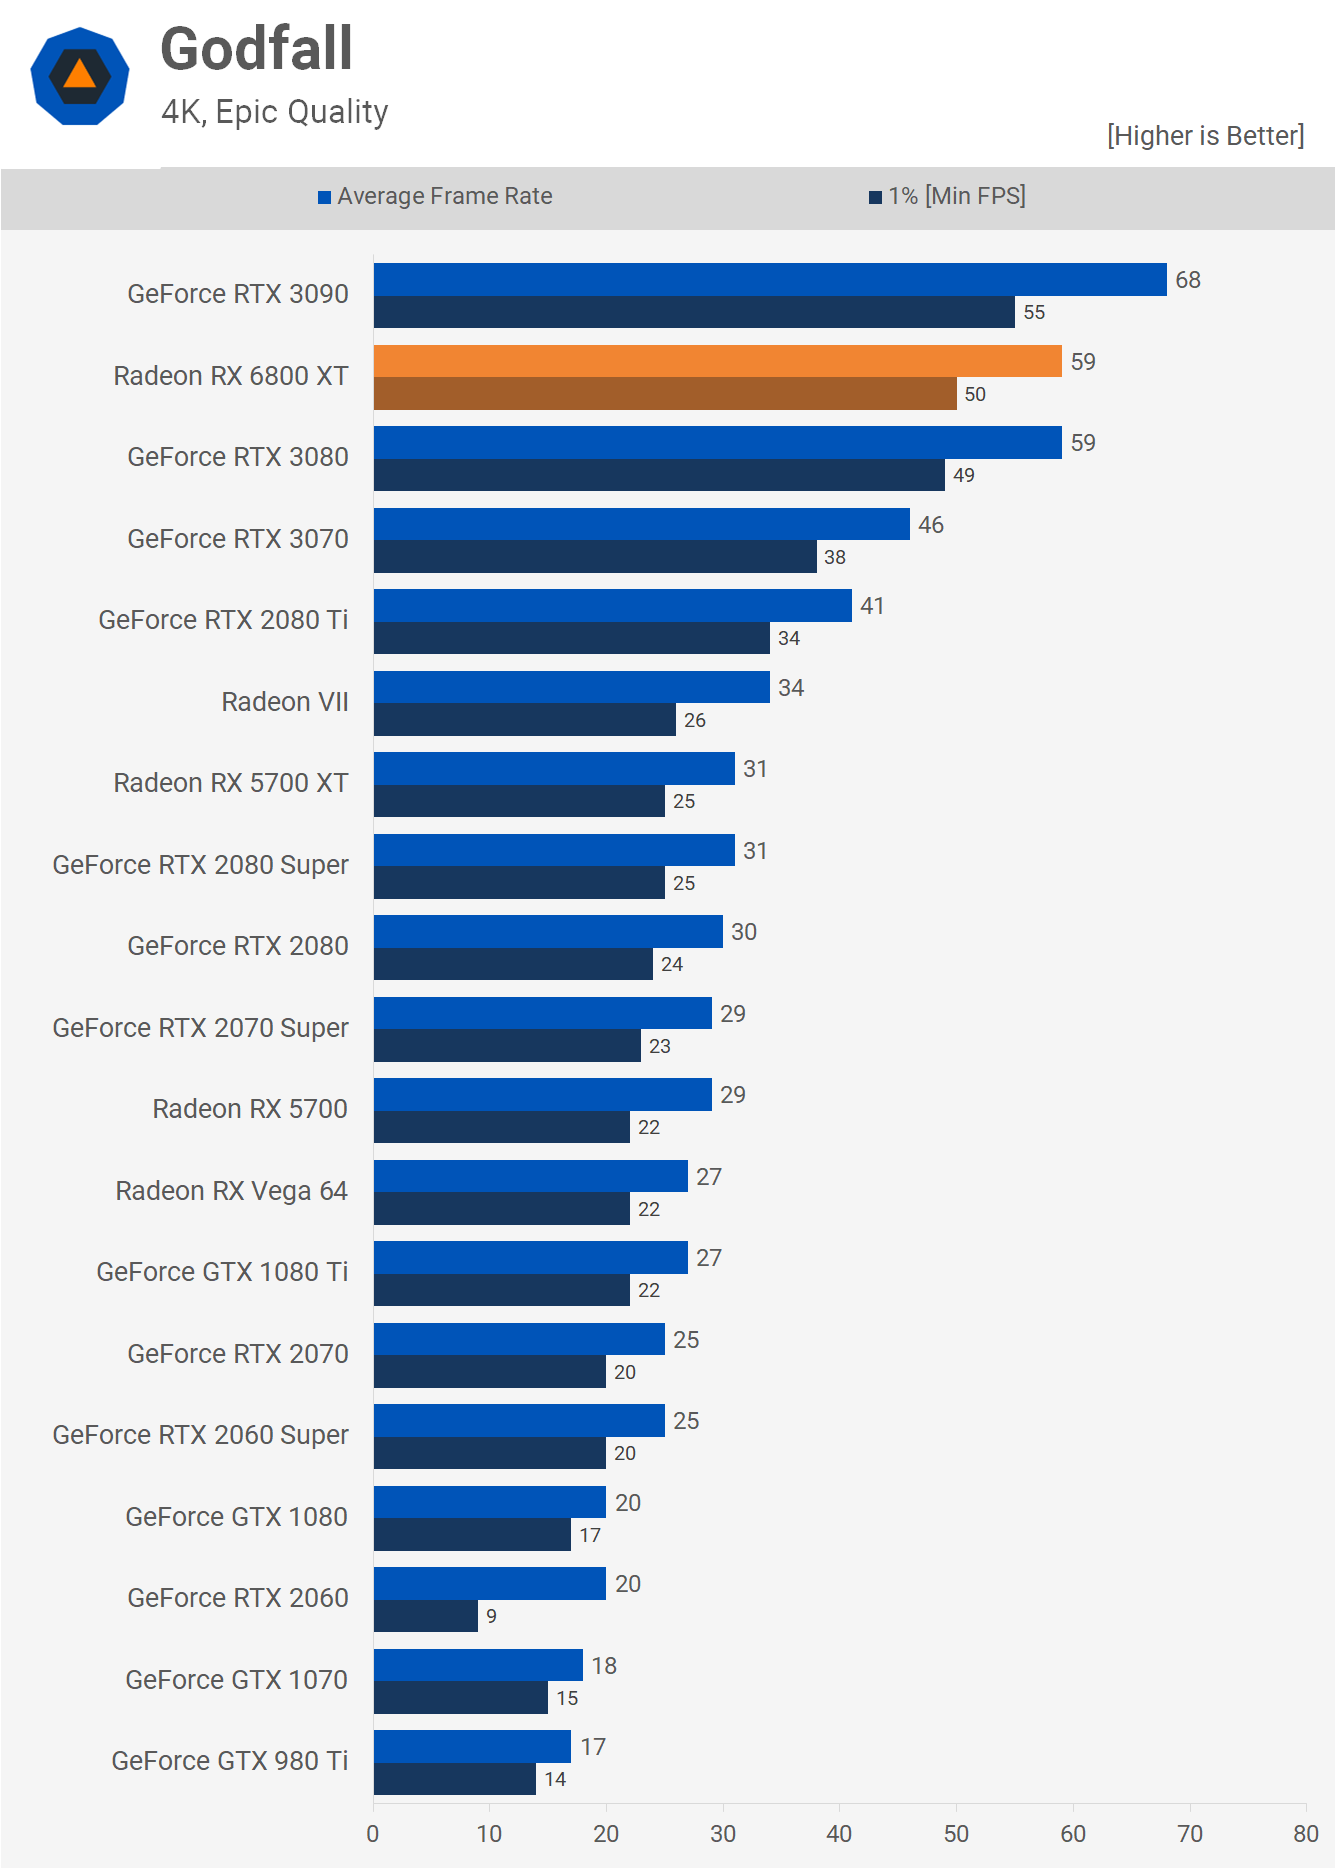
Jumping to 4K sees the 6800 XT lose some ground to the 3090, though it managed to match the RTX 3080. We're also looking at 60 fps performance at 4K in this visually impressive title.
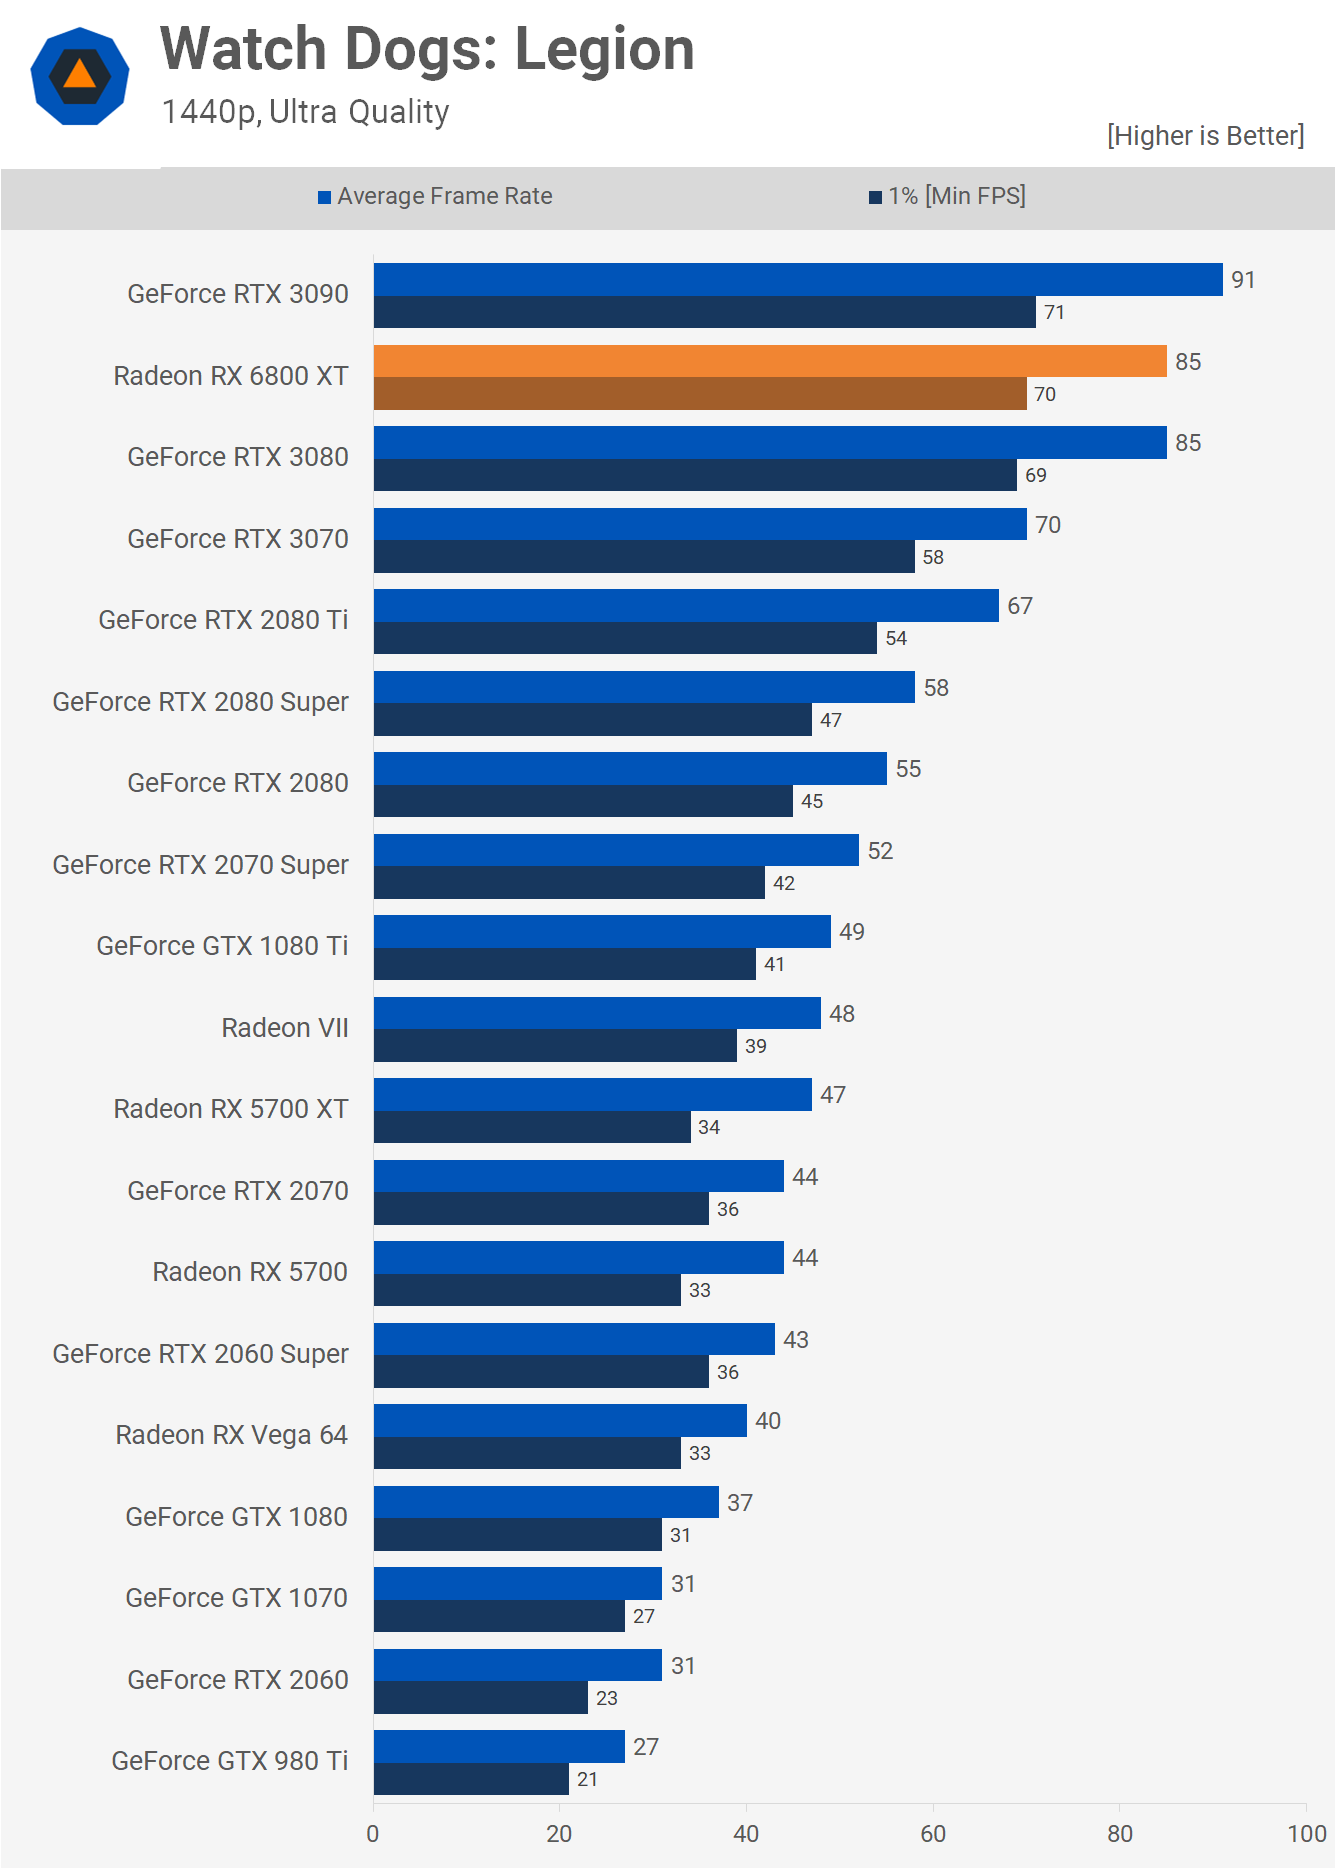
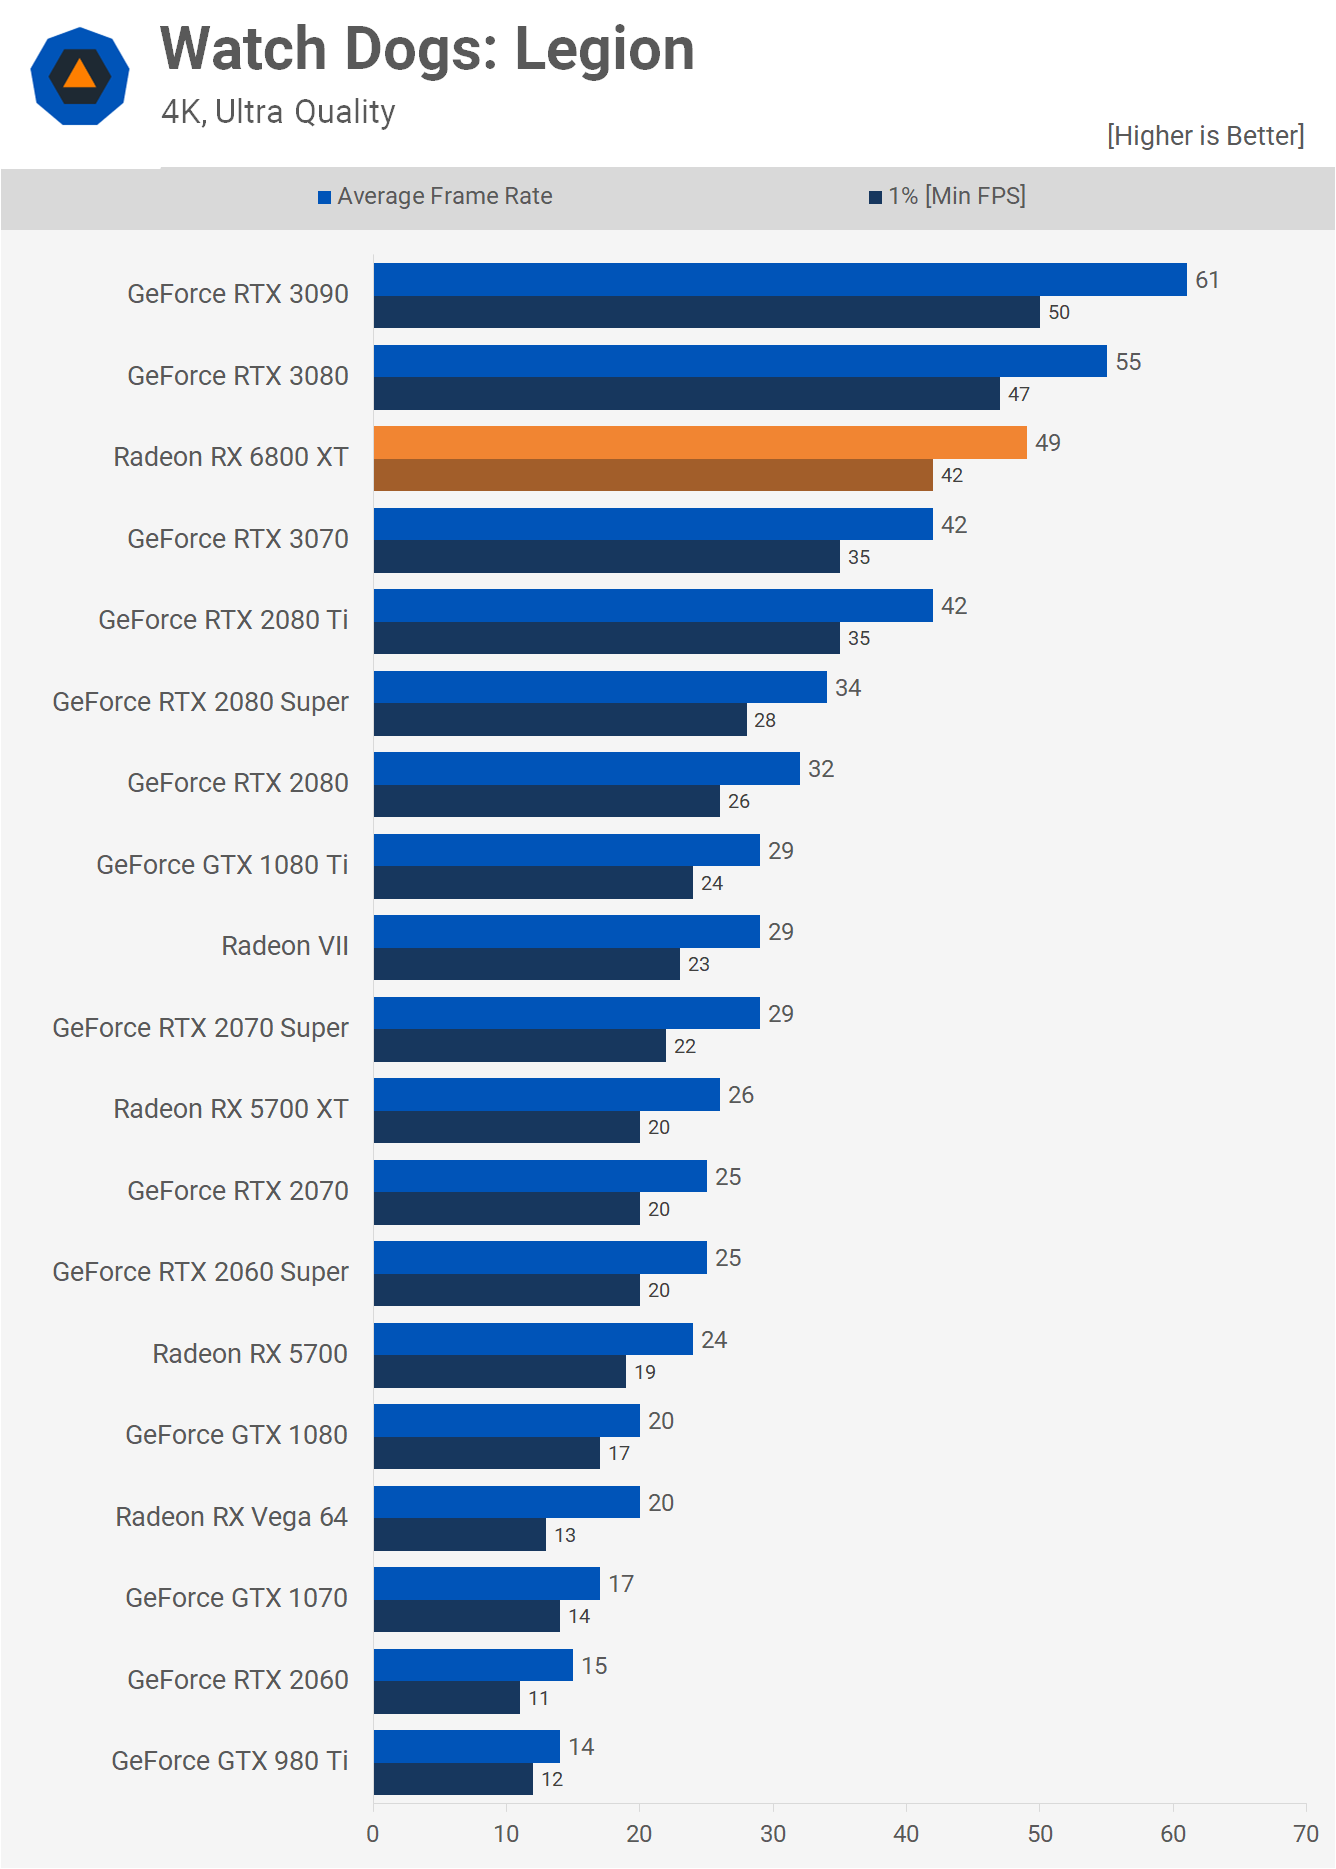
Whereas Godfall is an AMD sponsored title, Watch Dogs Legion is the opposite and sponsored by Nvidia, but even so the Radeon RX 6800 XT still impresses at 1440p, matching the RTX 3080 with 85 fps on average using the highest visual quality settings the game has to offer. At 4K we’re seeing performance slip a little, or rather the 3080 scales better at higher resolutions. The 6800 XT for example scales as expected and in line with the 2080 Ti, to cite one example. The end result is an 11% loss to the 3080 at 4K, placing the 6800 XT between the 3080 and 3070.
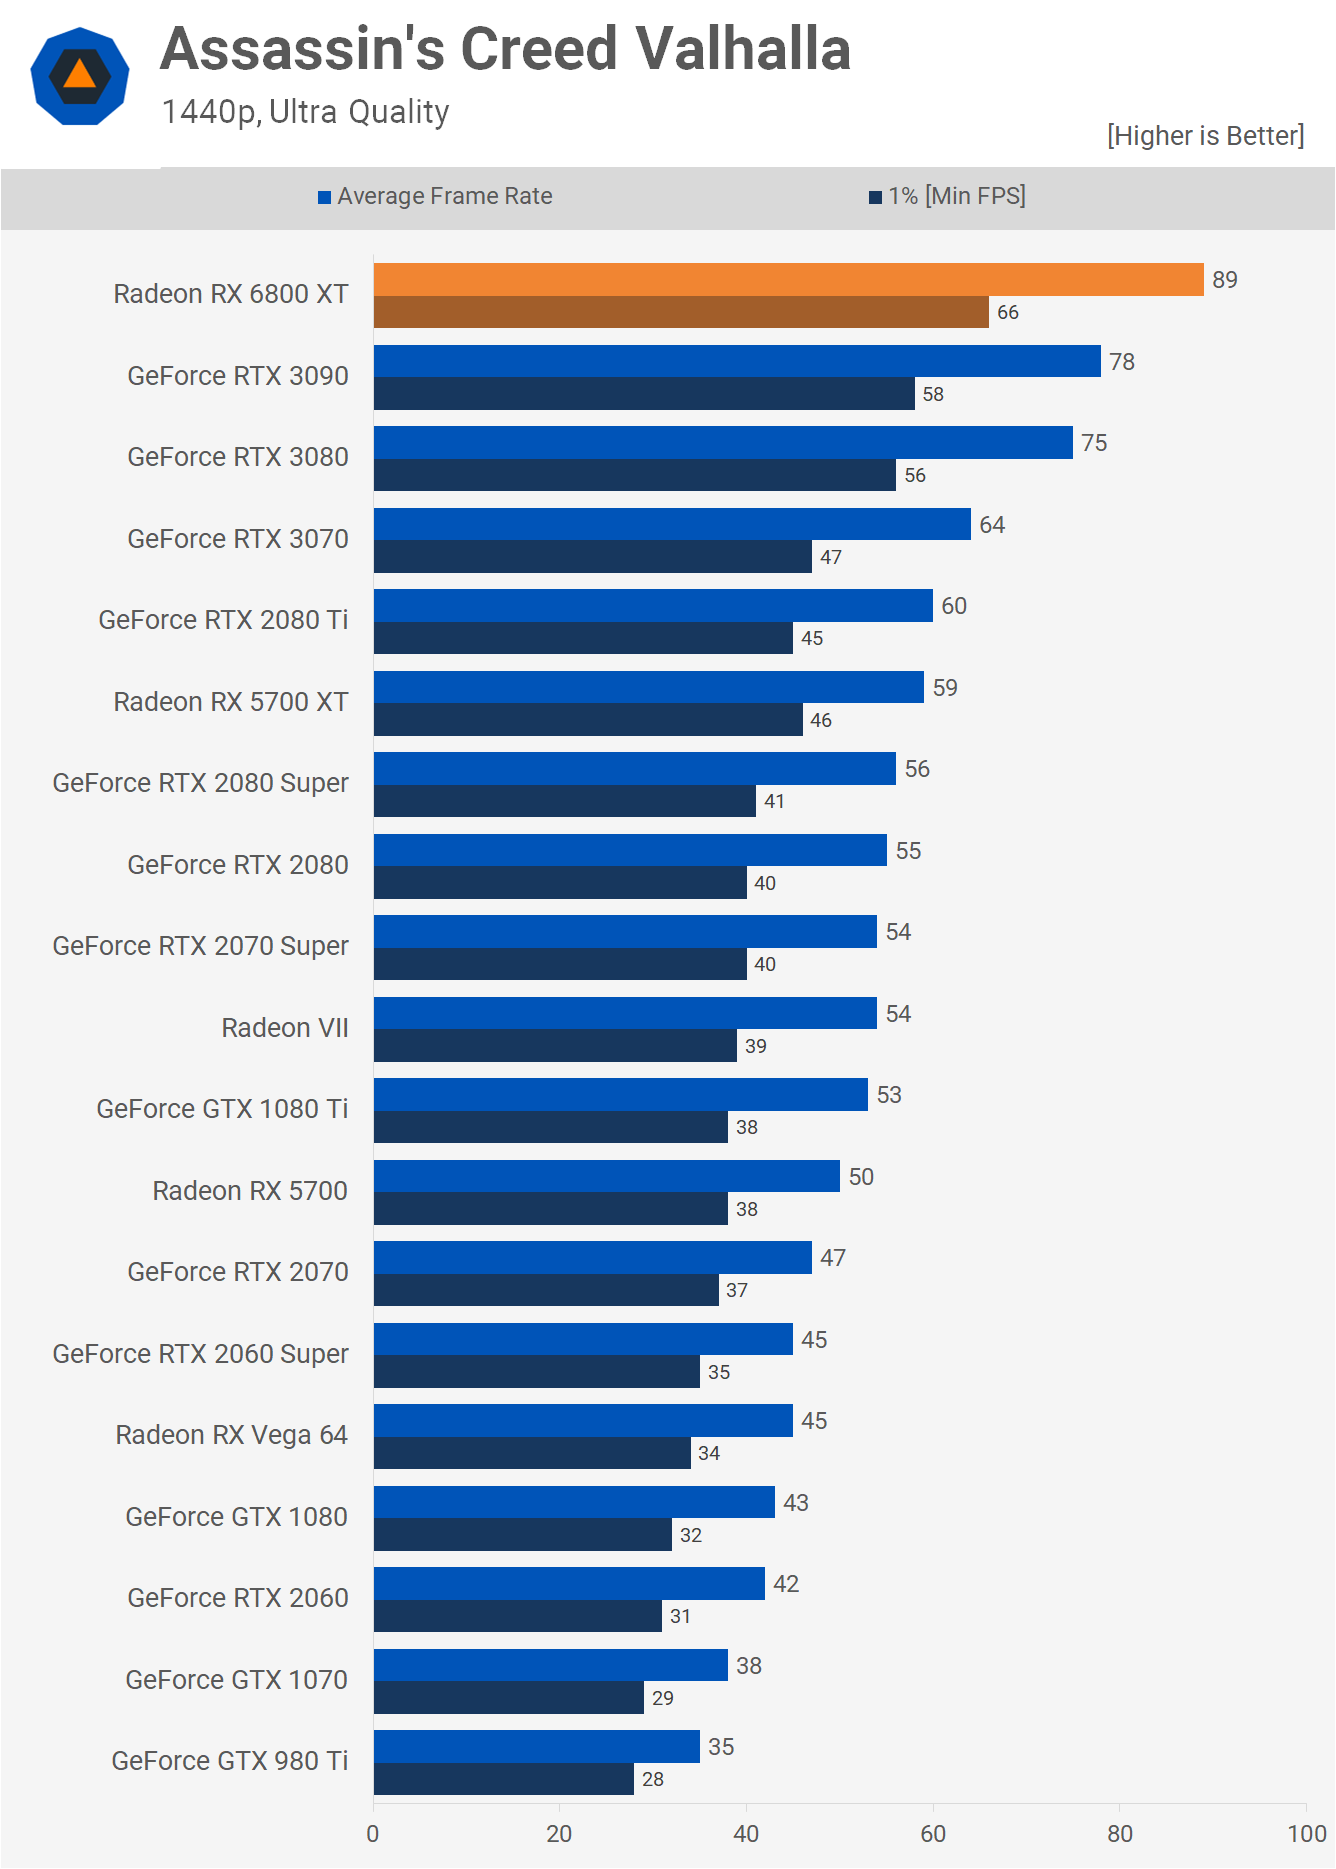
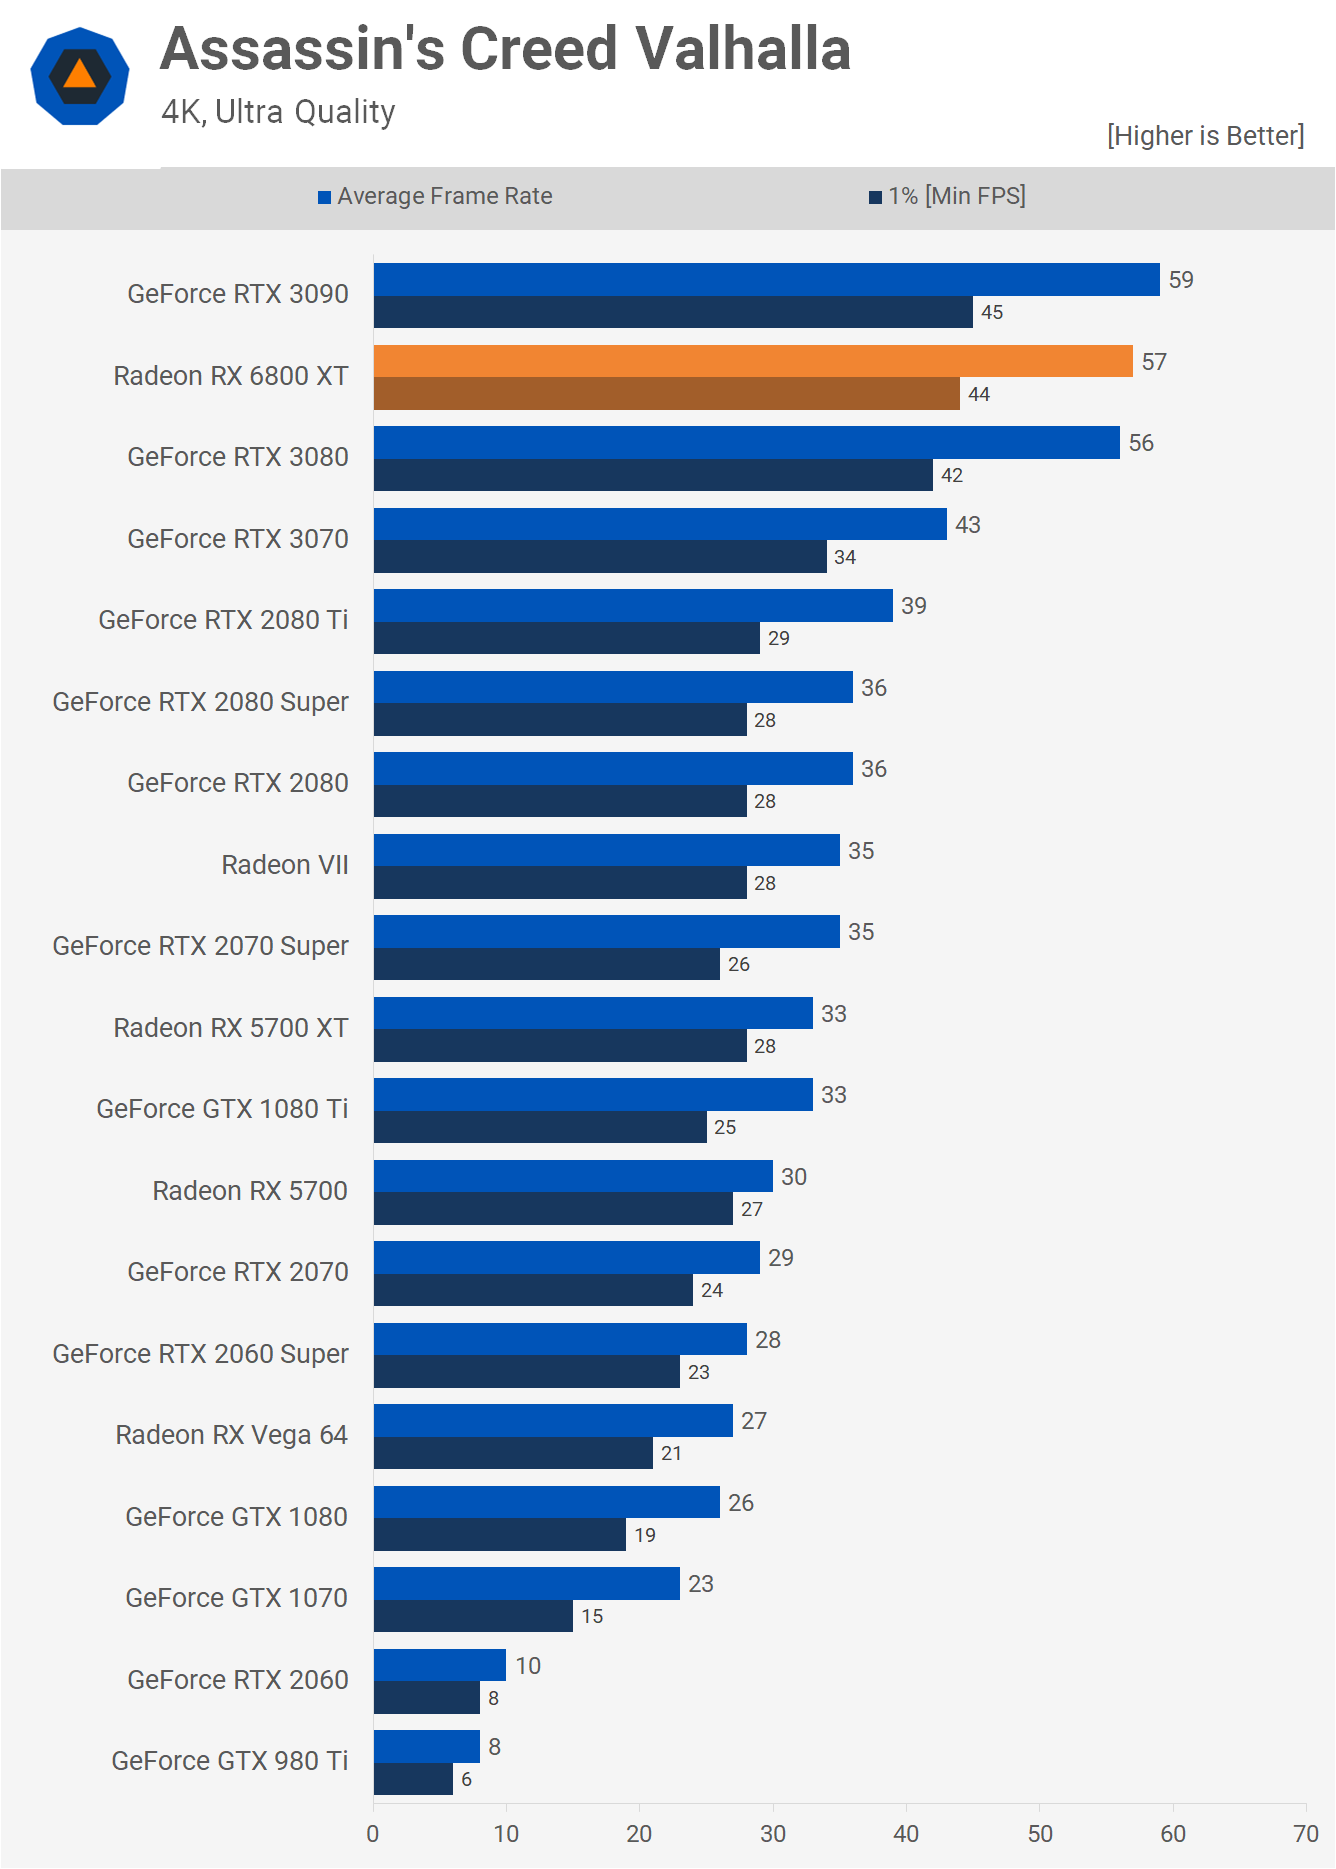
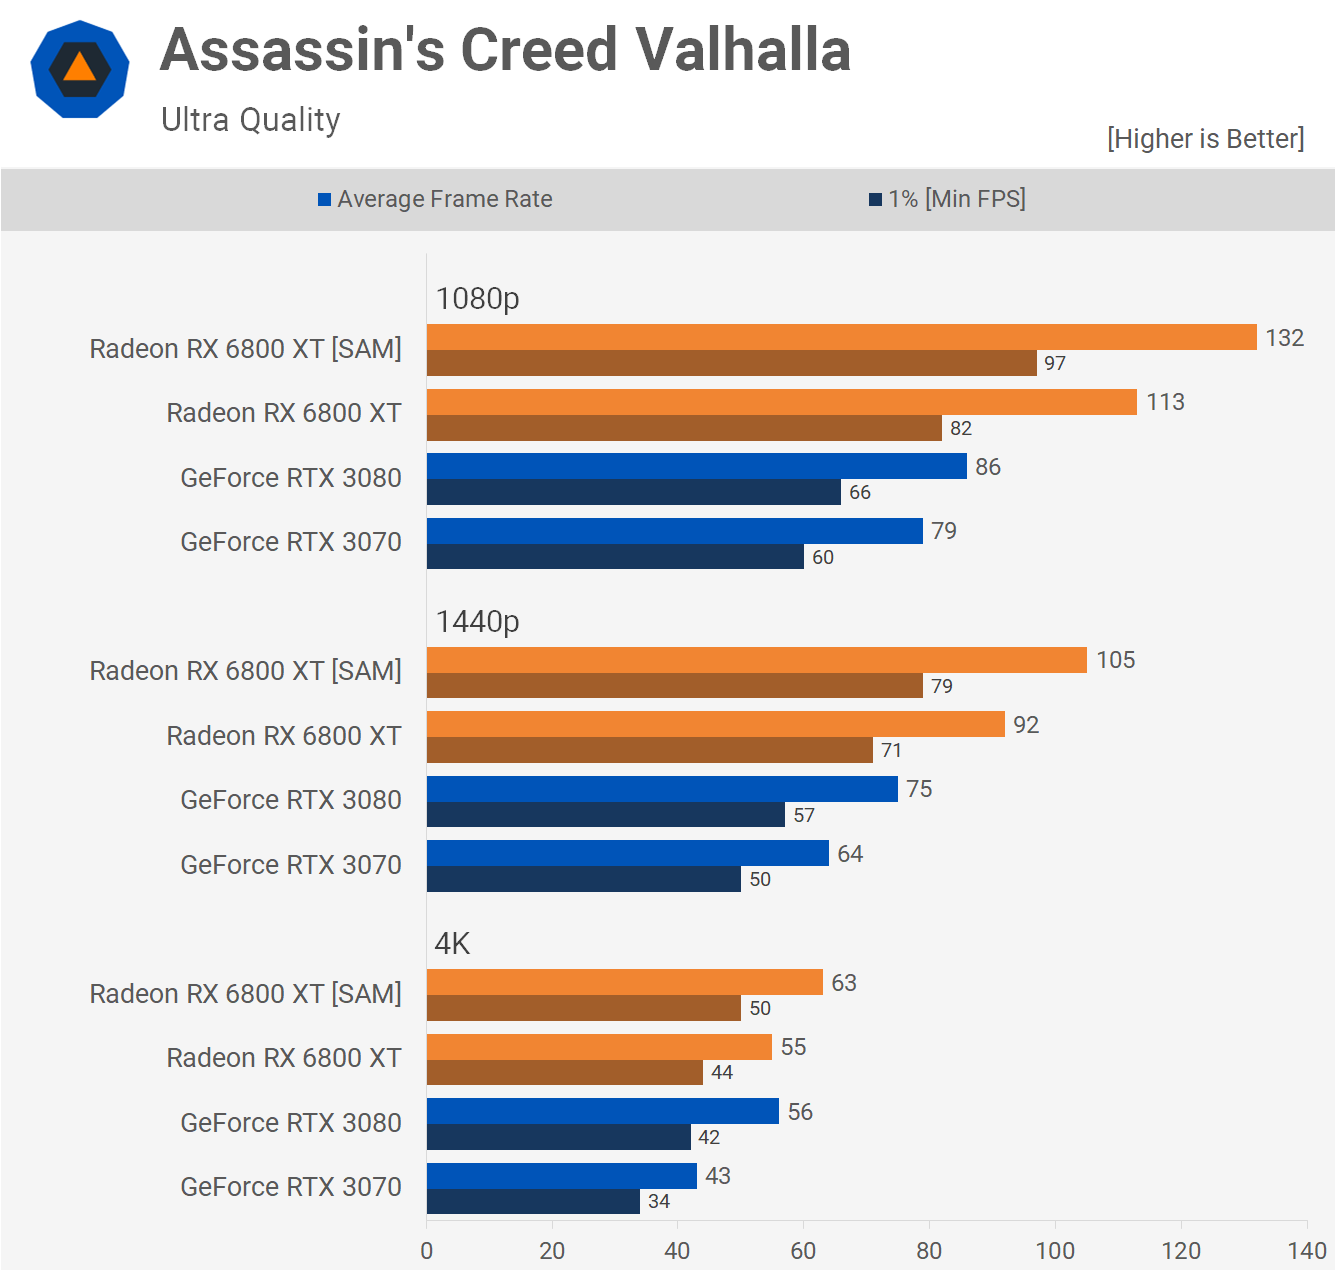
The Radeon RX 6800 XT performs exceptionally well in Assassin’s Creed Valhalla, beating even the RTX 3090 by a convincing 14% margin at 1440p. It's possible Nvidia will be able to improve performance in this title with future driver updates, but for now AMD enjoys a serious performance advantage. The Ampere GPUs are able to catch up at 4K and now the 6800 XT finds itself situated between the RTX 3080 and 3090, which is still an impressive result, just less so than what was seen at 1440p.
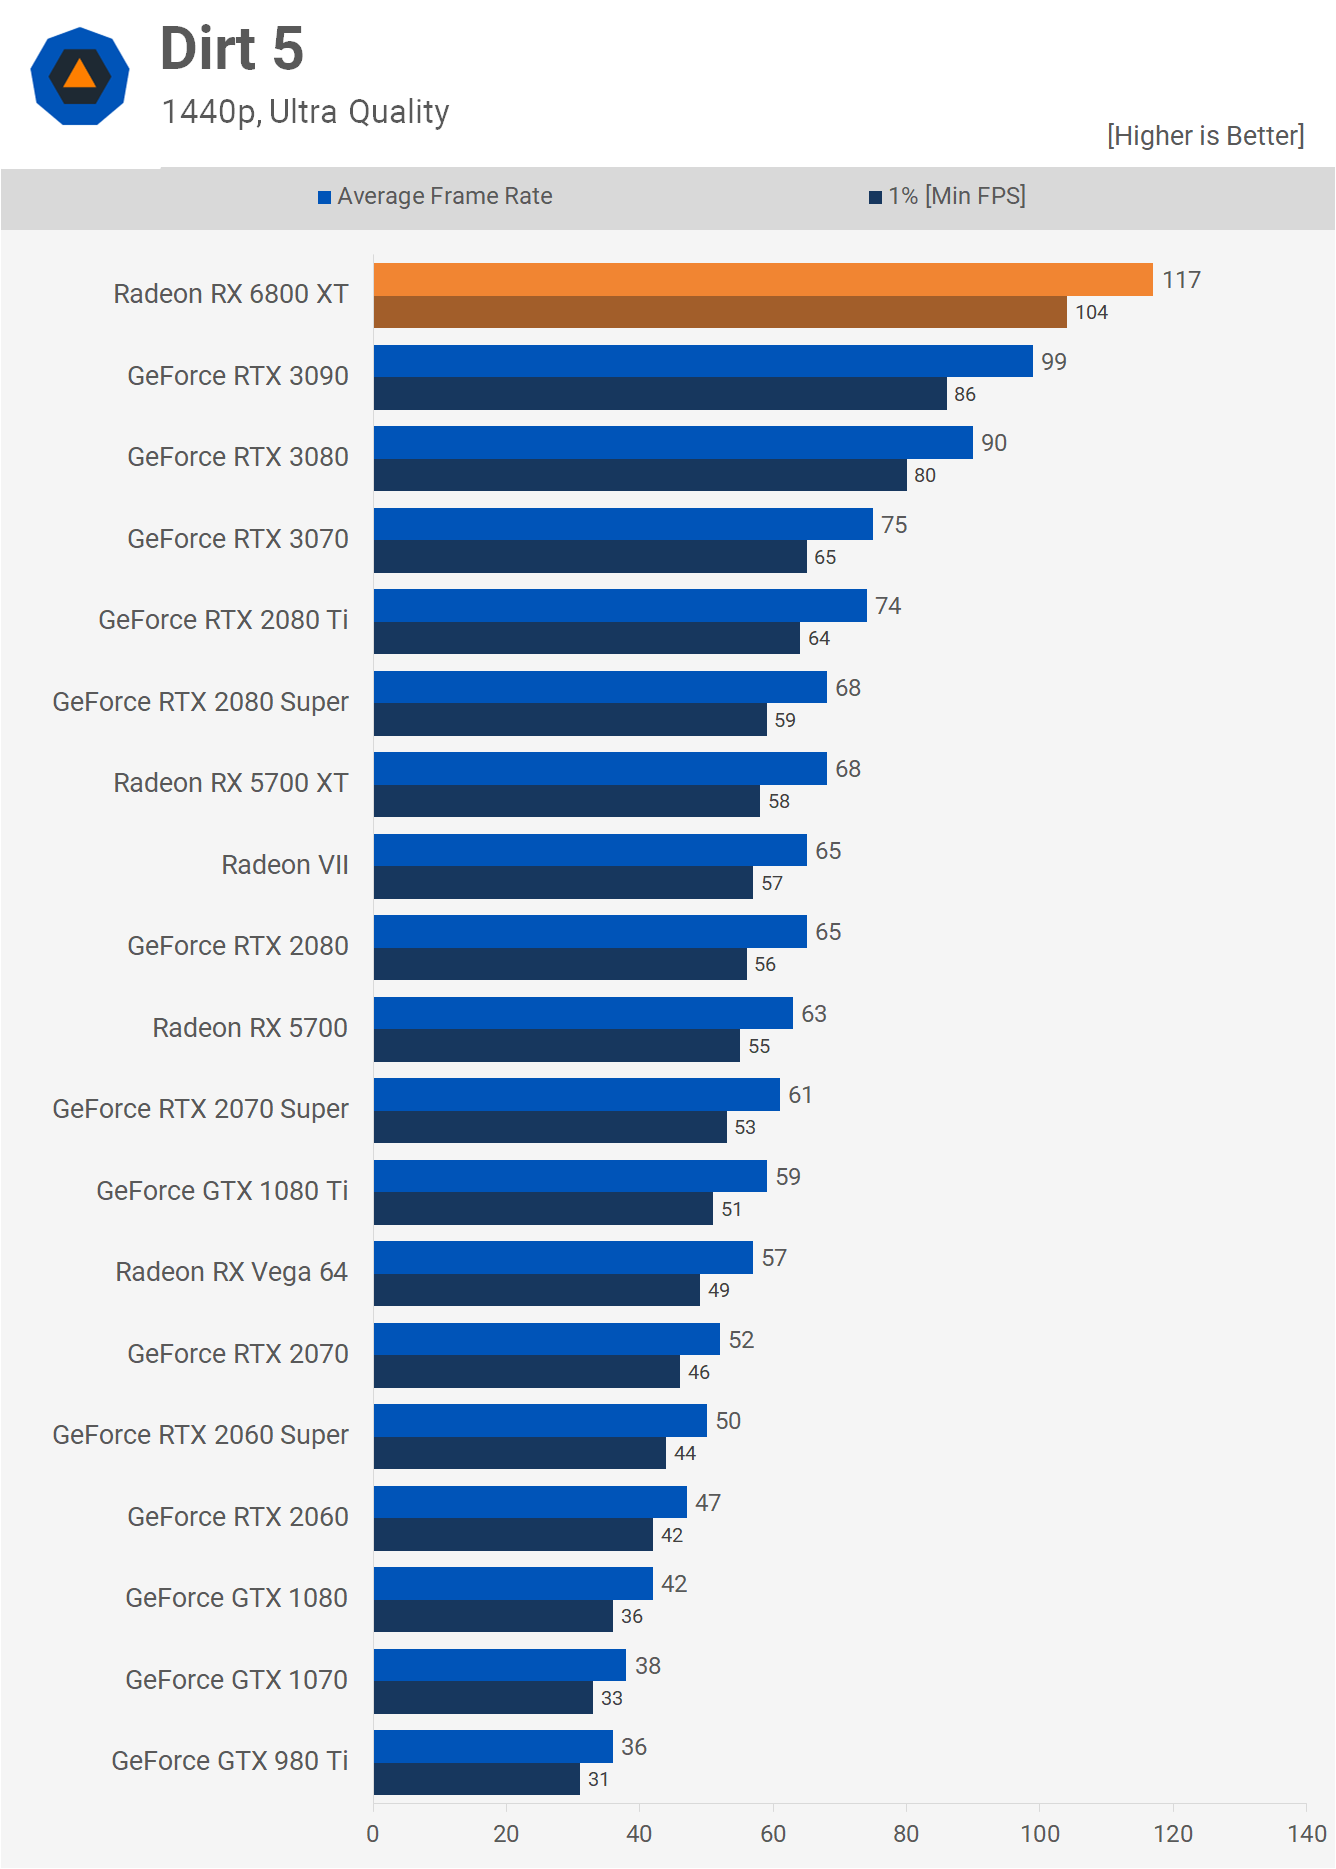
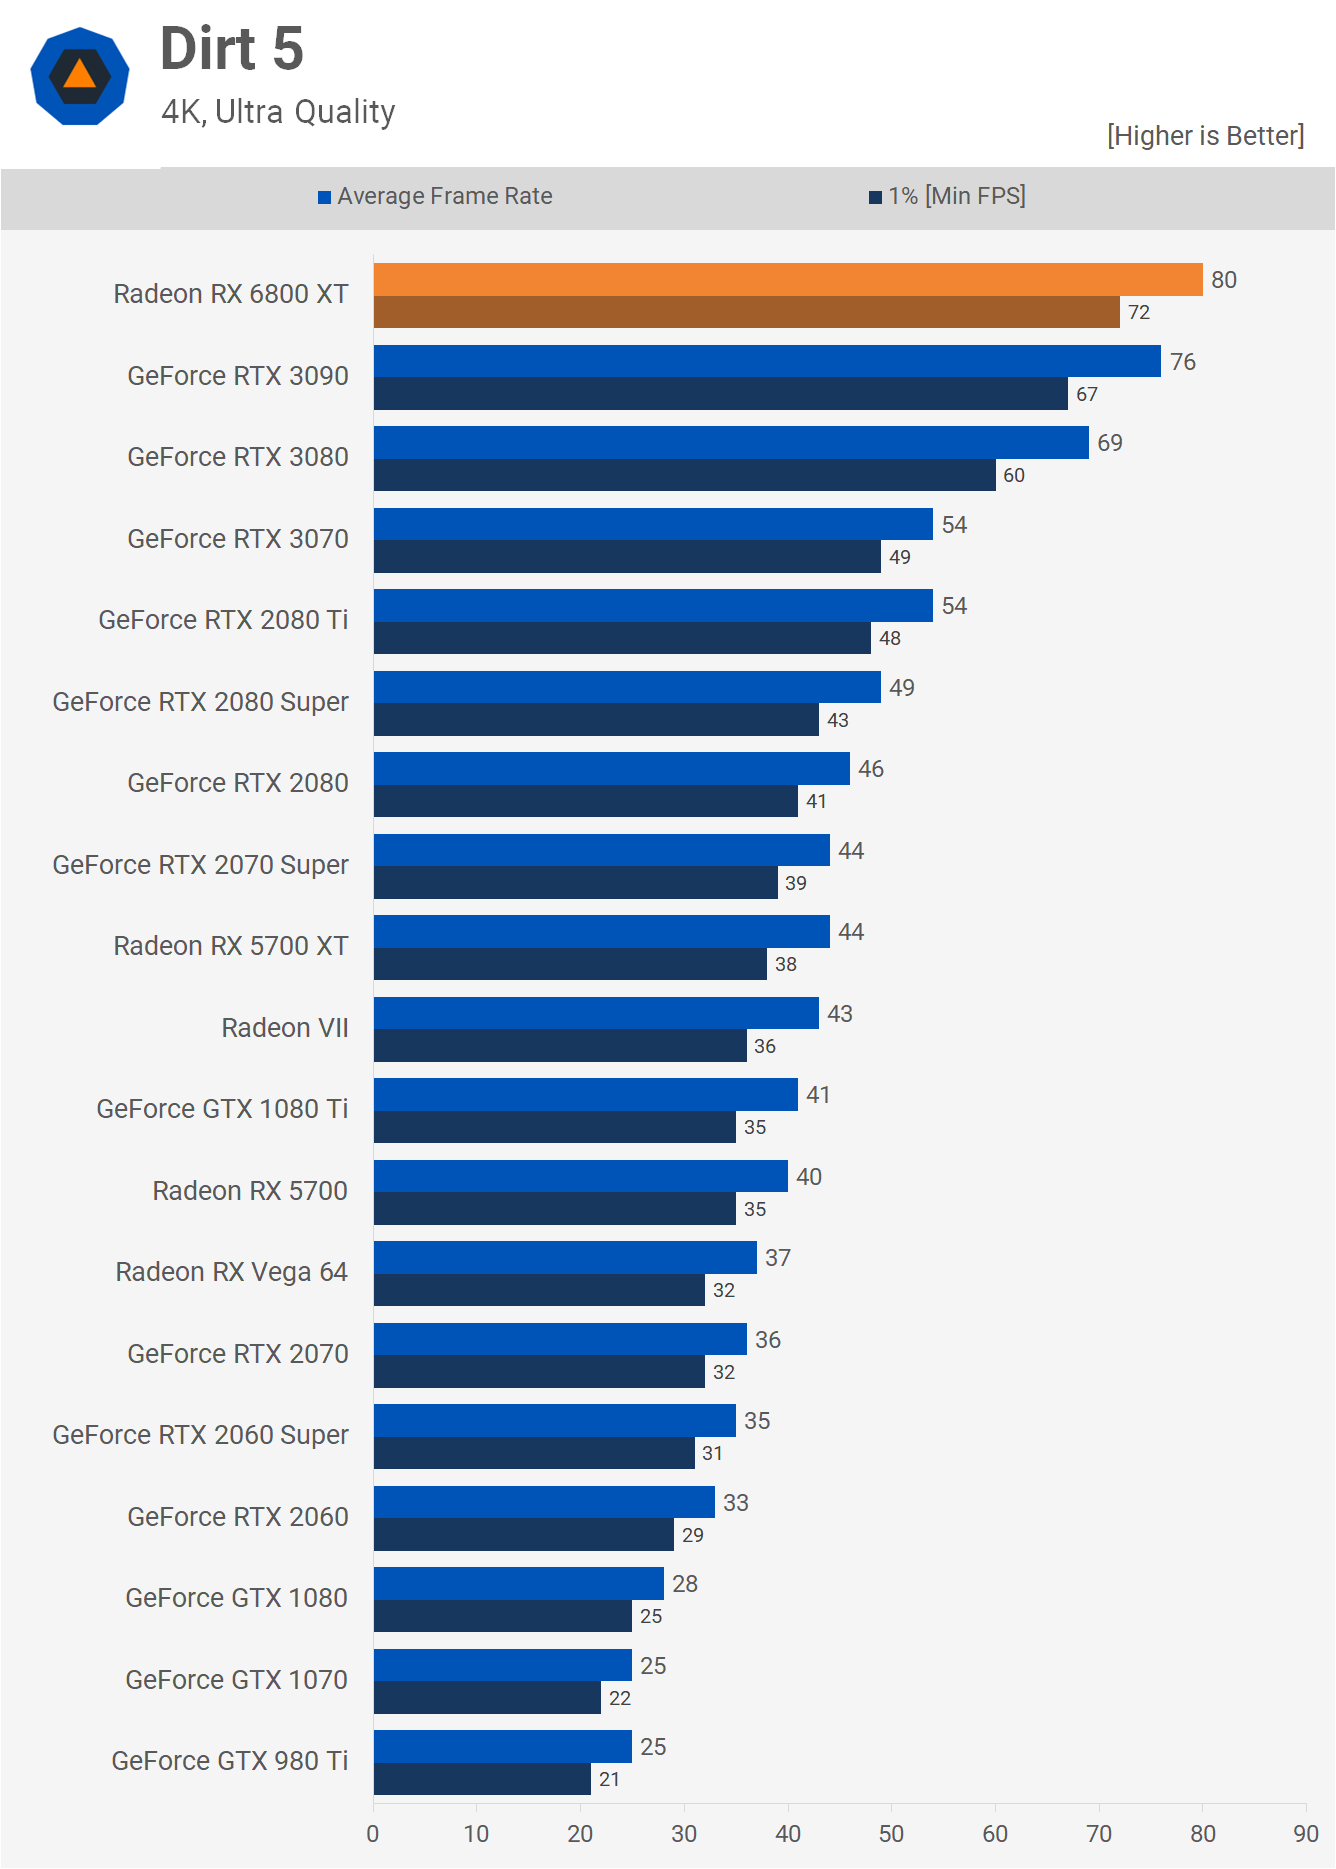
Dirt 5 is another new AMD sponsored title and here the Radeon GPUs clean up. The 6800 XT was 18% faster than the 3090 and 30% faster than the 3080. That's a staggering difference and we expect at some point Nvidia will be able to make up some of the difference with driver optimizations. It remains to be seen how long that will take though considering it took them quite a while before they addressed the lower than expected performance in Forza Horizon 4. At 4K the Ampere GPUs kick into gear and manage to gain ground on the 6800 XT. The RDNA2 GPU was still 5% faster than the 3090 and 16% faster than the 3080.
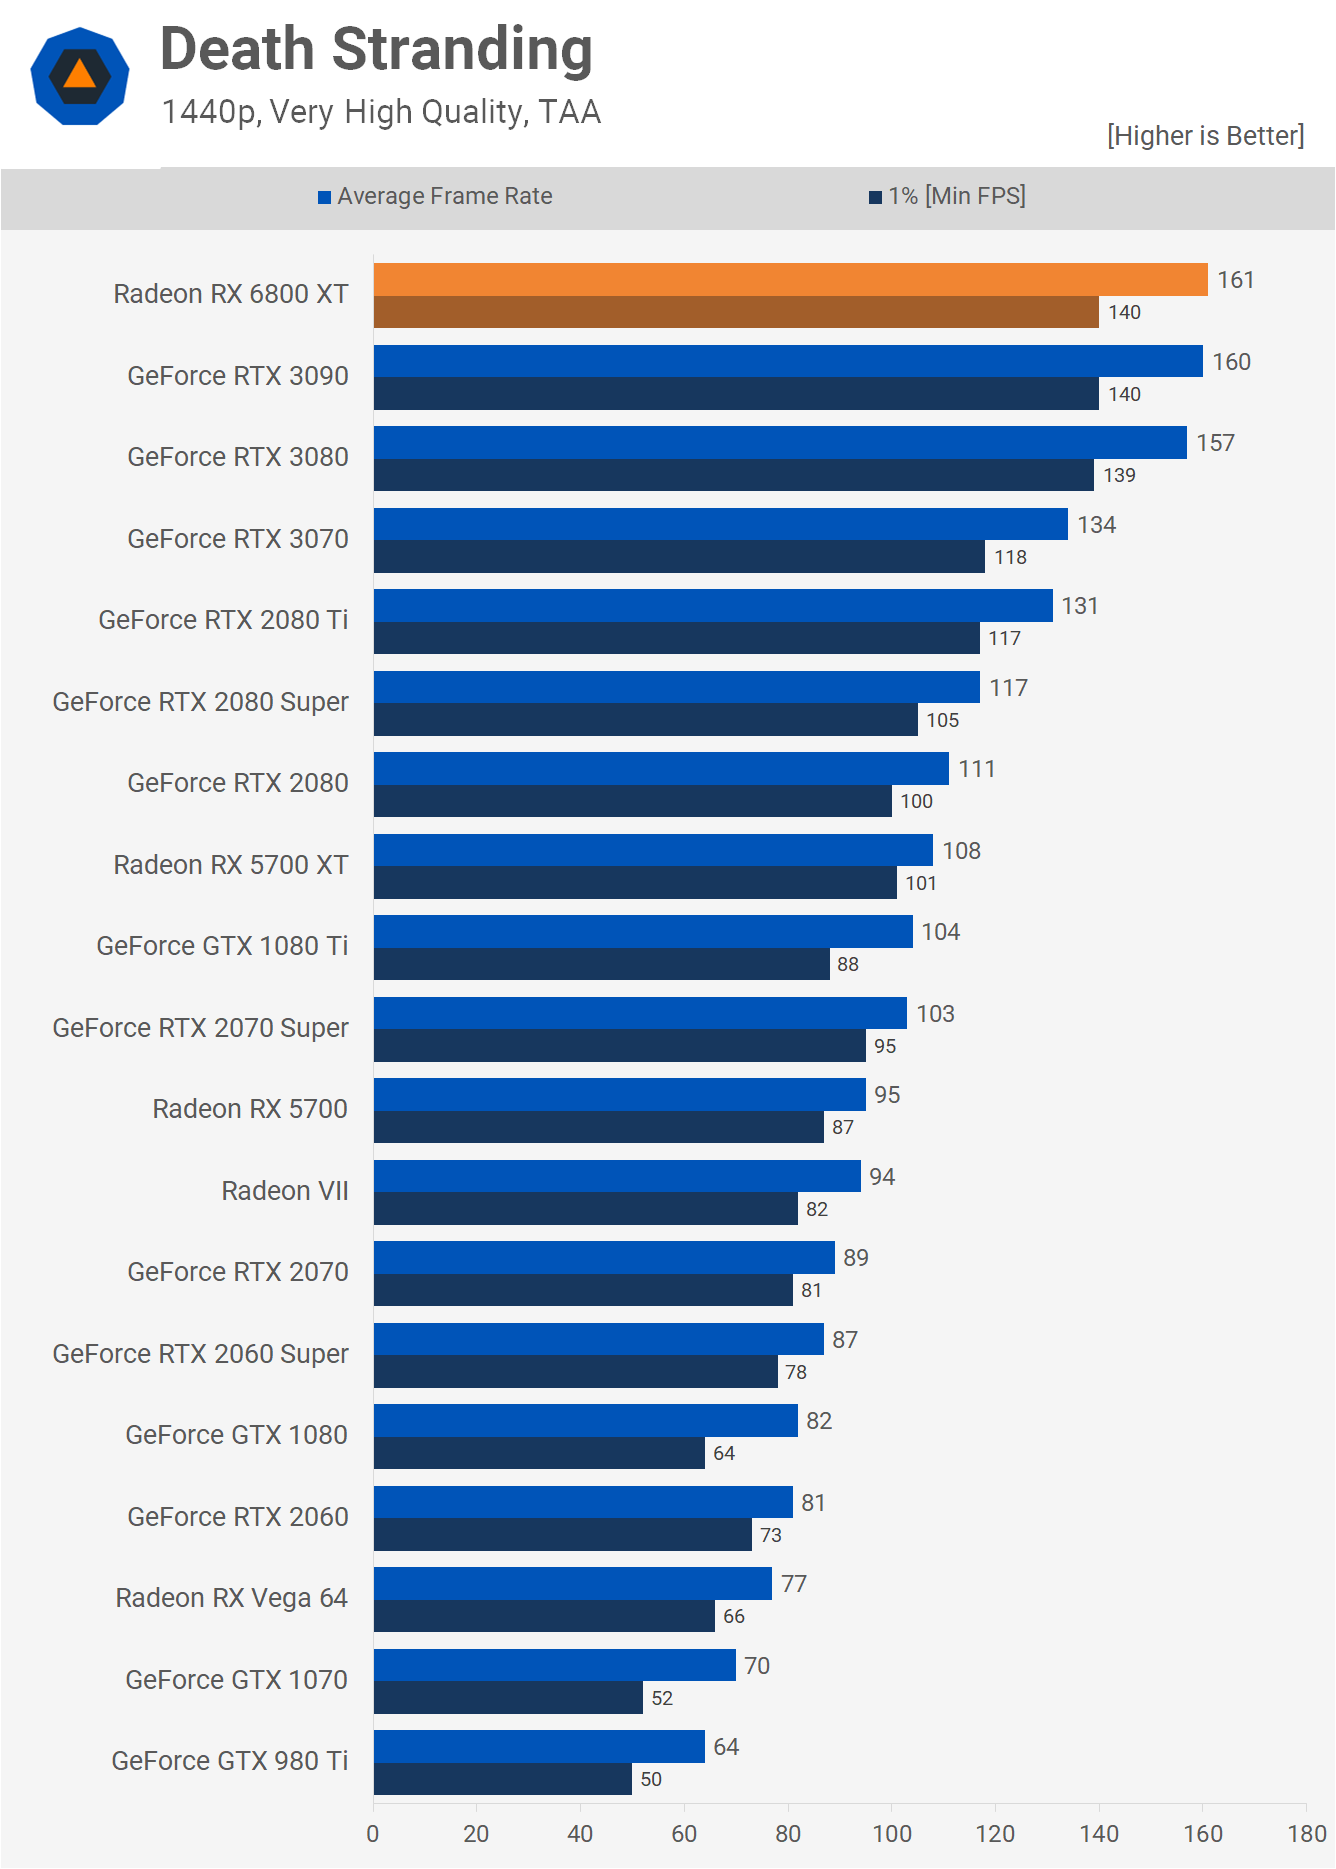
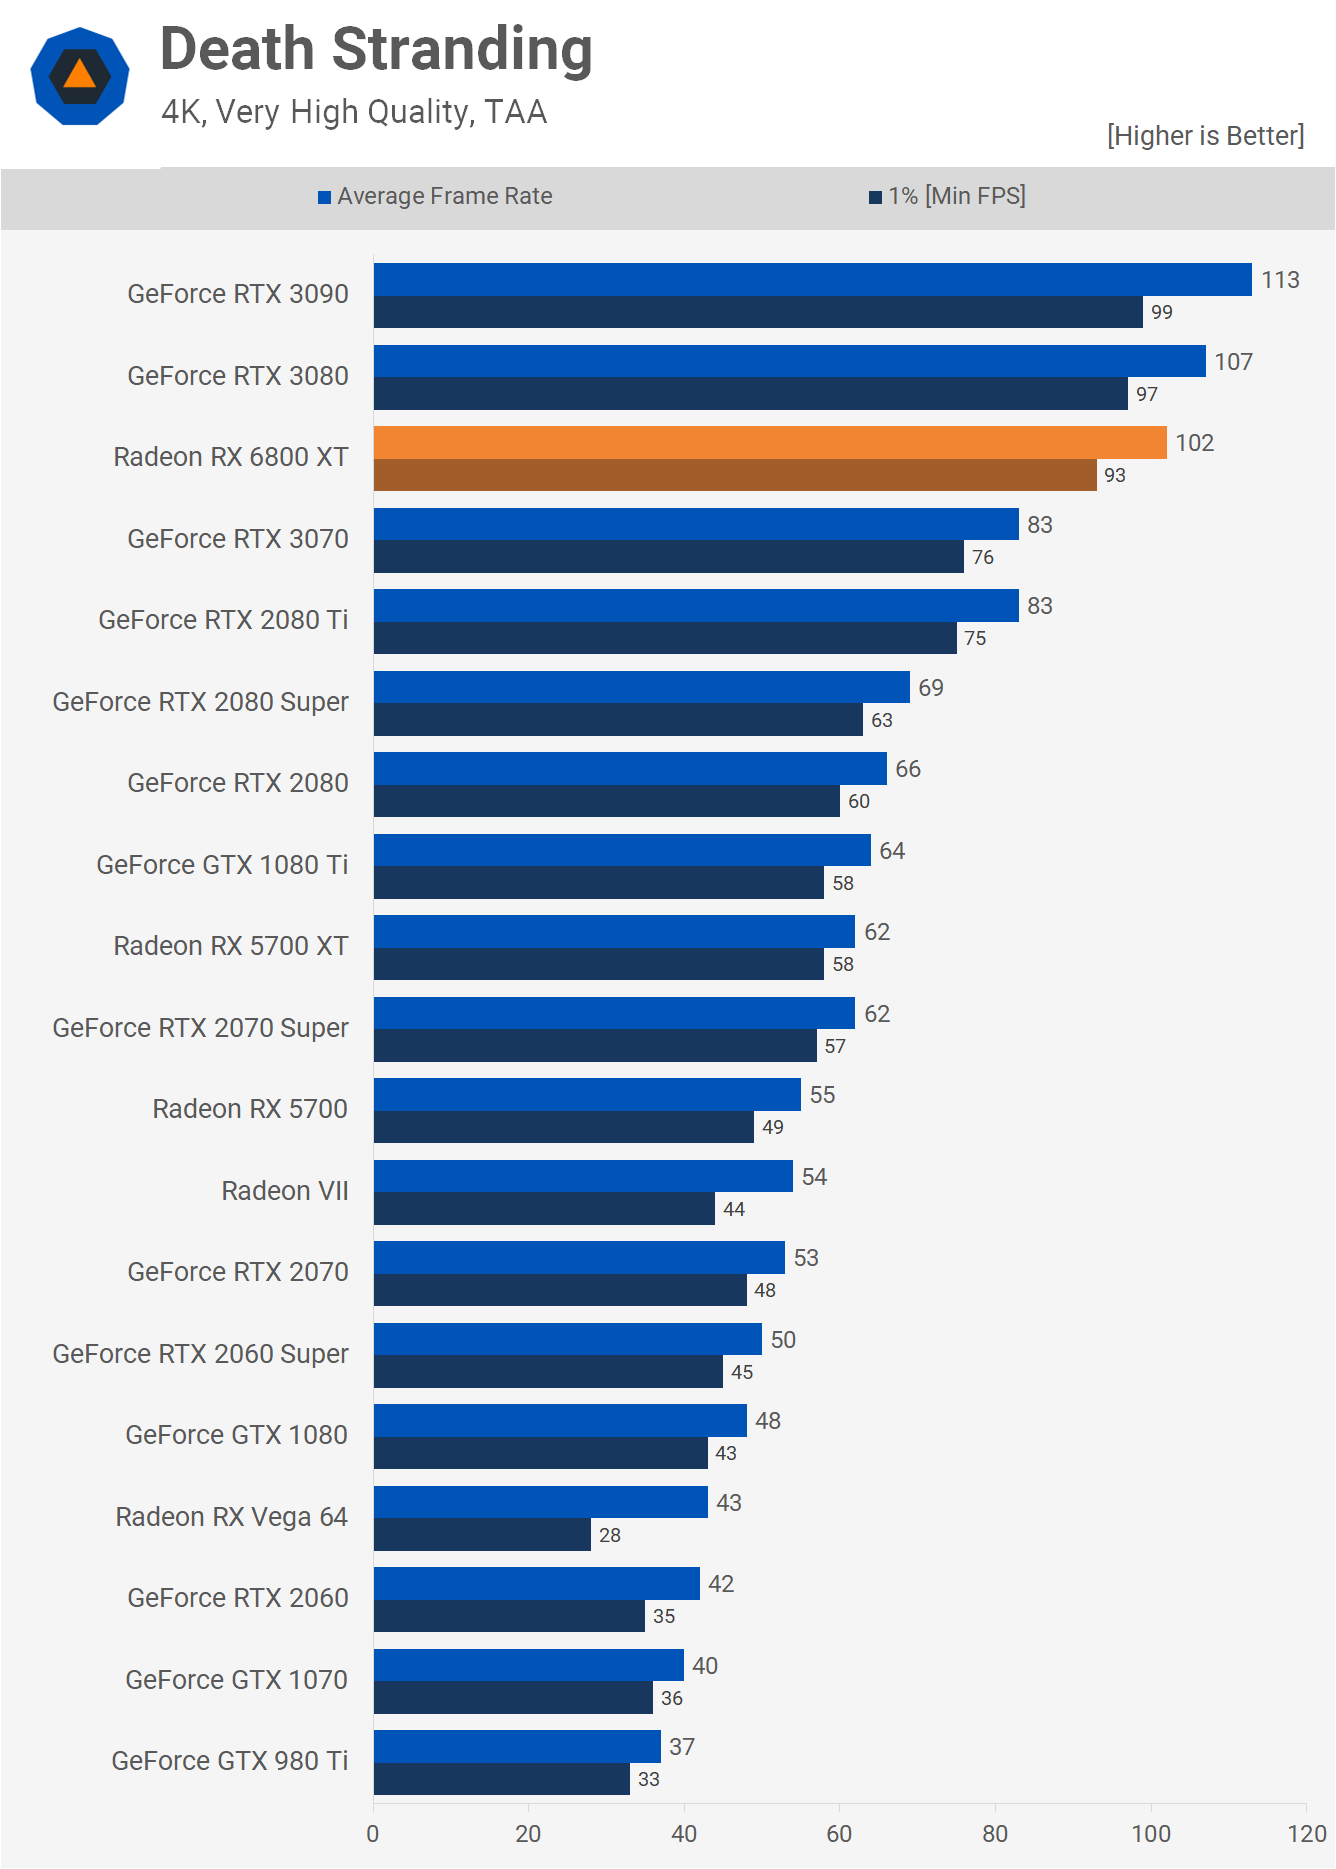
Next up we have Death Stranding and we're seeing impressive results out of the 6800 XT at 1440p again. Here it's able to match the 3090, nudging it ever so slightly ahead of the 3080. Even at 4K, the performance is very good and although the 6800 XT slips behind the RTX 3080, we're looking at a 5% deficit and over 100 fps on average. We doubt anyone is going to complain with that kind of performance at 4K.
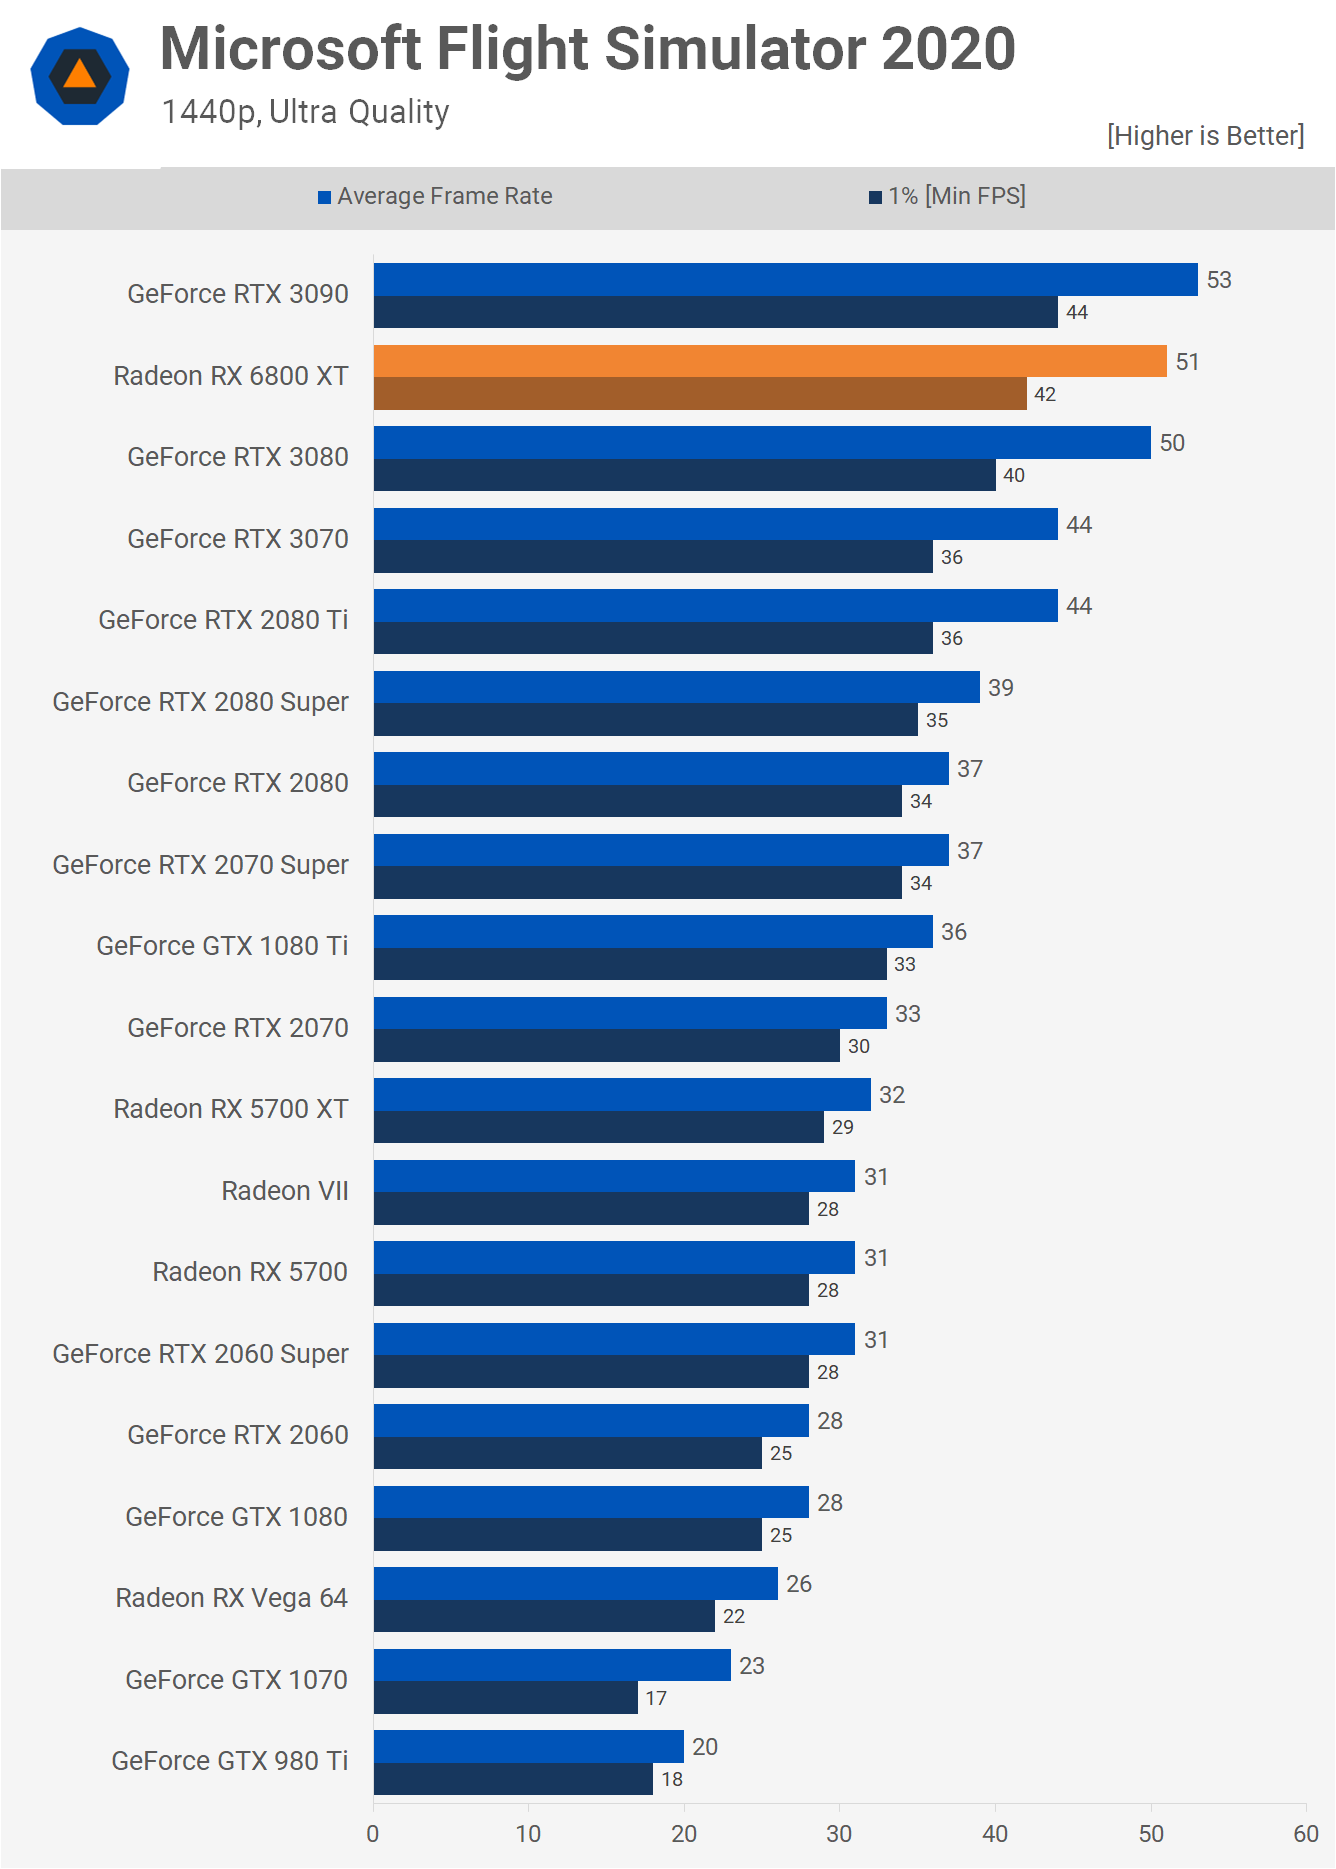
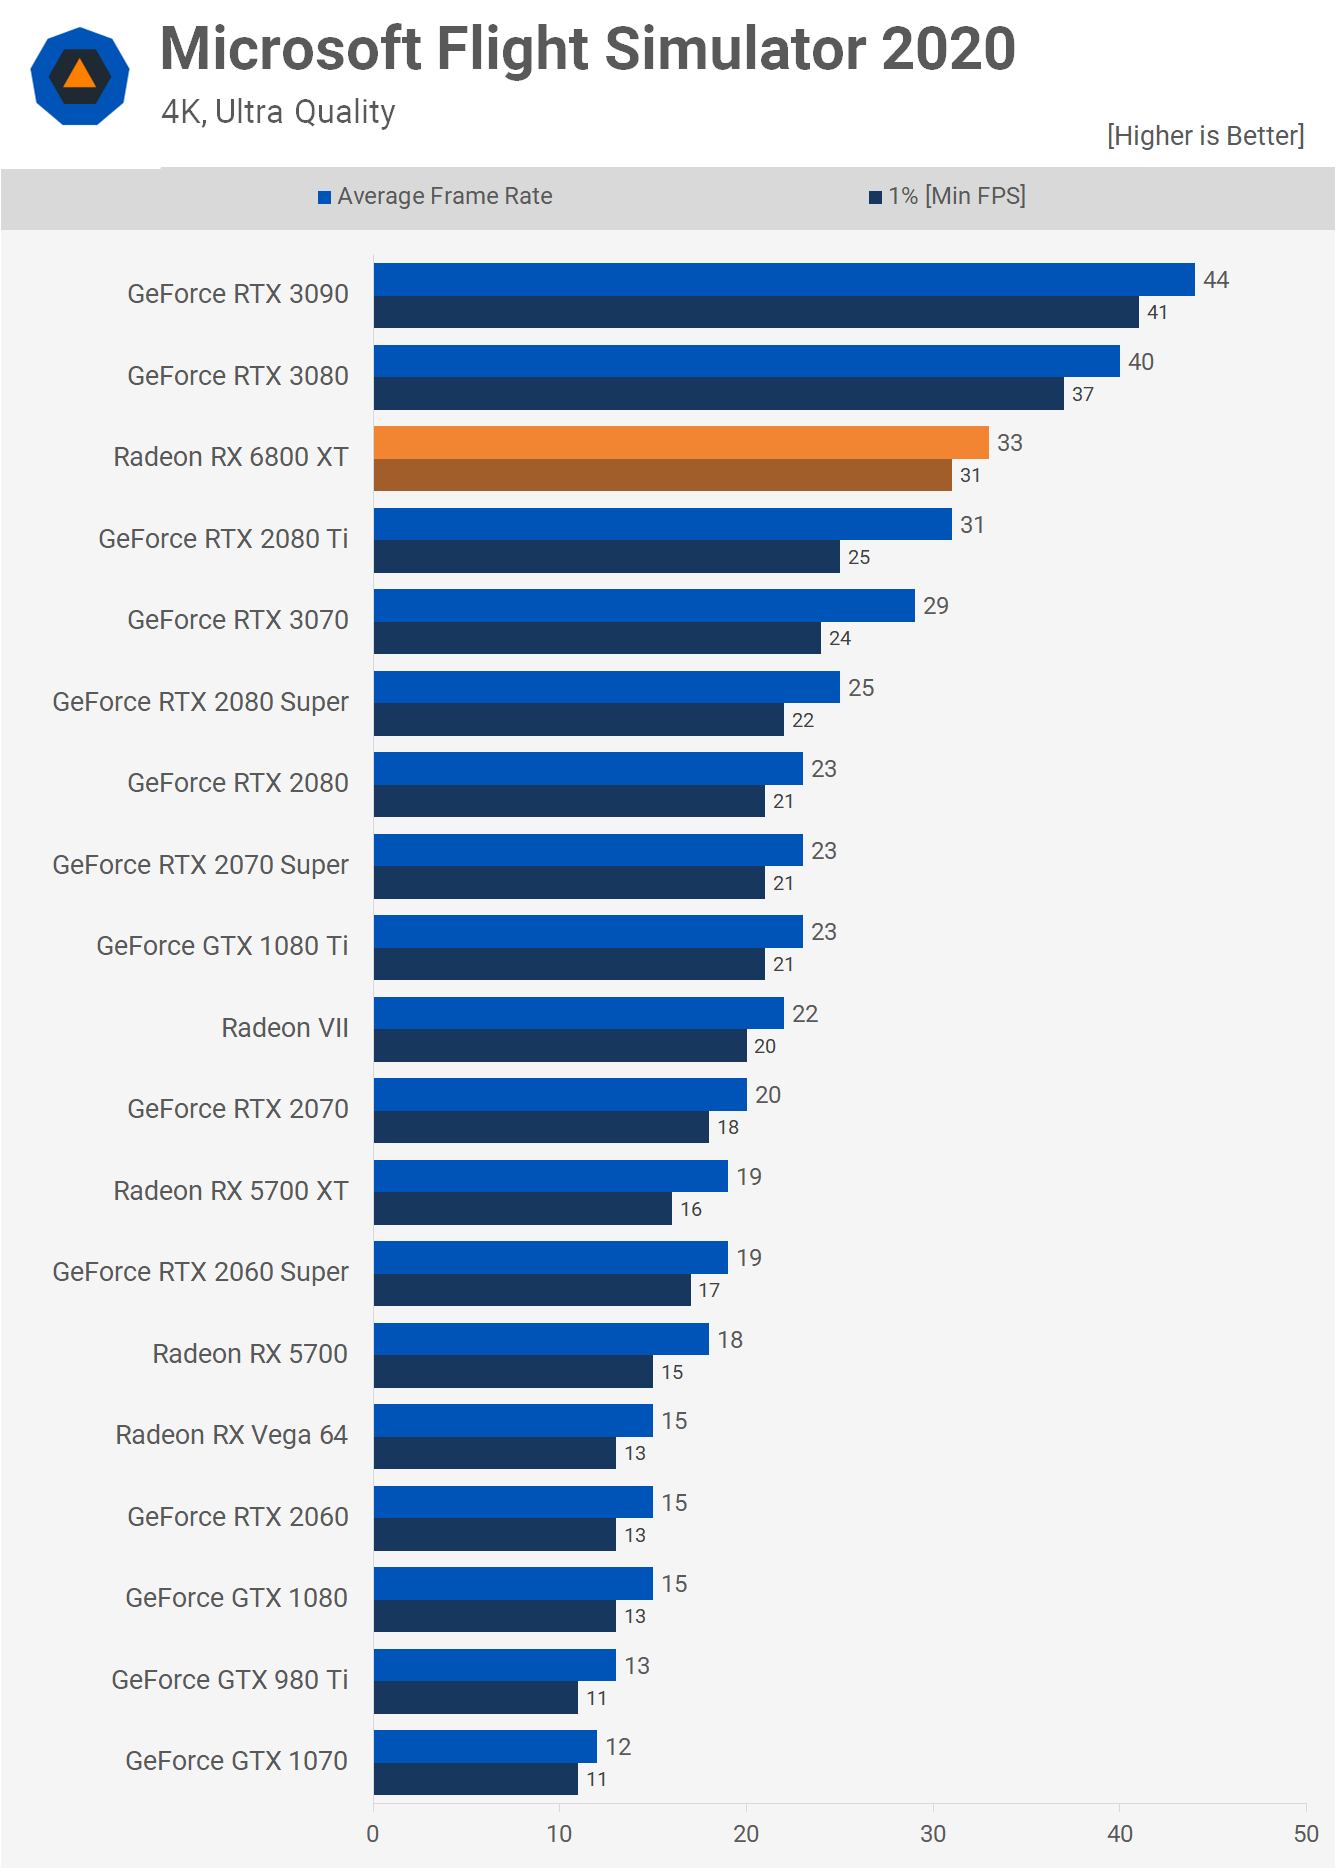
The Microsoft Flight Simulator 2020 results at 1440p are good, with an almost 60% performance improvement over the 5700 XT, averaging 51 fps which places it on par with the RTX 3080. That said, performance does slip considerably at 4K and now the 6800 XT is 18% slower than the 3080. When compared to the 5700 XT, it is 74% faster.
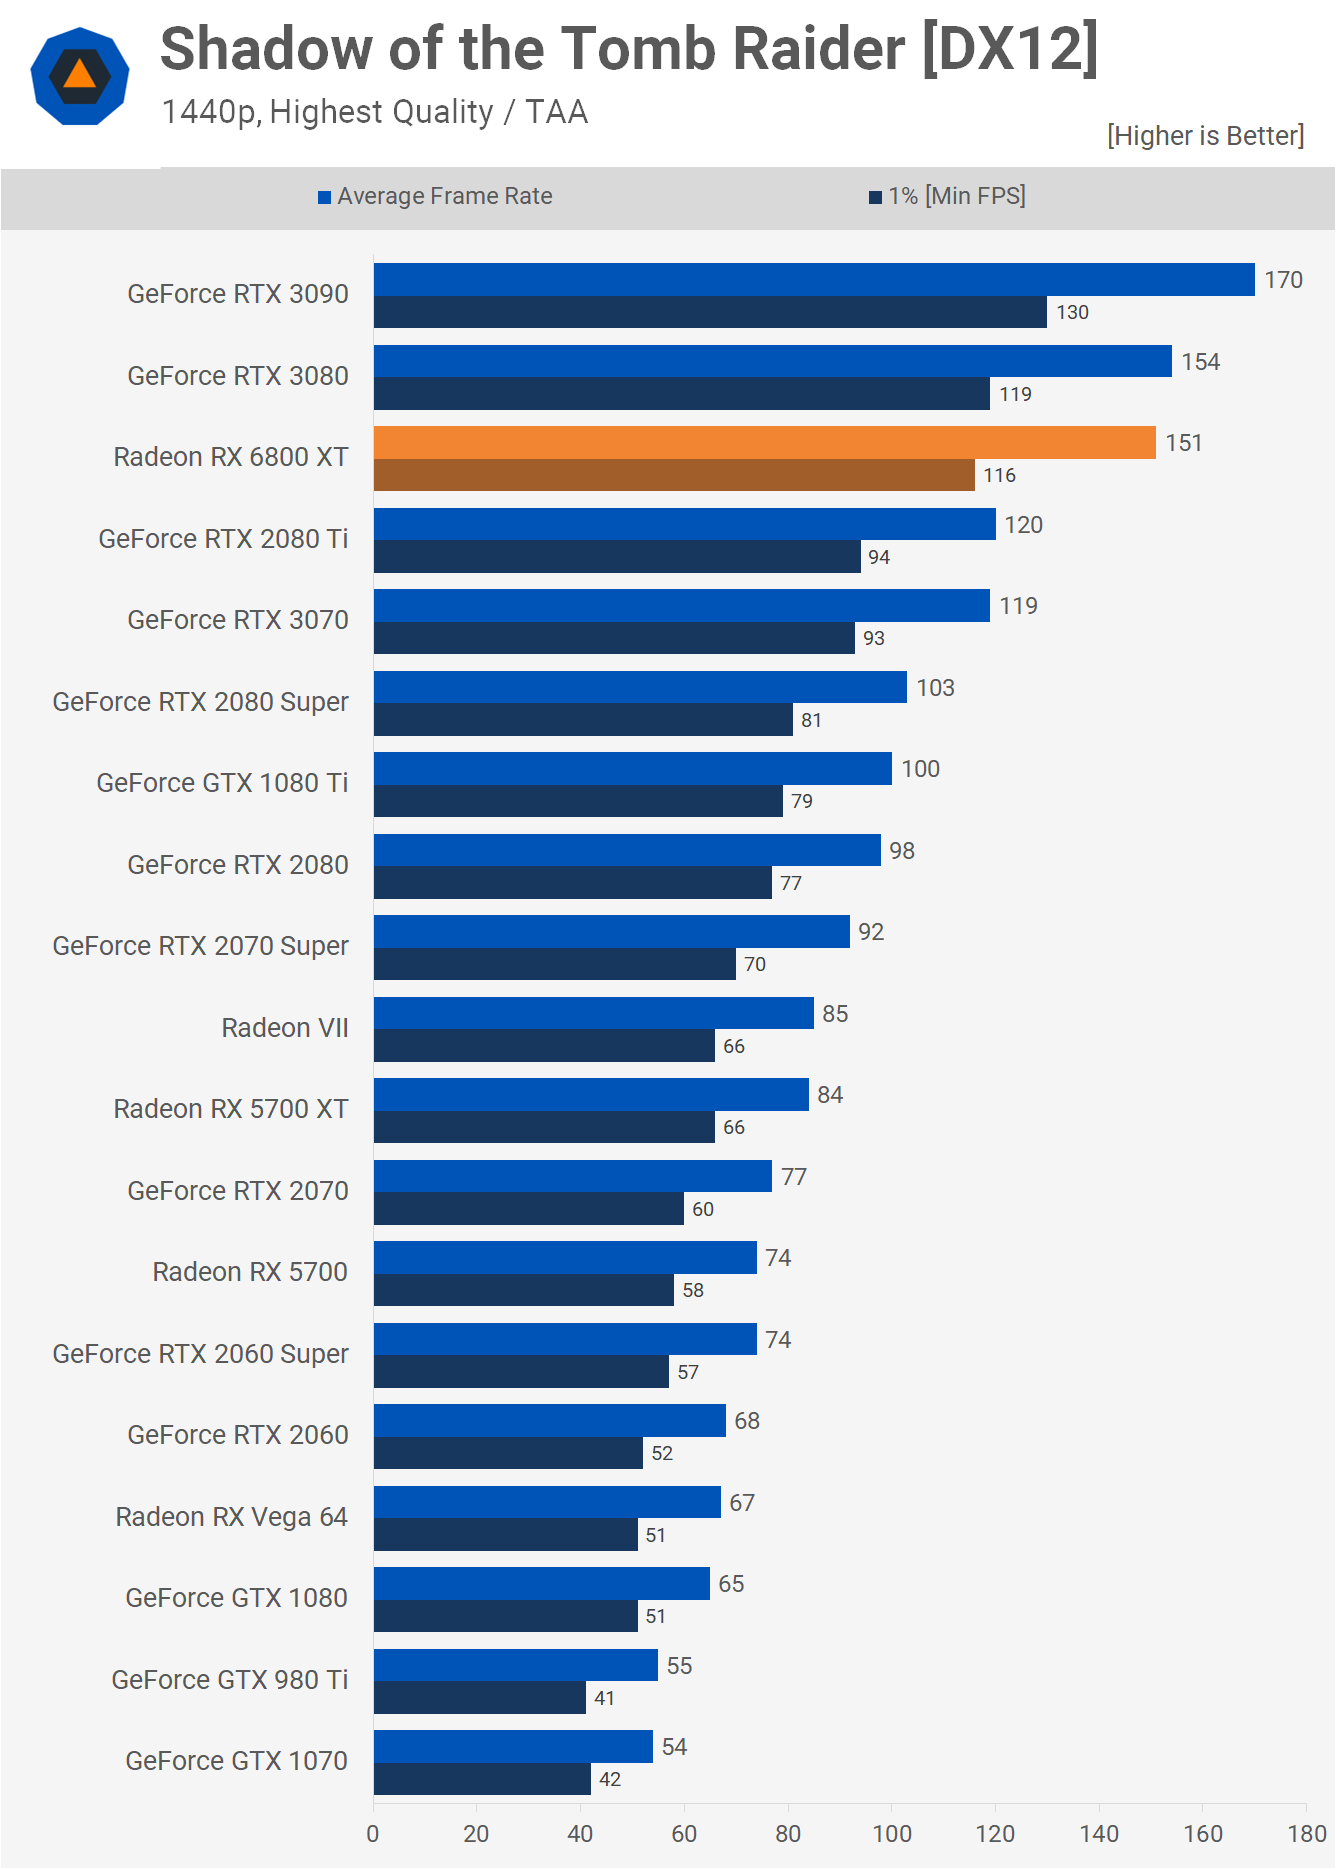
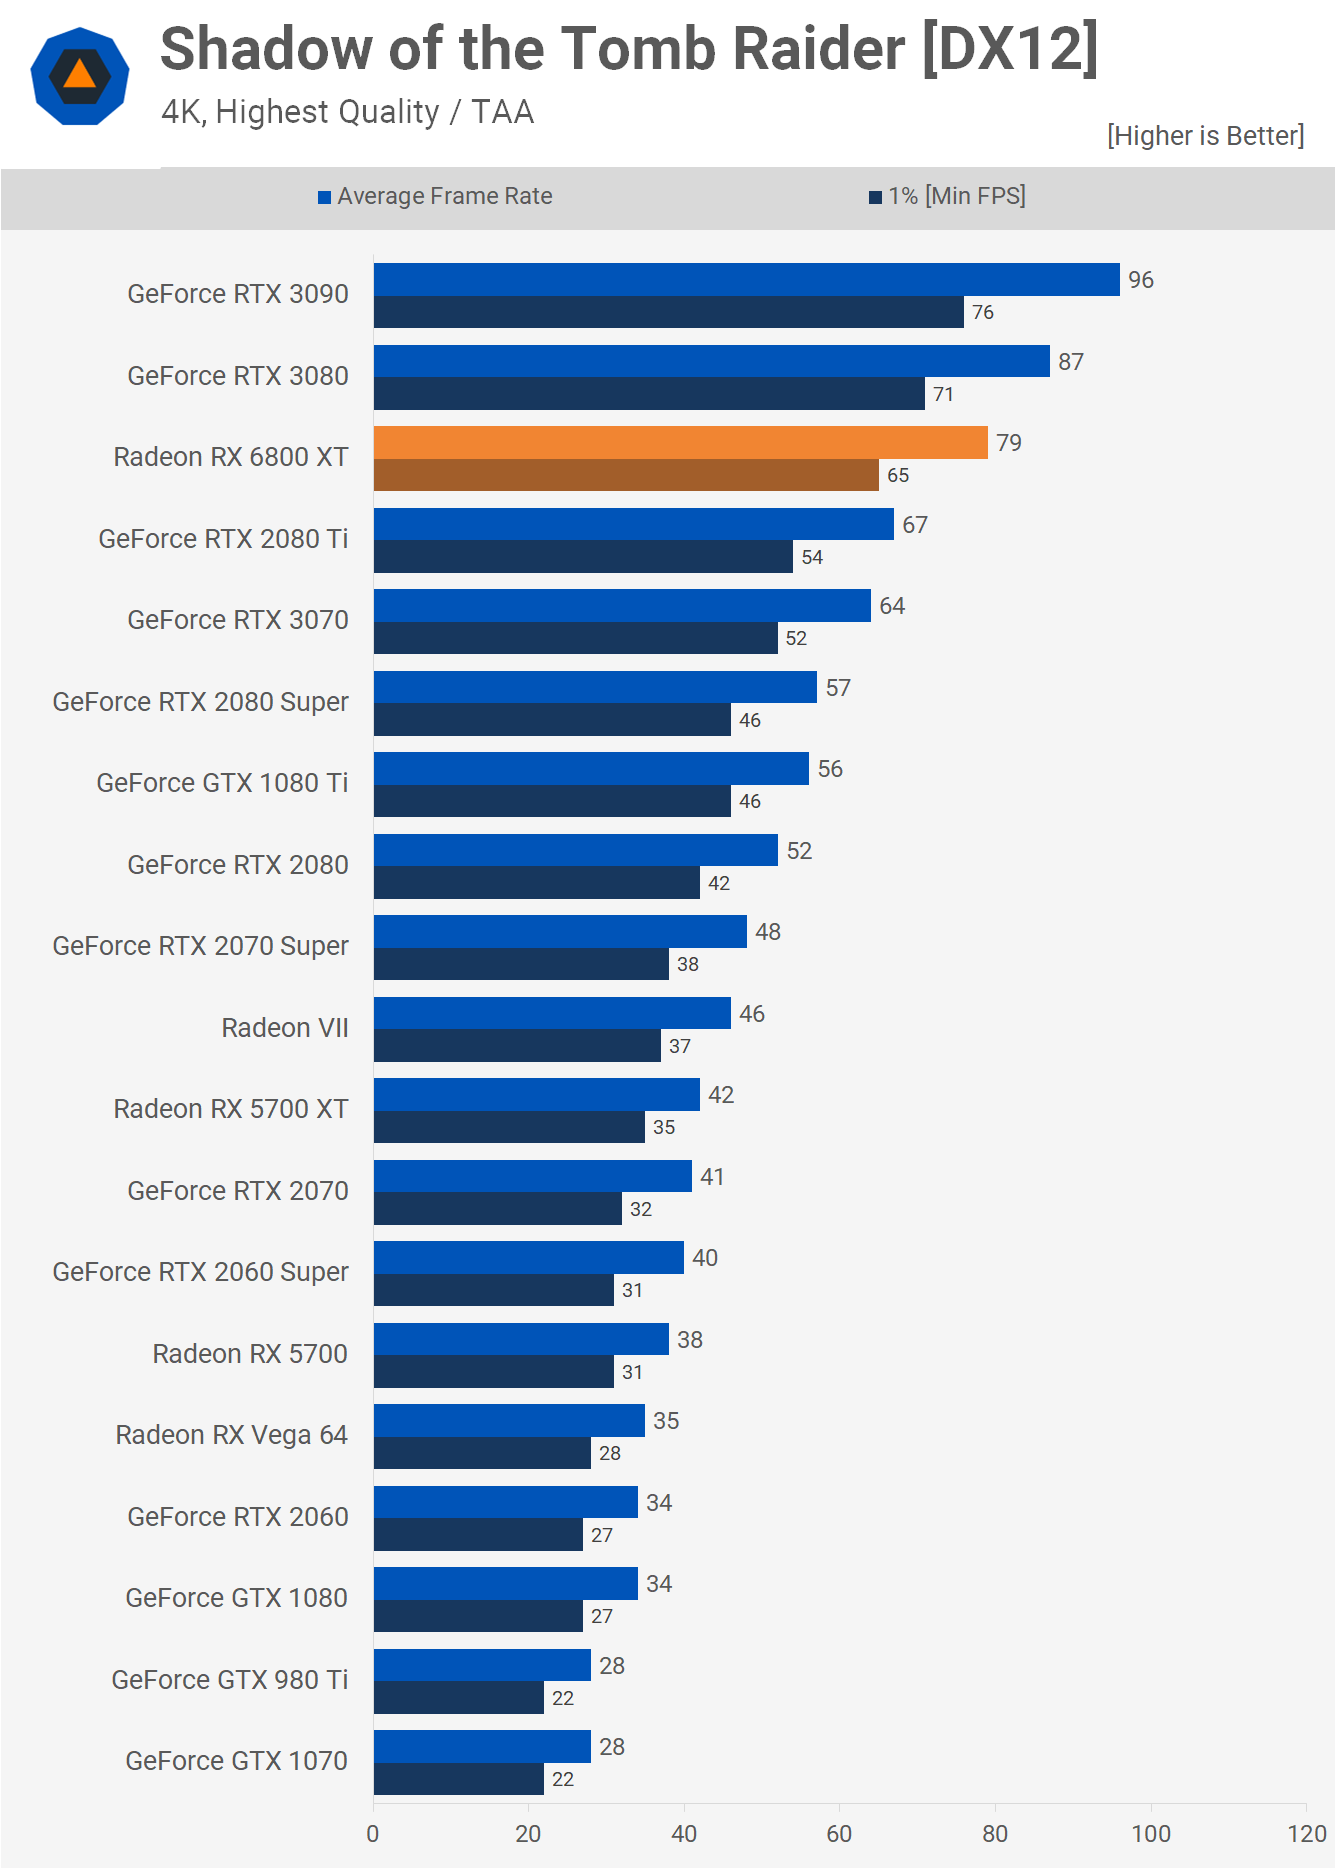
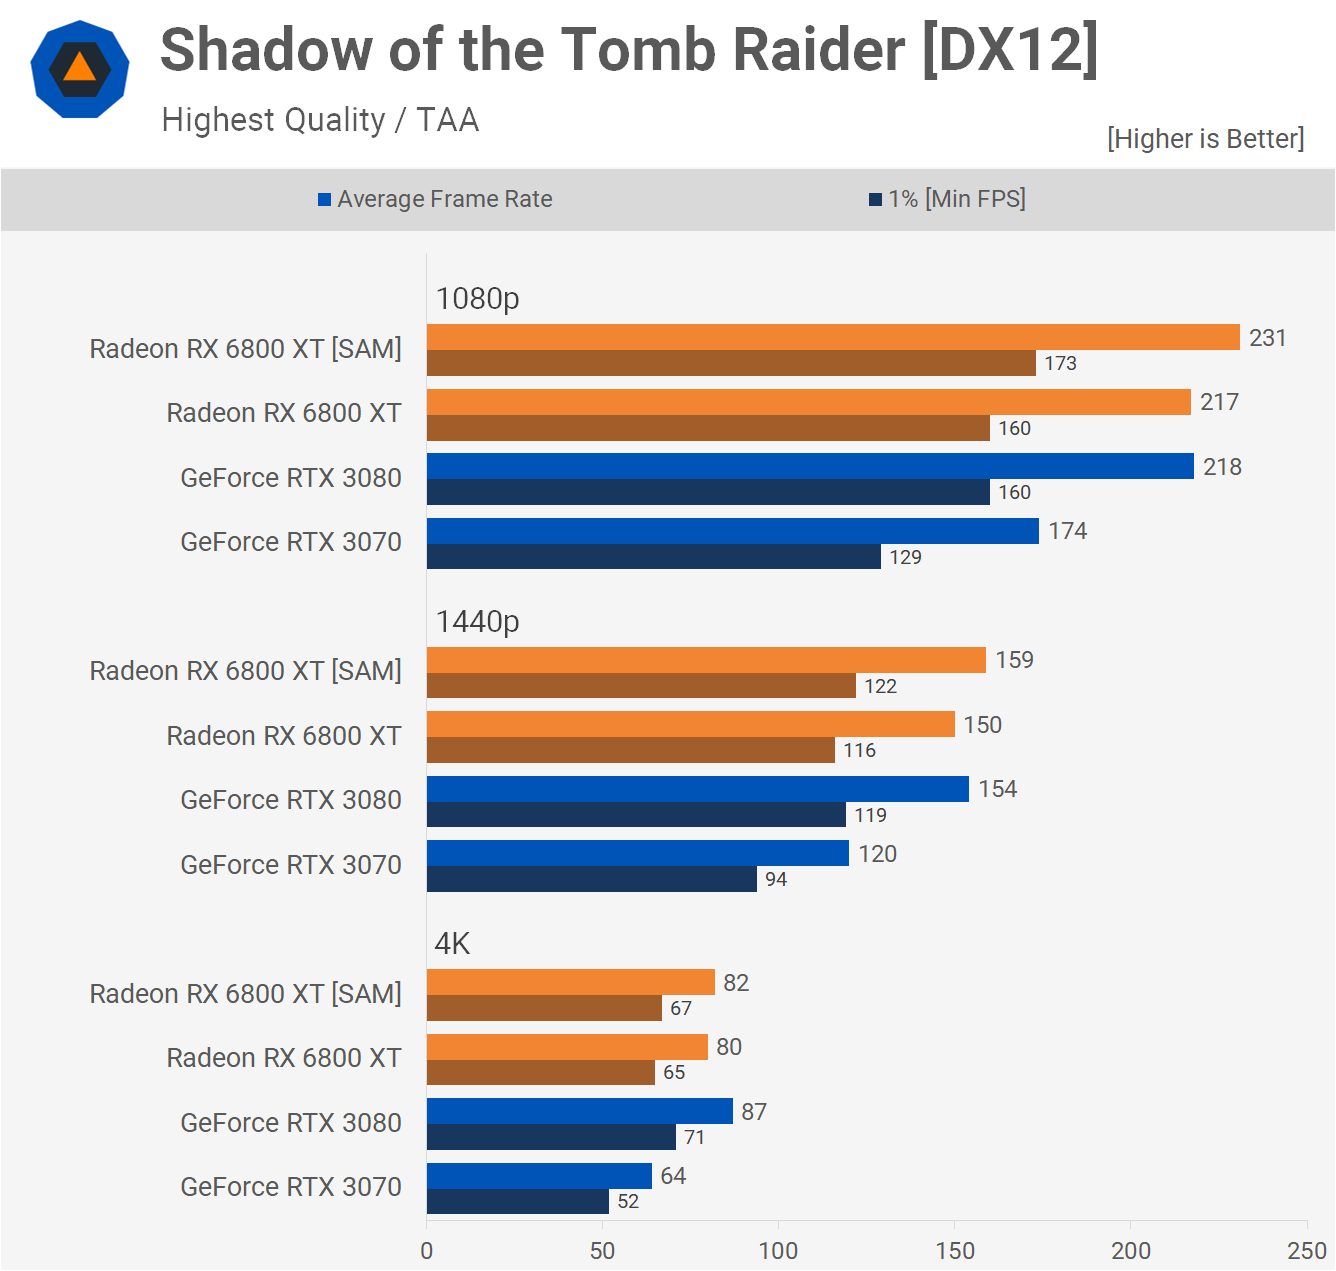
Moving on to Shadow of the Tomb Raider, the 6800 XT trailed the RTX 3080 by a few frames at 1440p, though we're basically talking about the same level of performance as you won't notice the difference between 151 and 154 fps. Again though we're seeing that the 6800 XT falls short at 4K, this time trailing the RTX 3080 by an 8% margin.
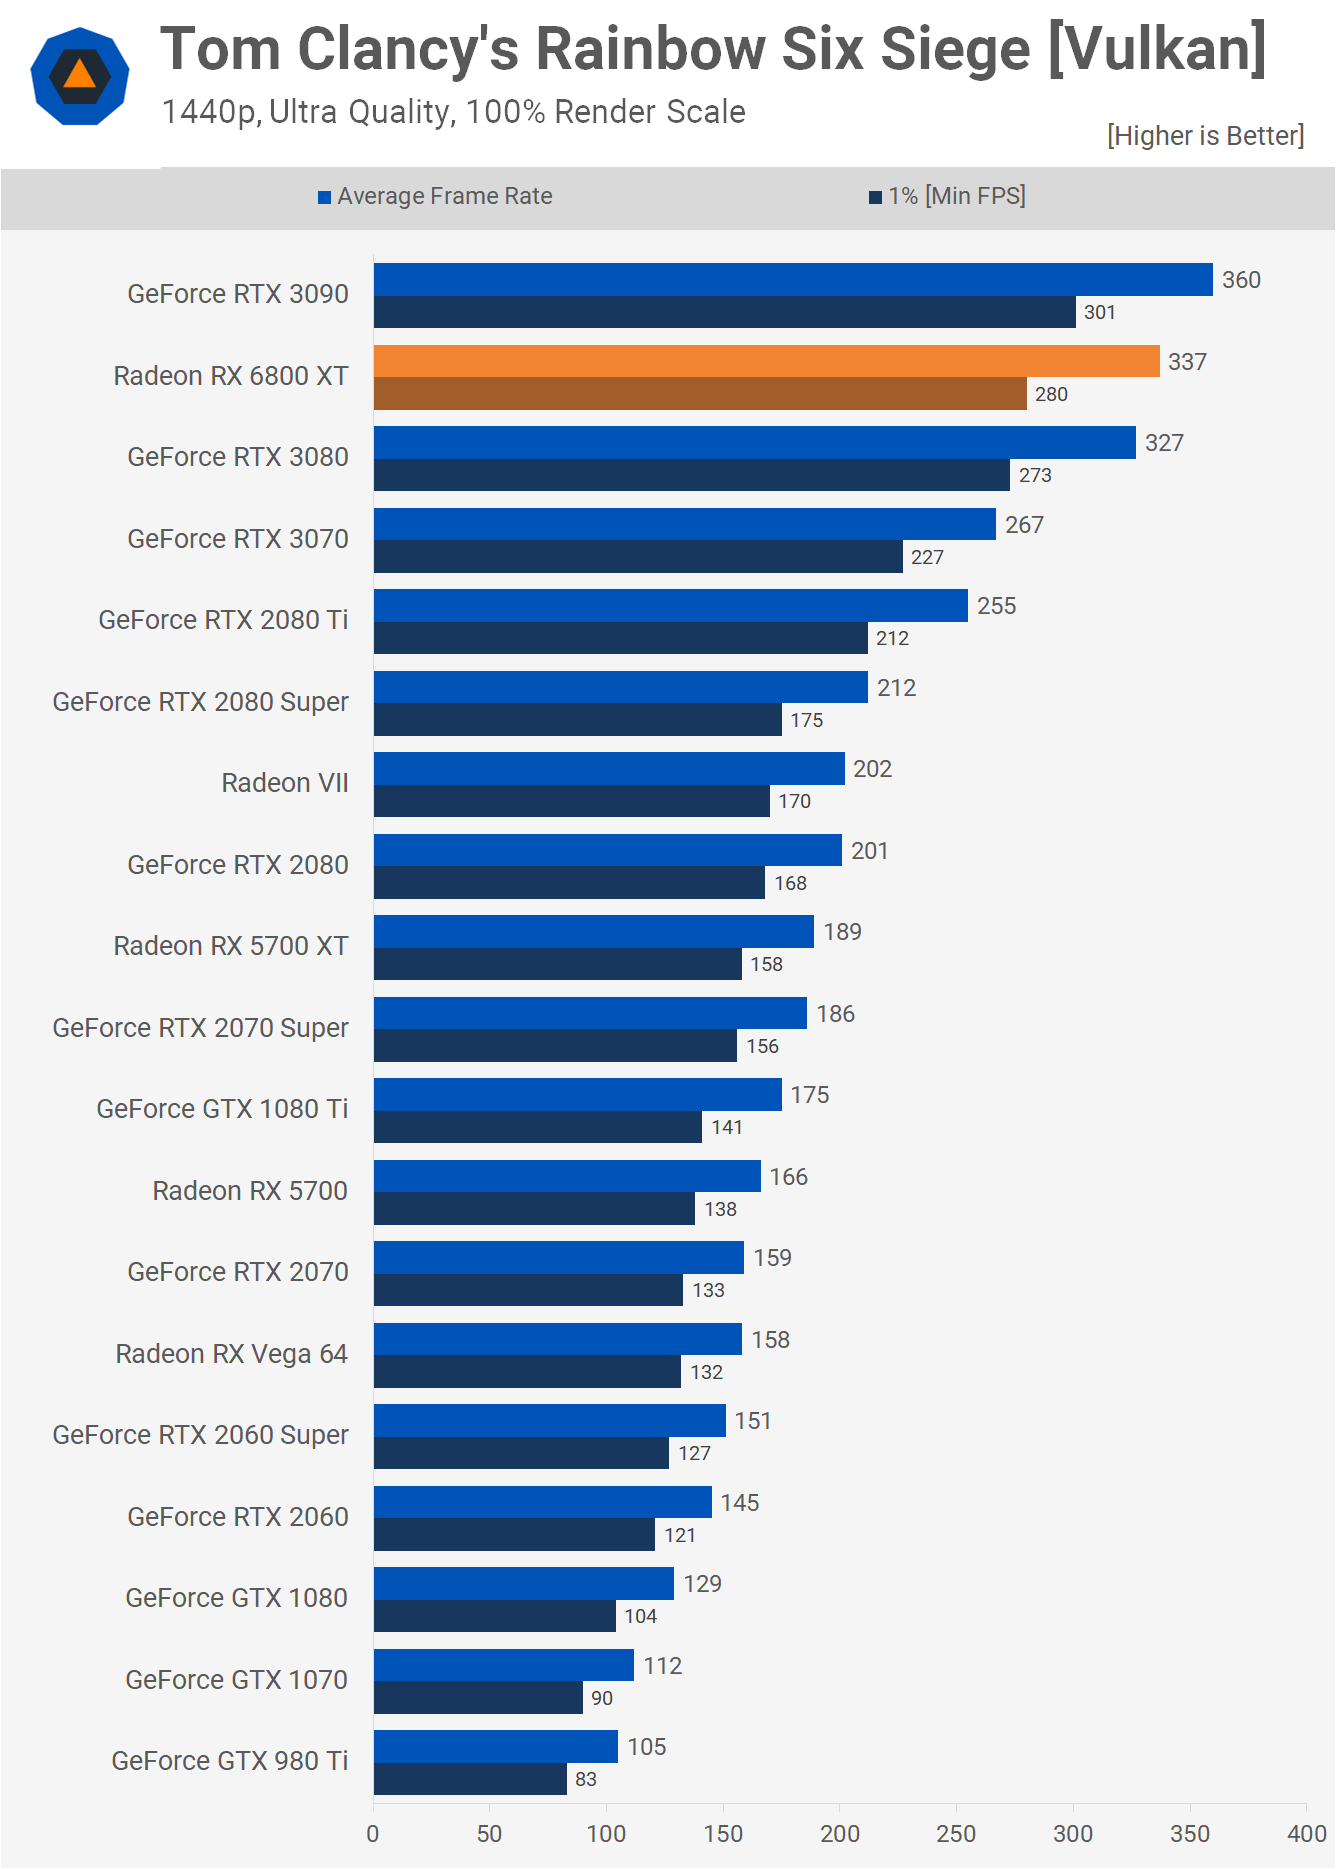
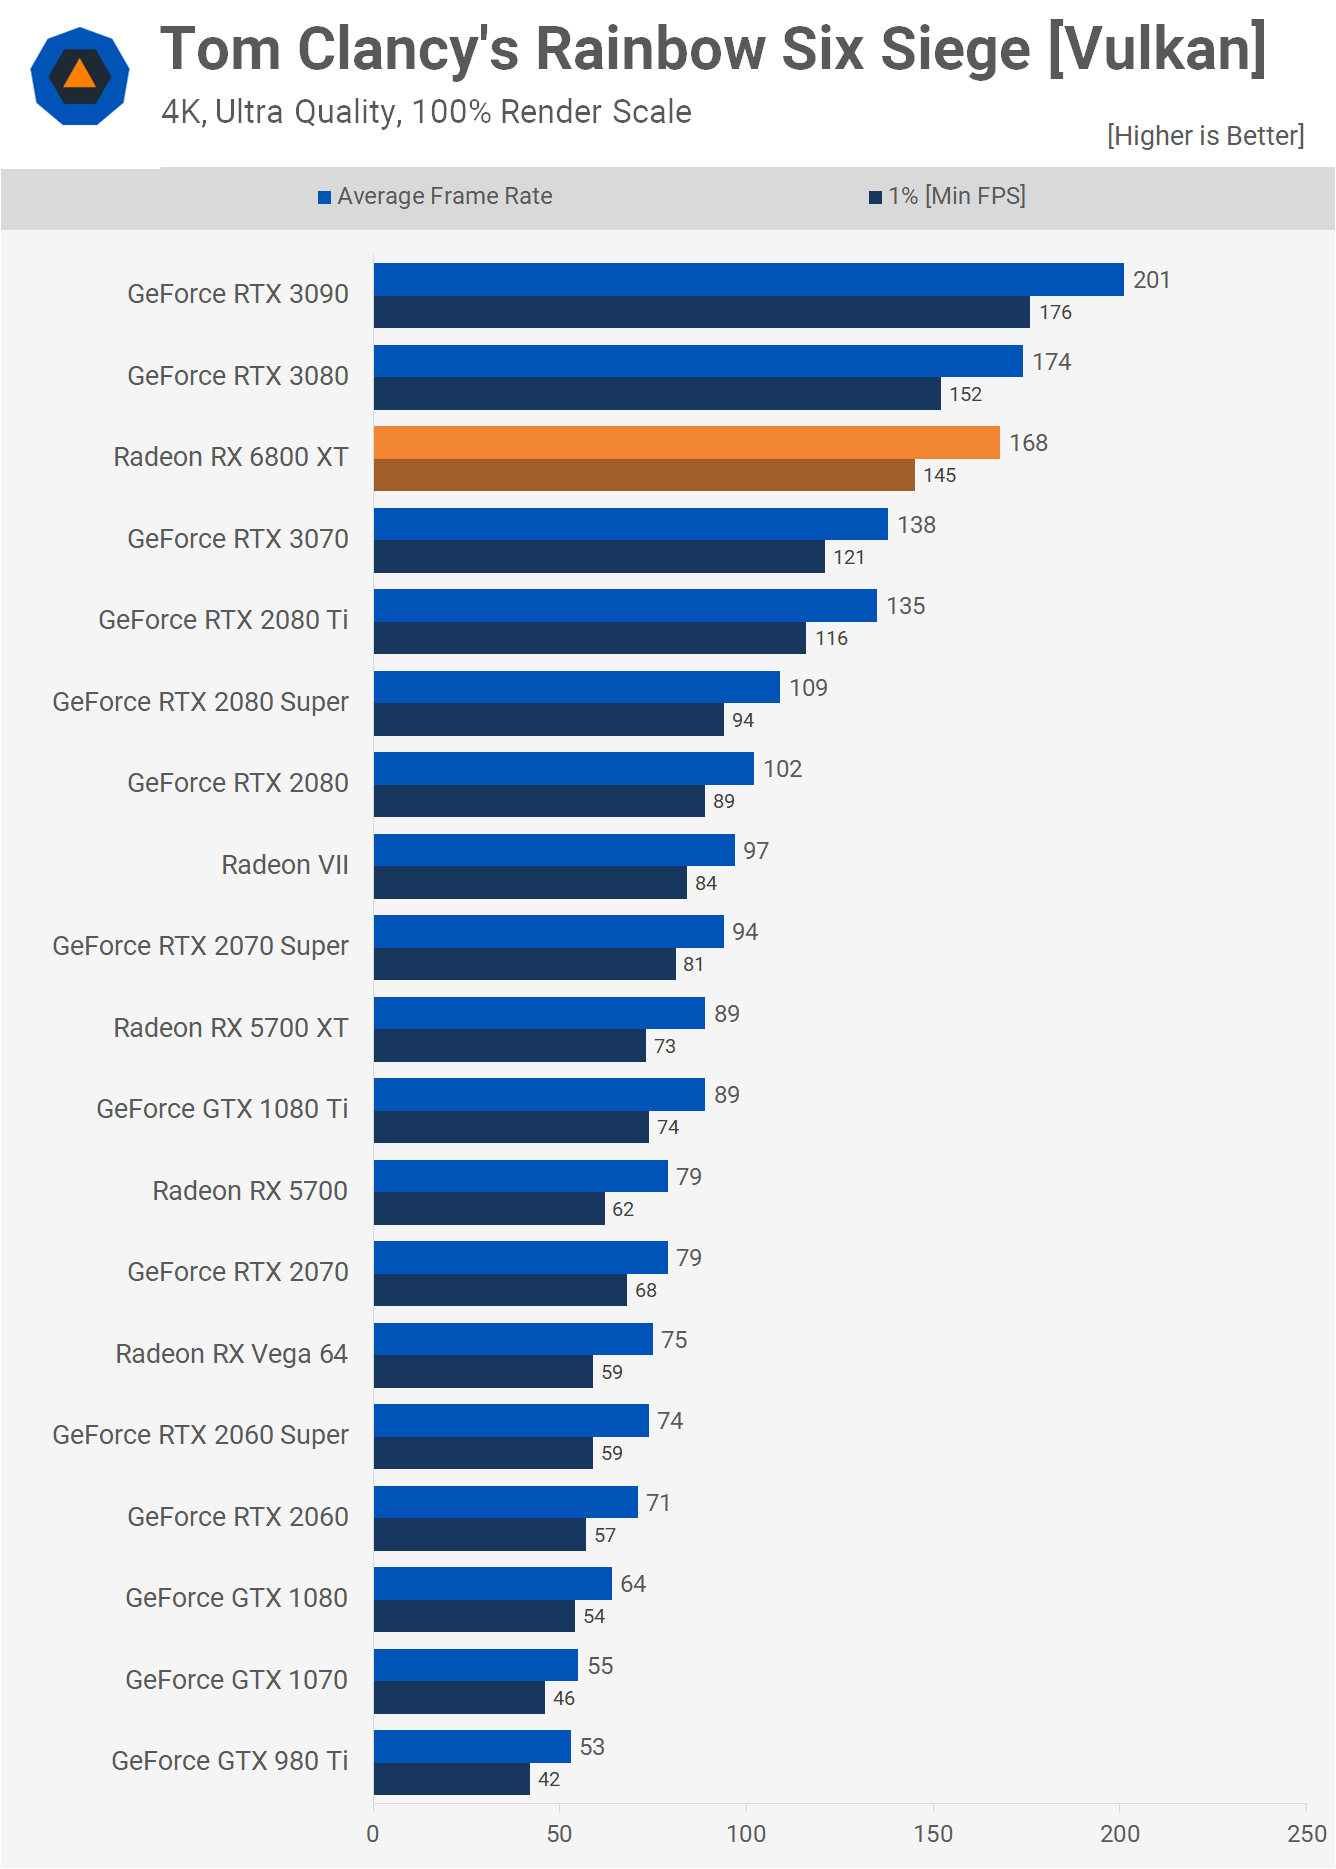
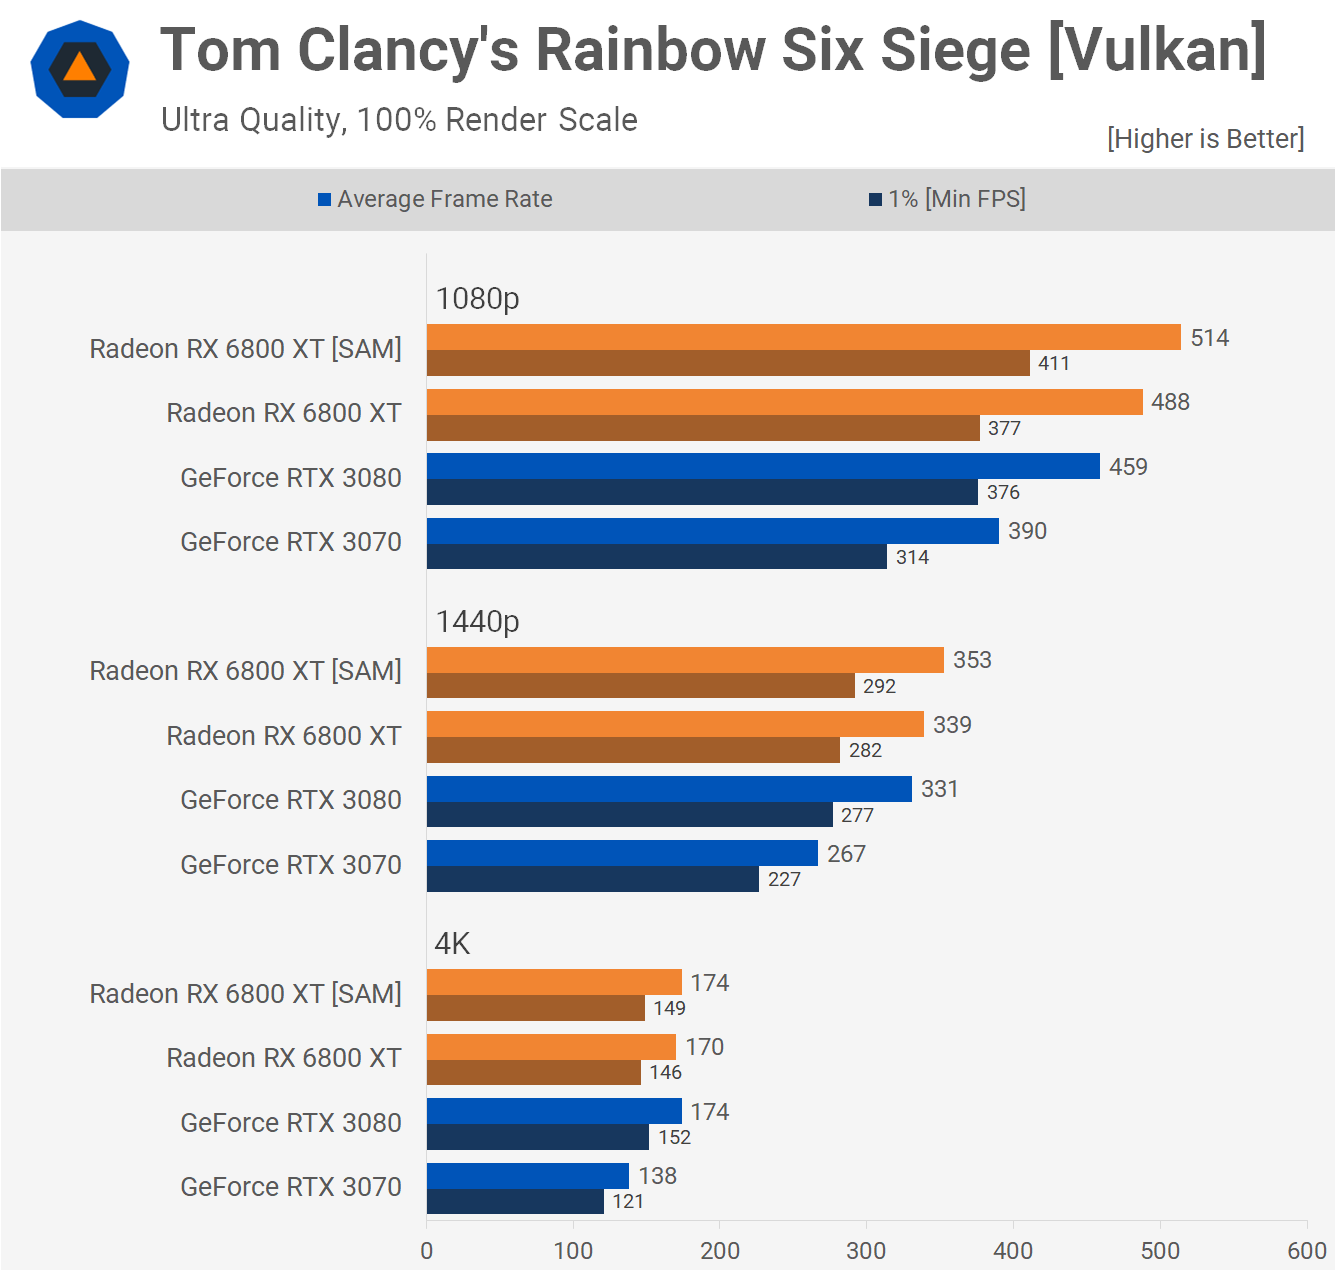
Frame rates in Tom Clancy’s Rainbow Six Siege are very competitive, the 6800 XT offered RTX 3080-like performance, nudging ahead by 3% at 1440p to pump out 337 fps on average. The 6800 XT remained strong at 4K as well. It was capable of rendering 168 fps on average making it just 3% slower than the RTX 3080, delivering about the same level of performance.
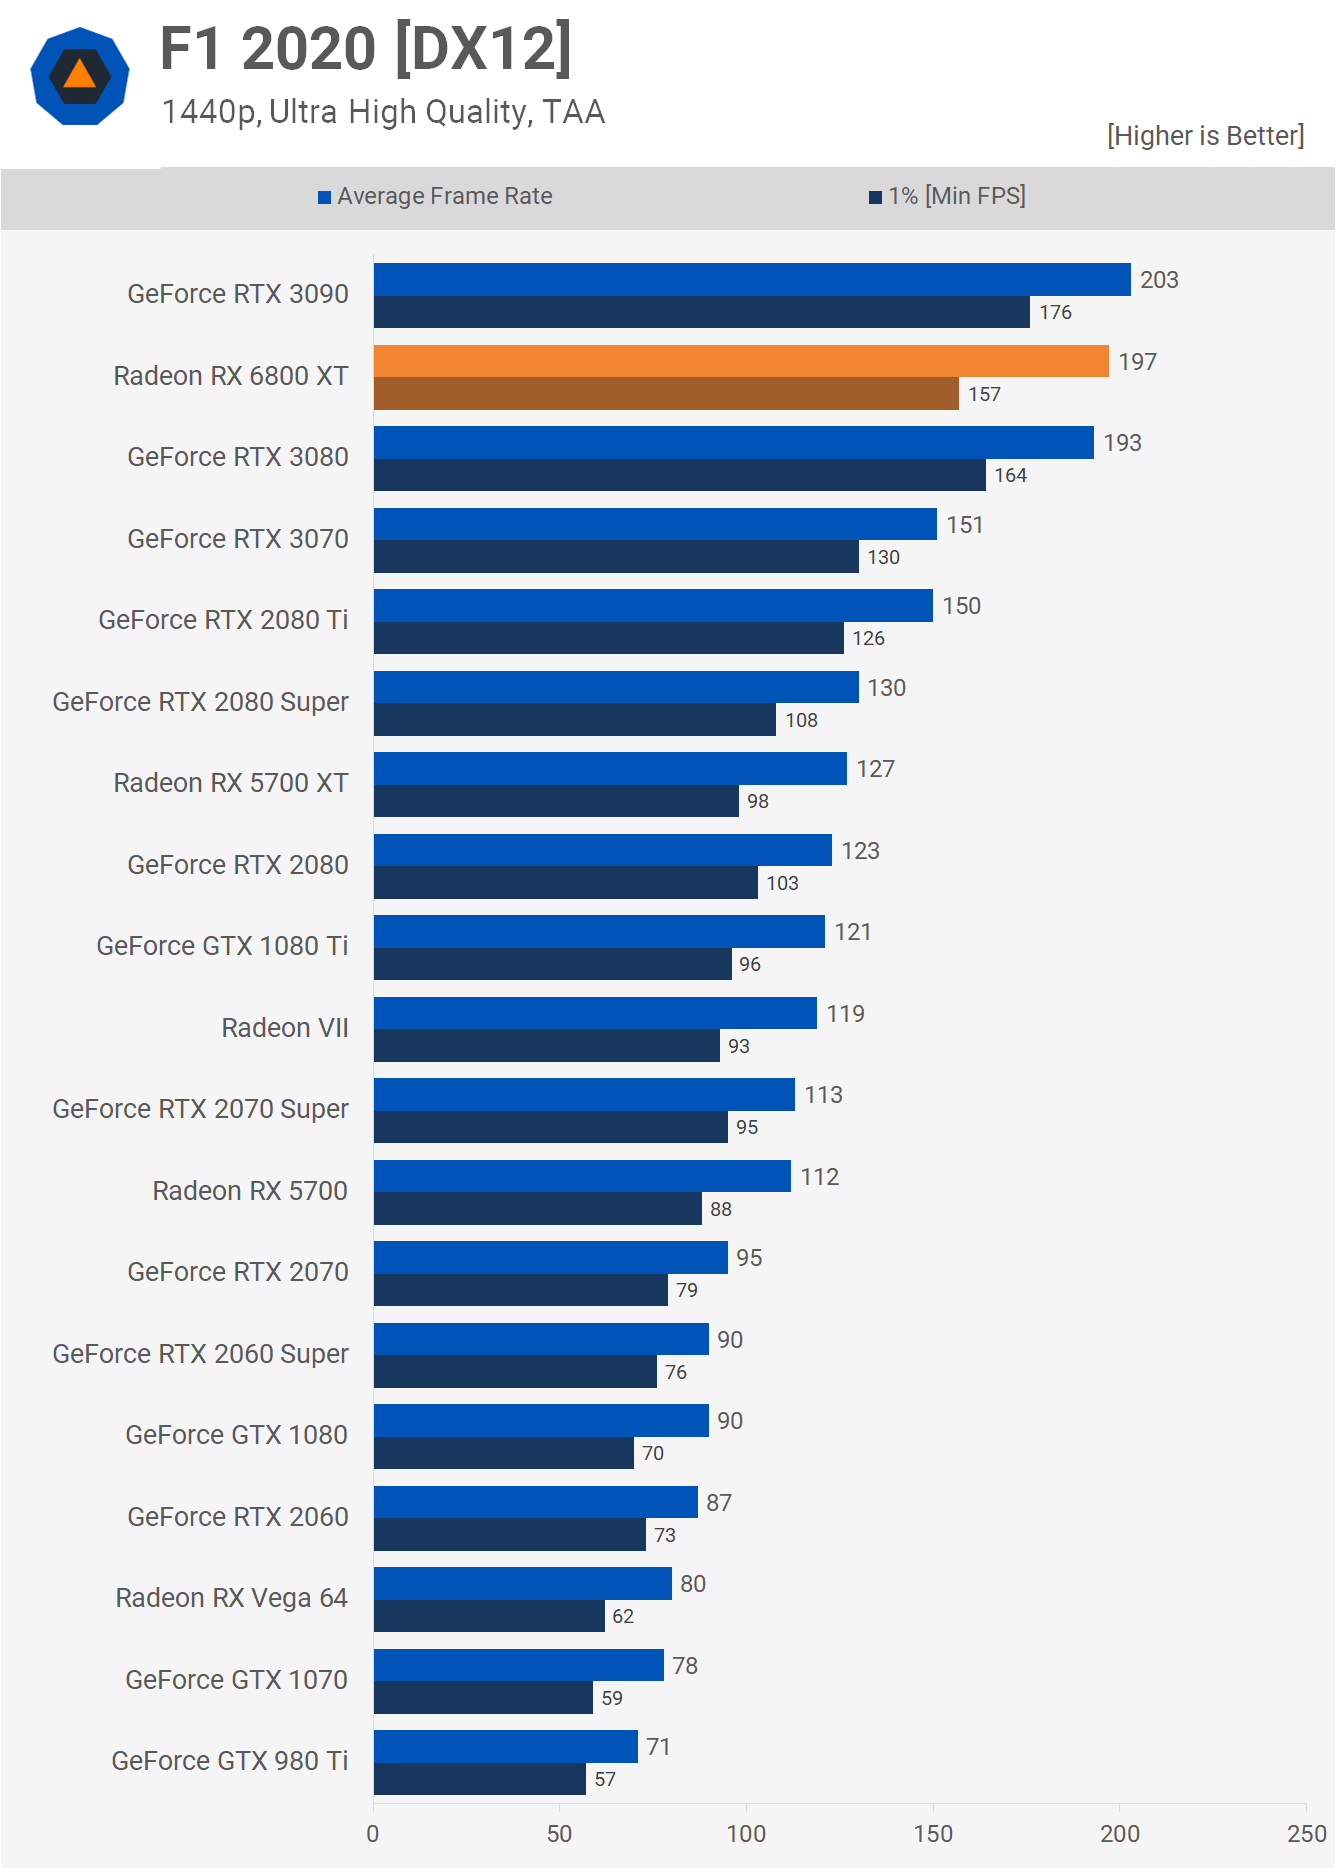
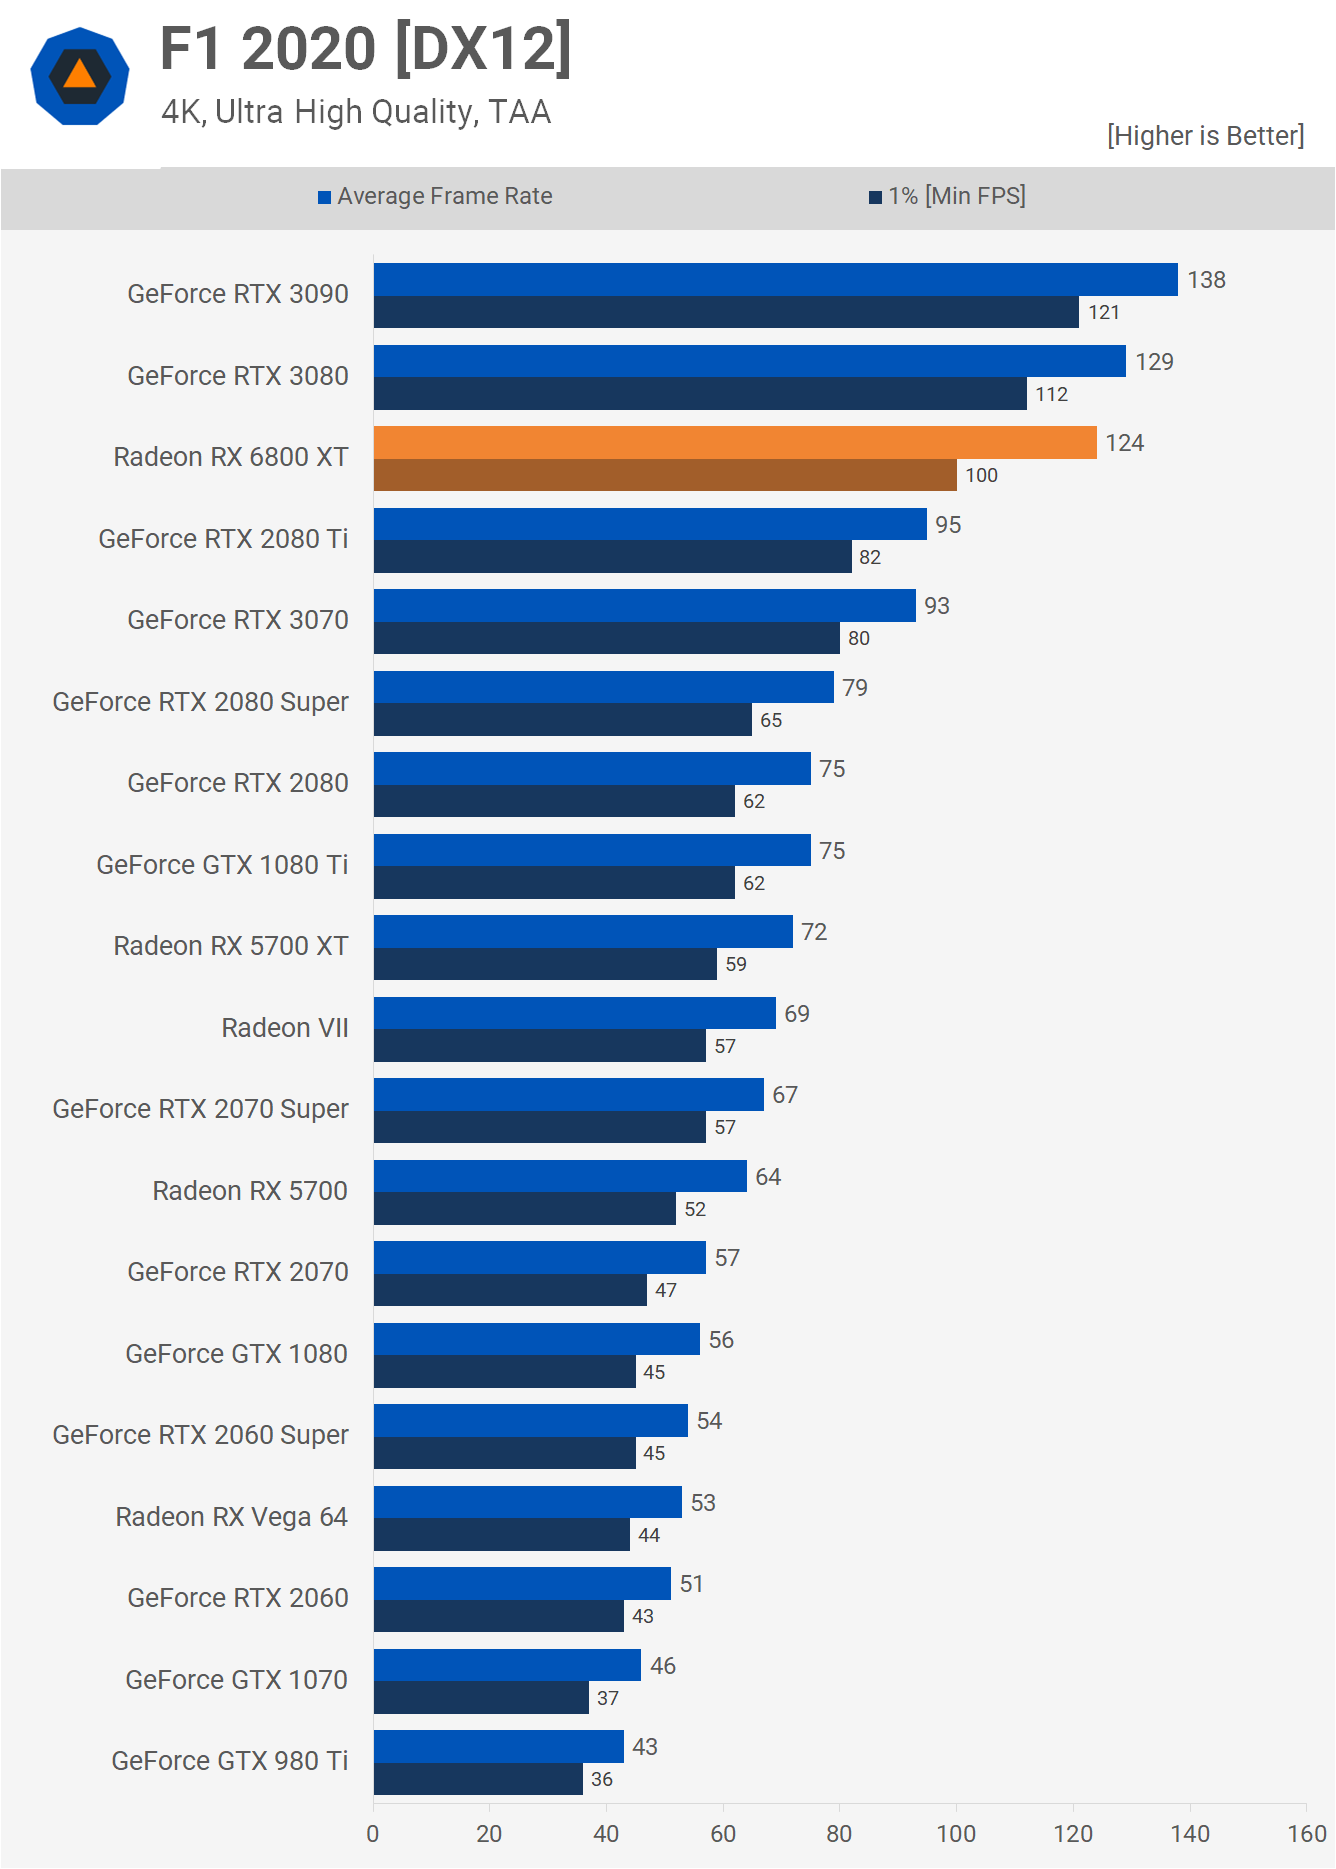
F1 2020 sees the 6800 XT delivering RTX 3080-like performance and with 197 fps on average it was 55% faster than the 5700 XT at 1440p. Increasing the resolution to 4K saw the 6800 XT beat the older 5700 XT by a whopping 72% margin, though it was a little slower than the RTX 3080, but still overall a great result and we'd argue that 120+ fps at 4K in F1 2020 is plenty.
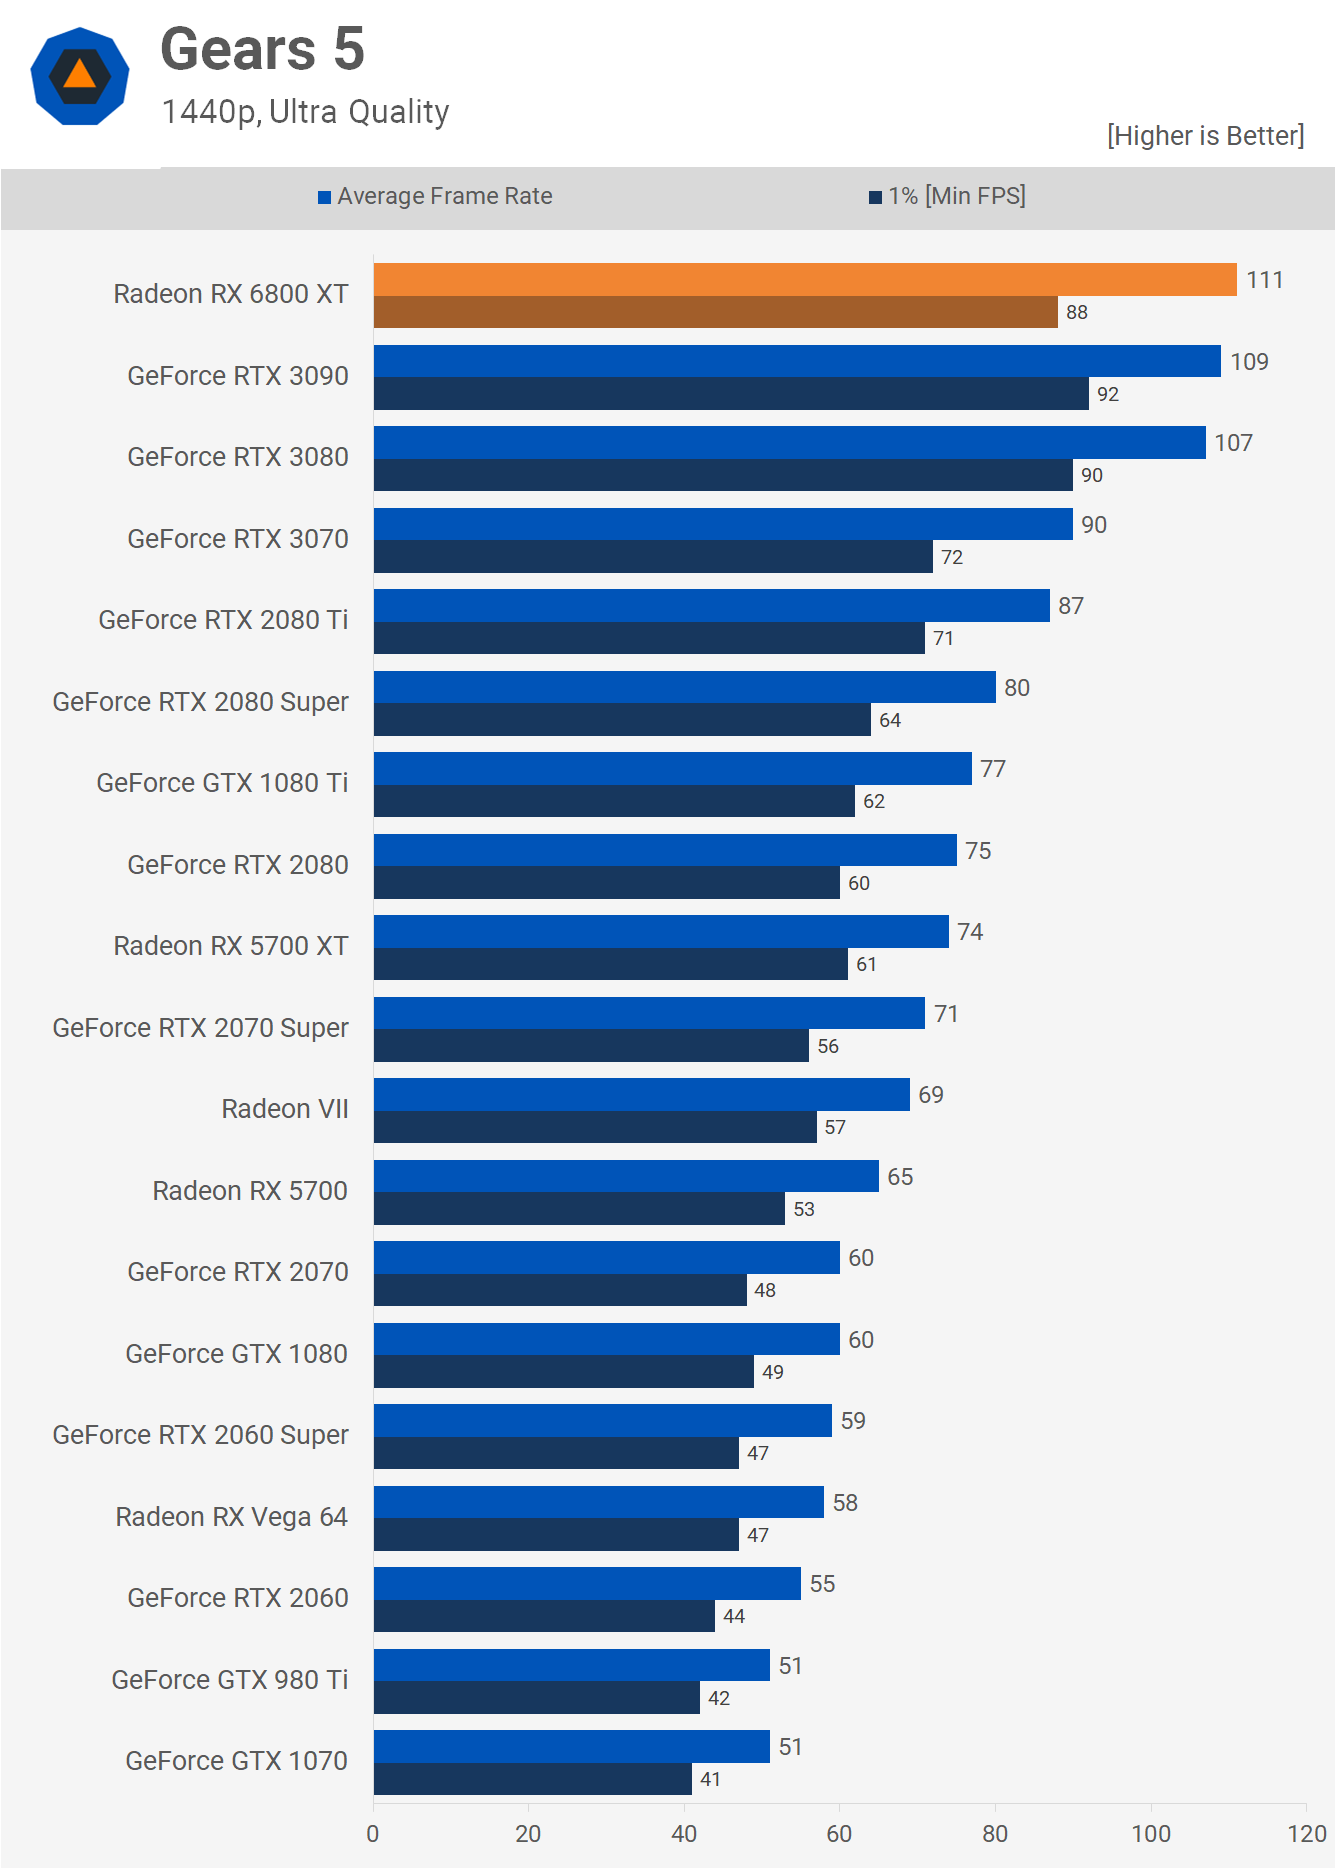
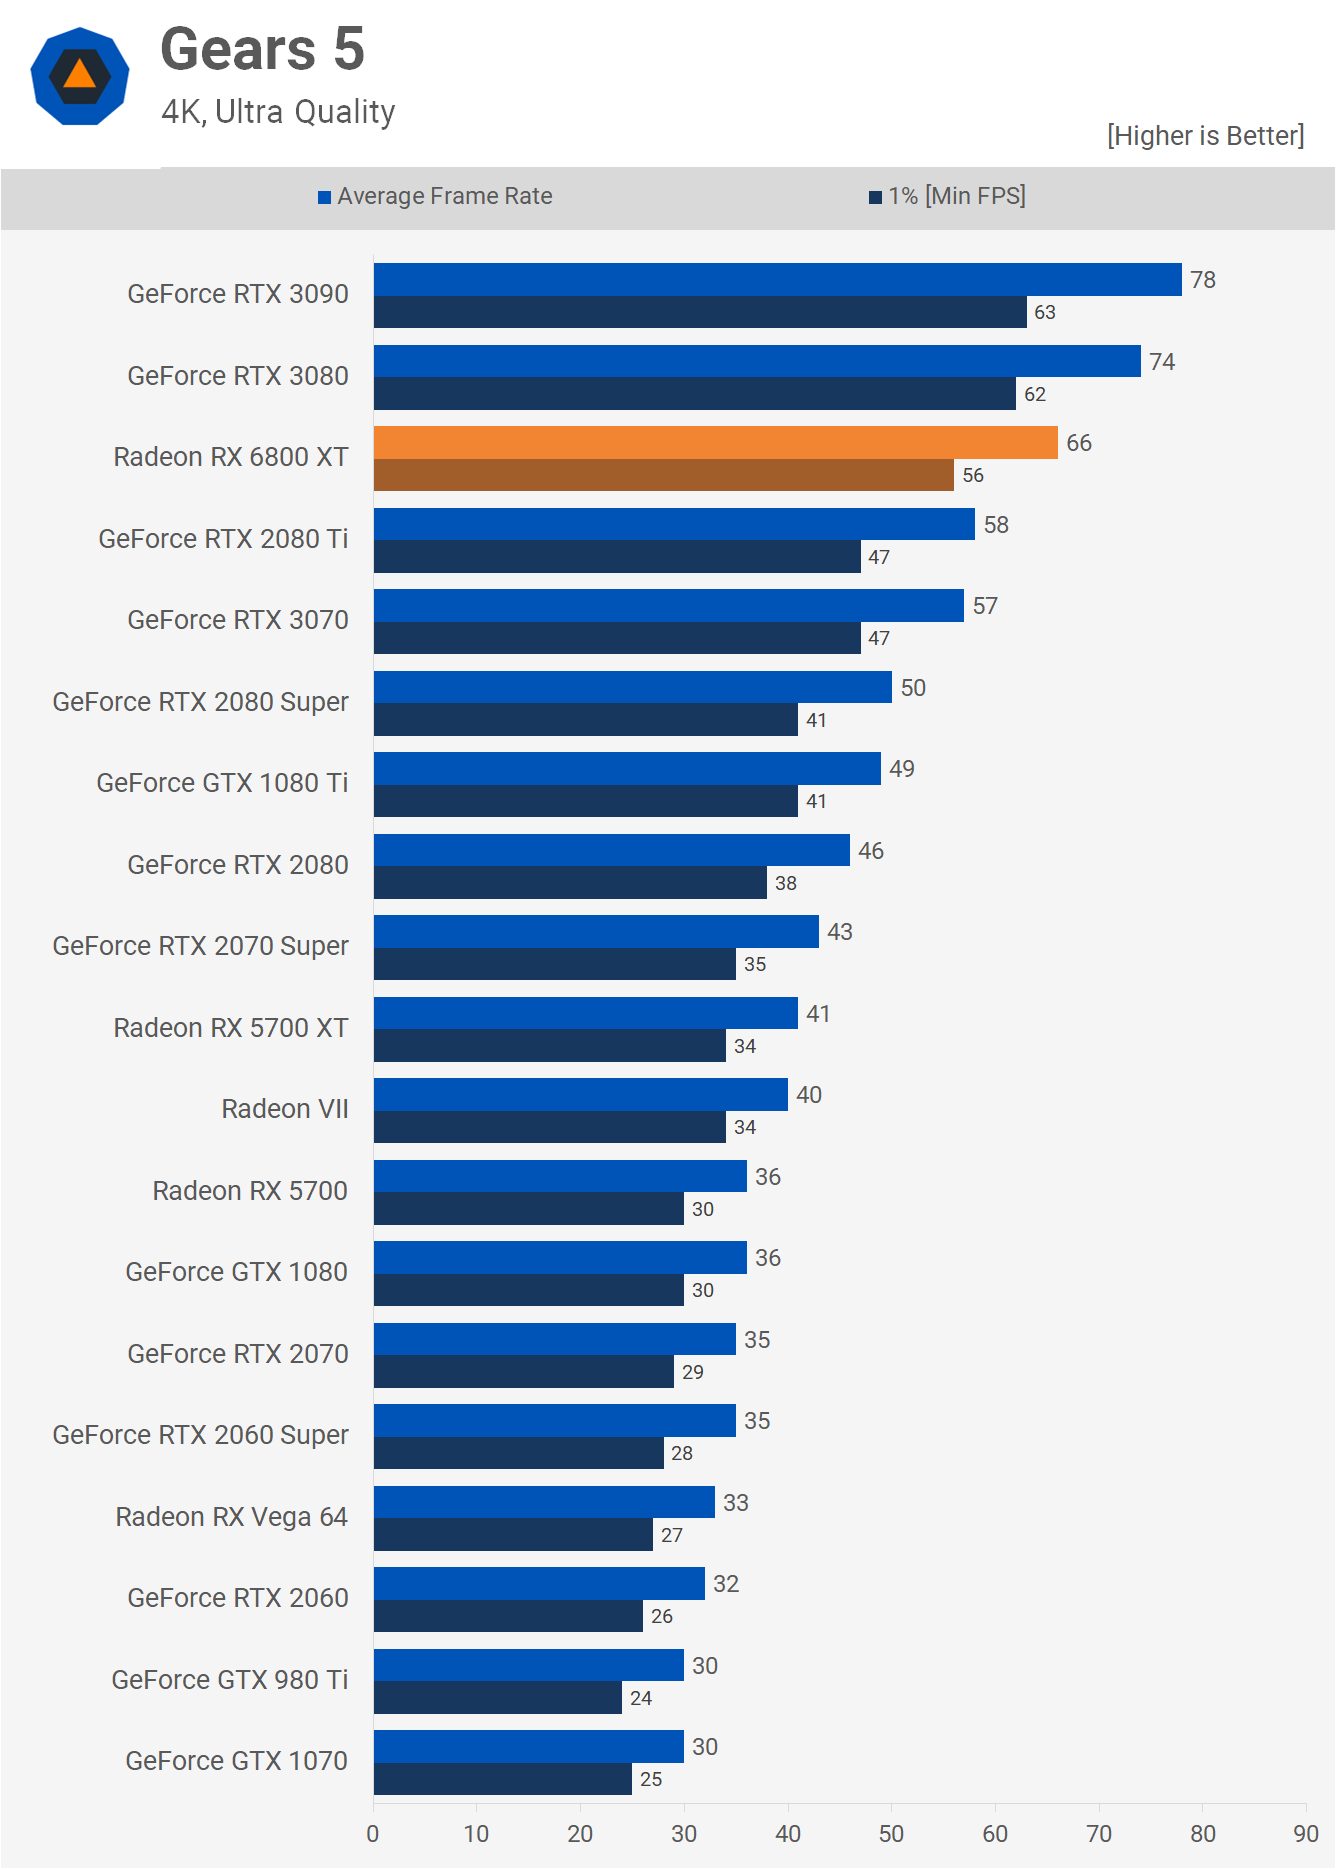
Moving on to Gears 5 testing, we're seeing strong 1440p performance from the 6800 XT again as it manages to edge out even the RTX 3090. We appear to be running into a bit of a CPU bottleneck here with the Ryzen 9 3950X, which eventually we’ll retest with a 5950X. At 4K the higher core count Ampere GPUs come to life, which sees the 6800 XT slip. The end result is a 12% performance deficit in favor of the RTX 3080.
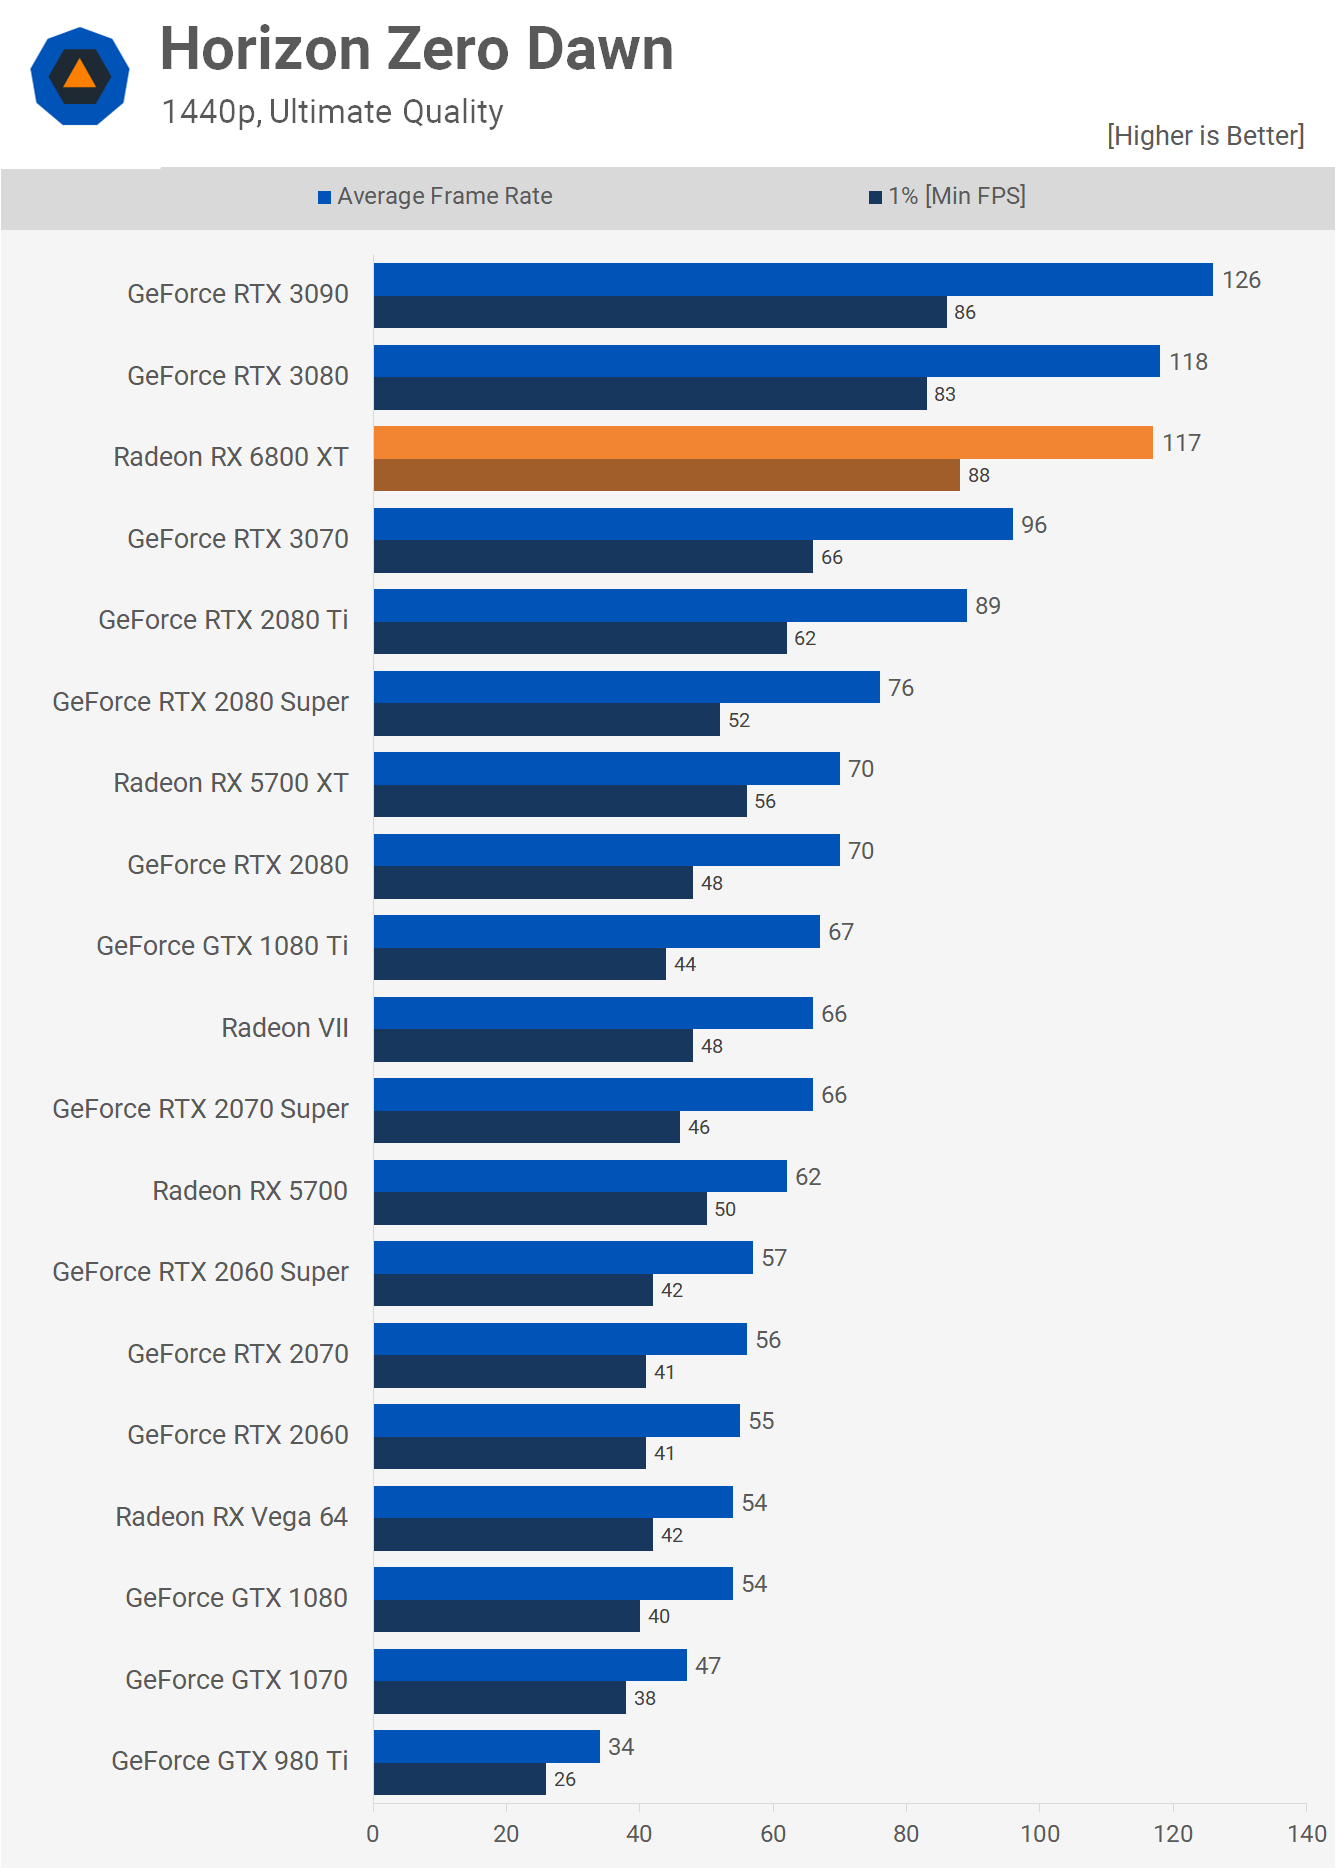
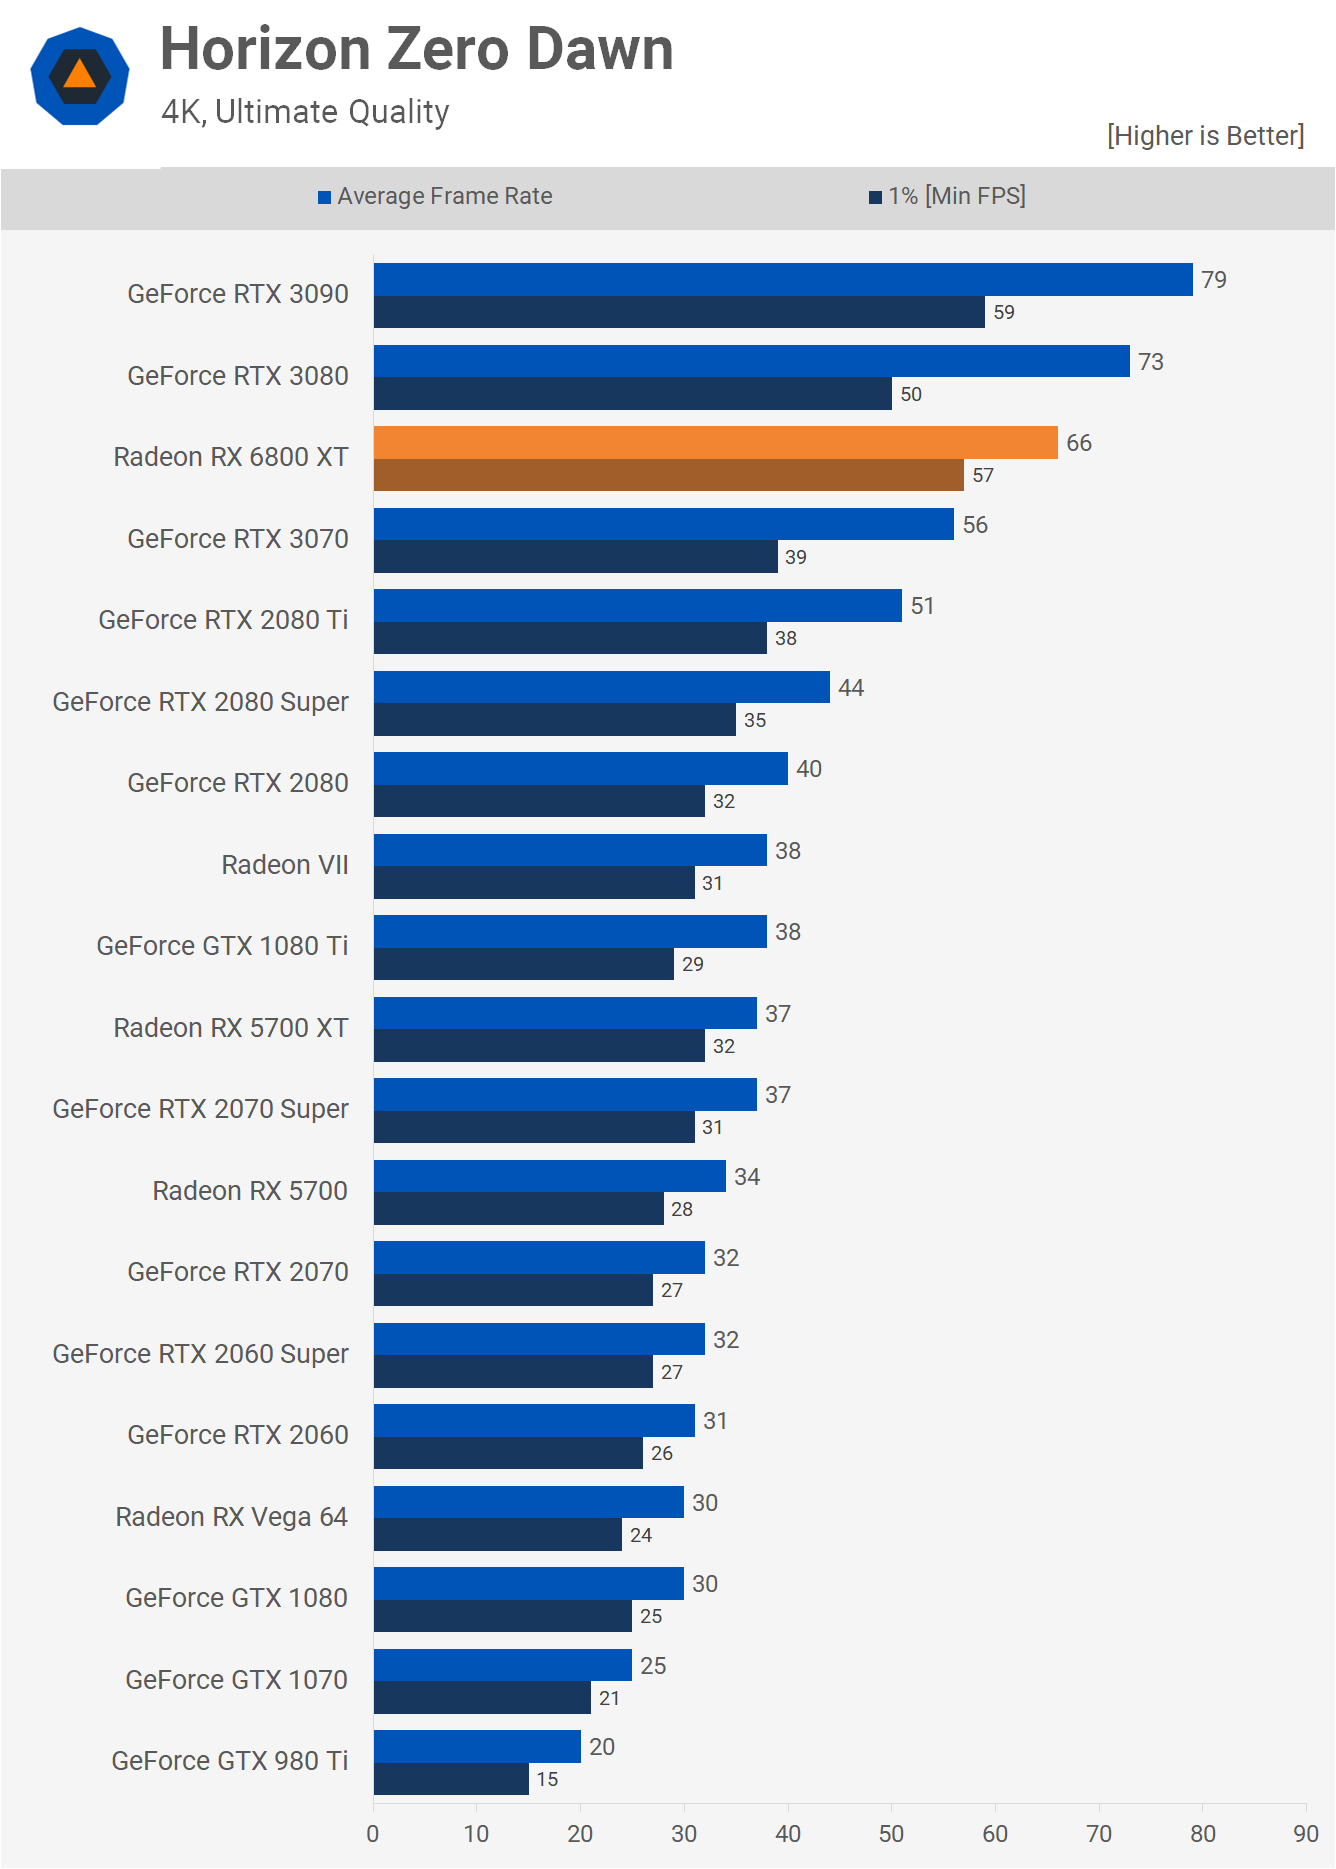
Horizon Zero Dawn runs well on the 6800 XT at 1440p, delivering performance that matches the RTX 3080, which now seems fine but just two months ago was the kind of performance that blew our minds. We see the 6800 XT fall behind the RTX 3080 by a 10% margin at 4K, so it's less impressive relative to the GeForce competition at this resolution. Over the 5700 XT, we're talking nearly an 80% improvement.
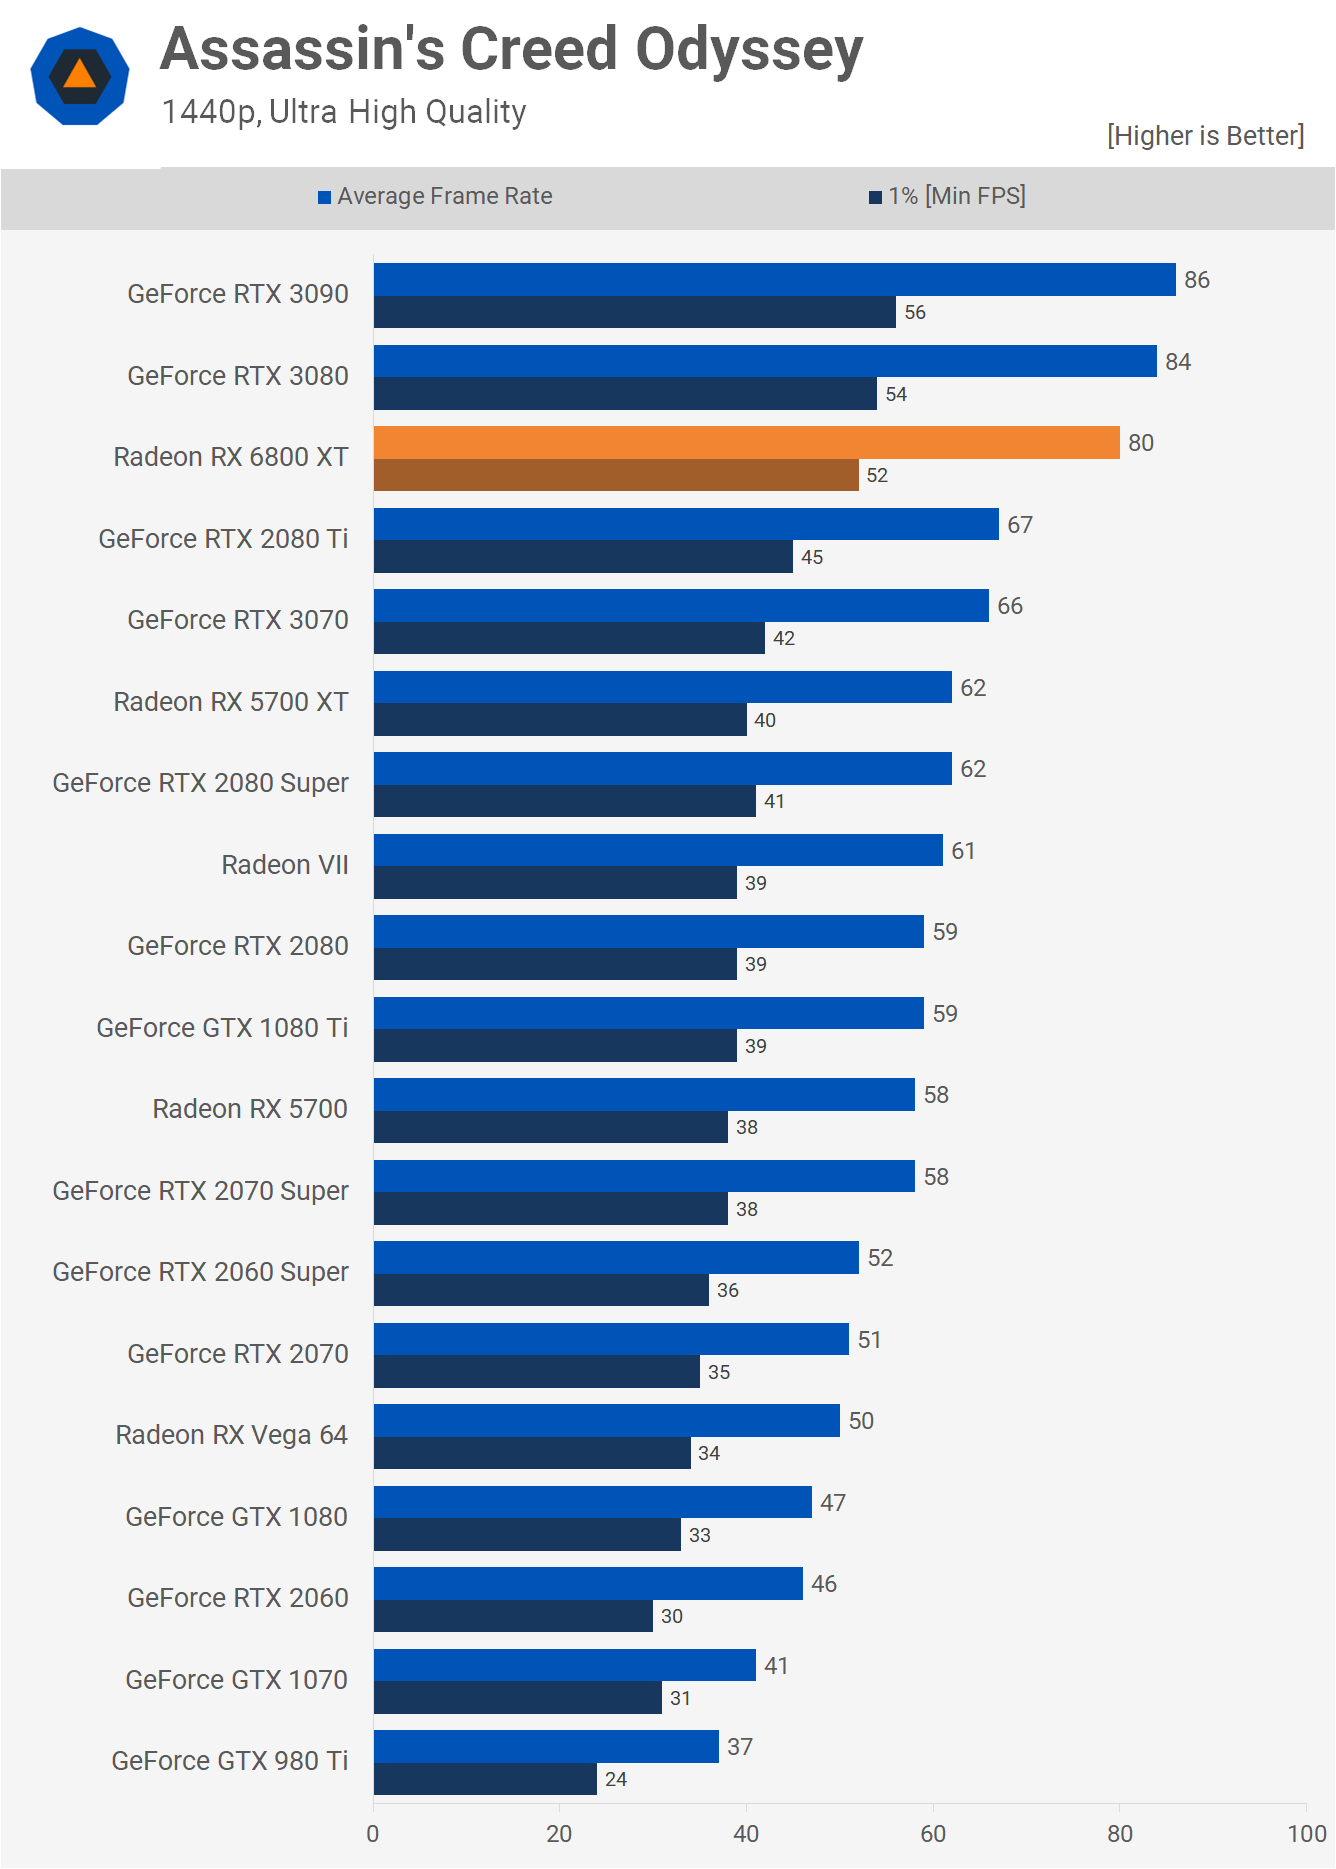
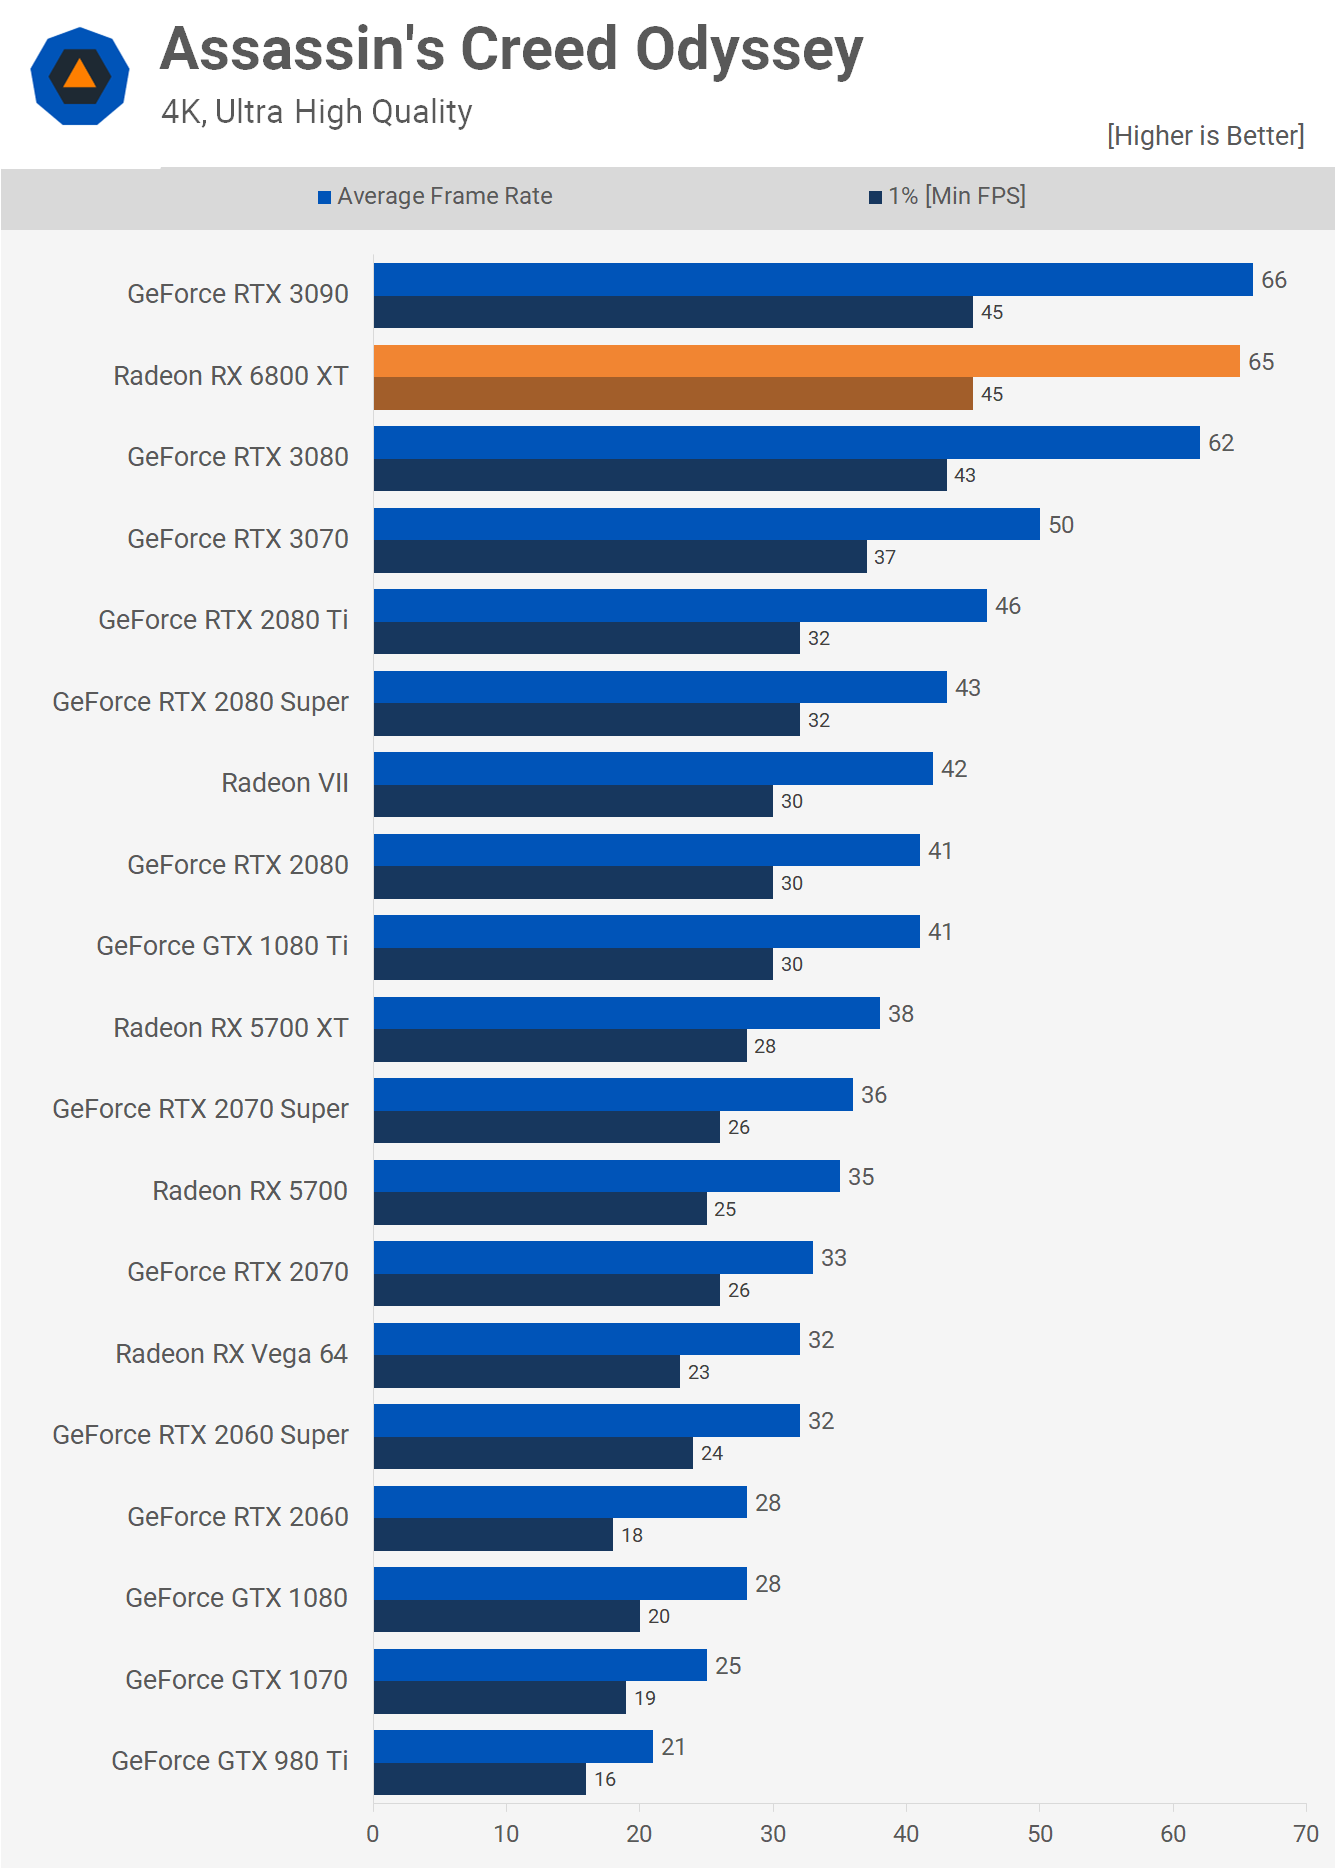
Assassin’s Creed Odyssey results are quite different to Valhalla. At 1440p, the 6800 XT is rendering fewer frames per second in Odyssey whereas the Ampere GPUs are rendering more. As a result, the 6800 XT was 5% slower at 1440p when compared to the RTX 3080 and just 29% faster than the 5700 XT. Then we see that quite unexpectedly the 6800 XT manages to overtake the 3080 at 4K, so scaling is at odds with everything we've seen previously. The 6800 XT ends up slightly faster than the 3080 and 71% faster than the 5700 XT.
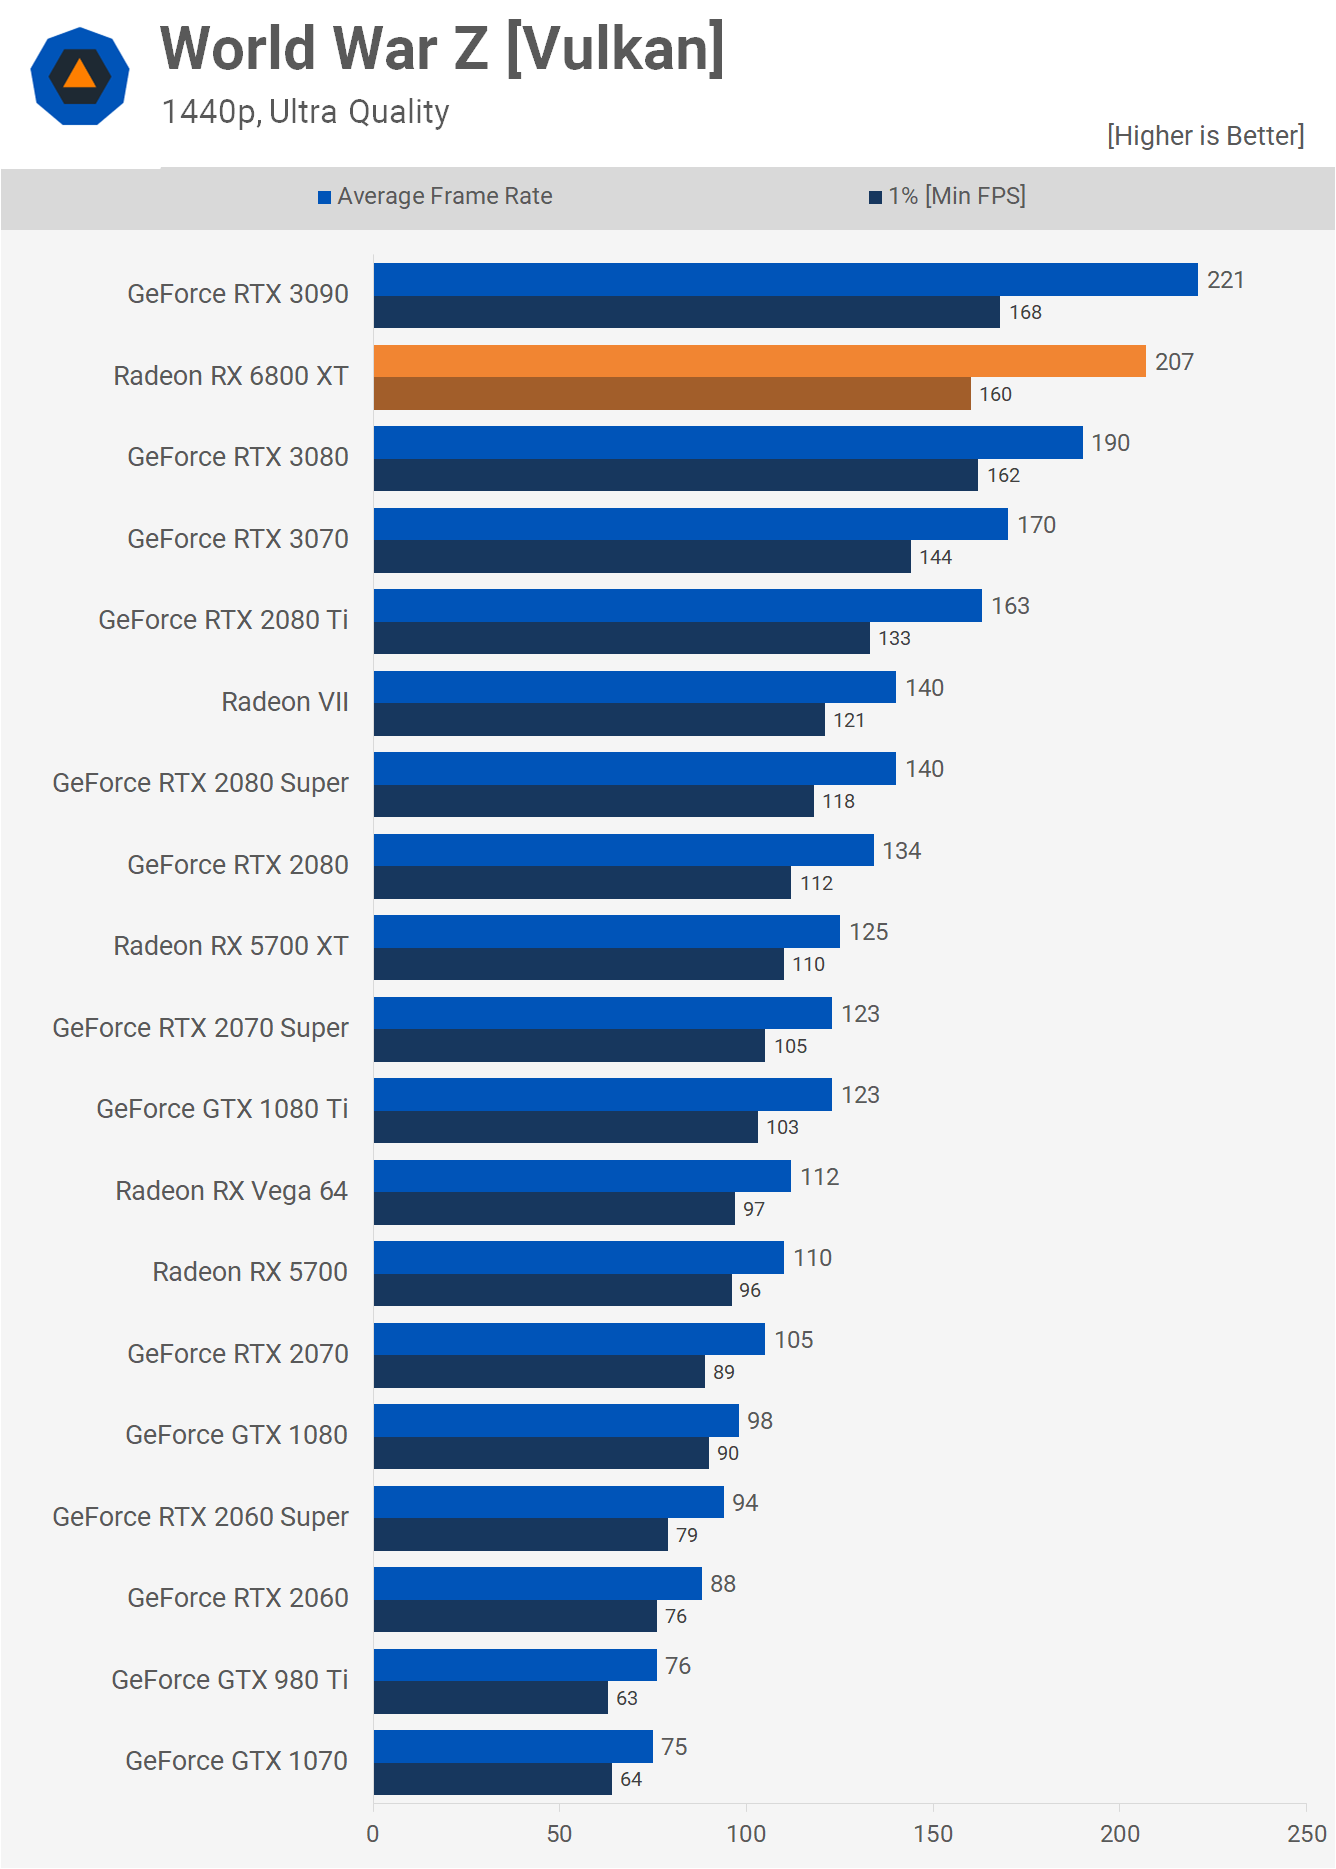
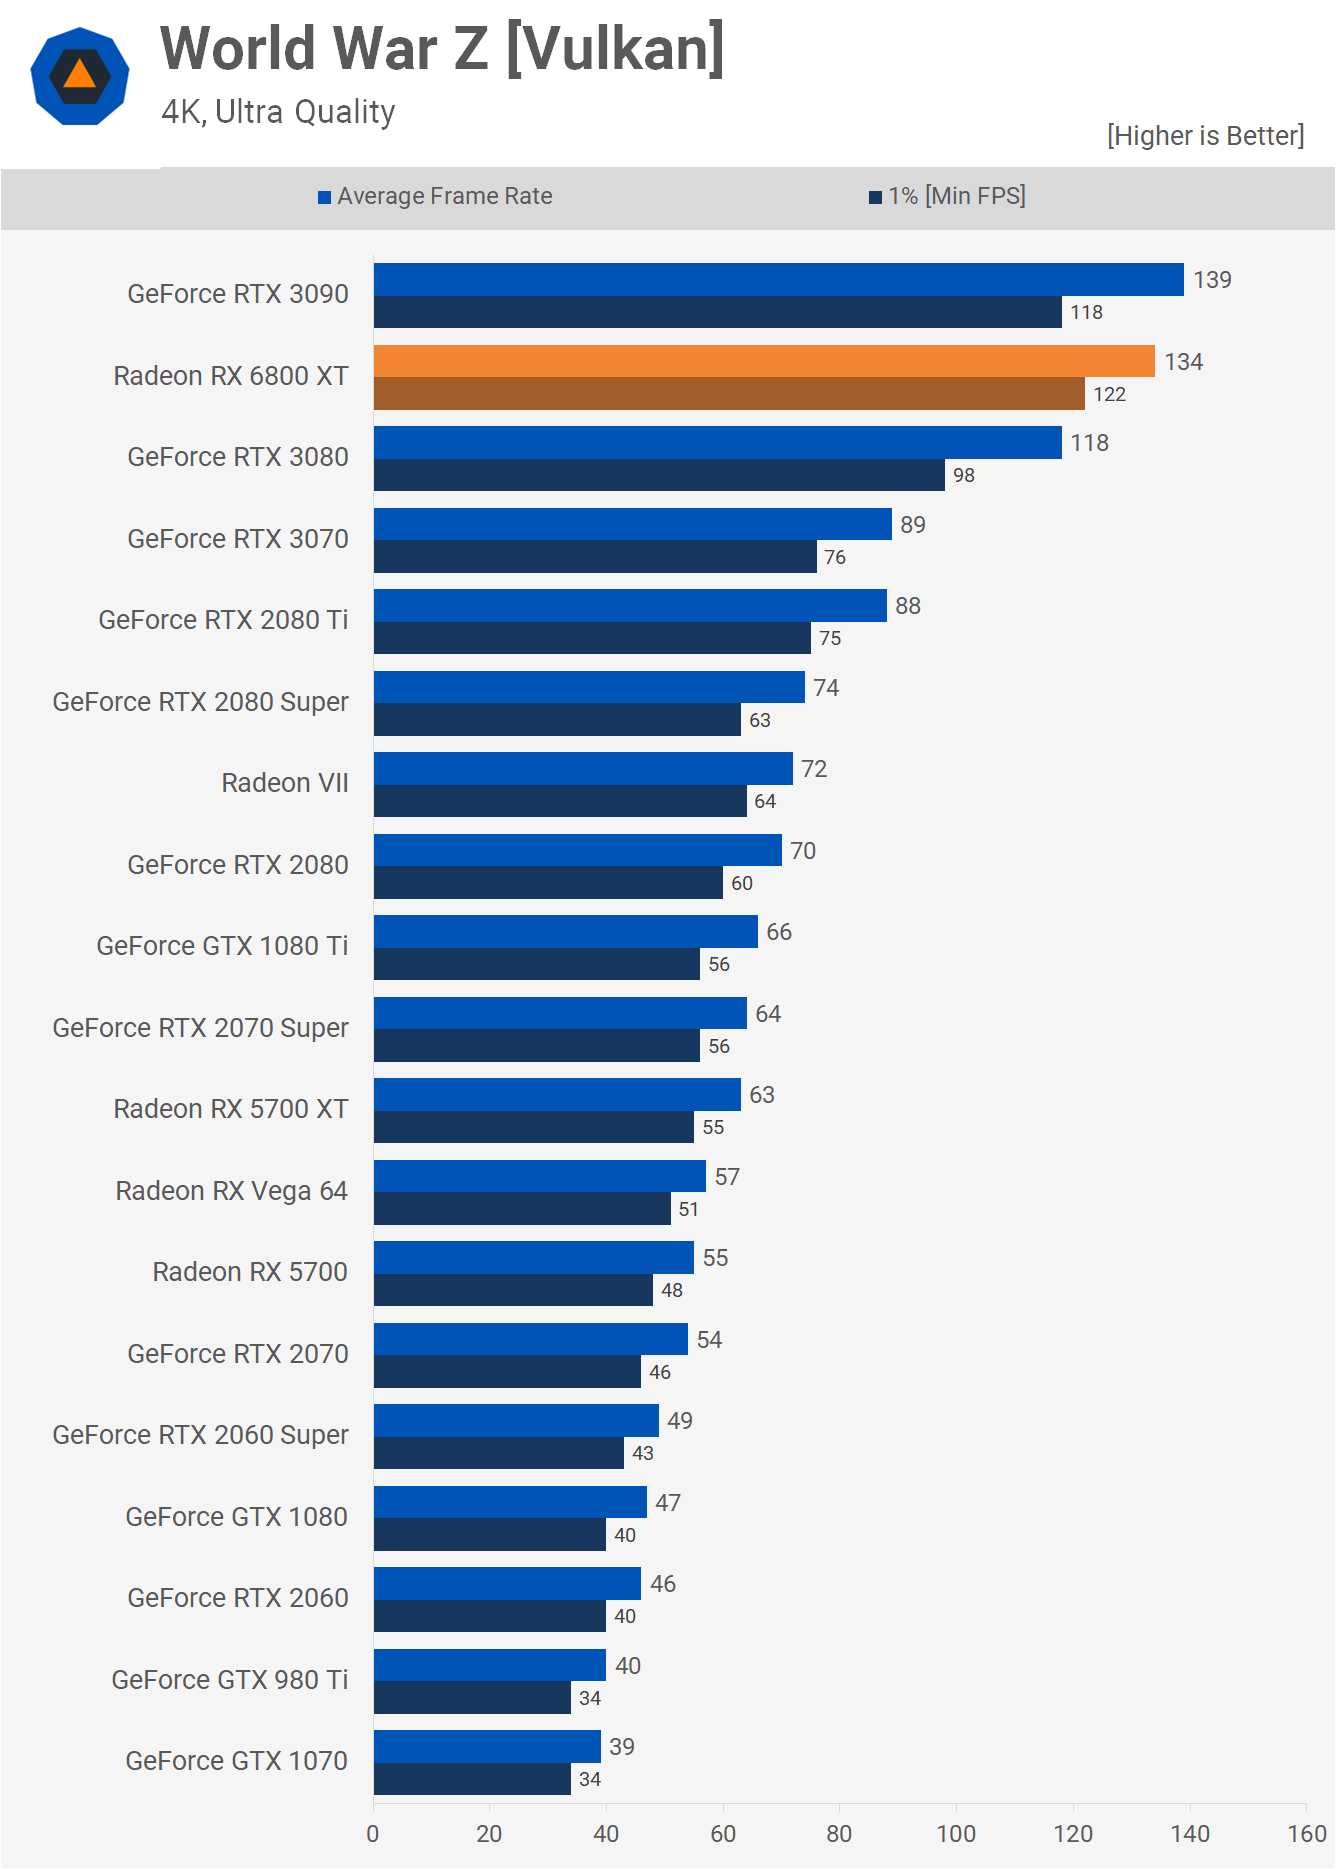
World War Z finds the 6800 XT situated between the RTX 3090 and 3080 at 1440p, beating the latter by a 9% margin with 207 fps on average. And here’s another example at 4K where the 6800 XT is able to pull further ahead of the 3080. This time beating it by a 14% margin to come in just behind the RTX 3090.
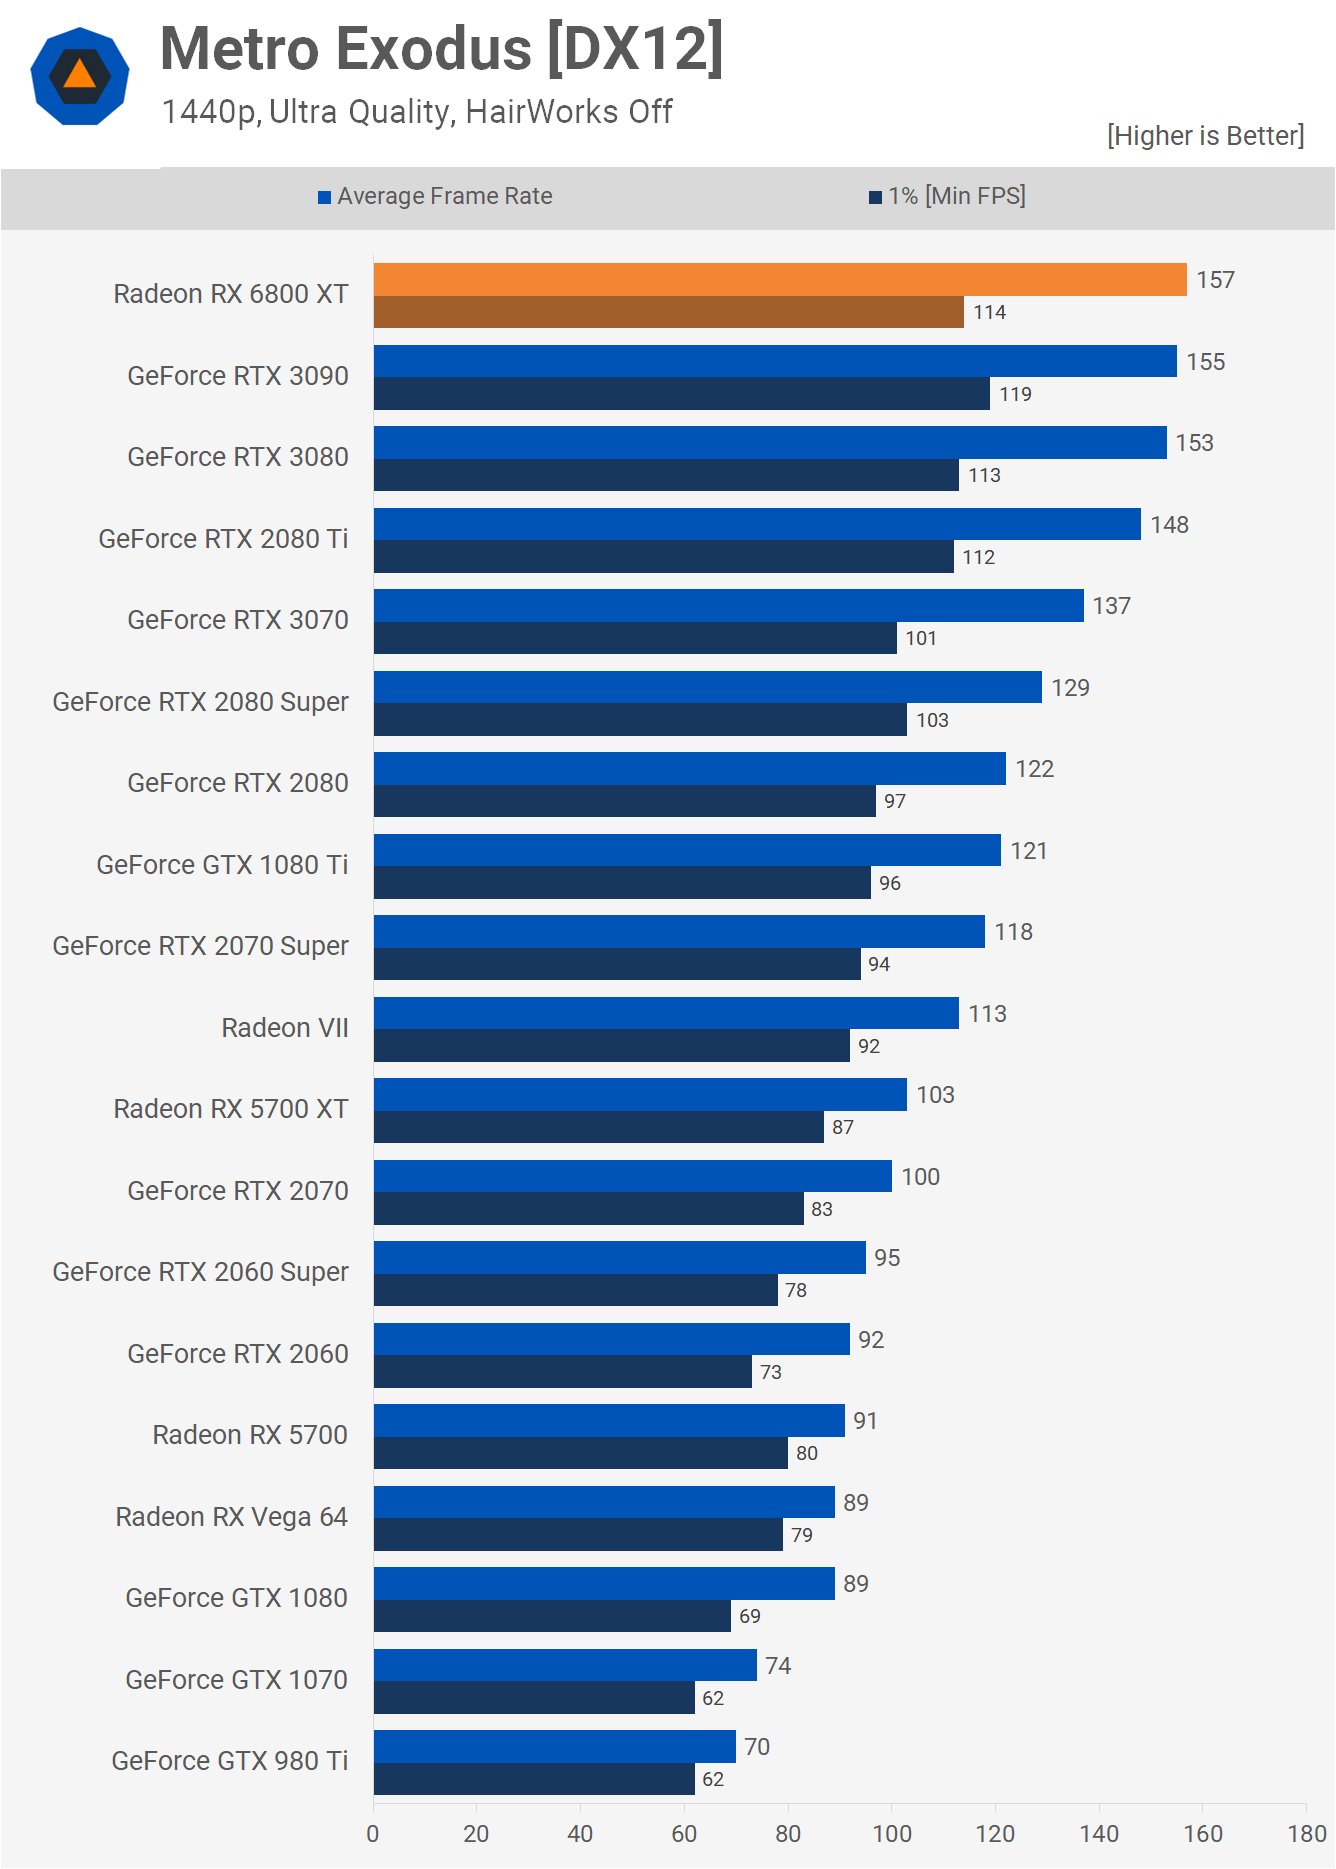
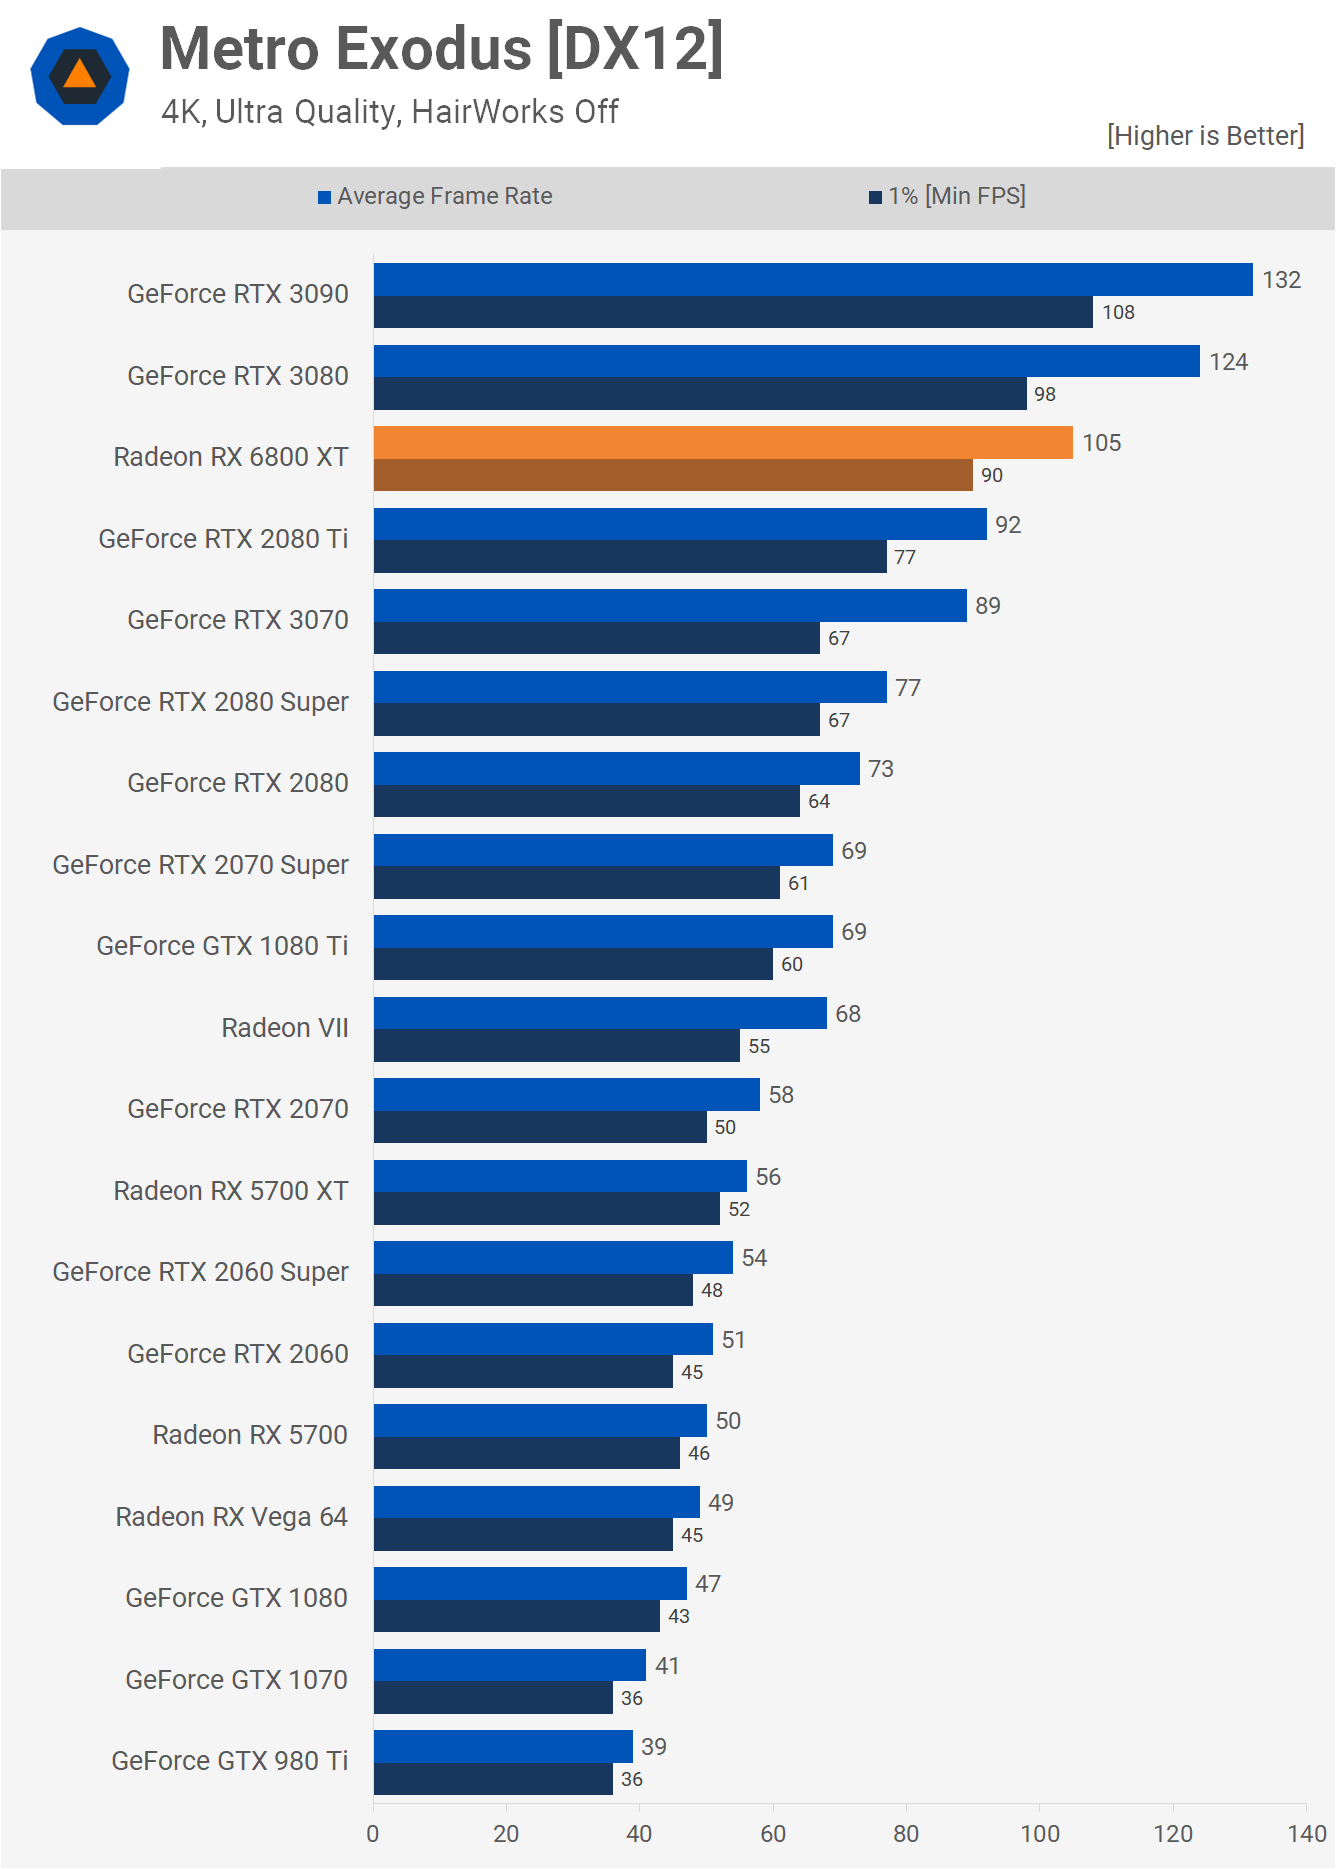
We’re running into a slight CPU bottleneck in Metro Exodus at 1440p with these higher end GPUs, and while we do plan to swap to the 5950X as soon as we can, that testing will require a lot of time. The 4K data is in no way CPU limited and there the 6800 XT falls behind the RTX 3080 by a 15% margin, which is a substantial difference, though 105 fps on average at 4K is still pretty good.
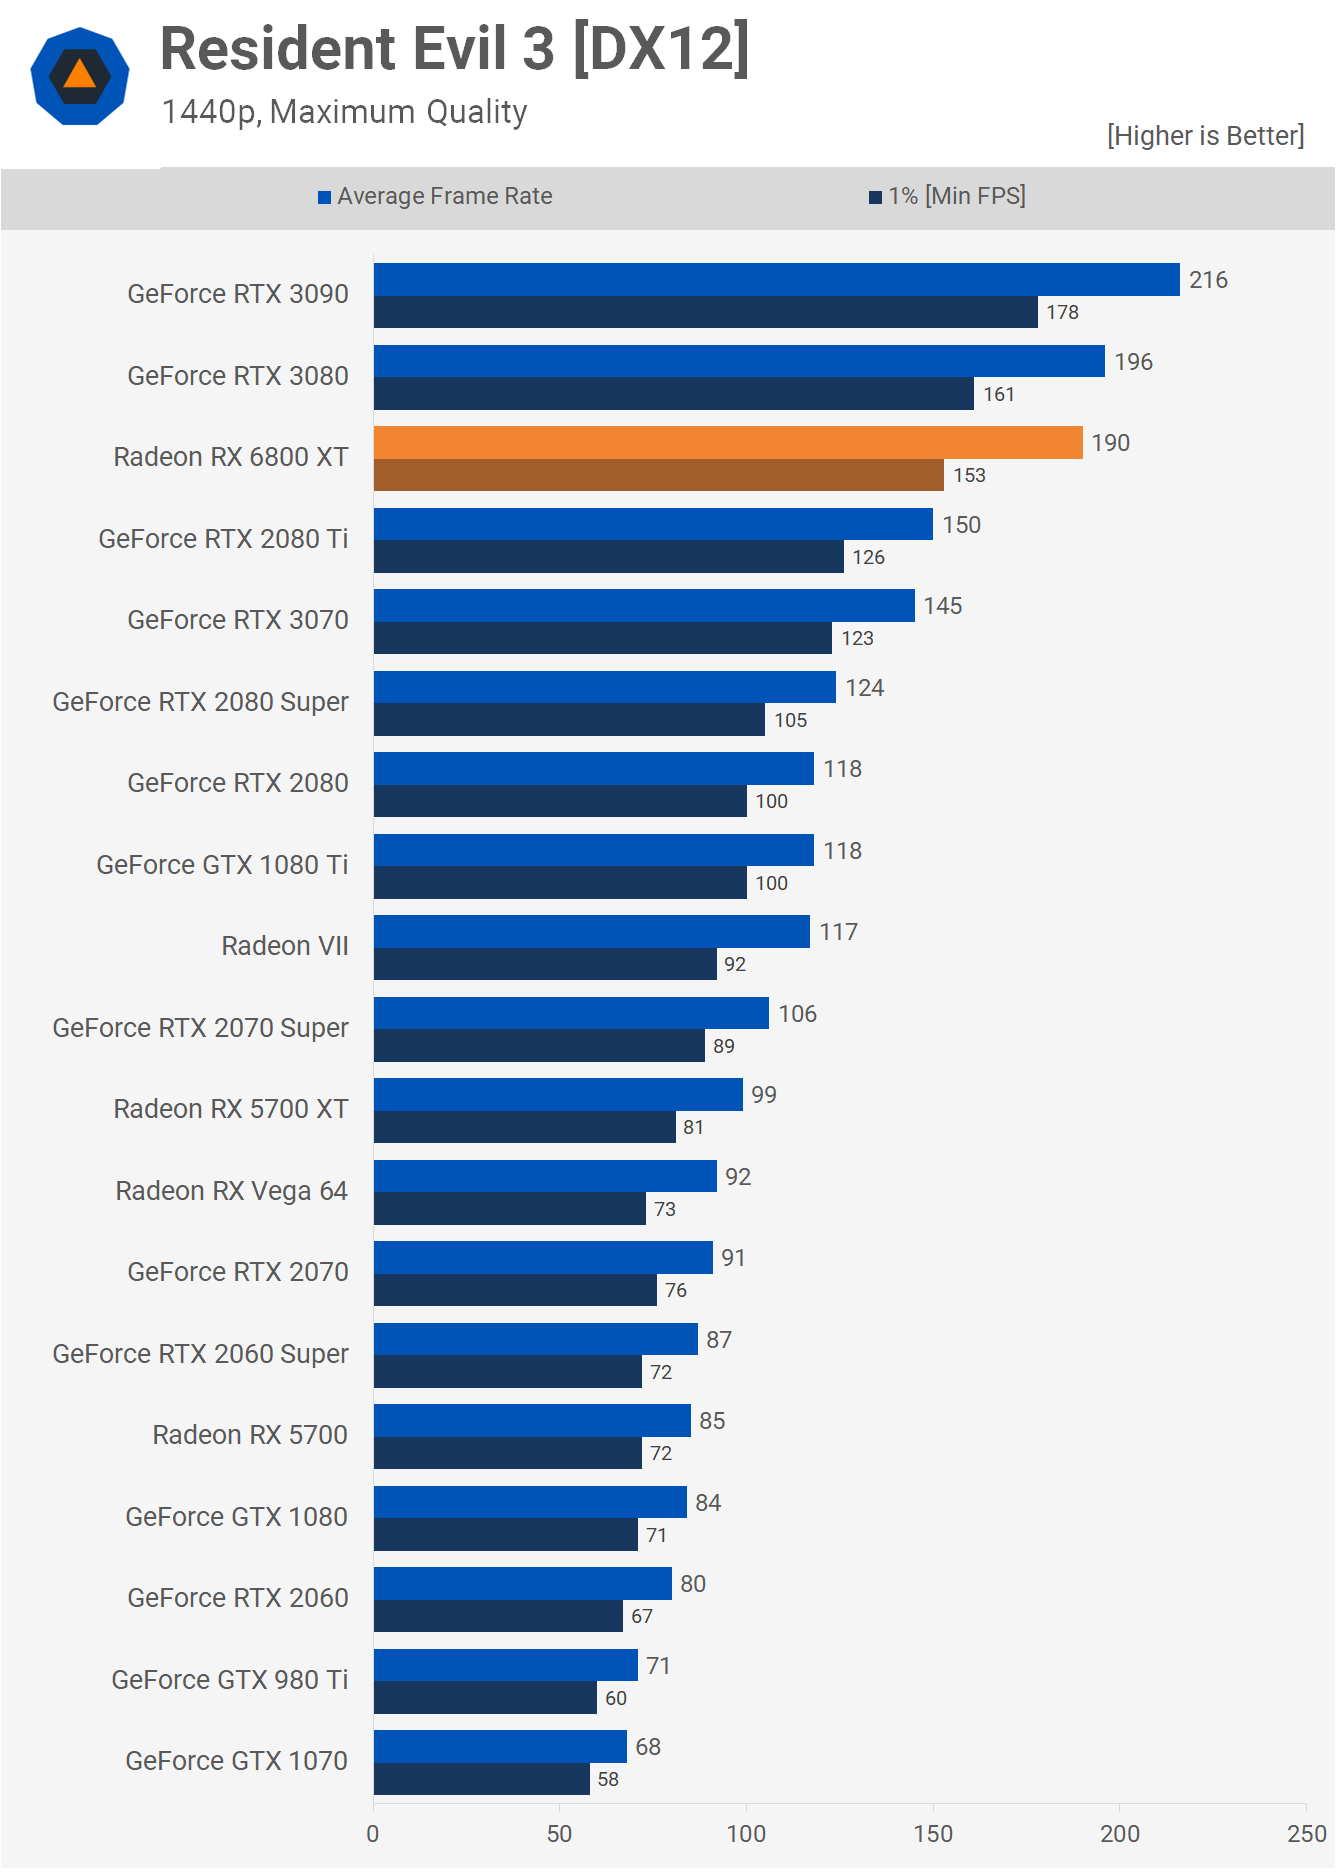
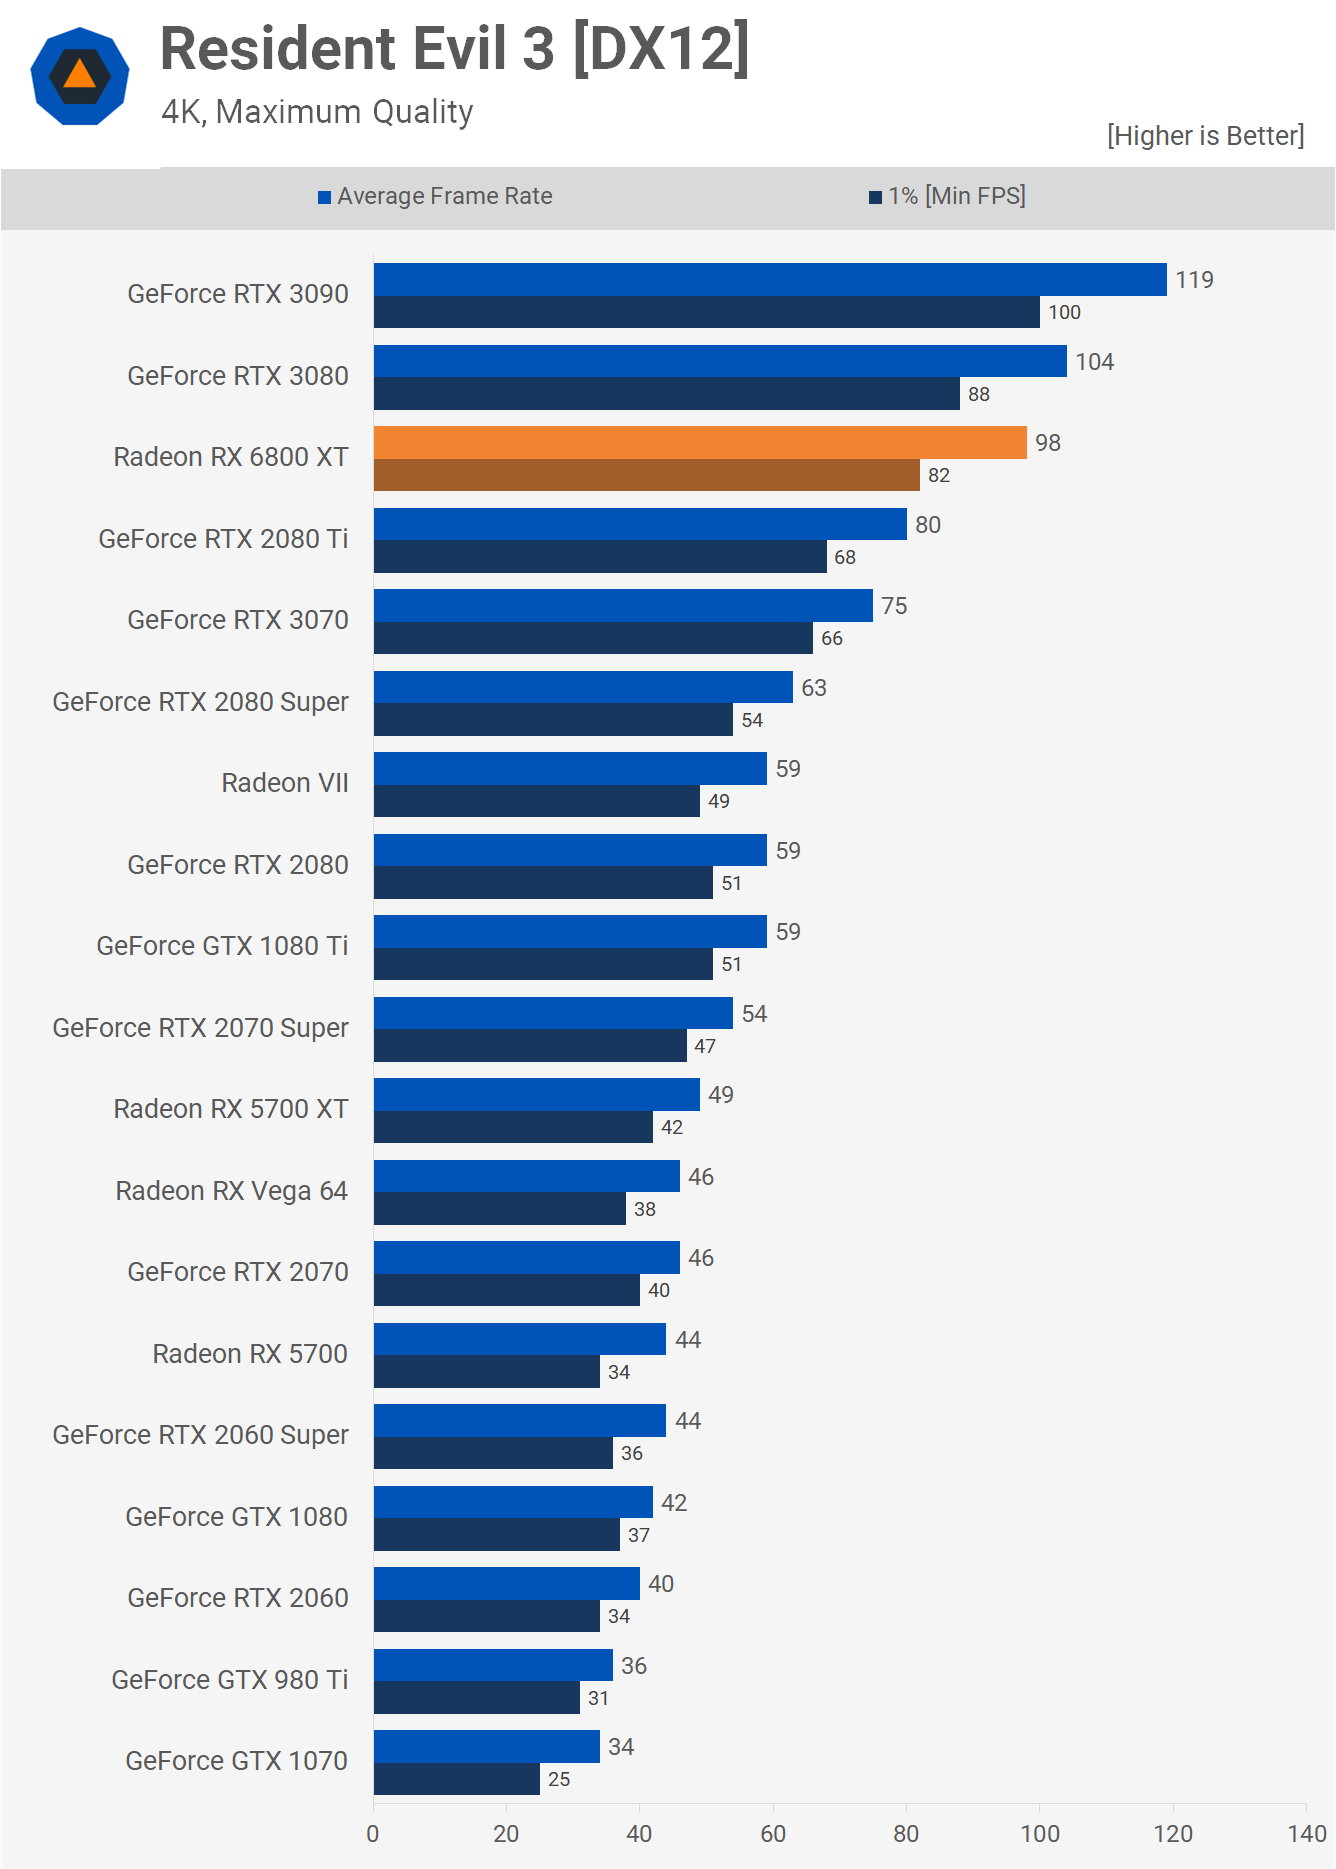
Testing with Resident Evil 3 shows the 6800 XT trailing the RTX 3080 by a 3% margin at 1440p, which is a comparable level of performance. That's an incredible 92% performance uplift over the 5700 XT and a 27% boost over Nvidia's previous generation flagship part. Then at 4K the 6800 XT is 6% slower than the RTX 3080. Not a huge margin, but this is more evidence that the RTX 3080 tends to be better suited to 4K gaming.
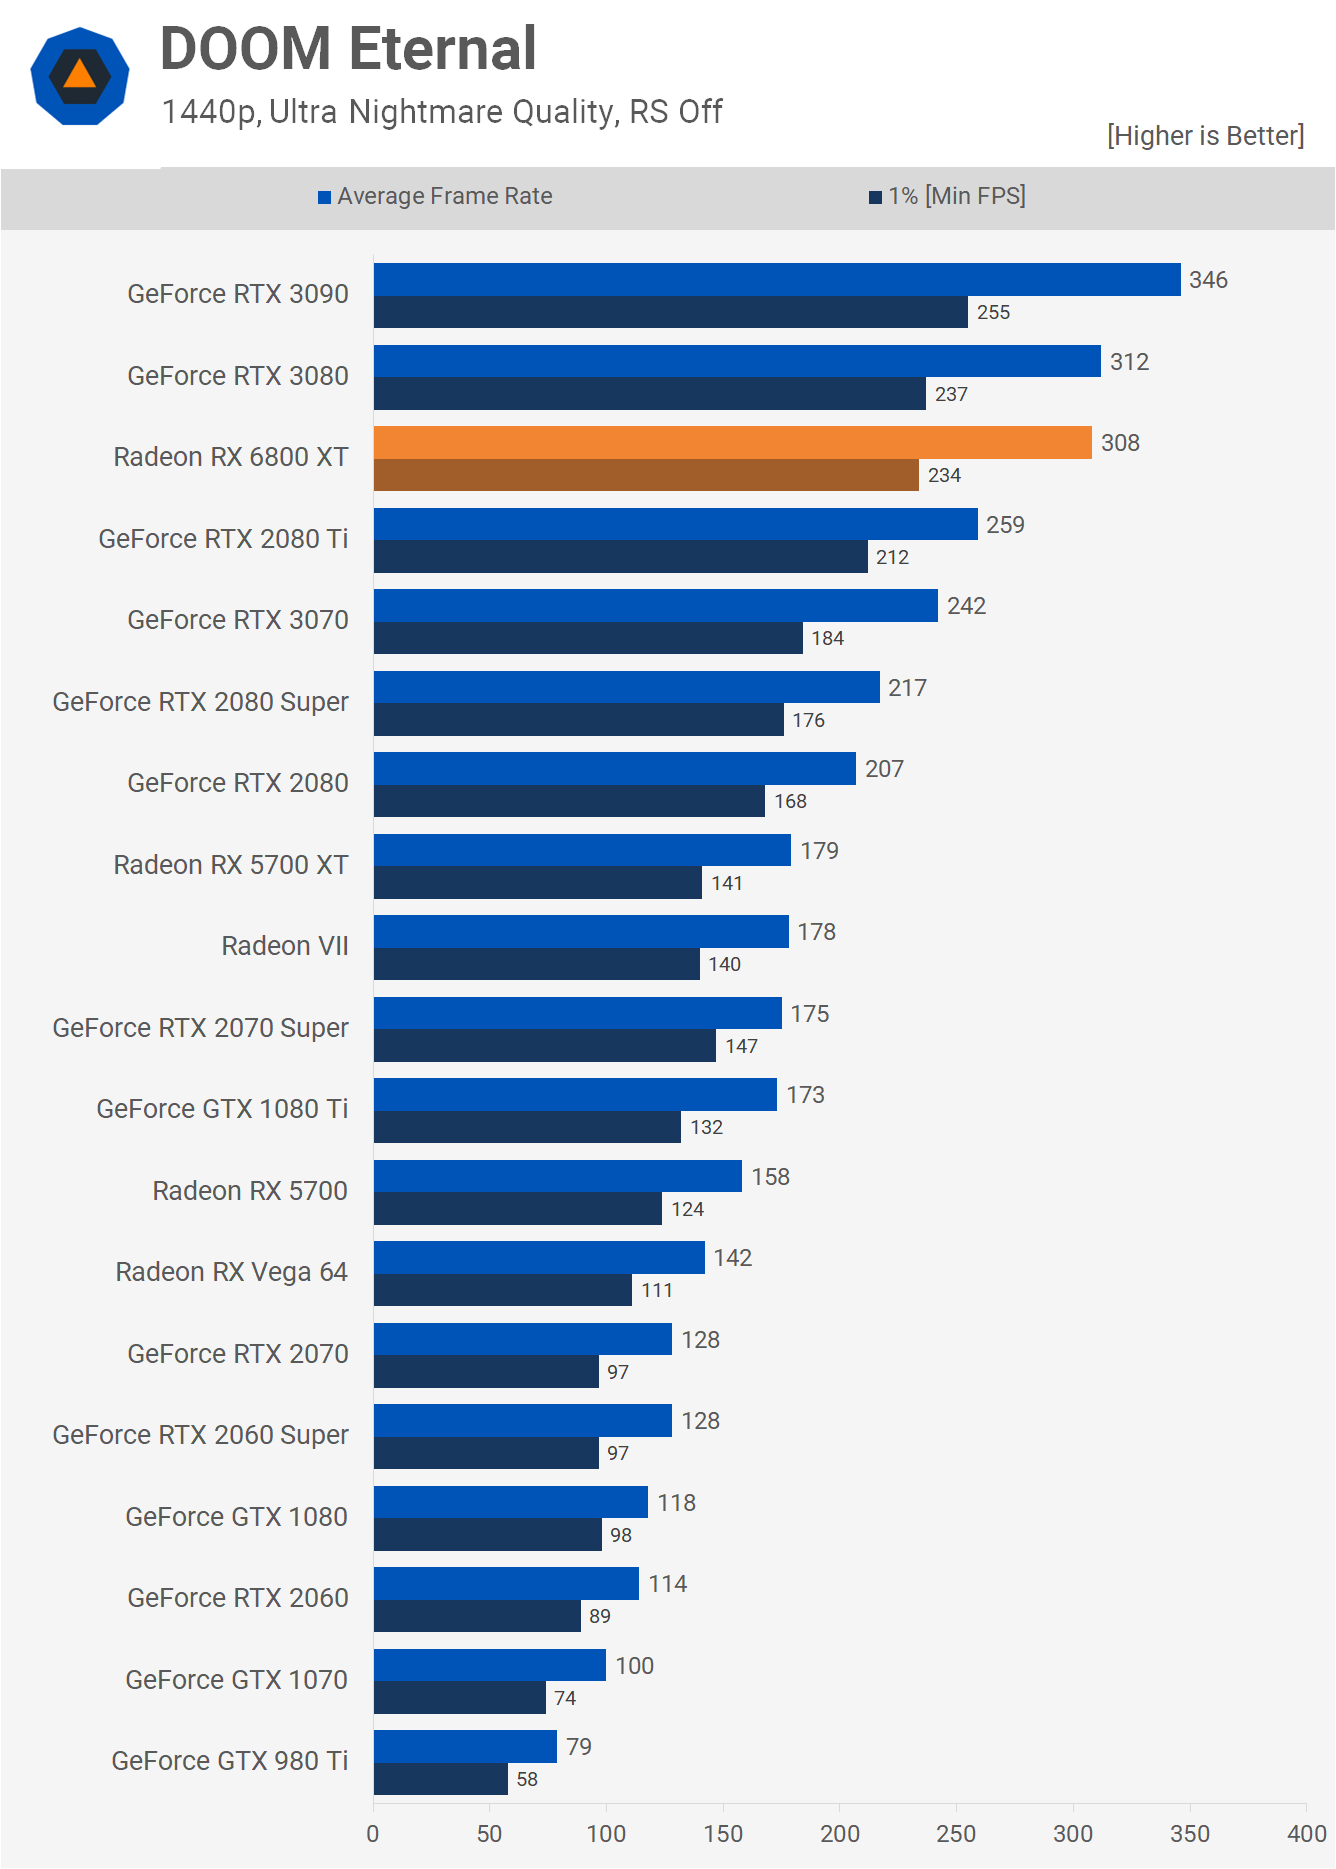
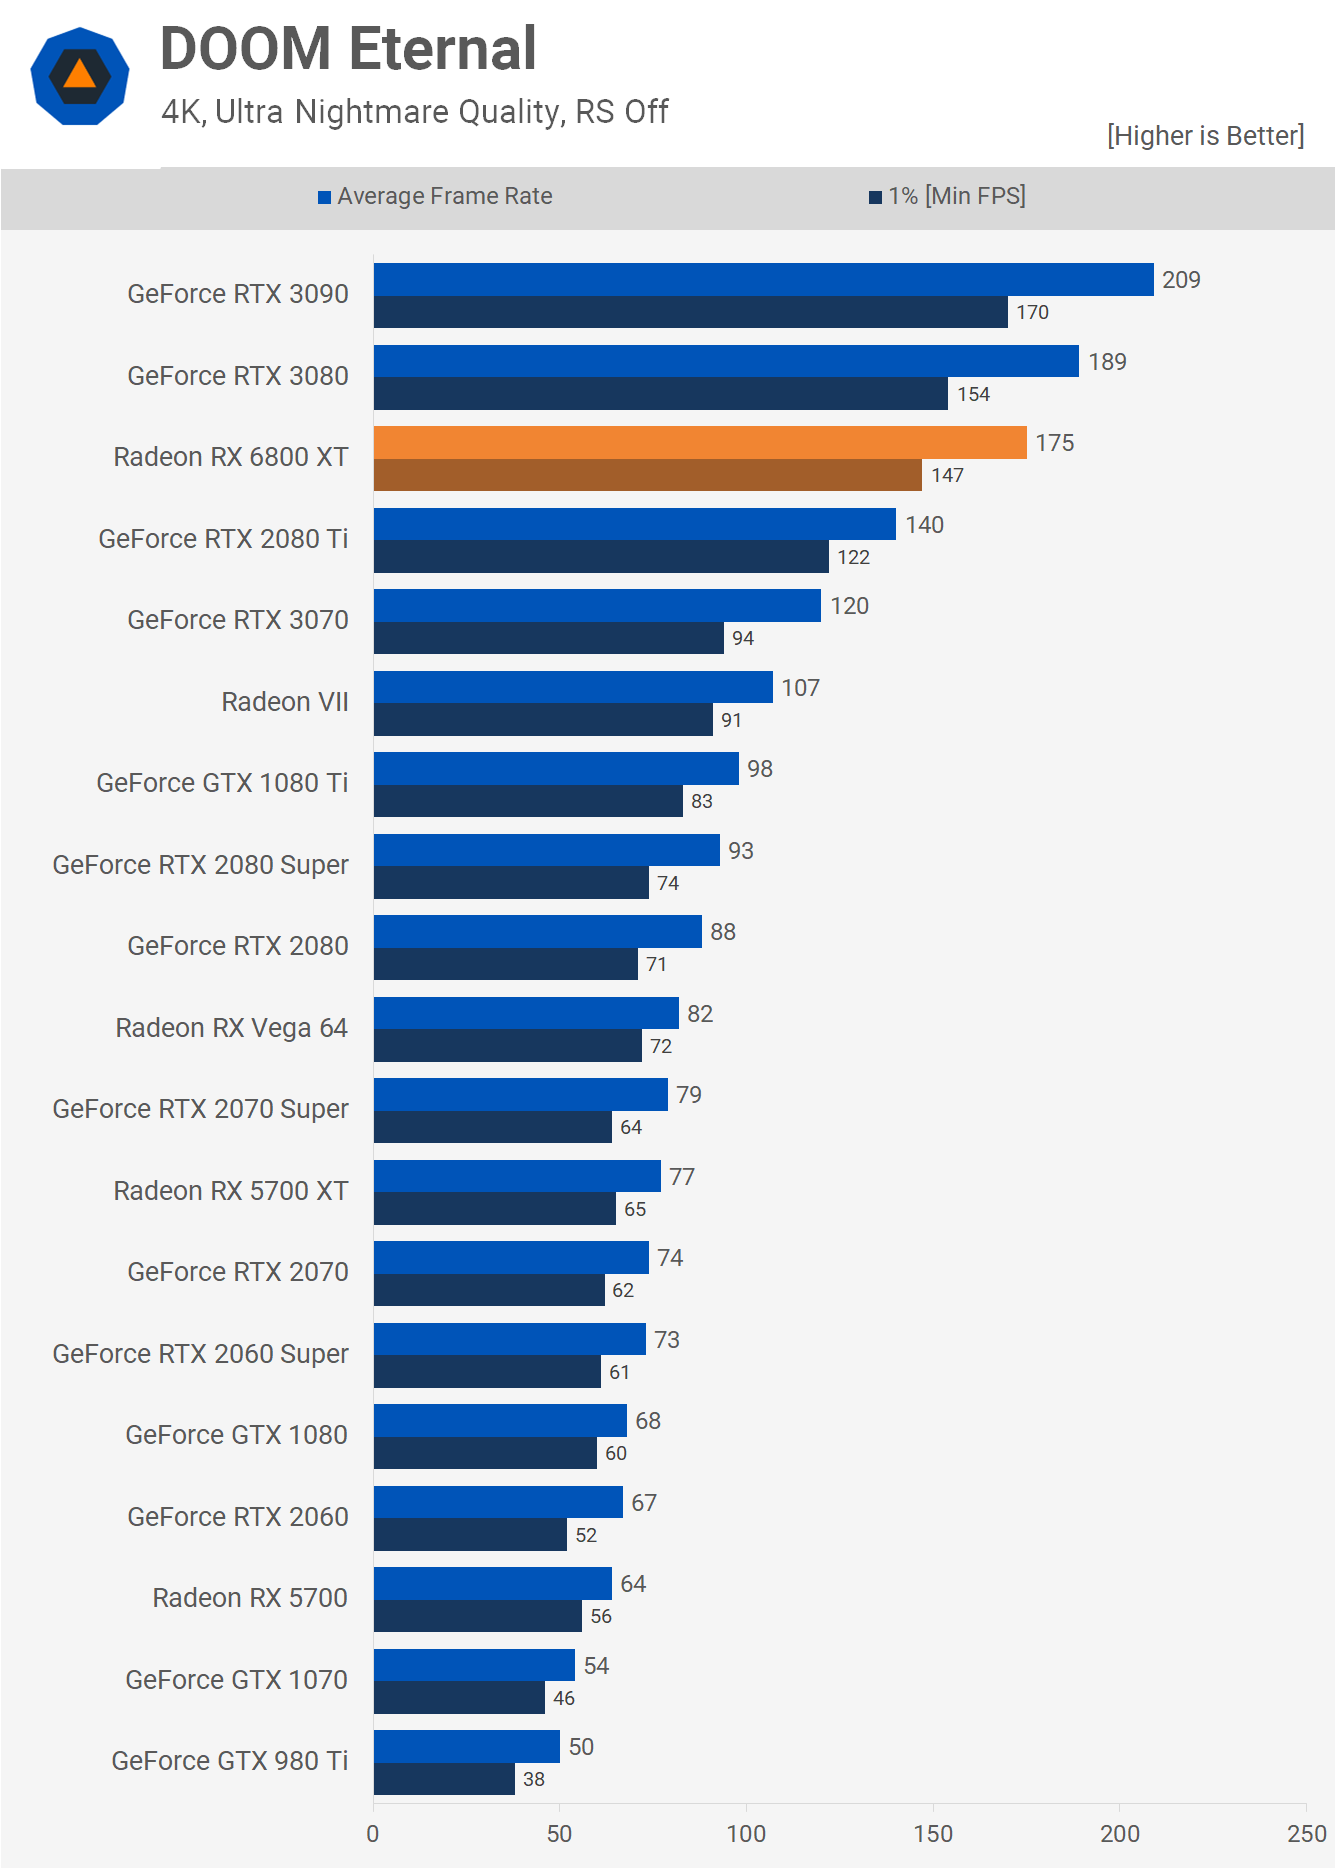
Doom Eternal sees the 6800 XT pumping out over 300 fps at 1440p to deliver RTX 3080-like performance, and that meant it was 72% faster than the 5700 XT and Radeon VII GPUs. That massive 16GB VRAM buffer comes in handy at 4K with the ultra nightmare texture quality as it allowed the 6800 XT to beat the 5700 XT by a 127% margin. Performance relative to the high-end Ampere GPUs was also good, as the 6800 XT trailed the 3080 by just 7%.
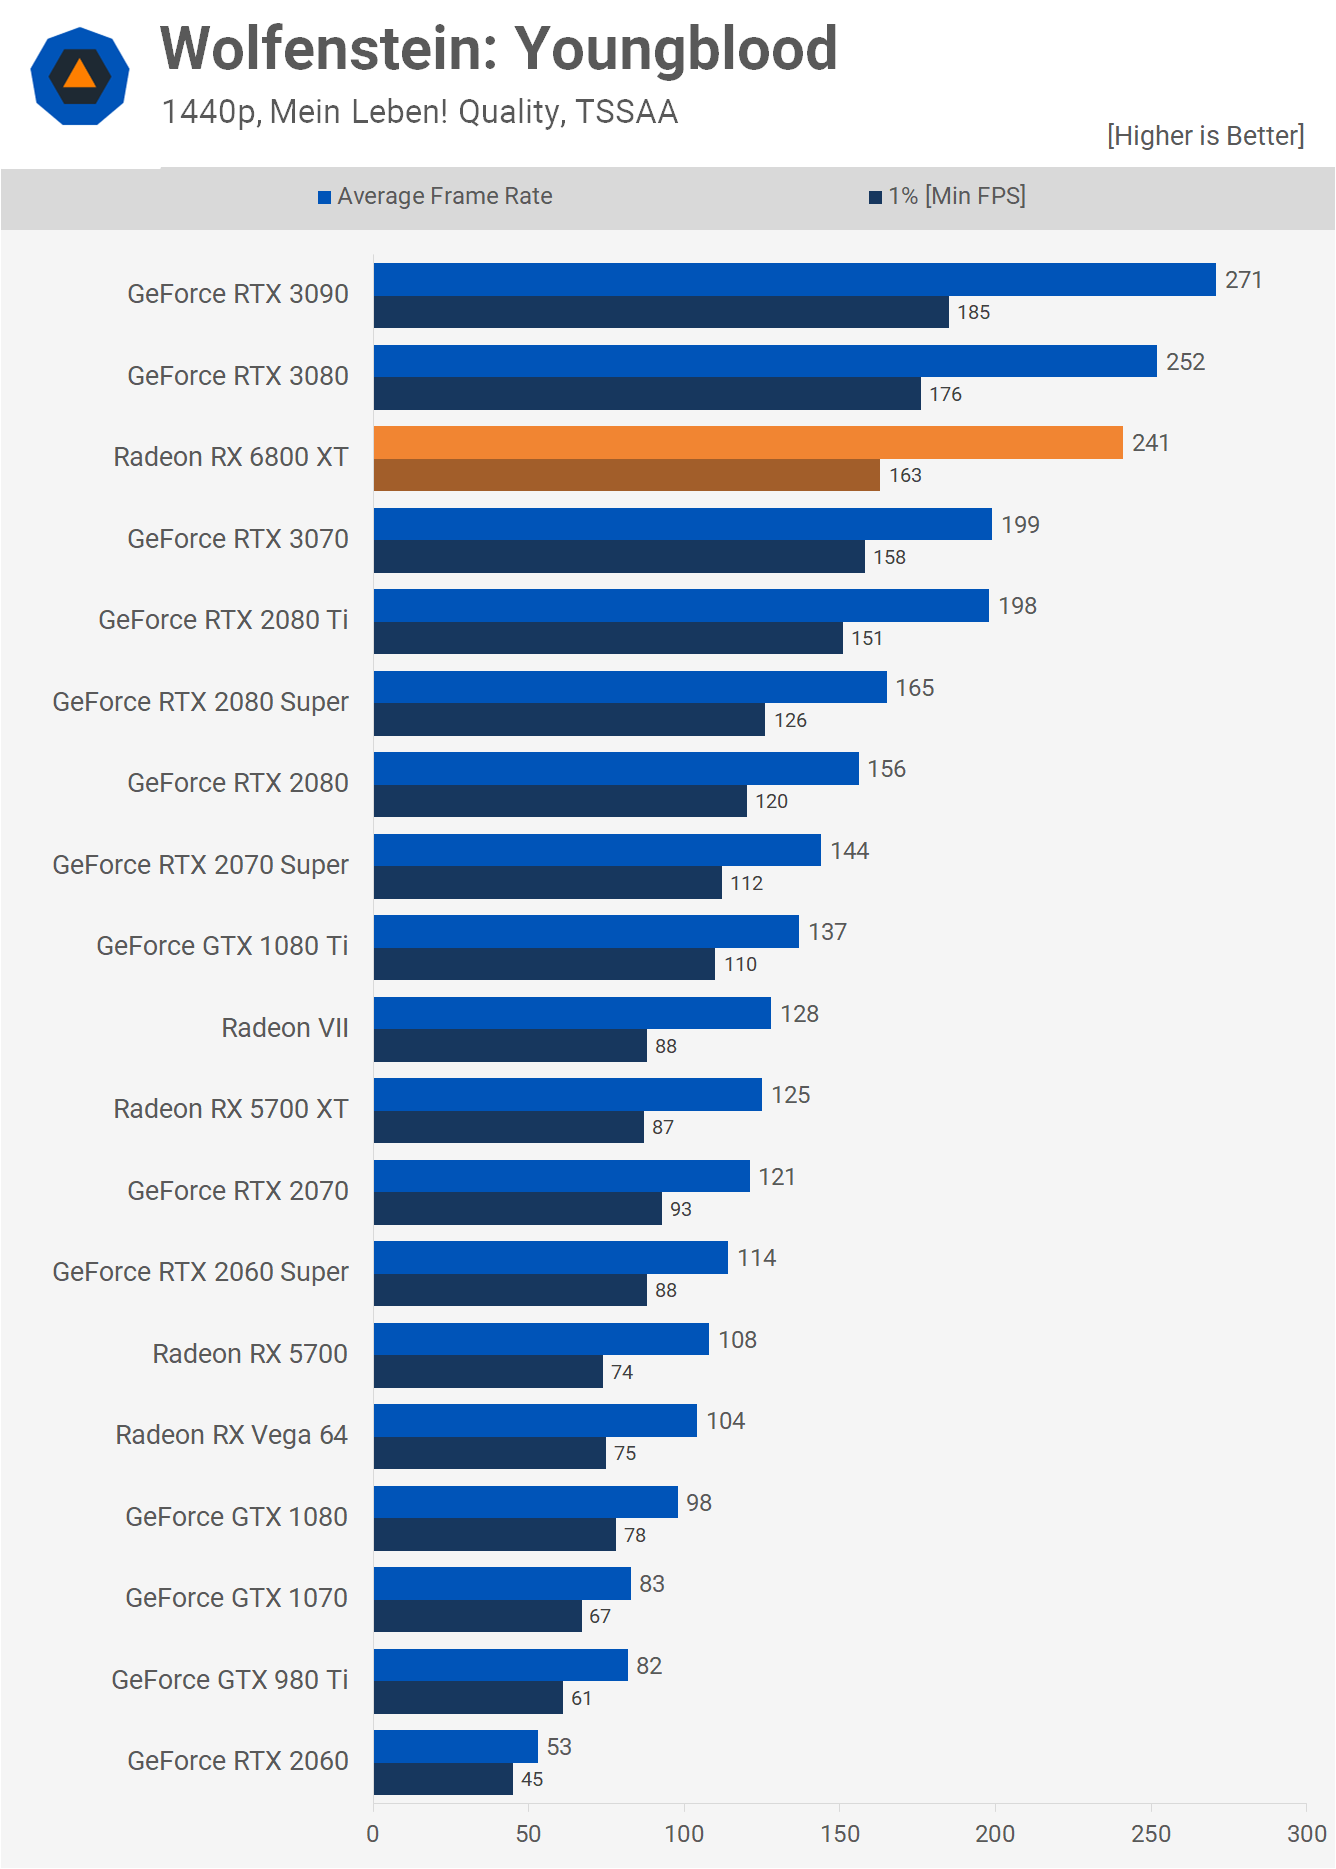
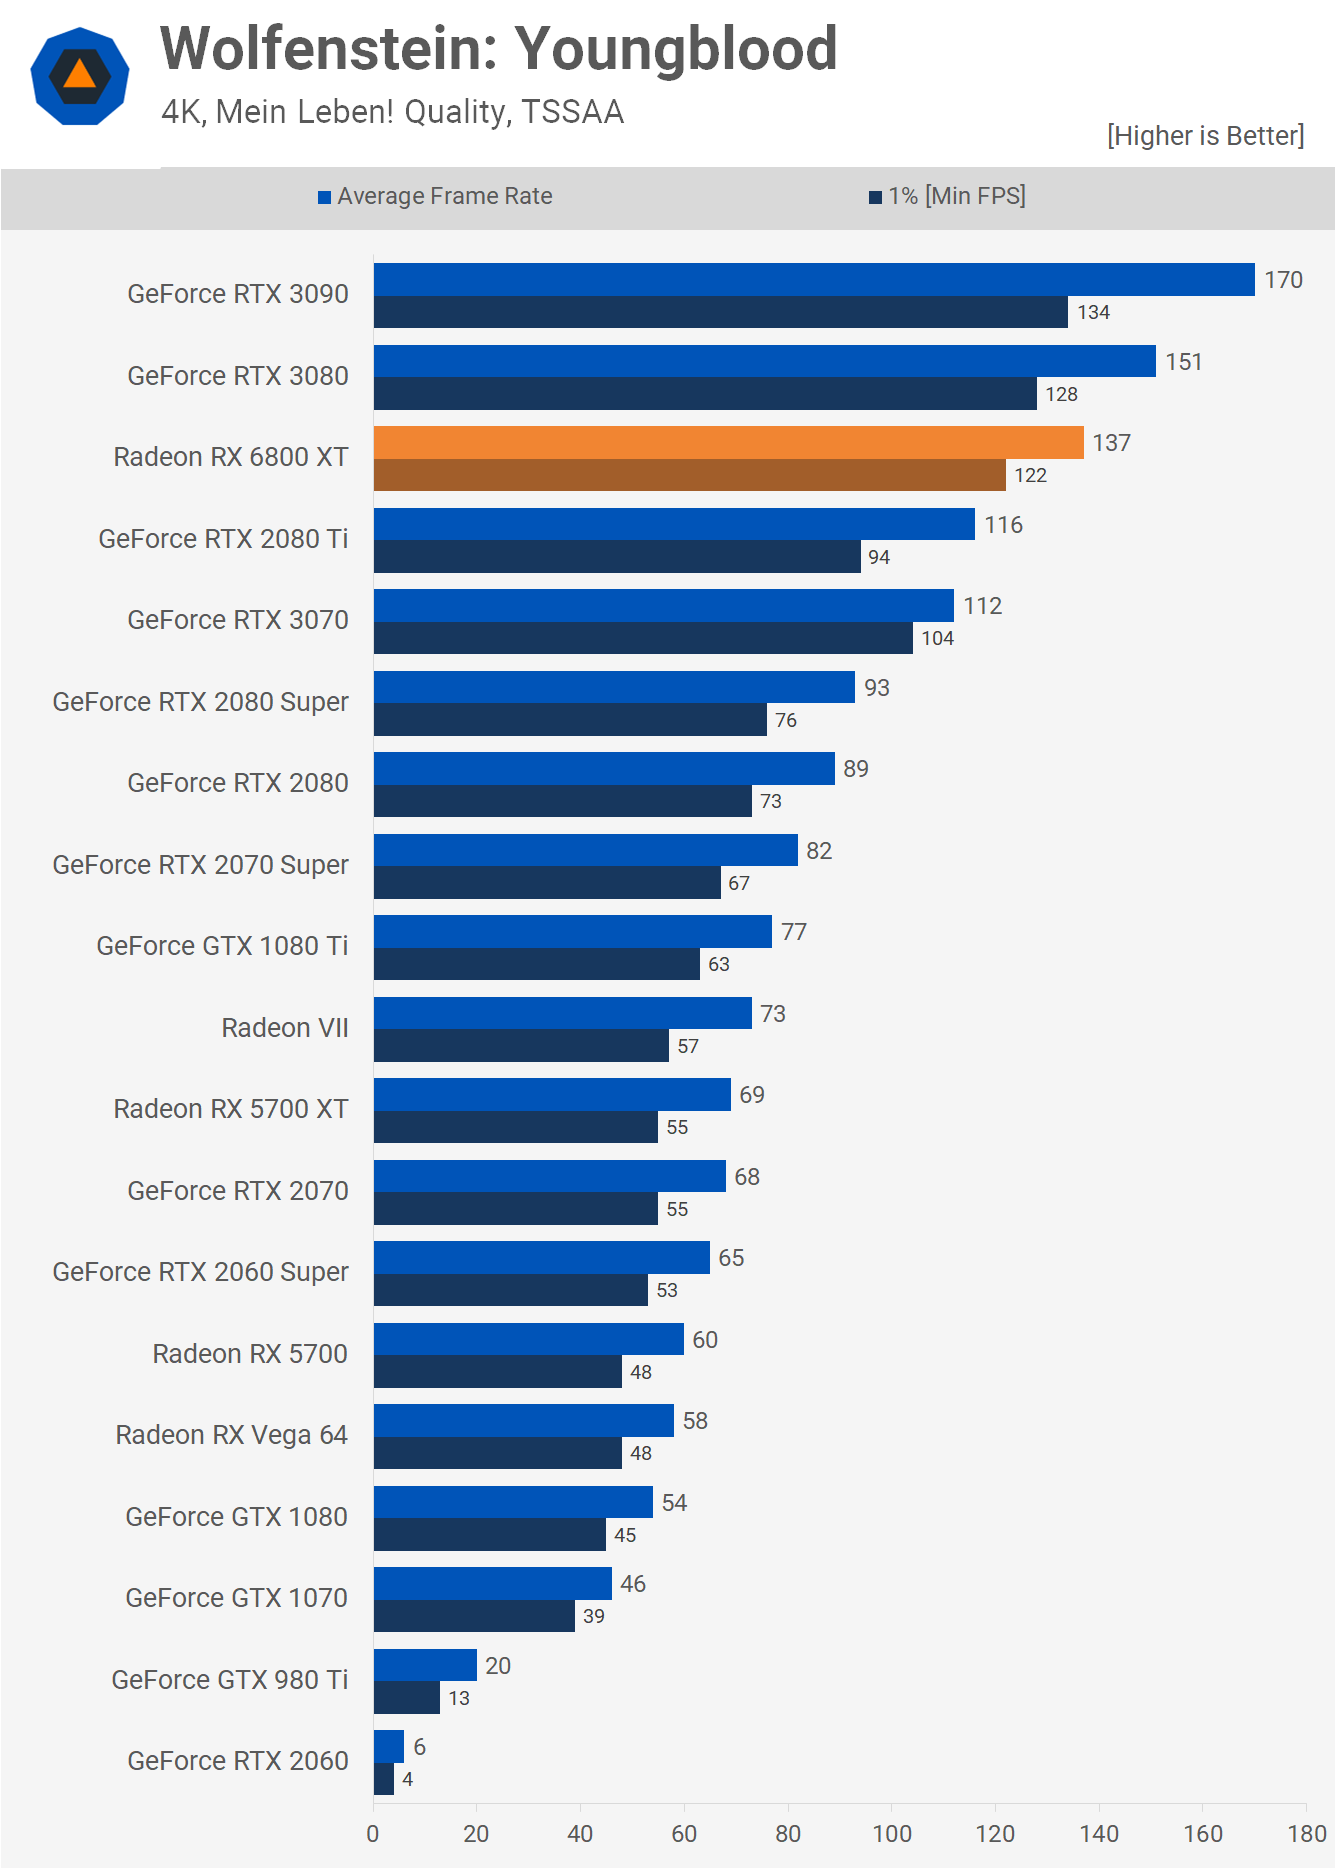
Wolfenstein: Youngblood at 1440p sees 241 fps from the 6800 XT, making it 4% slower than the RTX 3080. This is yet another title where we're seeing over a 90% performance uplift from the 5700 XT. The Radeon RX 6800 XT is just as impressive at 4K despite losing ground to the RTX 3080, which as we've seen time and time again, typically comes alive at this higher resolution as it's able to load up its cores. The 6800 XT was 9% slower in Youngblood with 137 fps on average.
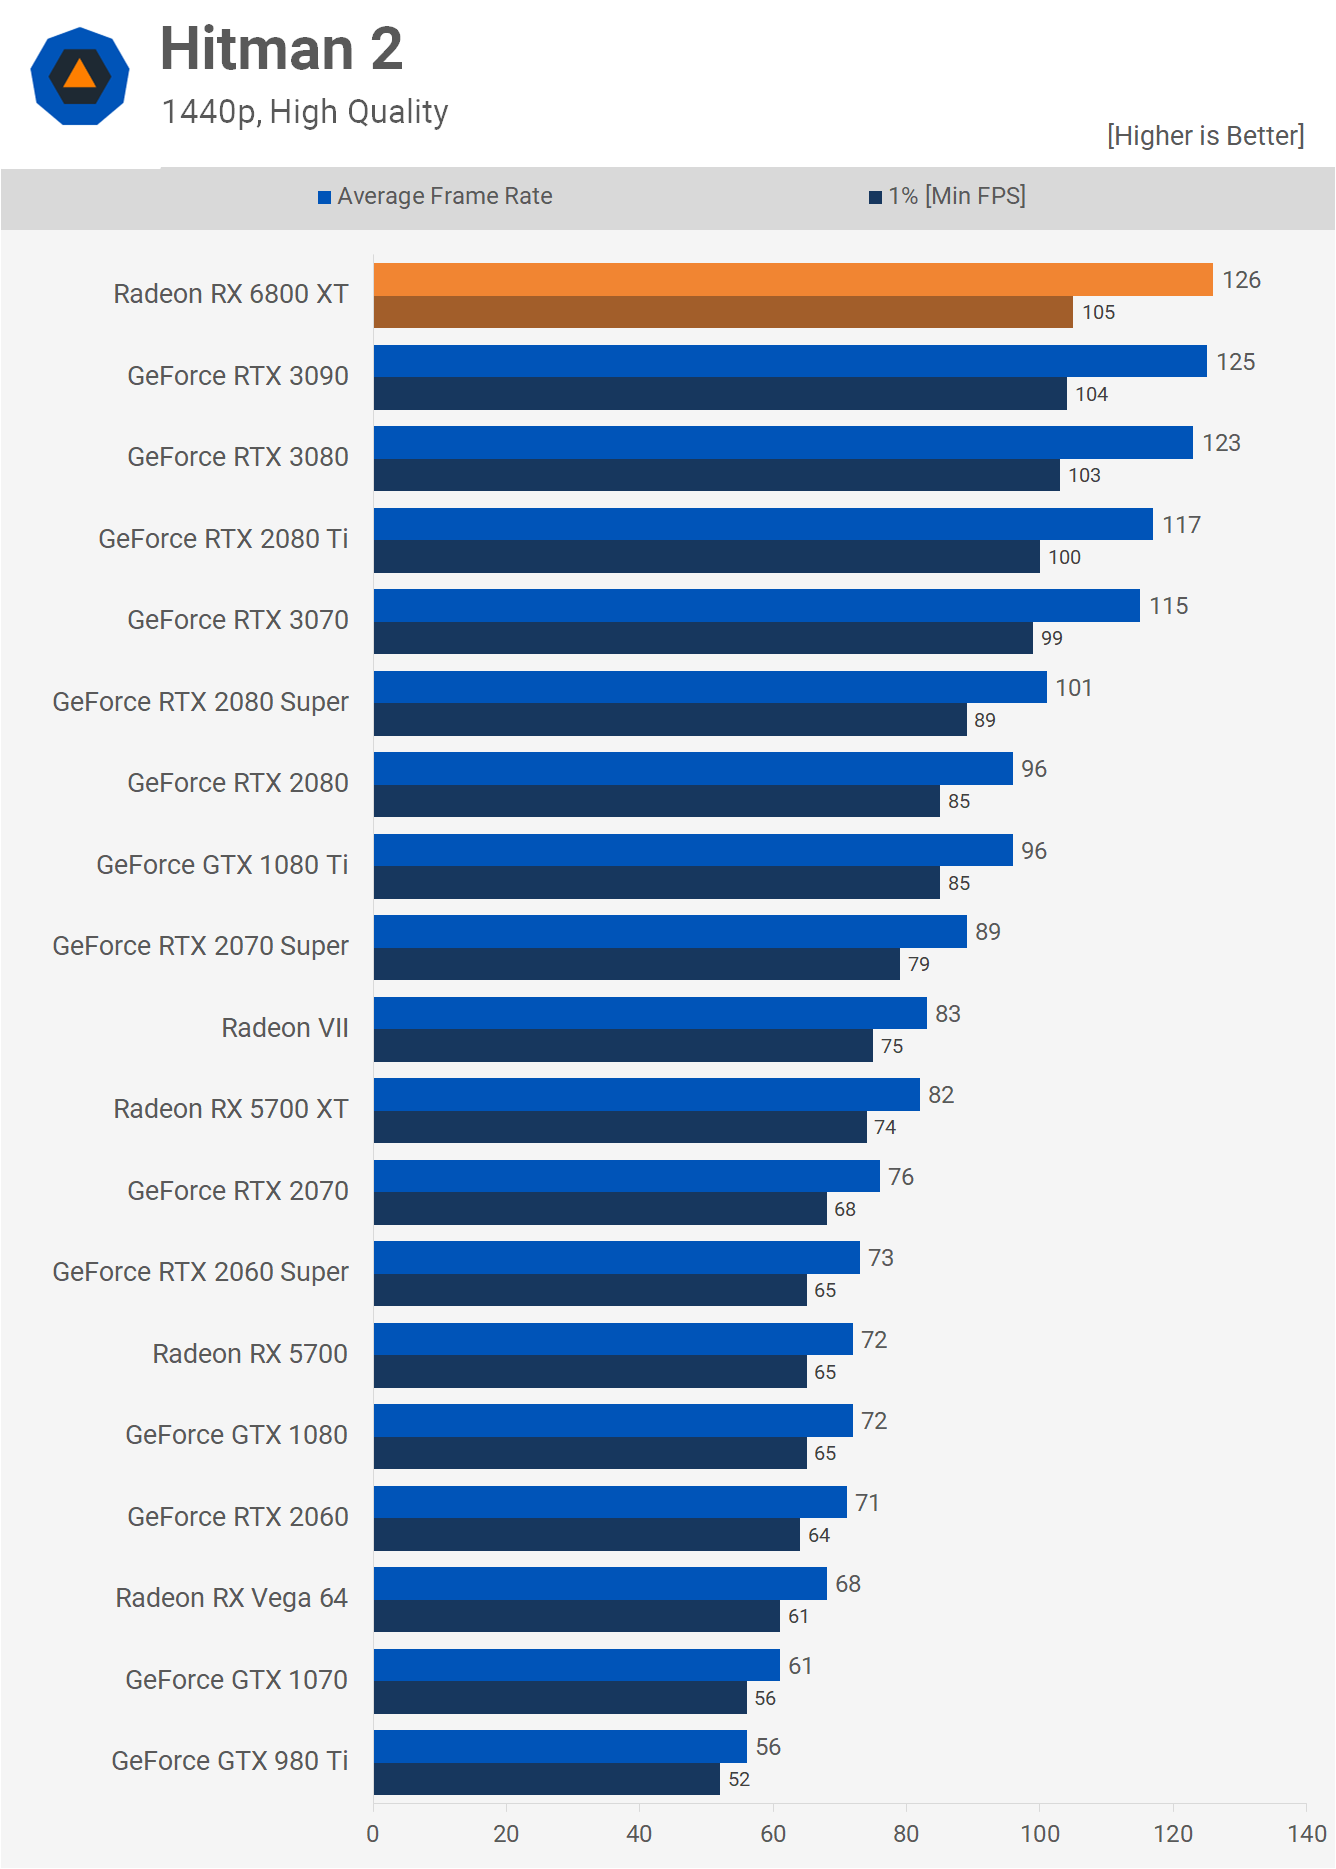
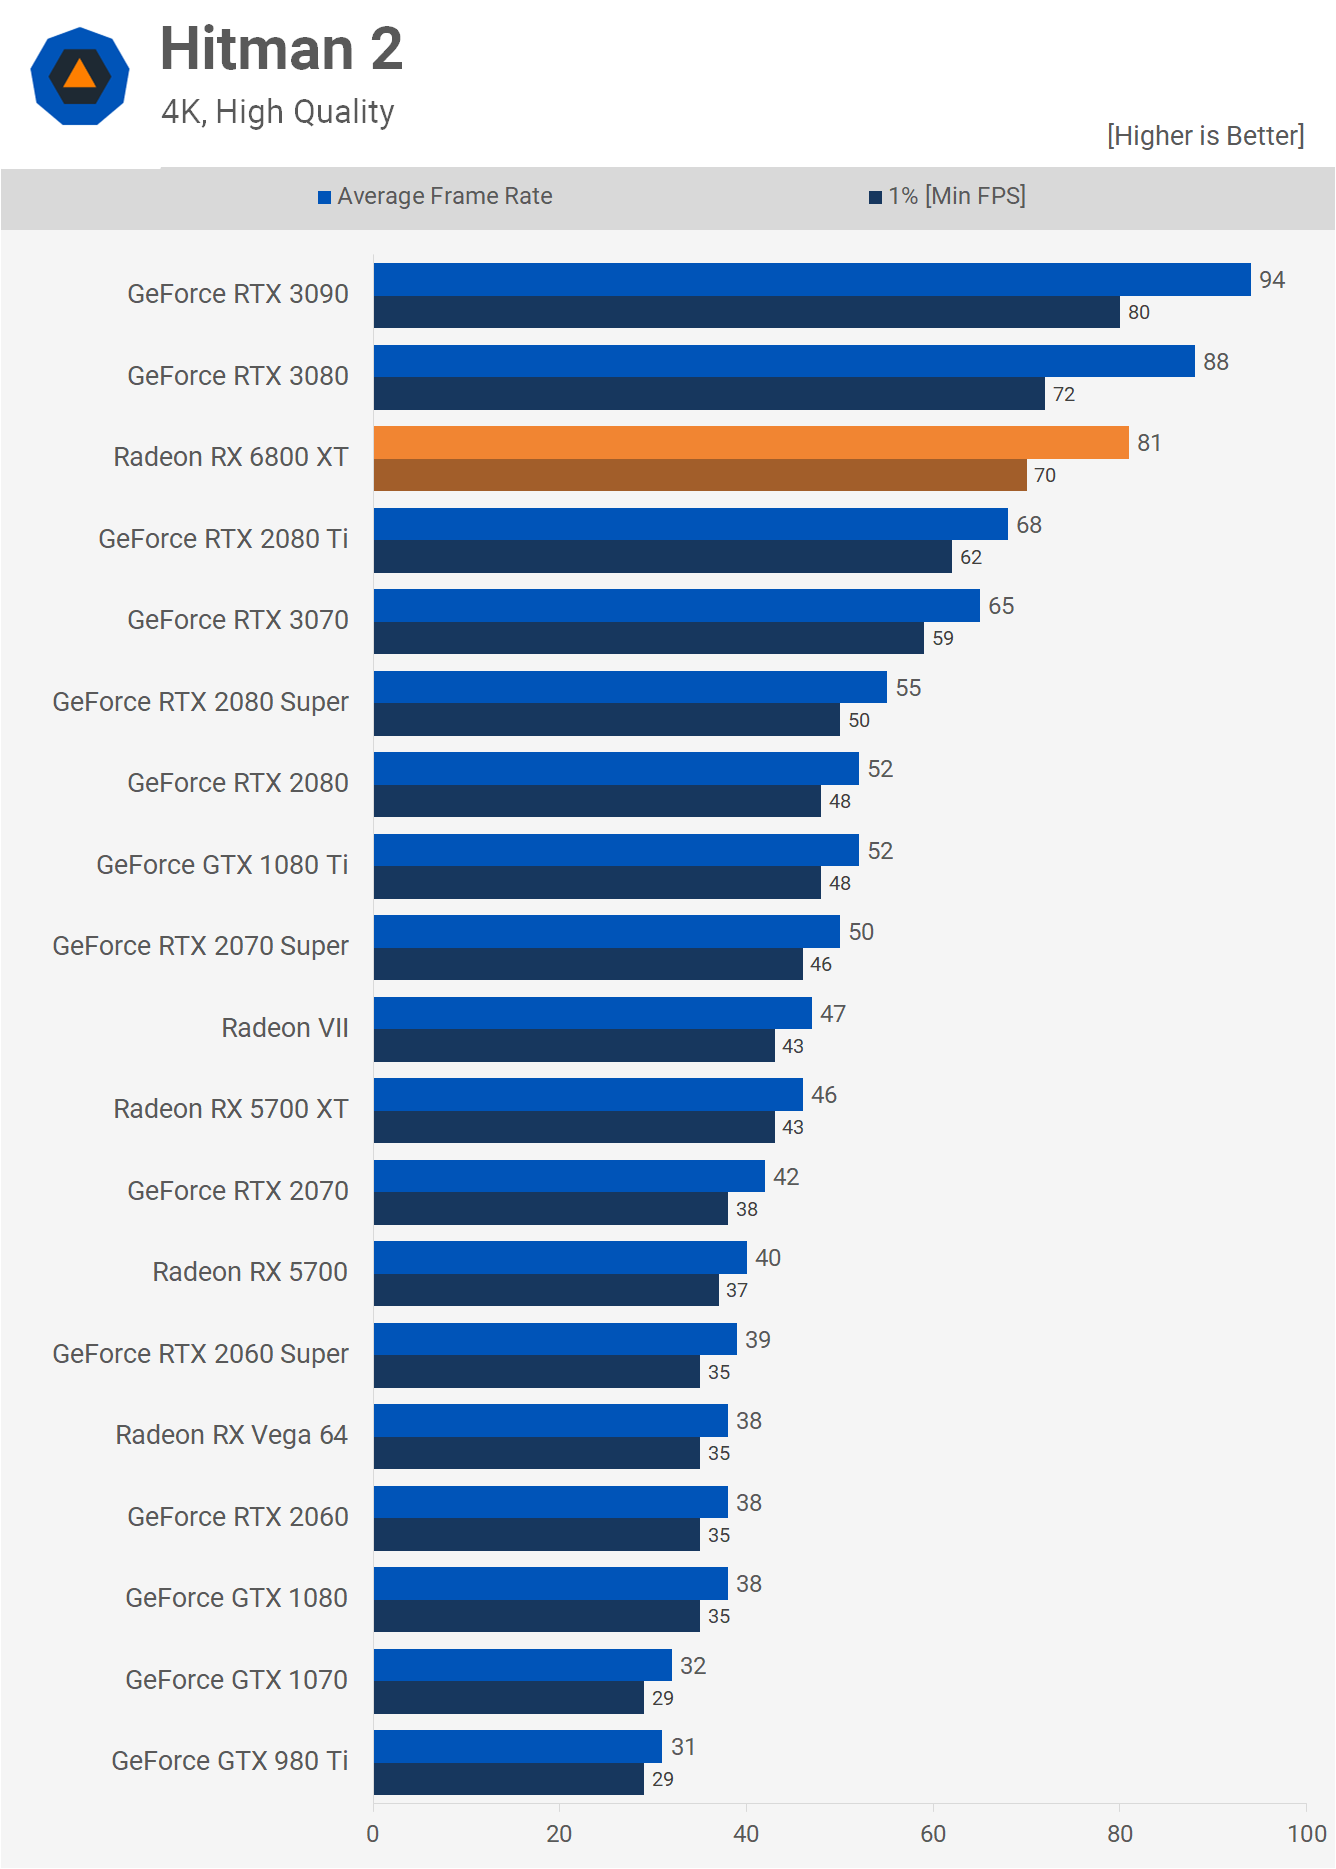
The last game we tested is Hitman 2, and like Metro Exodus, we're running into a CPU bottleneck at 1440p with the 3950X. The 4K data isn't limited by the CPU and the 6800 XT was 8% slower than the RTX 3080. Average Gaming PerformanceHere's a look at gaming performance as seen across the 18 games we tested. Although we skipped over 1080p data, we did collect it. So here's a look at the 1080p average data and as you can see at this lower resolution the Radeon RX 6800 XT fairs well, just edging out the RTX 3090 to beat the 3080 by a 6% margin. All in all, fairly similar performance across the three GPUs.
When compared to the RTX 2080 Ti, the 6800 XT was 23% faster and that's an interesting margin to note as we increase the resolution.
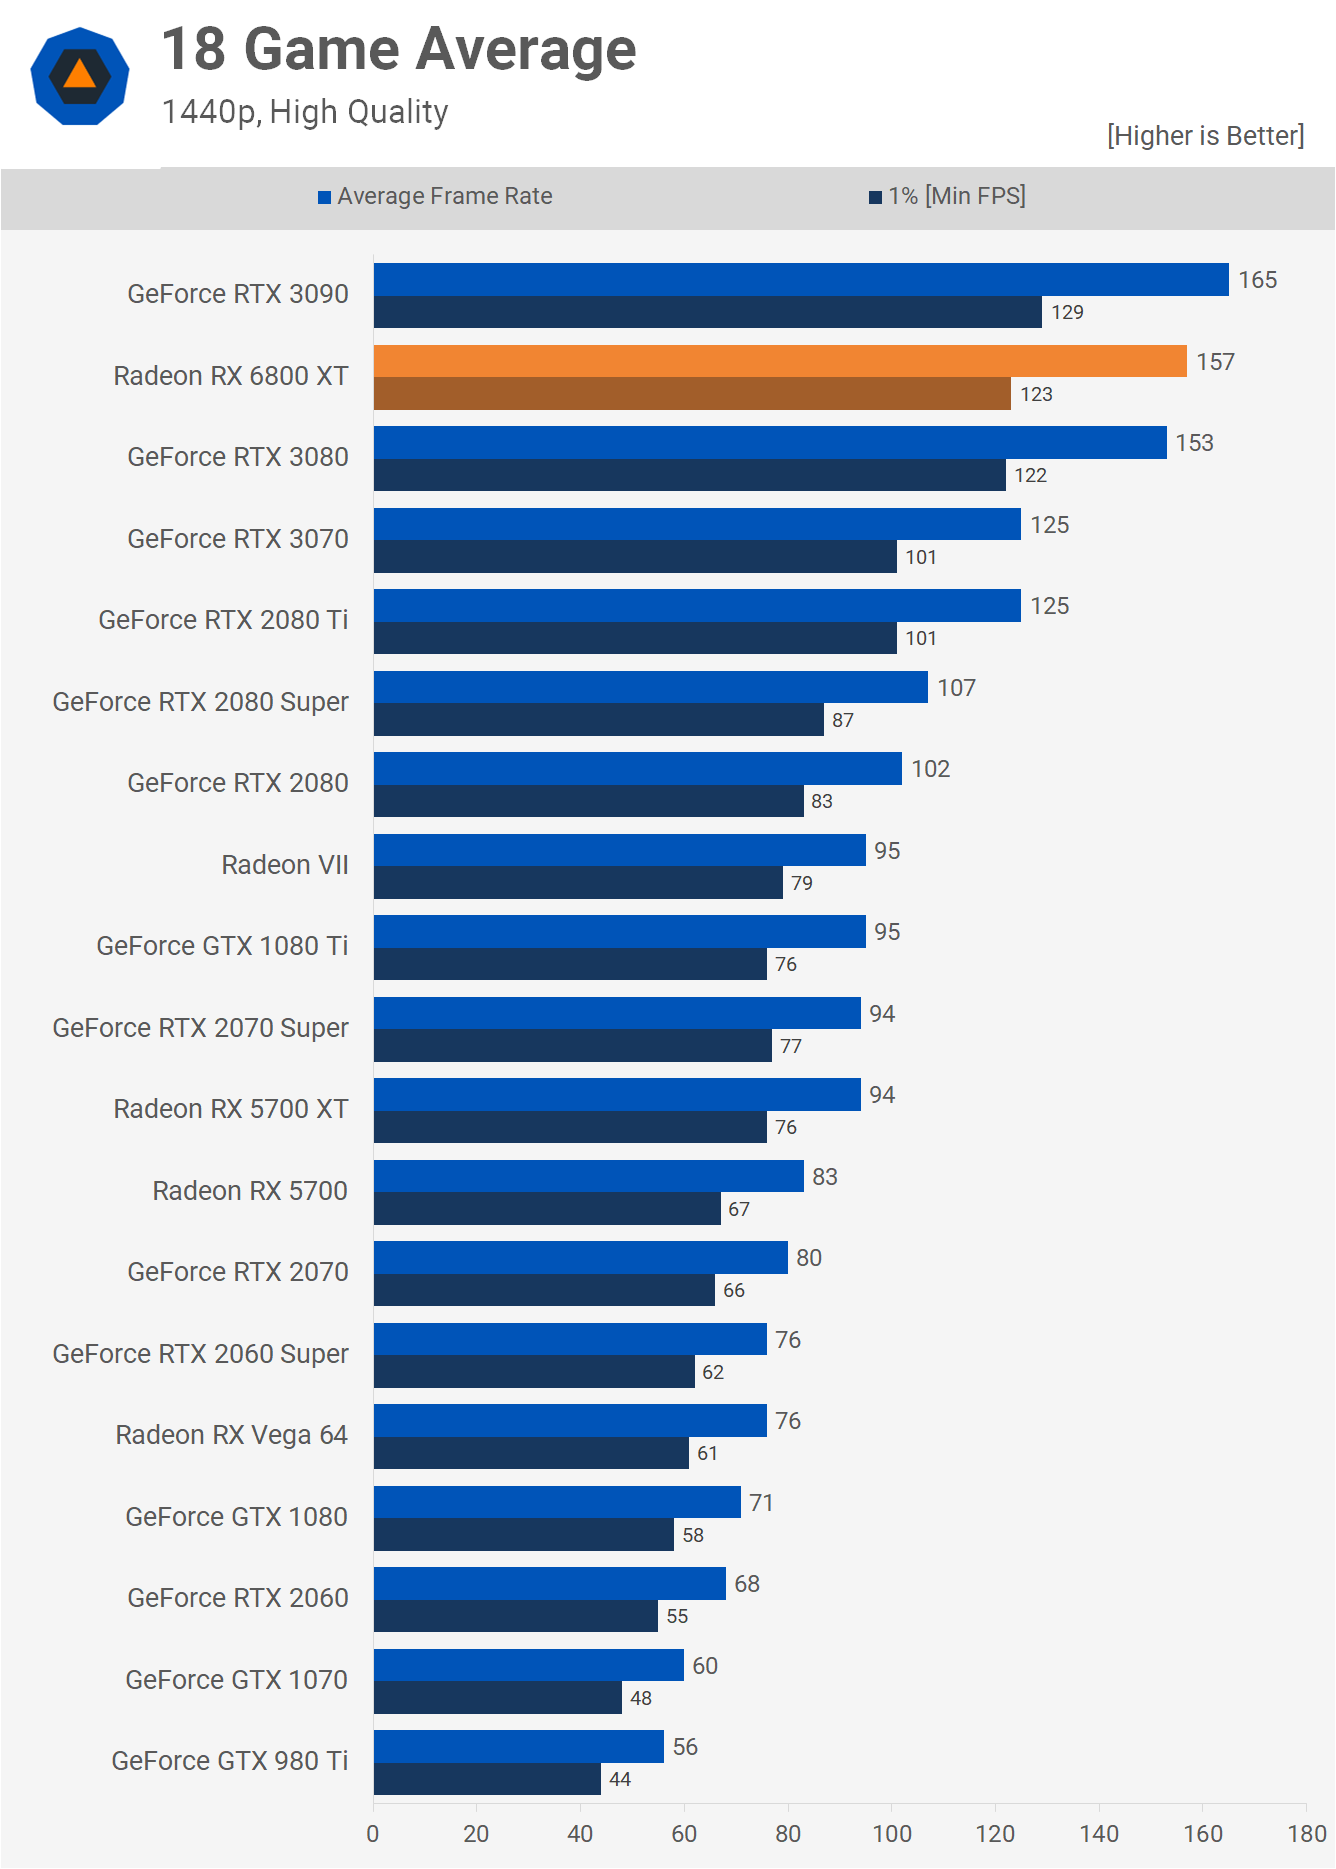
Now at 1440p, the Radeon RX 6800 XT is just ahead of the RTX 3080 by a 3% margin. In other words, performance is much the same as anything within a 5% margin we deem a tie. When compared to the 5700 XT we're looking at a 67% performance increase on average which is good but not amazing given the new Radeon costs a little over 60% more.
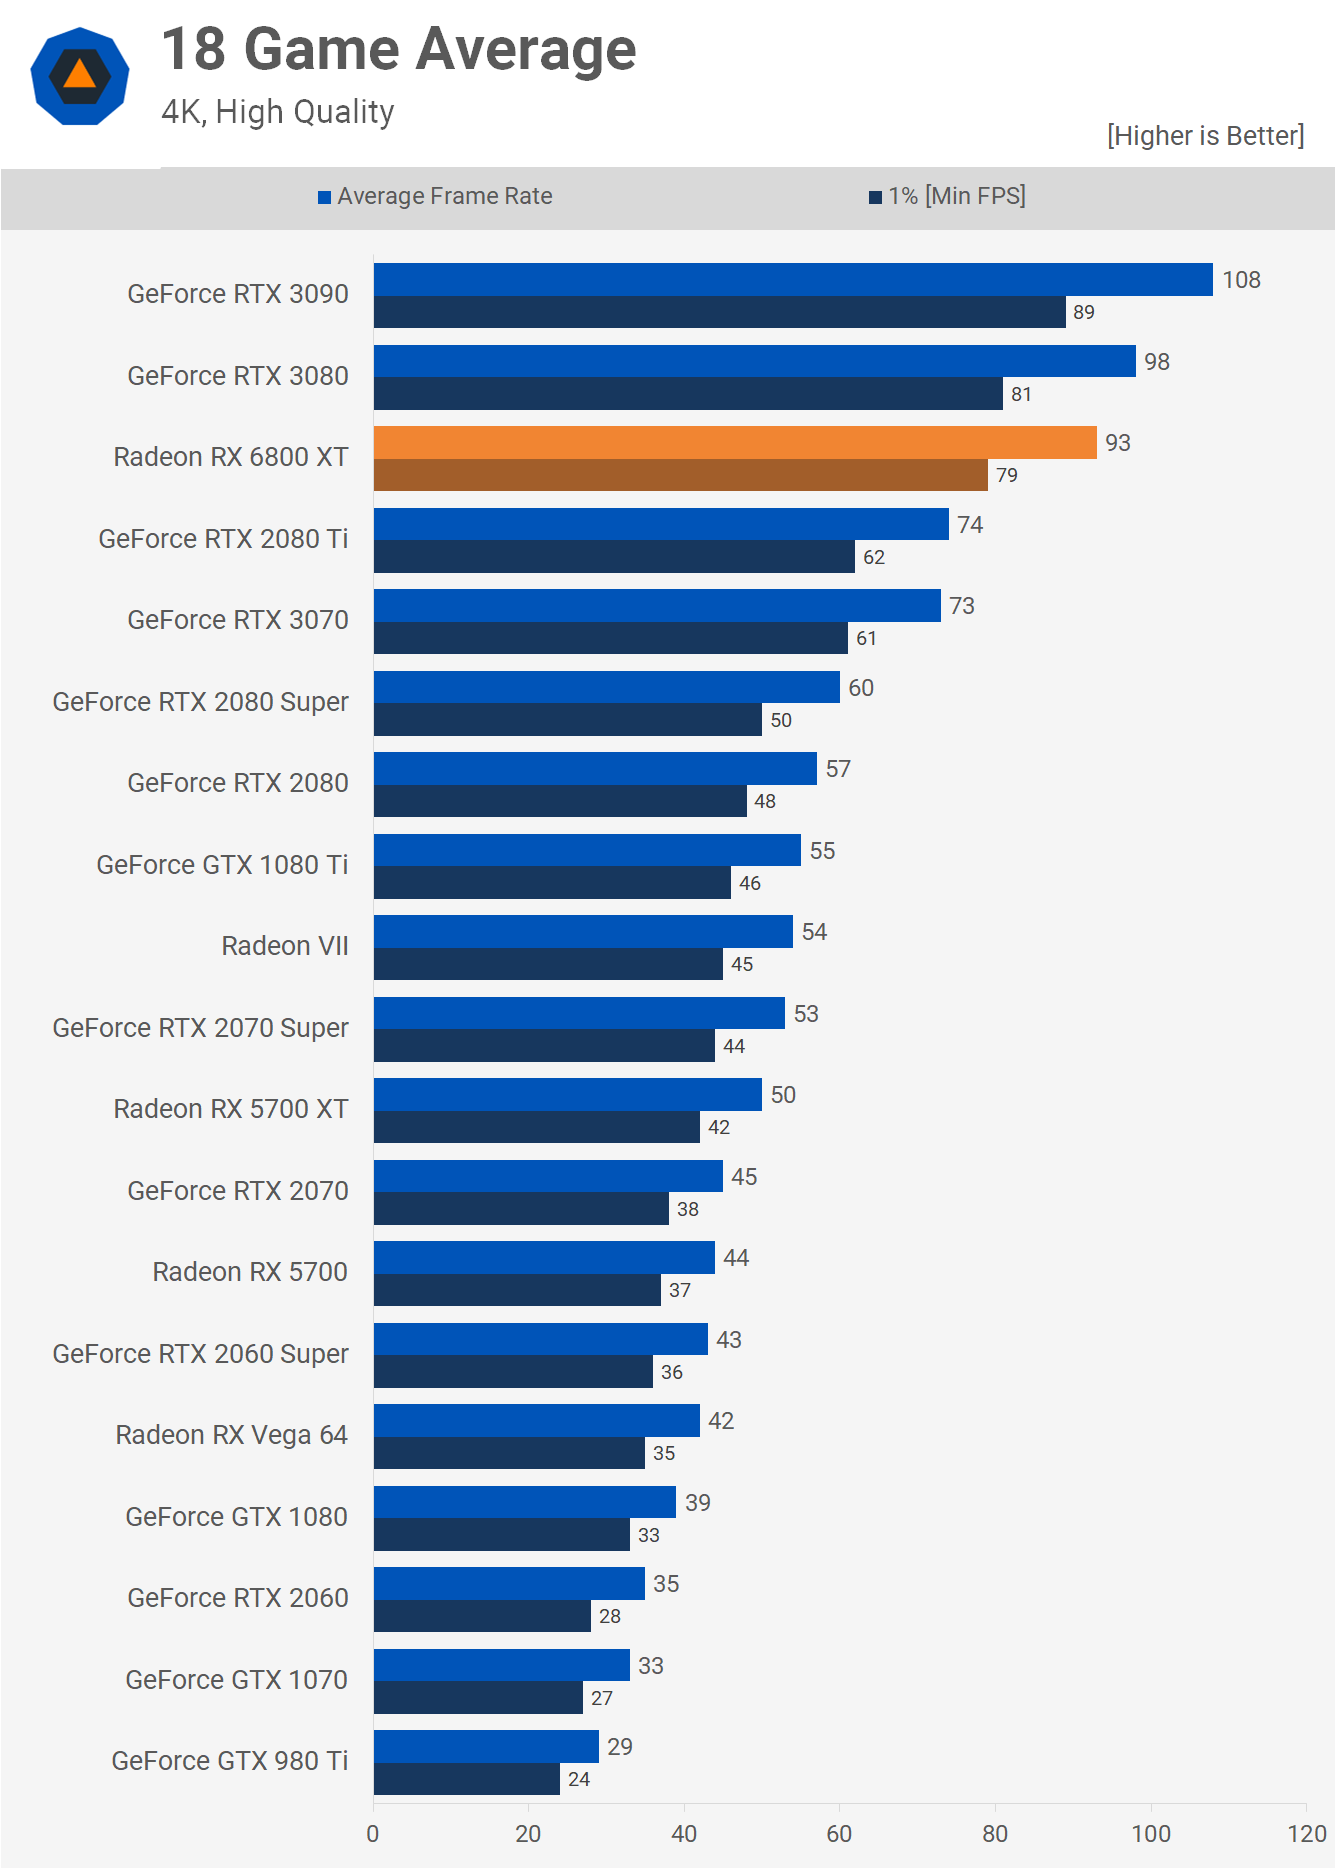
Then at 4K, the RTX 3080 fairs a little better. Overall the 6800 XT was just 5% slower and the margin to the 5700 XT opens up quite a lot. Here the new RDNA2 GPU was 86% faster and that's obviously a substantial performance uplift, even when taking the price hike into account. Cost Per Frame
Speaking of price hikes, here's a look at cost per frame and we'll start by using the 1080p data. When compared to the RTX 3080, the 6800 XT costs 12% less per frame while it comes in at an 8% premium over the RTX 3070, though that cost analysis doesn't account for the fact that the Radeon GPU packs twice as much VRAM. We're seeing a similar price premium over the 5700 XT, but again twice as much VRAM and a higher performance tier.
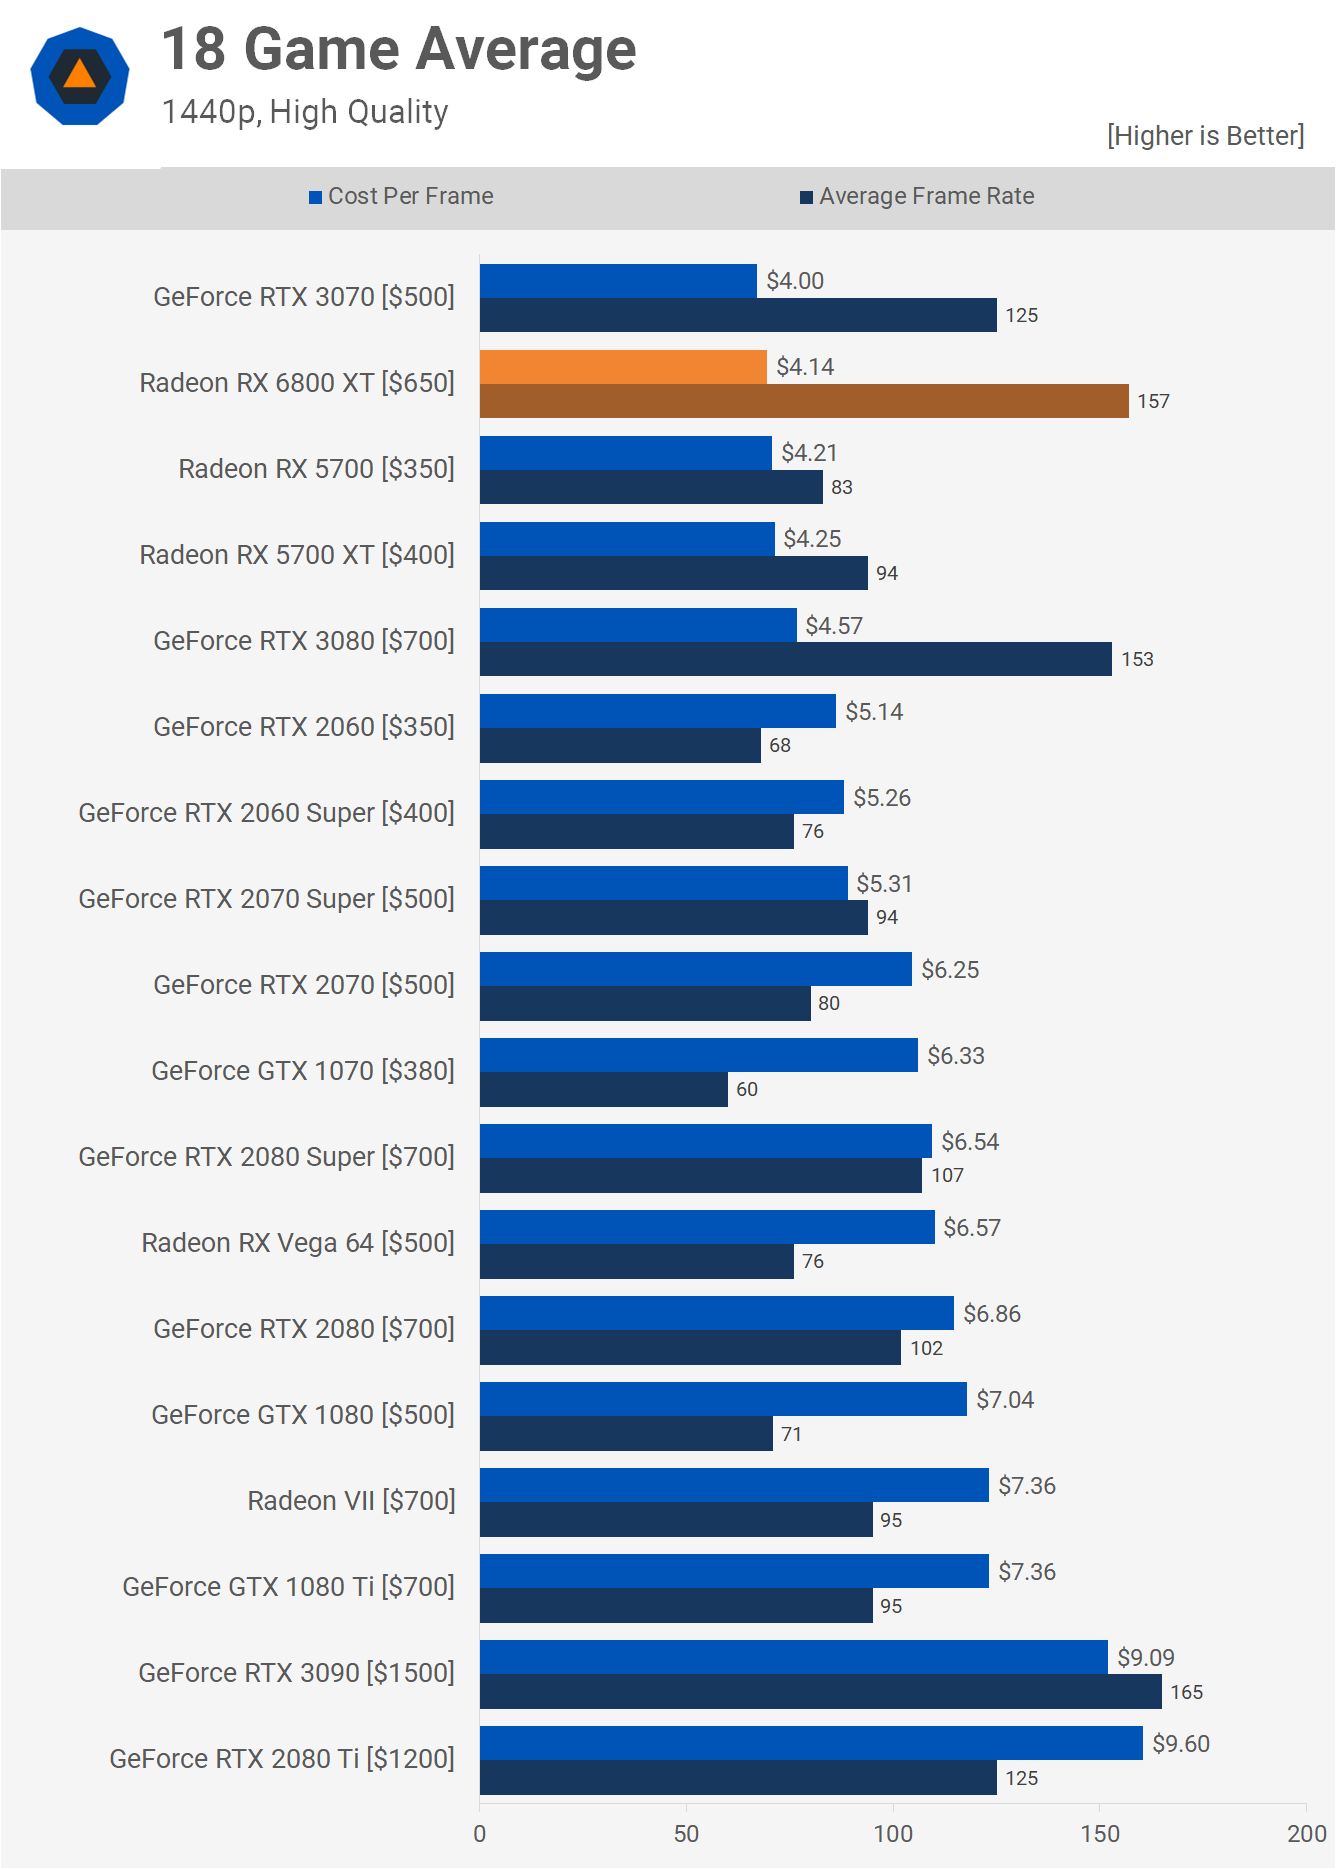
The cost per frame for the 6800 XT relative to parts such as the 5700 XT improves at 1440p for two reasons. It's a double whammy as the higher resolution means we're seeing fewer CPU limited scenarios with more chance of loading up all those cores on high-end GPUs. As a result, the 6800 XT is now one of the best value GPUs on the market, alongside the RTX 3070. It comes at 9% less per frame than the RTX 3080, and is a substantial improvement over similarly priced previous-gen products such as the RTX 3080 Super.
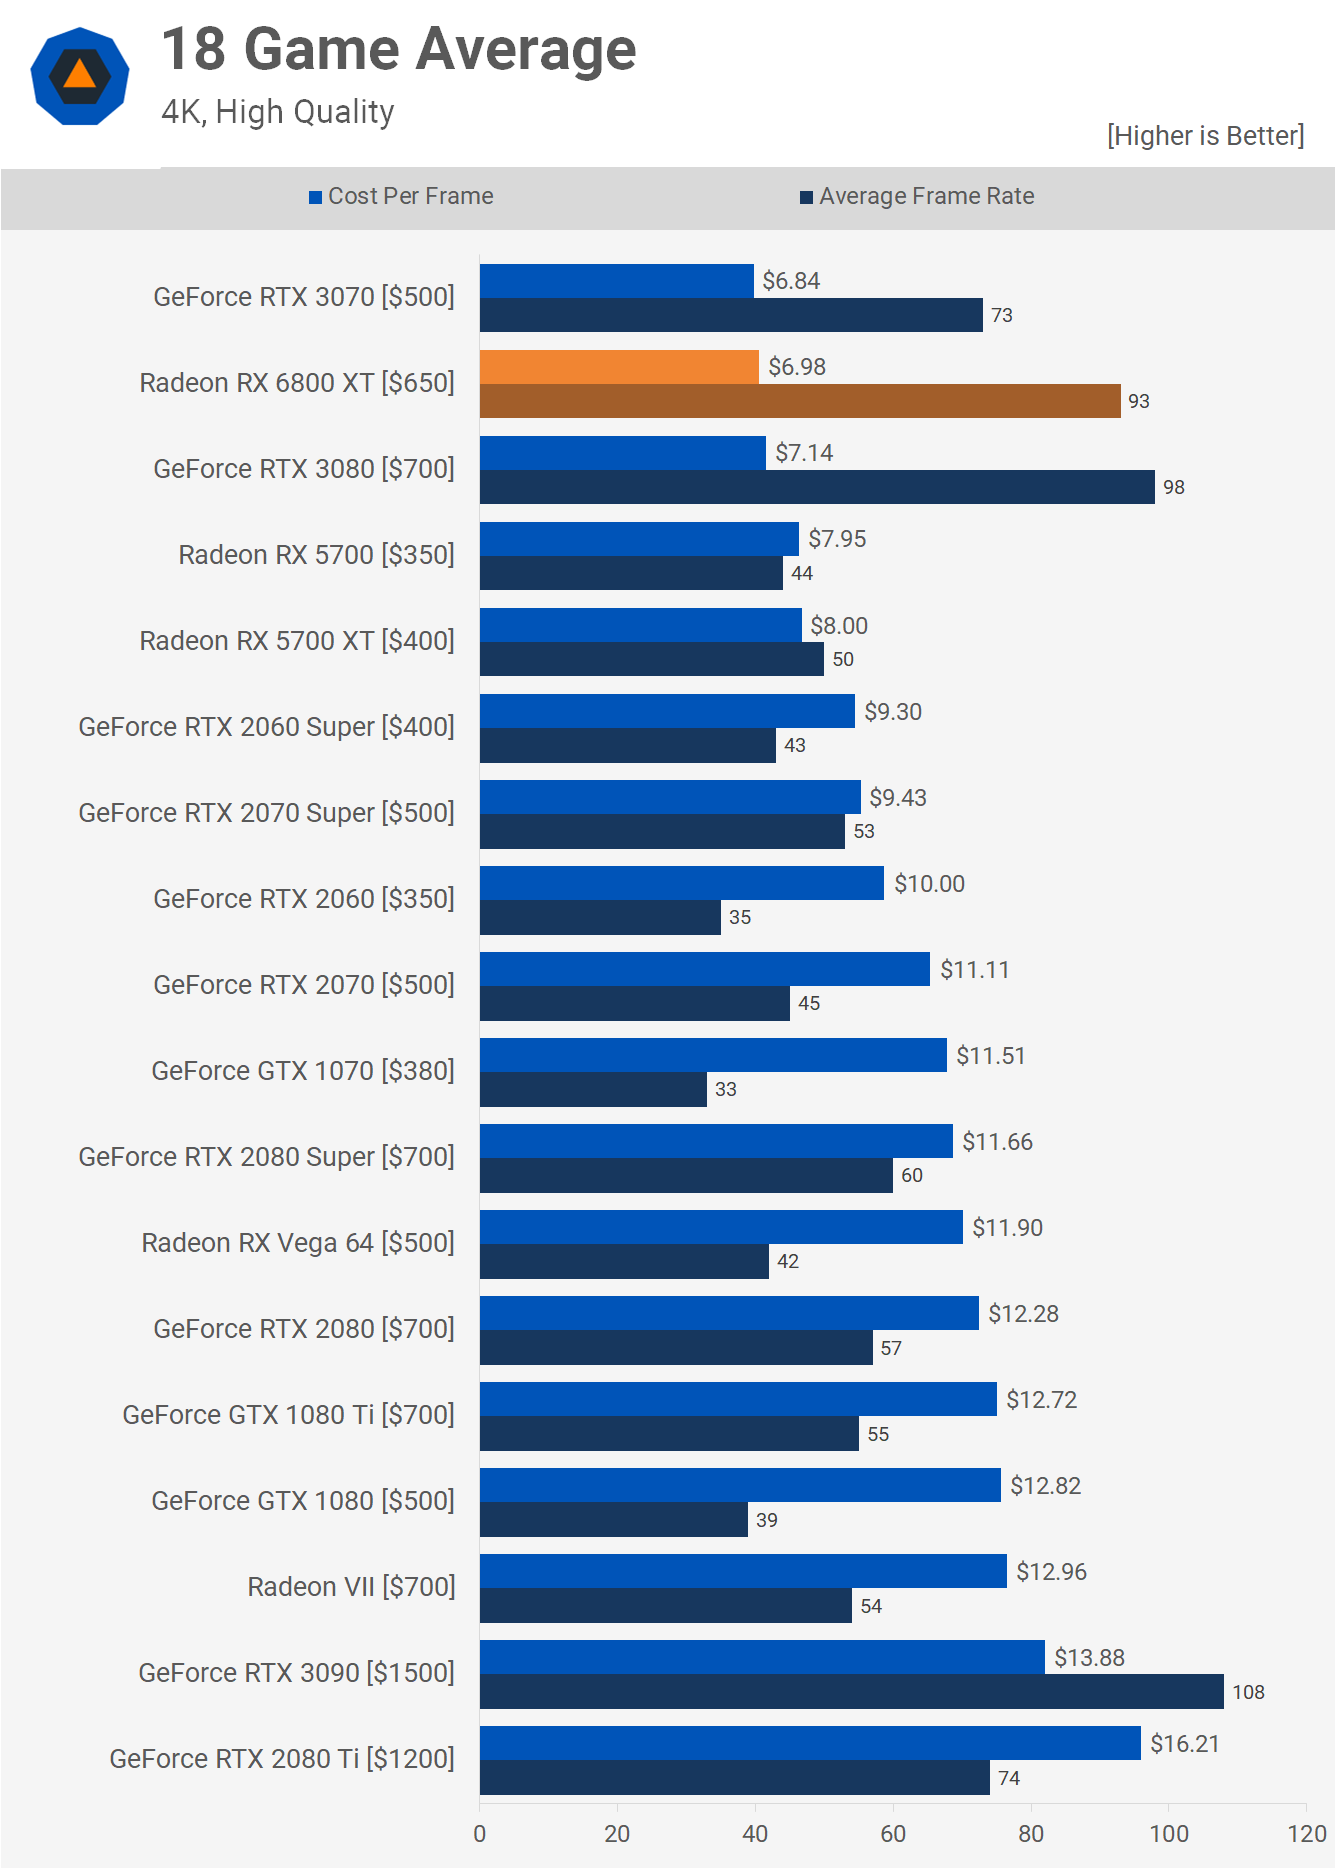
At 4K we see similar performance and value from the Radeon RX 6800 XT and GeForce RTX 3080 as they're neck and neck. You wouldn't necessarily pick one over the other based on performance or price. Ray Tracing Performance ComparisonFeatures that might sway you one way or the other includes stuff like ray tracing, though personally I care very little for ray tracing support right now as there are almost no games worth playing with it enabled. That being the case, for this review we haven't invested a ton of time in testing ray tracing performance, and it is something we'll explore in future content.
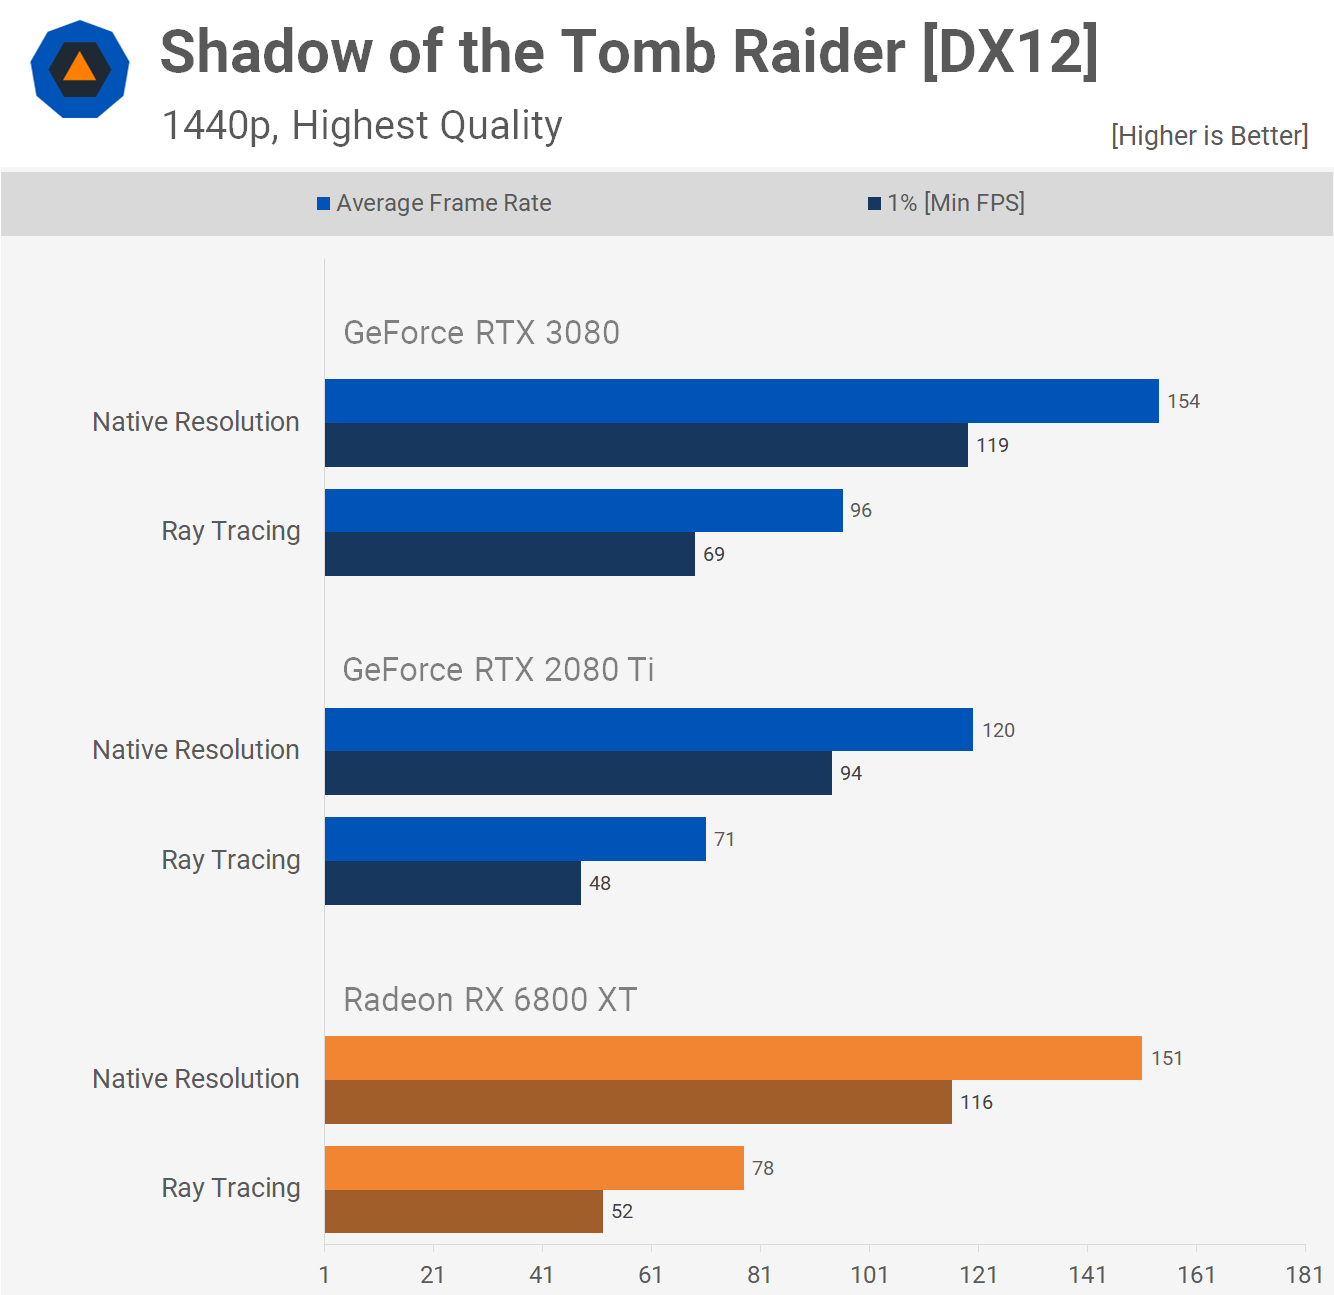
Shadow of the Tomb Raider was one of the first RTX titles to receive ray tracing support. It comes as no surprise to learn that RTX graphics cards perform much better, though the ~40% hit to performance the RTX 3080 sees at 1440p is completely unacceptable for slightly better shadows. The 6800 XT fairs even worse, dropping almost 50% of its original performance.
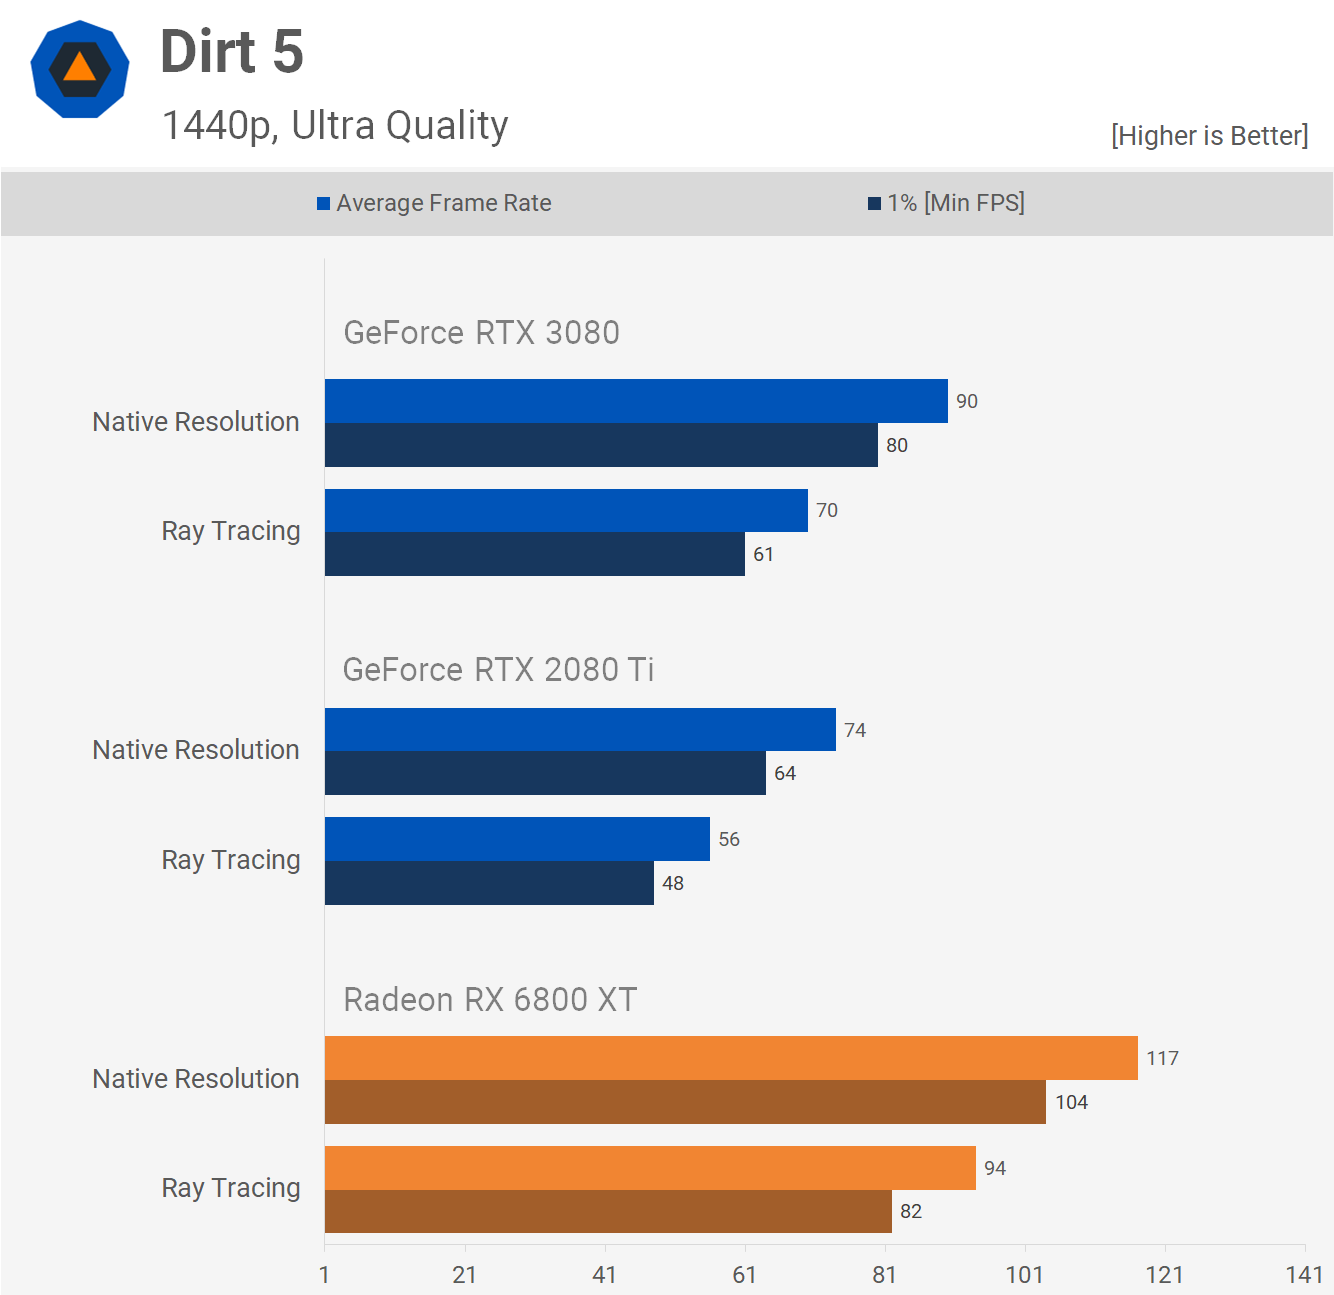
Another game with rather pointless ray traced shadow effects is Dirt 5, though here we're only seeing a 20% hit to performance and we say “only” as we're comparing it to the performance hit seen in other titles. The performance hit is similar for the three GPUs tested, the 6800 XT is just starting from much further ahead. At this point we're not sure what to make of the 6800 XT's ray tracing performance and we imagine we'll end up being just as underwhelmed as we've been by the GeForce experience. Testing Smart Access Memory’s Performance BoostA new feature that we find far more exciting than ray tracing, at least in the short term, is Smart Access Memory or SAM. What AMD's doing here is taking advantage of a PCI Express feature called Base Address Register which defines how much of your graphics card’s VRAM is to be mapped. Typically systems are limited to 256 MB of mapped VRAM but with RDNA2 and Ryzen 5000 processors, AMD's enabled this feature, giving the CPU full access to the graphics card’s VRAM buffer. We should note that this feature won’t improve performance in all games and margins will vary from title to tile. Nvidia has also come out and said they will be enabling SAM with a driver update coming soon, and that they've got it working on both AMD and Intel platforms in their labs. For now let's take a look at the performance using the Ryzen 9 5950X.
Assassin's Creed Valhalla shows pretty incredible results with SAM enabled. At 1080p we're looking at a 17% performance boost. That's a remarkable uplift and it means the 6800 XT is now 53% faster than the RTX 3080 at this resolution. At 1440p we're still looking at a good uplift, the frame rate is improved by 14% and that means the 6800 XT was 40% faster than the RTX 3080. 40% faster at 1440p, that's crazy. We're also looking at a 15% performance improvement at 4K. Before this, the 6800 XT roughly matched the RTX 3080, but with SAM enabled it's now 13% faster.
The effects of SAM are far less significant in Rainbow Six Siege. We're getting a further 5% performance at 1080p with it enabled. The margin was reduced to 4% at 1440p, and then we see just a 2% boost at 4K.
The gains in Shadow of the Tomb Raider are similar to those seen in Rainbow Six Siege. At 1080p we're looking at a 6% boost, though that was enough to pull the 6800 XT ahead of the RTX 3080. Then we see a 6% boost at 1440p, and just 3% at 4K. Power Consumption
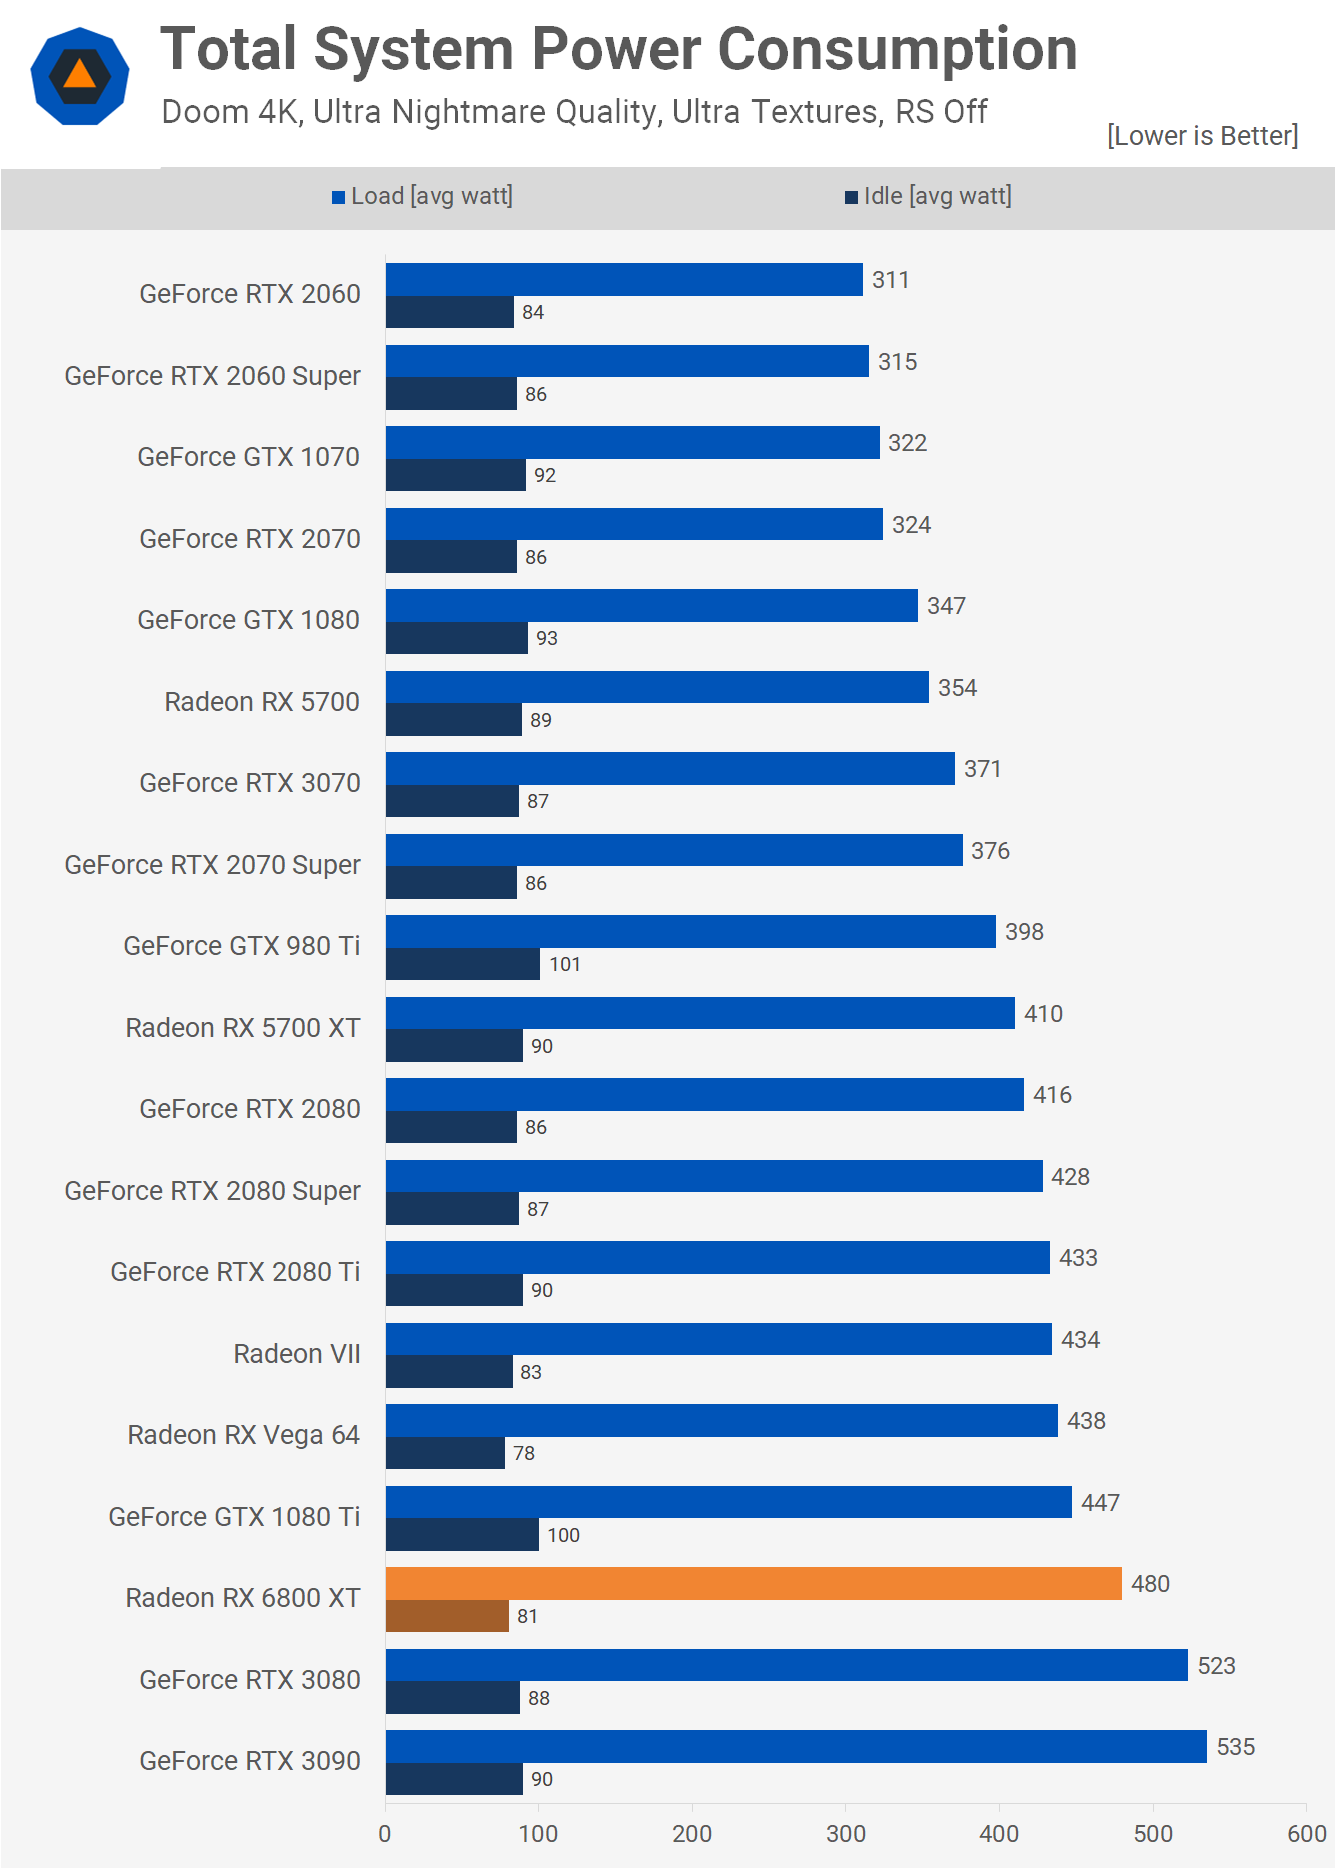
Nvidia’s RTX 3080 features a total board power rating of 320 watts, while the 6800 XT is a slightly more conservative at 300 watts. When comparing the AMD reference model with Nvidia's Founders Edition we're seeing a 40 watt reduction in total system usage going in AMD's favor. The 6800 XT remains a power hungry GPU, but it appears to be more power efficient than previous AMD GPUs.
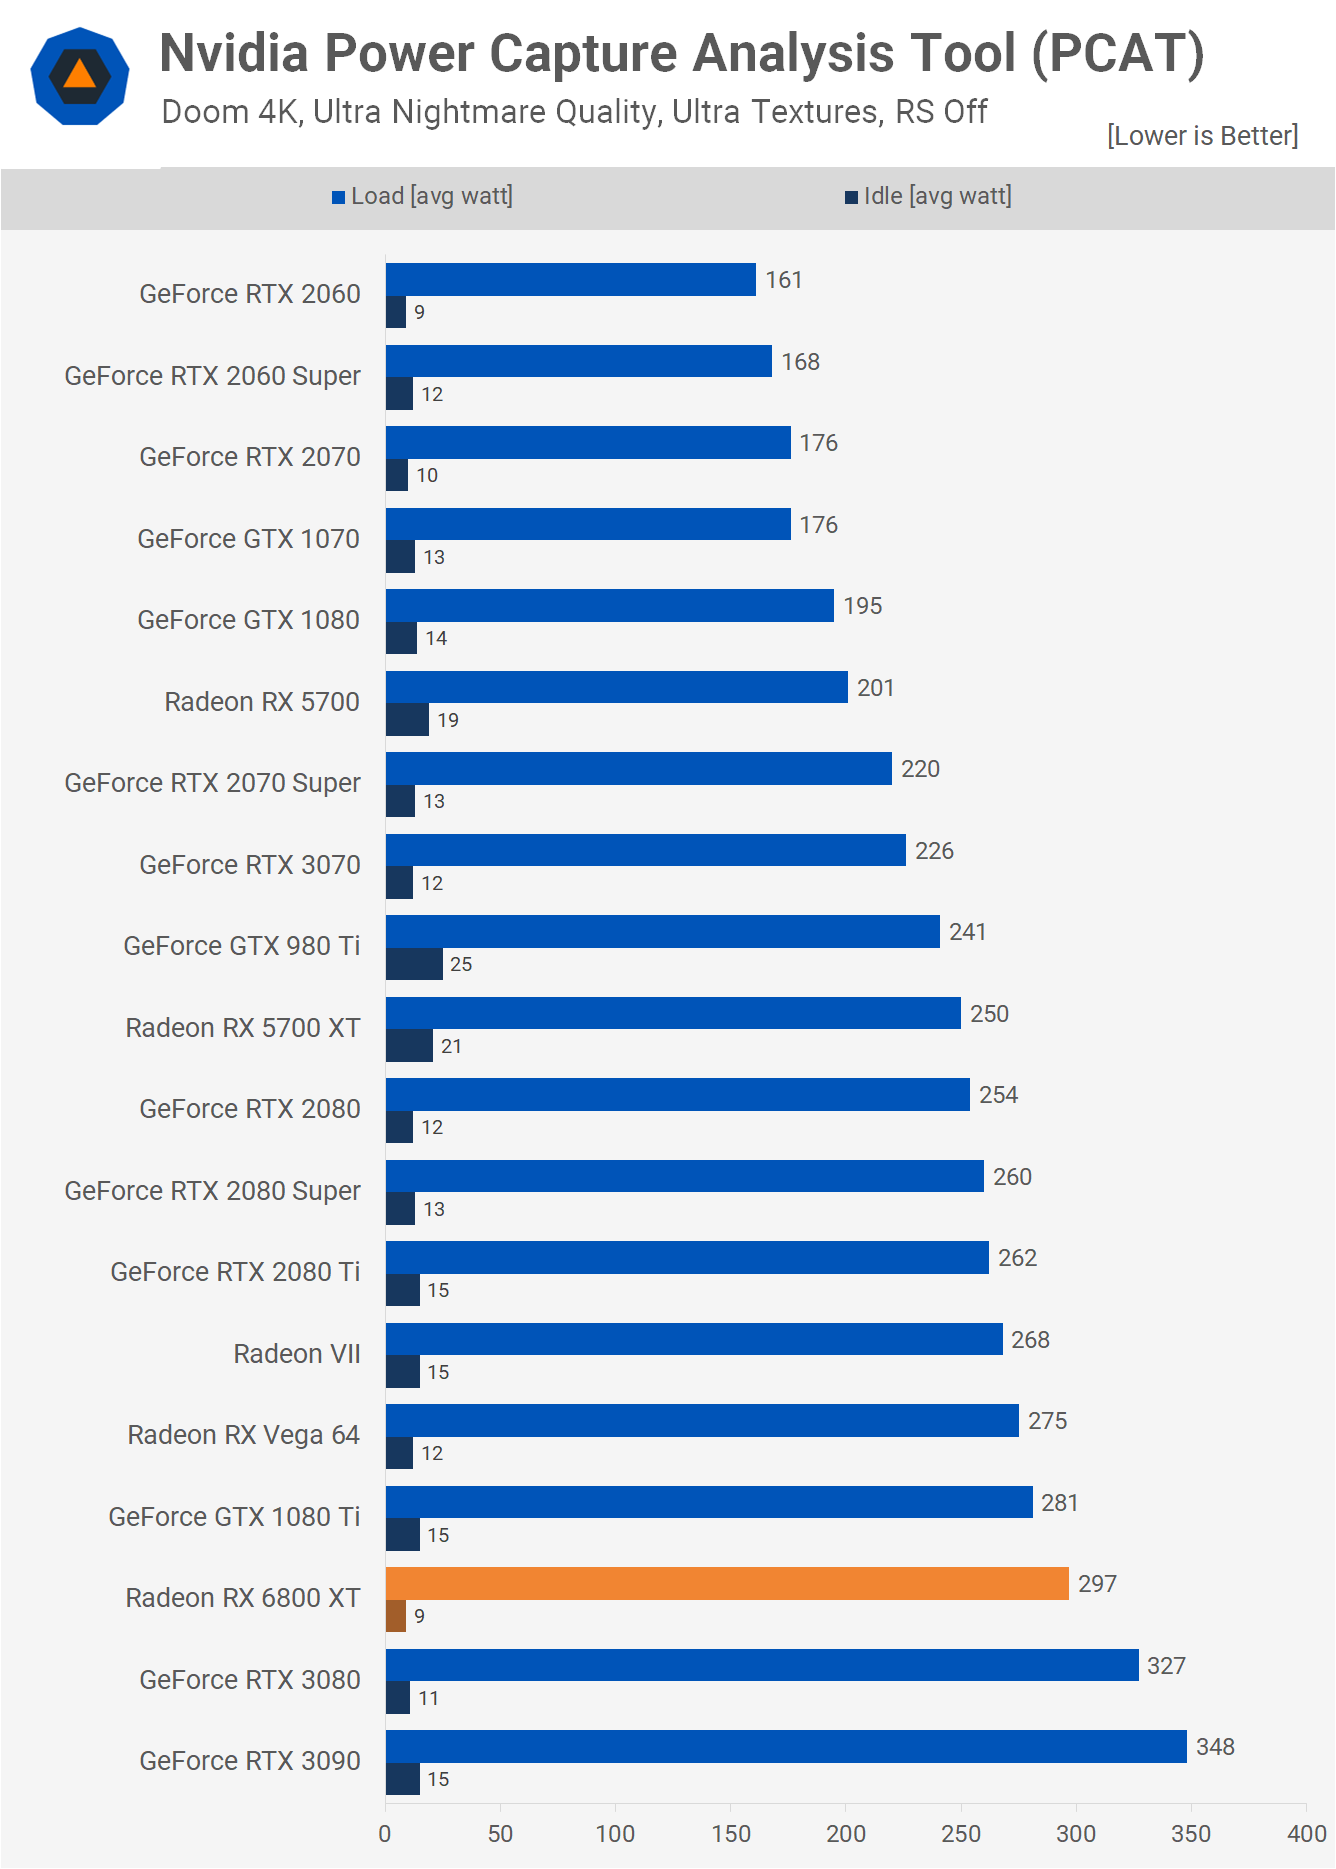
Using Nvidia's PCAT we see that the 6800 XT consumes around 9% less power than the RTX 3080 which depending on the resolution will give it a similar performance-per-watt rating. It's also interesting to note that while the 6800 XT consumed 19% more power than the 5700 XT, it was often well over 50% faster, so an impressive improvement there for power efficiency.
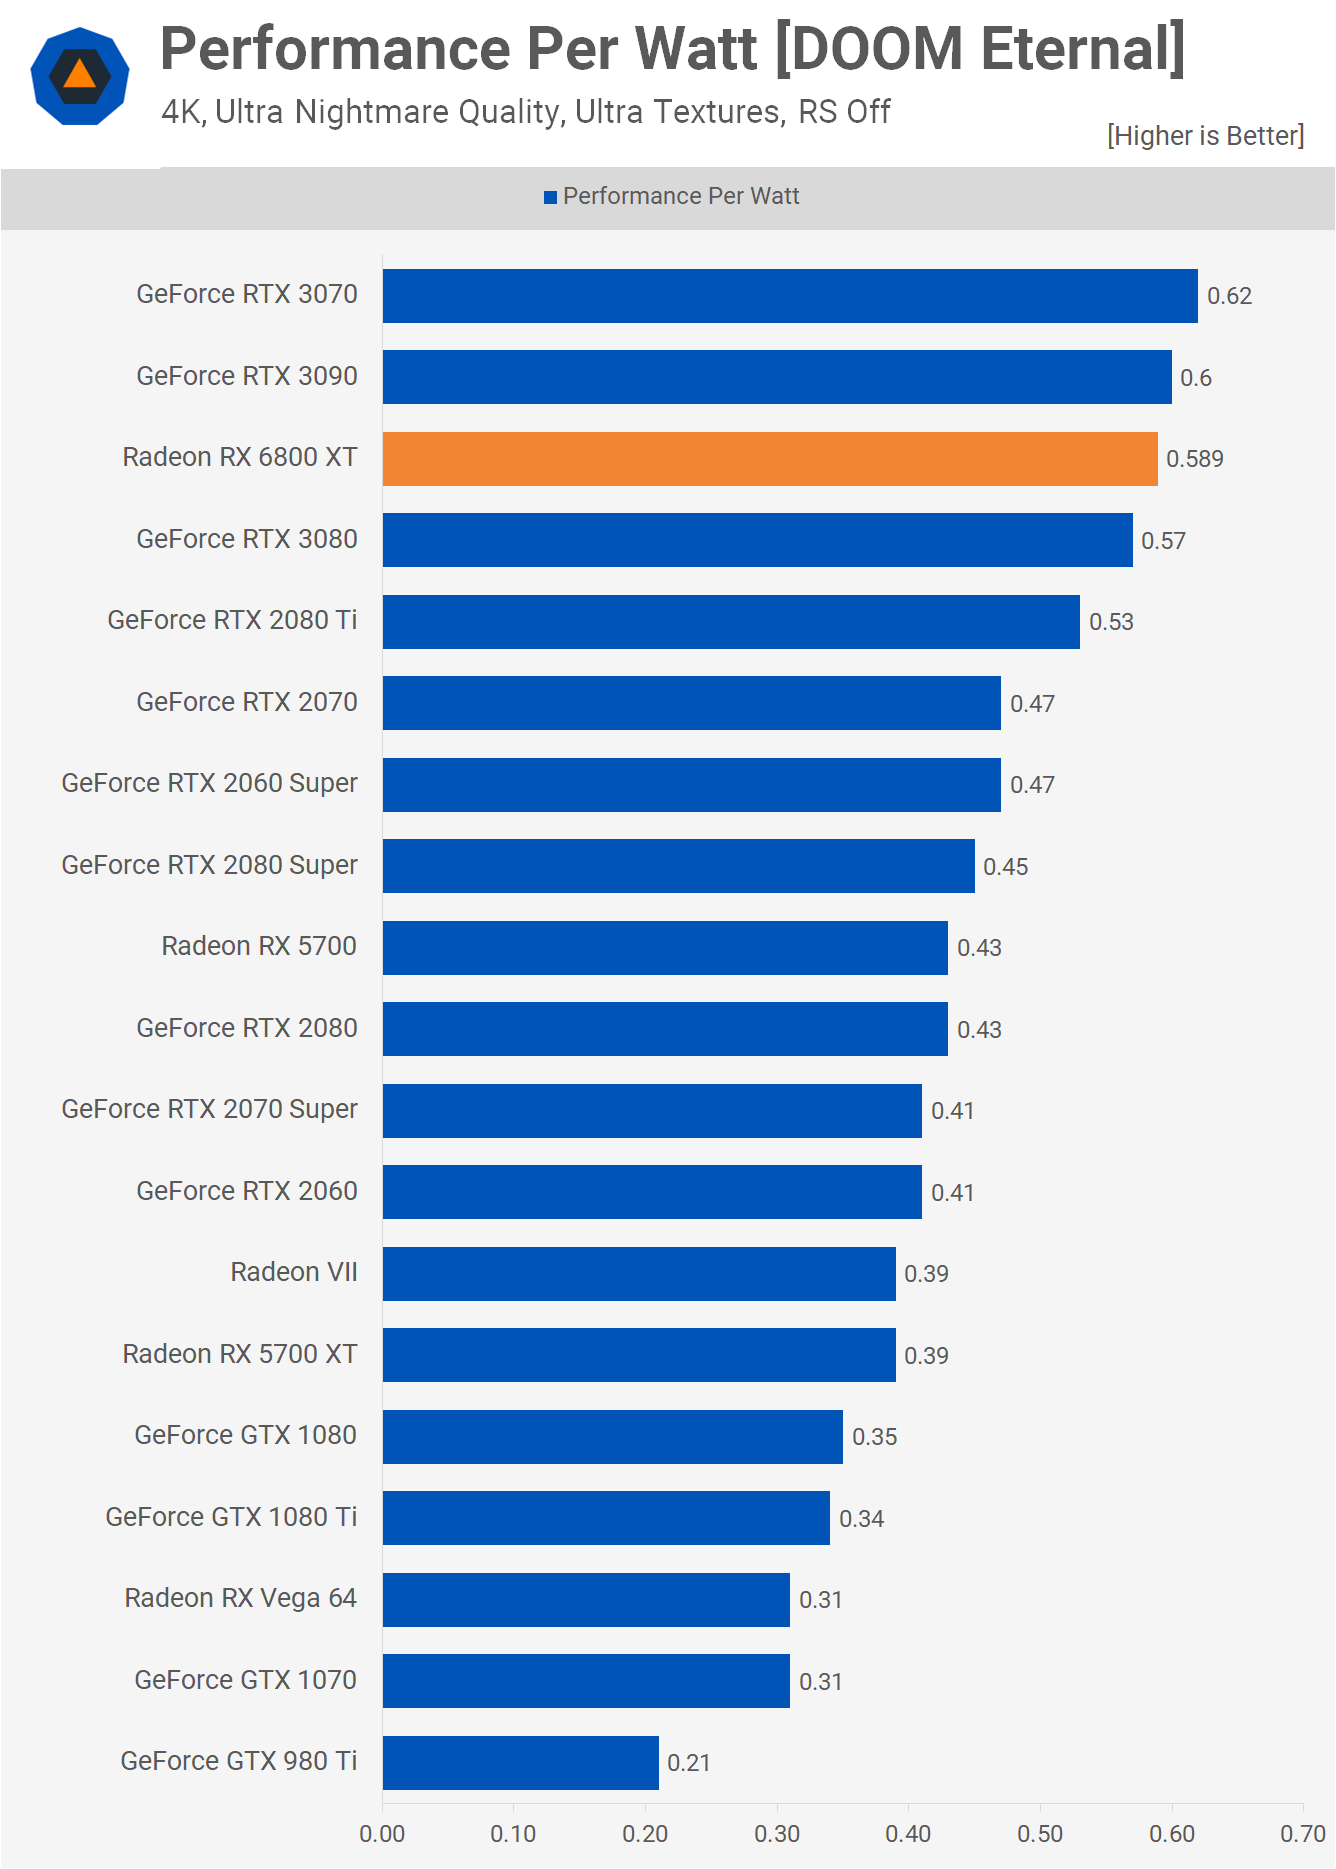
Here we see that in terms of performance per watt the 6800 XT is just over a 50% more efficient than the 5700 XT, and a slight improvement over the RTX 3080. As we found with Ampere GPUs, despite being very power hungry, the performance is strong enough that they come out looking very good in terms of performance per watt. Another area where AMD has improved massively is with their reference design, something we've basically been begging them to sort out for… about a decade now. Unlike previous dustbuster designs, the Radeon RX 6800 XT reference card runs cool and quiet. After an hour in Shadow of the Tomb Raider at 4K, the card peaked at just 75C with a fan speed of 1600 RPM. That's seriously good performance that sees AMD set the bar very high for their partners, but given the card isn't 3090-Founders-Edition-massive, we feel like they should all be able to rise to the occasion. OverclockingWe’ll discuss overclocking briefly. By default, this 6800 XT reference card operates at 2200 MHz in Shadow of the Tomb Raider after an hour. With the frequency increased to 2500 MHz in the Wattman software, the clock speed in-game was increased to 2365 MHz on average, so a 7.5% increase which generally netted us about a 5% fps boost in games. That’s pretty uneventful and hopefully AIB models have higher power limits for more OC headroom. What We LearnedThe Radeon RX 6800 XT delivers excellent performance. Just two months ago, the RTX 3080 completely blew us away with its performance, and we weren’t overly confident AMD could pull this one off. But for the first time in a long time, the latest Radeons are able to catch up to newly released high-end GeForce GPUs. As it’s often the case, depending on the game and even the quality settings used, the RX 6800 XT and RTX 3080 trade blows, so it's impossible to pick an absolute winner, they're both so evenly matched. The advantages of the GeForce GPU may be more mature ray tracing support and DLSS 2.0, both of which aren't major selling points in our opinion unless you play a specific selection of games. DLSS 2.0 is amazing, it's just not in enough games. The best RT implementations we're seen so far are Watch Dogs Legion and Control, though the performance hit is massive, but at least you can notice the effects in those titles. The advantages of the Radeon RX 6800 XT includes a much larger VRAM buffer, SAM support, and a slight price decrease. The 16GB VRAM buffer is almost certainly going to prove beneficial down the track, think 1-2 years. Support for SAM is potentially a big one, but by being limited to Ryzen 5000 CPUs on a 500 series motherboard, its impact is less significant. Nvidia claims they’re working on getting this working with Ampere GPUs, too, and for all platforms, which is a good thing as it will force AMD to open up support to all users. On that note, PCIe 4.0 doesn't appear to be required either. We ran a few tests in Assassin's Creed Valhalla while forcing PCIe 3.0 on our X570 test system and didn't see a decline in performance when compared to PCIe 4.0, so that's interesting. The testing was limited though, and it’s something we'll need to explore further with a little more time up our sleeves. It’s also great to see AMD finally nail the reference design, though by next week we should gain full access to AIB’s custom models. Chances are you'll be able to buy an even cooler and quieter model with higher power limits for overclocking. As for availability, all indications point to horrid availability for this initial wave of reference models. The release date for custom cards is November 25, a week from this review. We're hearing stock levels are better for those models, but there's no way they're not going to sell out in seconds. Expect availability pain until at least December, that's just par for the course with popular GPU releases. We'd expect AMD to be on top of demand within two months though, if not, it will be another Ampere-like disaster. AMD has been given the rare opportunity to steal away Nvidia customers who have been desperate for RTX 3080 performance for months now. They've likely got a narrow window to pounce here, so it will be interesting to see if they squander that opportunity. There's almost no chance those who sold their RTX 2080 Ti in anticipation of the RTX 3080, and have been left hitting refresh since release, aren't going to snap up an RX 6800 XT faster than you can say 'Just Buy It', assuming availability. That’s going to do it for our initial look at the Radeon RX 6800 XT. You should also definitely check out our detailed RX 6800 review, which is a lighter version of the same board selling for under $600. Next week we plan to look at the first board partner cards, and then a review of the Radeon RX 6900 XT next month. Shopping Shortcuts: | |||||||||||||||||||||||||||||||||||||||||||||||||||||||||||||||||
| How To Get Custom Status Bar Backgrounds Based on the Time of Day Posted: 19 Nov 2020 01:22 PM PST If we talk about the best mobile operating system list, the first thing that strikes our mind is Android and iOS. Both of the mobile operating systems are unique in their own way, and both of them provide endless features and customization options. However, if we talk particularly about the customization, Android usually steals the show. The best thing about Android is that you can gain administrator privileges by rooting the device. After having root access, you can enjoy custom ROMs, skins, etc. Similarly, you can enjoy different Xposed Modules as well. We are talking about Android customization because recently, we came across an Xposed module that can change the status bar background based on the time of day. According to the time, the Xposed module in talk provides a cool way to adjust the status bar background. Also Read: How To Install Android Studio On Windows PC In 5 Easy Steps Get Custom Status Bar Backgrounds Based on the Time of DayIn this article, we will share a working method that would help you get Custom Status Bar Backgrounds based on the time of day. So, let's know how to get a custom status bar background based on the day's time. Get Custom Status Bar BackgroundsStep 1. First of all, you need a rooted android as an Xposed installer can only be installed on a rooted android, so Root your android to proceed for having superuser access on your android. Step 2. After rooting your android device, you have to install the Xposed installer on your android, and that's quite a lengthy process. For that, you can proceed with our Guide to Install Xposed Installer On Android. Step 3. Now, after having an Xposed framework on your android, the only thing you need is the Xposed module that is Zeus Contextual Expanded Status Header (Lollipop+), the app that will allow you to get cool notifications background. Step 4. Now install the app on your device, and after that, you need to activate the module in Xposed Installer, and then you need to reboot your device for the proper working of the module in your device. Step 5. Now you need to move forward in the app, and you will get lots of cool background modules to download in the app and set it as a notification background. That's it. You are done! Now you will have a cool notification background, and that will make your android looks awesome and that too according to your wish. 2. Using PowerShadeUnlike the previous one, Power Shade doesn't automatically change the color based on time. However, the good thing is that it works on non-rooted devices, and it offers a more advanced notification panel customizer. With Powershade, you can change themes, change colors, etc., of your Status bar. Here's how to use the app. Step 1. First of all, download & install Power Shade on an Android device. Step 2. Once installed, open the app. You need to grant three permissions at the start. Step 3. Now you will see the main interface of the app. Step 4. Just tap on the toggle behind 'Not Running' to run the application. Step 5. Once done, tap on the 'Colors' option to change the status bar color. Step 6. Now you will see many Status bar customization options. Step 7. Just make all the customizations. If your phone supports dark mode, then you can also enable dark colors. For that, enable the 'Auto Dark Mode' option. Step 8. Now scroll down and customize the 'Dark Colors.' The app will automatically use the dark colors whenever you enable the Dark Mode on your phone. That's it! You are done. This is how you can use Power Shade to change the Status Bar Background. So above is all about Get Custom Status Bar Backgrounds Based on the Time of Day. I hope you like the article, make sure to share it with your friends also. If you have any other doubts related to this, let us know in the comment box below. | |||||||||||||||||||||||||||||||||||||||||||||||||||||||||||||||||
| What’s New in Outlook 365 for Mac’s Fall 2020 Update Posted: 19 Nov 2020 12:18 PM PST
Microsoft Outlook 365 received a nice update for Mac in the fall of 2020. Along with an enhanced look came new and improved features. With everything from a customizable toolbar and better search to the ability to snooze emails, let's take a look at all that's new in Outlook 365 for Mac. Try the New OutlookIf you've already installed Microsoft Outlook's fall 2020 update (16.42 (20101102) or later), then you can switch to the new look easily. In the top-right corner of the window, next to the "Search" box, enable the toggle for "New Outlook."
Confirm that you want to switch to the new look by clicking "Switch to New Outlook."
Once you switch, you can still go back to the previous version. Just disable the "New Outlook" toggle and confirm that you want to switch back. If you don't see the toggle, you can update Outlook on Mac by clicking Help > Check For Updates from the menu bar. Select the "Check for Updates" button.
Customize Your ToolbarInclude only those buttons you need and want in the Microsoft Outlook toolbar. Click "See More Items" (three dots) in the toolbar and choose "Customize Toolbar."
Drag buttons from the bottom to the top to add them, or do the reverse to remove them from the toolbar. Click "Done" when you finish.
Enjoy Enhanced SearchingIf you find yourself searching for emails from certain people or received on specific days often, you'll like the improved search in Outlook. Now powered by Microsoft Search, you'll get better search results and suggestions.
Click in the "Search" box to find what you need. You'll notice you can still use filters and select a mailbox or folder. View Your Office 365 GroupsWhen you use Mail or Calendar in Microsoft Outlook, you can see all of your Office 365 Groups in the sidebar. Just click "Groups"to expand the list and pick the one you need. Click once more to collapse Groups again.
Reply or Forward Emails in the Same WindowIf you use the Reply, Reply All, or Forward options for an email, you can add to your message in the same window rather than a new one. This keeps everything nice and neat without the need for a brand new Compose window.
Ignore ConversationsWant to get rid of an email or two including any new messages that come in from the same person? You can ignore conversations with a click. In the Toolbar, Message menu, or Message shortcut menu, select "Ignore Conversation." Emails you've already read or that come in later will be automatically deleted.
Snooze EmailsIs it one of those days when you're receiving way too many Outlook notifications? Snooze them! Select an email and then at the top of the window, click "Snooze" in the toolbar. Choose a time frame and you'll then receive that email to your inbox at the specified time as an unread message.
If you don't see the "Snooze" button, use the Customize Your Toolbar steps above to add it. New Views for EventsYou have two new views for your schedule in Mail and Calendar with the updated Outlook for Mac application. In Mail, you can see "My Day," which lists out your agenda for the current day. Just click the "Task Pane" button or View > Task Pane from the menu bar.
In Calendar, you can use a condensed three-day calendar view. Click the drop-down box at the top and choose "Three Day."
Miscellaneous Outlook Calendar UpdatesAlong with major updates to Mail and those couple mentioned here for Calendar, you'll find a few other Outlook Calendar improvements.
Along with a much-improved appearance, Outlook 365 for Mac offers up some terrific features. If you give it a try and have an idea, click Help > Suggest a Feature from the menu bar to share your suggestion with Microsoft. | |||||||||||||||||||||||||||||||||||||||||||||||||||||||||||||||||
| How to Insert Bullet Points in an Excel Spreadsheet Posted: 19 Nov 2020 09:59 AM PST
Adding a bulleted list in an Excel worksheet isn't straightforward, but it's possible. Unlike Microsoft Word—or even PowerPoint—there's not much in the way of visual cues to guide you when adding these lists. Instead, we'll try some manual trickery to get the task done. Insert Bullet Points From the Symbol MenuFirst, select any blank cell in your Excel workbook.
Make sure you have the "Insert" tab open and click "Symbol" from under the "Symbols" icon.
In the dialog box, type 2022 in the "Character code" box.
Click "Insert" and then "Close."
If you want to add more bullets to the lines underneath, press ALT + Enter on the keyboard and repeat the previous steps. Insert Bullet Points in a Text BoxIf you want to skip the functionality of a worksheet and just layer a text box on top, it's a more straightforward process than the above—though you'll lose some of the functionality of a worksheet as it acts more like a Word document. Go to the "Insert" tab and click "Text Box" under the "Text" menu.
Click anywhere in the worksheet to add the text box. To resize, grab any of the corners, drag it to your desired size and then release the mouse button.
Type the list items inside the text box.
Highlight the items you want to add bullets to. To add the bullets, right-click the list and then click "Bullets" from the list of options.
Choose your bullet style.
Insert Bullet Points Using Keyboard ShortcutsClick the cell where you'd like to start your bulleted list.
For a standard bullet, press Alt + 7 on your keypad. You can also use Alt + 9 if you'd prefer a hollow bullet.
To add more bullets, just click the square in the lower-right corner, hold the mouse button down, and drag the mouse down (or to the left or right) to fill in additional cells.
Or, if you want to add your bullets to a non-adjacent cell, just highlight the bullets and press Ctrl + C to copy and then Ctrl + P to paste it into a new area.
Excel, like most Microsoft Office products, has multiple ways to do the same thing. Just choose the way that works best for you and what you're trying to accomplish. | |||||||||||||||||||||||||||||||||||||||||||||||||||||||||||||||||
| You are subscribed to email updates from My Blog. To stop receiving these emails, you may unsubscribe now. | Email delivery powered by Google |
| Google, 1600 Amphitheatre Parkway, Mountain View, CA 94043, United States | |




0 nhận xét:
Đăng nhận xét