How to Link or Embed a PowerPoint Slide in a Word Document |
- How to Link or Embed a PowerPoint Slide in a Word Document
- How to Stop Annoying Website Notifications in Chrome on Android
- How to Reset Network Settings On Android in 2021
- How to Bring Back Photoshop’s Warning Dialogs
- How to Reset Network Settings on Android
| How to Link or Embed a PowerPoint Slide in a Word Document Posted: 01 Mar 2021 07:47 AM PST
The good thing about the Microsoft Office suite is all the programs in the collection work pretty well together. One example is the ability to link or embed Microsoft PowerPoint slides in a Microsoft Word document. Here's how it's done. Linking vs. EmbeddingWhether you link or embed the PowerPoint slide in the Word document, the goal is always the same: providing an external reference that compliments the content within the document. However, there are some subtle differences between linking and embedding that you should be aware of. The difference between linking and embedding an object is how the object's data is stored and how the content within the object is updated. Since the data is stored differently between the two methods, the process of updating the content will also be different when that time comes. RELATED: How to Link or Embed an Excel Worksheet in a Word Document If you link an object, then that link simply sends the reader to the location of the source object when clicked. The file itself doesn't actually store any data from the linked object to the file. This is advantageous if the object you're linking to is large in size and you need to reduce the file size of your Word document. The downside is that if the location of the linked object changes, the link in your Word document will break. If you embed an object, then you don't need to worry about whether the location of the object changes, as it becomes part of the document itself. That is, Word stores the object data in the actual Word file. The good news is that you don't have to worry about broken links in your document. The downside is that when the object is updated, those updates aren't reflected in your embedded object because there's no link connecting it to the source. Also, you'll need to consider that the file size increases with embedded objects. Link or Embed a PowerPoint Slide in a Word DocumentThe difference between being able to link or embed a Microsoft PowerPoint slide in a Microsoft Word document is only one click. First, open the PowerPoint presentation that contains the slide you want to link or embed. From there, select the desired file by clicking its preview thumbnail.
Next, copy the slide to your clipboard by using the Ctrl+c (Cmd+c on Mac) keyboard shortcut, or by right-clicking the slide and selecting "Copy" from the context menu.
Now, open the Word document you would like to link or embed the slide to. In the "Clipboard" group of the "Home" tab, click the down arrow under "Paste."
In the drop-down menu, click "Paste Special."
The "Paste Special" window will appear. If you've copied the PowerPoint slide to your clipboard, you'll see a "Microsoft PowerPoint Slide Object" option in the box under "As." Click it to select the option. Next, to embed the slide, click the bubble next to "Paste." To link the slide, click the bubble next to "Paste Link." Select "OK" to insert the linked or embedded object.
The Microsoft PowerPoint slide is now linked or embedded in your Microsoft Word document. |
| How to Stop Annoying Website Notifications in Chrome on Android Posted: 01 Mar 2021 05:37 AM PST  Website notifications can range from useful to downright spammy. If you have oversubscribed, don't worry, you can easily stop website notifications for individual websites in Chrome for Android. Alternatively, you can block the notification pop-up in Google Chrome altogether. When you visit a news website, you'll often see a pop-up asking you to subscribe to their latest posts.
If you agree to this, you'll get periodic notifications from the website via the Chrome app. Fortunately, you can disable the notifications for a website and the notification subscription pop-ups from the Settings menu. You can do this on the Chrome desktop app as well. RELATED: How to Stop Websites From Asking to Show Notifications To get started, open the Chrome app on your Android smartphone or tablet and tap the three-dot icon in the top-right corner.
Choose the "Settings" option.
Scroll down and open the "Notifications" section.
Now, tap the checkmark next to the website for which you want to disable notifications. Repeat this process for all the websites you want to unsubscribe from.
If you want to disable the website notifications feature altogether, toggle off the "Show Notifications" option from the "Sites" section.
That's it. You won't find website notifications crowding up your notifications anymore! Love opening lots of tabs in Chrome? Use the Tab Groups feature to keep your tabs organized. |
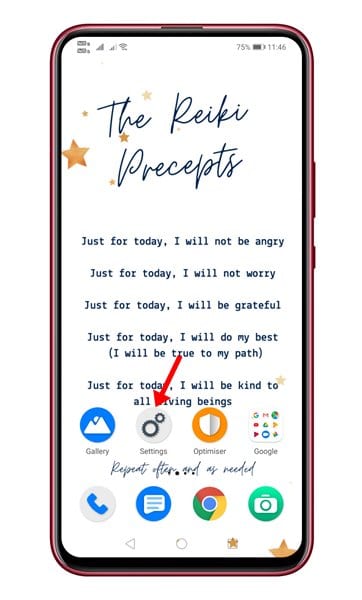
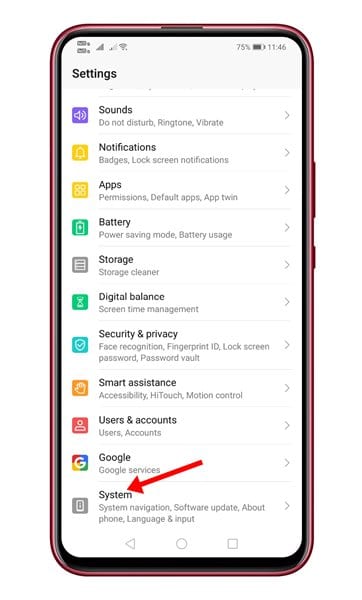
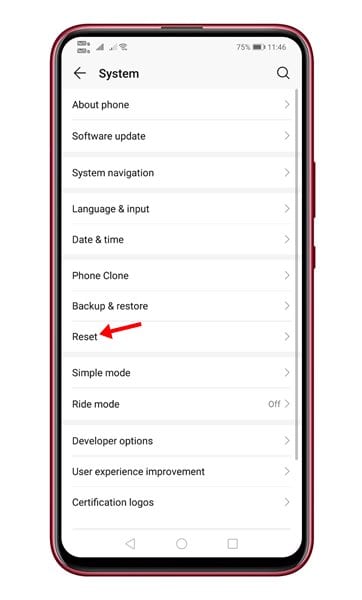
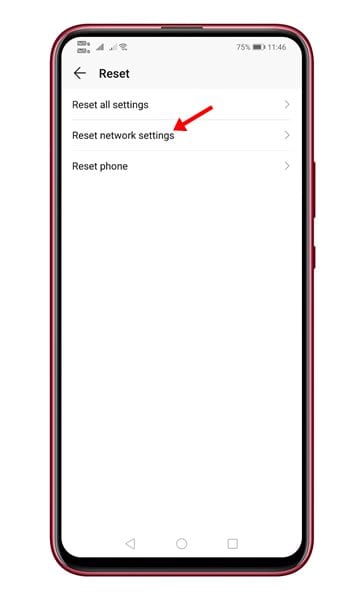
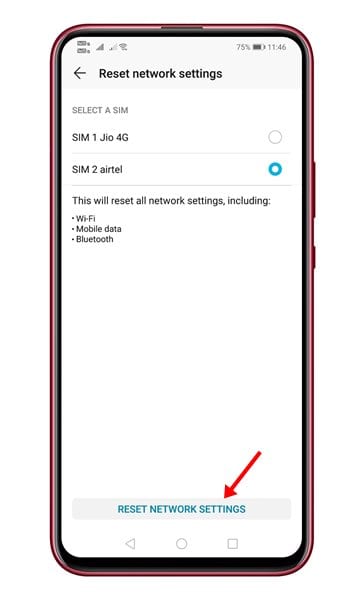
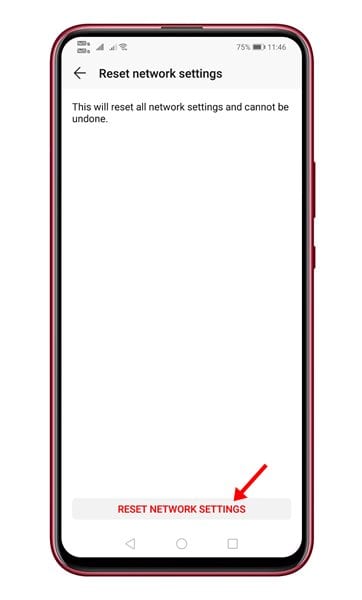
| How to Reset Network Settings On Android in 2021 Posted: 01 Mar 2021 04:21 AM PST Although Android is right now the best and most popular mobile operating system, it's not without its flaws. Compared to any other mobile operating system, Android has more bugs. Network options have always been a troubled part of Android. Android users deal with problems like slow internet connection, WiFi not showing on Android, and more often or not. Let's admit, the internet is a vital thing today, and if our phone doesn't connect to WiFi, we end up feeling cut off from the rest of the world. So, if you just found that your Android device isn't connecting to WiFi, or if your internet speed is too slow, then you might expect a few helps here. Your Android smartphone has an option known as 'Reset Network Settings.' The feature helps you to deal with WiFi networks, mobile data, and Bluetooth-related problems. Resetting the network settings on Android brings back all network-related settings to their original state. Also Read: How To Add Network Speed indicator In Android Status Bar Steps to Reset Network Settings On AndroidHowever, one should reset their network settings if every other method fails to work out. If you reset your network settings on Android, you need to set up your WiFi, BlueTooth, VPN, Mobile Data all over again from scratch. This article will share a detailed guide on how to reset network settings on an Android smartphone. Let's check out. Important: Please make sure to back up your WiFi network username/passwords, mobile data settings, and VPN settings before resetting the network settings. Once you reset, you will lose all those things. Step 1. First of all, open Settings on your Android smartphone. Step 2. On the Settings page, scroll down and tap on the system.' Step 3. On the System page, scroll down and tap on the 'Reset' option. Step 4. On the next page, tap on the 'Reset Network Settings' option. Step 5. Now tap on the 'Reset Network Settings' option located at the bottom of the screen. Step 6. On the confirmation page, tap on the 'Reset Network Settings' option again. Note: The Reset option might vary from device to device. This guide will give you an overall idea of how and where to find the reset network setting on Android. It's usually under the System Settings or General Management page. So, this article is all about how to reset network settings on Android. I hope this article helped you! Please share it with your friends also. If you have any doubts related to this, let us know in the comment box below. |
| How to Bring Back Photoshop’s Warning Dialogs Posted: 28 Feb 2021 05:12 PM PST
Adobe Photoshop is a complicated program. By default, it throws up a lot of warnings and other dialog boxes to make sure you're aware of the consequences of what you're doing. With most of these, you can check a box to never see them again. But what happens if you want to bring them back? Here's what to do. Photoshop can, at times, feel a bit like an over-anxious parent, throwing up warnings when you do simple—and reversible—things like deleting a layer. It's easy to get in the habit of checking "Don't Show Again" every time you see one.
Unfortunately, Photoshop's app-that-cries-wolf approach means that you can dismiss genuinely helpful warnings for things that can have unintended and hard-to-reverse consequences for your work. For example, changing the color space of your images deeply affects how they'll look if you post them online or print them out, without really changing what you see in Photoshop. Sometimes you really do want to change the color space of your work, but it's also something you can do by accident, especially if you're combining multiple images from different sources. Changing the color space or combining images from different color spaces is the kind of thing that you probably do want to see a pop-up about every time you do.
I, of course, dismissed that warning, like pretty much every other one Photoshop has shown me. Whoops. While there's no way to reset individual warning dialogs, you can reset them all. This means you'll need to check a few "Don't Show Again" boxes for common features, but the more important pop-ups will be back, too. Just be a little more careful about dismissing them next time you see them. To restore Photoshop's warning dialogs on a Windows PC, go to Edit > Preferences. On a Mac, select Photoshop > Preferences > General. Click the "Reset All Warning Dialogs" button, then click "Okay."
Now, the next time you're doing something Photoshop feels it should warn you about, it will do so.
|
| How to Reset Network Settings on Android Posted: 28 Feb 2021 11:43 AM PST  If you're having trouble connecting to a Wi-Fi network or Bluetooth device on your Android smartphone or tablet, it might be time to reset your network settings. Doing so might remove any conflicts. To do that, you'll need to follow these steps. Before we begin, a word of warning. Issues with Android fragmentation are well known and documented, where even the settings menu can vary from device to device. Thankfully, many Android manufacturers are now choosing to use the "stock" Android interface (or something similar) for their devices rather than personalizing them with a custom interface. If you're unsure which steps to follow, follow the steps for "stock" Android, as they're likely to match (or closely match) what you'll see on your device to reach the same end result. Reset Network Settings on Stock Android DevicesIf you're using a device that's running "stock" Android (8.1 Oreo or newer), it means that you're probably using the Google-issued Android interface (or something very similar) and should follow the steps below to reset your network settings. Samsung device owners, however, will need to follow the steps in the next section. To begin resetting your network settings, open the settings menu. You can do this by tapping the "Settings" app icon in your app drawer. Alternatively, swipe down from the top of your screen to view the notifications shade, then tap the gear icon in the top-right corner.
In the "Settings" menu, tap the "System" option.
Next, select "Reset Options" to view the available options for resetting your device. You may need to tap Advanced > Reset Options instead, depending on your device.
In the "Reset Options" menu, you can reset various system settings. To reset your network settings as a whole, tap the "Reset Wi-Fi, Mobile & Bluetooth" or "Reset Network Settings" option, depending on your version of Android.
You'll need to confirm that you want to proceed. Tap "Reset Settings" to begin the process.
Provide your lock screen PIN, password, fingerprint, or other form of authentication, then tap "Reset Settings" again to confirm.
Once this is complete, your Android device's network settings will reset to default settings, and you should restart your device to complete the changes. You'll then need to reconnect to your Wi-Fi or mobile network or reestablish any previous connections to your Bluetooth devices. Reset Network Settings on Samsung DevicesWhile most manufacturers are moving to Android uniformity with the "stock" interface, Samsung is one of the few manufacturers that continues to use its own interface (most recently named "One UI") for Android smartphones and tablets. RELATED: What Are Android Skins? If you're trying to reset your network settings on a Samsung Android device, start by tapping the "Settings" app in your app drawer. Alternatively, swipe down from the top of your screen to view the notifications shade, then tap the gear icon.
In the "Settings" menu, tap the "General Management" option.
In the "General Management" menu, select the "Reset" option to view the available options for resetting your device.
Tap the "Reset Network Settings" option in the "Reset" menu to proceed to the next stage.
Resetting your network settings on Android will wipe all previous settings for your Wi-Fi and mobile data connections as well as any previously connected Bluetooth devices. If you're happy to proceed, tap the "Reset Settings" option.
You may need to confirm your identity with a PIN, password, fingerprint, or other form of authentication. Provide this, then tap "Reset" to begin the process.
Once you've reset your network settings, restart your Samsung phone or tablet. You'll need to reconnect to your devices and Wi-Fi or mobile network connections once this is complete. |
| You are subscribed to email updates from My Blog. To stop receiving these emails, you may unsubscribe now. | Email delivery powered by Google |
| Google, 1600 Amphitheatre Parkway, Mountain View, CA 94043, United States | |
0 nhận xét:
Đăng nhận xét