How to Manually Restore Your iPhone or iPad Using Your Mac |
- How to Manually Restore Your iPhone or iPad Using Your Mac
- How to Share Your Apple Watch Face
- Watch Out For This New Amazon Email Phishing Scam
- How to Message a Facebook Friend From Instagram
- How to Send a Normal Retweet on Twitter (Not a Quote Tweet)
- How to Take Photos in Burst Mode on Your iPhone
- How to Enable Halloween Sounds on Ring Video Doorbells
| How to Manually Restore Your iPhone or iPad Using Your Mac Posted: 23 Oct 2020 08:33 AM PDT  Sometimes, your iPhone or iPad might refuse to boot or update via the Finder app. If it's stuck, you can try to manually restore your iPhone or iPad using the IPSW file on your Mac or MacBook. Restoring your iPhone or iPad should be a last resort, as doing so will erase all the data on your phone or tablet. It will also reinstall iOS or iPadOS with the latest version. Once the operating system restore process is complete, you can then restore your data from a backup. Before you begin, make sure you've backed up your iPhone or iPad. RELATED: How to Back Up and Restore Your iPhone or iPad without iTunes How to Download the Correct IPSW File for Your iPhone or iPadWhen you use your Mac to update your iPhone or iPad (via Finder or iTunes, depending on the version of macOS), your computer uses an IPSW file. If everything goes smoothly and you're able to update or restore your phone or tablet, you won't have to worry about this file. However, if your iPhone or iPad is stuck at a particular OS version (or if a beta version isn't playing nice) and won't update, the IPSW file will come in handy. You can download this file and force your Mac to use it to restore your iPhone or iPad. You can find and download the IPSW file for your device on the IPSW website. It lists the latest versions of IPSW files signed by Apple. You can't install an update file that isn't signed by Apple, as the company verifies it against its servers before installing the firmware. To get started, head to the IPSW website and choose your device (iPhone or iPad). For our example, we're going to restore a 2018 iPad Pro 11-inch (Wi-Fi), but the process is the same for all iPhones and iPads.
Scroll down and select your model (ours is the iPad Pro 3).
You'll then see all available IPSW files; select the latest signed version.
On the next page, click "Download." This is quite a large file (around 5 GB), so, depending on your internet connection, this could take a while.
How to Restore Your iPhone or iPad via Finder on a MacStarting with macOS Catalina, Apple broke out the iTunes app and moved the iPhone and iPad management section to the Finder app. All the features are the same, they're just in a different place. If you're using an older version of macOS, just follow the steps below in iTunes. RELATED: Where Are iTunes Features in macOS Catalina? Again, you want to make sure you've backed up your device before proceeding, as this process will erase all the data on your iPhone or iPad. After you've backed up your device, connect your iPhone or iPad to your Mac via its USB cable. If your iPhone or iPad won't boot, put it in the DFU (recovery) mode before you start this process. Open the Finder app on your Mac, and then select your iPhone or iPad from the sidebar. Press and hold the Option key, and then click "Restore iPhone" or "Restore iPad."
Next, select the IPSW file you downloaded, and then click "Open."
If your Mac asks you to install a device update, click "Install."
Wait while your phone or tablet downloads and installs the update.
When it's done, Finder will ask if you're sure you want to restore your iPhone or iPad; click "Restore." If this pop-up doesn't appear after the device update, go back and start the restore process again.
Your Mac will now start the restore process, which can take a while. Make sure your iPhone or iPad remains connected to your Mac. Your device will boot to the Apple logo a few times.
When the process completes, a pop-up will appear that says your device has been restored; click "OK."
Your iPhone or iPad will now restart, and you'll once again see it in the sidebar. You can now either restore your data from an iCloud backup or disconnect your phone or tablet from your Mac and set it up like new. If you have a backup on your Mac (especially if it's encrypted), it's going to be much faster to restore from this rather than an iCloud backup. After your device is restored, select it from the Finder sidebar to see the iPhone or iPad setup screen. Here, select a backup, and then click "Continue" to start the process.
After the process is complete, your iPhone or iPad will be back to how it used to be—only now, it will be functional! If you want to be more conscientious about your backups, be sure to check out all the data you can back up on iCloud. |
| How to Share Your Apple Watch Face Posted: 23 Oct 2020 02:42 AM PDT One of the best parts of owning an Apple Watch is the ability to customize your own watch face with different colors, photos, and complications. You can share these designs with friends, family, and the world, too. Here's how. How to Share Your Apple Watch FaceThe best way to share your Apple Watch face is by using the Watch app on your iPhone. Keep in mind that you need to have iOS 14 or later installed on your iPhone, and watchOS 7 or later installed on your Watch for this to work. Launch the Watch app on your iPhone, and tap on the face you would like to share. Now tap on the "Share" button in the top-right corner of the screen to see a list of locations you can share to. These include AirDrop, Messages, Mail, third-party chat services like WhatsApp, note-taking apps, and cloud storage services.
When you export a Watch face, your iPhone sends a file with the .watchface extension to the destination of your choosing. This allows you to share your Watch face to virtually any service that allows the uploading or sending of files, making it easy to make your face available to others. The size of a .watchface file comes in at around 400kb. You can also share your face directly from your Apple Watch. To do so, tap and hold your Watch face until you see its name at the top of the screen and an "Edit" button beneath it. Tap on the "Share" button in the lower-left corner of the screen.
This will open a new Messages conversation. You can add a contact and a message, then hit "Send" to share your Watch face. There is no way of sending your Watch face to other apps using this method. Receiving and Removing a Watch FaceWhen you send a Watch face via Messages, the recipient will see a preview of the face in the conversation window. If you're sharing a link to a file, this won't work quite the same. When the link is tapped, the Watch app will open and show a detailed preview of the face. The recipient can then tap "Add to My Faces" to add the face to their device. The face can then be chosen on the Apple Watch either by long-swiping left and right or by tapping and holding the face until its name appears, then scrolling through the list of available faces.
Faces can be removed via the Watch app using the "Edit" button, or by tapping and holding on an Apple Watch face and then flicking the face upwards (as if you were killing an app on your iPhone). Sending a Watch face to someone else will not affect their current list of faces, even if they already have a Watch face that uses a similar design (for example, Infograph). No personal information like calendar events, weather locales, or activity data will be included with any faces. Curated Watch Faces in the App StoreApple promises a curated selection of Watch faces will appear in the App Store for easy installation. As of watchOS 7's release in September 2020, however, they were not yet available in the App Store. Beware of apps promising to install thousands of Watch faces on your device, as these are mostly static images that can be used as regular Watch backgrounds. If you really want to make your Apple Watch your own, learn how to create your own truly personal designs using your own photos and albums. |
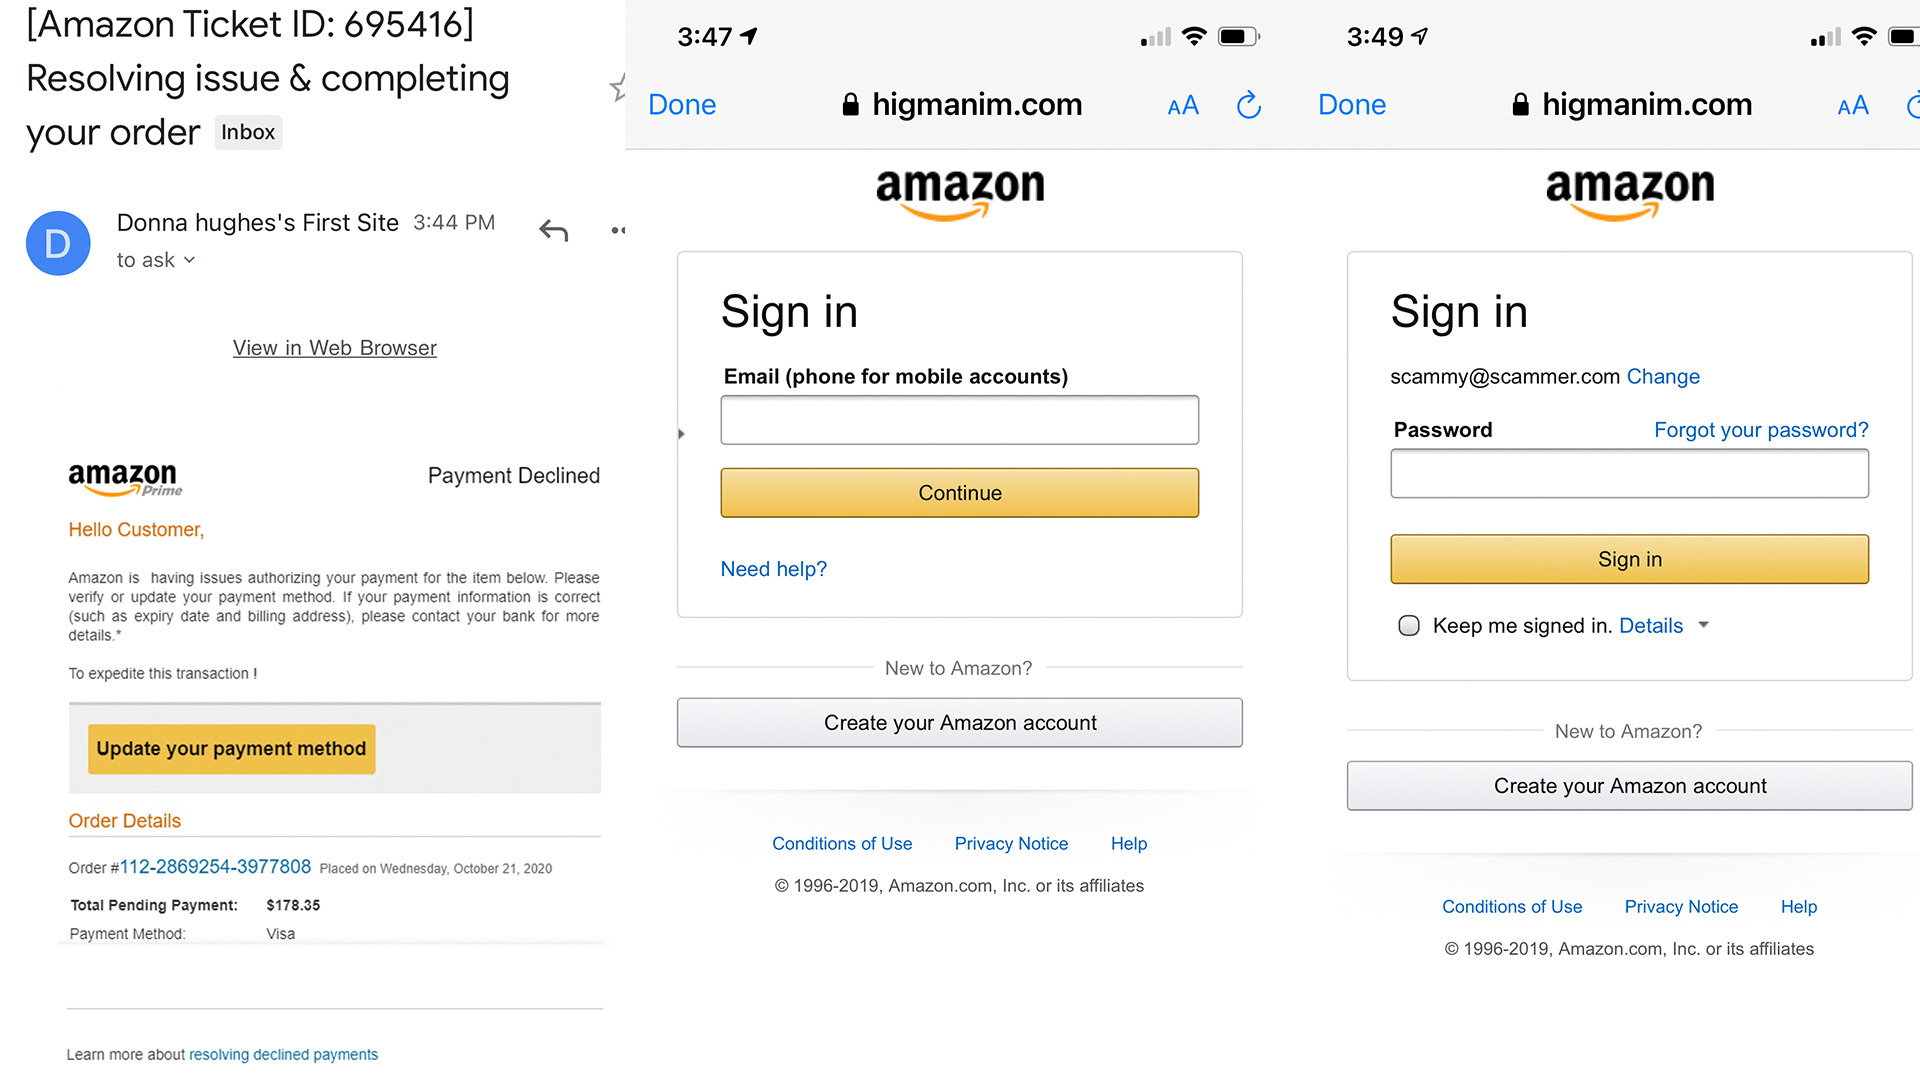
| Watch Out For This New Amazon Email Phishing Scam Posted: 23 Oct 2020 01:05 AM PDT Scam artists are getting so good at creating realistic-looking phishing emails that some are getting past Gmail's spam filters. Although most of us have been trained to spot suspicious email messages, some (like the one above) look like they could be from companies like Amazon. Bad actors posing as companies you do business with is nothing new. If you look at your spam folder right now, chances are that you'll see emails claiming to be from your cellphone carrier (T-Mobile, Verizon, AT&T, etc.) or a large retailer (Amazon, Best Buy, Target, etc.). In this case, we received an authentic-looking email pretending to be a support ticket from Amazon. The message claims the company is having issues authorizing a purchase and needs us to re-enter our billing information. As this phishing attempt arrived leading up to the holiday shopping season, it's easy to see why someone might instinctually trust the email's legitimacy. Thankfully, if a similar phishing email ends up in your inbox, there are a couple of easy ways to identify it as spam. RELATED: What Should You Do If You Receive a Phishing Email? But before we dig into this particular phishing attack, know that we DO NOT recommend you open any email that you suspect to be spam or click on links found within the message. Instead, immediately report the email, mark it as spam, and delete the message. The first thing you should always check before clicking or tapping links in an email is the sender's email address. Although the address can be spoofed, in our case, it wasn't. Combined with the sender's name appearing as "Donna Hughes's First Site" and odd spacing in the email's text, it's easy to tell something isn't quite right, but only if you slow down and look at the fine details first.
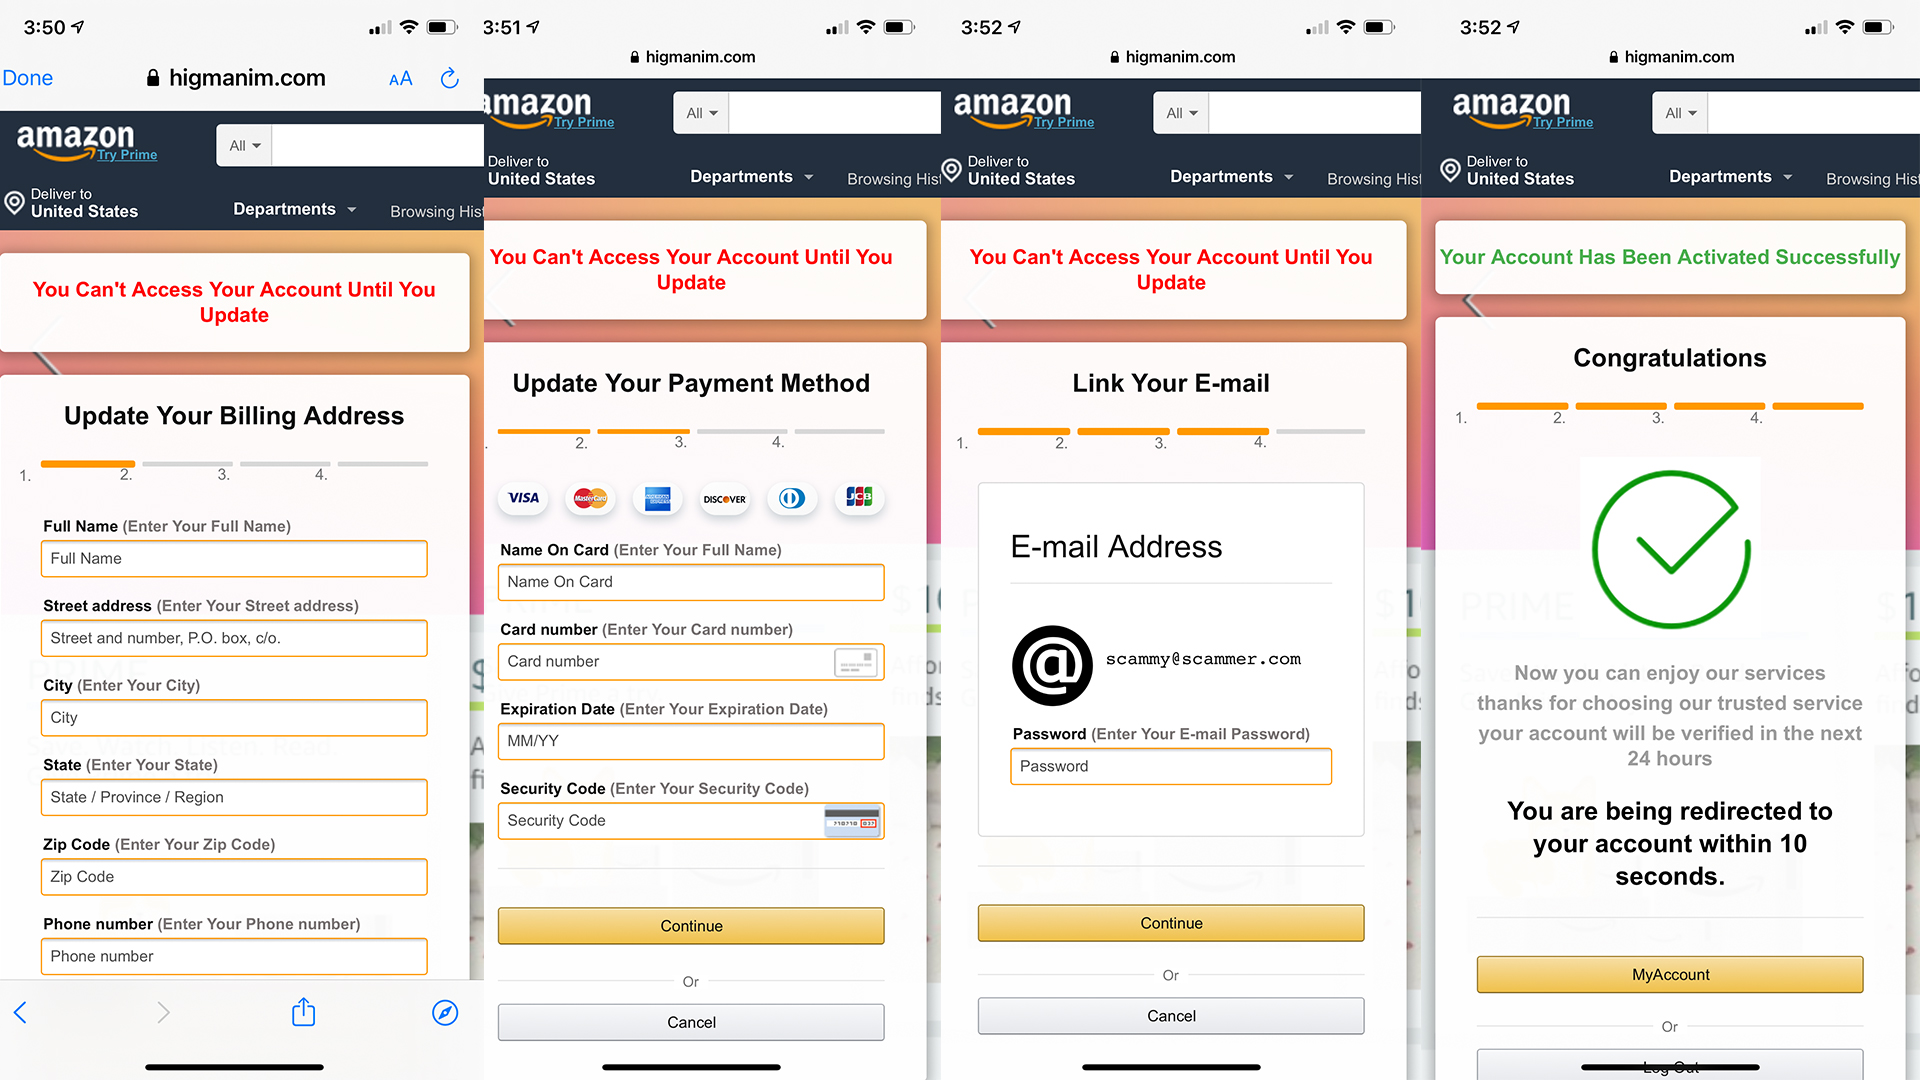
What's interesting/scary about this phishing attempt is that the bad actor is trying to steal multiple pieces of information in one attack. Once you click through the email to update your payment method, you're asked to sign in to your Amazon account. Although this site might look like Amazon's website, it's not. You will find the completely incorrect URL at the top of the screen. As you can see from the screenshots, we entered a false email address and password. Whoever created the scam is using this step to steal your Amazon credentials. We were then taken to a realistic Settings page that claimed we couldn't access our Amazon account until we updated our billing information. If we actually entered our information, the perpetrator would have our mailing address, phone number, and credit/debit card number.
The cherry on top of this entire scheme is the attempt to steal your login information for your email account. The fake website claims it wants to link your email to your Amazon account, but instead, you'd be giving whoever sent the message the keys to your private emails and possibly also your Google account. To reiterate, you should never click on a link that you're suspicious of or think might be spam. And if you do, don't enter any personal or credit card information. Instead, close any tabs or windows that were opened, mark the message as spam, and permanently delete the email. Be safe, and don't click on any links that appear even remotely insecure. RELATED: How to Spot a Text Message Scam |
| How to Message a Facebook Friend From Instagram Posted: 22 Oct 2020 02:50 PM PDT Facebook acquired Instagram in 2012, but the platforms remained mostly separate. This changed in 2020, though—you can now send messages to anyone on Facebook from the Instagram app. We'll show you how to use the Cross-App Messaging feature. Cross-App Messaging works in both directions: Facebook Messenger to Instagram, or Instagram to Facebook Messenger. However, it's more prominent on Instagram as the Direct Message icon has been replaced with a Messenger icon. There are a couple of limitations, however. You can only message people on Facebook from Instagram, not groups or pages. In Facebook Messenger, you can message any Instagram account, but not Direct Message groups. It's important to note that the two platforms haven't "merged." Your Messenger conversations will not suddenly appear in Instragam, or vice versa. You have to actually seek out people on the other platform. To get started, open the Instagram app on your iPhone, iPad, or Android device. Tap the Messenger icon at the top right.
Next, type the person's name in the Search box at the top.
As you're typing, results will appear below in different sections. Other people on Instagram will appear at the top, followed by "Facebook Friends." Tap the person you're looking for if they appear or tap "See All" to see more Facebook results.
You'll see a prompt that says "You're Messaging a Facebook Account." You can now send a message and your friend will see a similar prompt.
If you aren't friends with the person on Facebook, he'll be asked to "Accept" the message. Again, this works the same way if you message someone on Instagram from Facebook Messenger. You simply have to search for the Instagram account and both people will see prompts similar to those above. Cross-App Messaging is particularly handy if you have occasional conversations in Facebook Messenger, but you don't want to keep the app installed—you can just use it on Instagram. A little integration can make a huge difference! |
| How to Send a Normal Retweet on Twitter (Not a Quote Tweet) Posted: 21 Oct 2020 05:19 PM PDT  Twitter has temporarily changed its retweet system. When you try to retweet something, you'll see the "quote tweet" dialog that asks you to share your own thoughts. Here's how to send a normal retweet instead. What's the Difference Between a Retweet and Quote Tweet?What's the difference? Well, when you send a normal retweet, you're sharing the original tweet directly. The other account's tweet will directly appear in your followers' timeline. Any interactions—including likes, comments, and further normal retweets—will be associated directly with the original tweet. When you send a quote tweet, your followers will see whatever comment you type with the original tweet embedded. Any interactions on the tweet—like likes and comments—will be associated with your quote tweet rather than the original tweet. As The Verge notes, a lot of artists are upset about this. How to Retweet Without Quote Tweeting on TwitterLuckily, sending a normal retweet is still pretty simple. To do so, just click or tap the normal Retweet button on Twitter's website or in a Twitter app.
Twitter will show you the Quote Tweet dialog and ask you to add a comment. Don't type anything here—just click or tap the "Retweet" button. If you don't enter anything in this dialog, Twitter will send a normal retweet instead of a quote tweet.
This change was implemented worldwide on October 20, 2020. Twitter says it will "assess [the] continued necessity" of it and other changes after the end of the 2020 election in the USA. |
| How to Take Photos in Burst Mode on Your iPhone Posted: 21 Oct 2020 03:10 PM PDT Burst mode is a great way to guarantee you get any action shot—but, as of iOS 14, it's slightly hidden on the iPhone XS, iPhone XR, and newer devices. Here's how to use it on a modern iPhone. Taking Photos and Videos With QuickTakeQuickTake is a new feature that makes it easier to capture short videos while you shoot photos on your iPhone. It makes the camera app work more like the built-in cameras in apps like Instagram and Snapchat. To capture a short video, hold down the "Shutter" button. When you release it, the recording will stop. If you want to record a longer video, hold down the "Shutter" button and drag it to the padlock on the right. This will lock the recording until you tap the "Stop Recording" button. You can keep taking photos by tapping the "Shutter" button even as you record.
If you've used an iPhone for a while, you might notice this is how you used to shoot bursts. Now, to shoot a burst of photos, hold the "Shutter" button and drag it to the left. Your iPhone will keep shooting until you release it.
You have to drag the shutter quite quickly; pause too long and your iPhone will start recording video. If, like me, you like shooting in burst mode, it takes a little bit of getting used to. But there's a better way. Set Volume Up to Burst ModeThe volume buttons on your iPhone double as a shutter release and work with QuickTake. Tap "Volume Up" or "Volume Down" to take a photo, hold them down to shoot a short video. However, you can configure your iPhone so that holding "Volume Up" instead shoots a burst of photos, while holding "Volume Down" still shoots video. It's a great way to have total control of your camera. To enable it, go to Settings > Camera, and enable "Use Volume Up For Burst."
Selecting Photos from a BurstNot every photo you shoot in a burst will be good. In fact, you probably only want to keep one or two. Your iPhone will automatically select what it thinks is the best photo but you should still go through them yourself. To sort photos from a burst, open the Camera Roll. Bursts appear as a little stack of photos, although it's quite hard to see. Tap in and you'll also see "Burst (X photos)" in the top left.
Tap "Select," and swipe through the collected photos tapping each one you want to keep. Then tap "Done." You have the option to either "Keep Everything" or "Keep Only X Favorites."
Choose the option that best applies. In either case, the photos you selected will be pulled from the burst and appear as individual photos in your Camera Roll ready to be edited, shared, or ignored forever. (Confusingly, they don't get added to your Favorites album. To do that, you'll need to re-favorite them by tapping the Heart icon.) |
| How to Enable Halloween Sounds on Ring Video Doorbells Posted: 21 Oct 2020 10:38 AM PDT Like Google's Nest Doorbell, Ring has also brought some fun Halloween sounds to all of its video doorbells! The company has several more options compared to the Nest Hello, and they're just as easy to enable—here's how! Keep in mind this feature works best with Ring Chimes. If you don't have one of those, you can manually adjust your phone's notification settings to Halloween sounds, but that's definitely not as fun. First, open the Ring app on your iPhone, iPad, or Android device and select the "Chimes" option in the top toolbar.
If you don't see the "Chimes" option, select the hamburger menu button in the top-left corner.
Then, from the side menu, select "Devices."
Tap the Chime you'd like to change. You can have multiple Chimes use different sounds if you'd like.
Next, select "Audio Settings."
Choose "Chime Tones" from the list of options.
Finally, tap the sound you'd like to use. Special Halloween tones include "Bats," "Ghosts," "Howl," "Scream," and "Spooky Organs." You're done once you make a selection!
Now you can go back and change all your Chimes if you really want to get into the Halloween spirit. If you want to go even further, Ring also sells festive faceplates for the Ring Video Doorbell 3 and 3 Plus. Happy Halloween and stay safe! |
| You are subscribed to email updates from My Blog. To stop receiving these emails, you may unsubscribe now. | Email delivery powered by Google |
| Google, 1600 Amphitheatre Parkway, Mountain View, CA 94043, United States | |


0 nhận xét:
Đăng nhận xét