How to Stop AirPods Automatically Switching between iPhone and iPad |
- How to Stop AirPods Automatically Switching between iPhone and iPad
- How to Monitor In-Game PC Performance with MSI Afterburner
- Acer Swift 3 Review
- How to View All Your Instagram Stories on a Map
- How to Convert Keynote Presentations to Microsoft PowerPoint
- How to Change Instagram Fonts for Your Profile and Captions
- How to Change Your Twitter Username
- How to Keep Low Power Mode Enabled Permanently on Your iPhone
| How to Stop AirPods Automatically Switching between iPhone and iPad Posted: 19 Oct 2020 08:32 AM PDT  AirPods and AirPods Pro now automatically switch between iPhone and iPad. If you put down your iPad and start a call on your iPhone, they'll switch to your iPhone automatically. Don't like this feature? Here's how to disable it. How Automatic AirPods Switching WorksThis feature was added in iOS 14, iPadOS 14, and macOS Big Sur. As long as your iPhone or iPad is updated to the latest version of the operating system and your AirPods are in your ears, device-switching works automatically. (If not, try updating the firmware on your AirPods or AirPods Pro.) Automatic device switching works with AirPods (2nd Generation), AirPods Pro, Powerbeats, Powerbeats Pro, and Solo Pro. In the traditional Apple sense, it "just works." You don't need to enable this feature. When your AirPods switch between a device, you'll see a little notification about it. If you want, you can tap the blue "Back" button to switch back to the previous device.
RELATED: How to Switch AirPods Automatically on iPhone, iPad, and Mac How to Disable Automatic Switching for AirPods and AirPods ProIf you frequently use your iPhone, iPad, and Mac together (for example, while you're working on your desk), it might be annoying when your AirPods automatically switch between devices. Thankfully, you can disable AirPods switching, and go back to manually switching between devices. (While this process takes longer, it is more reliable.) You'll need to disable this feature on a per-device basis. First, connect your AirPods to your iPhone or iPad, and open the "Settings" app.
On the Settings screen, tap the "Bluetooth" section.
Now, find your AirPods from the list and tap the little "i" icon next to your AirPods.
Here, choose the "Connect To This iPhone" or "Connect To This iPad" option, depending on your device.
From this section, choose the "When Last Connected To This iPhone" or "When Last Connected To This iPad" option.
You have now disabled the automatic switching feature for AirPods. Go to your iPad and repeat this process. How to Switch Devices ManuallyYou can still manually switch between your iPhone or iPad using the Control Center. Swipe down from the top-right corner of the iPhone or iPad to reveal Control Center.
Here, tap the little "AirPlay" icon to show all available devices.
Now, select your AirPods to switch to them.
You can speed up this process using shortcuts and third-party apps on the Mac. To learn more, take a look at our complete guide for manually switching AirPods between iPhone, iPad, and Mac. RELATED: How to Manually Switch AirPods Between Mac, iPhone, and iPad |
| How to Monitor In-Game PC Performance with MSI Afterburner Posted: 19 Oct 2020 05:53 AM PDT
MSI Afterburner is one of the most popular ways to see in-game PC performance statistics. And yes, it works on all systems, whether you have an MSI graphics card or not. Here's how to set it up! What You'll NeedMSI Afterburner is primarily an overclocking tool for squeezing more performance out of your graphics card. But it also works with the RivaTuner Statistics Server from Guru3D.com to display real-time performance while gaming. To get started, you'll need to download and install both applications on your Windows PC. Getting Started With Afterburner
After you download and install MSI Afterburner, you'll see the interface above. You can change this look, but we won't be covering that here. In the default interface, there are two dials that show the current status of your graphics cards, including the frequencies of the GPU and memory clocks, the voltage, and current temperature. Between the two dials, there are sliders that allow you to tweak all this data (here's how to overclock your graphics card, if you're interested). Before we get all those delicious stats up on your screen, just one caveat: don't close the windows of either Afterburner or RTSS, as that also closes the programs. Instead, minimize them and they'll disappear from the taskbar. In the system tray, you'll then see two icons: a jet (Afterburner) and a computer monitor with a "60" on it (RivaTuner Statistics Server).
Now, let's get ready for the big show. Open Afterburner, and then click the Settings cog. In the window that appears, click "On-Screen Display." In the "Global On-Screen Display Hotkeys" section, you can set these to whatever you want or leave the defaults. Next, click the "Monitoring" tab; this is where you decide which stats you want to see in-game. First, let's take a look at the massive list under "Active Hardware Monitoring Graphs." Including all this info on-screen is unrealistic if you actually want to see your game. Luckily, none of these options appear on-screen by default. To enable any of these, simply highlight those you want. Under "GPU Usage Graph Properties" select the "Show In On-Screen Display" checkbox. We recommend you use the default for each, which displays it as text, rather than a graph, but play around with it.
After you choose a property to show up in the on-screen display (OSD), you'll see "In OSD" under the "Properties" tab to the right of each name. One of the most common properties people want to display is the frame rate to make sure their machine is hitting that all-important golden zone of 60 frames per second. To enable this, select the checkbox next to "Framerate," and then select the checkbox next to "Show in On-Screen Display." Gamers often talk about how many games aren't optimized for processors over four cores. If you have a six- or eight-core processor, you might want to keep an eye on the CPU performance and how work is distributed. Afterburner automatically detects how many threads your CPU has and offers options accordingly. If you have a four-core Intel processor with Hyper-Threading, for example, you'll see: "CPU Usage," "CPU1 Usage," "CPU2 Usage," "CPU3 Usage," and so on, all the way up to "CPU8 Usage." CPU clocks, temperature, RAM usage, and power are also popular choices. Of course, everyone also likes to see how the GPU is performing. The main stat here is "GPU Usage," shown as a percentage. "GPU Temperature" is also a good one to monitor if you want to see how well those fans are working to keep the GPU cool.
The list can get quite long if you're not careful, though. Still, it's nice to have all this information handy while you're playing. Our list includes GPU temperature and usage, memory usage, core clock, CPU temperature and usage for all threads, CPU clock, RAM usage, and the frame rate. This isn't a feature you want to run all the time. However, it can be particularly useful when you're playing a new game so you can see how your system handles it. It's also handy to see how a recent driver or game update has improved performance. While we've done the bulk of the work to get Afterburner running, we're not quite done. In the system tray, right-click the RivaTuner Statistics Server icon, and then click "Show." Again, make sure the "Show On-Screen Display" option is enabled. We also suggest changing the "Application Detection Level" option to "High," so most games will be automatically detected, and the in-game display will show up. You might get a few false positives occasionally, but it's usually pretty good about only appearing when you're playing a game.
By default, Afterburner shows all the stats in the upper-left corner. To change this, just click the corners. You can also adjust the coordinates below for more precise movement. There's no required location for this data. In some games, though, you might need to move it around, depending on what's on-screen.
You can also adjust the colors and text size in the on-screen display. Above the area where you adjust the location of the stats, just click "On-Screen Display Palette" and/or "On-Screen Display Zoom." MSI Afterburner and RivaTuner Statistics Server make an excellent team if you want keep tabs on your system's performance. Windows 10 has some built-in system performance panels you can enable, as well. They're less powerful and show less info, but they're easy to quickly turn on and off. RELATED: How to Show Windows 10’s Hidden Floating Performance Panels |
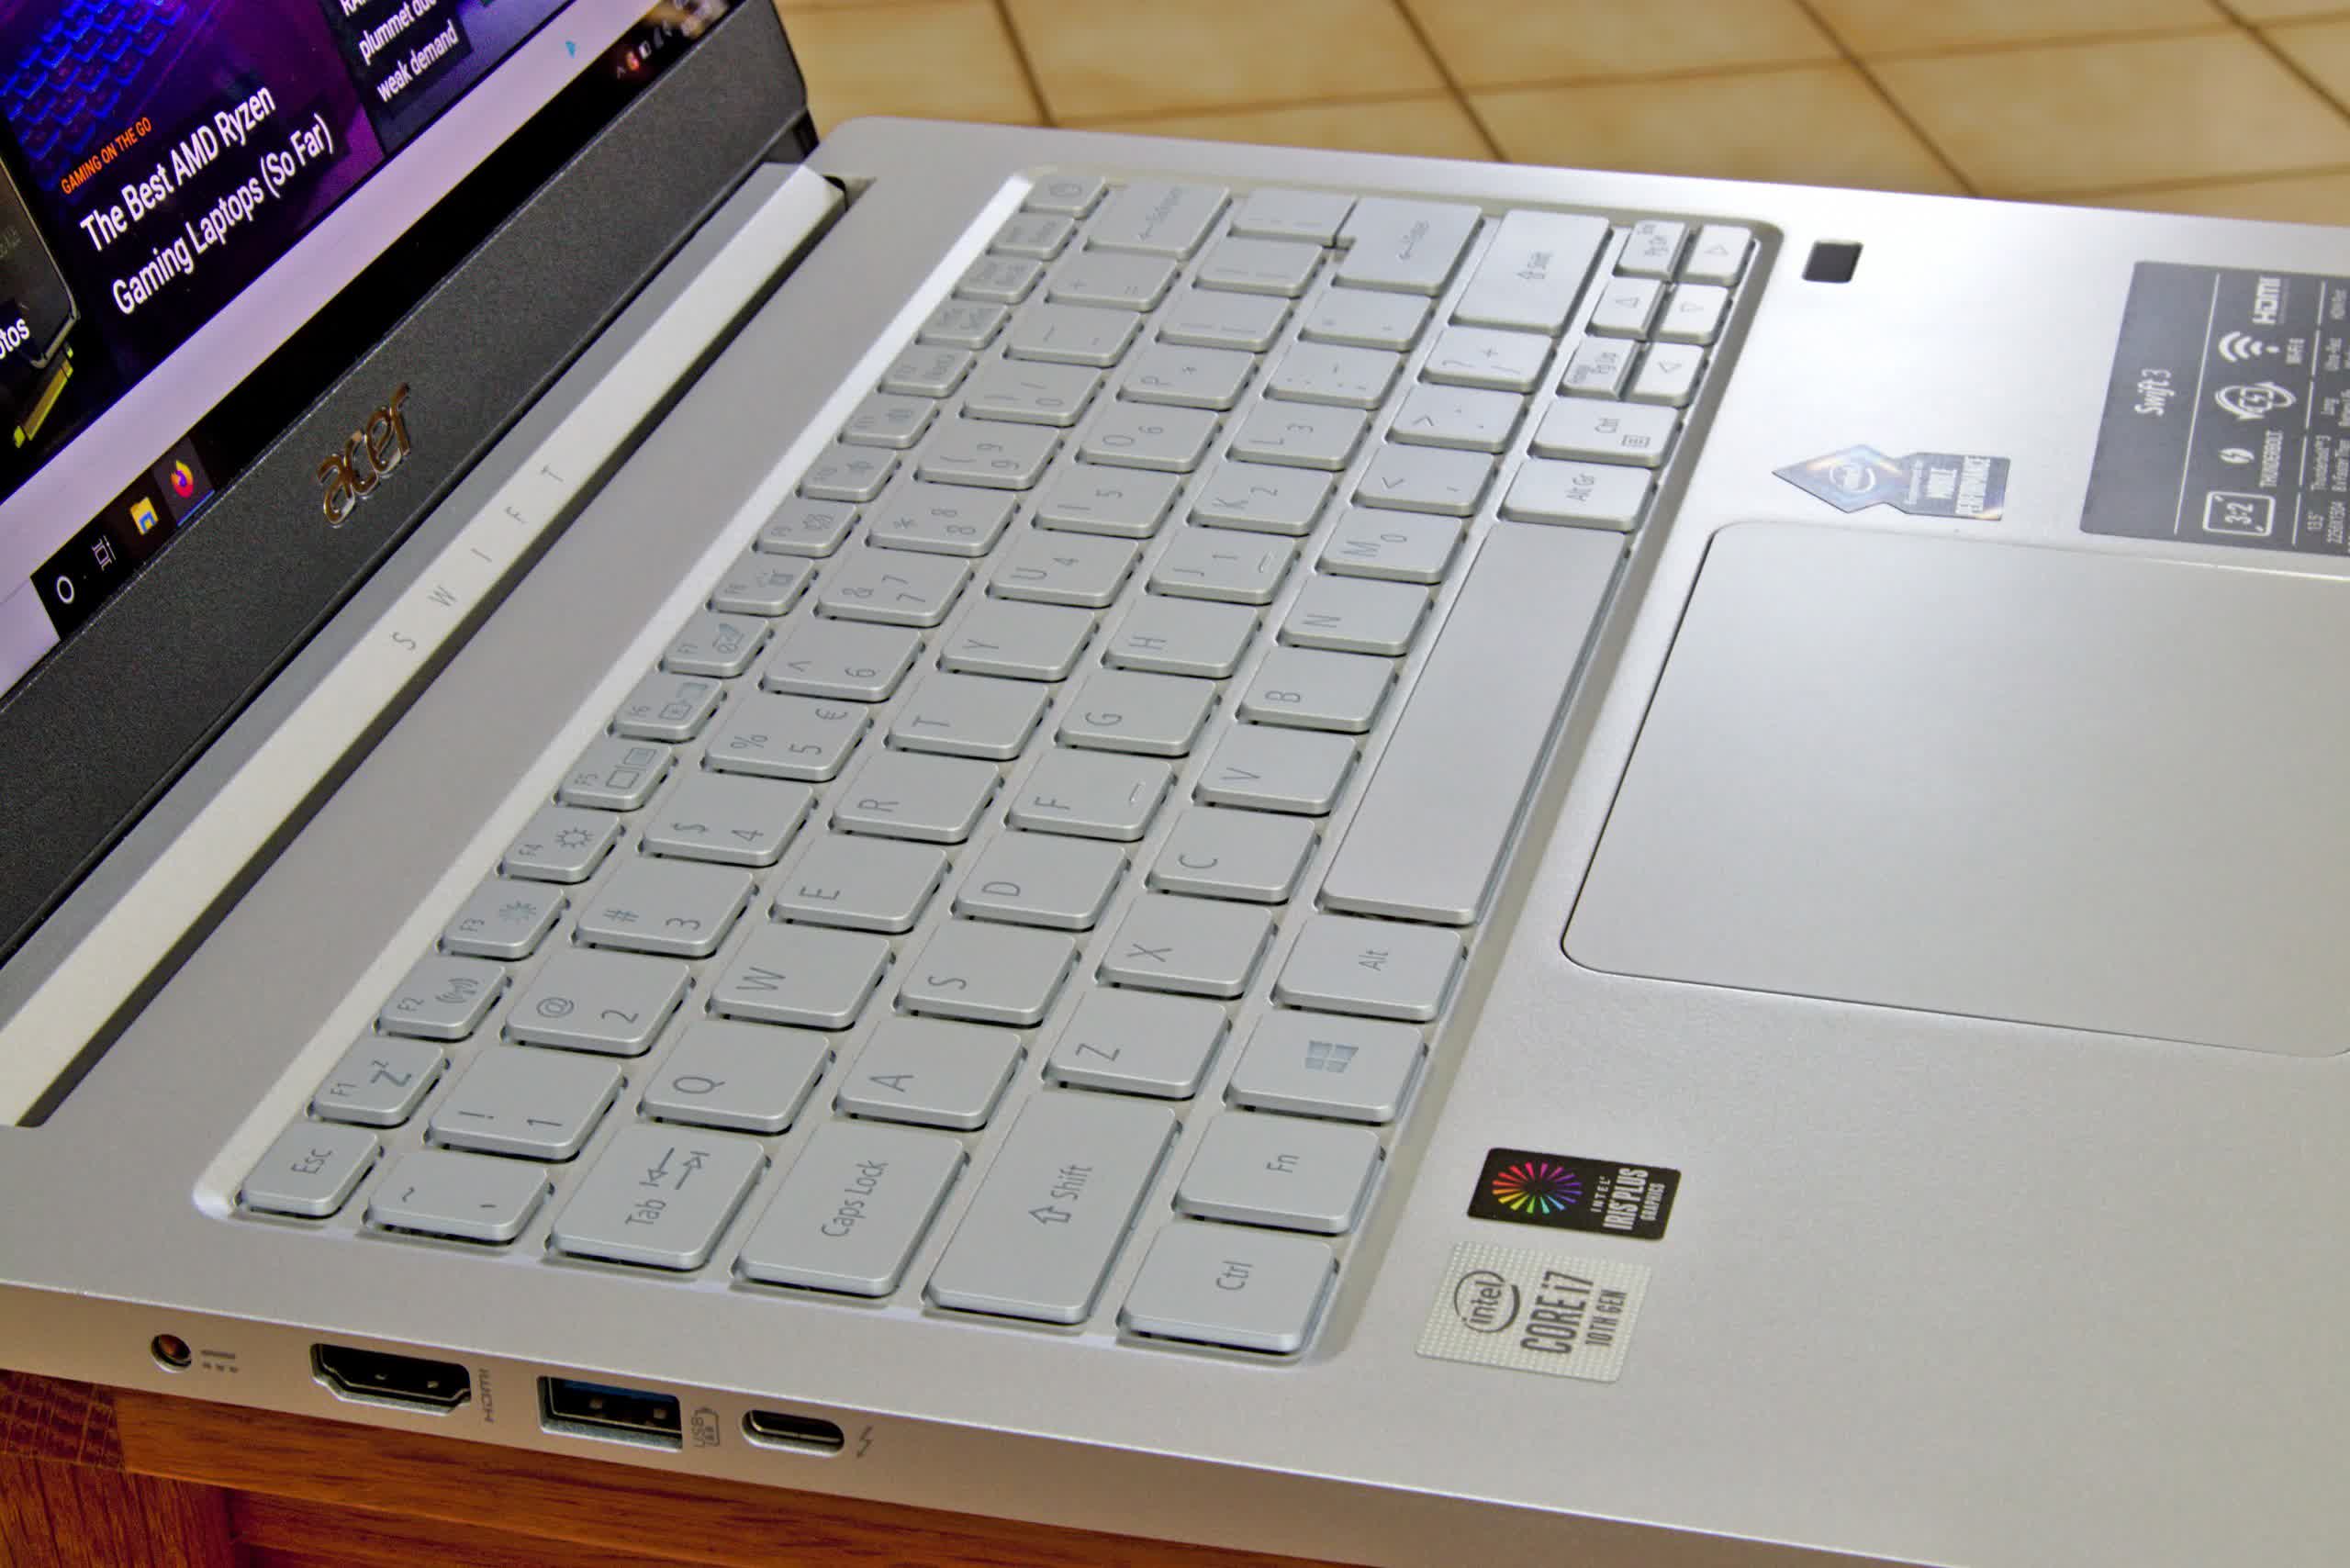
| Posted: 19 Oct 2020 04:26 AM PDT The Acer Swift line is the company’s family of ultraportables that offer improved battery life. The series has the Swift 7 at the top of the lineup, followed by the Swift 5, and then the Swift 3. That doesn’t mean the Swift 3 is a slouch though. This is Acer’s first laptop with Intel’s Engineered for Mobility Certification, a.k.a. Project Athena. To achieve this, laptops must meet a list of requirements including instant wake up, powerful internal hardware, long battery life, fast network connectivity, and a small form factor. The goal is to assure consumers that the laptop they are buying will meet their expectations. Let’s see how that translates in the real world with the Swift 3. The BasicsThe Acer Swift 3 starts at $579 with base specs, but the review sample we received is the Swift 3 SF313-52-78W6 which retails at Costco for $1,099, and comes with a number of noteworthy upgrades. Inside we find a Core i7-1065G7, 16GB of RAM, a 512GB SSD, and a 13.5 inch 2256×1504 IPS display.
Today’s focus won’t be on performance and benchmarks since we’ve already tested this CPU’s performance as well as the built-in graphics. Our unit is at the top end of the 11 models you can choose from, most of which can be purchased for between $600 and $800. This also includes several variants with AMD Ryzen 5 and 7 processors. The main differences between the Swift 3 and 5 lines are that all the Swift 5 models have a touchscreen while none of the Swift 3 configurations do. Moving up to the Swift 7 will roughly double the price and get you a substantially thinner and lighter laptop. The specs of the Swift 7 are two to three generations old though, so unless your only concern is with portability, we’d ignore those models until a refresh.
Build quality on the Swift 3 impressed us with the aluminum chassis, which gives nice rigidity without too much extra weight. Depending on how heavy you type, you may still notice a bit of keyboard flex. The touchpad experience was better than expected. Gesture recognition was very accurate in detecting double, triple, and four finger swipes. I typically rest my thumb on the left click button so proper rejection is important to me. I found it to work well with only a few instances of unwanted motion. It’s not as wide as some other laptops, but I didn’t mind. You can easily travel the whole width of the screen in one motion. The Swift 3 is light at 2.62 lbs (1.19kg), making it slightly lighter than a competing Dell XPS 13. The keys are more on the rubbery side than I prefer, but with thin laptops like this, that’s to be expected. The built-in backlight is a bit of a mixed bag. Most of the light escapes around the keys rather than up through the character symbol. This means some of the lettering don’t get properly illuminated at all.
Battery Life and ChargingThe Swift 3 we tested came with a 56 Wh battery. Unfortunately it charges using a DC barrel jack rather than USB-C. This might help cut down on the cost, but we think the extra few dollars for the additional circuitry would be well worth it, let alone on a laptop that can cost more than $1,000. In terms of charging, you can expect about 4 hours worth of runtime off of a 30-minute charge. Acer claims up to 16 hours of battery life for this model and 10-11 hours for most of the lower-end configurations. In our testing, we were able to achieve slightly over 15 hours while idle at the desktop, slightly over 10 hours doing normal work and web browsing, and about 2.5 hours on performance-heavy tasks at full load.
DisplayMost Swift 3 models come with a 14-inch 1920 x 1080 display, but our more expensive configuration sports a 13.5-inch display and a resolution of 2256 x 1504. This 3:2 aspect ratio gives extra vertical real estate without noticeably increasing the size of the laptop. I found this a bit strange at first since I’m more used to 16:9 displays, but it’s easy to get used to and Microsoft Surface owners usually praise their machines for having this ratio. The bezels are ok, but could be thinner when compared to other machines in this price range. The image is crisp and bright enough for mild outdoor use, but don’t expect to get much use of it in bright sunlight. It’s plenty for typical inside use though. It uses an IPS panel so colors are decent, but with an average deltaE of 3.9, it’s far from great. Even with calibration, we were unable to get much better results. If you’re buying a laptop like this though, color performance won’t be one of your top priorities.
ConnectivityWith video conferencing becoming increasingly necessary, audio and webcam performance is something that needs to be considered more than ever before. The built-in speakers fire downwards which means if you use your laptop in your lap, it will sound muffled. It’s designed to be placed on a hard surface to better reflect the sound to your ears. We found that it got plenty loud, but sound quality was merely average, lacking low end. The webcam on top is passable, but not the highest quality. We’d have expected something with a bit more detail and color reproduction. We found that you could fit three people comfortably in the shot, but a four-person video chat got tight. I would have preferred a slightly wider lens for this scenario, but it’s far from the end of the world. Taking a tour around the outside of the laptop, let’s talk about connectivity. On the left we have the charging port, an HDMI port, a USB 3.1 Gen 1 port with power-off charging, and a USB 3.1 Gen 2 / Thunderbolt 3 port. On the right we find a Kensington lock, a USB 2.0 port, and a headset combo port. An additional USB port would have been nice along with moving the charging interface over to USB-C, but what we have is acceptable for this price range. AMD Ryzen-based systems maintain the USB-C port, but drop Thunderbolt 3. The Swift 3 comes with a Wi-Fi 6 adapter for improved network performance. Check out our explainer for more details on what new features Wi-Fi 6 brings to the table. At close range, I was able to achieve wireless file transfers around 700-800 Mbps. This is impressive, but of course it does drop off significantly as you move away from your router/access point. I would say 300-400 Mbps is achievable in most living spaces. One issue I noticed was the network interface would sometimes switch back to legacy Wi-Fi 5 even though it was on a Wi-Fi 6 network. Disconnecting and reconnecting to the network fixed this, so it’s likely a driver issue that will be fixed soon.
The last thing to talk about is general usability. Cooling in the laptop is decent without becoming too hot on the bottom. In our testing, we noticed the fan become noticeable after 5-10 minutes of sustained use. It kept the system under 80 C at full load and allowed the CPU to turbo up to 1.5GHz. We were impressed by the Project Athena instant wake up feature. It’s nice opening your laptop and having it up and running in less than 3 seconds despite being closed overnight. The Windows 10 installation that comes preloaded is considerably more bloated than we’d have liked. There are nine “Acer” branded apps as well as Norton and ExpressVPN. The first thing we’d do after getting this laptop would be to uninstall that.
Wrap UpWhile we did have the fully upgraded configuration of the Swift 3, most of the design elements should carry through to lower-end models, which are potentially more attractive for budget yet svelte laptops (more about that in a second). At $1,100, we had reasonably high expectations for this laptop. Performance was fine, the display was fine, and overall usability was good. Hopefully you’re sensing a theme. Acer’s Swift 3 is a mid-market laptop that doesn’t try to do everything, but packs just enough features to make it a solid choice for the average consumer. We can see this type of laptop doing great for a student or someone that travels a lot, but still wants decent performance. You can get smaller laptops that lack performance, or faster laptops that are too big. We found the Swift 3 to be somewhere right in the middle.
In regards to the particular configuration we tested, we’d tend to recommend something else. Starting with the choice of CPU, dropping down to a Core i5 and 8 GB of RAM, you will see the laptop sell for half the cost at $700. If you still want the larger 3:2 screen, that’s an extra $100. Now, for the most compelling of all the Swift 3 configurations, we’d strongly recommend the Ryzen 7 4700U configuration, which puts the i7-1065G7 to shame. We think that model makes for a great all-around budget laptop. You drop down to 8 GB of RAM and a standard 16:9 display, but it’s half the price at $655, and will perform better than the tested configuration in most scenarios. Shopping Shortcuts |
| How to View All Your Instagram Stories on a Map Posted: 18 Oct 2020 12:03 PM PDT Since Instagram Stories disappear after 24 hours, it can be hard to track down past clips. Thankfully, Instagram now allows you to view your stories on a map, so you can browse them based on where you shot them. To do this, update the Instagram app in the App Store (iPhone) or Google Play Store (Android). Next, open the Instagram app and navigate to the profile tab by tapping your profile picture at the bottom right.
Tap the hamburger menu at the top right, and then tap "Archive."
Here, you'll find all the stories you've created. The first section simply lists them in chronological order.
The middle tab features a calendar view that allows you to find stories based on when you posted them. When you tap a date, Instagram loads all the stories you posted on that day.
The last section shows a world map with pins in the locations associated with your stories. You can pinch inward to see more of them at once, or pinch out to scan pictures and videos in a narrower area.
When you zoom in, Instagram automatically categorizes the stacks of photos and videos to their exact coordinates.
Note that Instagram doesn't use the image file's data. Rather, it relies on the location tag you can add to your stories. Stories that don't have this tag won't be visible on the map. If you want to permanently pin a collection of photos and videos from a location, tap them on the map, and then tap "Highlight" at the bottom.
Type the location, and then tap "Add." These photos and videos will then be available right under your profile's description.
Instagram used to offer a similar map view for your permanent photos and videos, but it was removed several years ago. |
| How to Convert Keynote Presentations to Microsoft PowerPoint Posted: 18 Oct 2020 10:40 AM PDT
Apple's presentation software does all the heavy lifting for you when converting a PowerPoint presentation to Keynote. Doing the opposite, though, requires a few extra steps—we'll walk you through them! First, double-click the Keynote presentation you want to convert in Keynote, and then click "File" at the top left.
In the drop-down menu that appears, hover your cursor over "Export To." In the submenu that appears, click "PowerPoint."
You'll now be in the "PowerPoint" tab of the "Export Your Presentation" window. There are a few options you can select here, including requiring your recipient to use a password to open a presentation. This is a good idea if the presentation contains sensitive information, like a company roadmap. Click the "Format:" drop-down menu to change your PowerPoint file to ".pptx" or ".ppt," and then click "Next."
Next, give your presentation a name, select a location to save the file, and then click "Export."
Your Keynote presentation will now be converted to a Microsoft PowerPoint file. To make sure it was properly converted before sending it out, locate the document, and then right-click it. In the menu that appears, click "Get Info."
In the "General" section (next to "Kind:"), you can check the file type to make sure it was successfully converted.
|
| How to Change Instagram Fonts for Your Profile and Captions Posted: 18 Oct 2020 08:53 AM PDT
While Instagram lets you use nine different fonts in your stories, you're stuck with a single boring sans serif for your profile details, regular post captions, and comments. Here's how you can side-step the limitations and spice things up. How Custom Instagram Fonts Work
Instagram uses the font Proxima Nova for small text like comments and captions. There's no way to change that, but you can kind of get around it. To work with different alphabets, punctuation marks, scripts, and emoji, Instagram also supports most Unicode scripts. While these include things like mathematical operators (÷), Greek symbols used in science (Ω), and Hebrew letters (א), they also include some basic letter styles, like 𝒶 𝒽𝒶𝓃𝒹𝓌𝓇𝒾𝓉𝓉𝑒𝓃 𝓈𝒸𝓇𝒾𝓅𝓉, 𝔞 𝔊𝔬𝔱𝔥𝔦𝔠 𝔰𝔱𝔶𝔩𝔢, and ⓛⓔⓣⓣⓔⓡⓢ ⓘⓝ ⓒⓘⓡⓒⓛⓔⓢ. Different glyphs can even be combined to make things like an upside-down font (ʇuoɟ uʍop ǝpısdn uɐ) and ฬђคՇєשєг ץ๏ย ςคɭɭ Շђเร. (It should be clear that How-To Geek also supports Unicode!) So now that you know what's going on, let's look at how to easily use these fake fonts on Instagram. How to Add Funky Fonts to Your Captions and BiosWhile some Unicode characters can be entered using a regular keyboard, if you want to do more than substitute a + sign for a "t", it's easier to copy and paste from an app. On your smartphone, visit CoolFont.org and enter your caption or comment. It'll present you with around 100 different text options, ranging from the cool to the barely legible. Tap the "Decorate" button if you want to add additional text decorations like hearts, stars, and random patterns.
Once you're happy with the way the text looks, select it and tap "Copy," or just tap the "Copy" button. You can then paste it into any text field in Instagram.
It'll even work with Instagram stories, but it probably won't look as good as the built-in options.
You can use this same technique to add fun fonts to other social media sites that support Unicode like Twitter and Facebook. Just be careful: You want to make sure whatever you write is still easy to read. |
| How to Change Your Twitter Username Posted: 18 Oct 2020 06:26 AM PDT
On Twitter, your username serves as both an expression of your personality and a digital address that allows others to direct messages your way on the service. If you'd like to change your Twitter username, you can do so easily on iPhone, iPad, Android, and on the web. Here's how. How to Change Your Username Using a Web BrowserChanging your Twitter username using a web browser on PC, Mac, Linux, or Chrome is a simple process, but the option is a little buried. First, log into Twitter.com using any web browser. In the sidebar on the Twitter website, click the ellipses button (three dots in a circle) to reveal more options.
In the menu that pops up, select "Settings and Privacy."
In Settings, click "Account," then click "Username."
On the "Change username" page, click the "Username" text area and type the new username you'd like to use. While you're typing, Twitter will tell you if the username is already taken. Keep trying until you find one that is unique. Then click "Save."
Your new username is now set. The change should take place immediately, but if you don't see it right away, see the section at the bottom of this article for advice. How to Change Your Username on iPhone, iPad, or AndroidOn smartphones and tablets such as iPhone, iPad, and Android, the procedure to change your Twitter username is similar to the one used on the Twitter.com website. We'll be showing screenshots of the iPhone app, but the steps are the same on Android and iPad with slight variations in placement on the screen. First, open the Twitter app on your device. On smartphones, tap your avatar picture in the upper-left corner of the screen.
In the sidebar that appears, tap "Settings And Privacy" on iPhone and Android phones. On iPad, tap the ellipses button (three dots in the circle) in the sidebar and select "Settings And Privacy."
In "Settings And Privacy," navigate to Account > Username.
On the "Update Username" page, tap the text field labeled "New." If it asks for a confirmation that you want to change your username, tap "Continue." Enter the new username with the on-screen keyboard and tap "Done."
After that, you're free to leave settings and go back to using Twitter as usual. If You Don't See Your Username Change ImmediatelyAfter you've updated your username, sometimes it takes a few moments for the change to propagate completely through Twitter's system, which is composed of many machines working together in a network. If your Twitter friends don't see the change immediately, they may need to restart their Twitter apps or force-reload the Twitter website to see your new username. Have fun out there! RELATED: How to Hard Refresh Your Web Browser (to Bypass Your Cache) |
| How to Keep Low Power Mode Enabled Permanently on Your iPhone Posted: 17 Oct 2020 10:53 AM PDT
Apple's Low Power Mode is essential for making an older iPhone's battery last longer. Normally, iOS turns off Low Power Mode automatically when your iPhone charges to 80% capacity. But you can use a Shortcuts automation to keep Low Power Mode enabled forever. Here's how. First, open the Shortcuts app, which Apple added as a default app in iOS 13. If you can't find it on your Home screen, swipe downward with one finger in the middle of your screen to open Spotlight. Type "Shortcuts" in the search bar, then tap the "Shortcuts" icon.
In Shortcuts, tap the "Automation" button at the bottom of the screen.
If you already have an automation listed here, tap the plus (+) button first, then tap the "Create Personal Automation" button to add a new automation. If you don't see any automation listed, tap the "Create Personal Automation" button.
In the "New Automation" panel that pops up, scroll down until you locate "Low Power Mode." Tap it.
Next, we'll define the conditions that make the automation take place. Select "Is Turned Off" with a checkmark, and make sure "Is Turned On" is not selected. Then, tap "Next."
Now we'll define the action that takes place when the automation condition is met. Tap "Add Action."
In the panel that appears, search for "low power," then tap "Set Low Power Mode."
When the "Set Low Power Mode" action appears, it will default to "Turn Low Power Mode On." Leave it that way. This is the only action we need, so tap "Next."
On the next overview screen, tap the "Ask Before Running" switch to turn it off. If left on, Shortcuts will pop up a message every time the automation is triggered, which can get annoying very quickly.
When a confirmation dialog pops up, tap "Don't Ask."
After that, tap "Done," and your automation will be set. Every time Low Power Mode gets turned off (either by you or automatically by iOS), Low Power Mode will automatically switch back on. To get it started, you'll need to manually activate Low Power Mode in Settings (Settings > Battery > Low Power Mode) or with a Control Center shortcut. Your iPhone will then stay in Low Power Mode indefinitely. RELATED: How to Quickly Turn on Low Power Mode on Your iPhone How to Disable the Low Power Mode AutomationAfter using the automation for a while, you might notice that it's no longer possible to turn off Low Power Mode the usual way, as it automatically just switches back on again. But fear not: It's easy to disable the automation, so you can turn off Low Power Mode again. Here's how. First, open "Shortcuts" and tap the "Automation" button at the bottom of the screen. In the list of automations, tap the "When Low Power Mode is turned off" automation you created.
On the details screen for the automation, tap the "Enable This Automation" switch until it is turned off. This will disable the automation.
After that, tap "Done." With the automation disabled, Low Power Mode can be toggled manually as usual. If you ever want to turn the automation back on, just revisit the automation in Shortcuts and flip the "Enable This Automation" switch to on. Finally, it's worth noting that as of iPadOS 14.0, the iPad does not include Low Power Mode. That might be added in a future update, however. For now, this automation only works on the iPhone. |


| You are subscribed to email updates from My Blog. To stop receiving these emails, you may unsubscribe now. | Email delivery powered by Google |
| Google, 1600 Amphitheatre Parkway, Mountain View, CA 94043, United States | |


0 nhận xét:
Đăng nhận xét