How to Remove Contact Suggestions From the Share Sheet on iPhone and iPad |
- How to Remove Contact Suggestions From the Share Sheet on iPhone and iPad
- AMD Ryzen 9 5950X Review
- How to Forget Wi-Fi Networks a Mac Previously Connected to
- How to Change Your Default Google Account on Android
| How to Remove Contact Suggestions From the Share Sheet on iPhone and iPad Posted: 07 Nov 2020 06:29 AM PST
By default, your iPhone and iPad suggest a list of people whenever you tap the Share button. It's easy to share things accidentally. Starting with iOS 14 and iPadOS 14, you can remove suggested contacts from the Share sheet. The Problem: Contacts in the Share SheetApple uses the Share menu for more than just sharing something with friends. It's also how you perform actions on an item, such as duplicating a photo or saving a PDF to the Files app. Depending on what you're trying to do, seeing a list of your friends or family members pop up when you're just trying to copy a file can be surprising. You might worry that a stray tap would share a link or piece of media with someone by accident. Luckily, starting with iOS 14 and iPadOS 14, it's now easy to completely remove the list of sharing suggestions on the Share sheet.
How to Remove People From the Share MenuTo remove these contacts from the Share menu, open "Settings" on your iPhone or iPad.
Tap "Siri & Search."
In "Siri & Search," tap the switch beside "Suggestions when sharing" to turn it off.
Exit "Settings." The next time you tap "Share" in an app, you'll notice that the list of sharing suggestions is now gone. Instead, you'll just see the regular row of app icons and a list of potential actions below.
This one small change can potentially bring a great deal of peace of mind to some iPhone and iPad users, but if you ever want to bring it back, just enable the "Suggestions when Sharing" option in Settings again. How to Remove Contacts from Share Sheet in iOS 13 or OlderIf you want to remove contacts from the Share sheet on an iPhone or iPad running an older operating system—in other words, iOS 13 or below on an iPhone and iPadOS 13 or below on an iPad—you'll need to delete a conversation within the Messages app or within other apps that support Share extensions, such as Discord Even if you're running iOS or iPadOS 14, it's possible to temporarily remove particular contacts from your Share sheet this way. Deleting message threads is not an ideal fix, however, so if your device supports it, consider updating your iPhone to iOS 14 or updating your iPad to iOS 14 (or whatever newer operating system is available), and you'll be able to completely disable contact suggestions in the Share menu. Good luck! RELATED: How to Remove Contacts From the Share Sheet on iPhone or iPad |
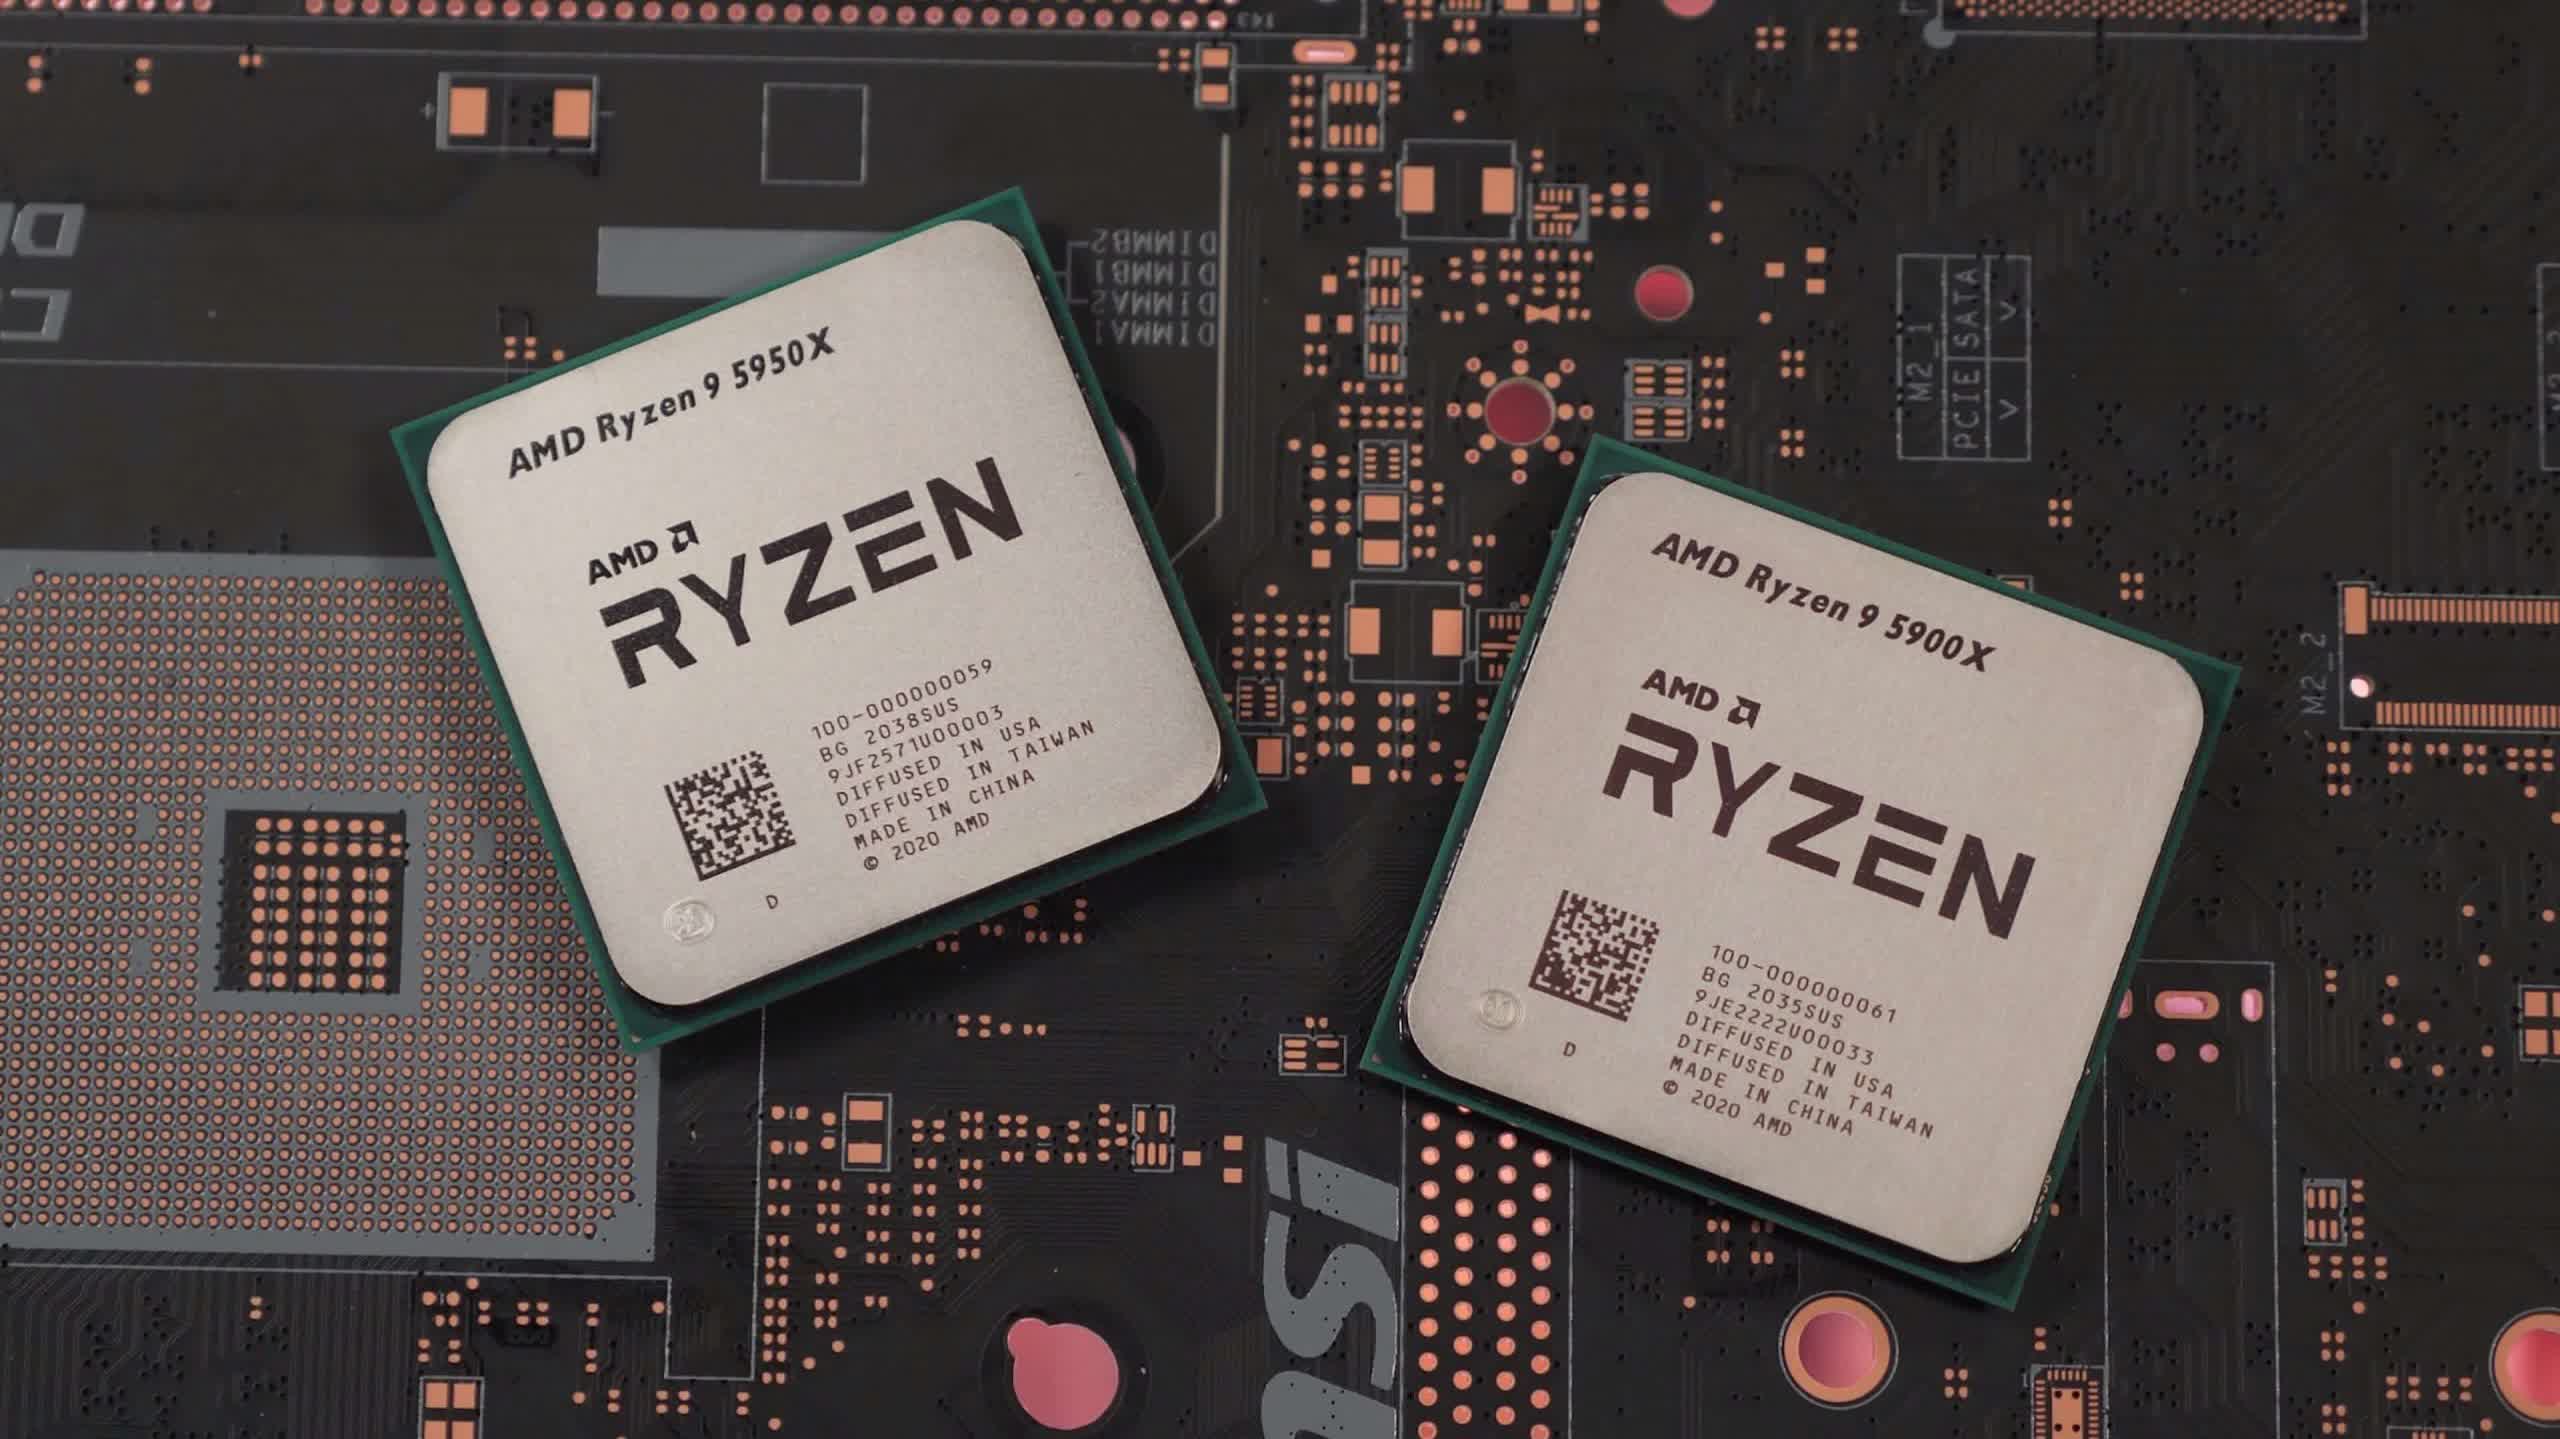
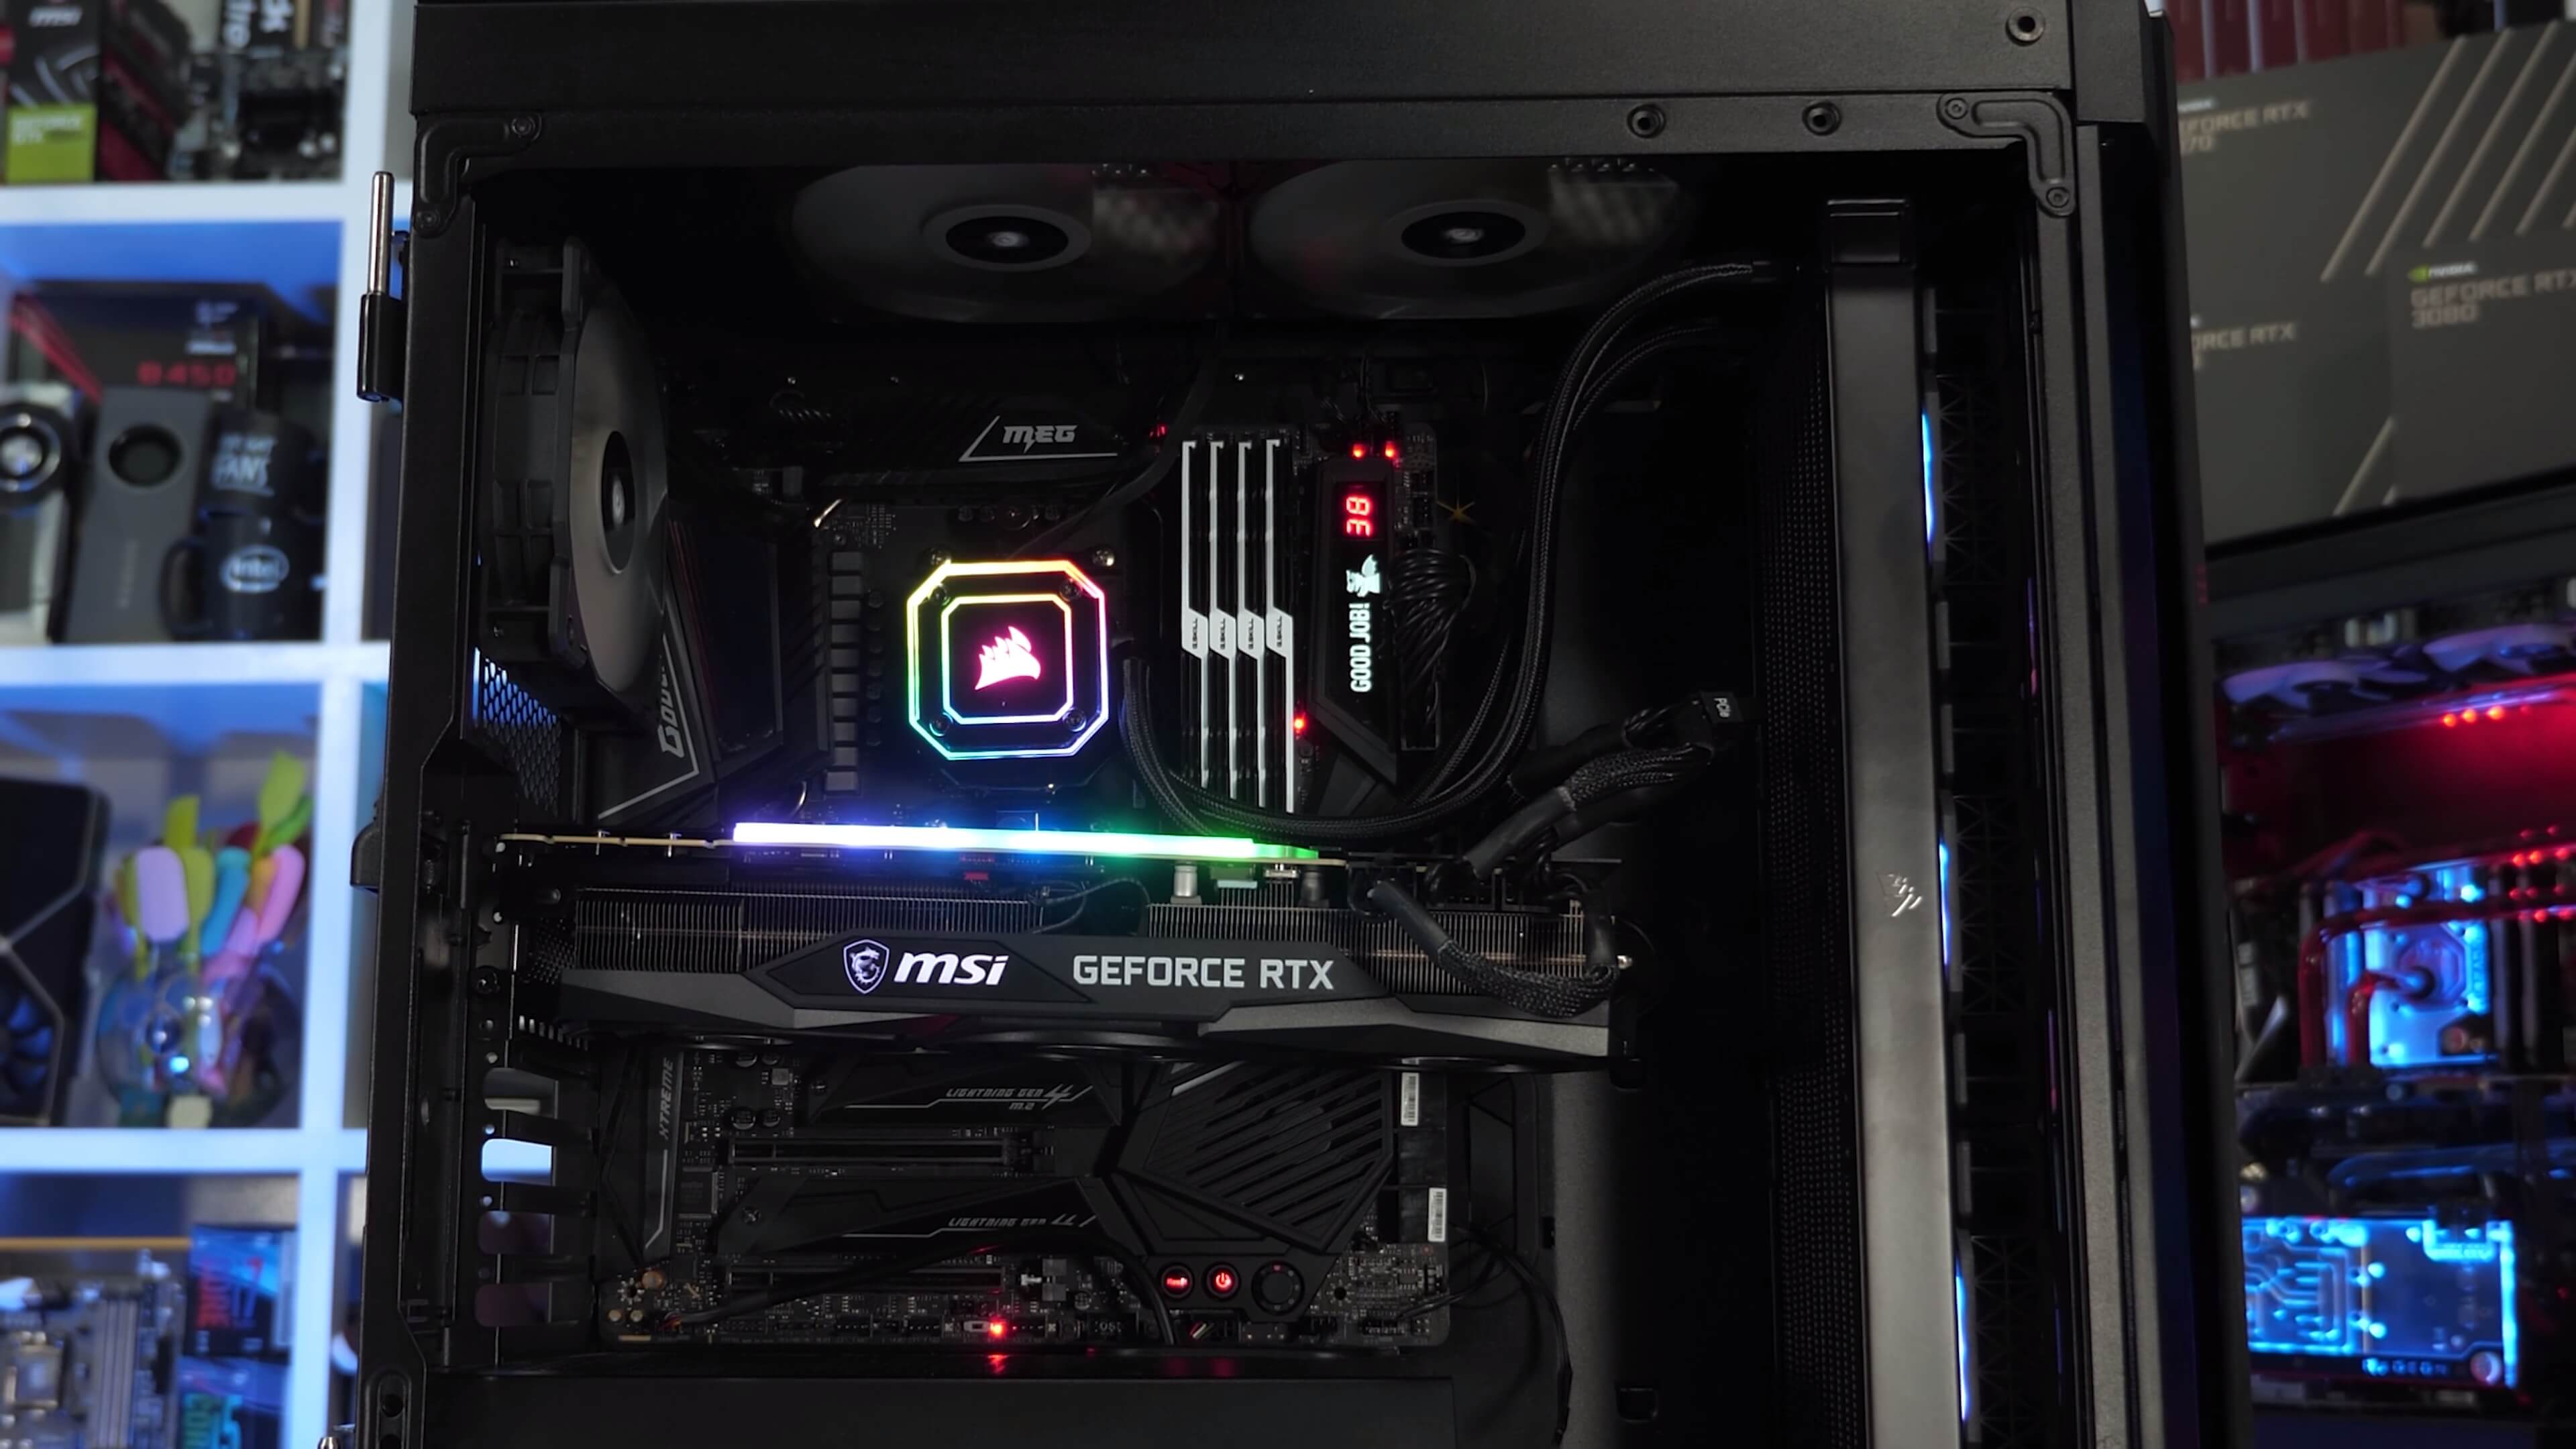
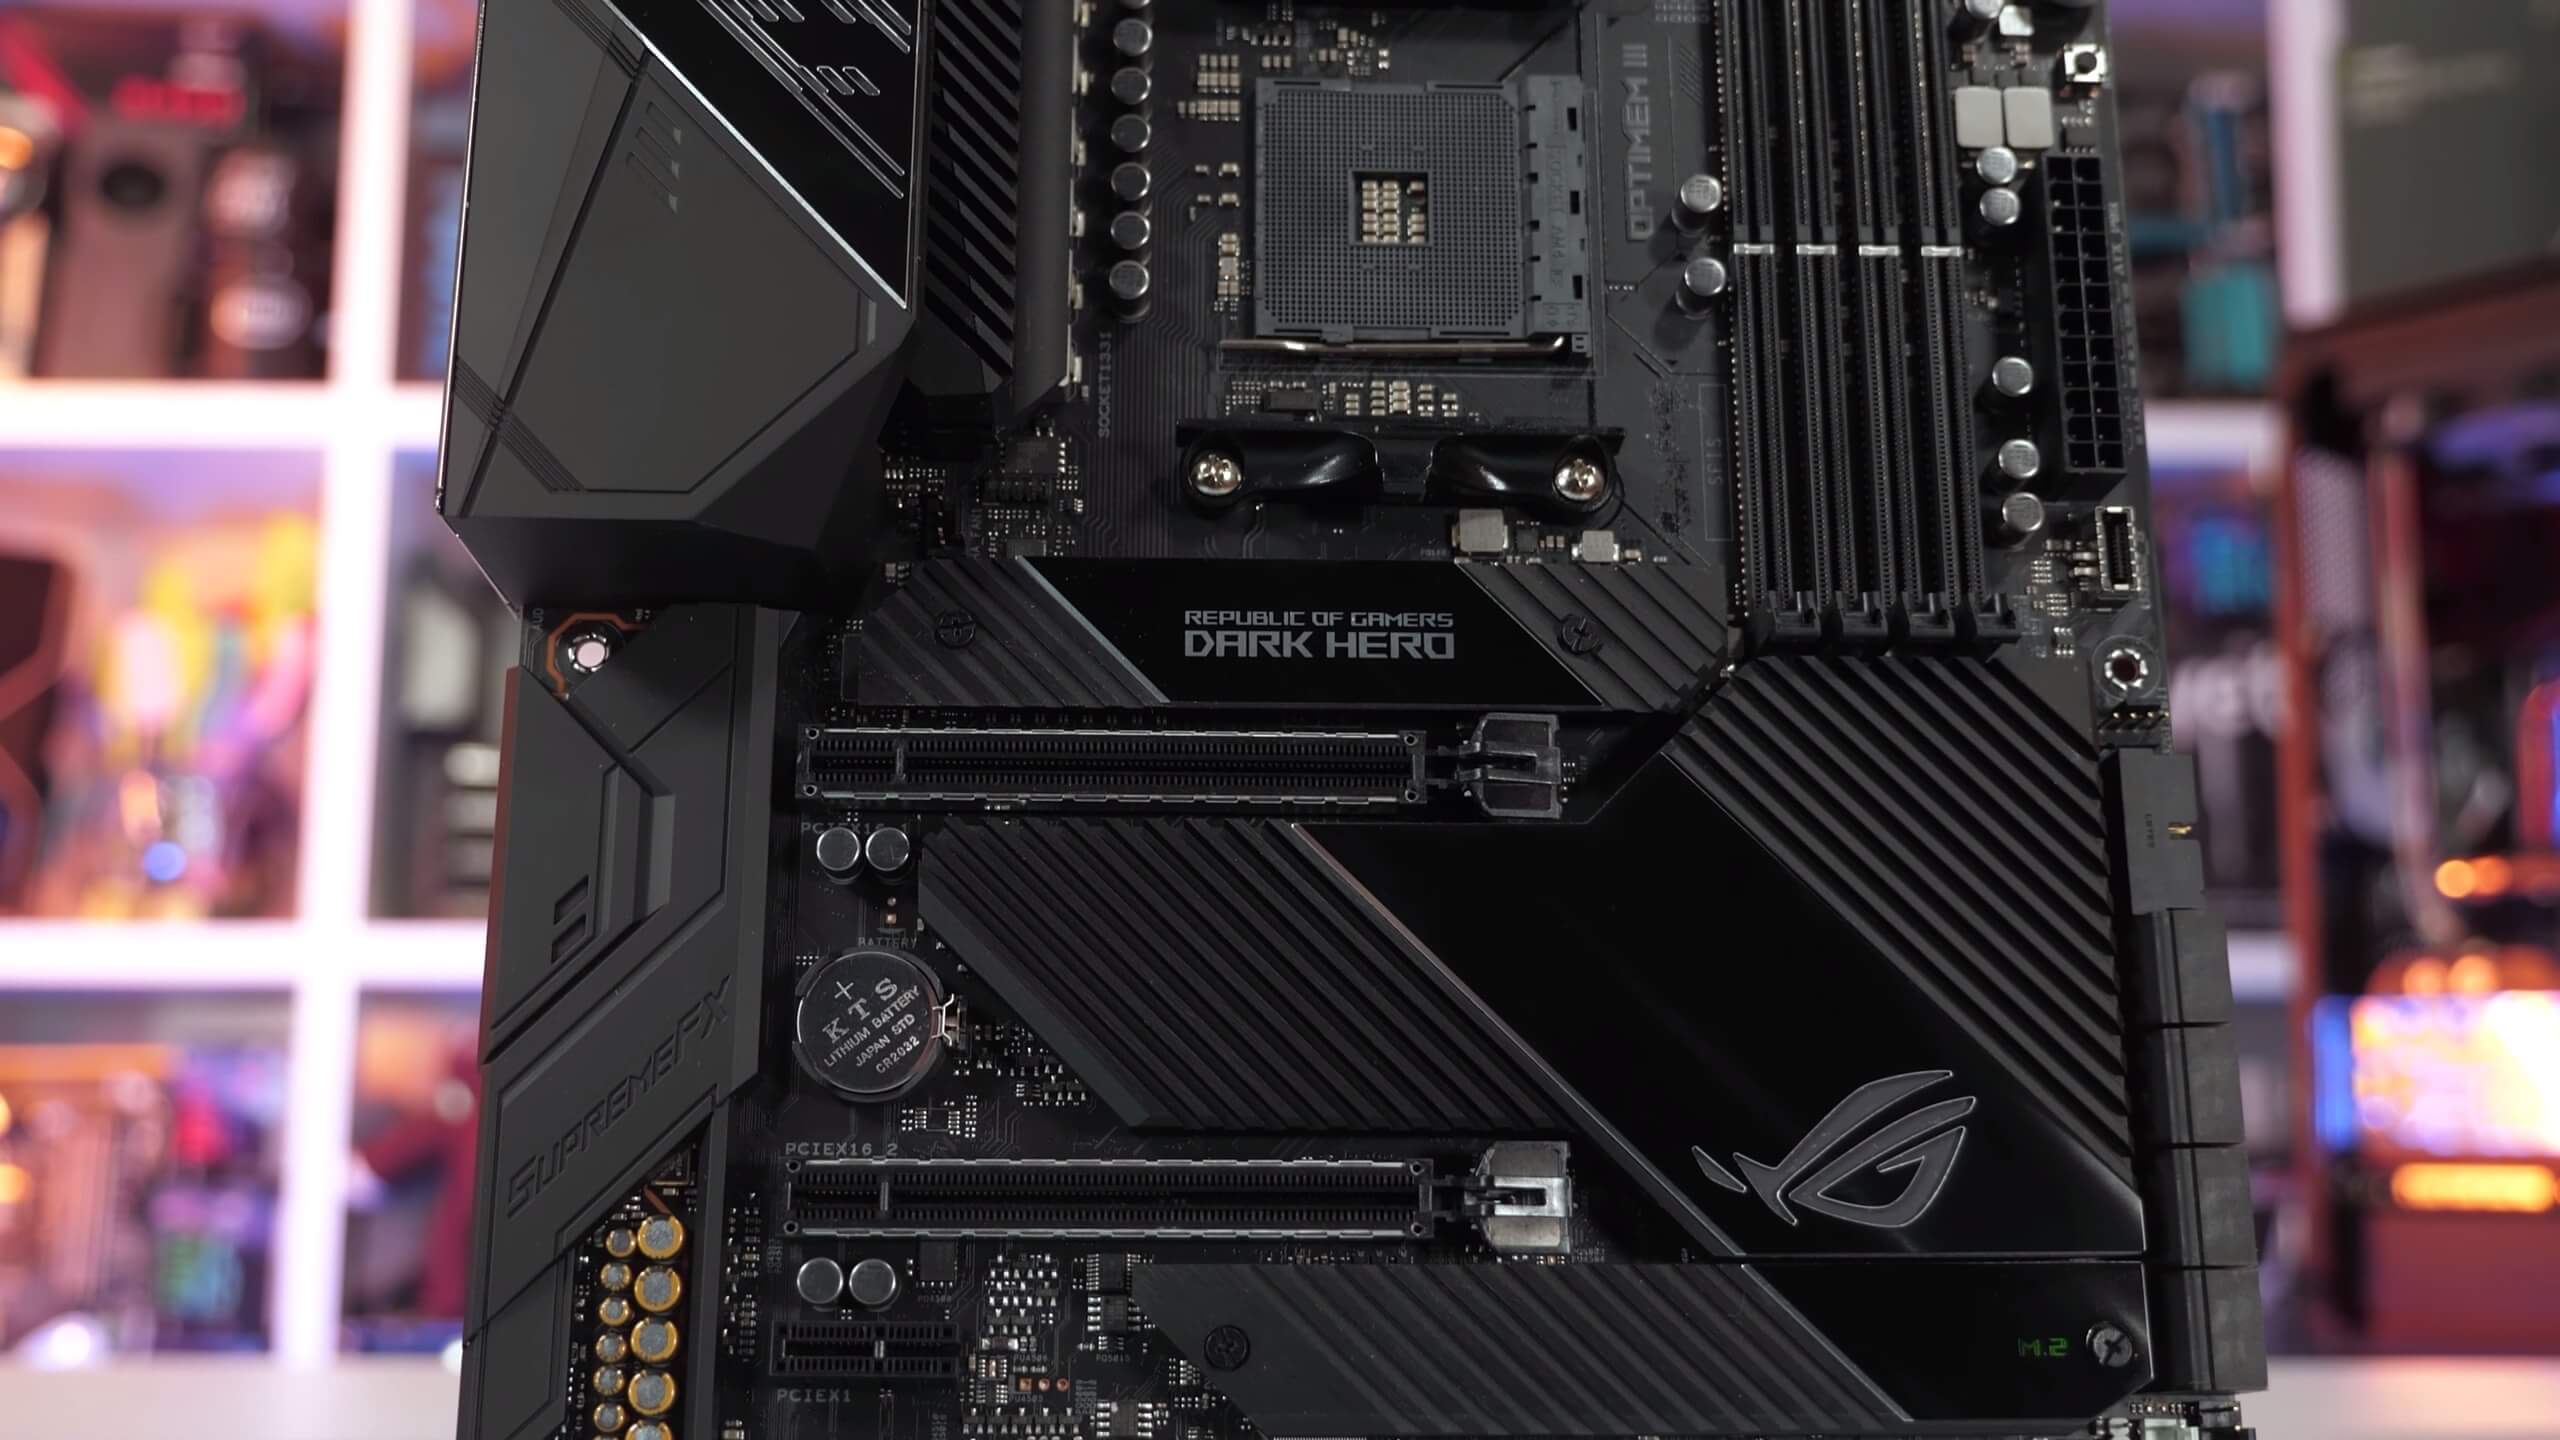
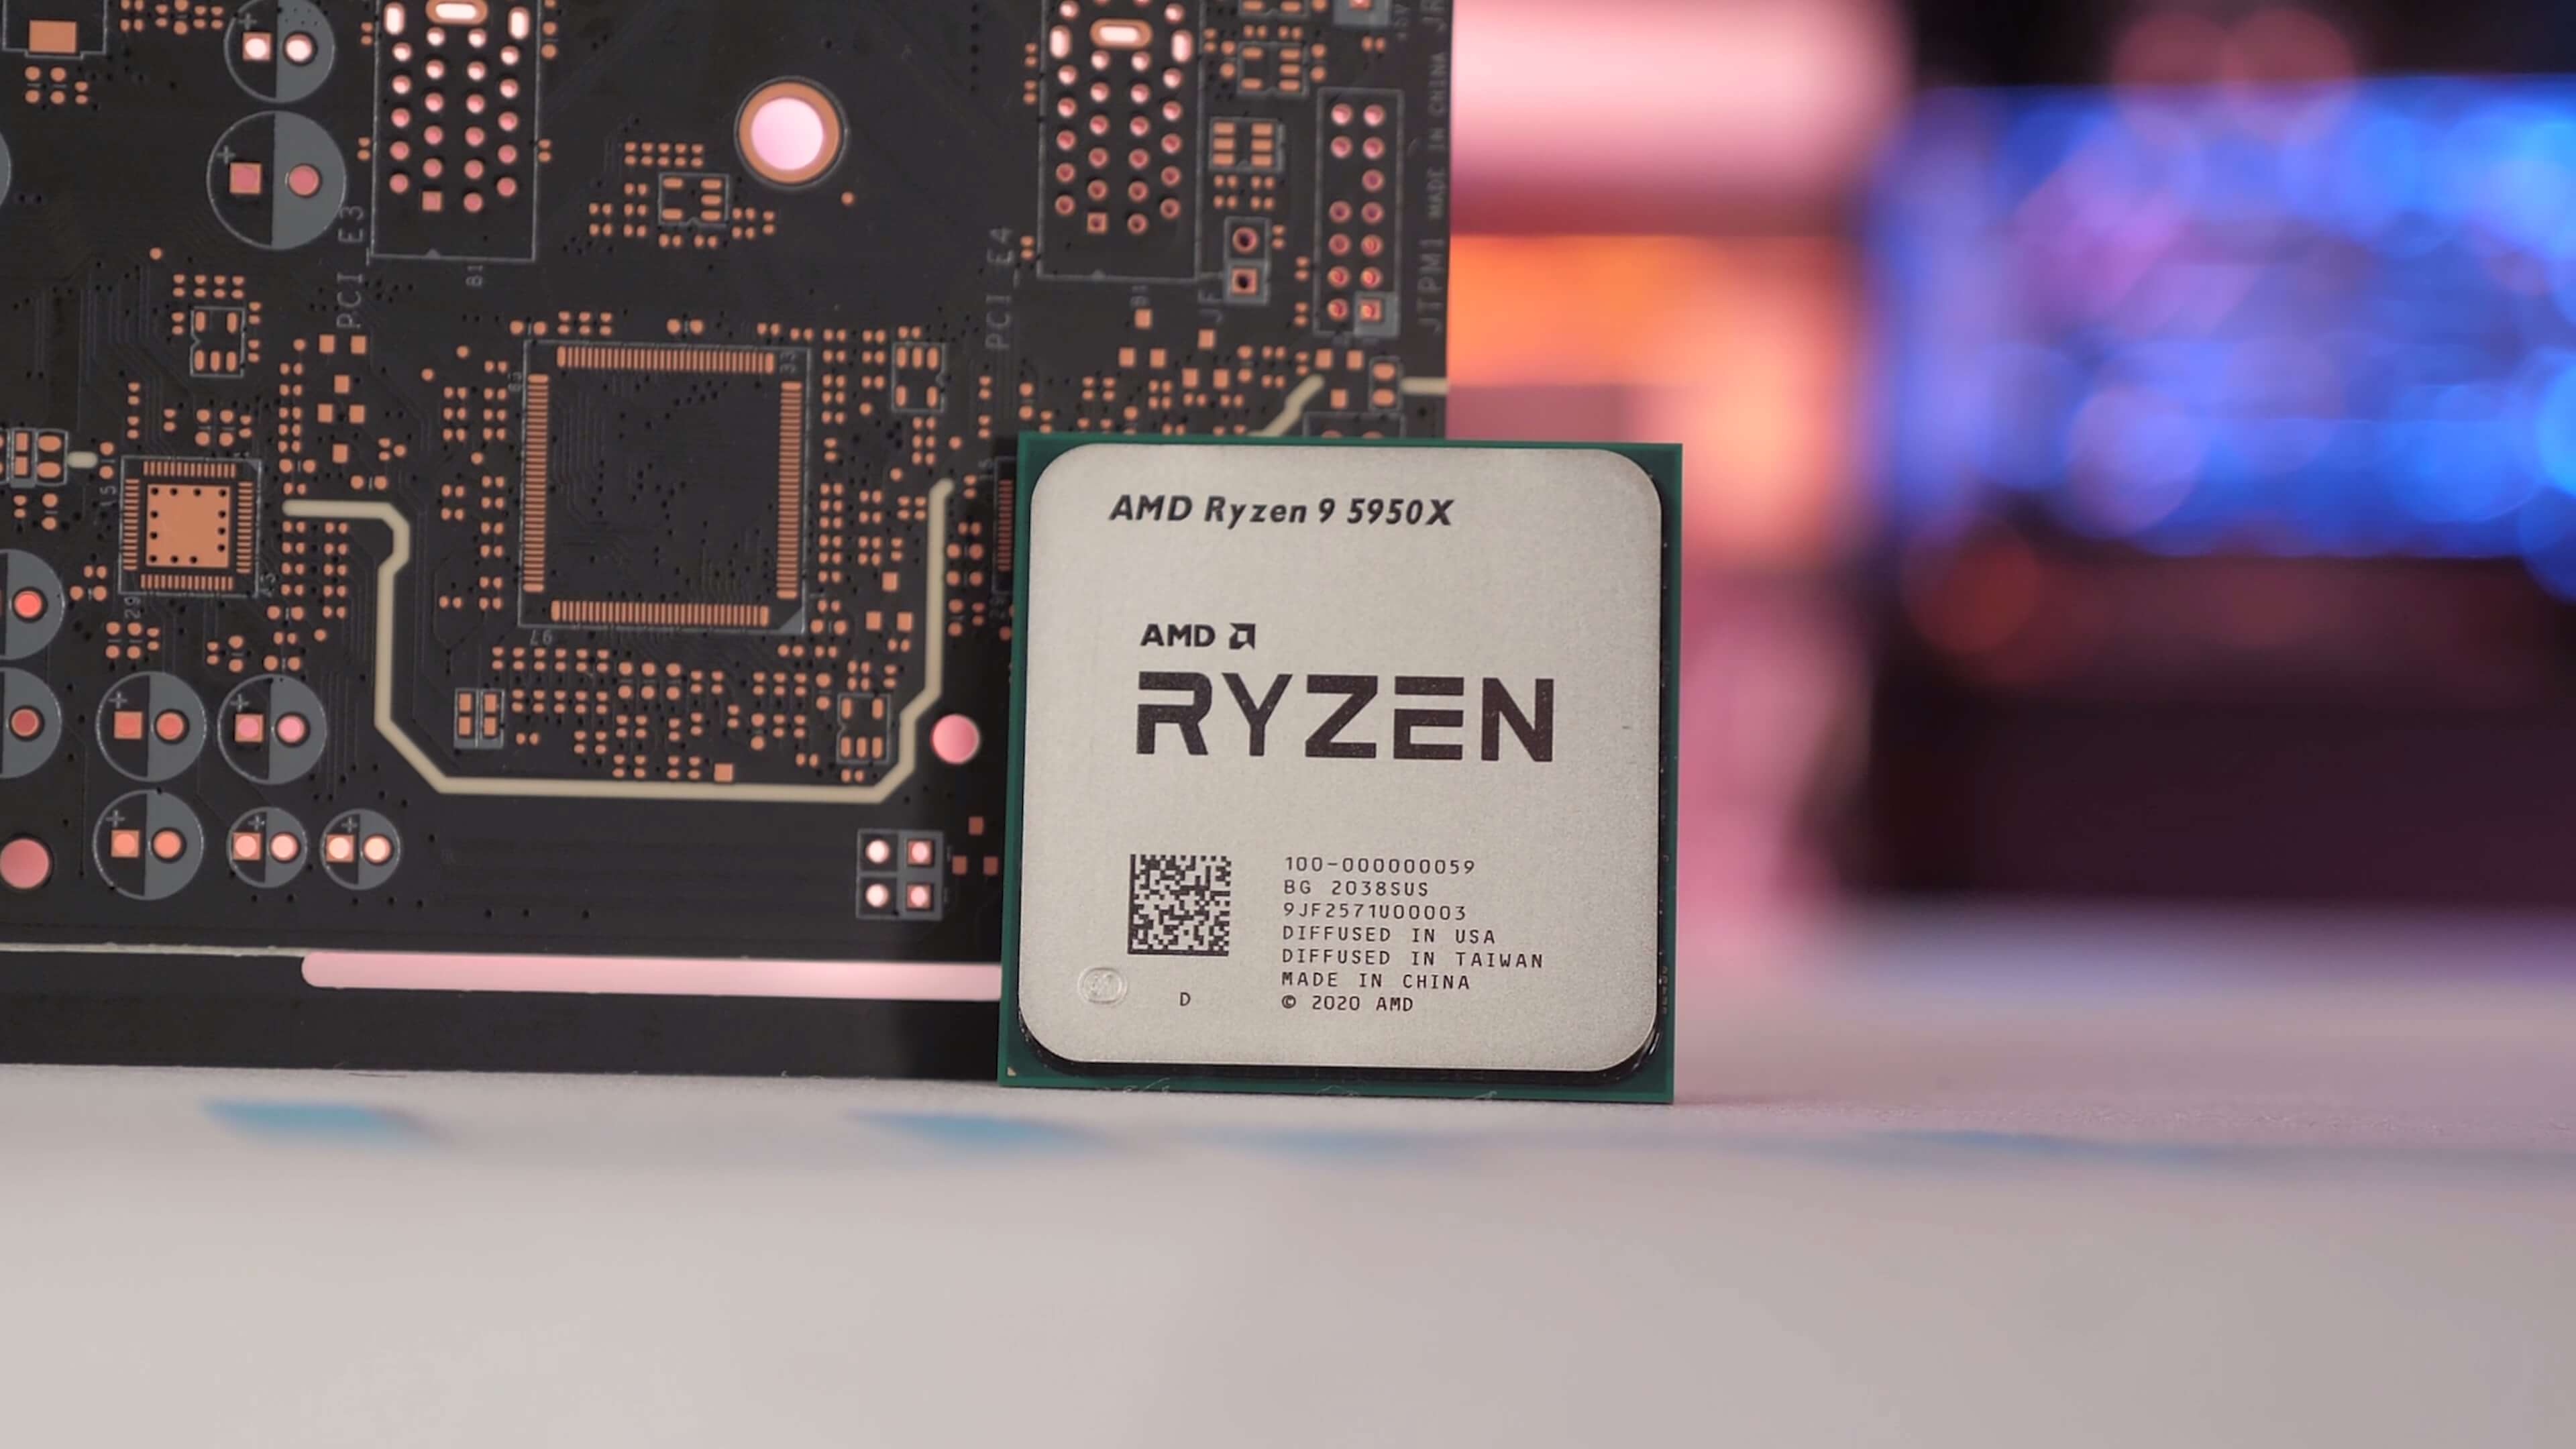
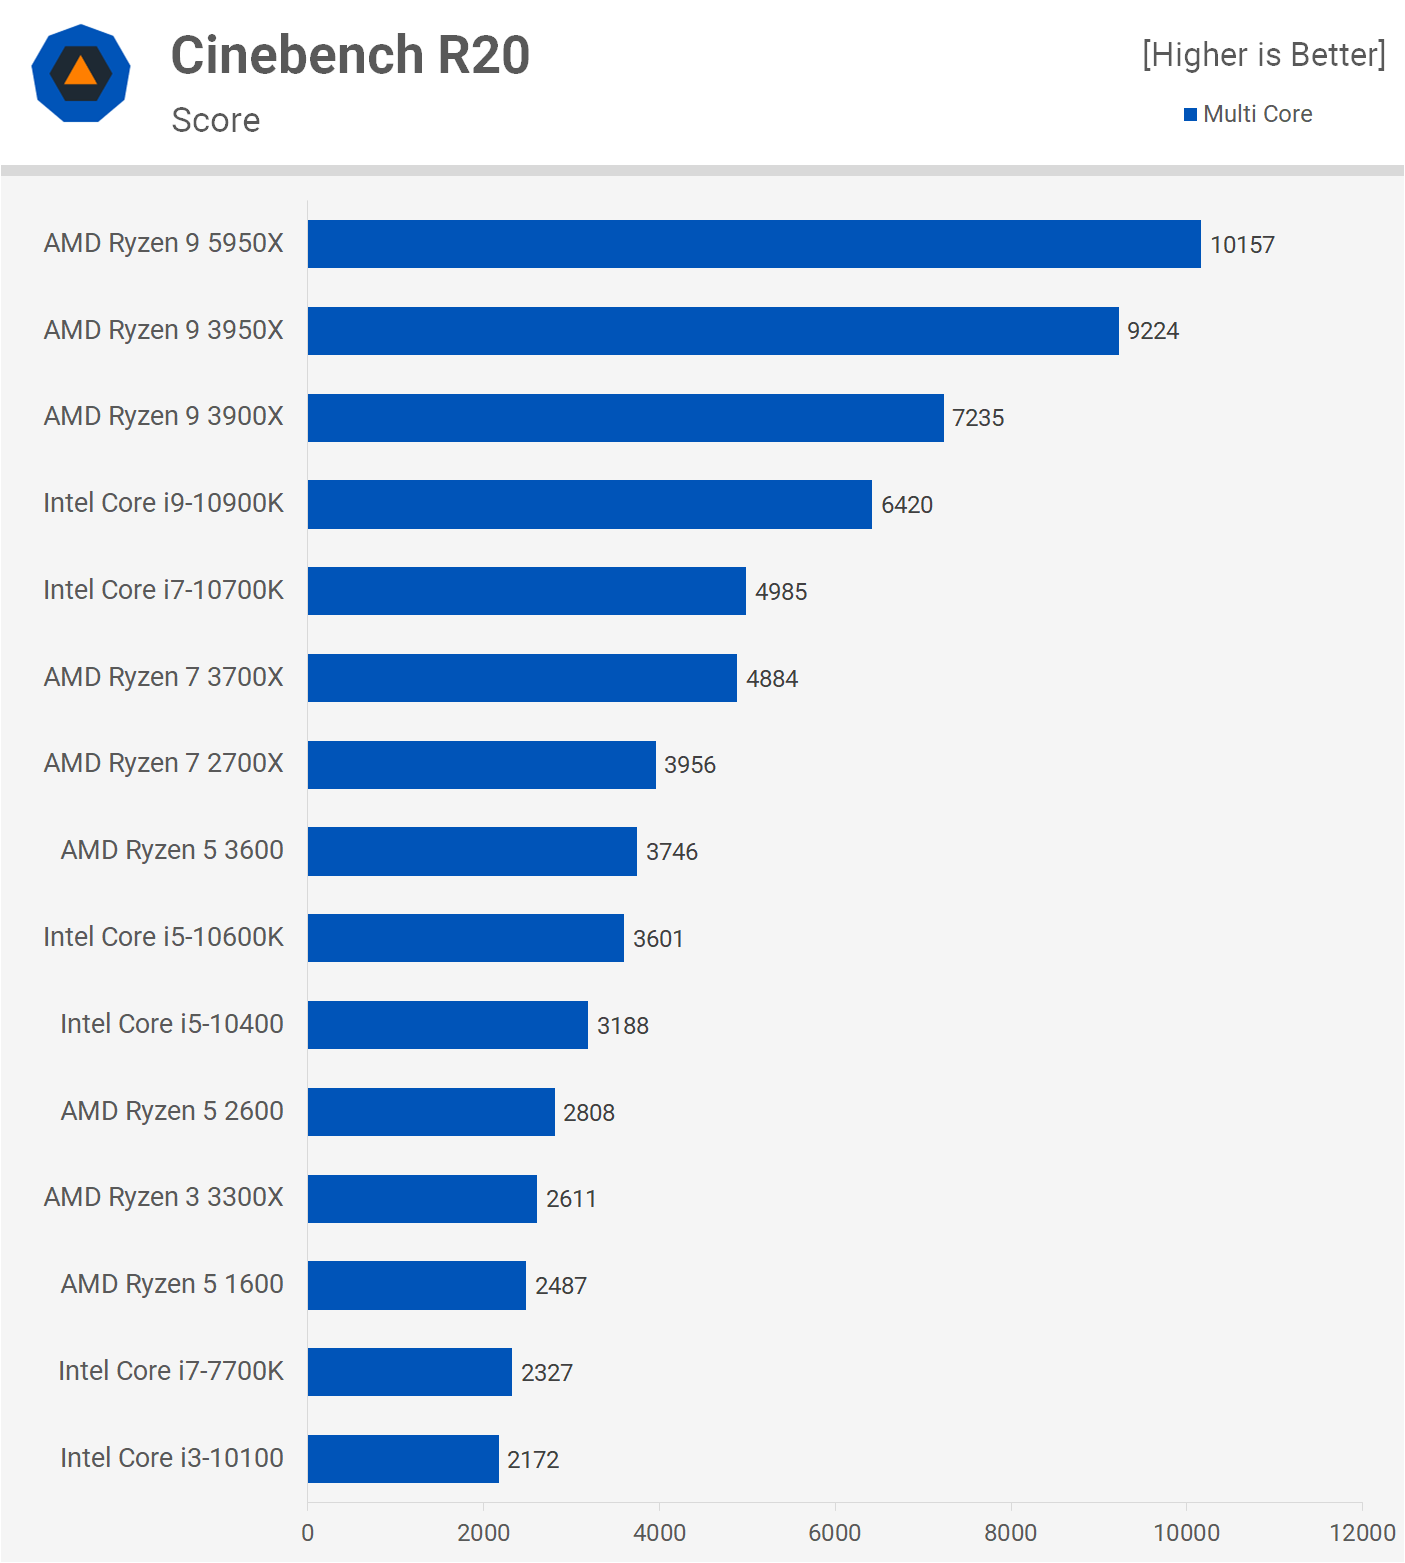
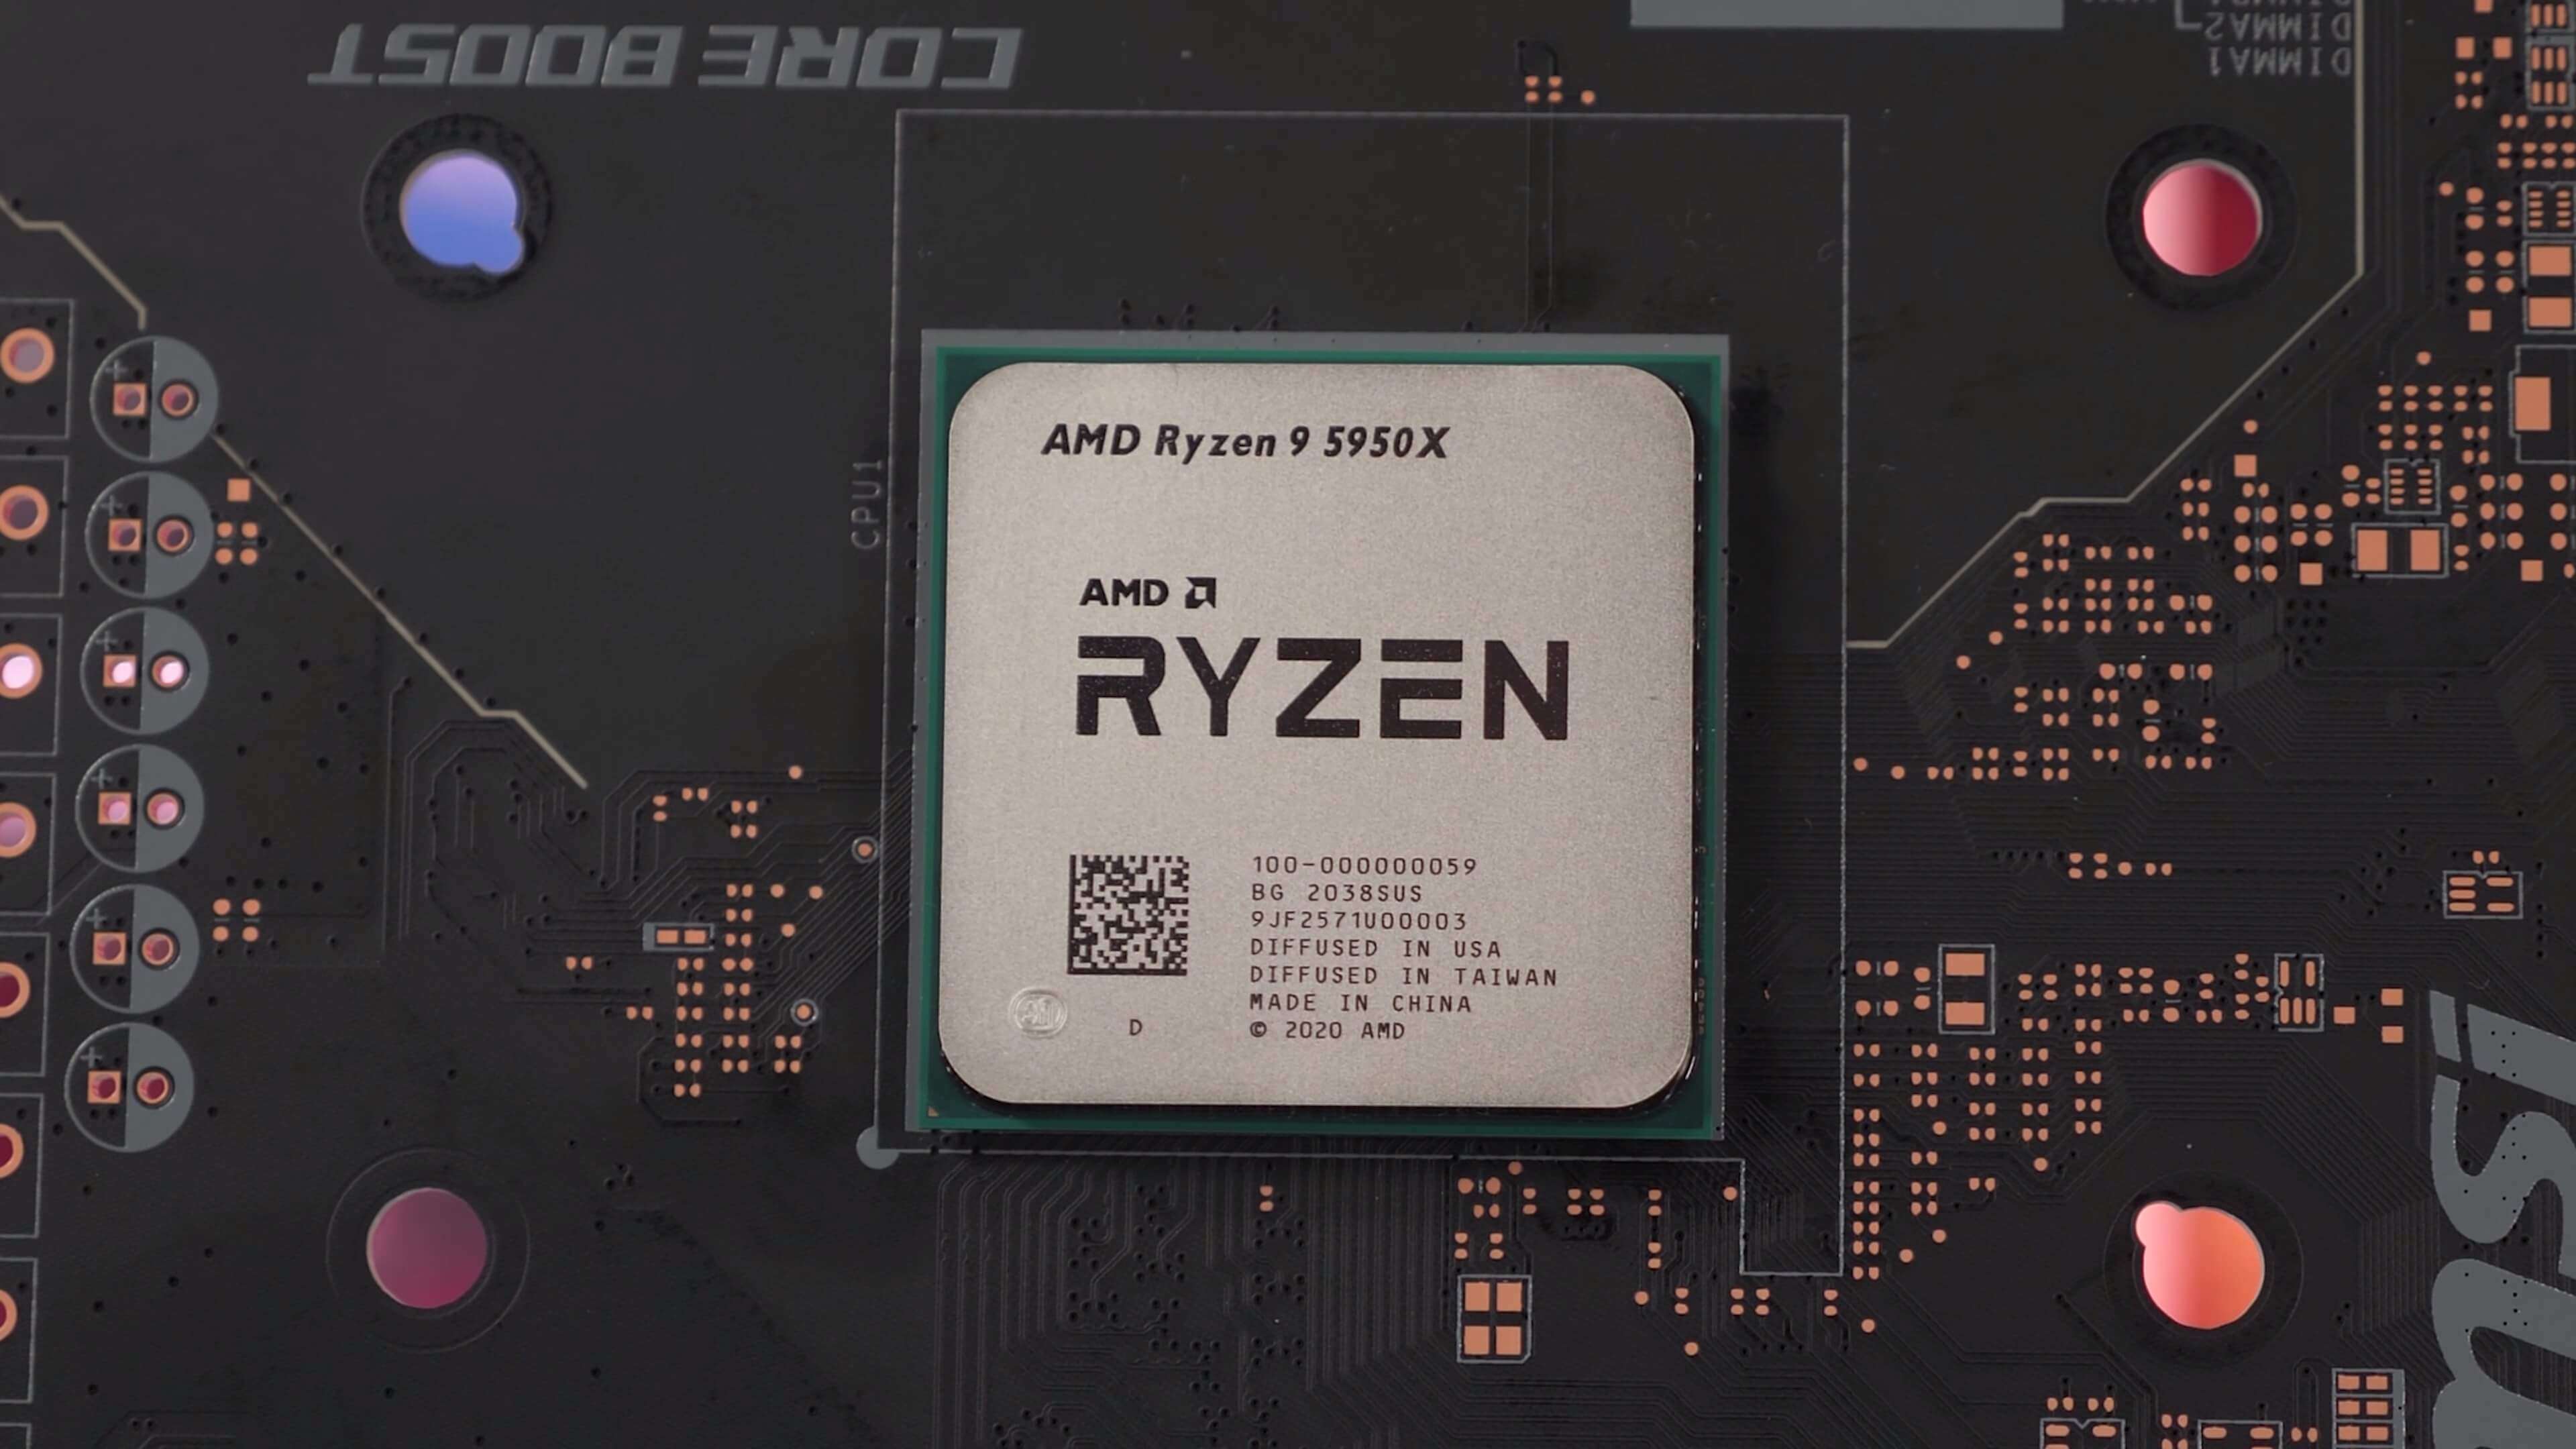
| Posted: 06 Nov 2020 02:39 PM PST Here’s our first look at the new Ryzen 5000 CPU series, starting with a full review of the Ryzen 9 5950X flagship. As a direct replacement to the R9 3950X, the new chip packs 16 cores with SMT support for 32 threads. The suggested retail price has been increased from $750 to $800, so it's an expensive CPU for the mainstream AM4 platform. Of course, we also have the Ryzen 9 5900X, Ryzen 7 5800X and Ryzen 5 5600X on hand, and you'll see reviews on those parts over the next few days. We feel that these new AMD processors offer a significant leap forward that they each deserved their own dedicated review. AMD is justifying the price bump across the series with what they're claiming to be dramatically improved performance, especially when it comes to gaming. Highlights include boost clocks of up to 4.9 GHz and a 19% IPC improvement thanks to a new design that sees core complexes expanded to 8 cores with a new 32MB L3 cache topology. This has been achieved using the same TSMC 7nm process. There’s a number of architectural improvements, some of which we’ve gone over when they were announced and we could only discuss the new CPU features on paper. But rather than going over all of that, we’ll going to jump right into what we suspect you're really here for: the benchmarks. With that, let's go over our test setup and jump into all the glorious blue bar graphs. For testing the AMD CPUs we used the MSI X570 Godlike motherboard, partly because it was one of four X570 motherboards to receive BIOS support from AMD. Although prior to release other AM4 boards did have Zen 3 support, AMD was limiting reviewers to four models to help speed up any troubleshooting issues, should a problem arise. It's quite a feat that you're able to run Zen, Zen+, Zen 2 and Zen 3 CPUs all on the one motherboard, although official first-gen support isn't listed. Most X570 boards do support Ryzen 1000 series parts however. In the case of the X570 Godlike, we could slot in either the Ryzen 5 1600 or the new Ryzen 9 5950X, and both worked perfectly, so that's four generations of CPUs on a single motherboard. On the other hand, for testing Intel processors of the same period you'd require three separate test systems. Anyway, we equipped all AMD and Intel systems with four 8GB G.Skill TridentZ DDR4-3200 CL14 memory modules for a 32GB capacity. We cooled them using Corsair’s iCUE H150i Elite Capellix AIO, as most of these CPUs don't come with a box cooler. As a side note, we recently received the new Asus ROG Crosshair VIII Dark Hero motherboard which is a modified version of the original. It’s suggested to be coming in at $400 for the Wi-Fi 6 version. Why is this relevant? This seems to be a very capable board that’s been further refined from the original, removed the X570 chipset fan and upgraded the VRM to sixteen 90A TI power stages. This looks to be a high-end X570 motherboard that should easily match the extreme $700 models such as MSI's X570 Godlike in terms of VRM performance, but for less. Finally, please note for all the productivity testing we're using the GeForce RTX 2080 Ti, but for the gaming benchmarks we've gone back and updated all our numbers with the RTX 3090 and added some new games in the process. So let's get into the graphs… BenchmarksFirst up we have Cinebench R20 with the Ryzen 9 5950X becoming the first desktop CPU on a mainstream platform that breaks the 10,000 point barrier out of the box. When compared to the 3950X we're looking at a 10% performance uplift. Compared to Intel's best mainstream offering, the 10900K, we're talking of almost a 60% increase in performance, though AMD's also offering 60% more cores here.
The real showstopper though is the single-core performance where the new R9 5950X is 20% faster than the 3950X and 17% faster than the 10900K. This kind of single thread performance is going to bode well for gaming performance.
We also took a look at how the 5950X clocks in each of the Cinebench R20 tests. For the multi-core test, where all cores are heavily loaded, the 5950X clocks at around 3.95 GHz, though we saw 4.2 GHz in Blender as this figure is workload dependent. AMD advertises a base clock frequency of 3.4 GHz. AMD also advertises a max boost clock frequency of 4.9 GHz and this should be achieved in single core or lightly threaded workloads. In the Cinebench single core test the 5950X typically operated at 5 GHz or 5050 MHz to be exact. That's 150 MHz over the advertised spec.
The 5950X is just 8% faster than the 3950X in the 7-zip compression test, though that remains a nice generational performance improvement, though keep in mind the new chip also costs 7% more, meaning we’re not seeing an improvement in the price-to-performance ratio.
The decompression margins are a little more impressive. This time the 5950X is 14% faster than the 3950X and almost 80% faster than the 10900K. Based on current retail pricing, the 5950X should only cost ~35% more.
Ryzen processors largely dominate AES encryption performance and the SiSoft Sandra benchmark is one of the more balanced tests. That said, the Zen 3 architecture offers very little improvement over Zen 2, but even so the 5950X was 71% faster than the 10900K.
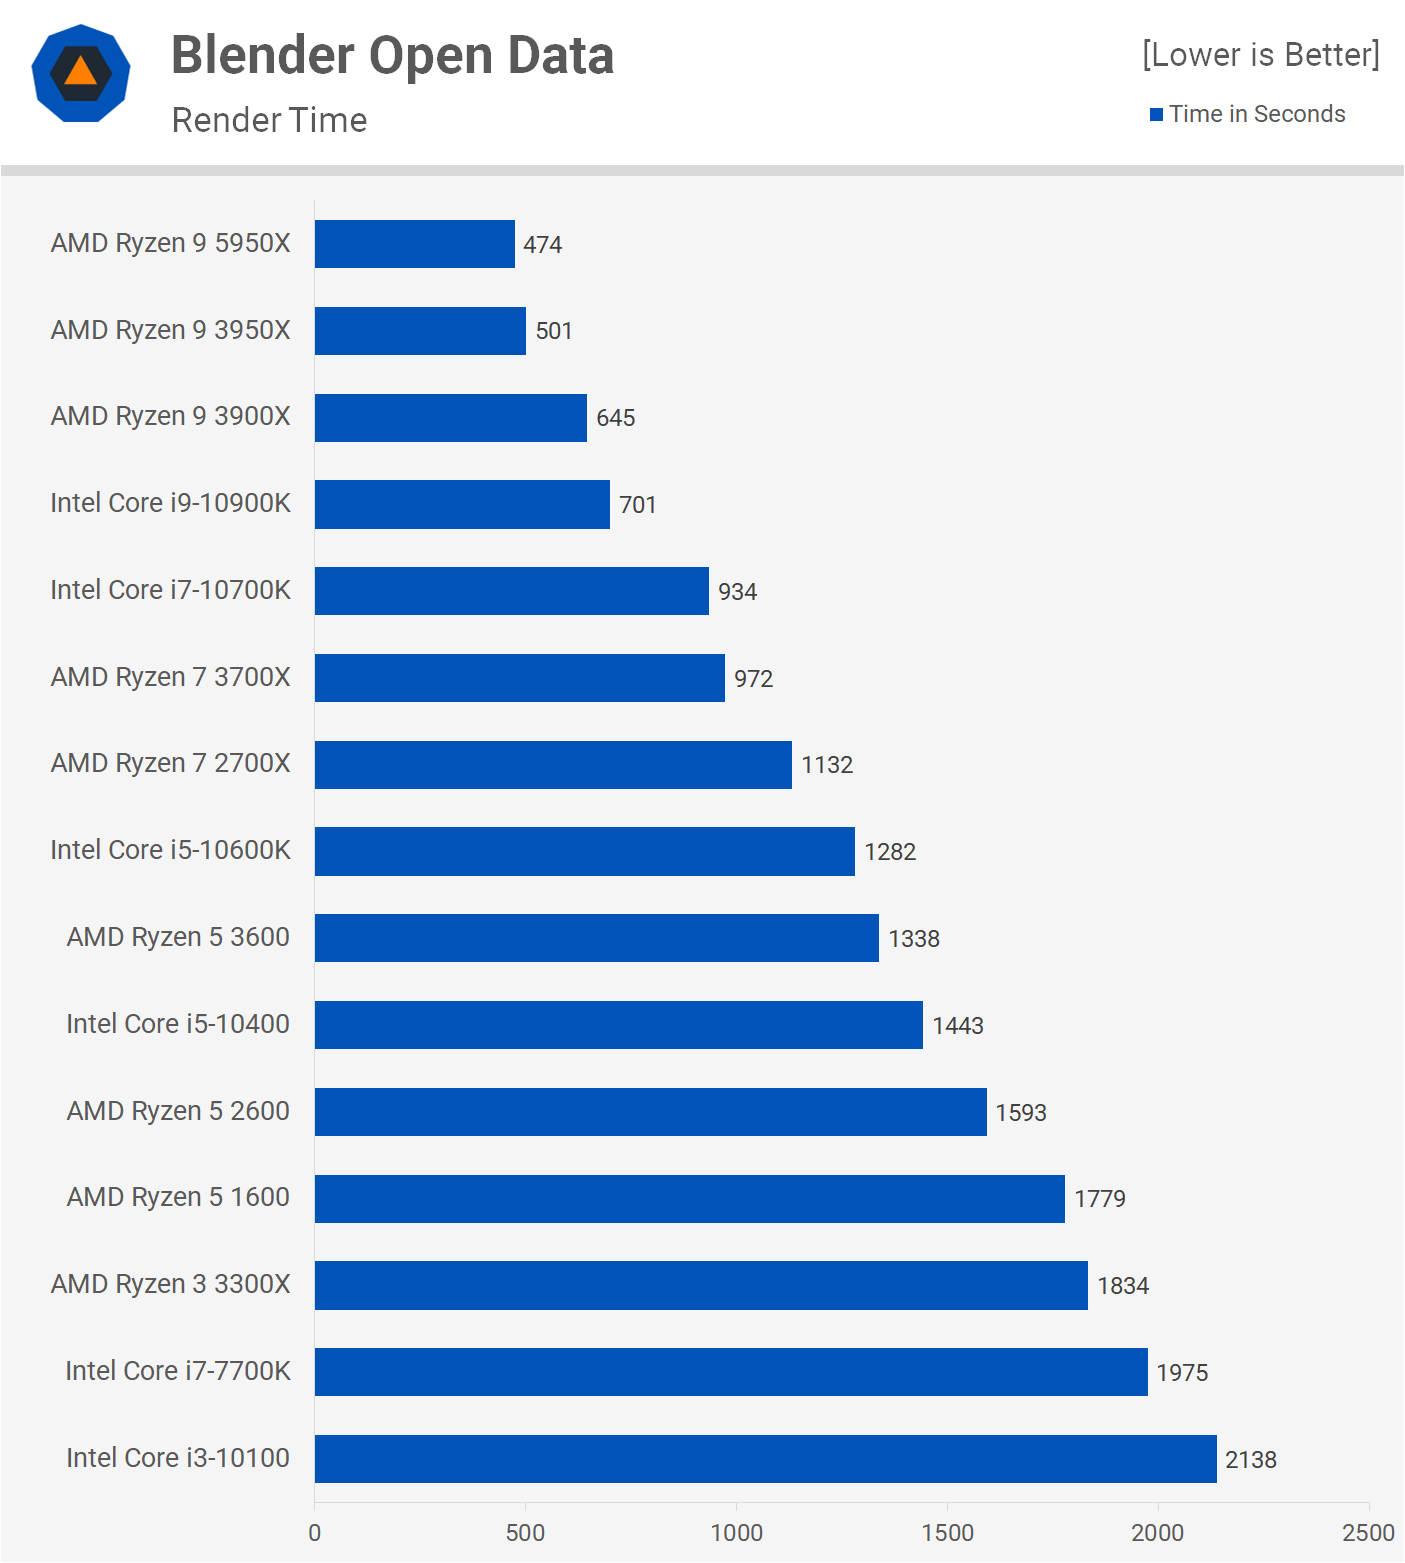
With Blender we're only seeing a small improvement for the 5950X over the 3950X, at 6% faster. The AMD flagship is nearly 50% faster than the 10900K, making it the better value part.
Interestingly we see a huge performance uplift in the V-Ray benchmark. Here the 5950X is 20% faster than the 3950X and a massive 62% faster than the Core i9-10900K. This is exciting news for those using V-Ray who don't want to dish out big dollars on a Threadripper system.
The 5950X also offers big performance gains in Corona, beating the 3950X by a 20% margin and around 60% faster than the 10900K.
Here's a look at code compilation performance where we see a mild improvement for the 5950X at 7% faster than the 3950X. It was also 50% faster than the 10900K.
The DaVinci Resolve Studio 16 benchmark is more reliant on GPU performance, though as you can see here the CPU can still make a difference. We're seeing a small 4% boost with the 5950X over the 3950X.
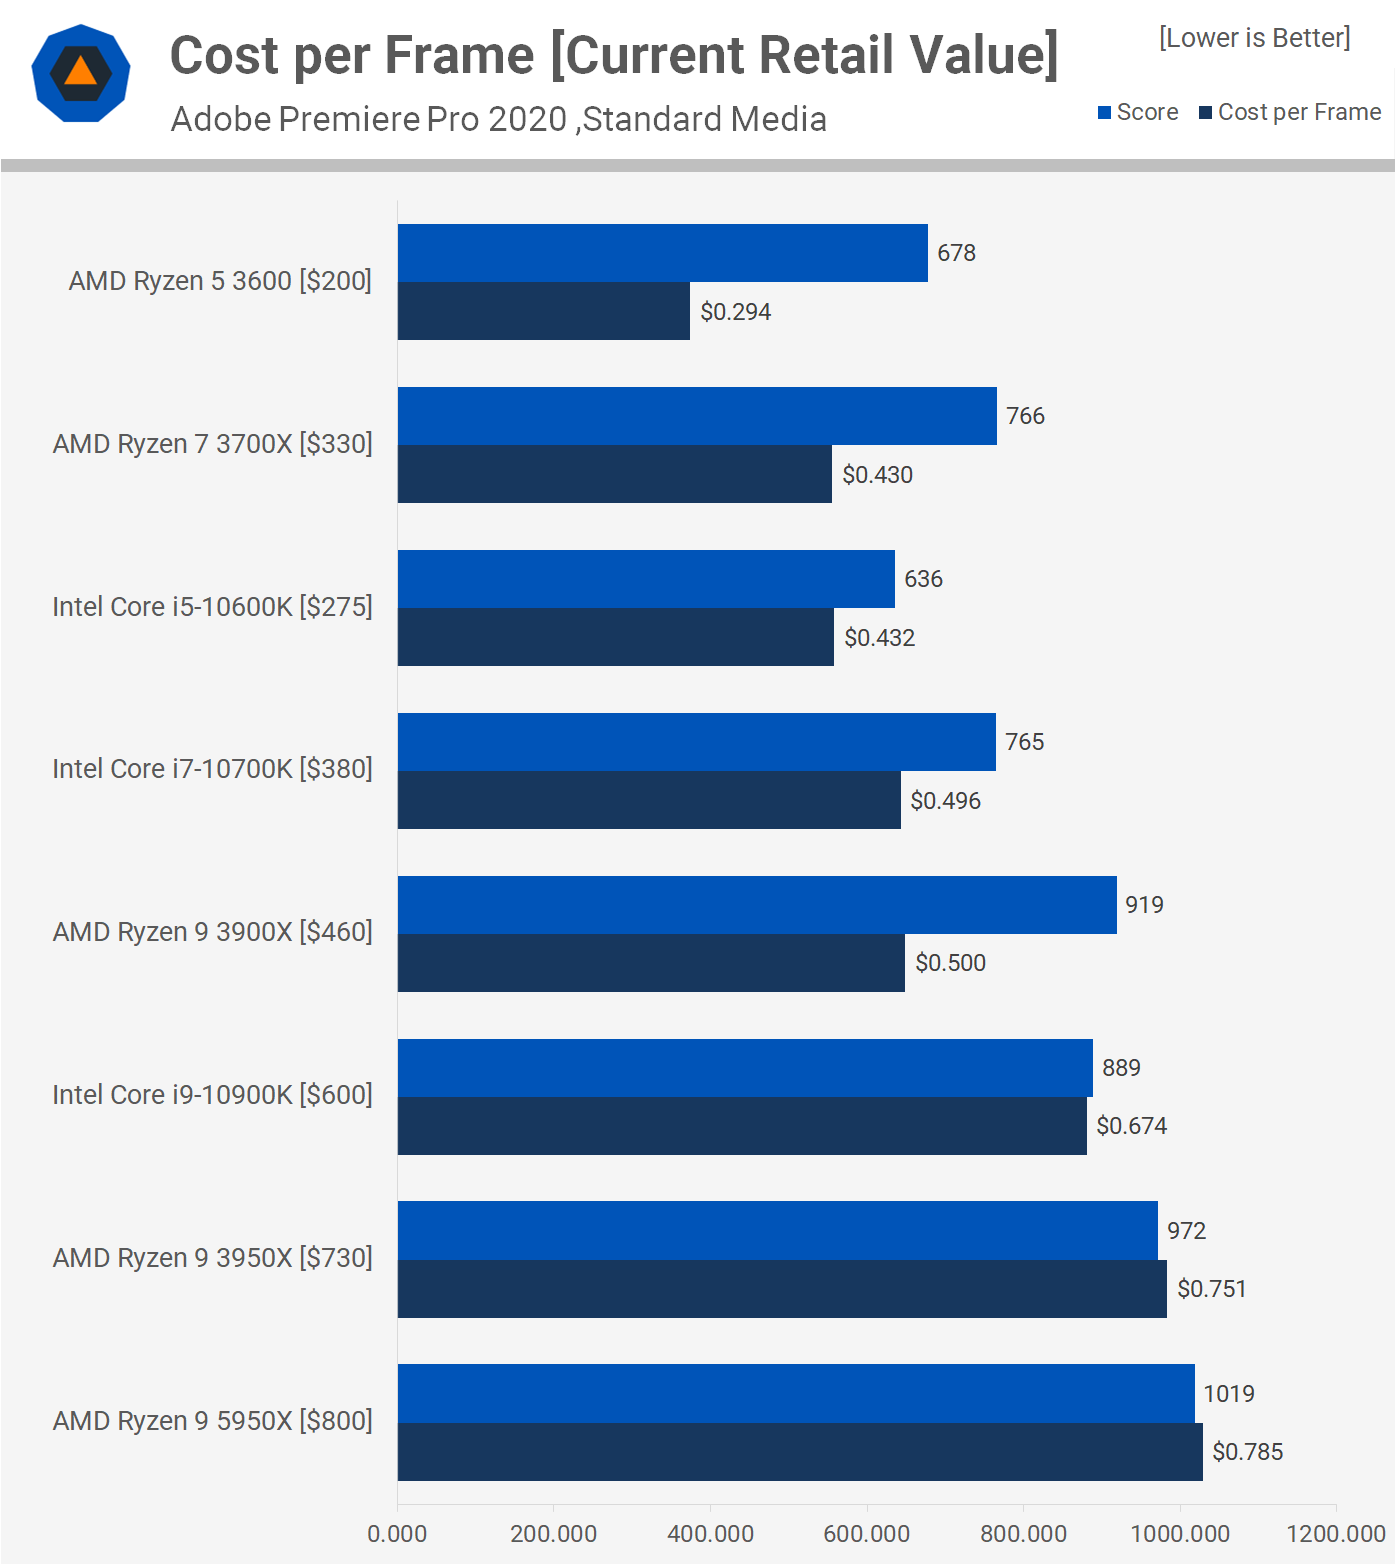
The performance uplift in Premiere Pro is also mild relative to the 3950X. We're looking at just a 5% performance improvement and a somewhat small 15% increase over the 10900K.
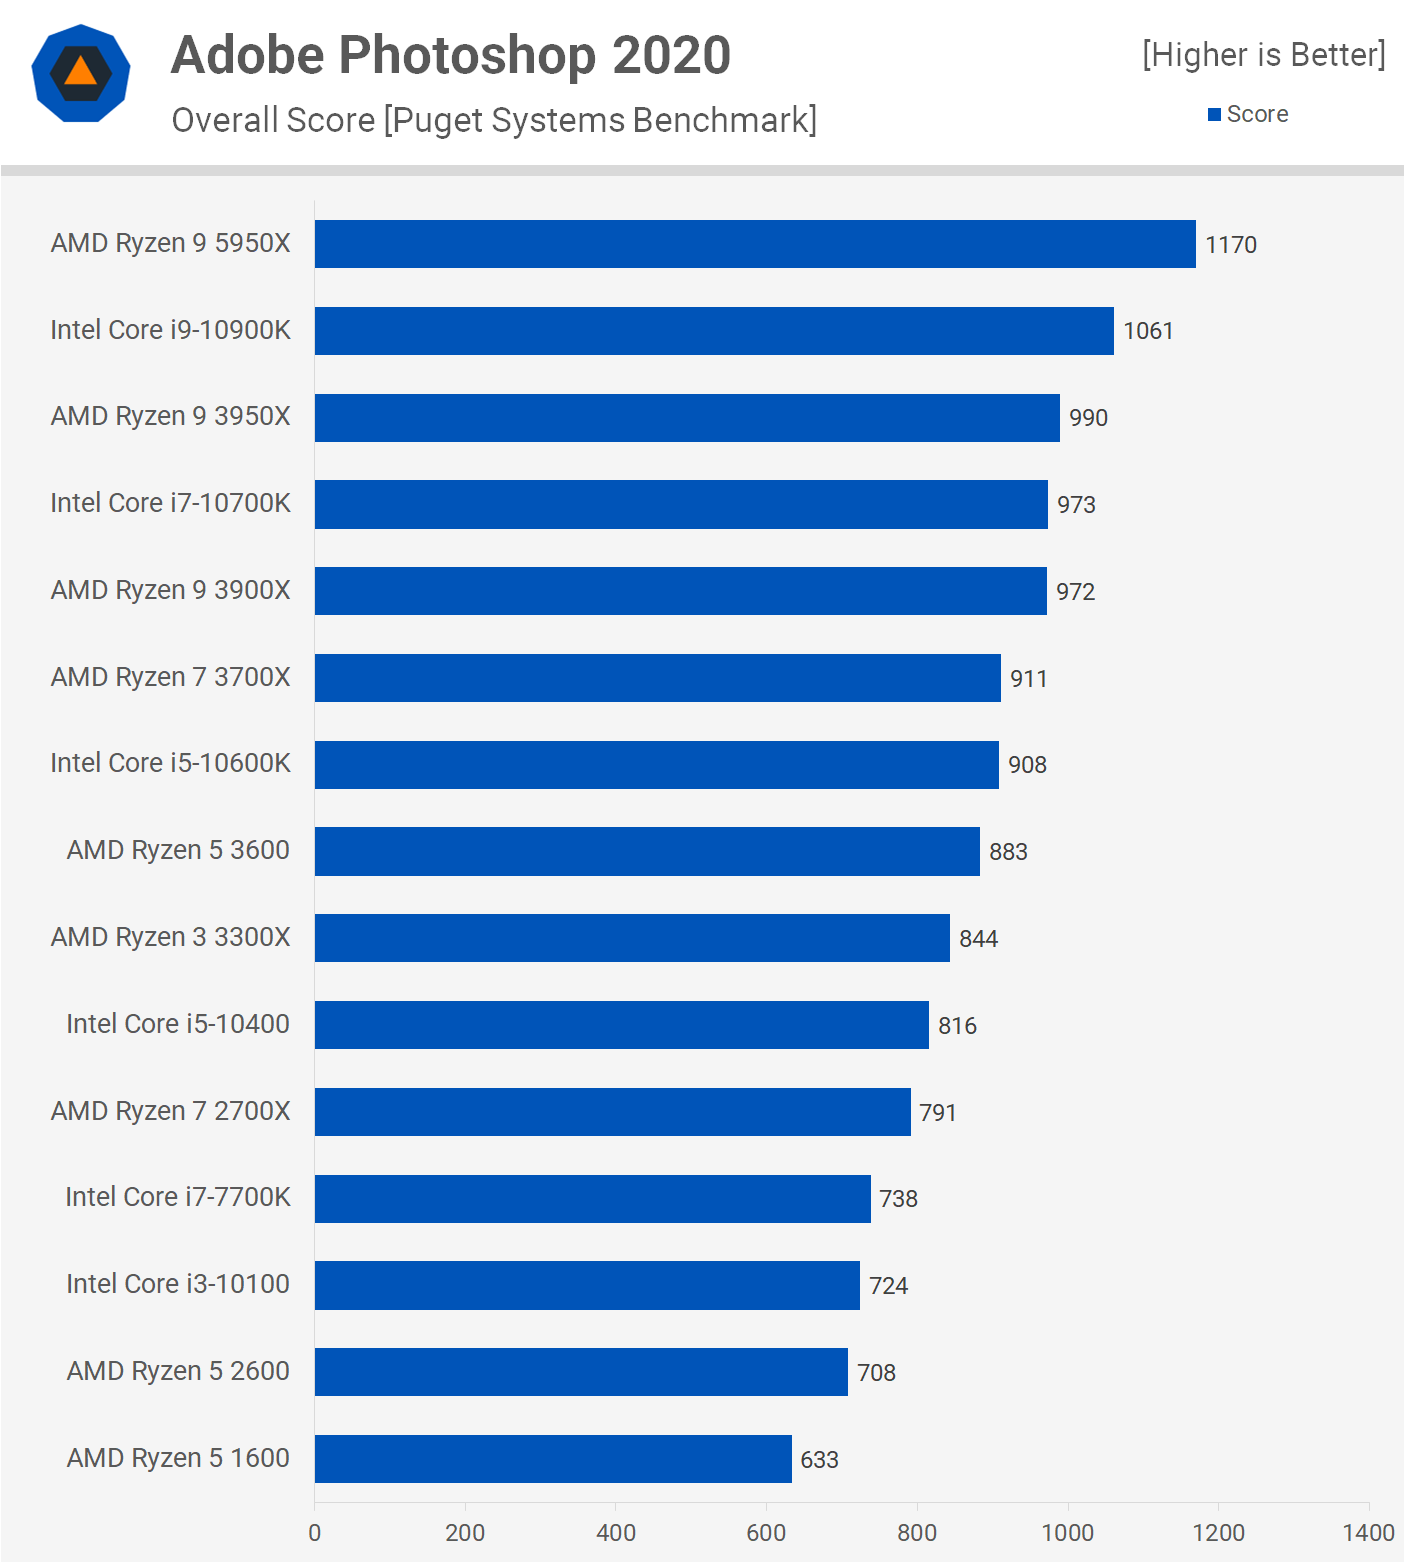
Unlike the video editing software, Adobe Photoshop relies predominantly on single thread performance and as a result the 5950X is able to offer strong performance gains over the 3950X with an 18% performance boost. The latest Ryzen 9 was also 10% faster than the 10900K, so pretty impressive stuff.
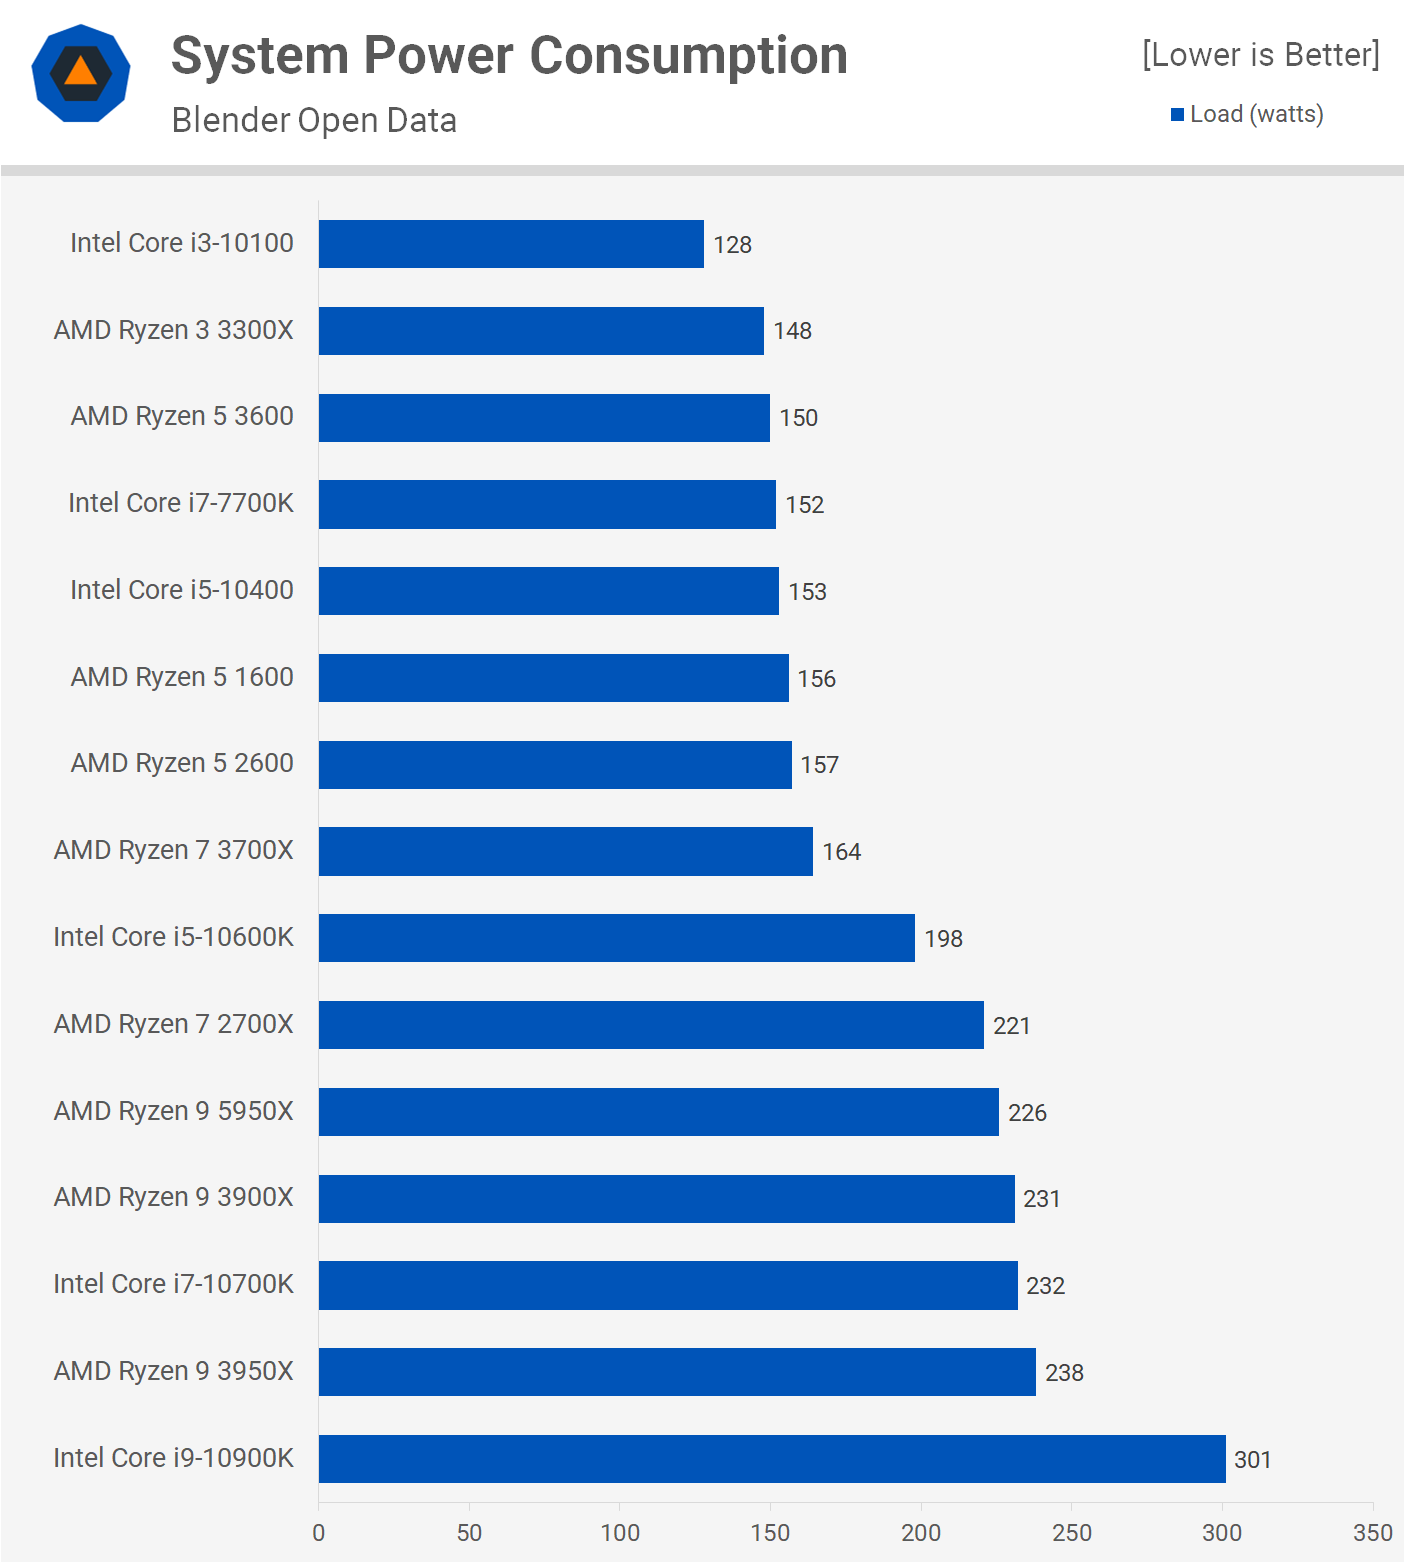
After Effects is another application that heavily relies on single core performance and we're seeing a strong performance advantage with the 5950X at 20% faster than the 3950X and 15% faster than the 10900K. Power ConsumptionWe took a quick look at power consumption and we were impressed with what we found. The 5950X is manufactured using the same 7nm process as the 3950X, and yet AMD's engineers were able to improve performance, but also reduce power consumption for greatly improved efficiency. Despite boosting performance by 6%, we're also looking at a 5% reduction in power usage for the total system. Compared to Intel’s 10-core Core i9-10900K, we're looking at a 25% reduction in power usage.
A brief look at temperatures and operating behavior comparing the Ryzen 9 3950X and 5950X. Both tested in a 21C room on an open test bench using the Corsair iCUE H150i AIO and MSI X570 Godlike, installed inside the Corsair Obsidian 500D. The Ryzen 9 5950X ran 6 to 7 degrees cooler than the 3950X under the same test conditions, despite running at a slightly higher clock speed using the same 7nm process. Part of this will be down to 7nm maturity, but AMD is claiming architectural optimization as well. These enhancements allow for a slightly lower vcore which again would have helped to reduce power consumption and therefore thermals. Gaming BenchmarksTime for the gaming tests where we used the fastest GPU currently available, the GeForce RTX 3090. Starting with Far Cry New Dawn at 1080p, we find a 10% performance uplift for the 5950X over the 3950X. Not a bad result, though that puts the 5950X behind the 10900K by around 6%. They're identical with the 2080 Ti, but this next-gen GPU pushes performance back in Intel’s favor in this title.
Moving on to Tom Clancy’s Rainbow Six Siege, we find a 7% performance improvement for the 5950X over the 3950X, again not bad, but not that amazing either. That means the new 16-core CPU was still 6% behind the 10900K which will no doubt disappoint AMD fans.
Watch Dogs: Legion is the latest game to be added to our battery of benchmarks and this one shows a 14% performance increase for the R9 5950X over its predecessor. That made it just 2% slower than the 10900K, so it was very close this time around although the Intel CPU is less expensive than AMD’s flagship.
Frame rate performance in F1 2020 is also close between the 10900K and 5950X. AMD trails by 2%, allowing the RTX 3090 to pump out 272 fps. It's worth noting that we're looking at an impressive 21% performance uplift over the 3950X.
In Horizon Zero Dawn the 5950X edged out the 10900K, albeit by a small 2% margin, so it was more of a match. To get here, the new processor received a 14% performance boost over the 3950X.
We’re only seeing a 5% performance boost in Borderlands 3 for the 5950X over the 3950X, but that's enough to put the new 16-core CPU within a stone’s throw of the 10900K. In the end, it was 4% slower than the 10900K which is as close as it gets before calling it a draw.
Intel enjoyed a reasonable performance advantage in Death Stranding as the 10900K was almost 20% faster than the 3950X. The Ryzen 9 5950X is a whopping 34% faster than the 3950X and that meant it was also 12% faster than the 10900K. That's a win for AMD.
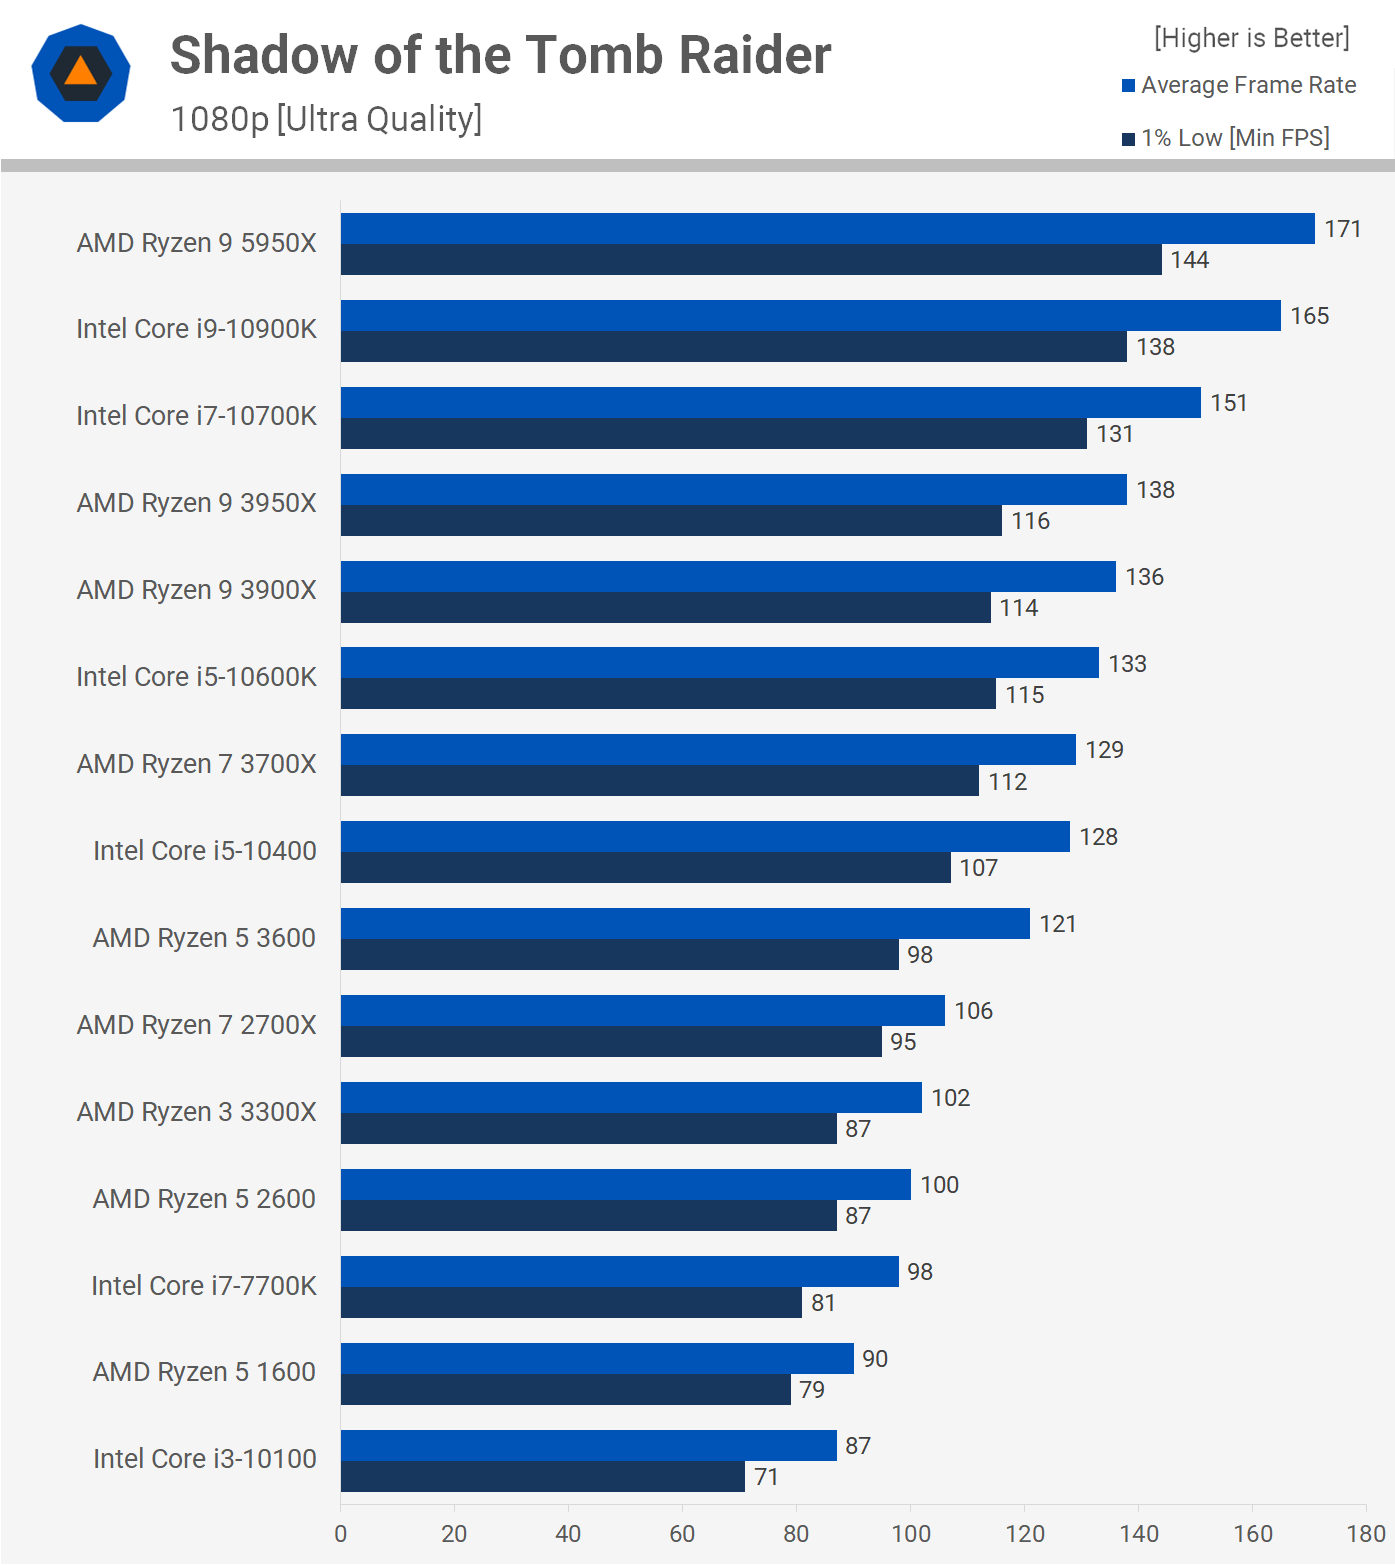
The 5950X also nudged ahead in Shadow of the Tomb Raider. Here the R9 5950X is 4% faster than the 10900K, so basically the same performance, but that’s a 24% improvement over the 3950X.
Another game where AMD is seeing a huge generational leap is Hitman 2. Here we're looking at a 34% boost, pushing the 5950X + RTX 3090 combo to 167 fps on average. That’s 10% faster than the 10900K.
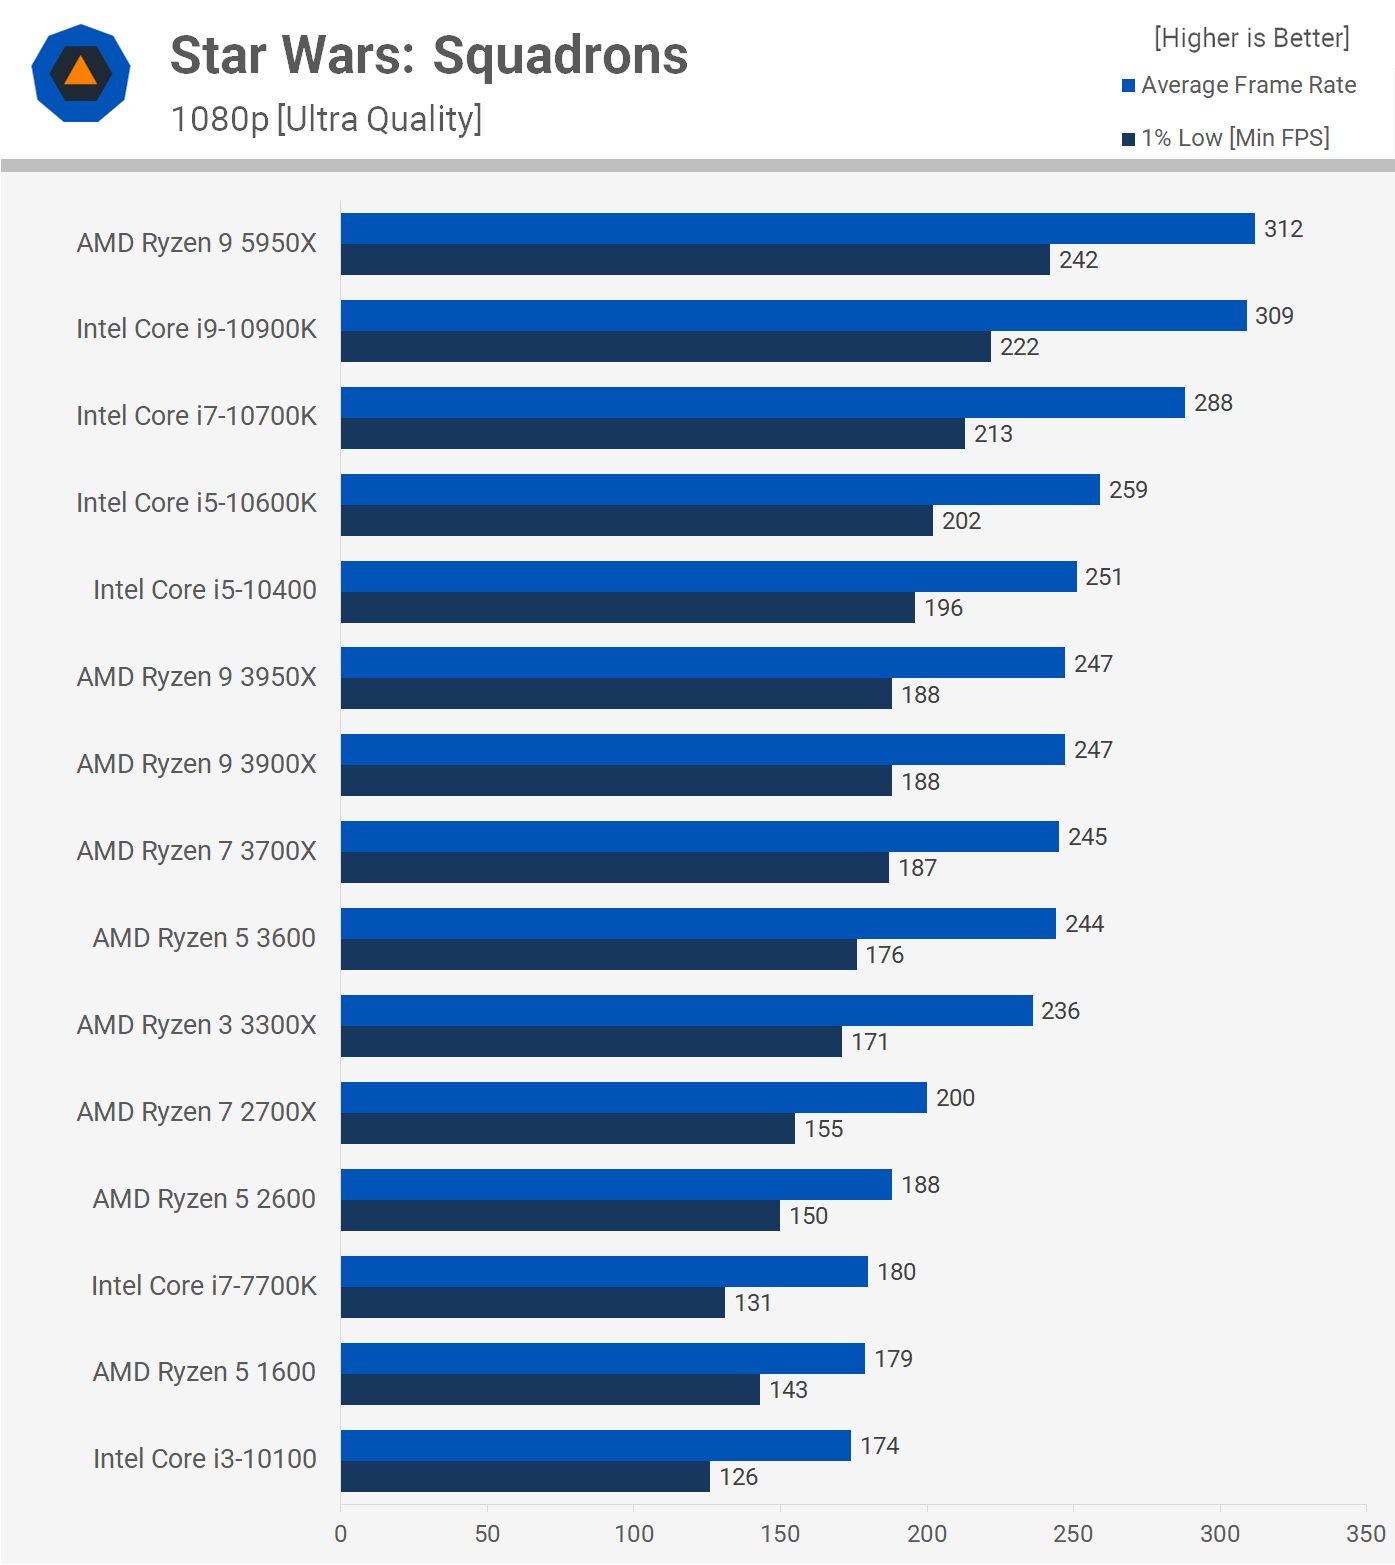
Another game where the 5950X performs very well is Star Wars Squadrons, pushing the RTX 3090 up to 312 average fps, and placing it on par with the 10900K, though the 1% low performance was 9% stronger. When compared to the 3950X we're looking at a 26% performance increase.
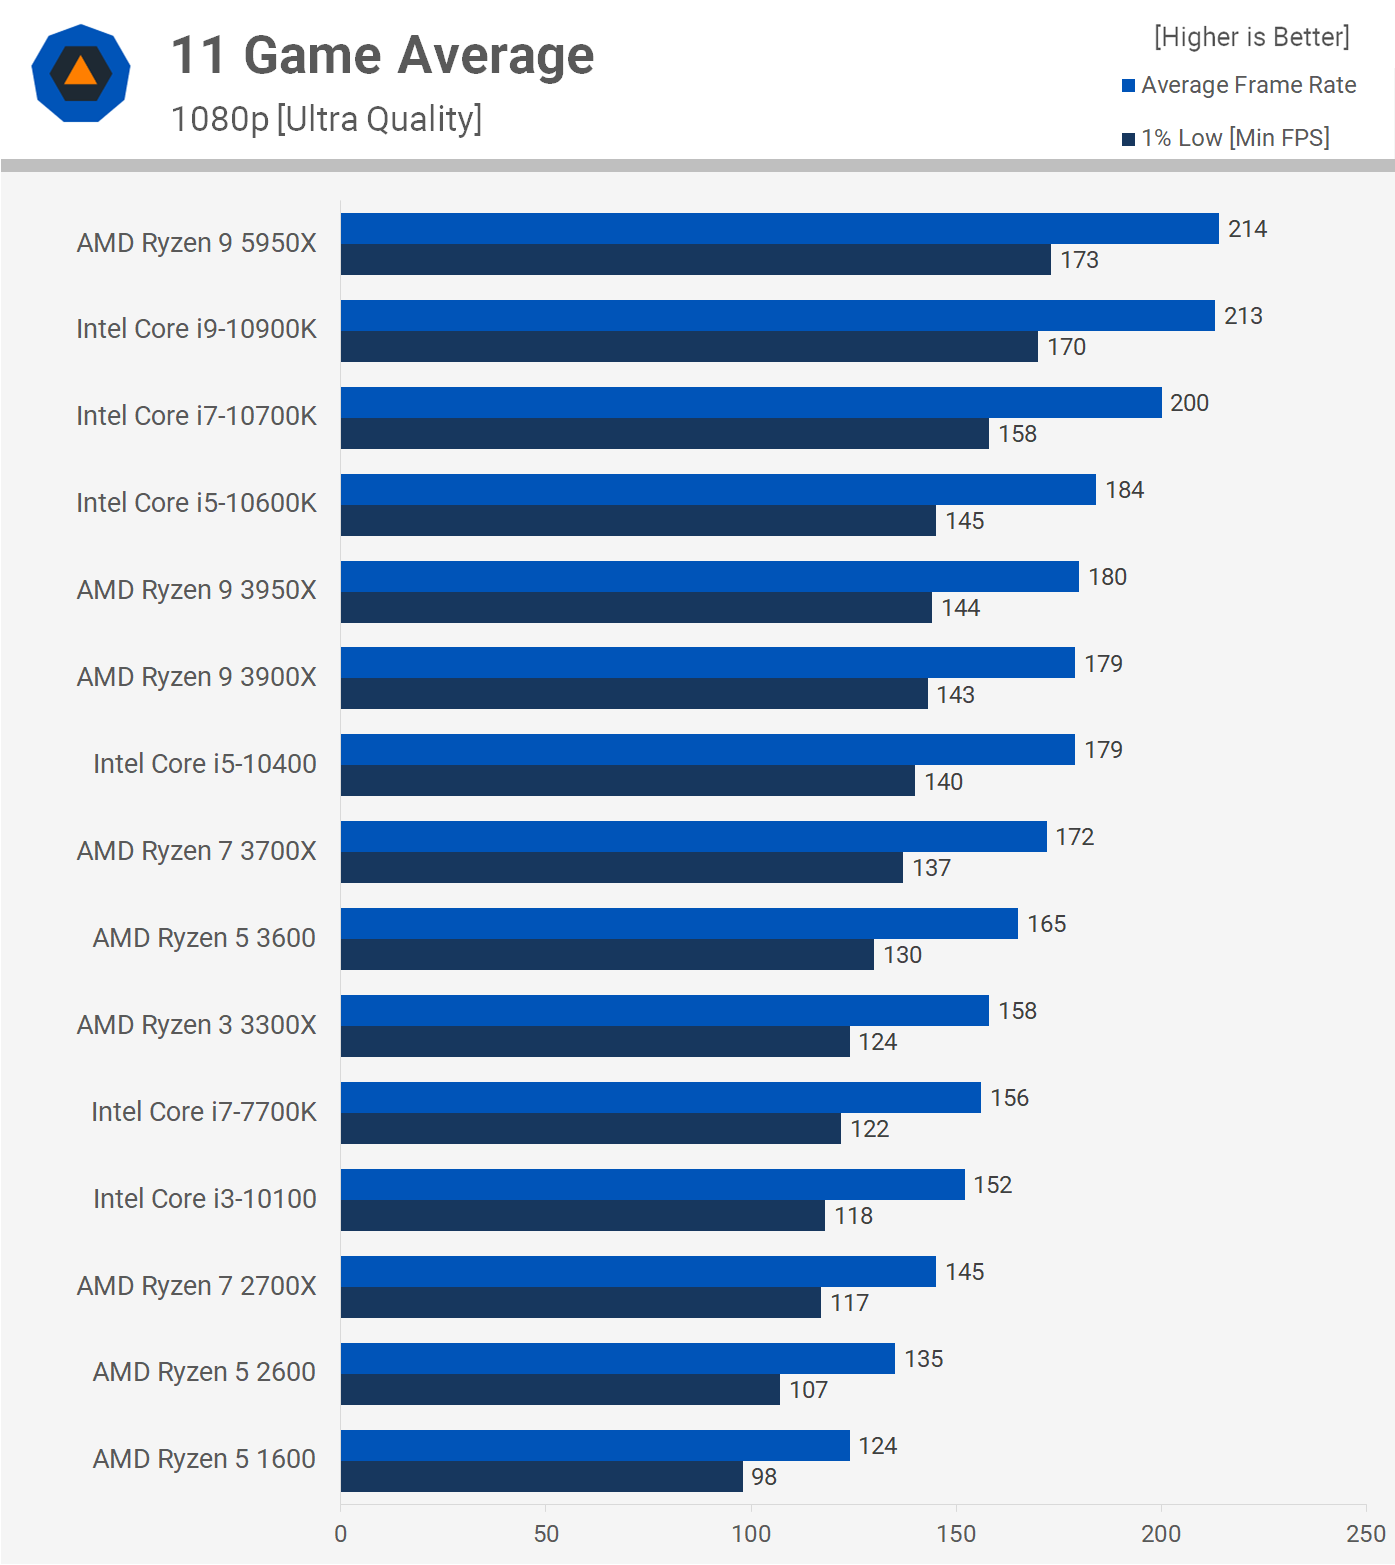
We had to re-test Serious Sam 4 three times just to make sure this was all accurate. Here the Ryzen 9 5950X was 13% faster than the 10900K and an insane 48% faster than the 3950X, that's one hell of a performance leap from one generation to the next. Gaming Performance AverageHere's a look at performance averaged out across the 11-game sample. As you can see the Ryzen 9 5950X and 10900K are a match in terms of performance. This also means on average the 5950X was 19% faster than the 3950X, which is an impressive generational leap for gaming workloads. You could also argue Intel remains pretty competitive for gaming. Even if that means it consumes more power and compares poorly in productivity applications, the Core i9-10900K does hold its own in gaming against AMD’s best.
OverclockingNow let's take a look at overclocking performance. We were able to hit an all-core 4.7 GHz overclock with the 5950X using 1.375v. This overclock boosted performance in Cinebench R20 by 20%, a very substantial performance increase for core-heavy workloads.
However, that same overclock is far from ideal for single-core workloads as the 5950X stock clocks as high as 5 GHz, so we've reduced the peak operating frequency by 6% and single core performance has dropped by 5%.
Back to a core heavy workload, the increased all-core frequency is of great benefit. Blender shows an 18% performance increase which is quite remarkable.
Of course, the downside to overclocking is increased power usage and therefore thermal output. The 4.7 GHz overclock increased total system usage by 40% as the R9 5950X was now sucking down around 140 watts more. When compared to the stock 10900K, it doesn't look all that bad and it was 74% faster.
Overclocking this CPU isn't particularly useful in games as we're losing a bit of performance.
Oddly though, performance in Far Cry New Dawn was slightly improved. We're only talking about a few extra frames, but after what we saw in Rainbow Six Siege, we weren't expecting this kind of result. Price to PerformanceHere's our look at the price to performance data, first looking at productivity. The 5950X should land at $800 and that means upon release it will cost $70 more than the 3950X. In terms of price vs. performance that puts these CPUs on par, both are better value than the 10900K, but slightly worse than other lower core count Intel parts such as the 10600K and 10700K. But of course, when talking about core-heavy productivity, they're in a completely different league.
Despite the strong single core performance, the 5950X works out being a little more expensive than the 3950X and 10900K. Though that's probably not an issue for a high performance CPU as the “time is money” mentality can be generally applied here.
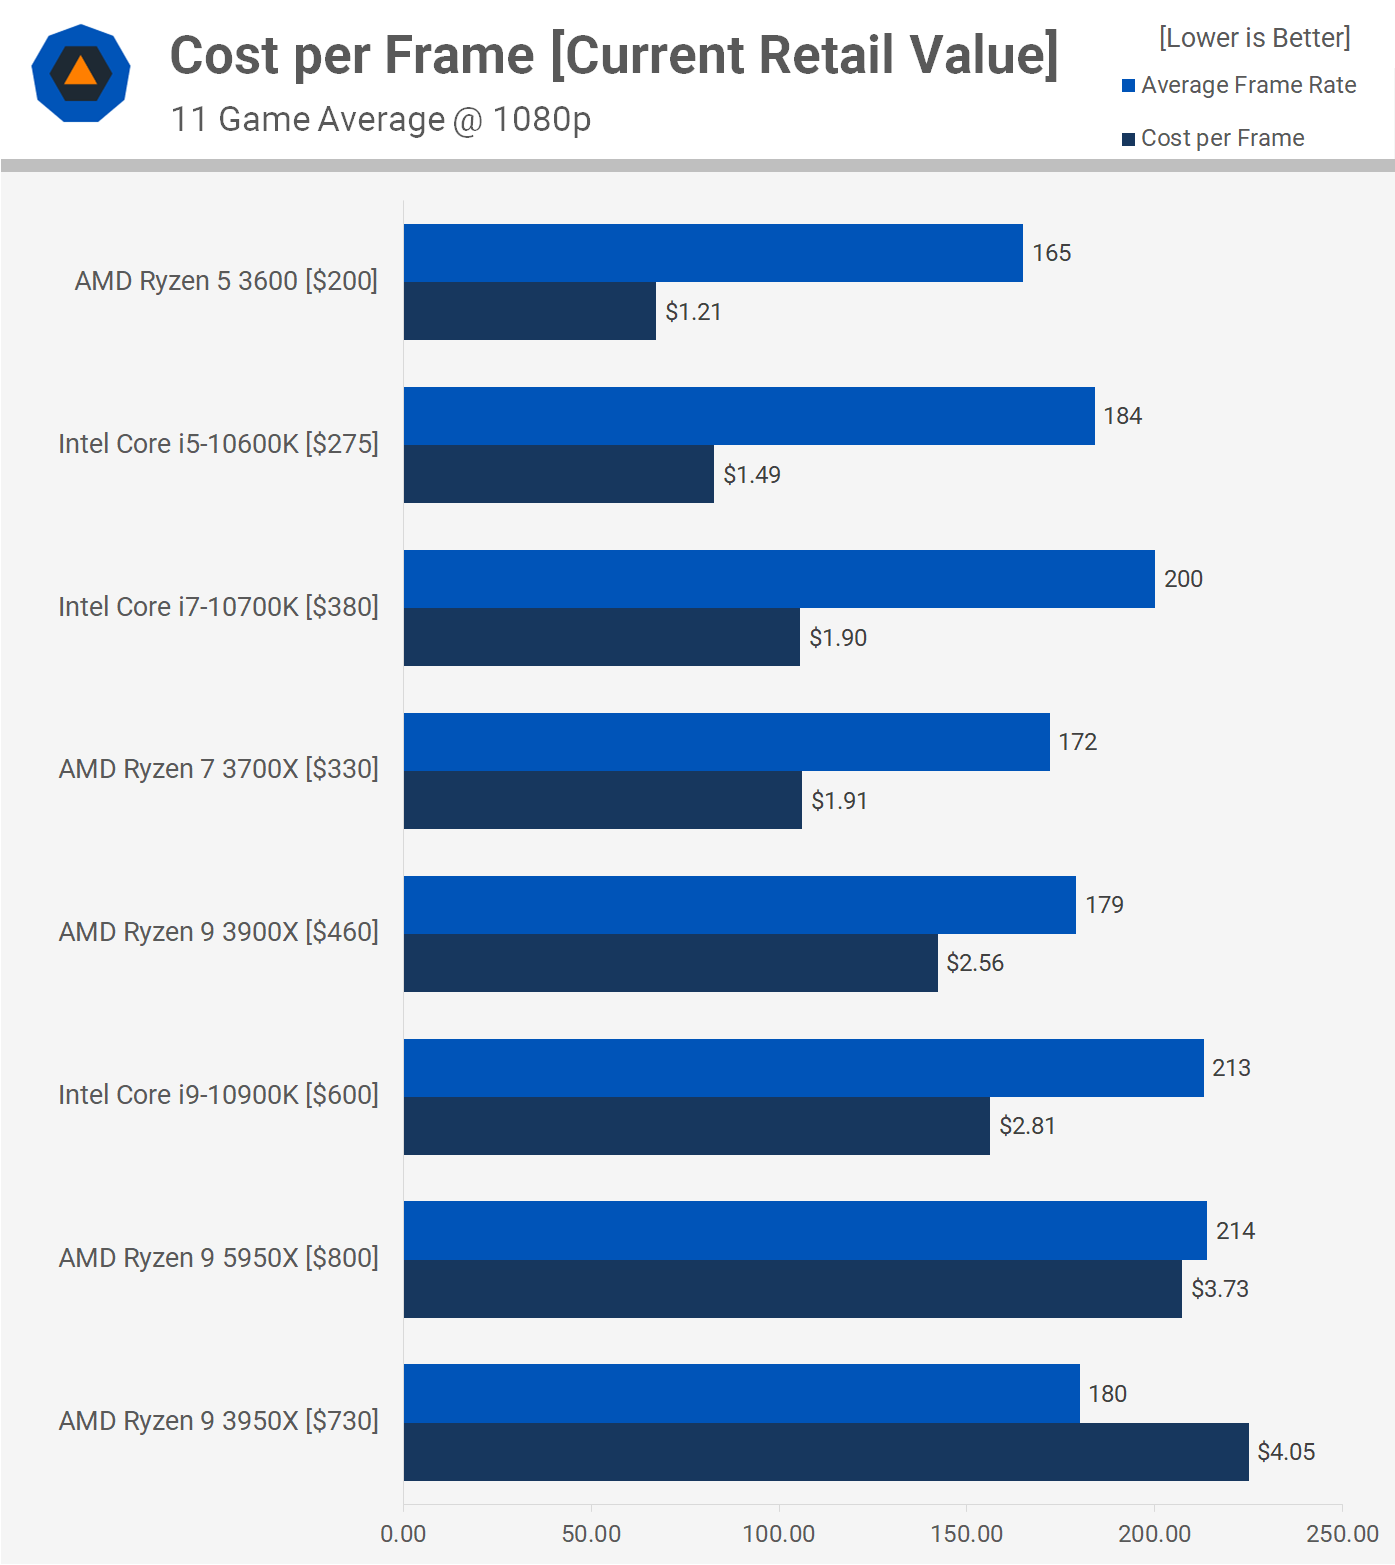
For gaming, the 5950X is a pretty weak value prospect as typically speaking games don't come anywhere close to utilizing even half of the 5950X. That said, for an extra $70 over its predecessor, it’s a better value for gaming than the 3950X.
Even if we average the performance seen across the 11 games tested and use that data for a price to performance comparison, we see that while the 5950X beats the 3950X, it's worse value than everything else. That's no surprise given games can't take full advantage of a 16-core/32-thread processor. What We LearnedAMD put Intel in a tough spot a year ago with the Ryzen 9 3950X. It easily beat the Core i9-9900K in core-heavy workloads by packing twice as many cores, and when it came to low-res maximum FPS gaming performance, there often wasn't that much in it. There were times where the Intel CPU was up to 20% faster however, which is a significant margin and therefore we recommended the 9900K for those seeking maximum gaming performance with little interest in productivity performance. Nevertheless, the 16-core 3950X took the mainstream desktop performance crown and also eliminated Intel's Cascade Lake-X HEDT platform, with the assistance of 2nd and 3rd-gen Threadripper parts. A year later and we have an even better CPU that firmly takes the performance crown away from Intel. Of course, if you're mostly interested in gaming performance, the Ryzen 9 5950X is overkill. You'll be getting a similar level of performance from the more affordable 5900X and even the 5800X. In most games, even the 5600X won't be far behind. We’ll follow up with detailed reviews on all those chips in the next few days. Put differently, spending $800 on the Ryzen 9 5950X only for gaming is pointless, but going with a core-heavy processor no longer hampers performance, so it is a viable option for gamers with deep pockets. Where this new 16-core processor really shines is for those who want to work and play, and right now there's no better option for tackling both those tasks. We believe we're at the end of the road for the AM4 platform, so the 5950X investment loses a bit of its value as the upgrade path is effectively dead, but if you want the best processor for under $1,000, this is it. For those of you already rocking a Ryzen 9 3950X, the R9 5950X isn't worth the upgrade. Chances are, if you're gaming with a high-end GPU, you're doing so at a high resolution where you'll be GPU bound most of the time. For example, at 1440p there will be very little difference between the 3950X and 5950X with an RTX 3090, and we expect to see no difference at 4K. Then when it comes to productivity performance, the gains don't justify the investment. If you're coming from a 2nd-gen Ryzen processor, the upgrade for both gaming and productivity will be huge though. For seriously strong productivity performance, the 5950X will be a great option, as long as you're ready to part with $800. On that note, it’ll be interesting to see what happens with pricing for the 3950X over the next few months, as it might become the ultimate value option for high-end CPU performance. Of course, this will all depend on the true availability of the Ryzen 9 5950X, but we’re hearing we should expect strong supply for new Ryzen 5000 series processors. It's always great to see AMD take yet another big step forward, and we’re looking forward to checking out the rest of the product stack. Shopping Shortcuts: |
| How to Forget Wi-Fi Networks a Mac Previously Connected to Posted: 06 Nov 2020 11:06 AM PST
Macs automatically remember all the Wi-Fi networks you've ever connect to along with their passphrases. If you're having trouble connecting to Wi-Fi, you can remove the list of networks to troubleshoot your problem. If there's a network you previously connected to that's no longer working, deleting it and connecting again is a good place to start your troubleshooting. Whether you want to remove one wonky network or you want to every Wi-Fi network macOS has saved over the years, you can do it from the same place on your Mac's Network preferences screen. First, open System Preferences. To do so, click the "Apple" icon at the top left side of the menu bar and select "System Preferences."
From the System Preferences menu, click the "Network" option.
Make sure you have "Wi-Fi" selected on the left side of the window and click the "Advanced" button at the bottom of the window to bring up more options.
Click the network you want to delete to highlight it. If you want to delete multiple networks, Command+Click each one. Click the "-" button to delete the networks.
Click "Remove" on the pop-up to remove the networks. If you selected more than one network to remove, you can check "Apply To All" to avoid seeing this pop-up multiple times.
If you want to avoid saving Wi-Fi networks in the future, you can uncheck the box next to "Remember Networks This Computer Has Joined." It's not really necessary, but if digital clutter drives you crazy, it's always an option.
Click the "OK" button at the bottom right when you're done.
Finally, click the "Apply" button to apply the changes.
You can now close the System Preferences window. The next time you connect to a deleted network, you'll have to select it in your Mac's Wi-Fi menu manually—and you'll have to type the network's passphrase again, too. |
| How to Change Your Default Google Account on Android Posted: 06 Nov 2020 09:11 AM PST
If you use an Android phone or tablet, you know that your Google account is tightly integrated with the experience. The default account will decide how you're logged in to many apps, especially Google apps. We'll show you how to change this. While it's easy to add multiple Google accounts to your Android device, setting one to be the "default" account is cumbersome. The default account is whichever account you signed into when you first set up the device. That means in order to change it, you'll need to sign out of accounts. Say you're signed into two Google accounts on your Android device. First, you'll need to sign out of the current default account. That will promote the second account to the default spot, then you can sign back into the first account. Let's do it. To begin, swipe down from the top of your Android smartphone or tablet's screen (once or twice depending on the manufacturer) and then tap the gear icon to open the "Settings" menu.
Scroll down the Settings list and select "Google."
Your default Google account will be listed at the top of the screen. Select the drop-down arrow icon under your name to bring up the accounts list.
Next, tap "Manage Accounts on this Device."
You will now see a list of all the accounts you are signed into on your device. Find your default Google account and select it.
Tap "Remove Account."
It's important to remember that removing the account will delete all of the messages, contacts, and other associated data found on your Android phone or tablet. Fortunately, some of that data is backed up to your account and it will be restored when you sign back in. Tap "Remove Account" on the confirmation pop-up message if you're okay with that.
The account will be removed from the list and your device. Tap the back arrow in the top-left corner to return to the Google settings.
Select the drop-down arrow icon next to your name again to open the accounts list. This time, tap "Add Another Account."
After you confirm it's you with your fingerprint or password, a Google sign-in page will appear. Follow the on-screen steps and enter your credentials for the account you wish to add.
It may take a few minutes for your account to be imported. Once it's finished, you'll be all set with a new default Google account on your Android smartphone or tablet! |
| You are subscribed to email updates from My Blog. To stop receiving these emails, you may unsubscribe now. | Email delivery powered by Google |
| Google, 1600 Amphitheatre Parkway, Mountain View, CA 94043, United States | |















0 nhận xét:
Đăng nhận xét