How to Send Audio Messages Using Siri on iPhone |
- How to Send Audio Messages Using Siri on iPhone
- How to Make the Most of Complications on Your Apple Watch
- AMD Ryzen 7 5800X Review
- How to Change Your Bluetooth Name on Android
- How to Change Apple Watch Move, Stand, and Exercise Goals
- 10 of the Most Unique Lorem Ipsum Generators
- How to Get MacBook Like Touch Bar on Android
- How to Enable Safe Browsing In Google Chrome for Android
- AMD Ryzen 9 5900X Review: i9-10900K Versus
- How To Change the Icons Names On Android Homescreen
| How to Send Audio Messages Using Siri on iPhone Posted: 09 Nov 2020 08:40 AM PST  Siri works pretty well with iMessage. You can ask Siri to send a message, and Siri will transcribe it to text for you. But what if Siri gets something wrong? Sending an audio voice message removes all confusion. Starting with the iOS 14 update, Siri can record your voice and send it as a voice (audio) message. While you can send voice messages directly in the Messages app, the beauty of using Siri is that you can do this without even picking up your iPhone—assuming you have AirPods or other headphones. How to Send a Voice Message With SiriTo get started, bring up Siri. You can do this by saying "Hey Siri" on your iPhone or AirPods. Or, you can press and hold the "Side" button on your iPhone.
Then, just say "Send a voice message to (contact name)". Siri will show an "OK, recording…" message, and you'll see the Siri orb animate on your screen.
Give it a second or two and then start speaking. In our tests, we found that if you speak immediately, it cuts off the first second or two. Once you're done with the message, just stop speaking. Siri will recognize this and automatically stop recording. You'll then see a Siri card at the top of the screen with your audio message. You can tap the "Play" button here to preview the voice message to make sure you're happy with it. Tap the "Send" button to send the message. You can also just say "Send" to Siri on either your iPhone or AirPods.
Once your message is sent, Siri will show another card at the top of the screen with the contact name.
Now, just exit the Siri view by swiping up from the bottom of your iPhone's screen or pressing the dedicated "Home" button, if it has one. How to Find the Voice Message You SentThe audio message will be available in the Messages app as well. To find it, just launch the "Messages" app and open the conversation. You'll see the audio message highlighted in blue. You can press the "Play" button here to play the message. If you can't hear anything, tap the "Volume" button next to the voice message to unmute the audio.
When you're dealing with voice messages, you should know that by default, the audio messages disappear in two minutes. Here's how to stop audio messages from being deleted on an iPhone. RELATED: How to Keep Audio Messages from Being Deleted on the iPhone |
| How to Make the Most of Complications on Your Apple Watch Posted: 09 Nov 2020 05:56 AM PST  The Apple Watch can do a lot more than just tell time, track your activity, or show you notifications from your phone. With complications, it can display almost any information you want, or provide quick access to your favorite features. We'll show you how to make the most of them. First, note that while you can customize the watch face and add complications directly on your watch, it's much easier to configure things via the Watch app on your iPhone. Choosing the Right Watch FacesEach watch face has a limit of how many complications it can display at one time. Some, like Numerals Mono, don't allow any, while the Infograph face allows up to eight. Most allow somewhere between three and five.  But not all faces are created equal. While the Infograph face can display a lot of different complications, it's a nightmare to read at a glance. There's just too much information in too many tiny circles. The Astronomy face, on the other hand, looks stunning, but can only display two small complications, including the date. To make the most of complications, you want to go with a watch face that strikes a good balance between information, looking good, and, most importantly, being easy to read.
With that in mind, the following faces are worth a try:
How to Use Multiple Watch FacesIt's almost impossible to create a perfect watch face that will show everything you want, so why bother? There's no rule against using multiple watch faces. Switching between them is super easy—you just swipe right or left on the current face to move between those you've set up.
To get this to work, though, you have to keep your installed faces organized. To do so, open the Watch app on your iPhone, and then, under "My Faces," tap "Edit." Use the handles to rearrange the Watch faces so they're grouped naturally. Tap the red minus sign (-) to delete any you aren't using. (Bye, Mickey Mouse!) If you don't want to deal with the hassle of swiping between watch faces, you can also use the Shortcuts app to automatically switch between them during the day.
Then, instead of limiting yourself to just one master watch face, you can craft different ones for different situations. For example, I have two Infograph Modular faces I switch between: one is more of a reference face and the other has all my workout tracking. I also use a stark white Numerals Duo face when I just want my watch to show the time. Note that you can also use the same face more than once and include the same complication on different faces. You really can configure a different watch face for every situation. Watch Faces with Built-in Complications
The following watch faces have a built-in extra complication, which is nice because they make use of the whole display:
All of these were inspired by classic analog watches, and they're some of the best-looking options available. Look for Third-Party AppsApple's built-in apps have some pretty useful complications, but your favorite apps might have some, too! You don't have to limit yourself or wait for your niche tide-times app to add one. If there's a specific complication or feature you want, just search the app store. Third-party developers are creating all kinds of useful complications. For example, Just Press Record is a great audio recording and transcription app you probably didn't even know you needed. Battery Life will show your iPhone's battery life on your watch and MiniWiki brings all of Wikipedia to your wrist. Roll Your Own Custom ComplicationsApple has always limited what you can customize on your Watch. While this does prevent you from creating a watch face that's so over-the-top, it drains the battery in minutes, it also stunts your creativity a bit. Fortunately, there are some work-arounds!  The Watchsmith app allows you to design and combine your own custom complications from a list of nearly 50. You can set them up to change throughout the day, as well. So, for example, you could show the weather in the morning and sunset time in the afternoon. You can't use complications for other apps, but for basic reference information, this gives you a lot of options. If you're feeling a bit more adventurous, you can also set any Shortcuts you create as a complication. There's no real limit to what you can do here, as long as you're prepared to put the work into setting it up (and troubleshooting when things go wrong). Turn Contacts Into Complications
Navigating the Phone and Messages app on your Watch's small screen can be a bit awkward—especially if all you want to do is send a quick text. The handiest way to speed up the process is to set one of your complication spots as the person you most frequently contact. Then, you can just tap it to instantly call, text, or email that person. Don't Overcomplicate ItComplications on your Watch can certainly make your life much easier, but you also don't want to take it too far. While the moon phase complication looks cool, is that really something you need to be able to check at a glance? The more complications you have, the more cluttered, and less informative, your Watch face will be. Think carefully about which complications will really be useful to you. For example, having the weather, your to-do list, and habit-tracking visible whenever you check the time might be handy, but you probably don't need to see emails or journal entries. Try to avoid adding so many complications that your Watch face becomes too confusing to read. |
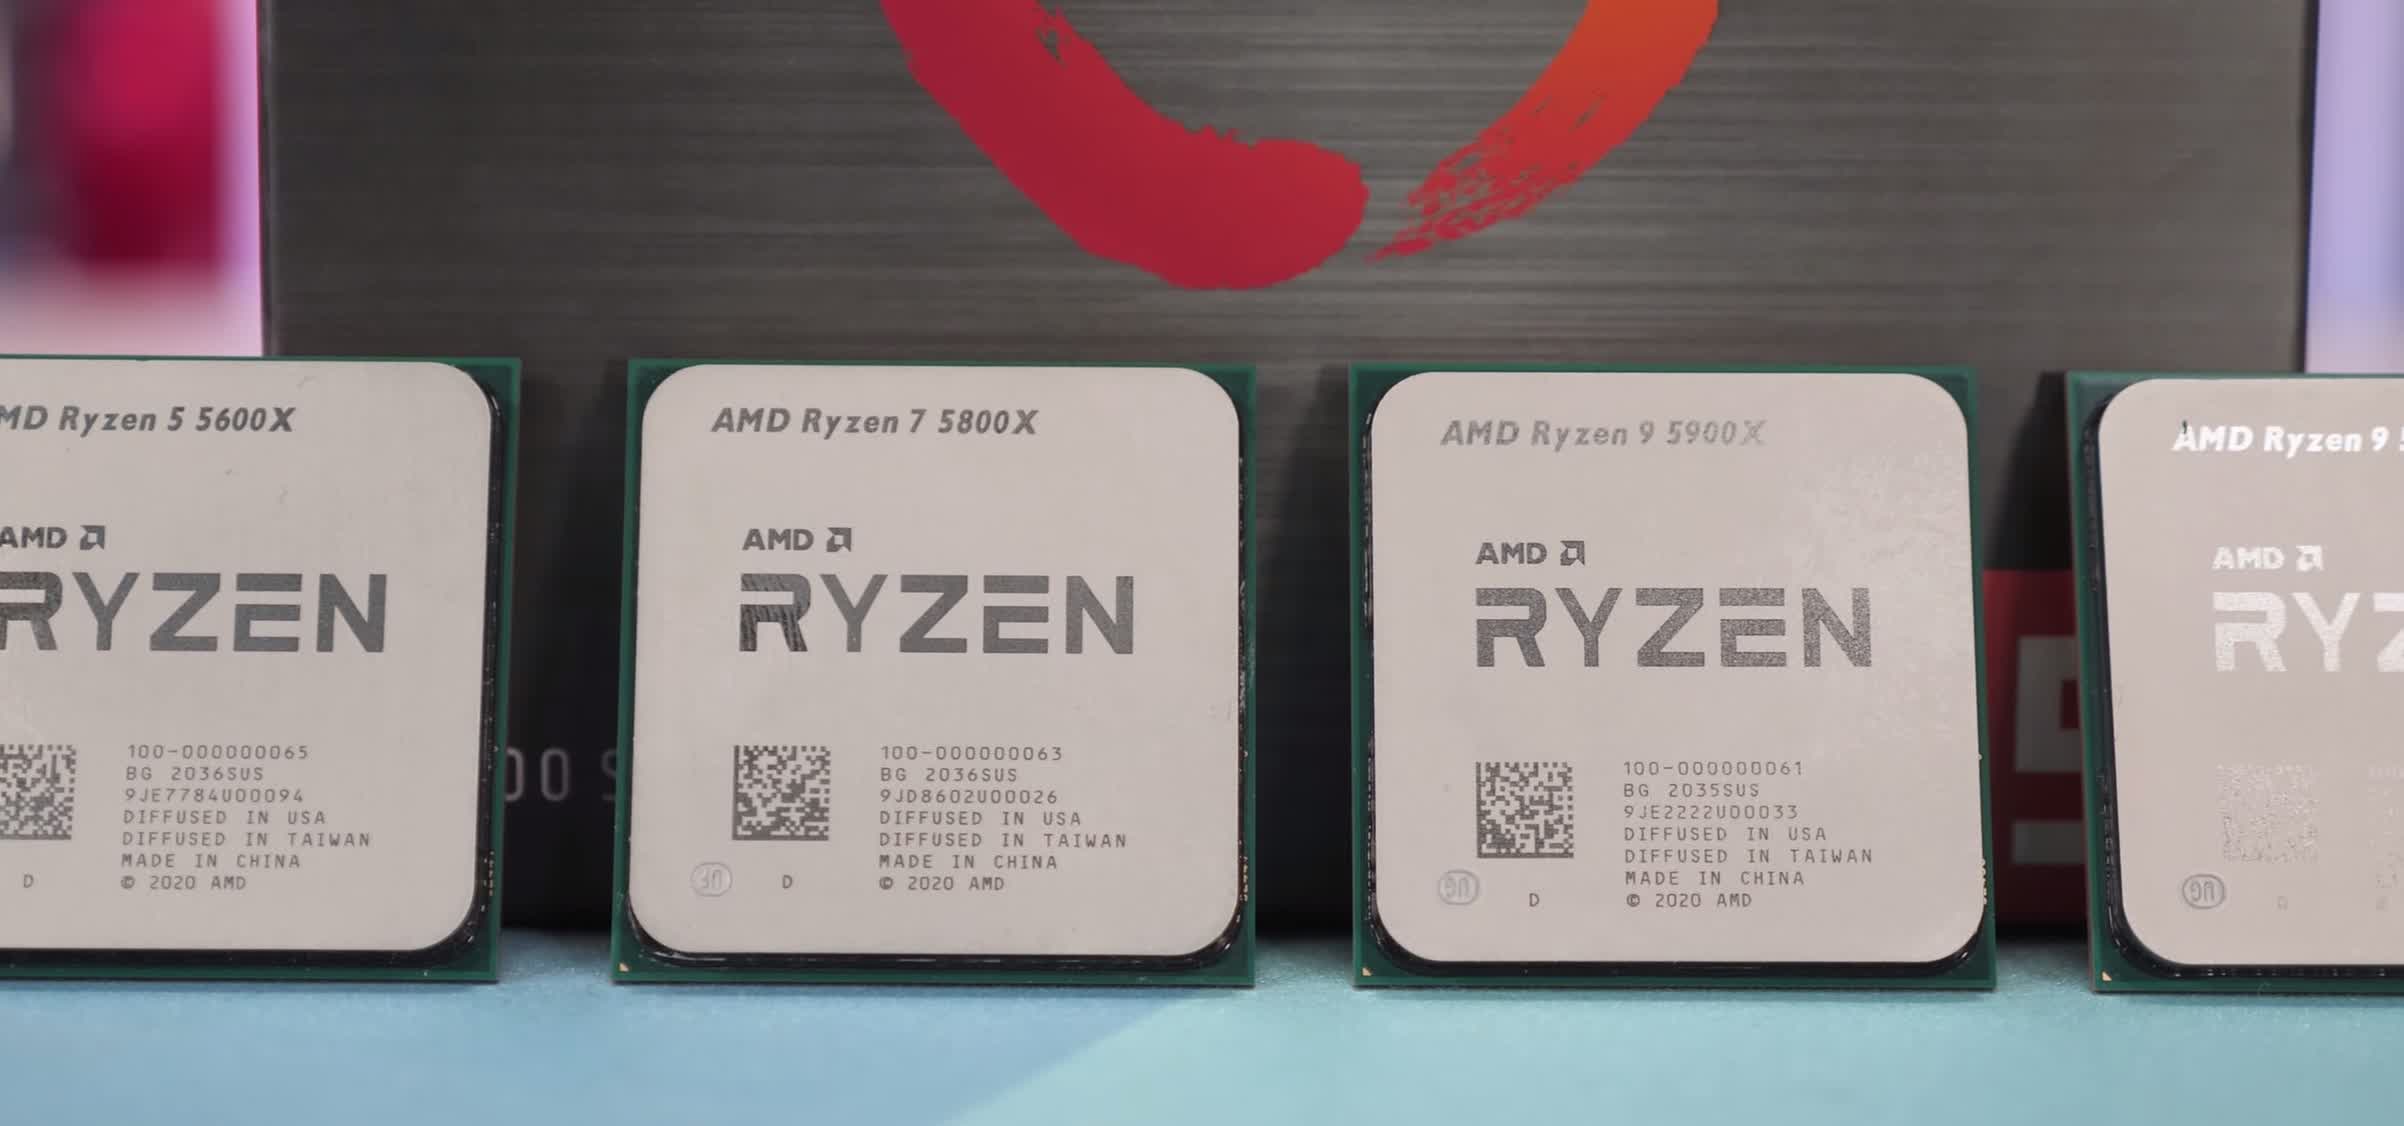
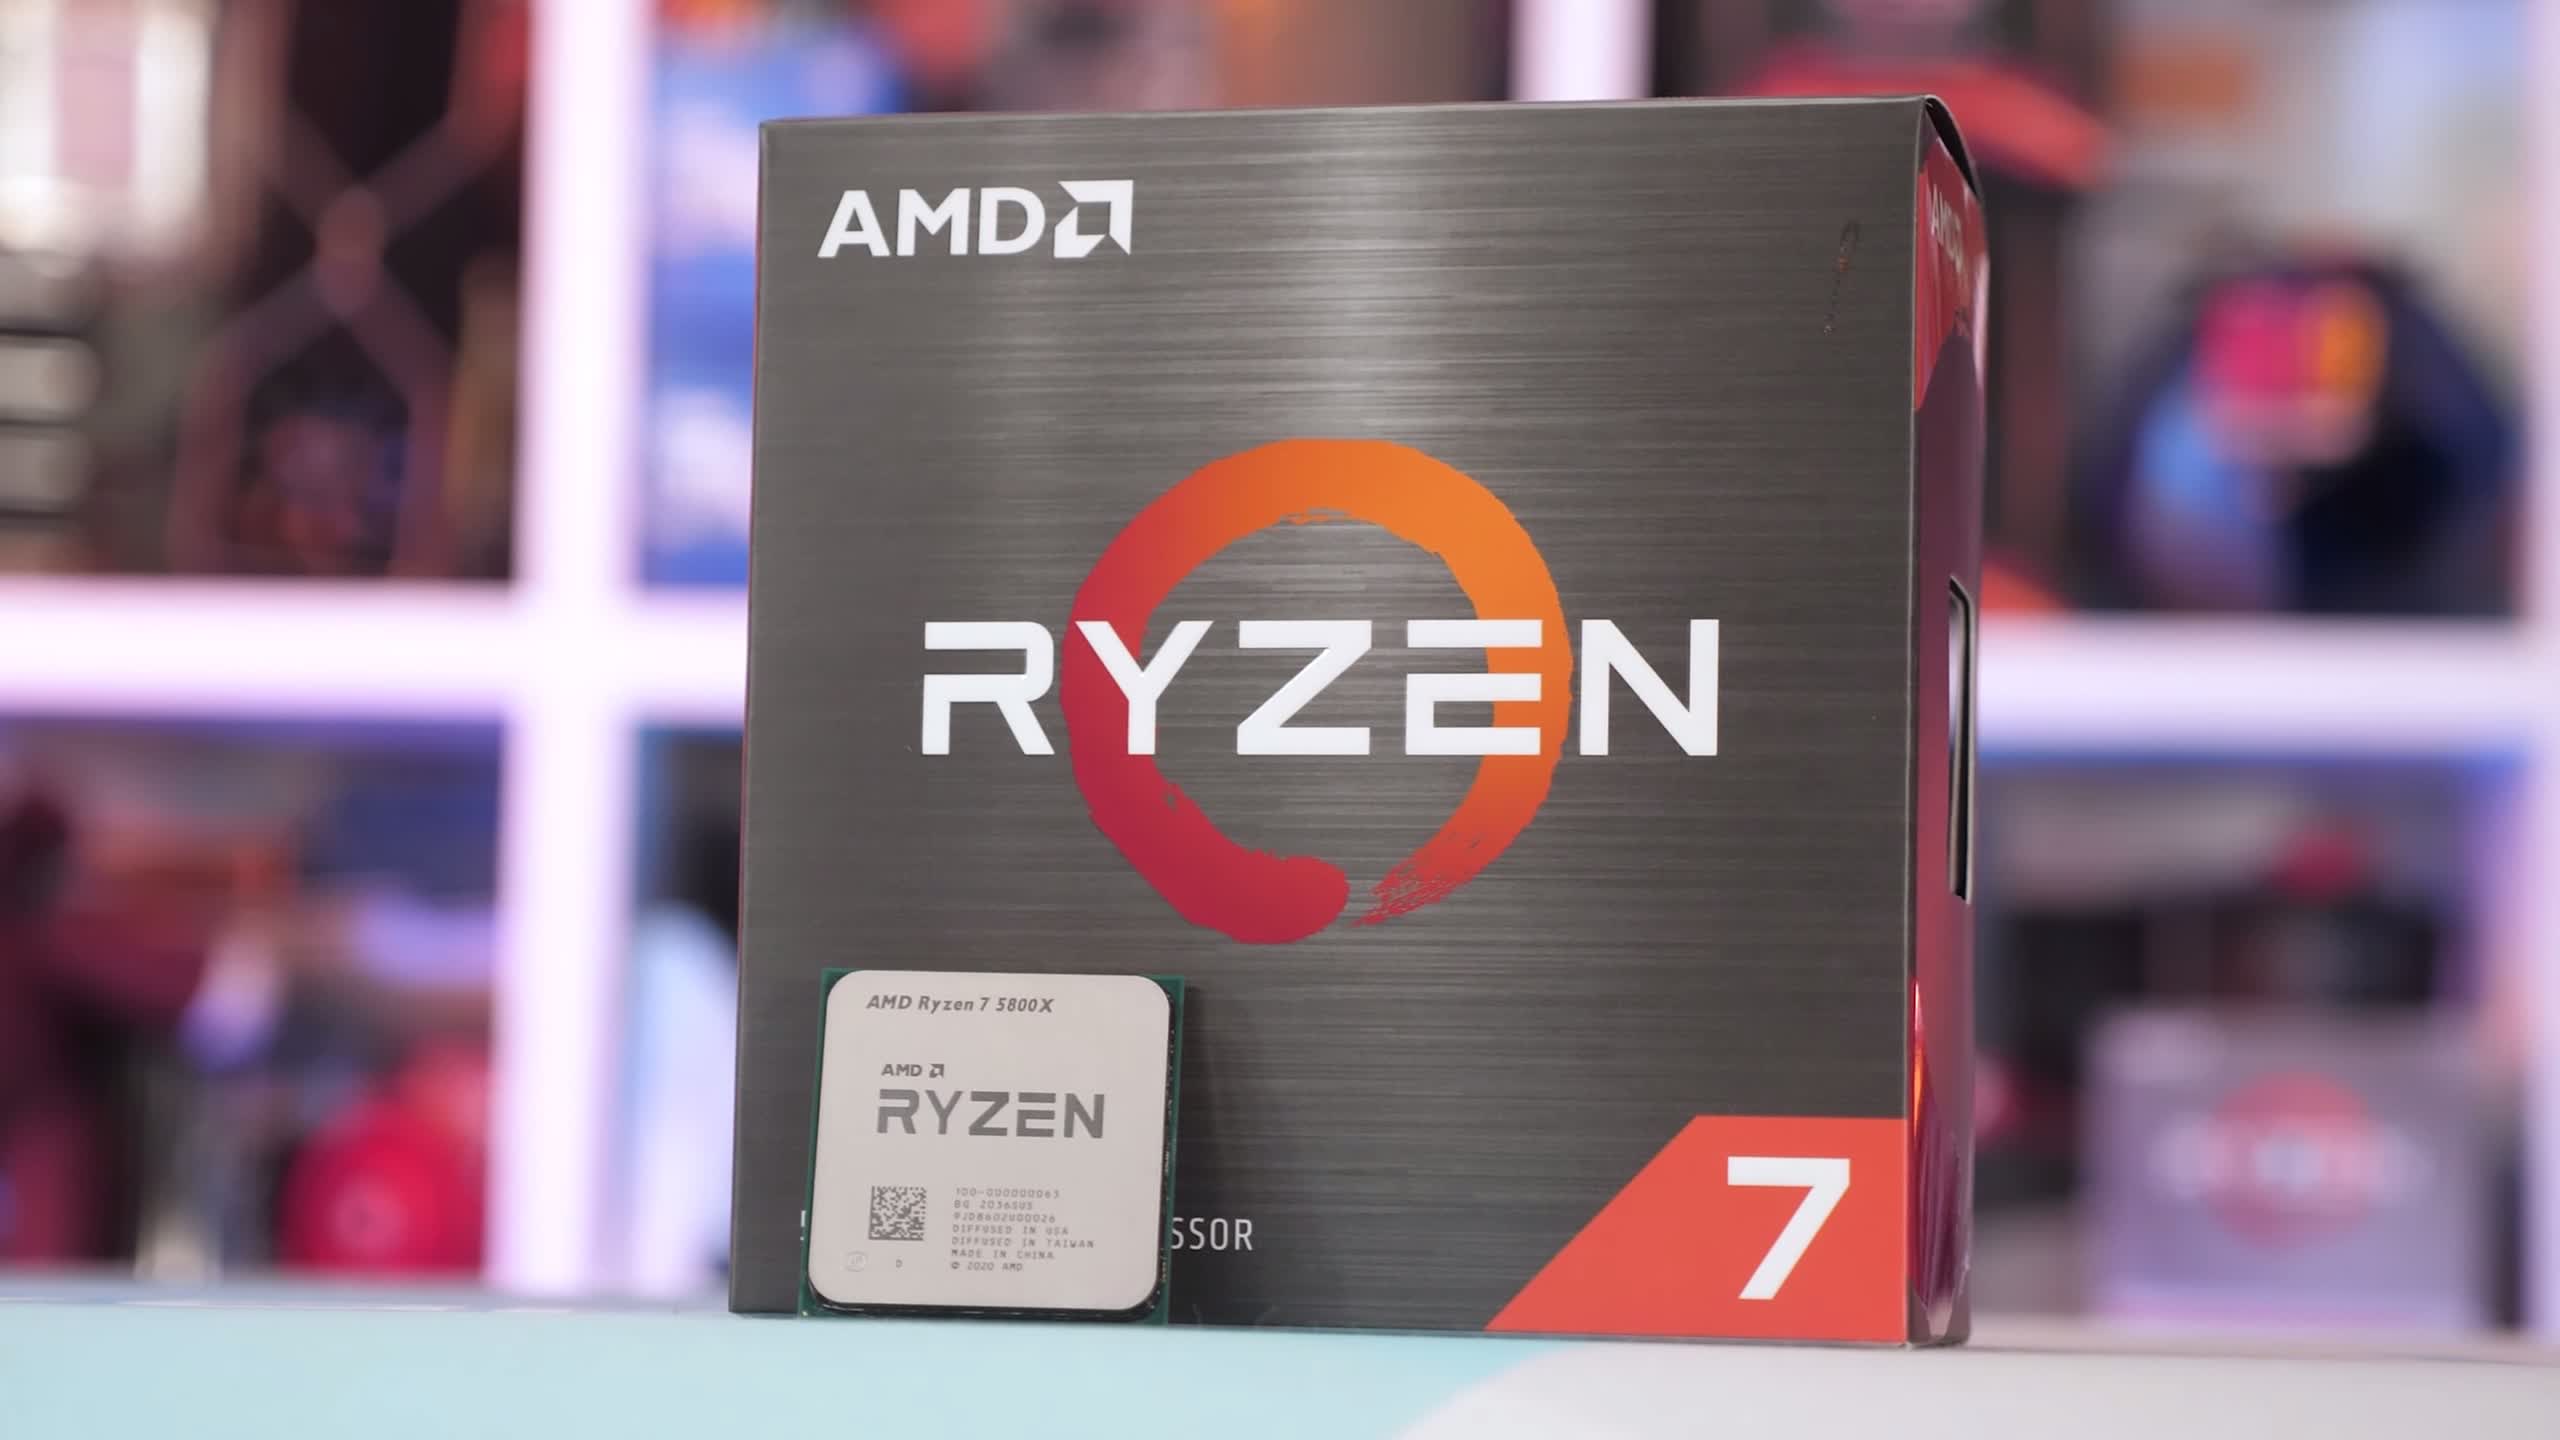
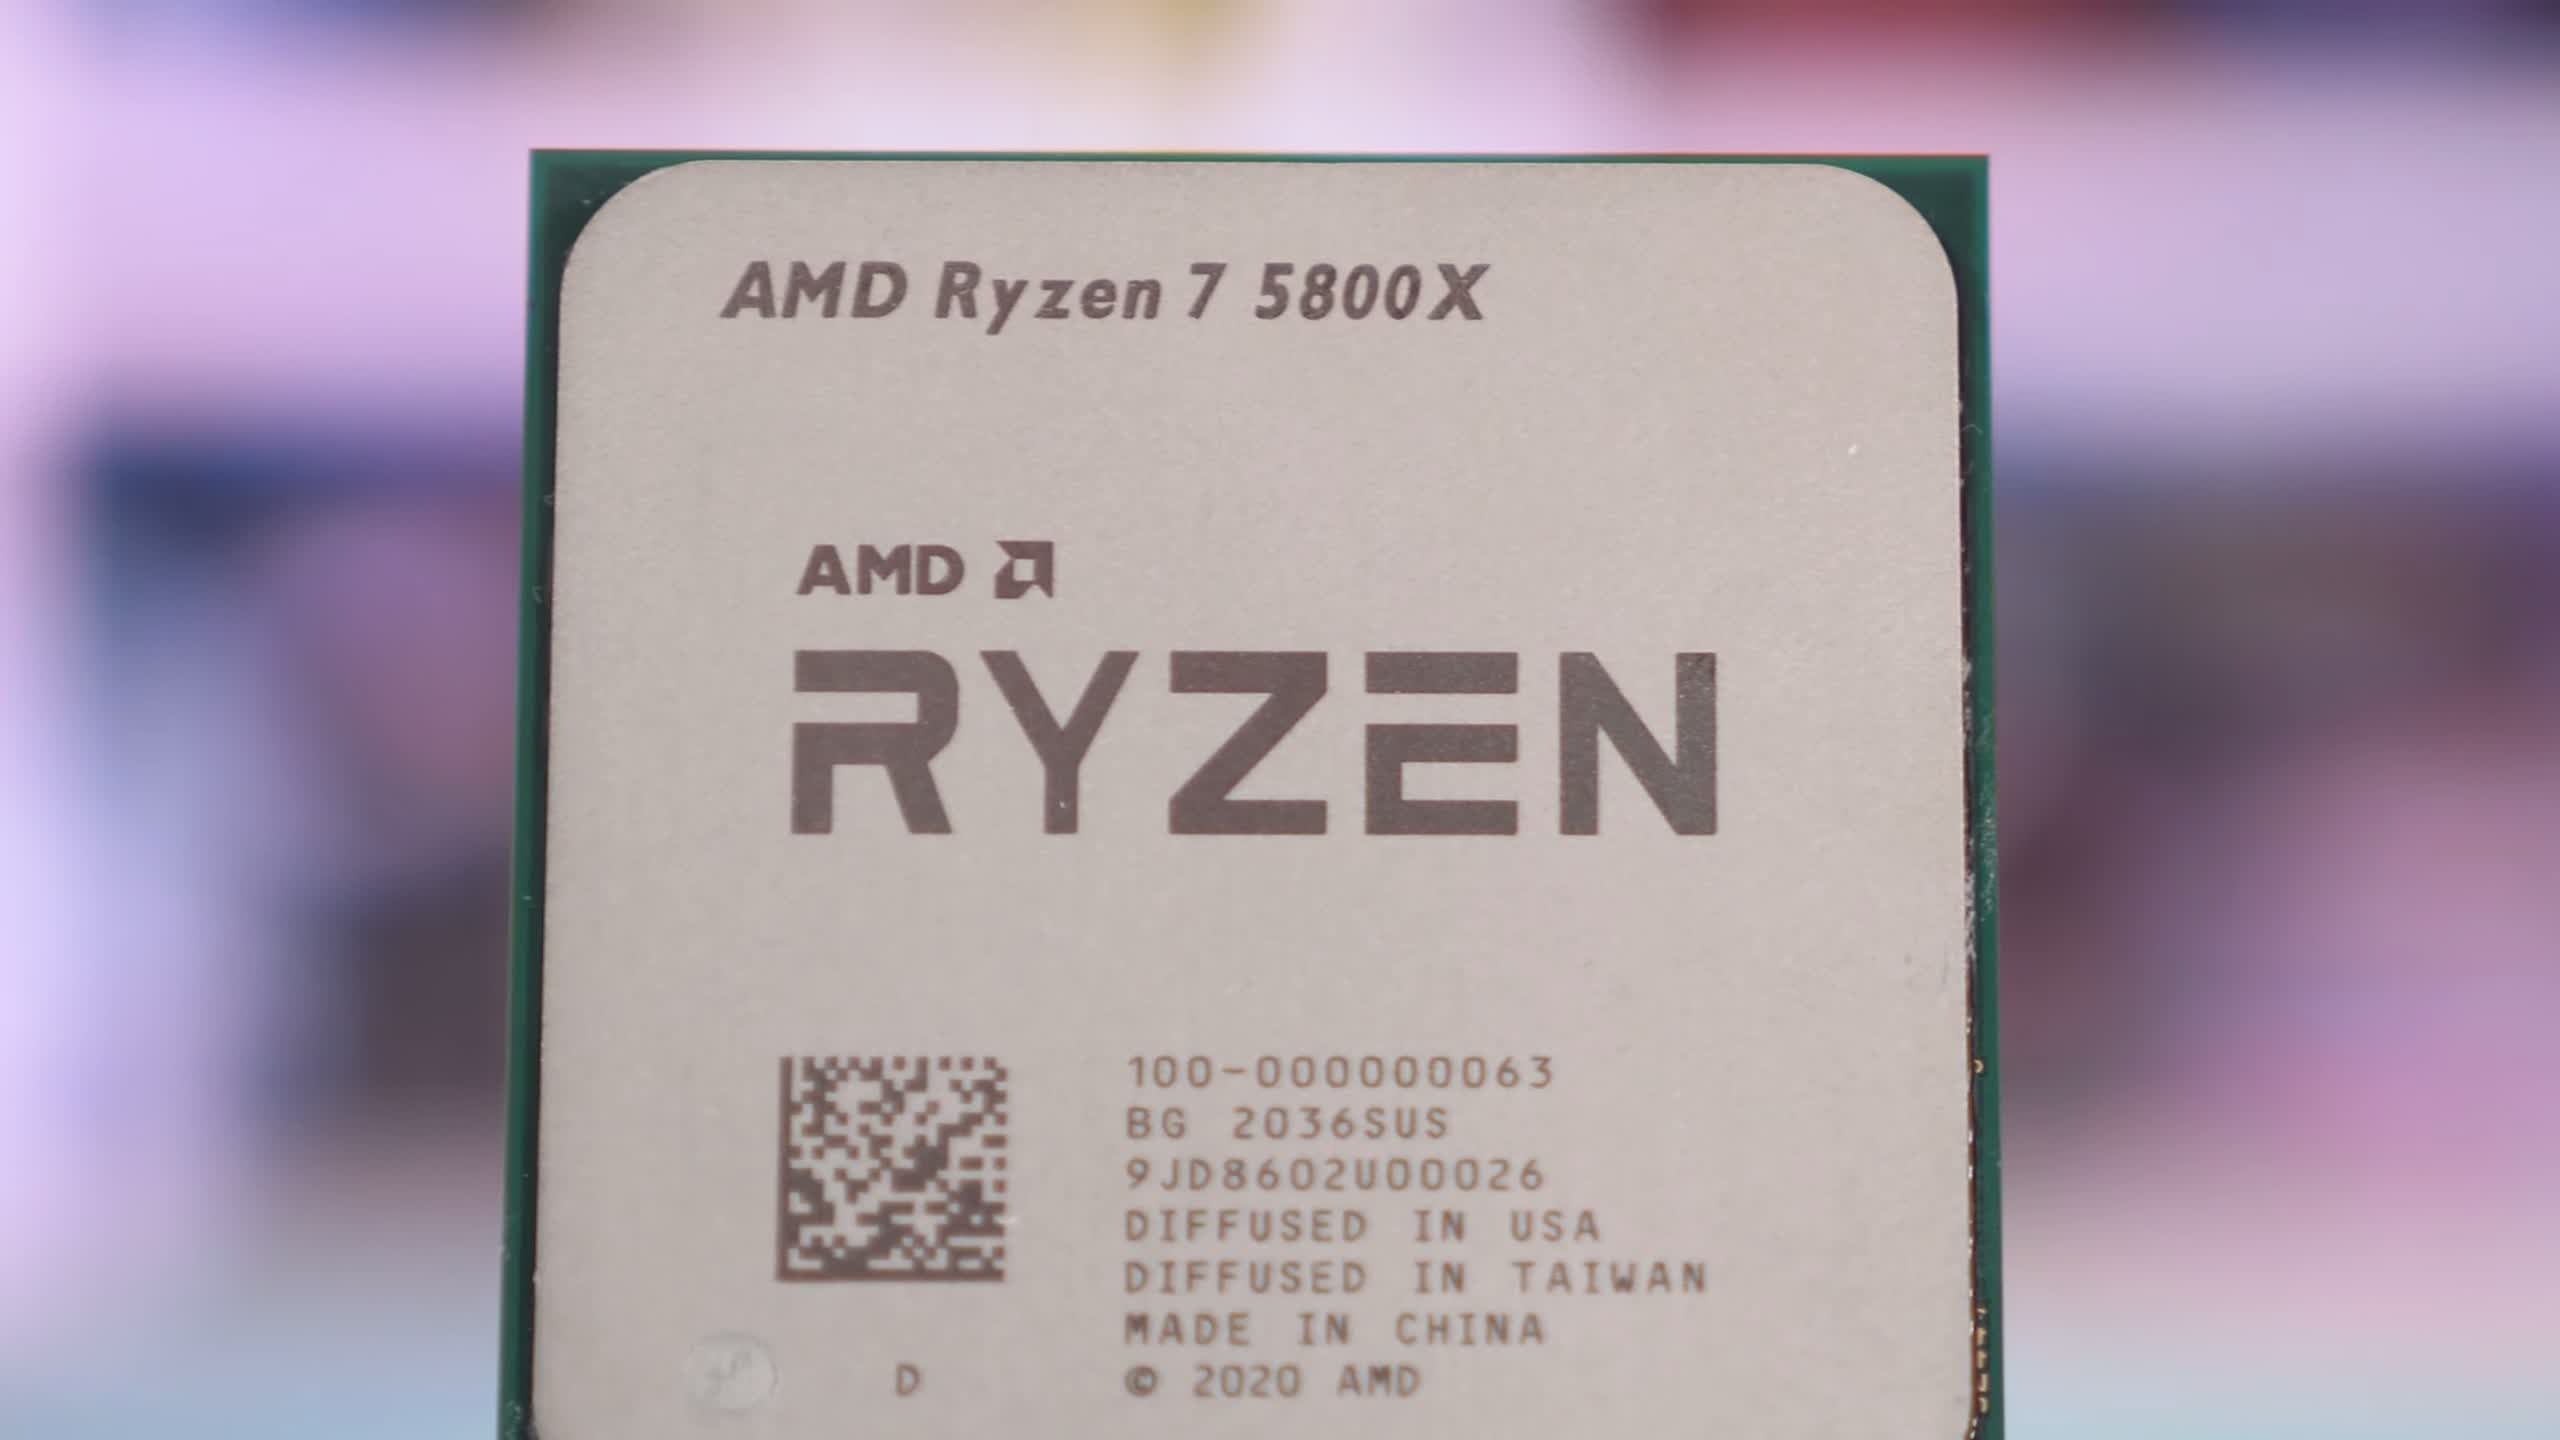
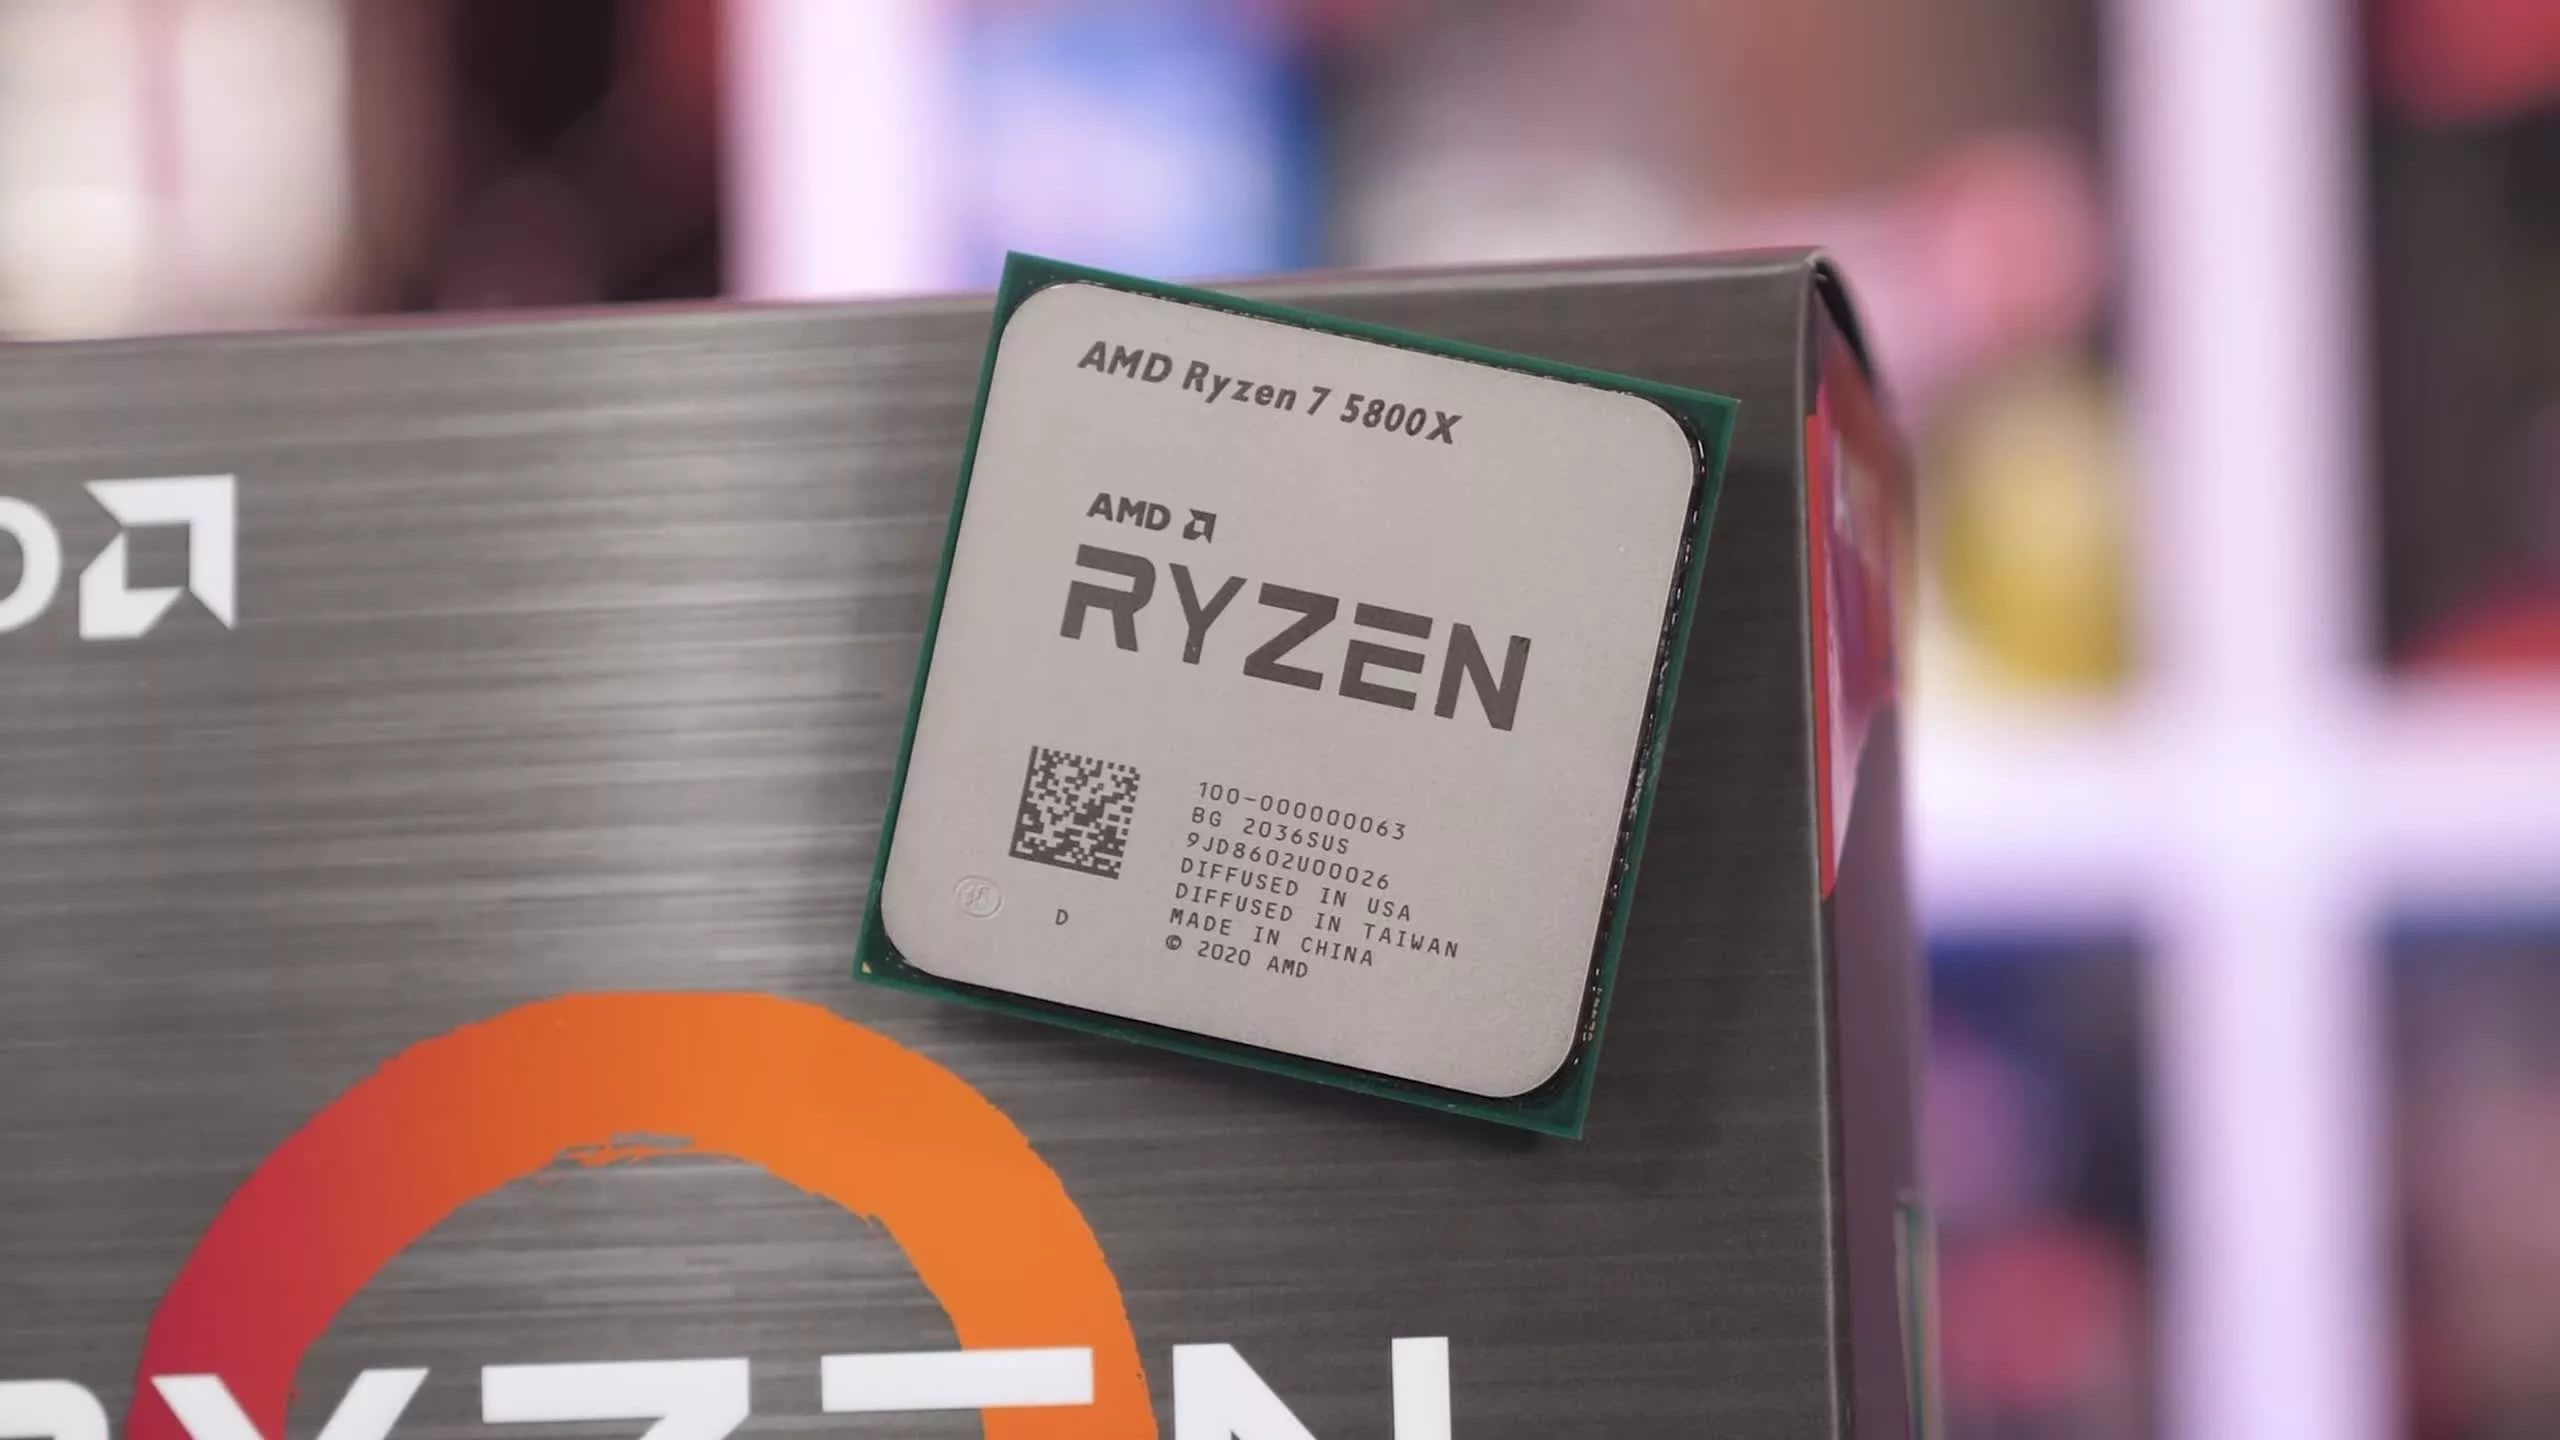
| Posted: 09 Nov 2020 04:36 AM PST Having reviewed Ryzen 5000 12-core and 16-core models, today we're testing the Ryzen 7 5800X, AMD’s latest 8-core CPU. So far we’ve been impressed by the Ryzen 9 5900X and 5950X, so let's continue to work our way down the product stack. Probably this won’t be the best way to start the review, but we've got to say the 5800X looks like the least compelling processor in the new series. There's certainly nothing wrong with an 8-core, 16-thread processor clocked at up to 4.7 GHz with high IPC. In fact, you could argue that's the sweet spot for gamers. The problem is price. At $450, it's just $100 cheaper than the 5900X, and while that nets you almost 20% in savings, you're also getting 33% fewer cores.
Whereas the 5900X costs $46 per core, the 5800X costs 22% more at $56 per core — and even 12% more than the 5950X flagship. If you’re wondering why AMD has positioned the 5800X so poorly, the answer is simple: it doesn't make sense for them to sell it any cheaper. As you’re likely aware, Ryzen processors consist of multiple chiplets or smaller dies, rather than a single monolithic die like what we see with Intel processors. In the case of Zen 3, a CCD or ‘Core Complex Die’ packs 8 cores, so a CPU like the 5950X features two CCDs with all cores enabled for an 8+8 core configuration. Then there's a third die, called the I/O die which houses the dual-channel DDR4 memory controller, PCIe 4.0 root-complex, and a number of SoC features such as SATA and USB ports.
Making up a CPU like the 5950X are two CCDs and a single I/O die, and the same configuration is used by the 5900X, but the 12-core version doesn't require fully working CCDs, rather detective silicon with one or two failed cores can be used. Each CCD only has 6 of the possible 8 cores enabled, resulting in a 6+6 core configuration. That makes these 6-core CCDs less valuable as they can't be used in the more expensive 5950X. So you see where this is going… The Ryzen 7 5800X and R5 5600X only use a single CCD, but the 5800X requires top shelf silicon with all cores enabled whereas the 6-core 5600X receives the same lower binned silicon used by the 5900X.
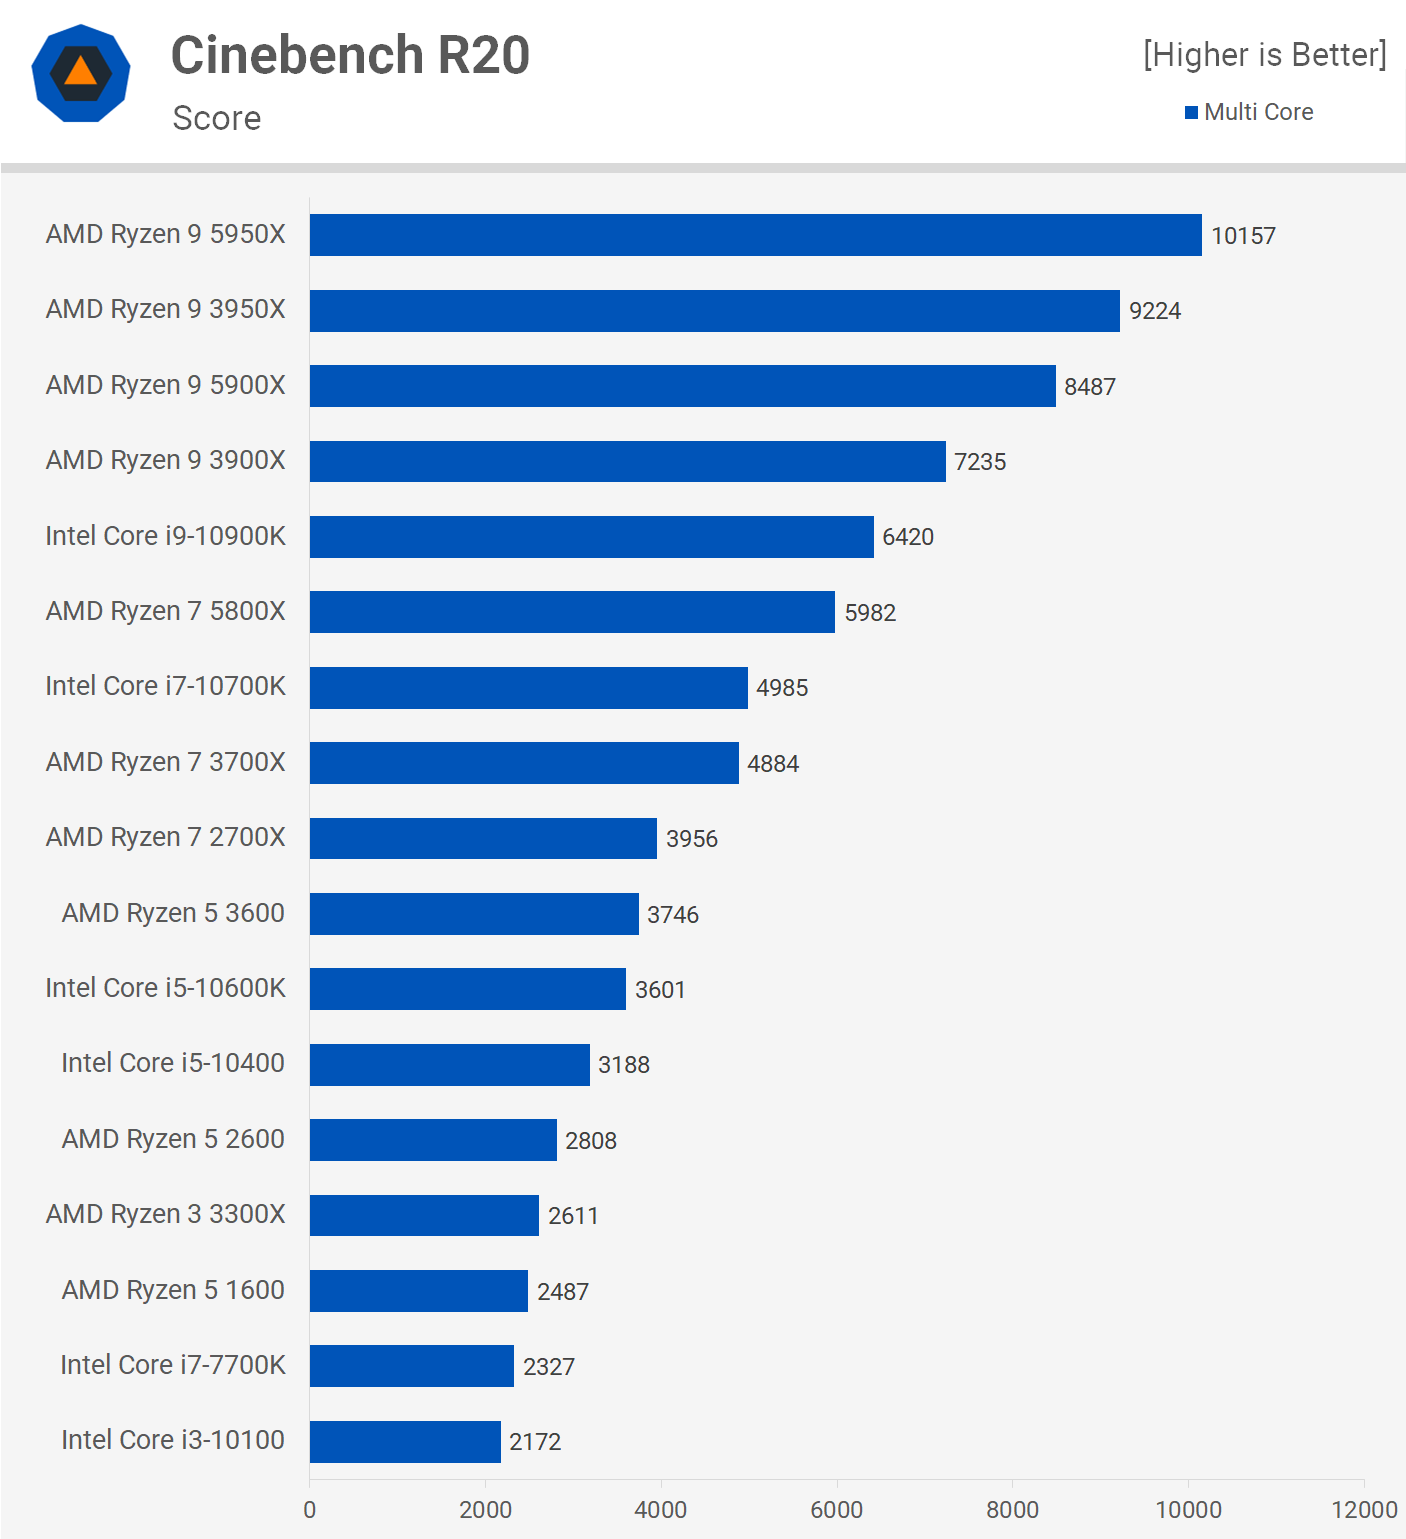
If the 5800X was to come in at roughly the same cost per core as the 5900X, it would cost just $370. But for the sake of this comparison, let's bump it up to $400 to price match the 3800X, which is also half the price of the 5950X. At that price, AMD is making less profit on the highest quality silicon, so rather than sell it at a lower margin in a $400 5800X, they're better off saving it for the $800 5950X, or alternatively selling the 5800X at an increased price, which is what they've been forced to do. It appears as though these 8-core chiplets are very valuable to AMD and we suspect they're also wanting to save as many as possible for Epyc 3 server processors, where the margins are even greater. All of this leaves the 5800X in an unfortunate position where it ends up costing more per core than any other Ryzen 5000 series processor. For that reason we feel most will either end up being upsold to the 5900X, or opt to save some money and go for the cheaper 6-core 5600X. Either way, it's time to test and then we'll re-evaluate the value of the 5800X towards the end of the review. For testing the AMD CPUs we’re using the MSI X570 Godlike with four 8GB G.Skill TridentZ DDR4-3200 CL14 memory modules for a 32GB capacity and then cooling all test systems is the Corsair iCUE H150i Elite Capellix AIO. All productivity testing was performed using a GeForce RTX 2080 Ti, but for the gaming benchmarks we used the top-of-the-line RTX 3090 GPU. BenchmarksAs usual we'll start with Cinebench R20. The 5800X scored 5982 pts in the multi-core test and that meant it was 22% faster than the 3700X, a serious performance uplift and it's what we've come to expect from Zen 3. We didn't bother retesting the 3800X as it's really no faster than the 3700X. In this test we're talking about a 3% performance boost.
When compared to the 10700K, the new AMD CPU is 20% faster even though both chips pack 8 cores with 16 threads. In fact, the 5800X is just 7% slower than the 10900K which features 25% more cores.
When testing with Cinebench we measured the 5800X’s clocks. For the multi-core test where all cores are heavily loaded, the 5800X clocks at around 4.55 GHz which is well above the advertised 3.8 GHz base clock frequency. AMD also advertises a max boost clock frequency of 4.7 GHz and this should be achieved in single core or lightly threaded workloads. In the Cinebench single core test the 5800X typically operated at 4.85 GHz, so that's 150 MHz over the advertised spec.
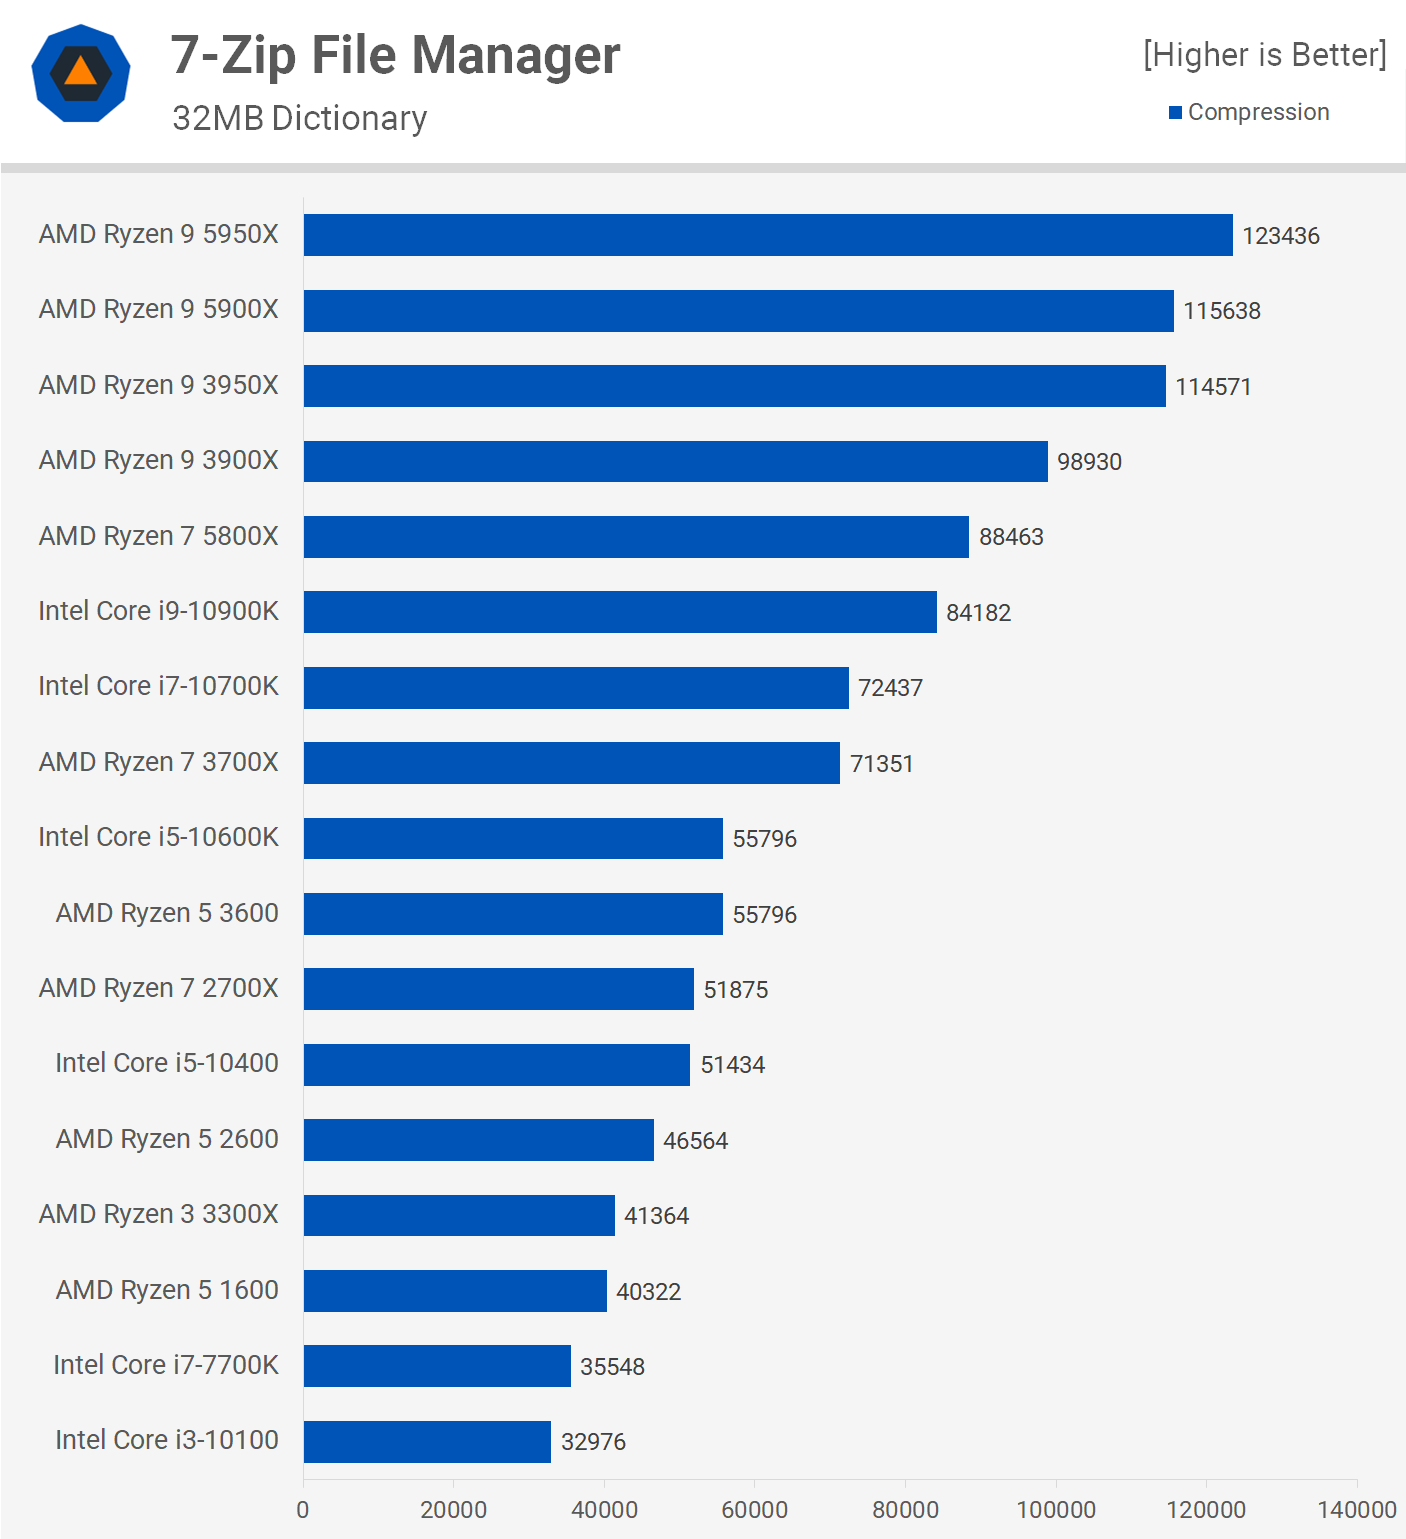
The 7-zip compression performance is excellent. The 5800X even managed to edge out the 10900K as it was 24% faster than the 3700X and 22% faster than the 10700K. In other words, the 5800X is now the fastest 8-core desktop CPU by a country mile.
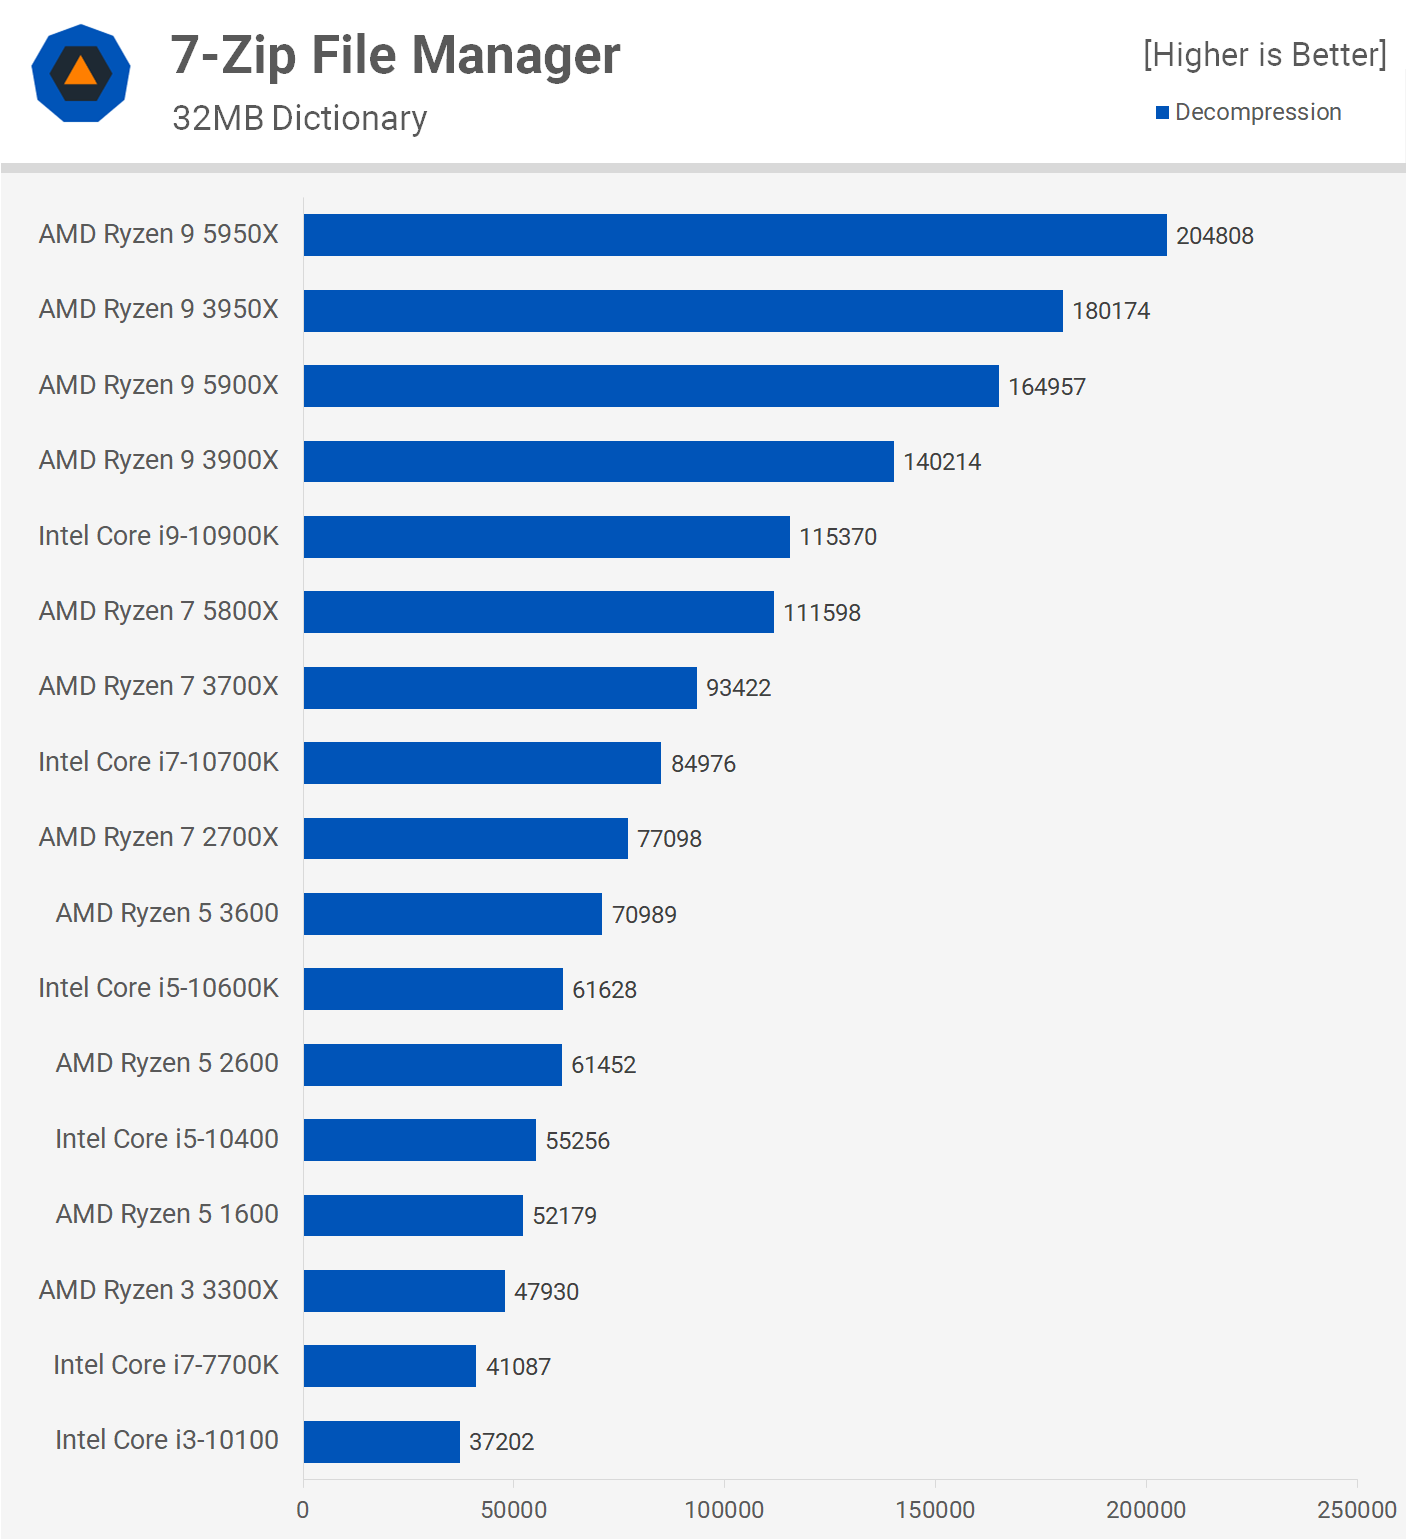
Decompression performance is also good, though the margins do shrink a little. Compared to the 3700X, the 5800X is 19% faster and it's also 31% faster than the 10700K, so a brutal 8-core smackdown there.
AES performance has improved by 12% over the 3700X and that made the 5800X a whopping 54% faster than the 10700K.
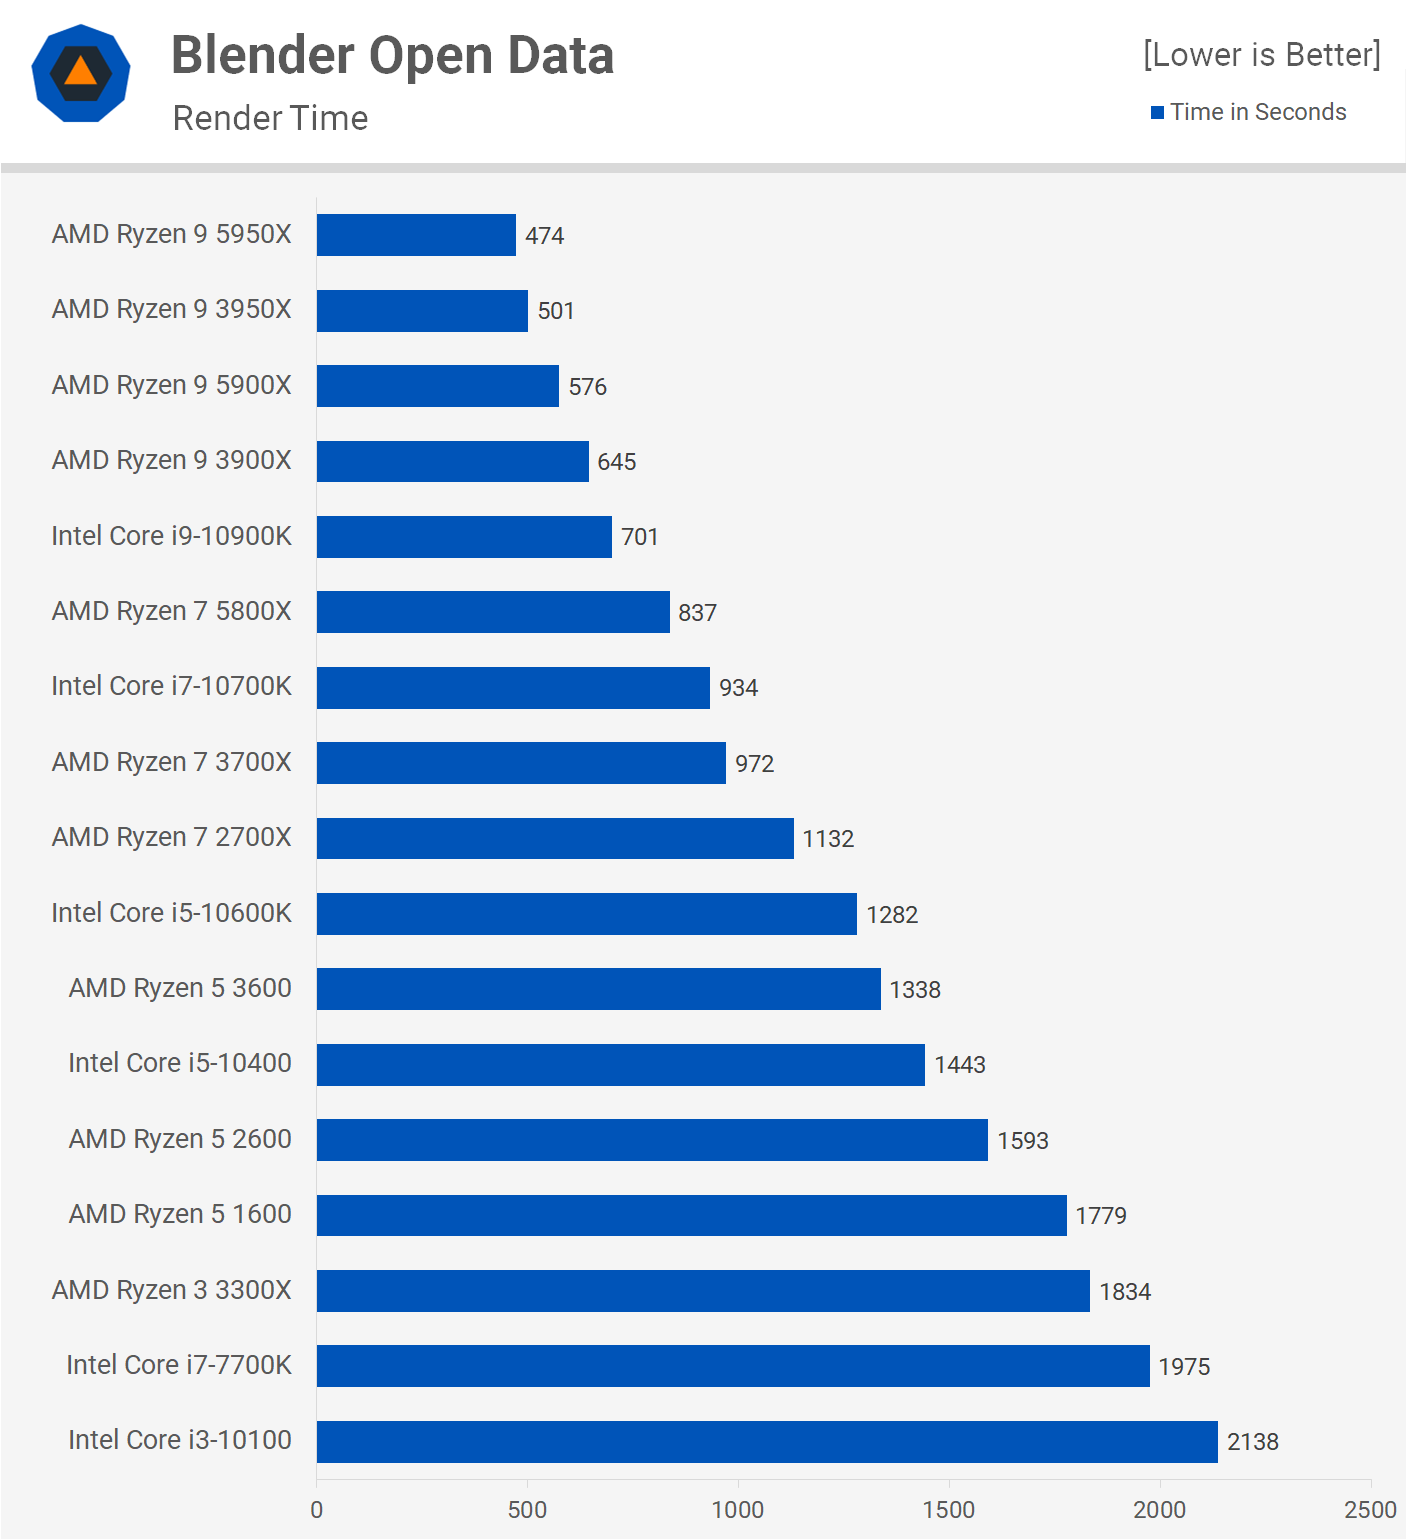
We’re looking at a 16% performance uplift over the 3700X in Blender making the 5800X 12% faster than the Core i7-10700K. It was also 16% slower than the 10900K and 31% slower than the 5900X, which makes sense given it packs 33% fewer cores.
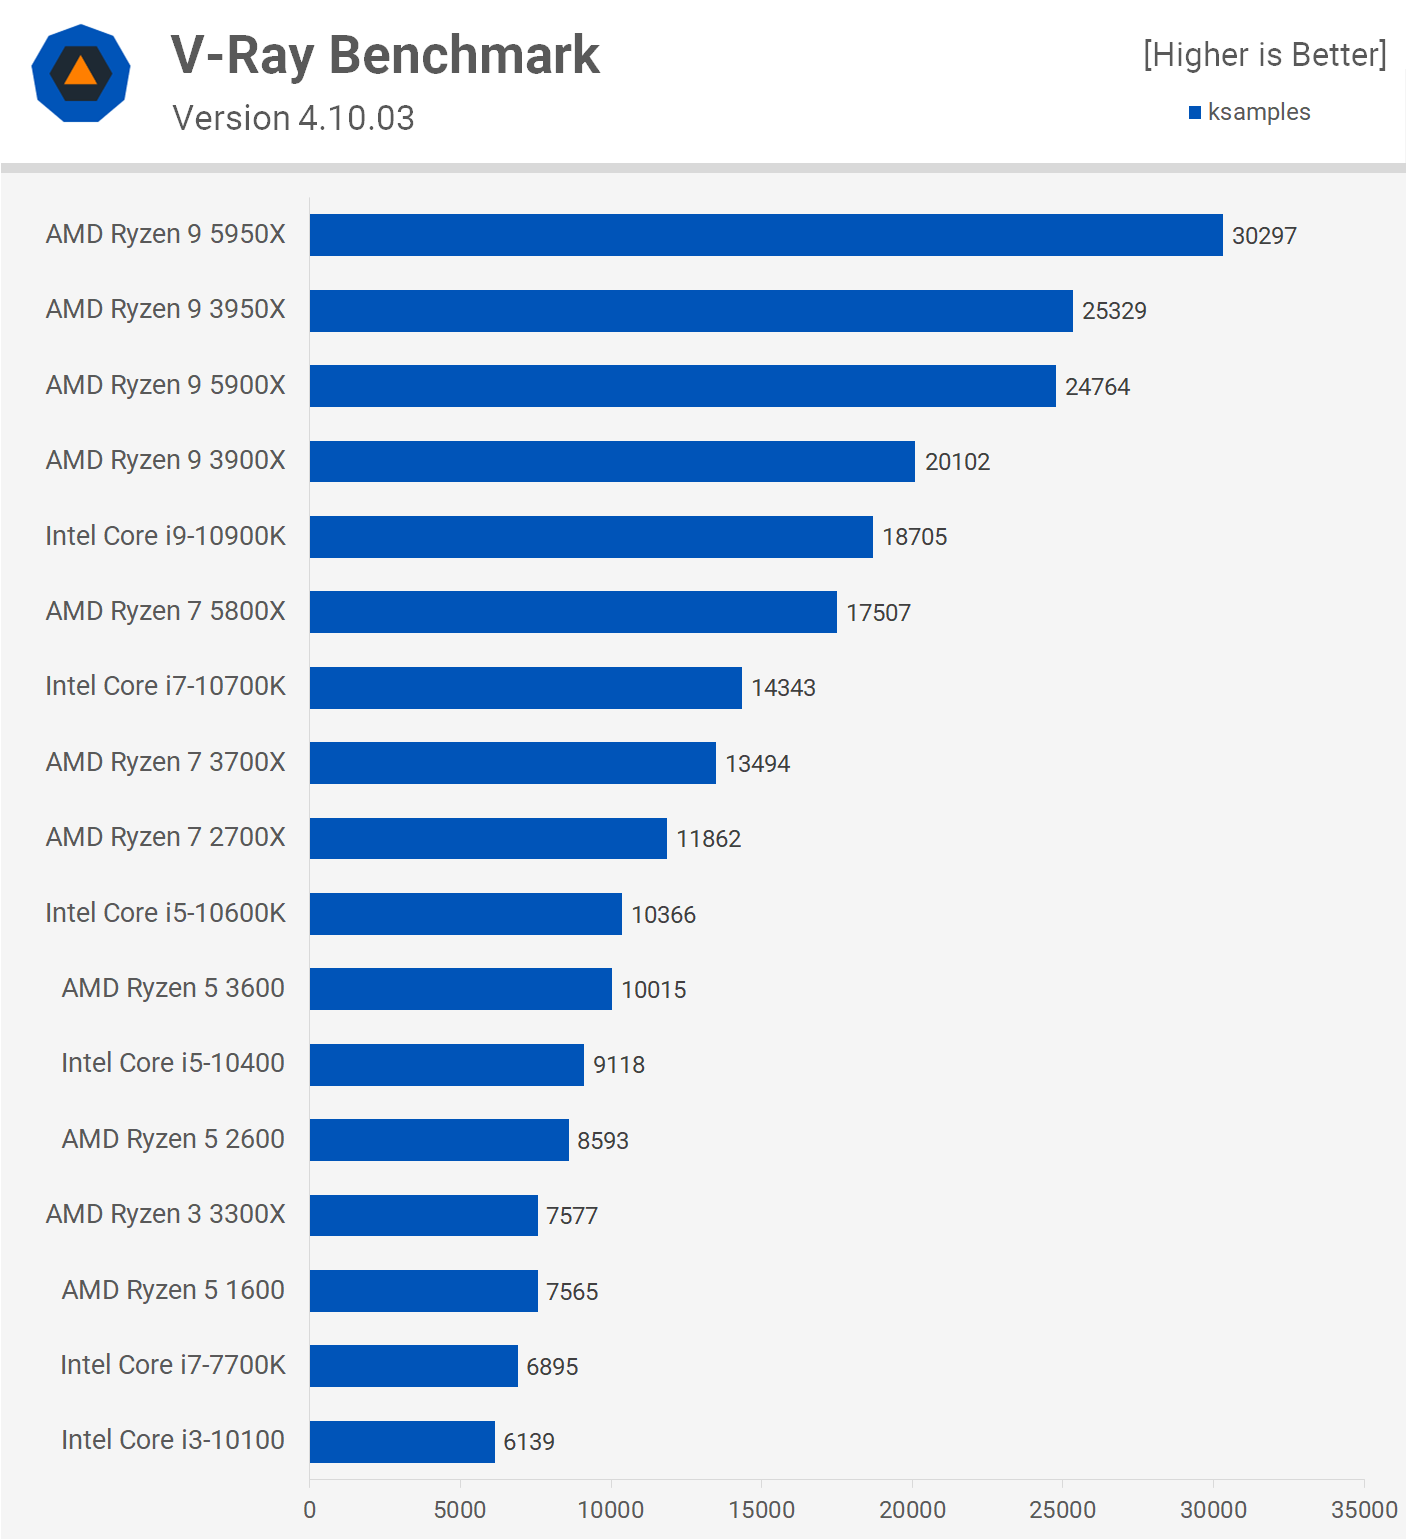
As we saw with the 5950X and 5900X, the gains for Zen 3 in V-Ray are extreme. The 5800X was 30% faster than the 3700X and not a great deal slower than the 10900K.
Performance gains in the Corona benchmark have also been strong and we're seeing a 26% performance uplift for the 5800X over the 3700X. Compared to the Intel competition we're talking about an 11% boost over the 10700K.
Code compilation performance gains are smaller, though a 12% performance uplift is nothing to sneeze at. It means AMD is 15% ahead when comparing the 5800X and 10700K, too.
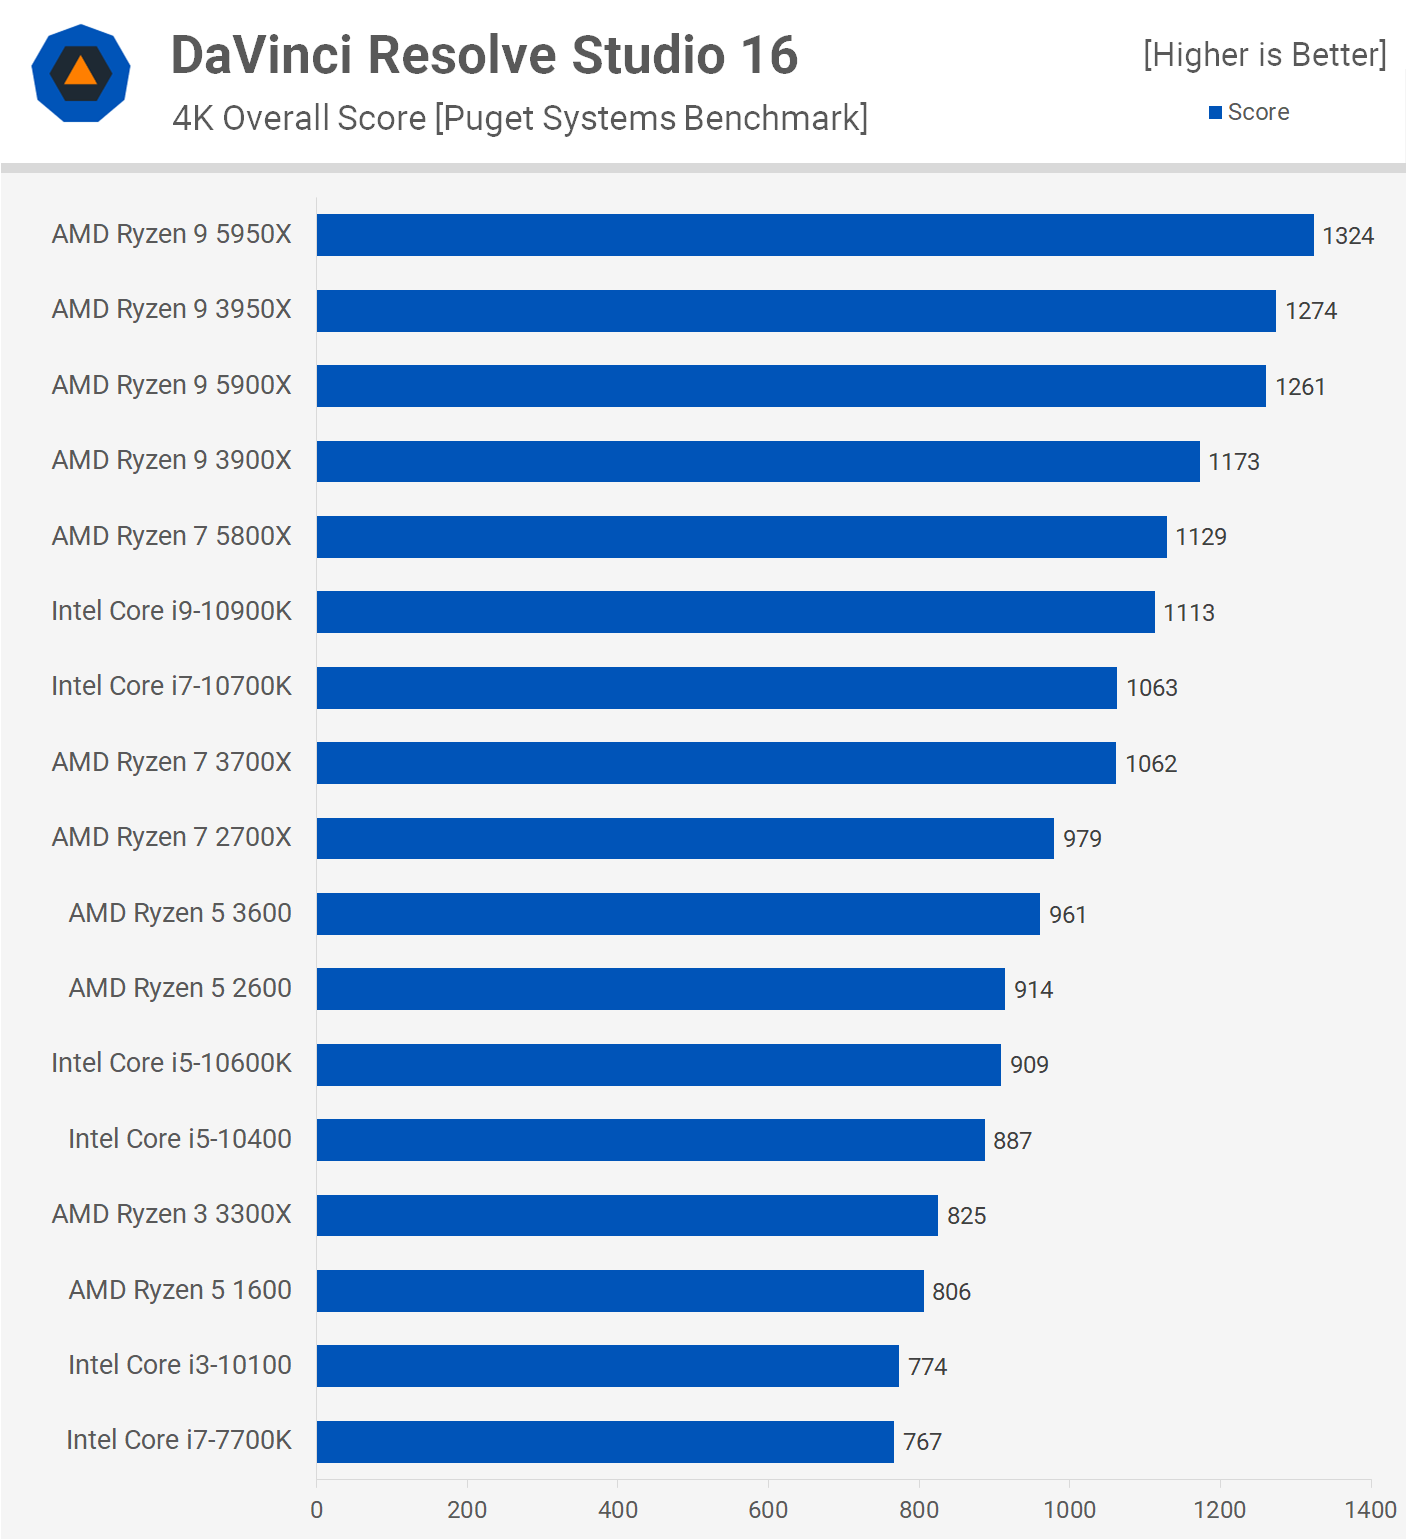
In DaVinci Resolve Studio 16 the CPU doesn't have a huge impact on performance, but we're still looking at a 6% increase for the 5800X over the 3700X.
It's a similar story in Premiere Pro. The 5800X is beating the 3700X and 10700K by a 14% margin, while it was just 2% slower than the 10900K.
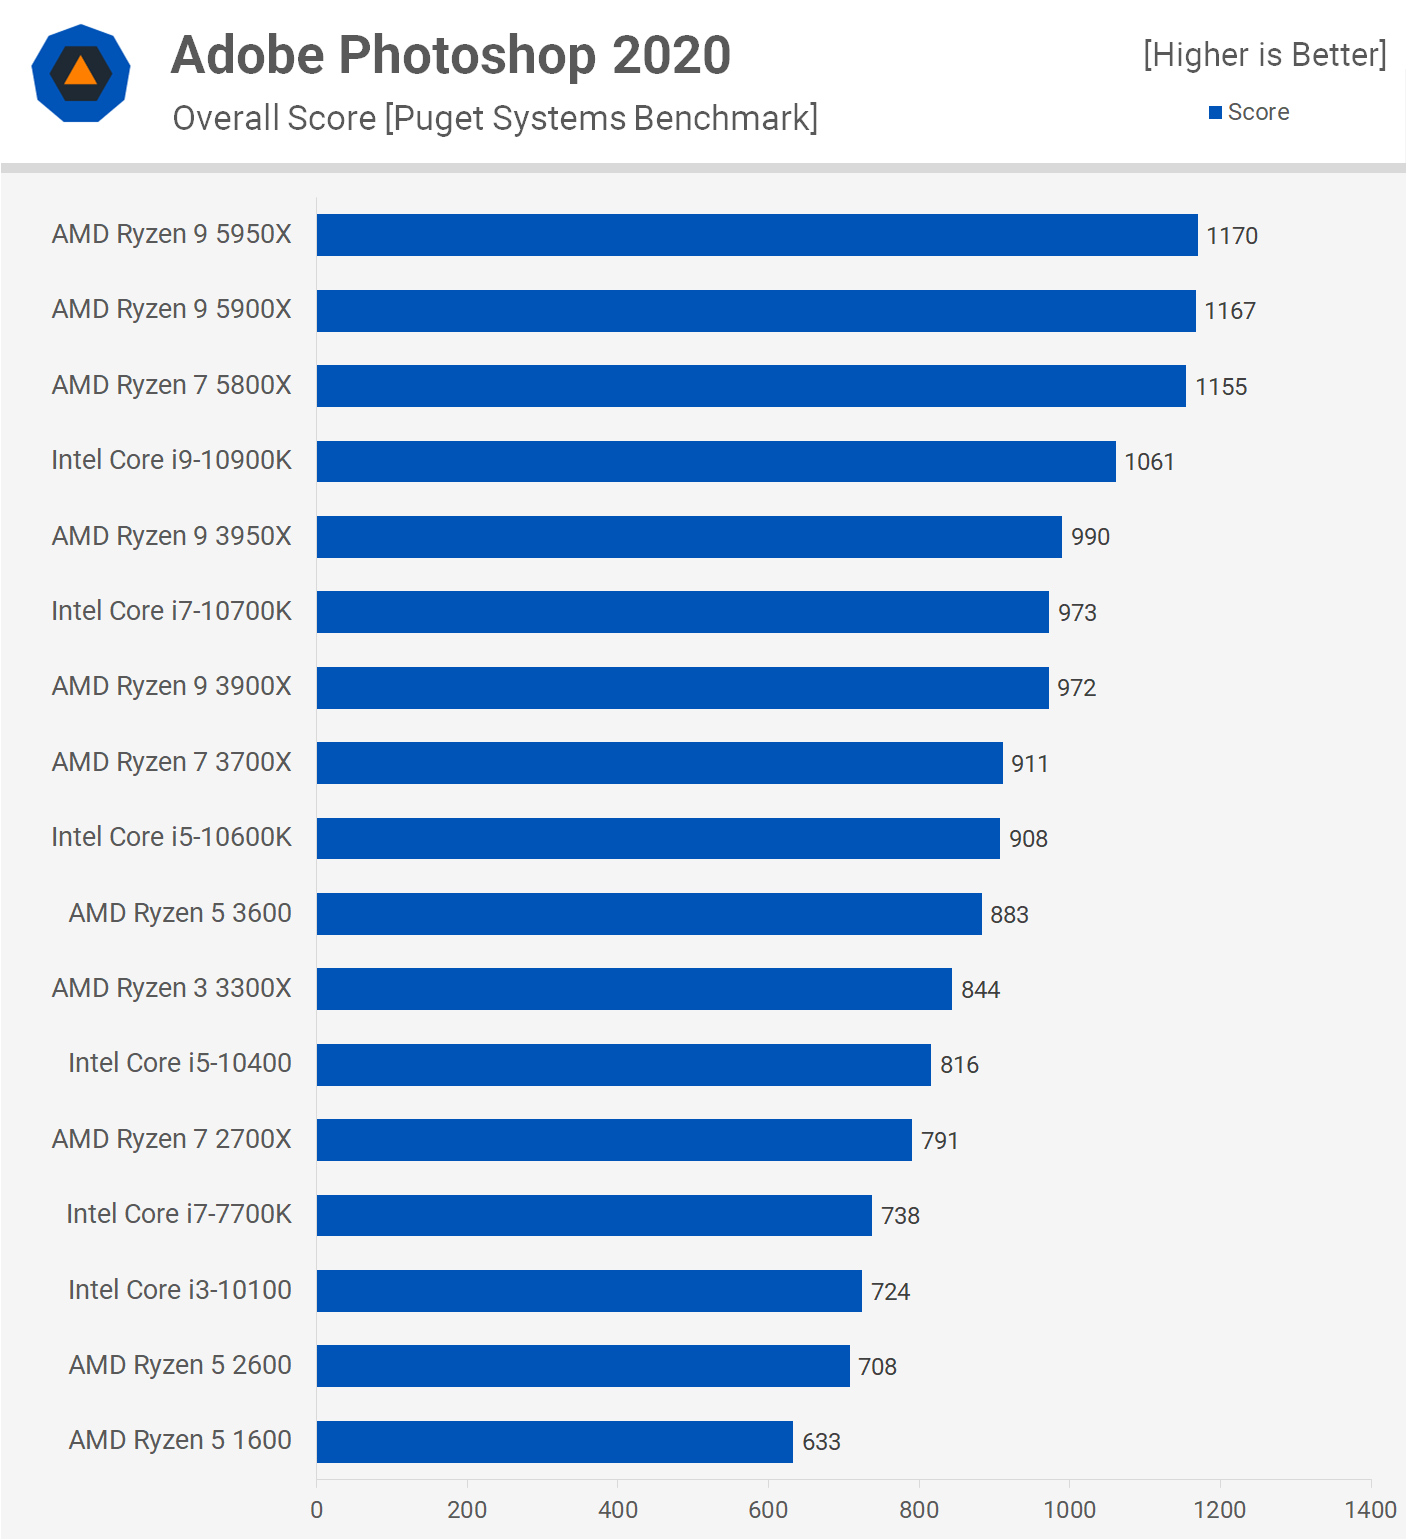
Photoshop relies heavily on single core performance and with Zen 3's massive improvement on this aspect, the 5800X is 27% faster than the 3700X. Moreover, because the 5800X, 5900X and 5950X all feature similar single core performance, they deliver comparable results in this benchmark.
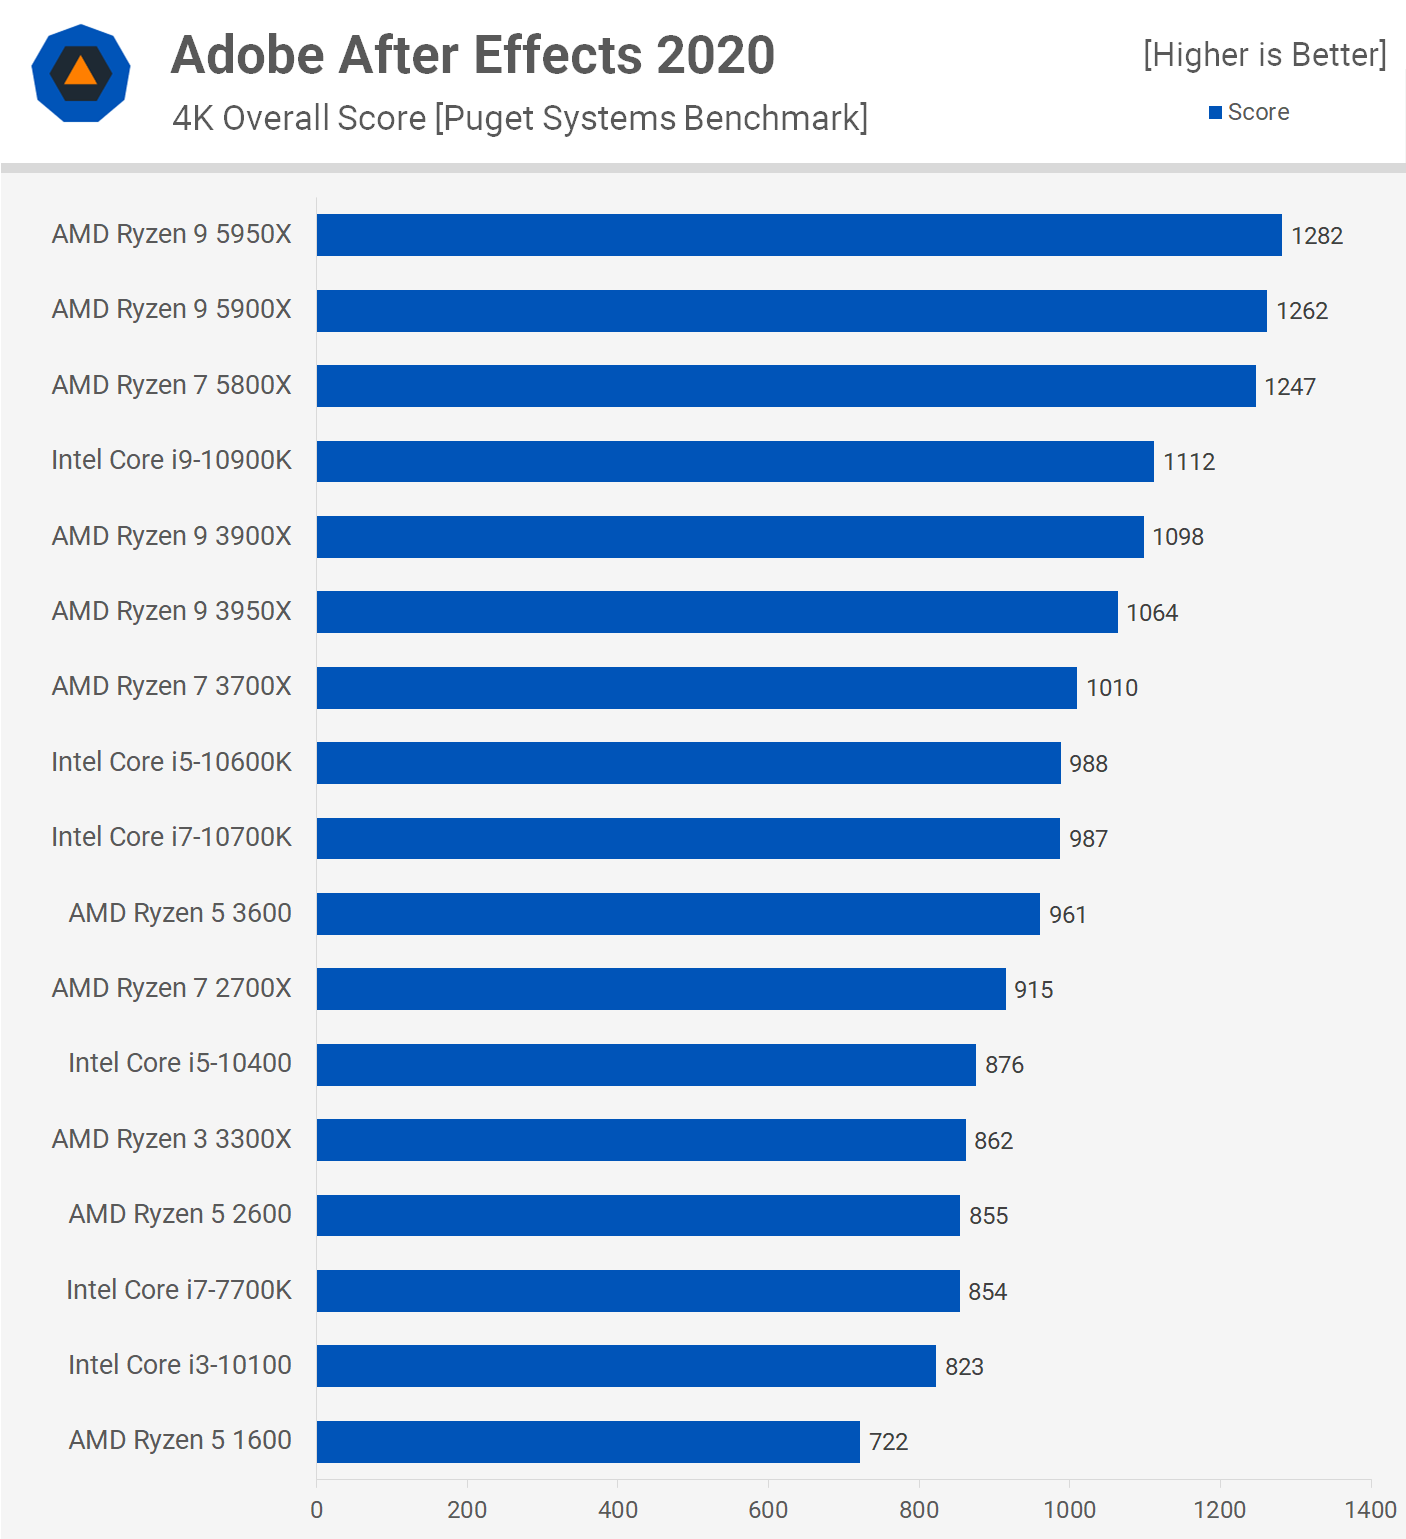
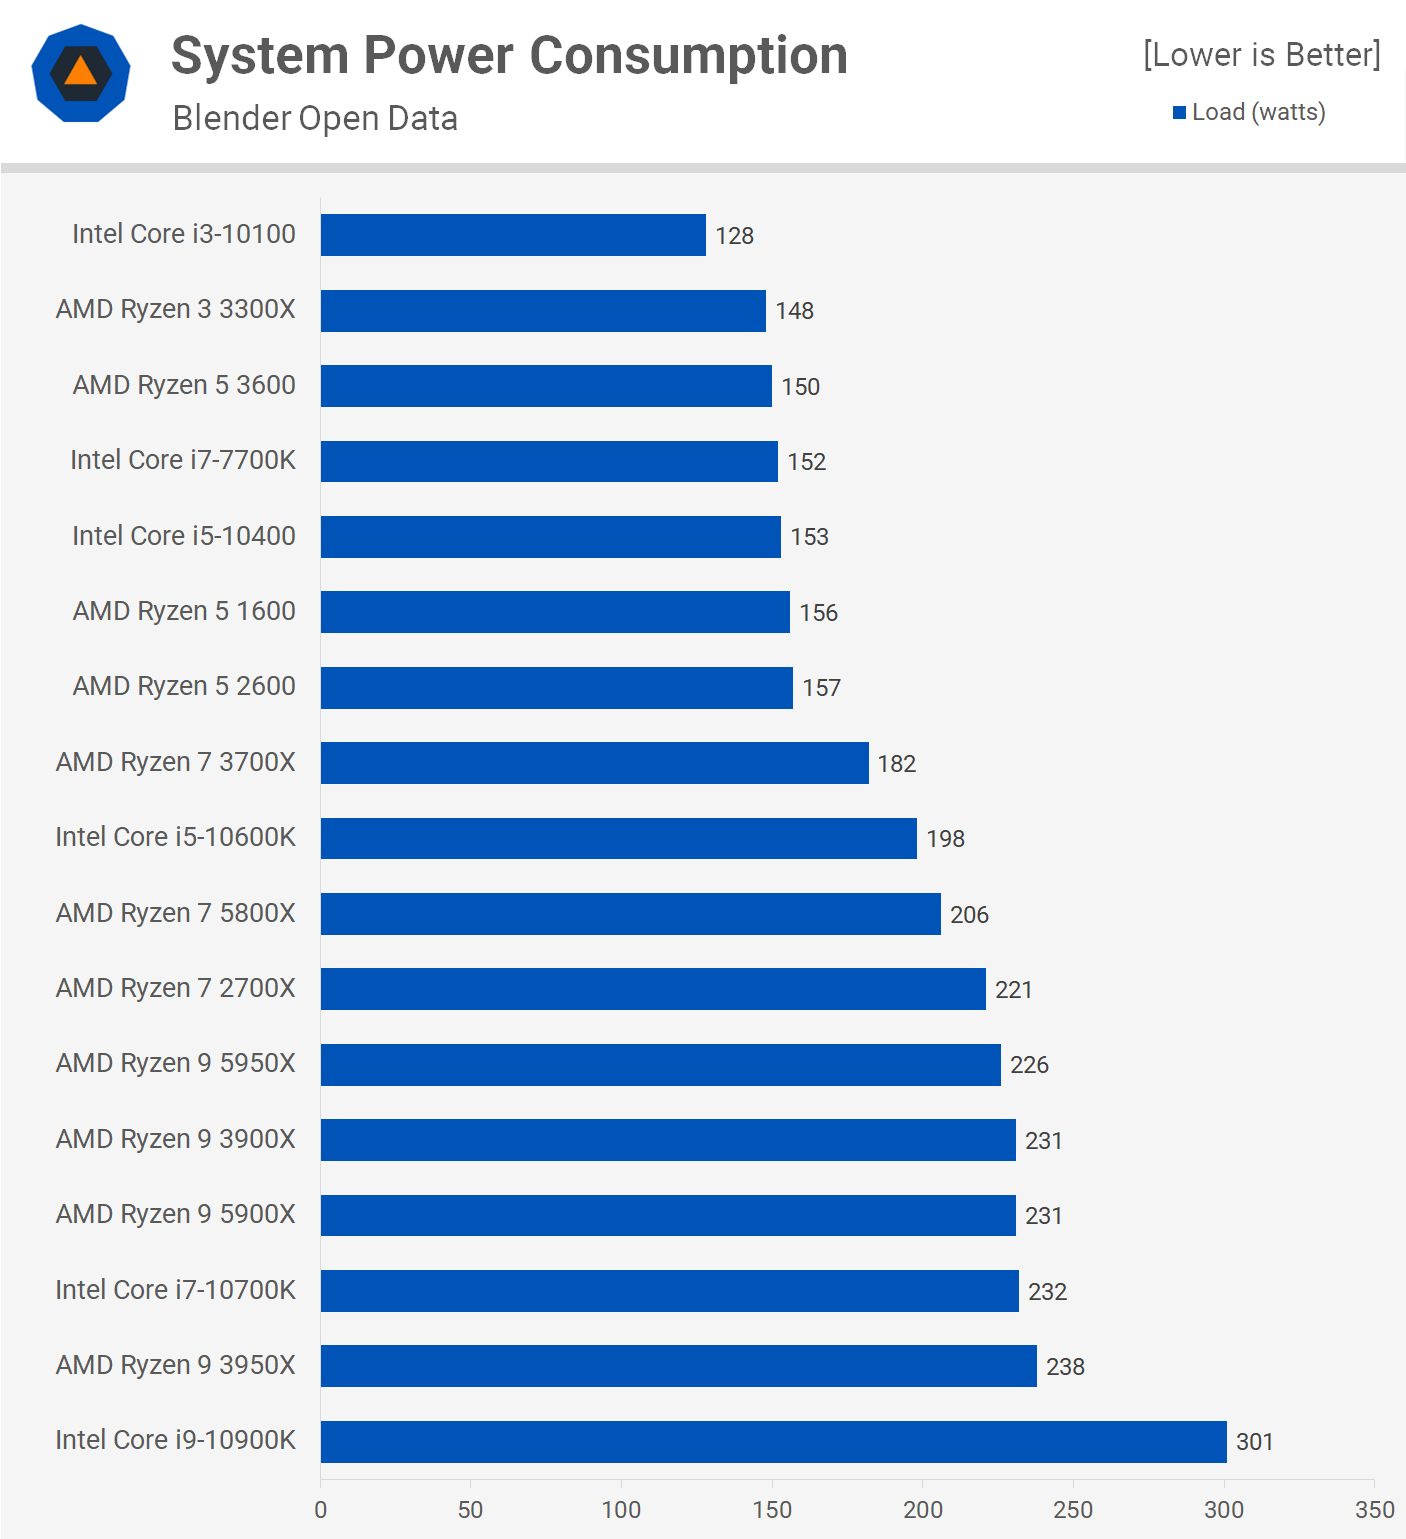
After Effects is another program that relies heavily on single core performance and as a result the 5800X is able to beat the 3700X by an impressive 23% margin. It was also 12% faster than Intel's best mainstream desktop CPU and 26% faster than the 10700K. Power ConsumptionThe Ryzen 7 5800X uses ~20 more watts than the 3700X, though that's not entirely surprising as the 3700X is in that sweet spot for efficiency. The 3800X, for example, consumes 20 watts more, which would make the 5800X and 3800X fairly even in terms of power usage. It's also worth noting that the 5800X was 16% faster than the 3700X in this test, so a 13% increase in total system power is still very good in terms of efficiency. It's also 30 watts less than Intel’s 10700K.
In terms of temperatures, we ran a quick comparison between the Ryzen 7 3800X and 5800X tested in a 21C room using Corsair’s iCUE H150i AIO, MSI X570 Godlike, installed inside the Corsair Obsidian 500D. We saw the 5800X running 3 to 5 degrees hotter than the 3800X, which is pretty good given it's clocking just over 400 MHz higher at a similar voltage. Gaming PerformanceFor our gaming tests we used Nvidia’s RTX 3090. Checking out Far Cry New Dawn first, we find that in this latency-sensitive title the 5800X is a whisker faster than the 5900X and 5950X, basically it matched the 10700K making it just 3% slower than the 10900K.
That's an 18% performance uplift from the 3700X, which can be seen trailing even the Core i5-10400, at least when comparing average frame rates.
Performance in Tom Clancy’s Rainbow Six Siege is strong. The 5800X matches more expensive Zen 3 processors with 508 fps on average. That made it 2% faster than the 10700K and 19% faster than the 3700X, another big generational performance leap.
We're also looking at a 16% performance uplift in Watch Dogs Legion, going from 99 fps up to 155 fps. The 5800X matched the higher-end 12 and 16-core models and both the Intel 10700K and 10900K.
The 5800X was blazing fast in F1 2020, beating its predecessor by a 20% margin and even edging out the 10700K by 5%. Basically it matched the 5900X and 5950X to come in just 3% behind the 10900K.
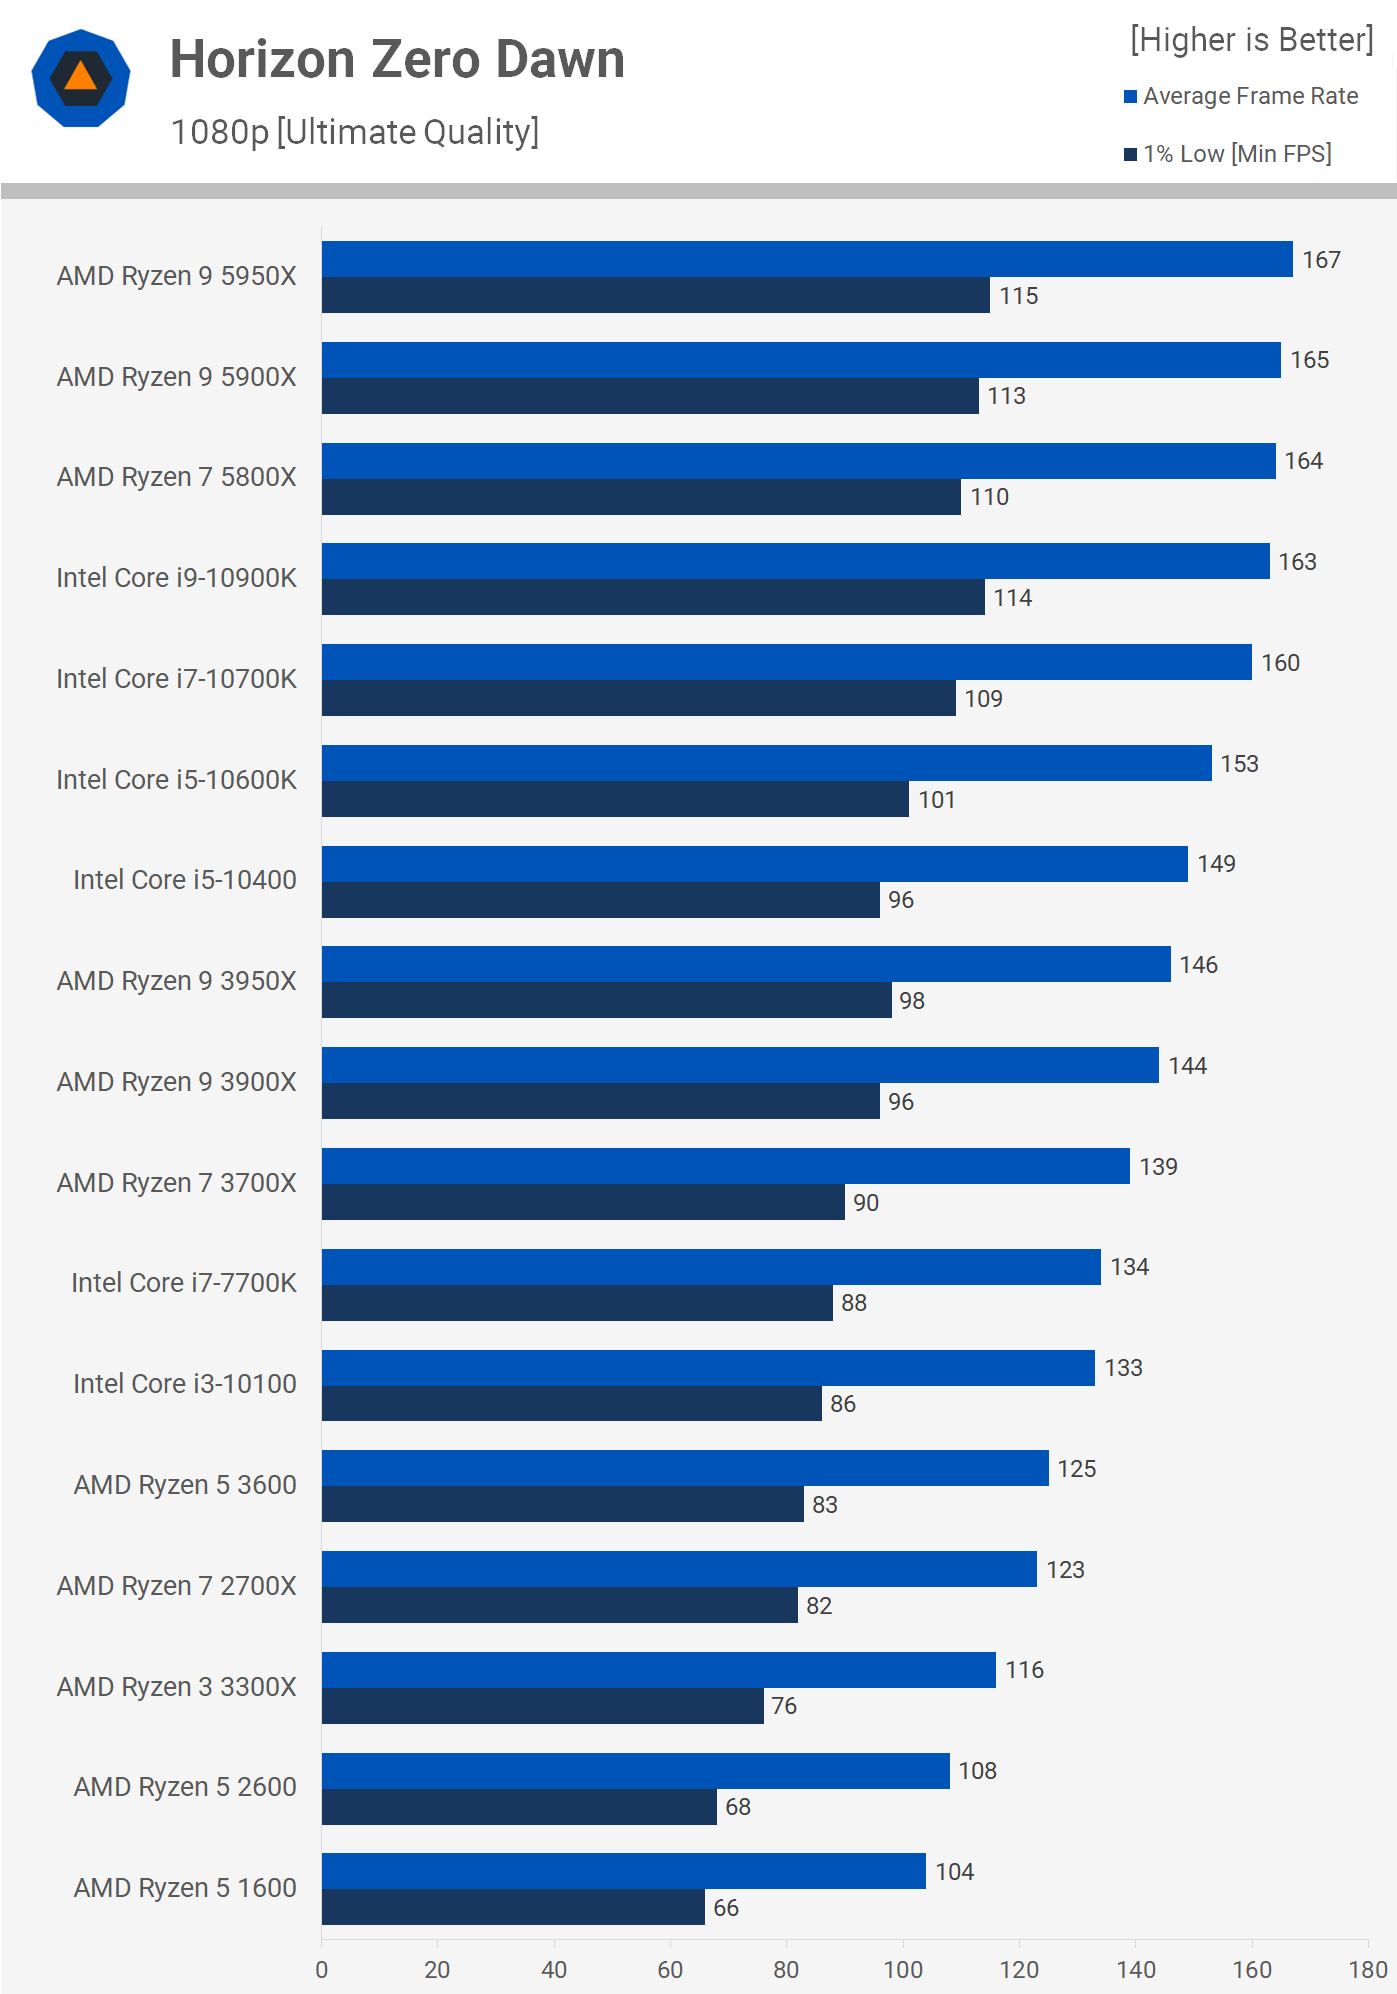
As seen previously with the 5900X and 5950X, Zen 3 offers solid performance in Horizon Zero Dawn and the 5800X drops just a few frames when compared to higher-end models. That meant it was 3% faster than the 10700K, matching the Core i7's level of performance and this was possible due to an 18% performance boost over the 3700X.
The gains seen in Borderlands 3 are less impressive, here the 5800X was 7% faster than the 3700x and that meant it was a little slower than competing Intel parts. It was just 4% slower than the 10700K though, which we’d generally deem a tie.
Where we don't see a tie is in Death Stranding, here the 5800X was 12% faster than the 10700K and you'd be hard pressed to make up that margin by overclocking the Core i7 part. The 5800X is also 33% faster than the 3700X which is great, though having now looked at the 5900X and 5950X, we’re starting to get spoiled to seeing margins like this.
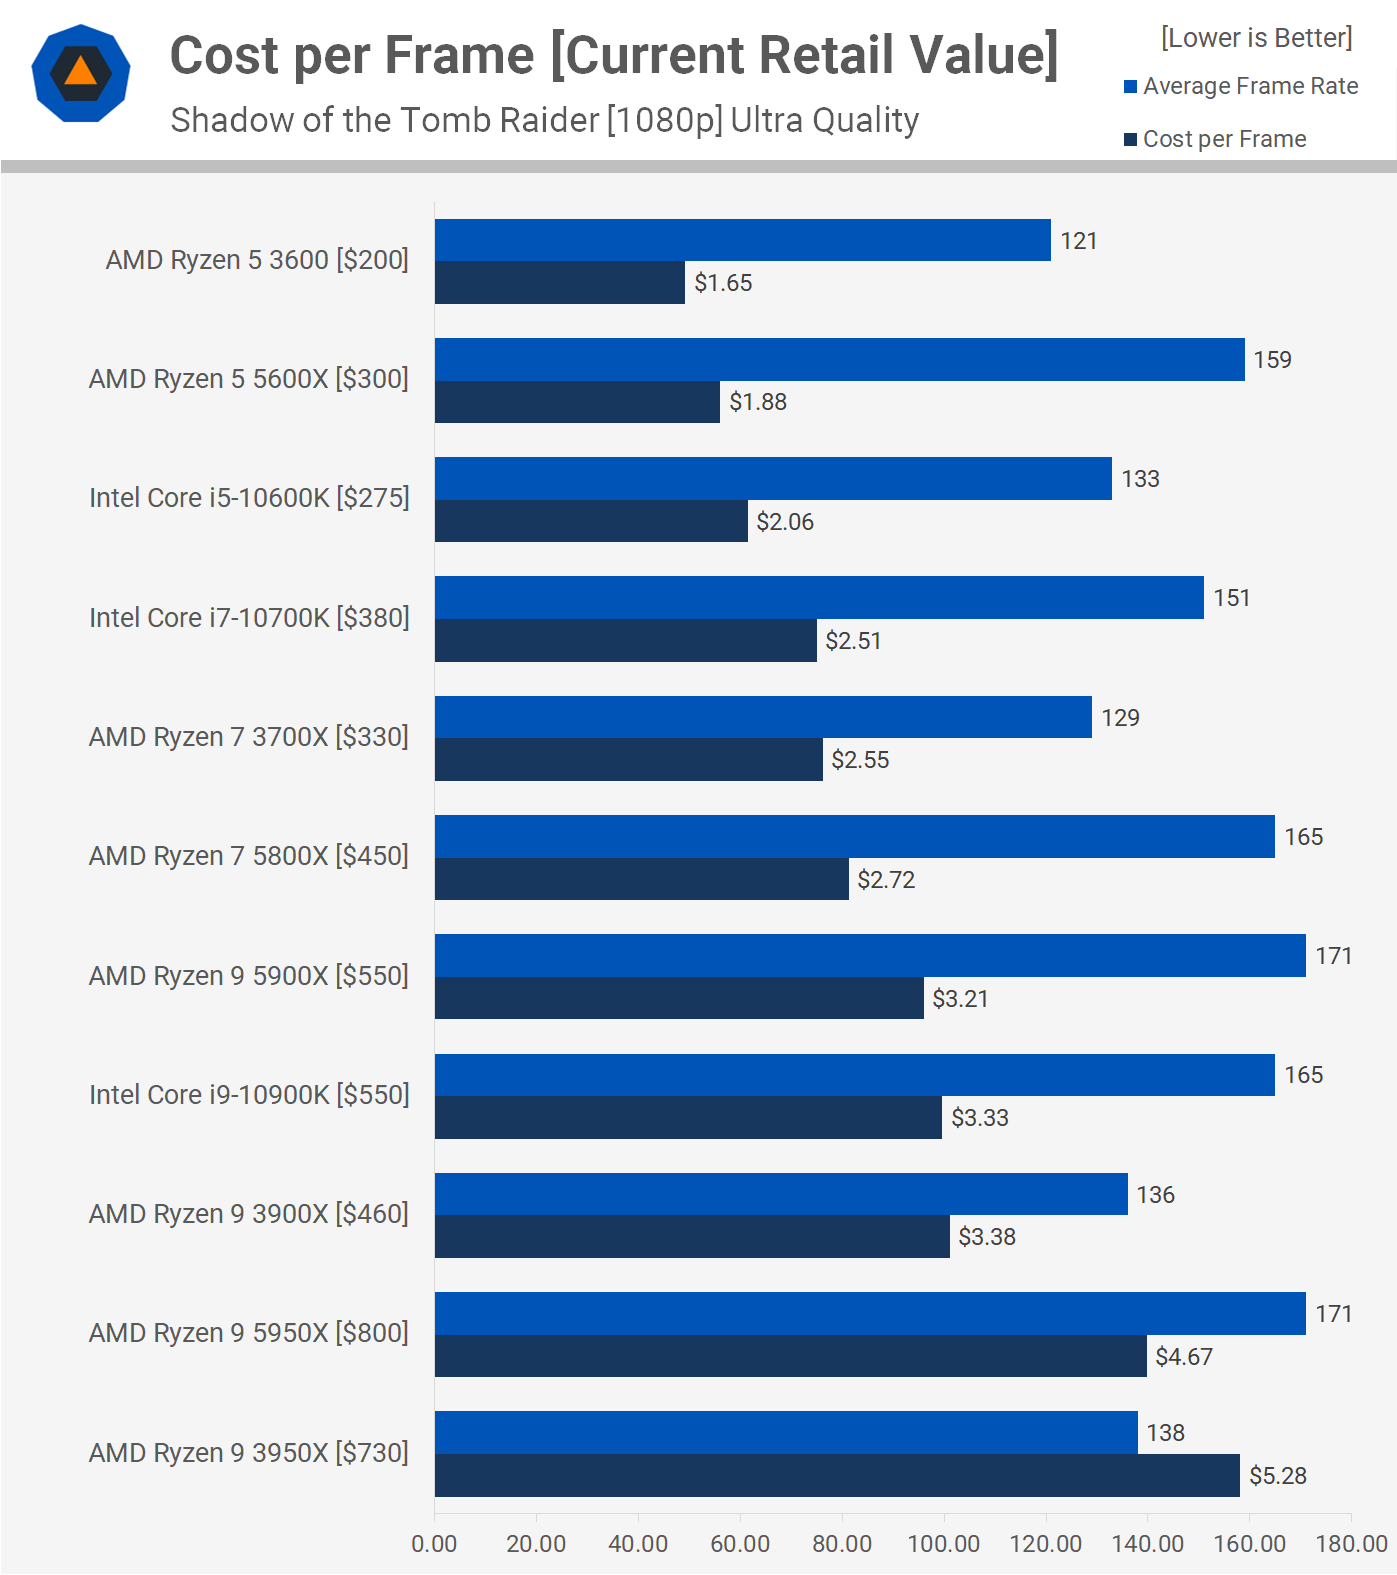
The 5800X managed to match the 10900K in Shadow of the Tomb Raider with 165 fps on average and that made it 28% faster than the 3700X and 9% faster than the 10700K, while it was just 4% slower than the higher-end Zen 3 base models.
Interestingly, the 5800X isn't as impressive as the 5900X and 5950X in Hitman 2, pushing the RTX 3090 to 151 fps at 1080p, placing it on par with the 10900K. Certainly not a bad result but we also weren’t expecting it to be 7% slower than the 5900X.
The 5800X performed well in Star Wars: Squadrons, basically matching the higher core count parts to match the 10900K and beat the 10700K by an 8% margin. We're also looking at a big 27% performance uplift over the 3700X.
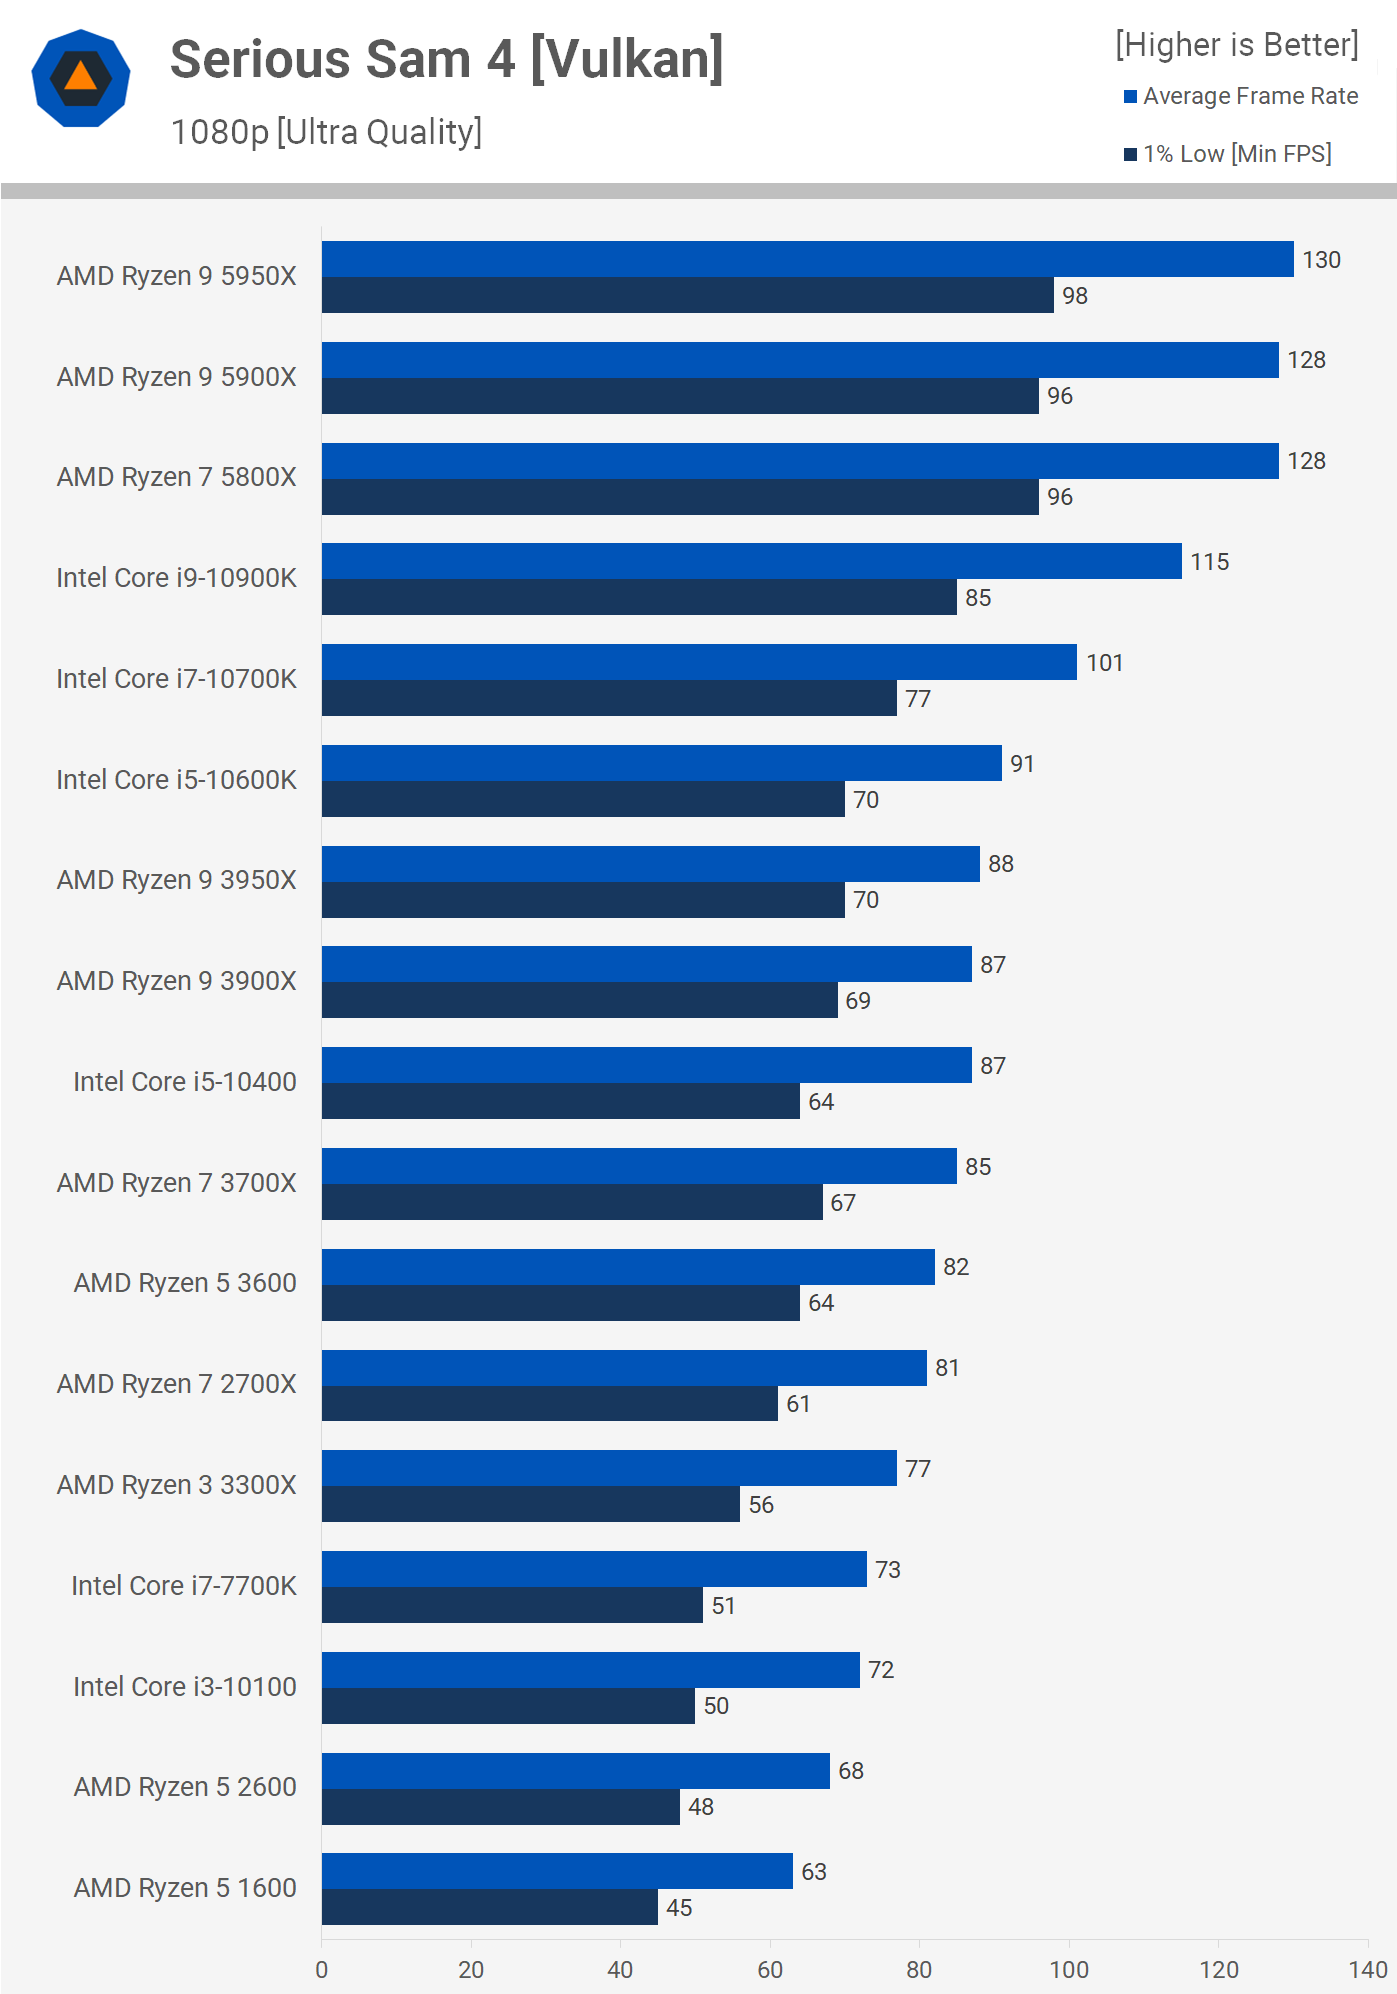
Last up we have Serious Sam 4 where the 5800X is seen matching the 5900X and 5950X with performance that placed it 11% ahead of the 10900K and a whopping 27% ahead of the 10700K. Moreover, we're looking at an insane 51% performance increase over the 3700X.
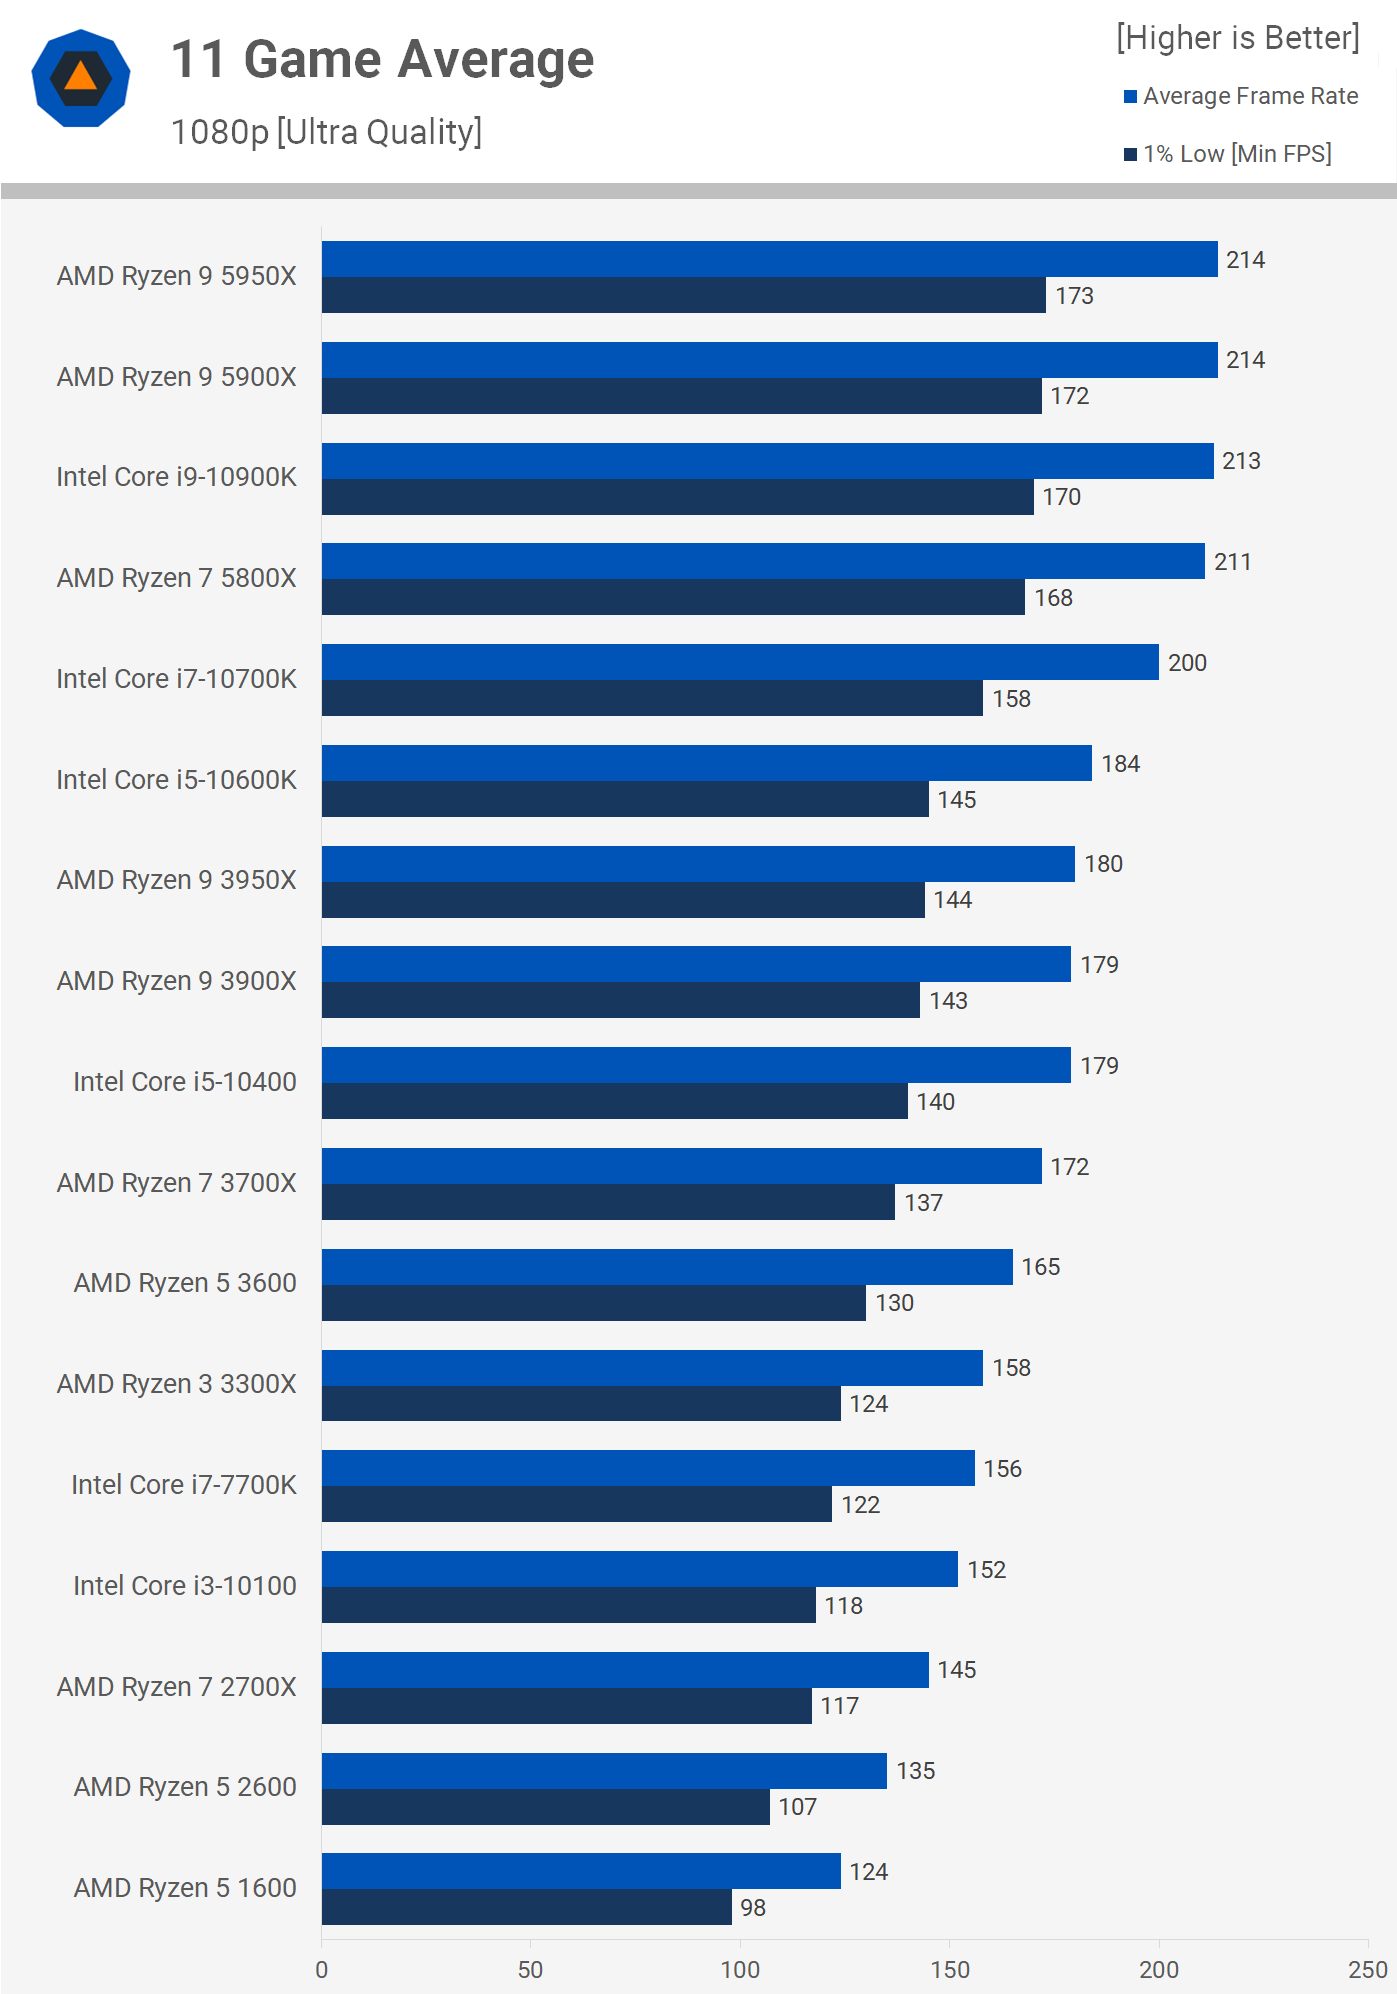
Now, if we average the gaming performance seen across all our game sample, we find that the 5800X is roughly on par with the 10900K and for the most part isn't much slower than the 5900X and 5950X. It also comes out 6% ahead of the Core i7-10700K and 23% ahead of the older 3700X. OverclockingWe were able to hit an all-core 4.7 GHz overclock with our Ryzen 7 5800X using 1.375v, so the same frequency achieved by the 5950X. In the case of the 5800X though, this only boosted multi-core performance by 5% as the all-core frequency was increased from 4.5 GHz to 4.7 GHz.
This overclock reduces single core performance as we're now operating 150 MHz slower and as a result the Cinebench R20 performance dropped by 3%.
We're also only seeing a 4% performance uplift in Blender, so it hardly seems worth the trouble, especially given the decline in single thread performance.
The upshot being that we're only looking at a 3% increase in power consumption, so that won't really affect thermals.
The hit to gaming performance isn't huge, as we saw in the single core Cinebench R20 test, we're looking at a low single digit percentage drop, in Rainbow Six Siege we're talking about a 4% performance loss.
Performance in Far Cry New Dawn though goes unaffected, we're looking at the same 132 fps on average. Still although we didn't see a performance decline here, it seems quite clear that overclocking is pointless for this CPU. Price to PerformanceUnfortunately the massive price hike does mean that the 5800X is worse value than the previous generation 8-core parts such as the 3700X. You're paying a 12% price premium, though that does place it on par with the 10700K despite being much worse than the 5900X.
It's a similar story in Premiere Pro, the 3700X is better value and the 5800X is even edged out by the 10700K. At this price point, you're actually better off with the Ryzen 9 3900X.
Then for gaming the 5800X comes out costing slightly more per frame than the 3700X despite the massive 28% performance uplift. It also loses out to the Core i7-10700K in terms of value, though it does make out better than the 5900X as most games can't utilize the extra cores.
Looking at the value equation across all games tested, it’s clear that while faster, Zen 3 isn't as good as Zen 2 in terms of value. The 5800X is edged out by the 3700X and even Intel’s 10700K presents itself as a better value option at the more affordable $380 price point. What We LearnedBased on what we’ve already seen from Ryzen 9 parts and how AMD has positioned its 8-core variant this generation, it's not surprising to learn that the Ryzen 7 5800X is a bit disappointing. In our opinion, AMD has unwisely afforded Intel some breathing room here, as the 5800X isn't the obvious choice for those looking to spend up to $450. At least for gamers, the much cheaper Core i7-10700K offers more value. Yes, it's a little slower, but at $380 it's the better deal. The only weakness on Intel’s platform is the lack of PCIe 4.0 support, but not everyone is planning to take advantage of that right away. Buyers may be faced with a situation where those looking to spend ~$400 are better off saving a few bucks by going with Intel, or alternatively they will need to dig deeper and come up with another $100 to land the Ryzen 9 5900X.
It's the same story for productivity, where the Ryzen 9 5900X offers a lot more bang for your buck while the Core i7-10700K is fairly similar in terms of value. Compare that to the match up we see between the 5900X and 10900K and it's hard not to walk away disappointed with the 8-core model. The 5900X dominates the 10900K in everything: performance, substantially better efficiency, and a better feature set, all for about the same price. Sure, if we put pricing aside for a minute, the Ryzen 7 5800X remains a phenomenal leap forward from AMD's previous-gen 8-core processors. A 23% gaming performance uplift on average is amazing, and as we said earlier, AMD now offers the world’s fastest 8-core desktop CPU. But at $450, we'd recommend skipping the R7 5800X. You can either spend less on the 10700K or maybe the 5600X will be what you need. Alternatively, you could spend more to get the 5900X, or keep your eye open for a good deal on a 3rd-gen Ryzen part. Shopping Shortcuts: |
| How to Change Your Bluetooth Name on Android Posted: 08 Nov 2020 12:29 PM PST
When you connect a device to an Android phone or tablet, the device model name is what you see. While this is a good identifier usually, it can sometimes not be the most helpful. We'll show you how to customize the name. The process of changing the Bluetooth name is simple, but it can vary depending on which Android device you have. In general, you'll be looking in the "Connected Devices" section of the Settings menu. We'll show you how it looks on two different devices. First, swipe down from the top of the screen once or twice and tap the gear icon to open the Settings menu.
Next, tap "Connected Devices" from the list.
Here's where things can be a little different, depending on your phone or tablet's manufacturer. On some devices, you'll see "Connection Preferences"…
…on others, you'll see "Bluetooth."
If you select "Connection Preferences," you'll now see "Bluetooth."
Your device name will be listed in the Bluetooth settings. On some devices, you can simply tap the name to change it…
…others will require opening the three-dot menu.
Enter a new device name and then tap "Rename" or "Save."
That's it! Now, when you try to connect to your Android device, this is the name you will see. If there are multiple of the same device in your home, changing the name can make it easier to find the right one. |
| How to Change Apple Watch Move, Stand, and Exercise Goals Posted: 08 Nov 2020 10:39 AM PST  The Apple Watch helps you stay in shape with goals for active energy, stand hours, and exercise minutes. You can change each of these individually to better reflect your activity levels. Here's how. How to Change Your Move, Stand, and Exercise GoalsTo change your Apple Watch activity goals, first launch the "Activity" app on your watch. You can do this either by tapping on the Activity ring complication on your current Watch face or by pressing the Digital Crown and locating the Activity app in the main menu.
With the app open, you should see your current goals and targets represented by three colors and three rings. If you don't see the activity ring, swipe to the right until you see it. Now scroll to the very bottom of the screen (either with the Digital Crown or using your fingers) and tap "Change Goals."
You can now adjust each goal in order, starting with your Move goal. Use the Digital Crown or on-screen buttons to adjust the value to your liking. Tap "Next" and you'll be able to adjust your Exercise goal in 15-minute increments. Tap "Next" one more time to adjust your Stand goal, in hour increments.
The ability to change your Exercise and Stand goals was added to the Apple Watch with the arrival of watchOS 7 in September 2020. Prior to this, you could only change your Move goal. If you used watchOS 6 or earlier, you might be wondering why you can't change your activity goals by force pressing the screen anymore. This is because Apple removed all Force Push functionality with the arrival of watchOS 7, even for older devices. You can upgrade your Apple Watch software by opening the Watch app on your iPhone and navigating to General > Software Update. watchOS 7 requires an iPhone 6s or later running iOS 14, and an Apple Watch Series 3 or newer. Add an Activity Ring to Your Watch FaceAdding the Activity ring complication to your preferred Watch face is the easiest way of keeping track of your goals. This is one of the most flexible complications on the Apple Watch and can be featured as a small tricolor ring or larger element with a detailed breakdown of your activity.
With your current Watch face currently on-screen, tap and hold until you see the "Edit" option appear at the bottom of the screen. Tap "Edit" and swipe across to the "Complications" interface. Tap on a free space and scroll the Digital Crown until you find the Activity ring.
You can also add an Activity ring to your iPhone if you want. To do this, unlock your iPhone so that you can see the Home screen. Tap and hold an icon until all of the icons start wiggling. In the top-left corner of the screen tap on the plus "+" icon.
Choose "Activity" from the Fitness section, then choose the size and place it on your Home screen. You can move the widget around until you are happy with its placement. Learn more about using widgets on your iPhone home screen in iOS 14. Apple Watch Default and Recommended GoalsBy default, your Apple Watch will set a default Move goal based on measurements like height and weight as well as your age and specified gender. You should adjust your Move goal to reflect your fitness goals and current lifestyle. Stand and Exercise each have default goals of 12 hours and 30 minutes respectively. To reach your stand goal, you'll need to get up and move around once every hour for at least 12 hours in your day to achieve your goal. For exercise, that's 30 minutes of vigorous movement per day. Your Apple Watch will automatically log exercise minutes when it detects an elevated heart rate and some kind of activity. If you use the Workouts app to log activities like walking, running, or resistance training, this will count toward your exercise goal. You'll find these listed in the Fitness app on your iPhone.
If you're consistently beating your goals, you'll probably want to increase your targets. It's also a good idea to pay attention to your own schedule and adjust your goals as you see fit. If you workout consistently five days per week, then you might want to cut yourself some slack on your rest days by dropping your Move and Exercise targets. The WHO recommends adults ages 18-64 do at least 150 minutes of moderate-intensity aerobic activity per week, or 75 minutes of vigorous activity. Do you love your Apple Watch? Check out these 20 tricks and tips to get the most out of your wearable. |
| 10 of the Most Unique Lorem Ipsum Generators Posted: 08 Nov 2020 08:49 AM PST  Lorem Ipsum is placeholder text used in publishing and web design so that designers can see how a page will look. It's usually a form of nonsense Latin, but here are 10 generators that make the text more interesting. If you want to generate standard lorem ipsum, you can generate it in Word or from various websites. "Standard" is so boring though, especially when the original text is taken from a 1st-century Roman orator. Mix things up a bit with some lorem ipsum that's a bit more….modern. Cat Ipsum |
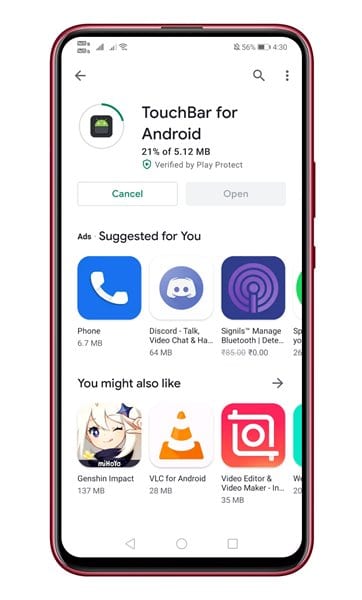
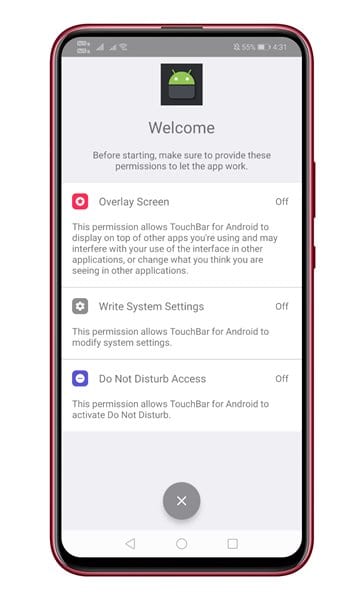
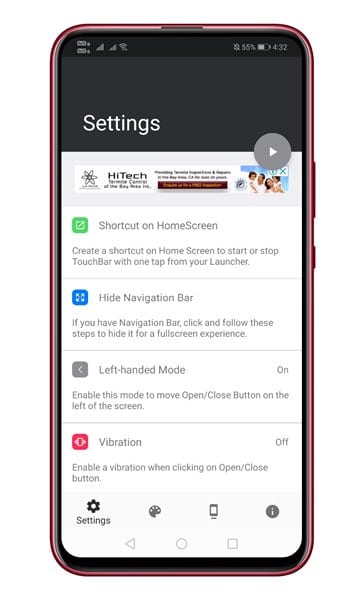
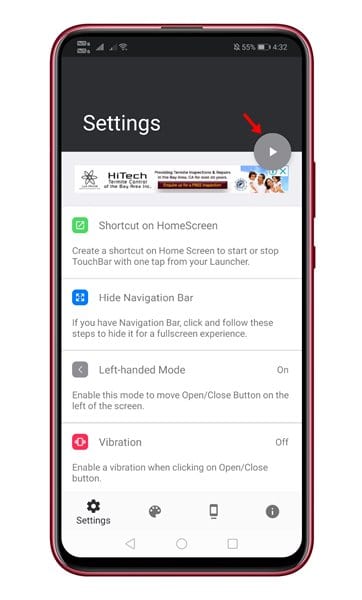
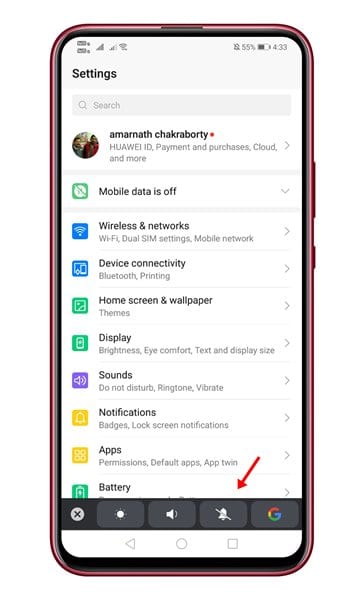
| How to Get MacBook Like Touch Bar on Android Posted: 08 Nov 2020 03:27 AM PST Back in 2016, Apple introduced its Touch-Bar integrated MacBook Pro. For those who don't know, TouchBar is a MacBook exclusive feature that provides users access to quick toggles for controlling various system settings. At the initial stage, the feature was heavily praised by the users. Inspired by the MacBook's Touch Bar, a senior XDA developer who goes by the name alecot18 has developed an app known as 'TouchBar'. Basically, the TouchBar Android app mimics the Touch Bar's control stop on Android smartphones. So, in this article, we are going to share some of the best methods that would help you to get a MacBook-like Touch Bar on any Android device. The good thing is that the TouchBar app is completely free to download and it works on both rooted and non-rooted devices. So, let's check out how to use the TouchBar app to get a Mac-like Touch Bar on Android. Get MacBook Like Touch Bar on AndroidThe method is quite simple and easy and you just need to follow some of the simple steps given below. So let's check out. Step 1. First of all, download & install Touchbar for Android on your device from the Google Play Store. Step 2. Now open the app and you need to grant the three permission – Overlay, Write System Settings, Do Not Disturb Access. Step 4. Now you will see the main interface of the app. Step 3. Now you need to tap the play button to activate the touch bar. This will activate the Touchbar on Android. Step 4. Once done, you will see the touch bar on every screen. That's it, you are done! You can further customize the touch bar on your Android as per your wish. You can adjust the length, height, add custom shortcuts to the touch bar. So, this is how you can get a MacBook Pro type Touch Bar on any Android device. The method shared above works on both rooted and non-rooted Android devices. If you have any other doubts related to this, let us know in the comment box below. I hope this article helped you, please share it with your friends also. |
| How to Enable Safe Browsing In Google Chrome for Android Posted: 07 Nov 2020 11:58 PM PST Early this year, Google introduced a new feature for Chrome desktop version known as 'Enhanced Safe Browsing'. According to Google, the enhanced safe browsing increases protection from dangerous websites and downloads. The feature works by sharing 'uncommon URLs in real-time' with Google Safe browsing to determine whether the site you are about to visit triggers a red flag or not. With this feature enabled, Google Chrome also sends a small sample of pages and suspicious downloads to discover new threats. According to Google, the enhanced safe browsing on Chrome reduces the security threats by up to 20% on the desktop. The feature is pretty good for users who don't have an idea about the internet's dark side. Also Read: How to Set Download & Upload Speed in Google Chrome Enable Enhanced Safe Browsing on Chrome for AndroidThe feature has been on the desktop version of Chrome for a while, and it's now finally available for Android. So, in this article, we are going to share a step-by-step guide on how to enable Enhance Safe browsing on Chrome for Android in 2020. Step 1. First of all, head to the Google Play Store and update the Google Chrome app. Step 2. Once done, open the Google Chrome browser. Step 3. Now open the 'Chrome://flags' on your address bar. Step 4. Search for 'Safe browsing' and enable the two flags – Safe browsing Enhanced Protection on Android and Security Section on Android. Step 5. Once done, tap on the 'Relaunch' button. Step 6. After the reset, open Chrome settings and tap on 'Privacy and Security'. Under the Privacy and Security, tap on the 'Safe browsing' option. Step 7. You will find three options – Enhanced, Standard, and No Protection. To enable the Enhanced Safe Browsing, select 'Enhanced Protection' That's it! You are done. This is how you can enable Enhanced Safe browsing on Chrome for Android. So, this article is all about how to enable Enhanced Safe Browsing on Chrome for Android. I hope this article helped you! Please share it with your friends also. If you have any doubts related to this, let us know in the comment box below. |
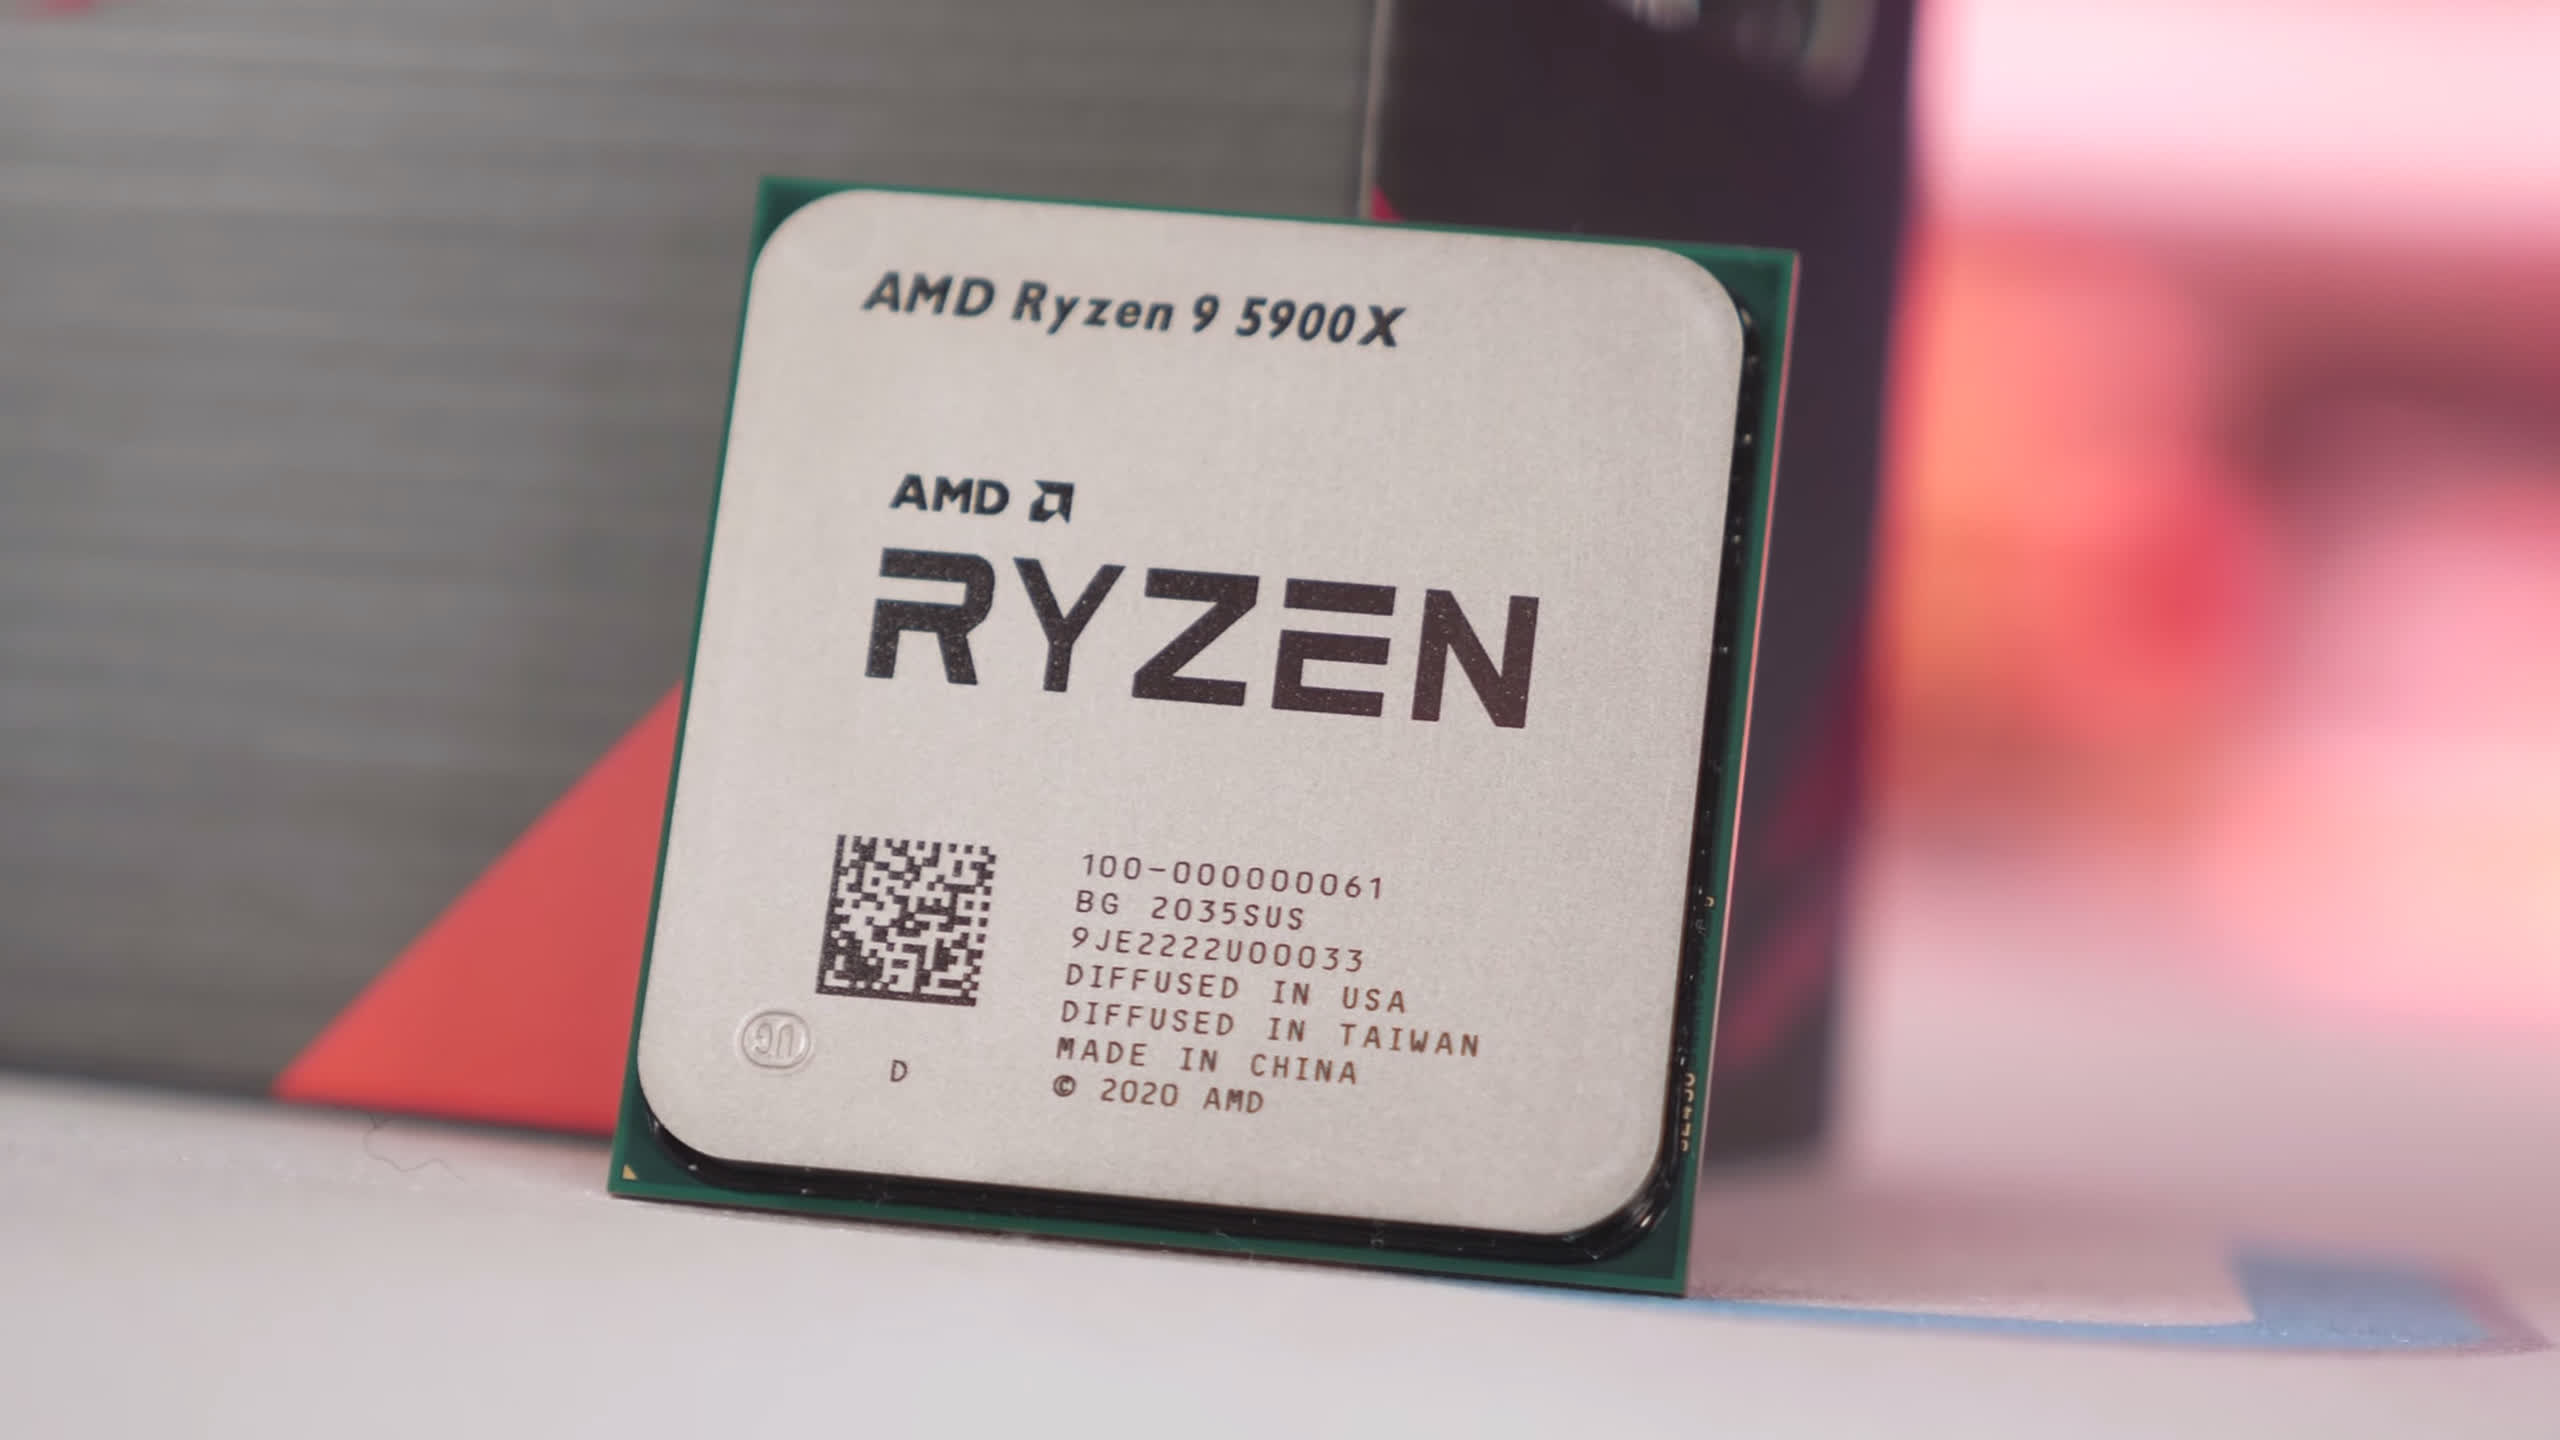
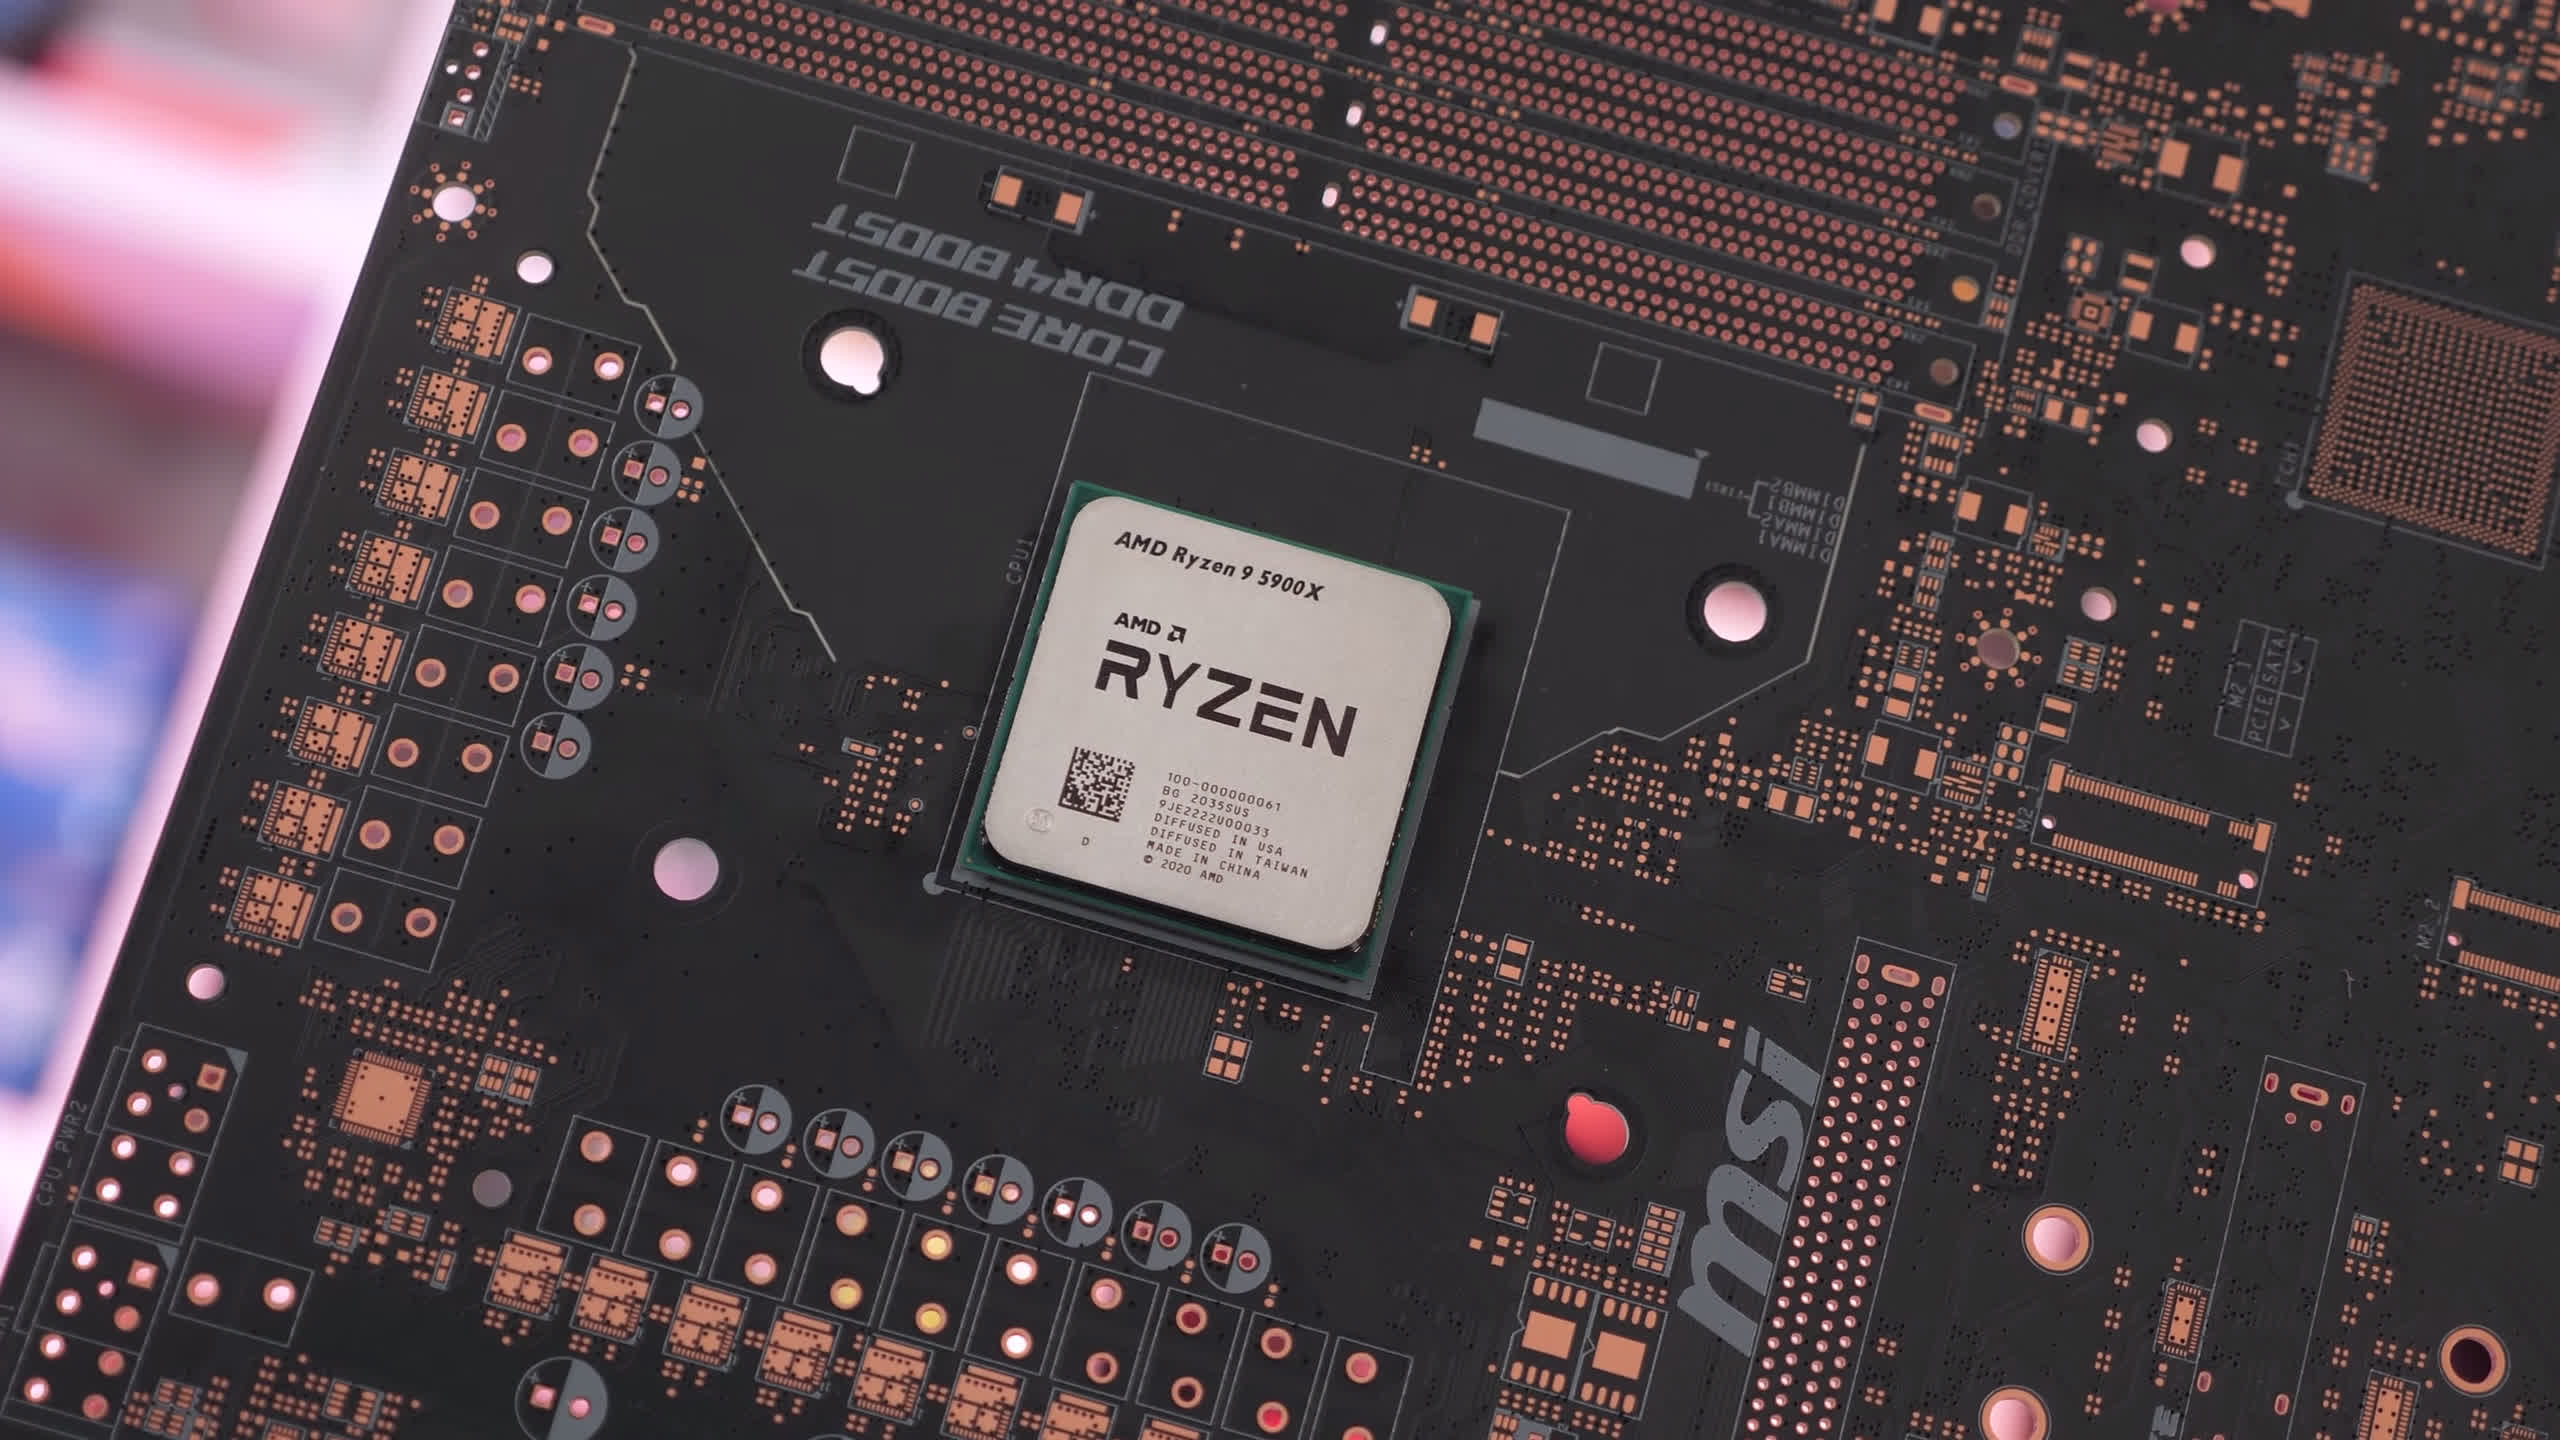
| AMD Ryzen 9 5900X Review: i9-10900K Versus Posted: 07 Nov 2020 09:58 PM PST For our first review of Ryzen 5000 we checked out the Ryzen 9 5950X, AMD's new $800 16-core, 32-thread AM4 processor. Today, we're looking at the Ryzen 9 5900X, the 12-core, 24-thread CPU that’s available for $550. That makes the 5900X ~8% cheaper per core when compared to its bigger brother as AMD can get away with charging a premium for the 16-core model given it faces no real competition. The 12-core R9 5900X is priced to compete with Intel’s Core i9-10900K. Normally, the 10-core Intel processor would retail for $530, but due to supply issues, it typically sells for $550 or $600, which means the 10900K and 5900X are comparable in terms of price. Now we need to find out how they stack up in terms of performance. The 5950X is a beast, so we’re expecting good things from the 5900X which brings down the core count as the only major change. The clock speeds are much the same, the boost frequency has been lowered by 100 MHz, while the base frequency increased by 300 MHz. Because both CCDs are still active, it packs a total L3 cache of 64 MB. Once again, we’re not going to concern ourselves with Zen 3 architectural improvements on this review, rather we'll skip that and jump into the benchmarks. Before we do though, let's take a quick look at yet another new AM4 motherboard. In yesterday’s review we showcased the Asus ROG Crosshair VIII Dark Hero, and now we're getting our first look at the MSI B550 Unify, a new B550 board that includes… well, pretty much everything. The highlights include a 16-phase VRM using Infineon TDA21490 90A powerstages, a 6-layer PCB with 2oz thickened copper, all aluminum extended heatsinks with dedicated VRM heatpipe, four M.2 slots with double sided M.2 Shield Frozr cooling and DDR4 A-XMP support for up to DDR4-5800. There is also a Unify-X version with just two memory DIMMs. MSI claims the Unify-X can do DDR4-5800 with 4000 G series processors and DDR4-5300 with 3rd-gen Ryzen. While the standard Unify that we have can achieve DDR4-5600 with 4000 G-series though they have yet to make any Ryzen 5000 series claims. Later this month we’ll put together a detailed Zen 3 memory performance guide and we'll use the standard Unify for the bulk of our testing. This MSI board is priced at $290, so it's a Gigabyte B550 Master competitor. We’ll go back to more motherboard testing after our slew of Ryzen reviews. To keep things simple for all our new Ryzen 5000 testing, we’re using the same MSI X570 Godlike motherboard along with four 8GB G.Skill TridentZ DDR4-3200 CL14 memory modules for a 32GB capacity. Cooling all systems is the Corsair iCUE H150i Elite Capellix AIO. For all the productivity testing we're using an RTX 2080 Ti, but for the gaming benchmarks we've updated all our numbers with the RTX 3090, so let's get into the graphs… BenchmarksFirst up we have Cinebench R20 and wow, 8487 points is pretty insane. That's a 17% increase from the 3900X, making the 5900X just 8% slower than the 3950X. These are impressive numbers considering the CPU packs 25% fewer cores. When compared to the Core i9-10900K which is a rough match in price, the new 5900X comes in 32% faster, although it does have 20% more cores.
Running the single core benchmark reveals why the 5900X is so much faster than the 10900K in Cinebench R20. Here we're looking at a 16% boost to single-thread performance. It's also a 23% improvement from the 3900X, and with a similar single core score to that of the 5950X, we’re expecting strong gaming performance.
We also watched how the 5900X clocks in each of the Cinebench R20 tests. For the multi-core test where all cores are heavily loaded, the 5900X clocks at around 4.3 GHz. Meanwhile, AMD advertises a base clock frequency of 3.7 GHz. In the Cinebench single core test, the 5900X typically operated at 4.9 GHz, which is 100 MHz over the advertised spec. AMD in this instance has made sure the max boost frequency is not only easily achieved, but can be exceeded to avoid the drama seen with Zen 2 and its boost clocks.
7-zip looks at compression performance and here the 5900X is 17% faster when compared to its predecessor. It’s also able to edge out the 3950X, making it 37% faster than the 10900K.
When decompressing we find that SMT is more useful and as a result the 3950X is able to pull ahead. That said, the 5900X is 8% slower and is still offering a substantial 18% performance boost over the 3900X. As a result, it's much faster than Intel's best, beating the 10900K by a whopping 43% margin.
AES encryption performance is slightly improved with Zen 3 and this is an area where Zen 2 already excelled. Therefore it's no surprise to see the 5900X dominating the 10900K by a huge 52% margin.
Moving on to Blender, here we're looking at a 12% performance boost for the 5900X over the 3900X and that meant it was 22% faster than the 10900K. When compared to the 3950X it was 13% slower and then 18% slower than the 5950X.
We found when testing the 5950X that the new Zen 3 architecture absolutely shreds in V-Ray, and we're seeing exactly that with the 12-core model, too. Here the 5900X basically matched the older 16-core 3950X and that meant it was 23% faster than its predecessor and 32% faster than its primary competitor, the 10900K, so a bit of a shellacking there.
The last rendering benchmark we have is Corona, where the 5900X is much faster than the 3900X, boosting performance by 22%, delivering 3950X-like performance. That's a big gen-on-gen improvement and it also meant the 5900X was 24% faster than the 10900K.
For those of you interested in code compilation performance we see that the 5900X is just 9% faster than the 3900X, so one of the smaller gains we've seen so far, in fact it might be the smallest. Despite that, it managed to beat the 10900K by a convincing 26% margin.
DaVinci Resolve Studio 16 using the Puget Systems Benchmark actually provides the weakest gains we've seen yet, where the 5900X was just 8% faster than the 3900X, roughly matching the 3950X.
Adobe Premiere Pro 2020 lowers the bar even further, here the 5900X was just 5% faster than the 3900X while it was just 9% faster than the 10900K. Still a 9% performance advantage for roughly the same money is hardly anything to sneeze at, certainly given it appears to be a worst case scenario.
The strong single core performance comes in handy when testing with Photoshop, here the 5900X matched the 5950X and that meant it was 10% faster than the 10900K and a whopping 20% faster than its predecessor, the 3900X.
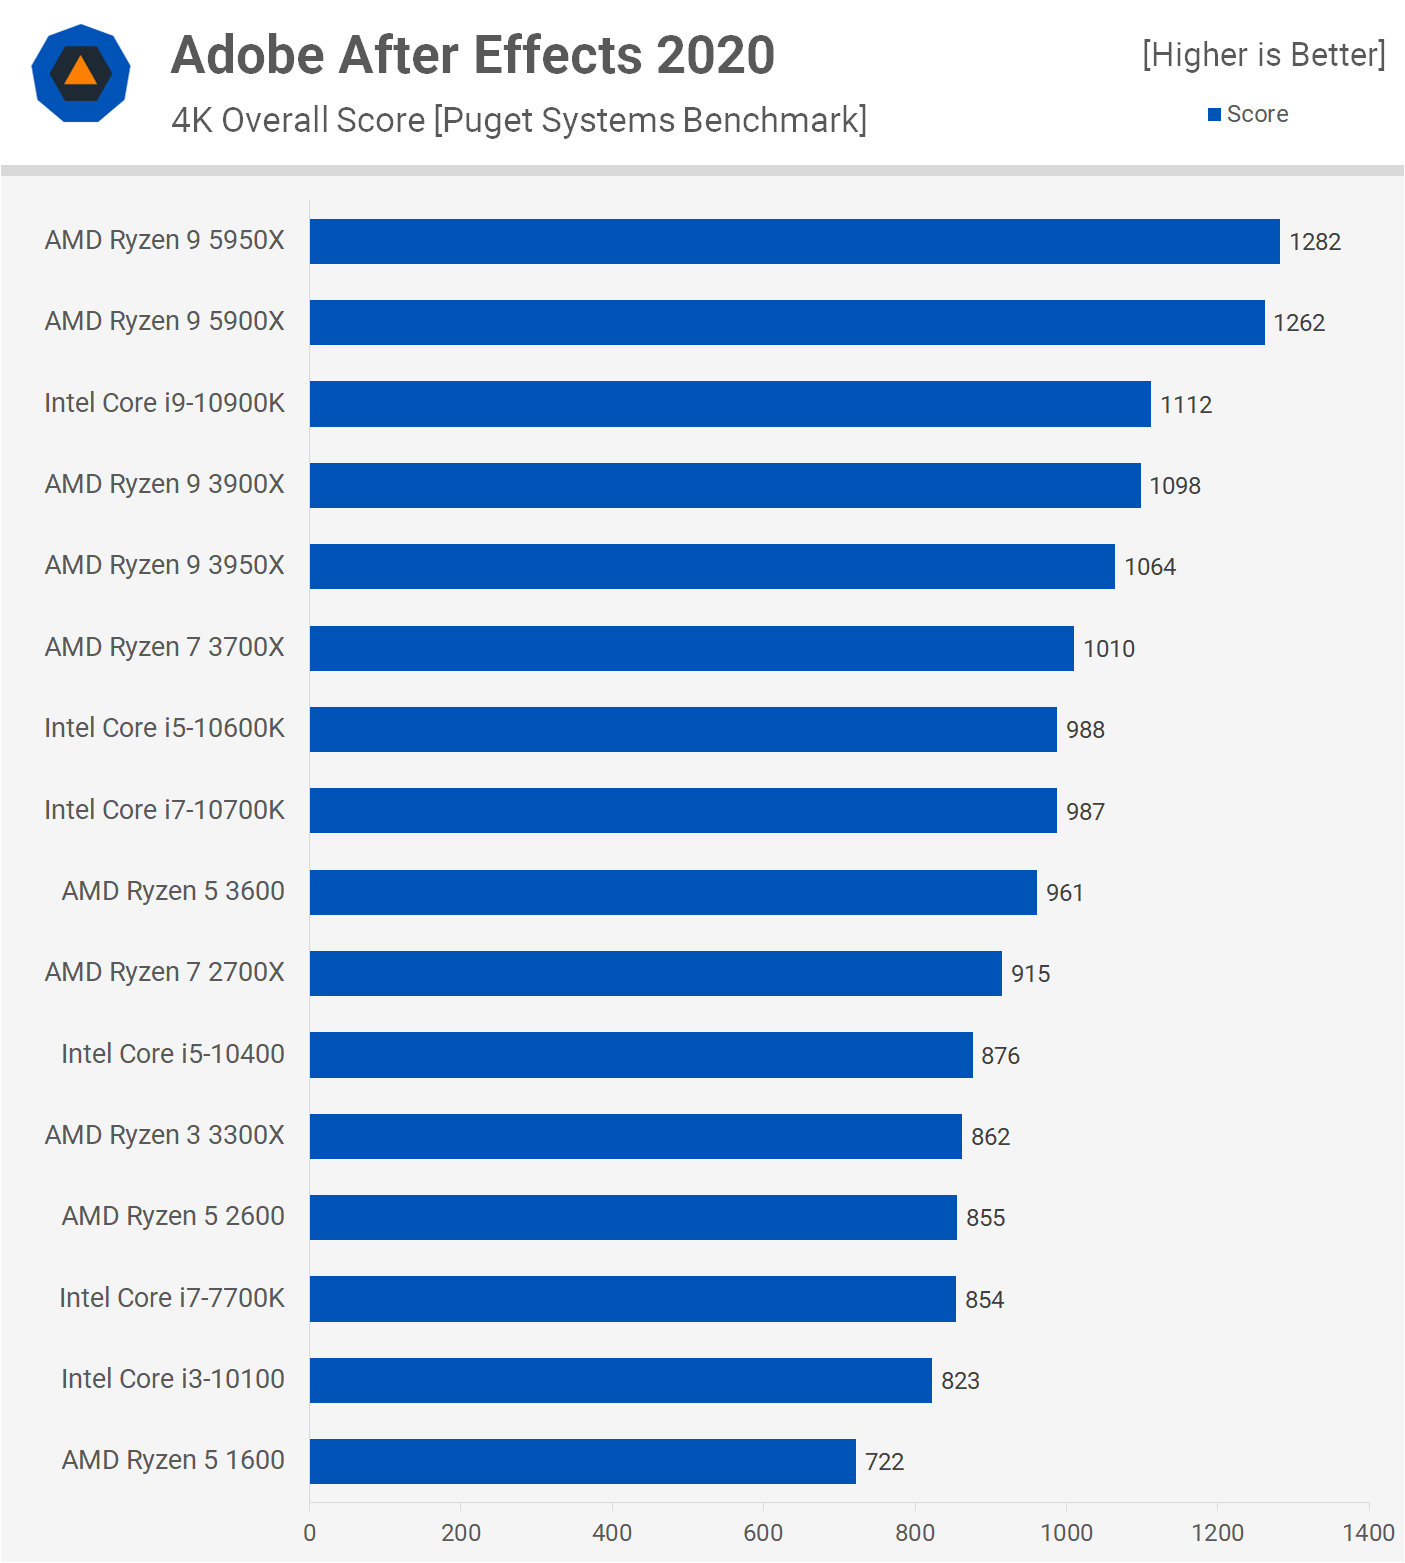
We're see strong performance gains over Zen 2 in After Effects, another application that relies heavily on single thread performance. Here the 5900X was 15% faster than the 3900X and 13% faster than the 10900K, almost matching the 5950X. Power ConsumptionFor measuring power consumption we monitored total system usage in Blender. The Ryzen 9 5900X matched the power usage of the 3900X, even though they both use the same 7nm process, Zen 3 is able to boost performance in Blender by 12%. Moreover, when compared to the 10900K, the 5900X reduced total system consumption by 23%.
In terms of temperatures, the Ryzen 9 3900X and 5900X were both tested in a 21C room on an open test bench using the Corsair iCUE H150i Elite Capellix AIO on the MSI X570 Godlike, installed inside the Corsair Obsidian 500D. We could see that the 5900X runs 7 to 8 degrees cooler than the 3900X under the same test conditions, despite running at a slightly higher clock speed using the same 7nm process. Part of this will be down to 7nm maturity, but AMD has also included a number of architectural optimizations. These enhancements also allow for a slightly lower vcore which would have helped to reduce power consumption and therefore thermals. Gaming BenchmarksWe have the same battery of gaming tests as yesterday’s 5950X review using a GeForce RTX 3090. Going in the same order, we’ll start with Far Cry New Dawn. The 5900X matched the 5950X exactly with 128 fps making it 6% slower than the 10900K, but still a good overall result given the double-digit percentage improvement over the 3900X.
The 5900X also trails the 10900K in Rainbow Six Siege by a small 5% margin. We see the CPU matching the 5950X to provide an 8% boost over the 3900X. This was enough to edge out some of the lower core count Intel processors such as the 10700K.
In Watch Dogs: Legion we see strong performance from the 5900X, placing it on par with the 10700K and just 2 fps down on the 10900K. That's also a rather large 15% boost over the 3900X, which struggled against even the Core i5-10400 at this low resolution.
We're also seeing big performance gains in F1 2020 as the 5900X is 21% faster than the 3900X, hitting 272 fps with the RTX 3090. That's a great result which has the new 12-core Ryzen processor a mere 2% behind the 10900K. That’s close enough to deem a draw in our book.
The performance uplift in Horizon Zero Dawn is solid. Here the 5900X is 15% faster than the 3900X and crucially is able to match the 10900K, edging it out by a few frames for what is basically the same performance.
Performance in Borderlands 3 is only slightly improved. The 5900X was just 5% faster than the 3900X, though that was enough to get it within range of the 10900K, losing by just a 4% margin.
As seen before in the 5950X review, these Zen 3 processors are beasts in Death Stranding and the 5900X matched the 16-core model exactly, making it 12% faster than the 10900K and incredibly, 35% faster than the 3900X.
The 5900X is also able to match the 5950X in Shadow of the Tomb Raider, meaning it’s 4% faster than the 10900K. A small win that’s close enough to call a tie. The new processor is beating the old 3900X by a 26% margin in this title.
Hitman 2 performance is also solid. Here the 5900X couldn't match the 5950X, but was still 7% faster than the 10900K and 34% faster than the 3900X.
Performance in Star Wars: Squadrons is strong, matching the 10900K, though edging it out convincingly for 1% low performance. Then we see a 27% performance boost over the 3900X, taking the average frame rate from 247 fps to 314 fps.
The Serious Sam 4 results look good for Ryzen. The 5900X is 11% faster than the 10900K and a staggering 47% faster than the 3900X. Gaming Performance AverageHere's a look at the average performance across the 11 games we tested. For the most part, the 5900X matches the 5950X in gaming, so it’s no surprise to see them both deliver the same 214 fps average. This also means that overall the 5900X and 10900K are on par when it comes to gaming performance, at least in our small sample of games. On that note, we’re looking forward to a 40 game head to head benchmark with these processors.
It’s also impressive to see a 20% performance increase over the 3900X. We know AMD claimed a 19% IPC improvement, but seeing that translate into real world gains in games is something else. OverclockingWe were able to hit an all-core 4.6 GHz overclock with the 5900X using 1.375v. This isn’t quite as good as the 5950X's 4.7 GHz, but a solid all core overclock nonetheless. This boosted the Cinebench R20 multi-core performance by 7%, so it’s not amazing and nothing like the 20% boost the 5950X received, but it's free performance assuming you have a decent cooler and motherboard.
With that said, we can't recommend this overclock as it reduced single core performance. Previously, the 5900X hit 4.9 GHz in this benchmark, now we're limiting it to 4.6 GHz and that reduced the score by 7%.
The overclock is useful for running core-heavy applications if you’re happy to sacrifice efficiency for more performance. The gains aren't amazing as seen in Cinebench R20's multi-core test though, again we're only looking at a 6% performance boost.
For that 6% performance boost the total system consumption is increased by 16% and while that's still 11% less than a stock 10900K, it is a reduction in performance per watt.
For the most part, gamers won't want to overclock the 5900X, at least not the way we have. Perhaps per CCX overclocking will work out better. Here we're looking at a 5% performance reduction, though obviously you'll only see that when heavily CPU bound which isn't often the case in games.
We do see a slight performance improvement in Far Cry New Dawn as the overclock increased the average frame rate by 2%, so that's something. Price to PerformanceTime for the price vs. performance analysis. Starting with Cinebench, we see that the 5900X comes out costing 25% less than the 10900K, with the Intel processor priced at $550, though we've seen selling as high as $600. It should be priced at $530, but with spotty availability, you'll find yourself paying a premium to get it.
Using a less favorable program like Adobe Premiere, the 5900X is still seen delivering more value than the 10900K as it was 8% more cost effective. Not a major difference, but as we said, this was one of the less favorable applications for the 5900X.
Despite currently costing almost $100 more than the 3900X, the 5900X still costs 5% less per frame. When compared to the 10900K, it was just 4% cheaper per frame.
The 11 game average looks slightly different. Basically the 5900X offers the same level of value for CPU-limited gaming as the 3900X, despite costing $90 more in our comparison. Also, when compared to the 10900K we're looking at the same level of value for gaming. What We LearnedWe've gotta say, as impressive as the Ryzen 9 5950X is, we found reviewing the 5900X a little more interesting, mostly because it has a direct competitor in the same price bracket. The Ryzen 9 5900X is a more wallet-friendly CPU and possibly the more popular of the two for those looking to build a high-end system. For gamers, it makes a lot more sense. The question now is, for gamers looking to build a high-end system, which CPU should they buy, the 10900K or the 5900X? For the vast majority of people, it's not going to make a real difference. Performance is going to be roughly the same, and even when CPU limited 99% of the time, you won't be able to tell the difference. Looking into the future, the 5900X is the more powerful of the two overall and also has more cores to boot. When looking at the newer, more demanding games such as Death Stranding and Serious Sam 4, for example, we see that Ryzen leads by a good margin. Therefore we foresee a situation in 1 to 2 years where the 5900X is leading the 10900K by a comfortable margin in most demanding titles, though that’s entirely speculation on our part based on what we've seen today. For the most part, you're likely going to be GPU limited when gaming, and that means you're even less likely to notice the difference between the 10900K and 5900X on the short term. The 5900X does have the advantage of greater power efficiency. There's also PCI Express 4.0 support in newer motherboards, which will prove beneficial at some point in the future. Then for those of you running any kind of application, especially a core-heavy workload, the choice is more obvious. Worse case scenario, the 5900X is only slightly faster. Best case, it's around 40% faster and typically we saw gains in the 20-30% range. For now Intel looks to be out of the game at the high-end, and we suspect things are only going to get worse for the blue team as we work down the Zen 3 product stack. The Ryzen 9 5900X is a mighty good CPU and for the 10900K to be considered an option, in our opinion it’d need to be priced at no more than $500, or less considering the the lack of PCIe 4.0. Stay tuned tomorrow when we review the Ryzen 7 5800X. Shopping Shortcuts: |
| How To Change the Icons Names On Android Homescreen Posted: 07 Nov 2020 07:29 PM PST If you have been using an Android smartphone for a while, then you might know that the operating system creates a new app icon whenever the user installs a new app. The app icons were created automatically with the default name and icon on the home screen. App icons are important as it provides quick access to the apps, but have you ever thought about changing the app icons or icon names? It's actually possible to change the name of icons on Android's home screen. However, you need to use a third-party app for that purpose. So, in this article, we are going to share an easy method that would help you to change the icon names on your Android's home screen. Also Read: 10 Best Android Icon Packs Change the icon names on the Android home screenThe good thing is that you don't need to root your Android device to change the icon names on Android. You just need to install a few apps from the Play Store to get things done. Let's check out. Using Quick Shortcut MakerQuickShortcutMaker allows users to create a shortcut for apps that are already installed on the computer. The great thing is that users can create app shortcuts on the home screen with custom icons and names. Let's check out how to use QuickShortcutMaker. Step 1. First of all, download and install the cool android app that is Quick Shortcut Maker. Step 2. Now launch the app, and you will see the list of the apps that were installed on your device. Step 3. Now you have to tap on the app whose icon name you want to change. Step 4. Quick Shortcut Maker will show you the app information. You just need to tap on the app name as shown below. Step 5. Now a popup will appear. Just type in the name that you want to set, and then tap on OK. Step 6. Now you will see a create option to create a shortcut for the app. Just tap on the 'Create' button. Once done, you will find the new app icon on the home screen. That's it! You are done, now you will have the app renamed with your desired name on your home screen. Using Nova LauncherNova launcher is a highly customizable & performance driven launcher. It brings wide range of customization options like you can apply custom icons, apply themes, etc. Also, it allows you to change the icon name on the home screen. Here's how to use Nova Launcher on Android. Step 1. First of all, download & install Nova Launcheron your Android. Step 2. You will see the screen like below where you will be asked to select a "Backup" You just need to tap on the "Next" button to continue. Step 3. Now you will be asked to choose your preset. Simply, select the option "Light" or "Dark" theme to continue. Step 4. Now you will be asked to choose the drawer style. Simply, select as per your wish and continue. Step 5. Now move to the home screen and long press on the app icon whose name you want to change. Step 6. Now you will get to see three options "Edit," "Remove," "App Info." Simply, tap on the "Edit" option. Step 7. Now you will be asked to set a name for your selected icon. Simply, set the name according to your wish. That's it! You are done. This is the easiest way to change your icon name. So, the above is all about how to change the icon names on Android. I hope this article helped you! Please share it with your friends also. If you have any doubts related to this, let us know in the comment box below. |
| You are subscribed to email updates from My Blog. To stop receiving these emails, you may unsubscribe now. | Email delivery powered by Google |
| Google, 1600 Amphitheatre Parkway, Mountain View, CA 94043, United States | |




















0 nhận xét:
Đăng nhận xét