How to Password Protect Applications on Windows 10 |
- How to Password Protect Applications on Windows 10
- How to Convert a Login to “Sign in With Apple”
- How to Stop Microsoft 365 From Automatically Renewing
- Asus ZenBook 14 UX425E Review
- How to Easily Identify Fonts in Images On Android
- How to Play Google Stadia on Your iPhone and iPad
- How to Add an Email Signature in Gmail for Android
- How to Show, Hide, and Pin Teams and Channels in Microsoft Teams
- How to See When Windows 10 Last Installed a Major Update
| How to Password Protect Applications on Windows 10 Posted: 17 Dec 2020 08:15 AM PST
If you use a shared computer, one way to keep other users off certain apps is to require a password for opening that app. You can password-protect individual applications with a third-party application. Should You Even Do This? Read These LimitationsIn this tutorial, we'll be using My Lockbox, which provides a free and paid version. There are other third-party applications available that provide free-trials—including Folder Guard, which can also protect apps—but require you to purchase a license after the trial ends. Freeware isn't known for its privacy or security. There are risks involved when using freeware as a quick and easy means to an end. Almost all freeware comes bundled with bloatware and, while most bloatware isn't malicious, that's not always the case. But even if the bloatware isn't malicious in itself, it does consume disk space which in turn can slow down your computer—a price most aren't willing to pay for free software. RELATED: Spread the Word: Ninite is the Only Safe Place to Get Windows Freeware The particular freeware application we're using in this article does a good job of doing what it says it does: password protecting folders (and the apps within those folders) and preventing access from unauthorized users. However, there are ways around this. If someone is signed in with an administrator account, for example, they can work around Lockbox by changing the Windows permissions, gaining access to the previously locked folders. While not the easiest thing to do, it is possible. Alternatives to Password-Protecting AppsIf you want to truly password-protect applications, there are other measures you can take aside from downloading third-party applications. For example, if your goal is to regulate the content and screen time for your child, you can set rules using Windows 10's parental controls. You can use separate Windows user accounts to prevent other people who use a shared PC from accessing your files, too. If you want to protect certain apps on your computer that are business-related, but you have a shared account with a spouse, you can create an encrypted container file and install the app to that location. That said, if what you need is a quick and (ideally) temporary solution, here's what you can do. RELATED: How to Password Protect Files and Folders With Encryption Lock Apps on Windows 10First, download and install My Lockbox by going to the "My Lockbox" page on the FSPro Labs website and clicking the "Download" button.
Once downloaded, double-click the "mylockbox_setup" icon. This will launch the My Lockbox installation wizard.
The wizard will carry you through the setup process. The first two windows will ask you to select a language and accept the License Agreement. After that, you'll be asked to choose a folder to install My Lockbox. This is You'll need at least 9 MB of free disk space to install My Lockbox.
Continue through the wizard and, at the end, click "Install." Installation of the software should only take a few seconds.
My Lockbox will now be installed. Double-click the app icon to launch it.
The first thing you'll be asked to do when launching the app is to add a password. Enter a strong password and type it again to confirm it. If necessary, add a hint and your email address to recover the password in case you forget. Click "OK" to continue.
Next, you'll be asked to select the folder you'd like to protect. What you'll want to do here is select the folder that contains the app you want to lock. If you lock the folder that contains the app, you will not be able to open the app–even if you try to access the app from the start menu or desktop shortcut. Click "Browse" to open File Explorer.
Navigate to the folder that contains the app you would like to lock, click it to select it and then click "OK." In this example, we'll select the folder that contains Google Chrome.
Confirm the file path in the "Folder to Protect" box and then click "OK."
You'll now be denied access when trying to launch the app.
To open the app, launch My Lockbox and enter the password. Click "OK."
The contents of the locked folder will now appear in the "My Lockbox File Browser." You can double-click the app here, or anywhere else, to launch it.
The app will now be accessible without protection until you enable the setting again. To do so, click the "Enable Protection" button in the top-right corner of the My Lockbox app.
The app inside the folder will now be behind the password wall again. Be sure to enable this protection feature each time you're finished using the app. |
| How to Convert a Login to “Sign in With Apple” Posted: 17 Dec 2020 07:15 AM PST  "Sign in with Apple" lets you register for and log into services using your Apple ID, just like you can with Facebook and Google. If you've already signed up for a service but would rather sign in with your Apple account, here's how you can switch. What Is "Sign in With Apple?""Sign in with Apple" lets you register for or sign up for a service without having to provide a password and go through a registration process. The service requires the use of an Apple ID that uses two-factor authentication, so anyone with an iPhone, iPad, or Mac can take advantage.
When you Sign in with Apple, you don't need to provide a password at all. Assuming you're already signed in to your Apple ID, logging in is a simple matter of tapping a button and waiting. Instead of a password, services identify you via your Apple ID, though you still maintain control over what information you divulge. The service works with existing biometric authentication methods like Touch ID and Face ID to make signing in as quick as possible. You can still sign in to services from any web browser (Windows, Android, and so on), you'll just need to log into your Apple ID first. Sign in with Apple isn't used by every service or app, but an increasing number of developers are introducing support. If you can use the service to log in to an app or website, you'll see the "Sign in with Apple" button alongside the usual login options. How to Convert Accounts to "Sign in With Apple"Since Sign in with Apple was introduced, many more developers have jumped on board and added support for the feature to their apps and websites. If you already have an account with a service that now supports Sign in with Apple, you may be able to switch over to the faster sign-in method.
How this works depends on how each service implements it. We tested WordPress.com and found the option under Account Settings > Social Sign-in, with an option to "Connect" your Apple account for faster login in the future. Other services can convert your login from within apps that run on your device. For Reddit, launch the app, then tap on your user icon, followed by Account Settings. You'll find an option to "Connect" your Apple account (alongside a Google account, if you wish) on this screen.
For apps that don't offer an option to convert, you can try logging out, then using the Sign in with Apple button to "create" a new login. Be aware that you'll need to explicitly share your email address (rather than choosing "Hide My Email") so that the service knows to link your existing account to your new login method. How to Convert From the Settings AppIf you save your passwords with Apple, they are synced between devices on iCloud. Some services may allow you to convert to Sign in with Apple under the Passwords section of the Settings app. Navigate to Settings > Passwords on your iPhone and iPad and authenticate so that you can see your list of saved passwords. Tap on "Security Recommendations," and then tap on a service that needs attention. If "Use Sign in with Apple" is available, tap it to start the conversion process and follow the prompts. How Does Sign in With Apple Protect You?Sign in with Apple means that you have one less password to worry about, which means one less password to change in the event of a security breach. But the same could be said for Google and Facebook's social sign-in options, so how does Sign in with Apple go the extra mile? Apple's implementation allows you to effectively sign up for a service anonymously, without divulging personal information like your email address. When you choose "Hide My Email" on sign up, Apple acts as an email relay, signing you up for an account while forwarding any correspondence to the email address normally associated with your Apple ID.
Unlike similar services from companies like Facebook, Apple says it won't track or profile you across apps and websites. Apple makes most of its money selling hardware like smartphones and laptops, with additional revenue from App Store sales and cloud services. Because you need to use two-factor authentication (2FA) to take advantage of Sign in with Apple, every service you sign up for also uses 2FA by default. Most services will allow you to link an email address and create a password for a more traditional login experience if you'd prefer. Convenient and SecureSign in with Apple is a remarkably "consumer-friendly" login system. The way that the service prioritizes privacy and prevents user tracking puts it head and shoulders above alternatives like Google and Facebook. As more developers get on board, the service will become more prevalent and viable. Are you concerned about giving away too much? Perform an iPhone privacy check-up on your device now. RELATED: How to Check and Tighten All Your iPhone’s Privacy Settings |
| How to Stop Microsoft 365 From Automatically Renewing Posted: 17 Dec 2020 06:03 AM PST If you subscribe to Microsoft 365 (or Office 365) and have decided it's not for you, you can turn off your automatic renewal. This allows you to keep using Office applications until the subscription expires, but not be charged again in the future. Sign in and Turn off Recurring BillingTo disable your automatic renewal for Microsoft 365, visit the Office 365 Login page and sign in to your Microsoft account. In the top-right corner of the web page, click your profile photo or initials and select "My Microsoft Account."
Alternatively, you can sign in directly on the Microsoft Account Services page. In the blue navigation bar at the top, choose "Services & Subscriptions." You can also click "Manage Microsoft 365 Services & Subscriptions" to the right of your name.
You'll see your renewal in the blue section at the top as well as in the main part of the screen under the subscription name. Click "Manage" in any of the three spots.
Under "Payment Settings," you'll see the amount of your subscription next to the recurring billing verbiage. To the right, click "Change" and pick "Turn Off Recurring Billing."
Scroll to the very bottom of the following page and select "Turn Off Recurring Billing."
If you change your mind and want to reenable the automatic renewal for your Microsoft 365 (or Office 365) subscription, follow the same steps as above and select "Turn On Recurring Billing." Then simply follow the prompts to set up your payment. Notes on Disabling Recurring Billing
Microsoft 365 is a terrific service, but only if you use it. Maybe you thought you would use applications like Word or Outlook regularly and that a Microsoft 365 subscription would be a great buy. But if you don't use any of the applications, you can save a few bucks by turning off the automatic renewal and checking out some Microsoft Office alternatives. |
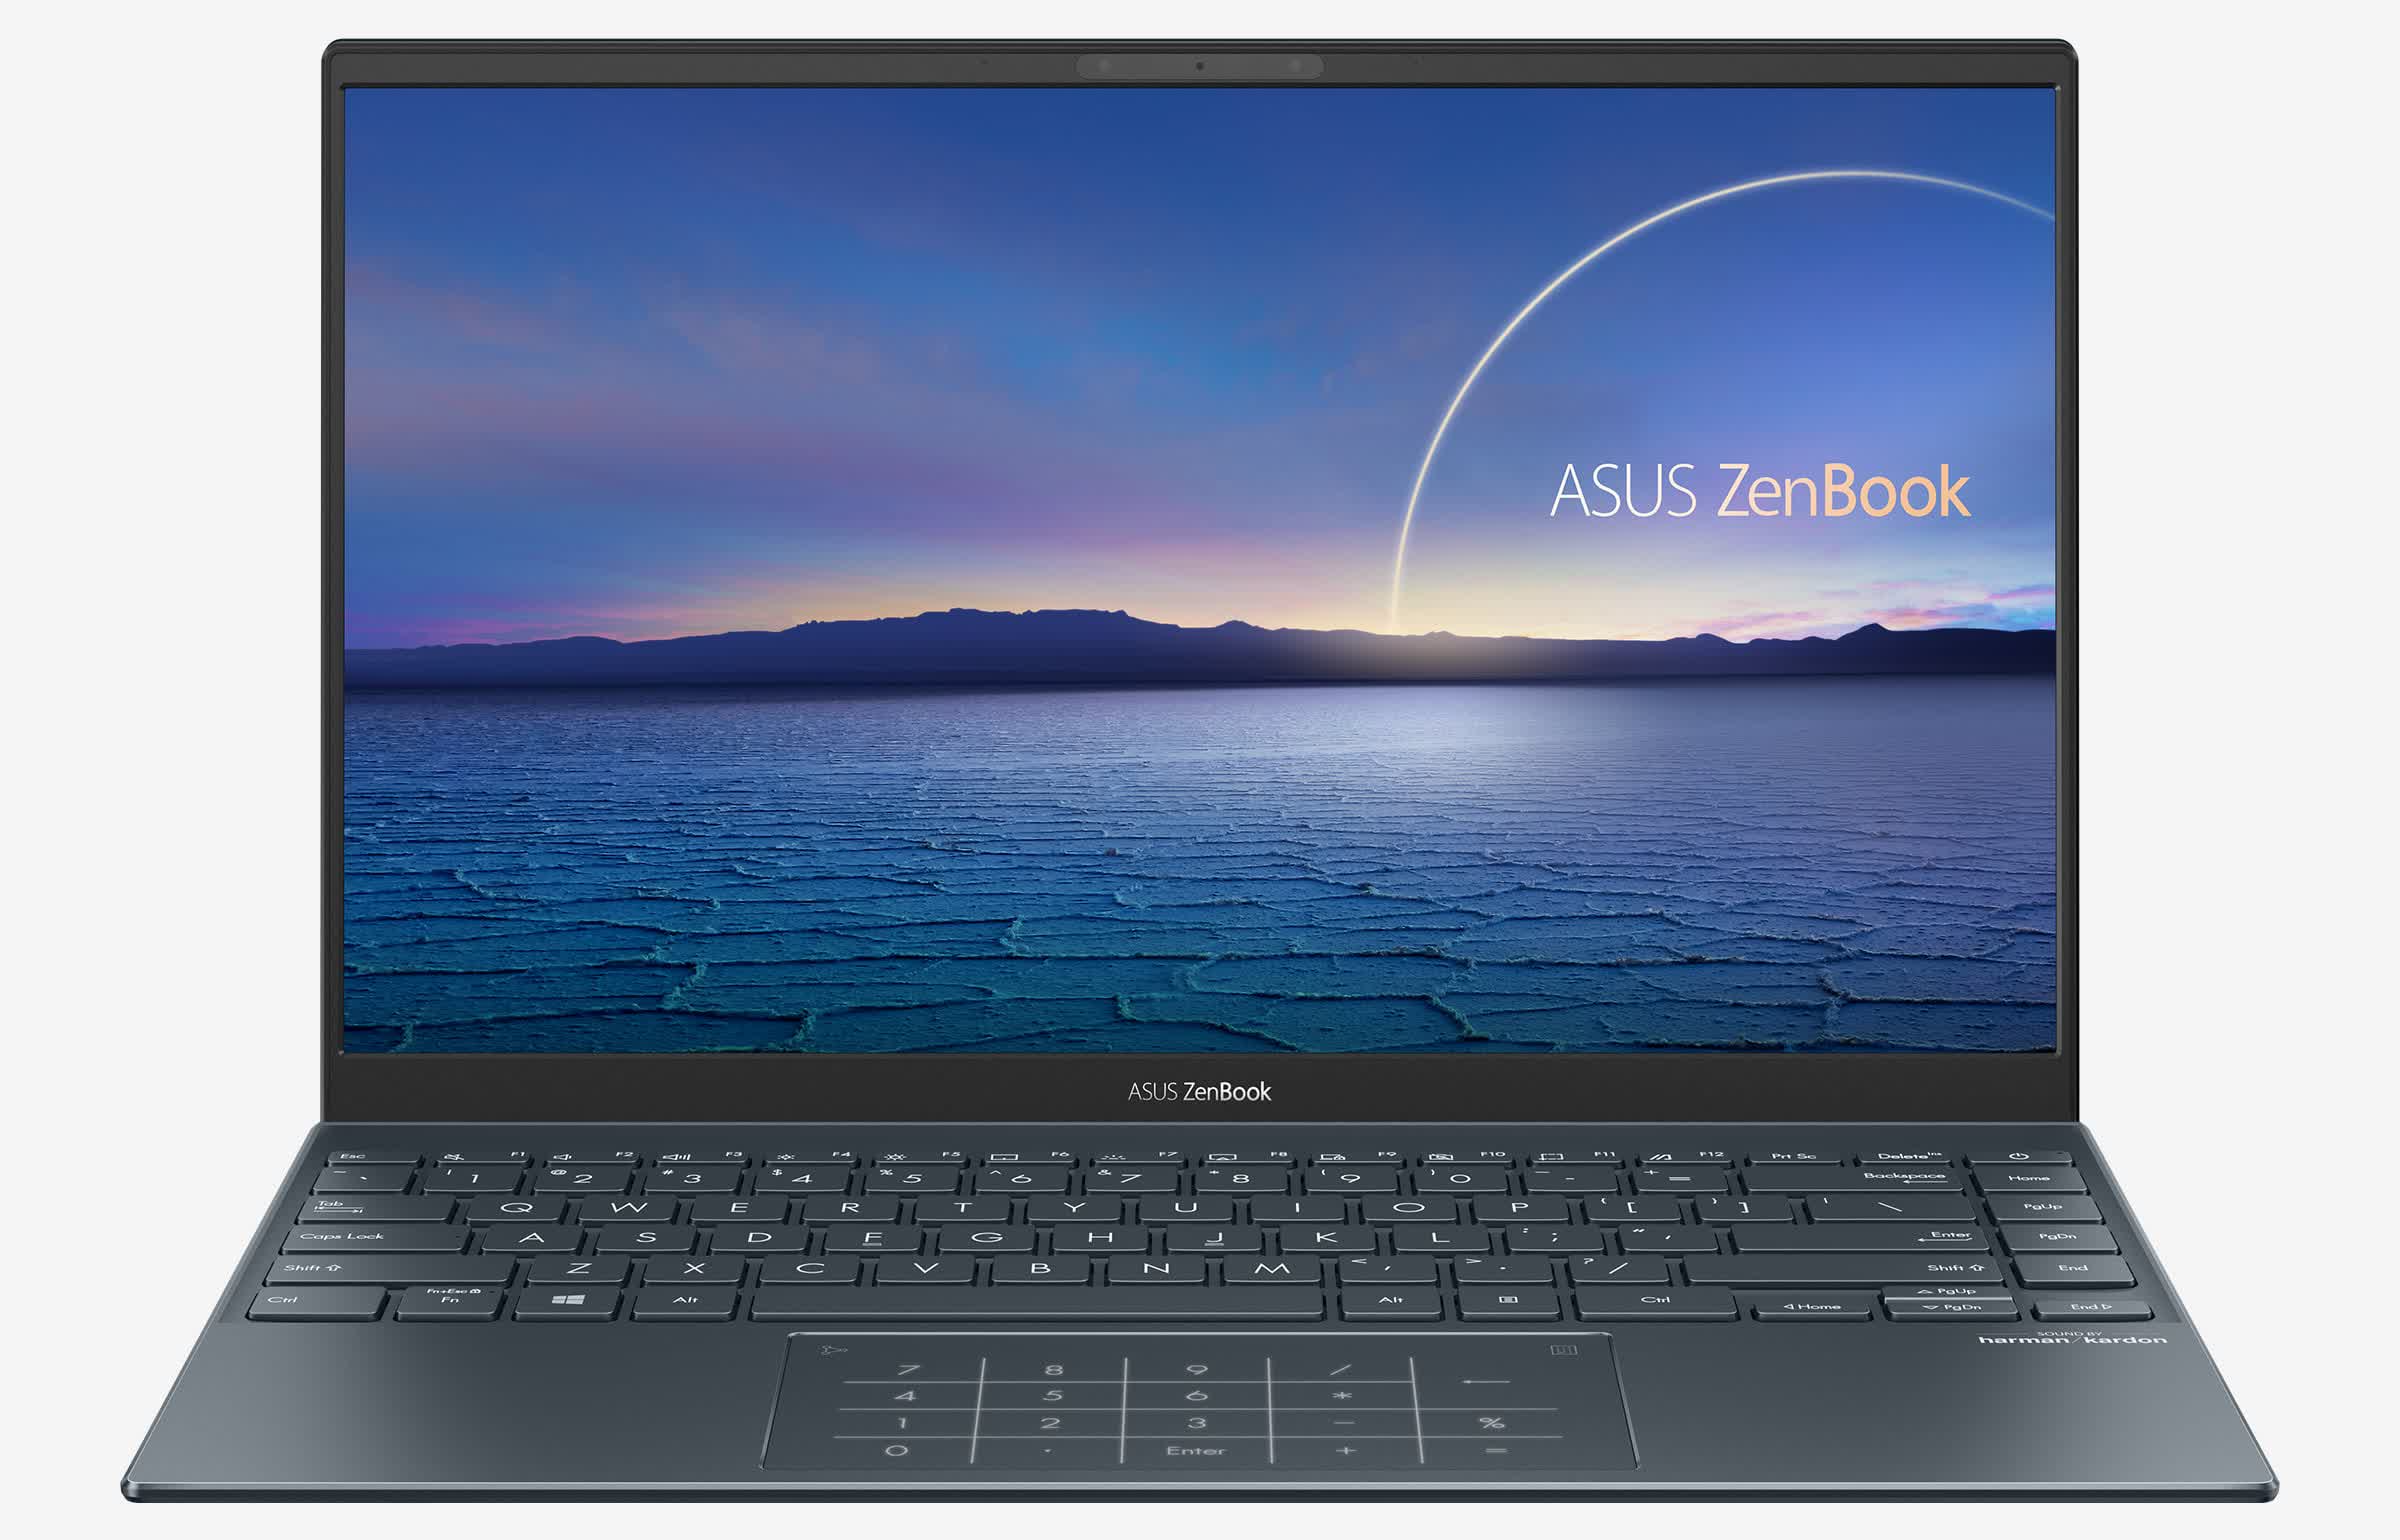
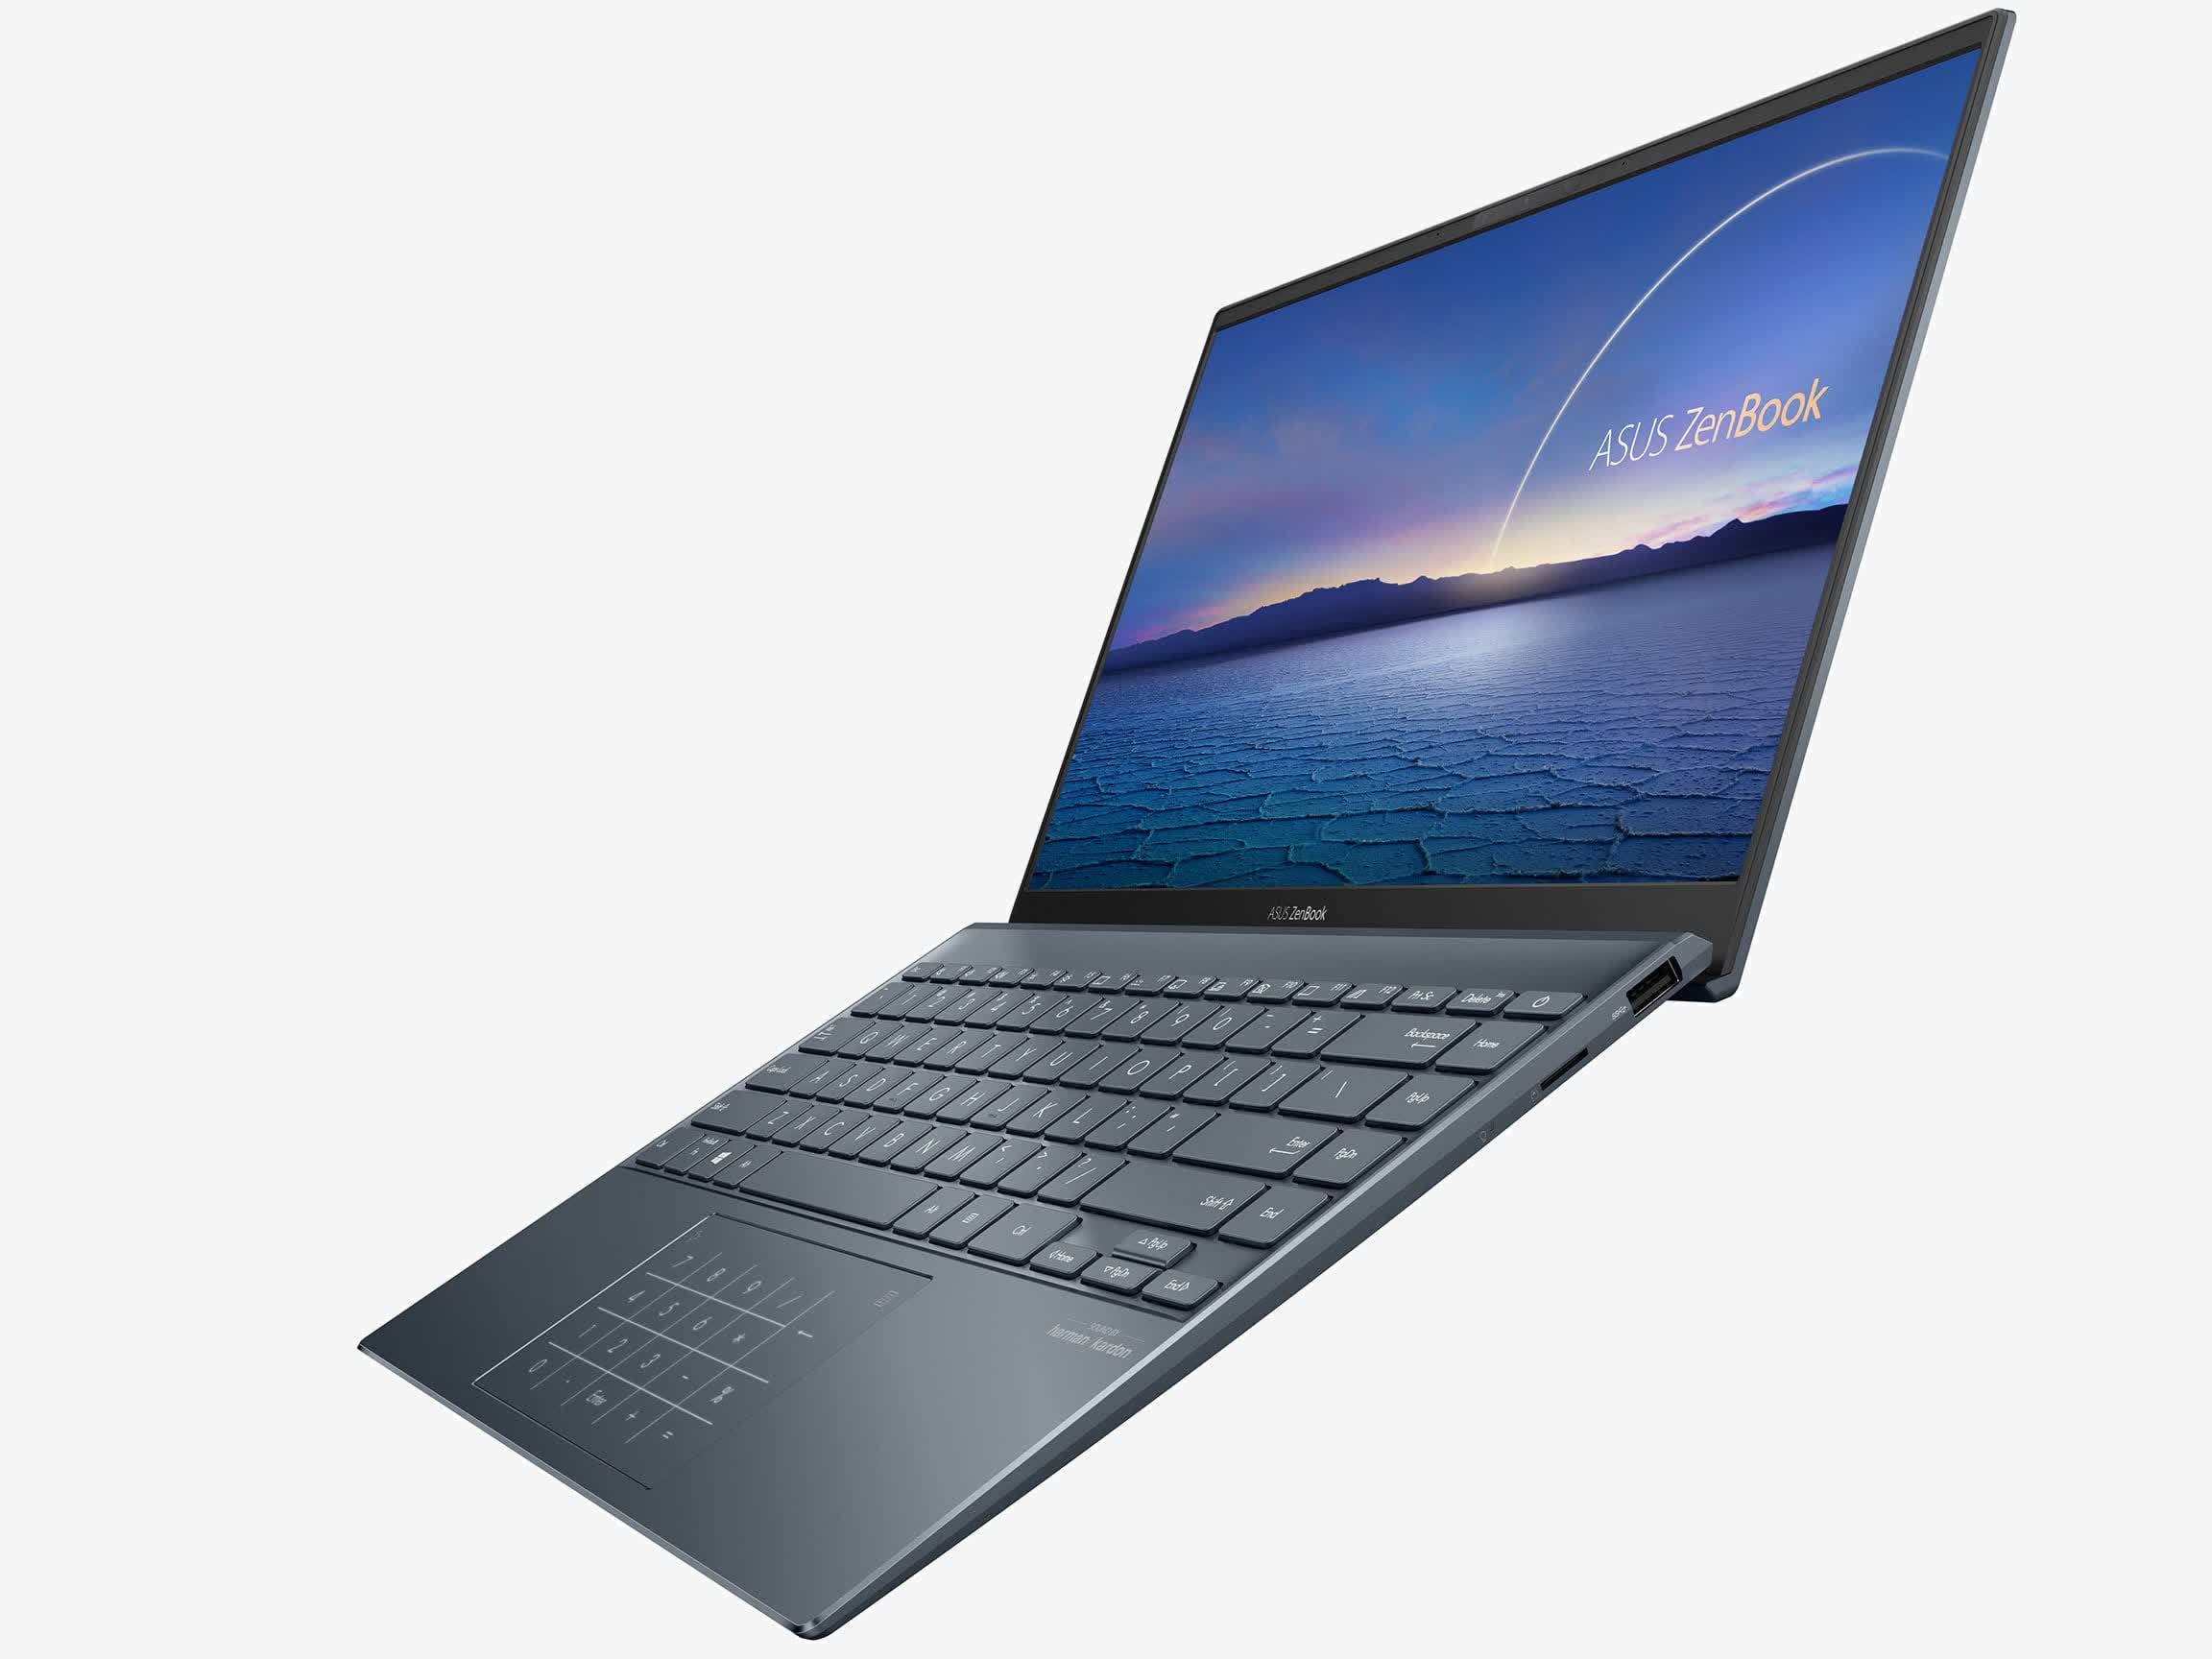
| Posted: 17 Dec 2020 04:32 AM PST The Asus ZenBook brand is the byword for accessible luxury, and the UX425 is the latest model to emerge with the brushed metal and sleek design associated with these machines. The most interesting thing here isn't the outside, though – it's the interior. This ZenBook is among the first laptops we've seen with one of Intel's Tiger Lake CPUs. The chip of choice is the Core i7-1165G7, which is set to become one of the most popular Tiger Lake offerings – it's already appearing in loads of laptops, and the preceding i7-1065G7 was everywhere. We have a detailed review on this new laptop CPU, but in a nutshell, the new Core i7 promises improved performance thanks to an improved manufacturing process and more versatility when it comes to clock speeds – alongside support for new features like Thunderbolt 4, PCI-E 4.0, and improved integrated graphics.
It's a fiercely competitive era in the laptop market, though. Intel may be making big claims about its new chip, but CPUs like AMD's Ryzen 5 4500U and Ryzen 7 4700U are ready to compete with Intel, and other machines are still finding success with the i7-1065G7. The ZenBook 14 configured as our sample unit (16GB RAM/1TB SSD) costs around $1,099, while the base $899 version comes with half of the memory and storage capacity.
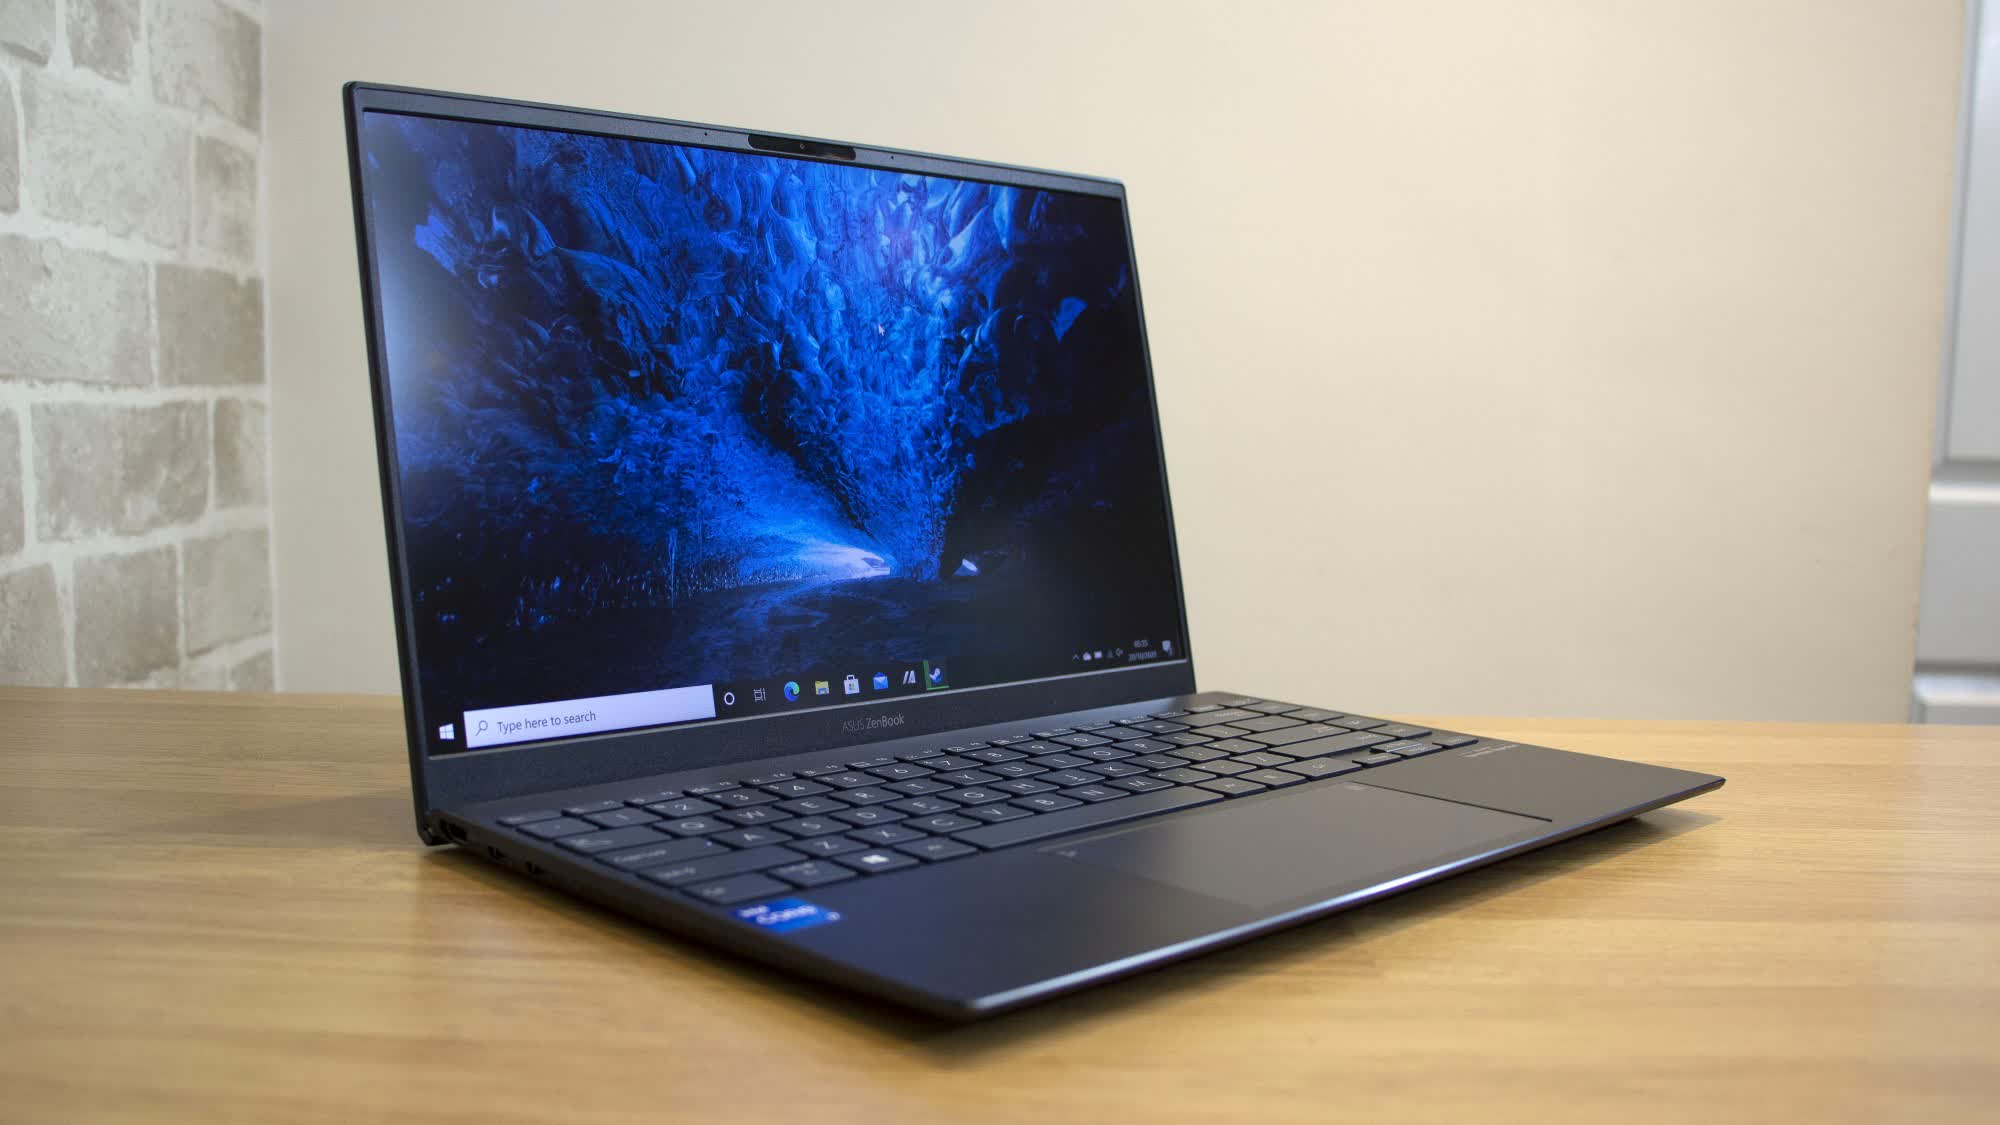
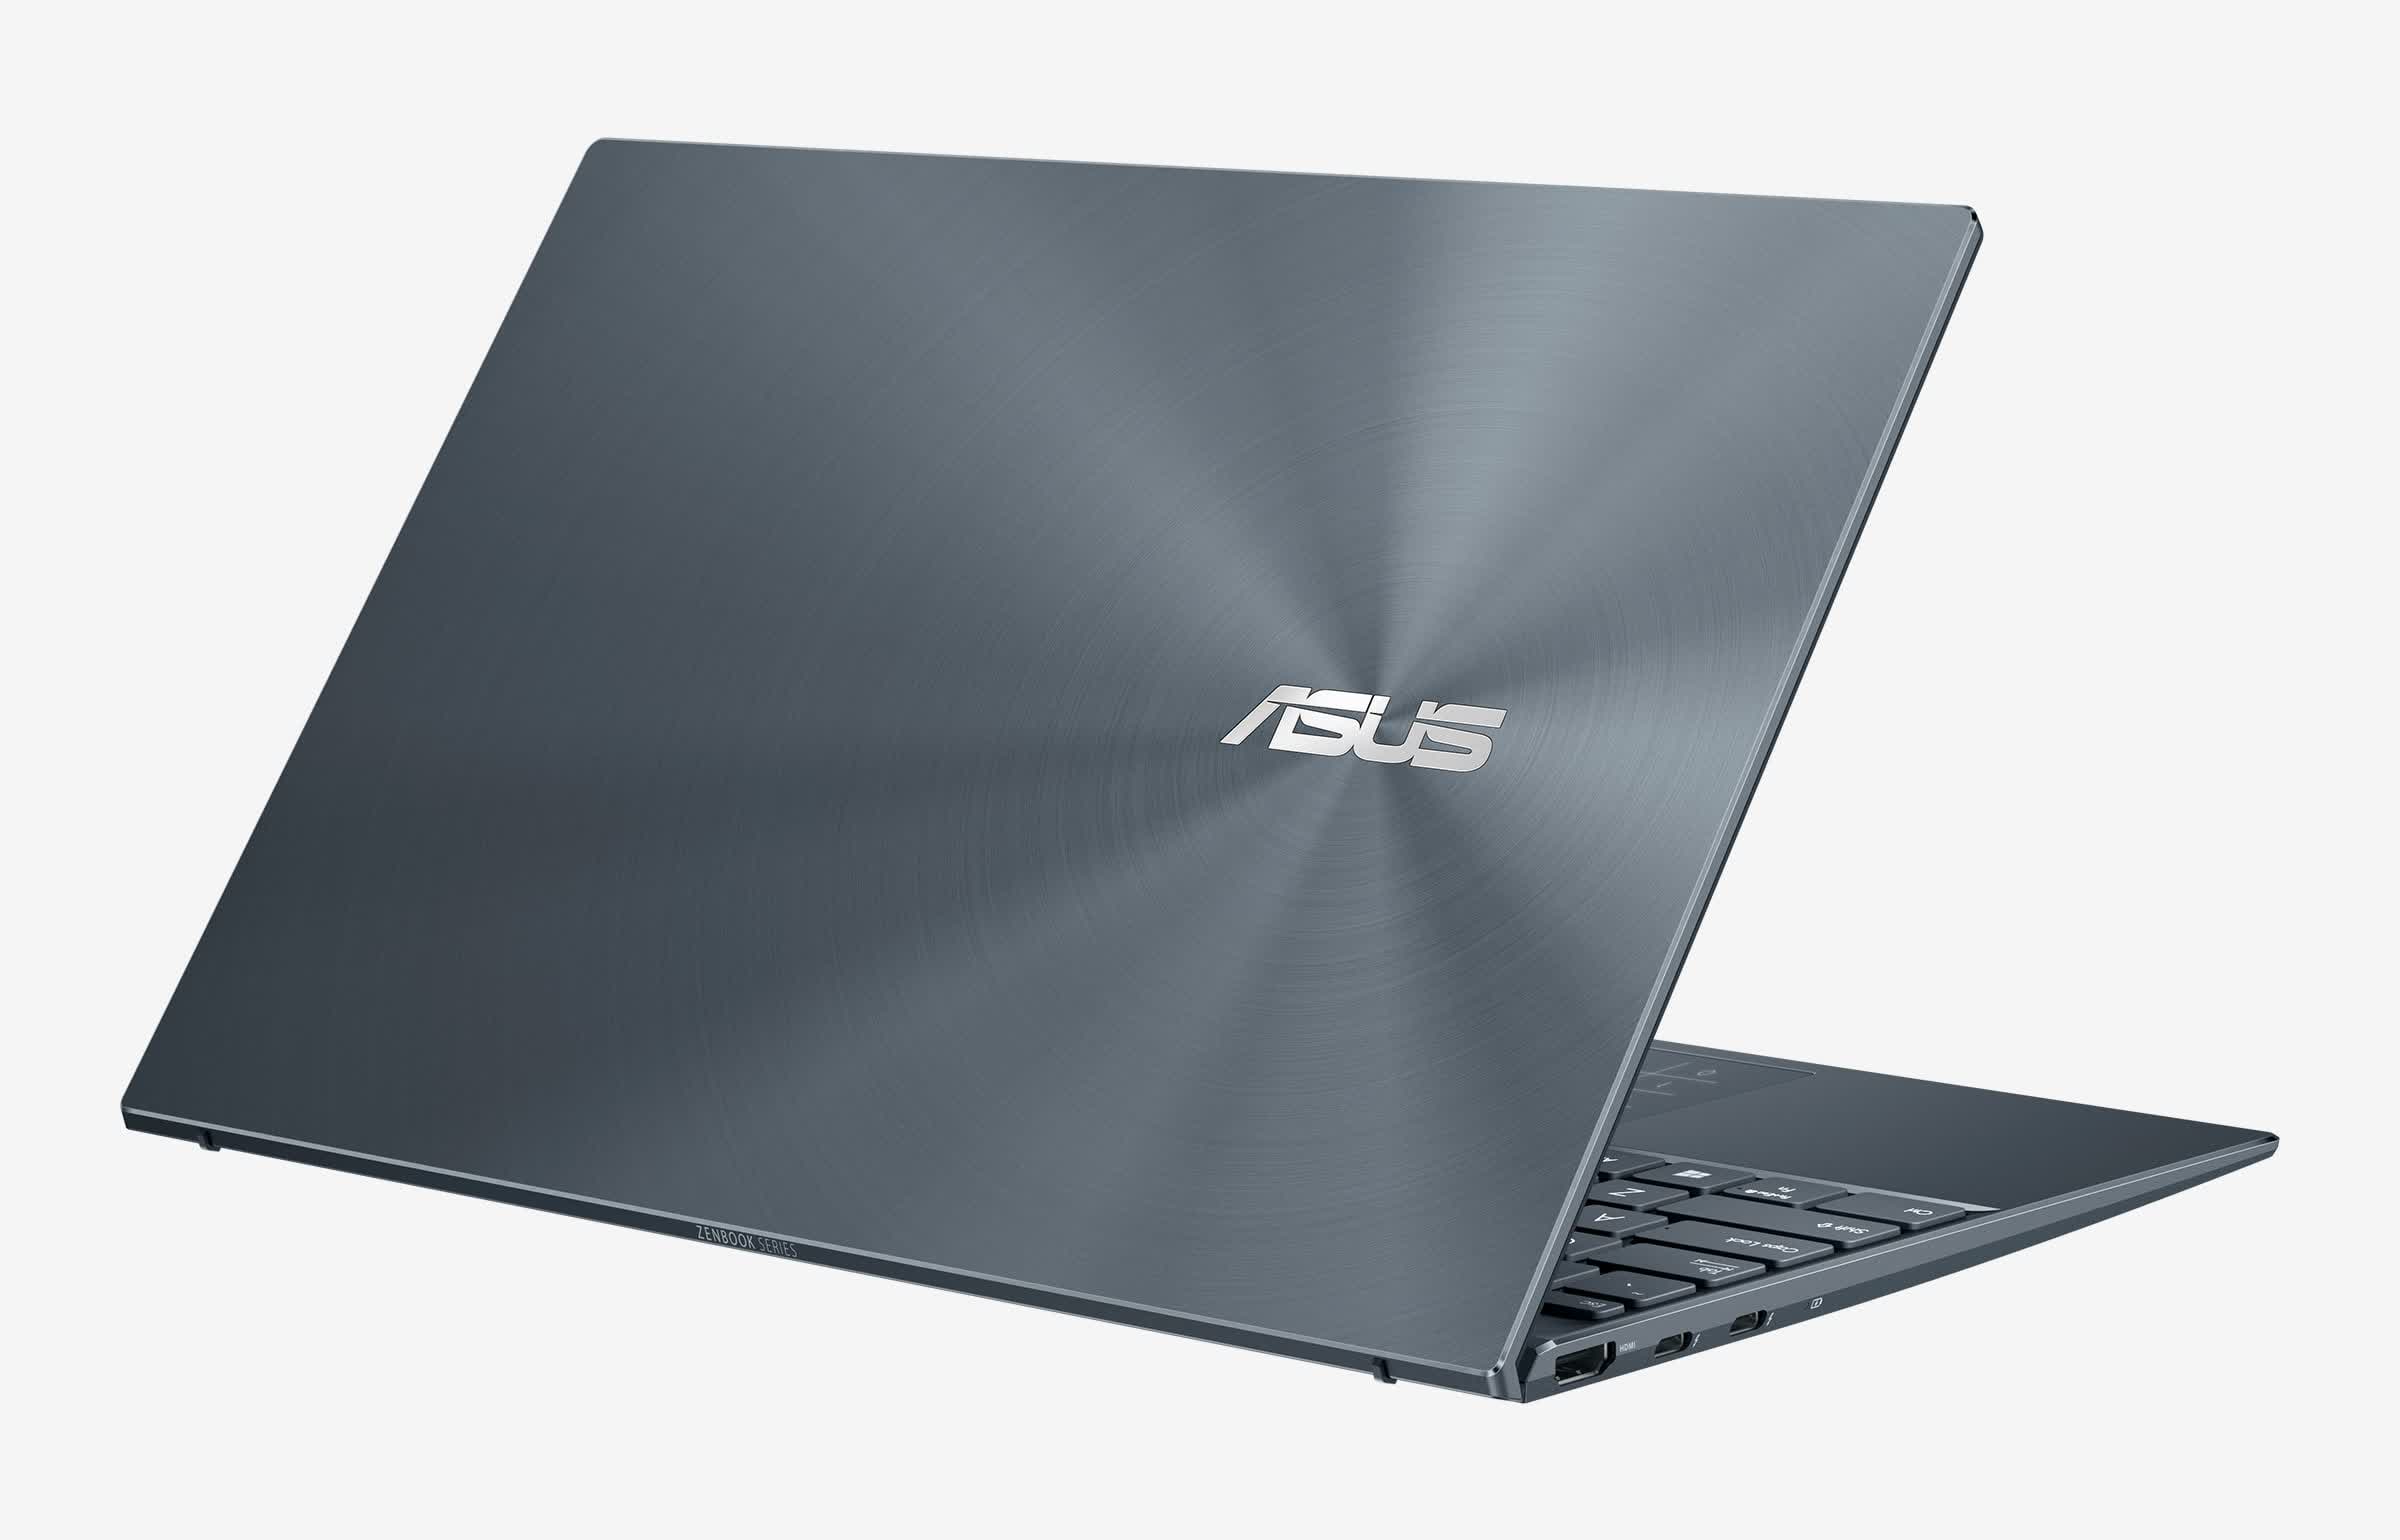
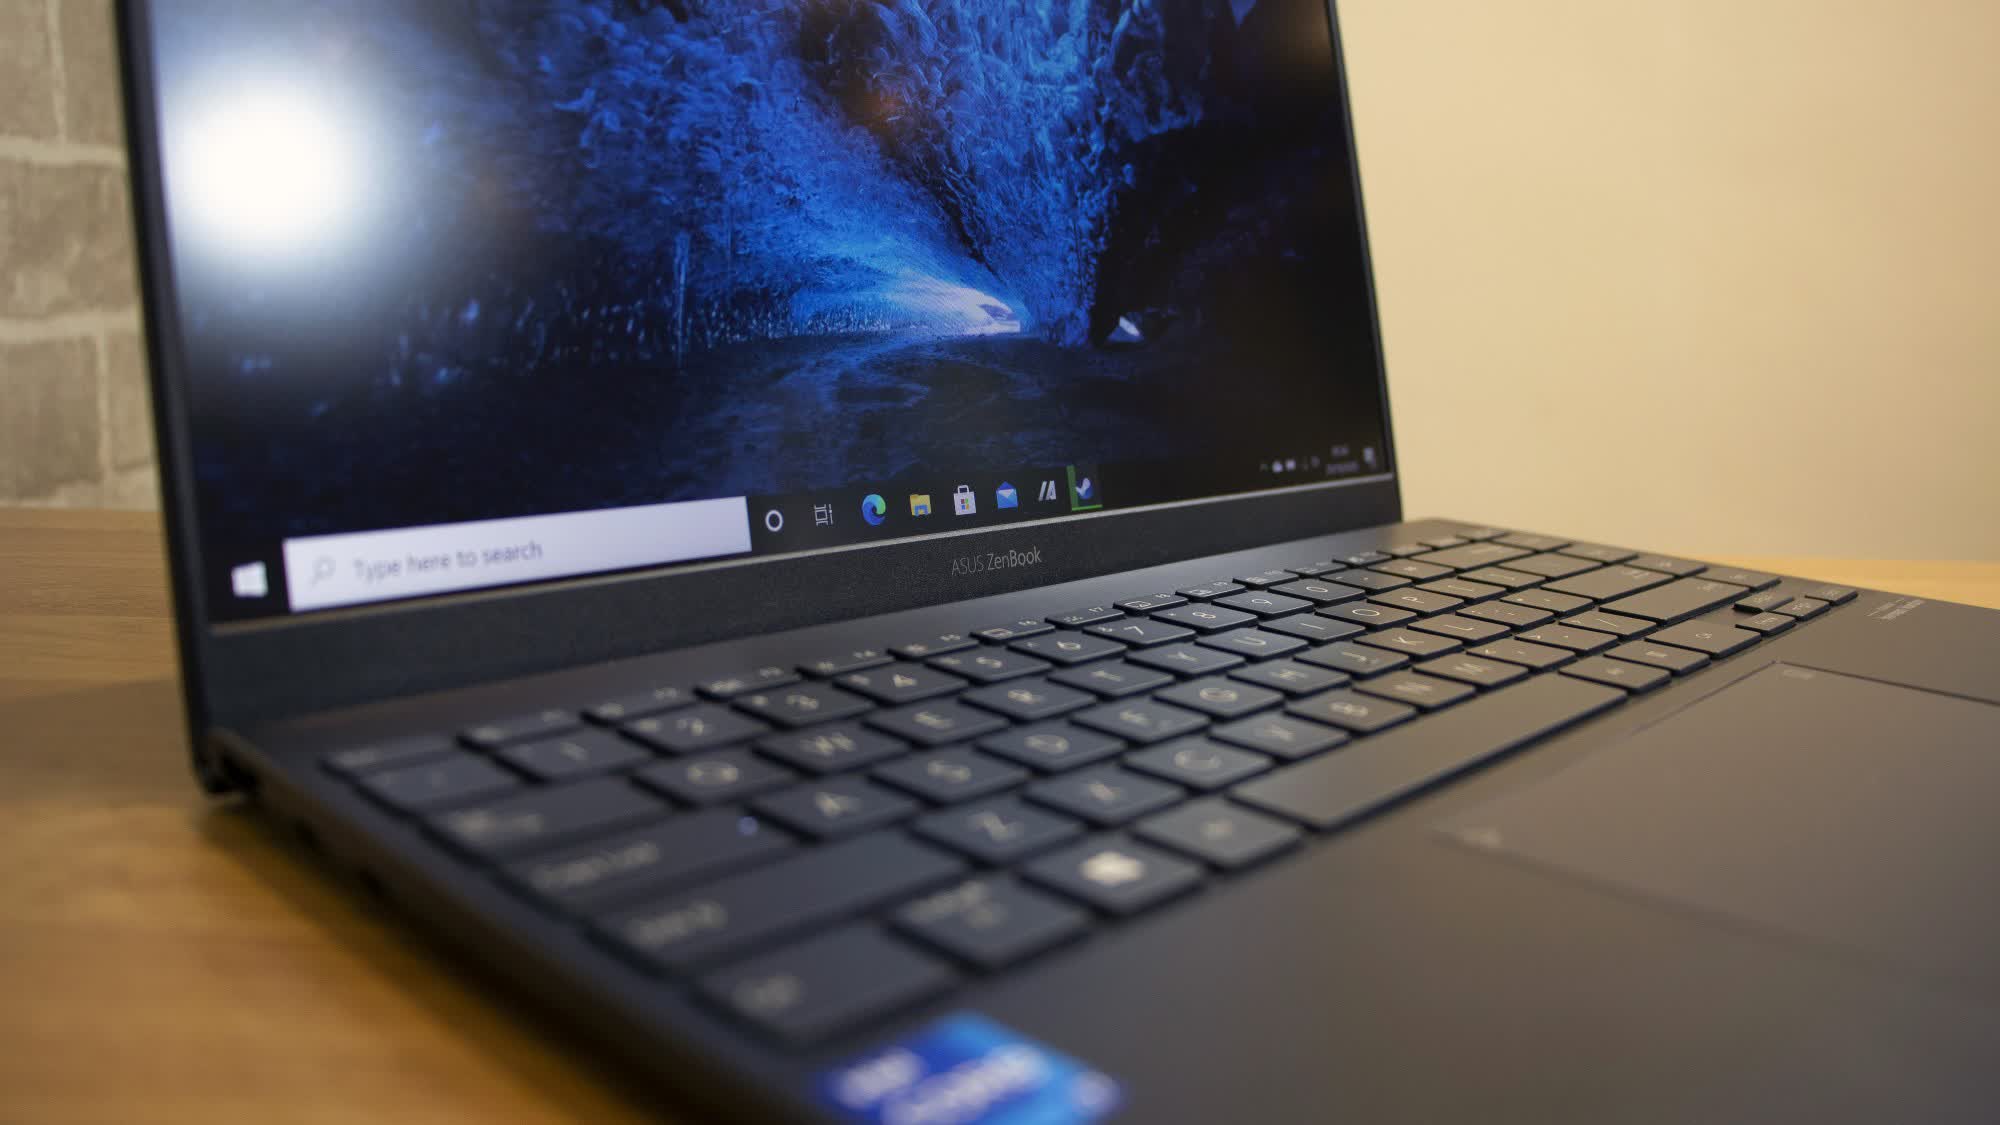
Features and DesignThe UX425 is unmistakably a ZenBook. The lid is built from aluminum alloy and finished in a smart, subtle concentric circle design focused around the shining, off-center Asus logo. Opening the machine reveals more alloy in the same dark shade. The shape is sleek, with a tapered front edge and slim bezels on both sides of the screen. The laptop can be opened smoothly with your fingertip. The rear has a modest ErgoLift hinge, which tilts the keyboard towards the user, and the underside is minimal, with one wide air vent and four rubber feet. The ErgoLift design means that the bottom bezel is a little too chunky, and it doesn't allow for the display to lay completely flat.
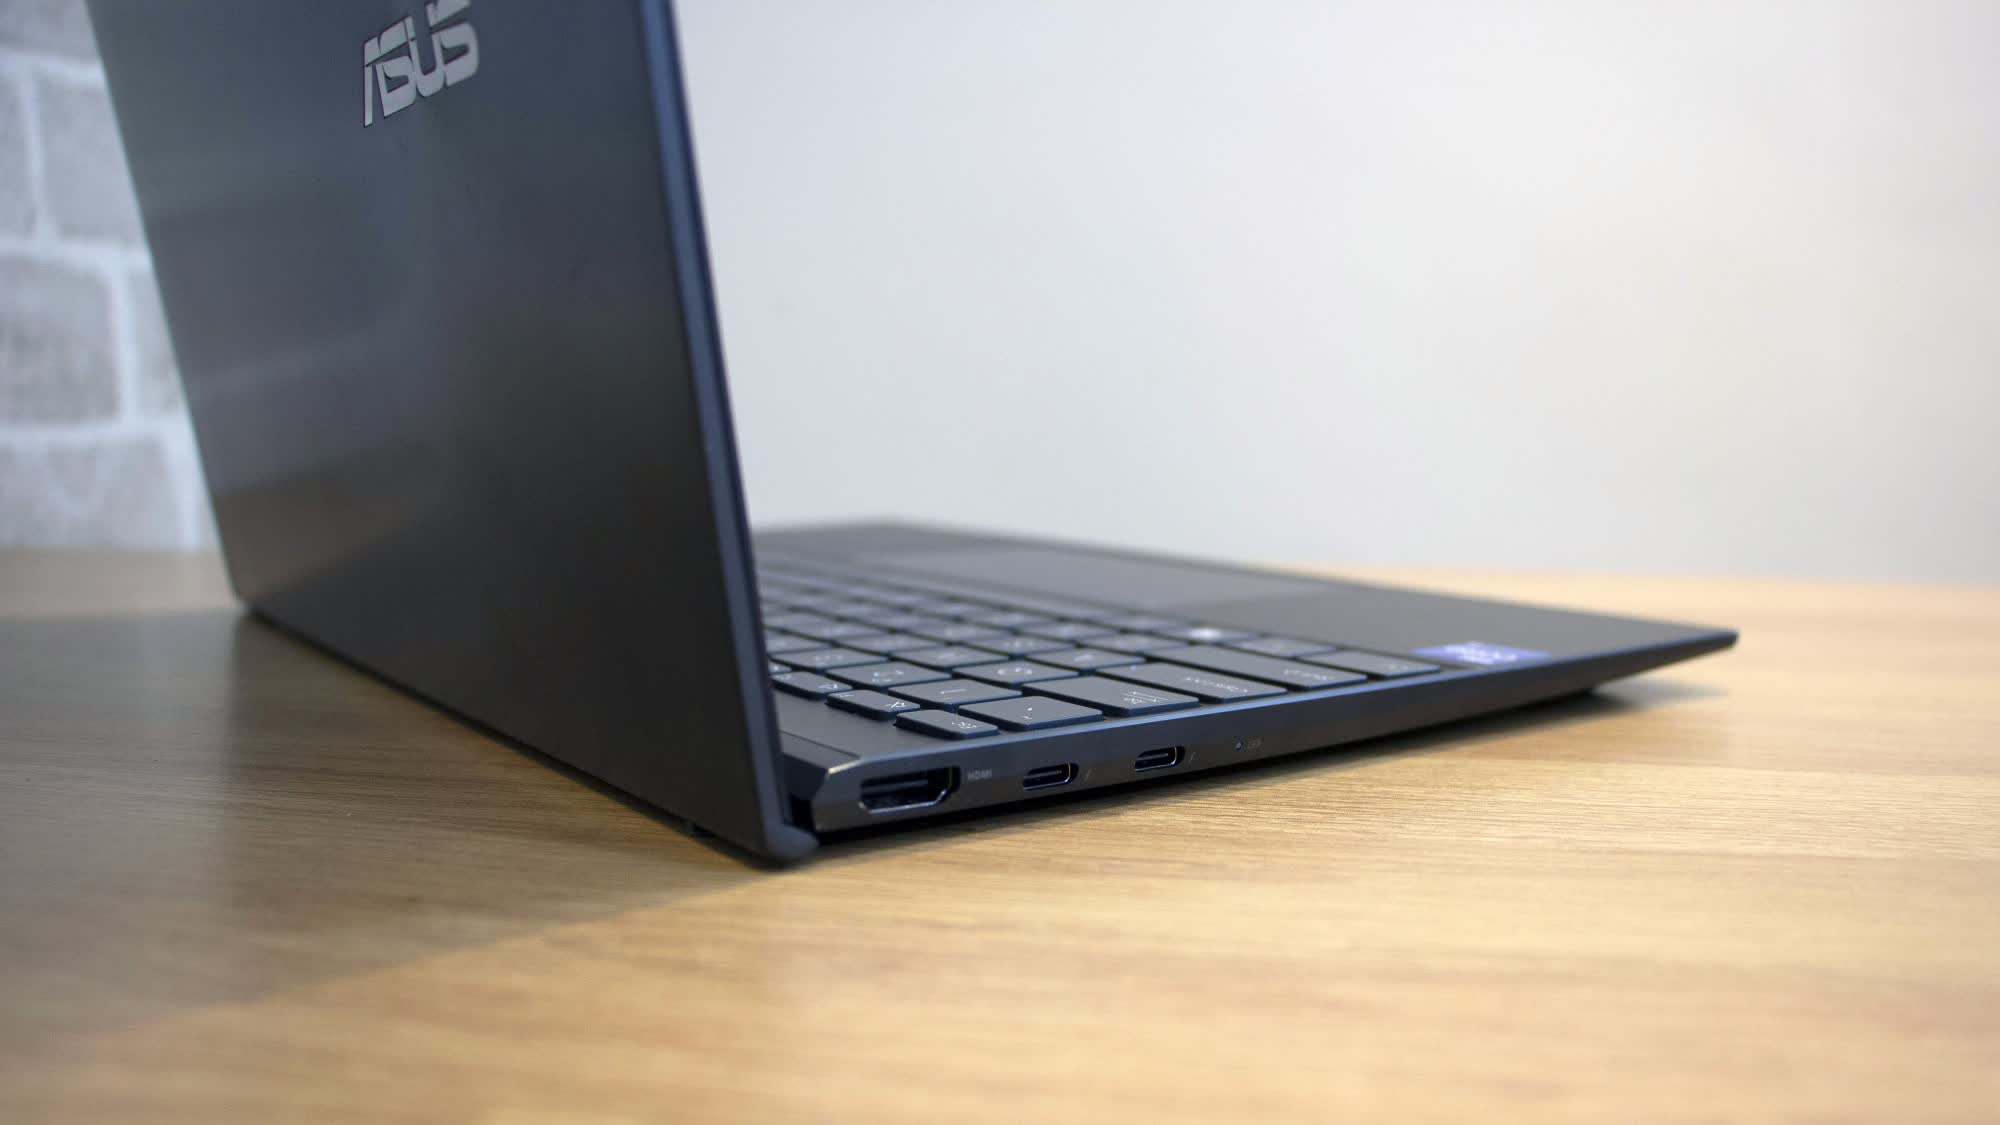
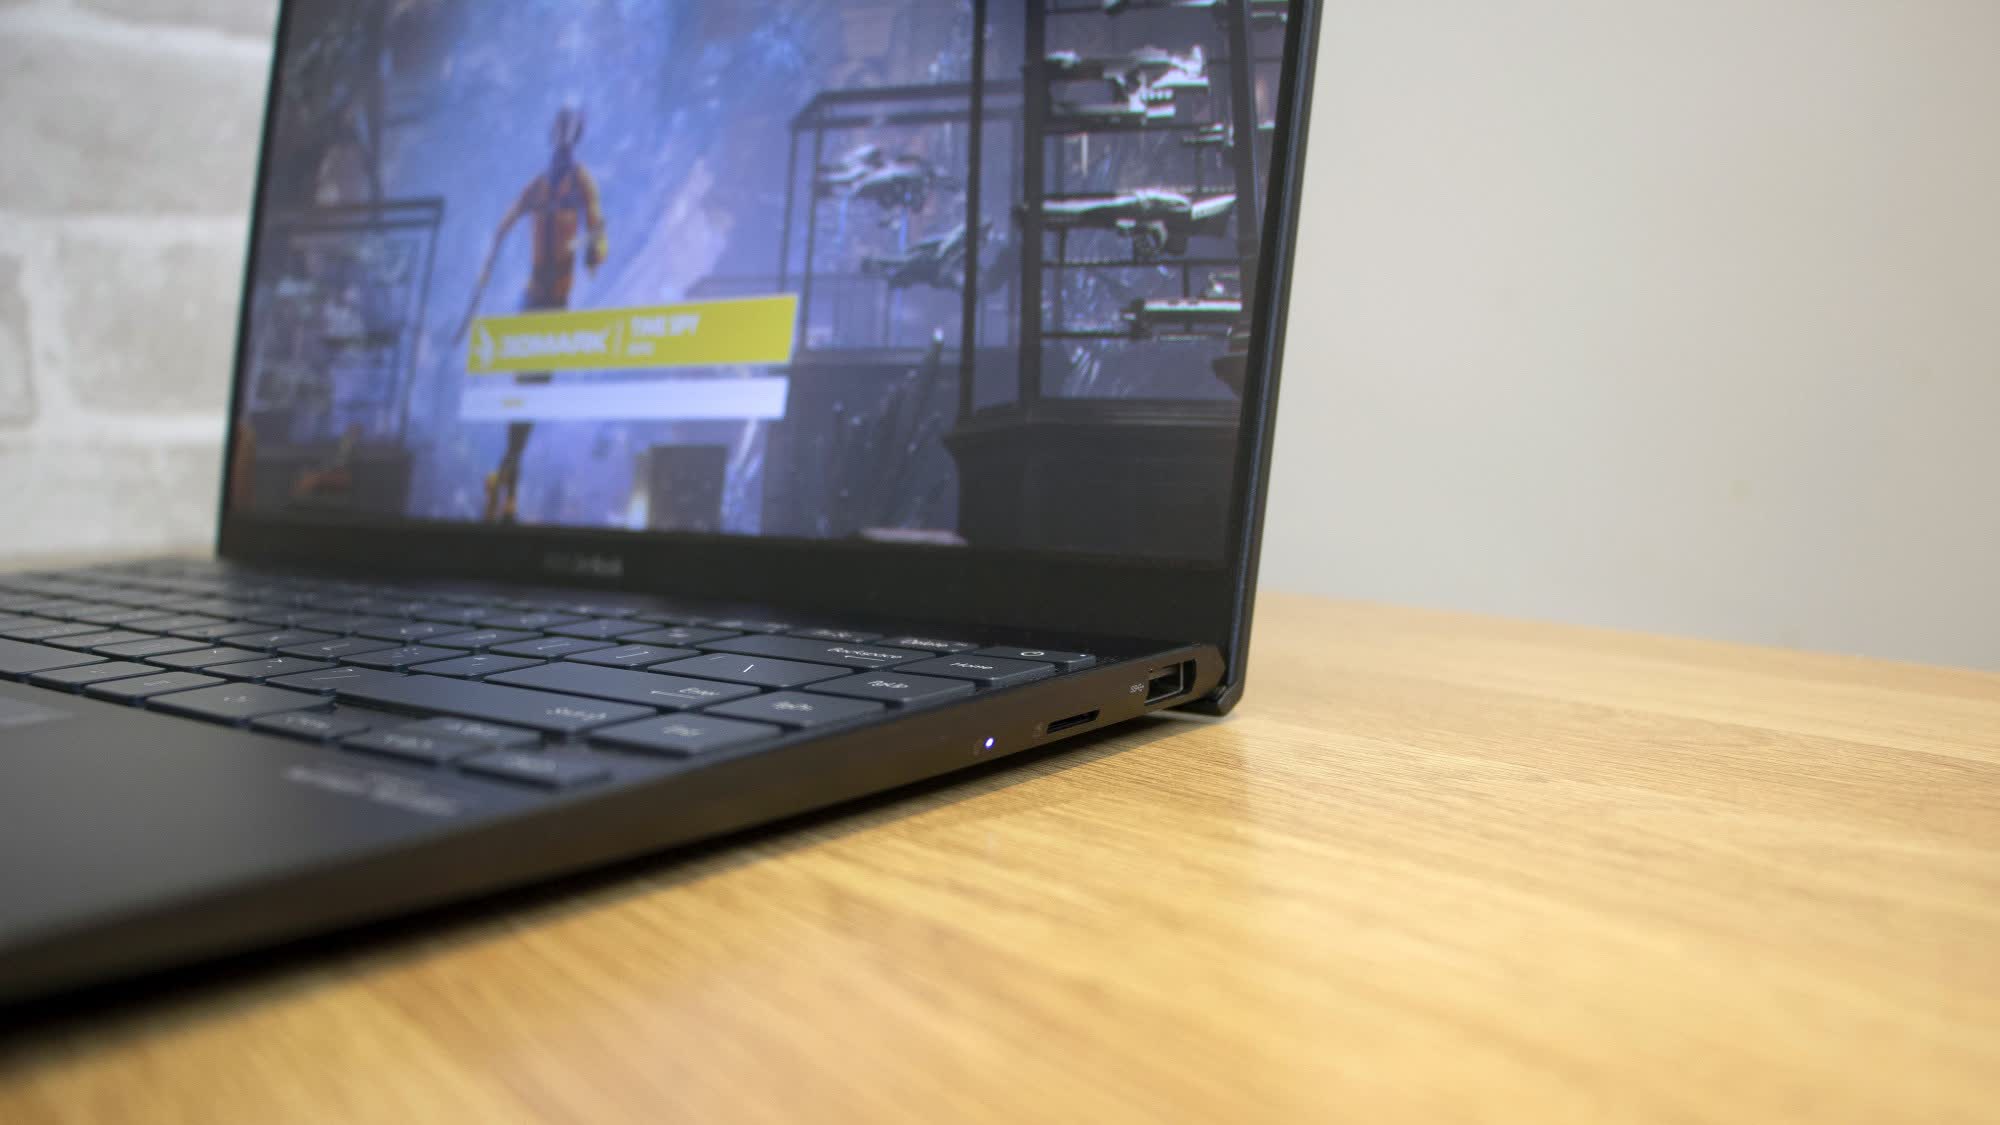
The ZenBook weighs a modest 2.49 pounds and is only 13.9mm thick, so it's slim and light enough to sling into your bag. Build quality is reasonable, with a sturdy base the highlight, but this is one area where the ZenBook's mid-range price is evident – the screen could be stronger, with too much movement along the top edge. It's not a serious cause for concern, but it's worth bearing in mind if you're going to take this machine out of the house. More reassuring is the ZenBook's adherence to MIL-STD-810G standards. This means the machine can withstand drops, vibrations, and extreme temperatures, so it should be fine to handle day-to-day life. Internal access is possible as long as you've got a small enough Torx screwdriver. However, the only component that can be accessed is the SSD – the memory chips and wireless module are all soldered to the motherboard. The left-hand side serves up two USB-C ports that support Thunderbolt 4, which can provide up to a whopping 40GB/s, and the ZenBook's USB-C ports are also used for charging. The left-hand side houses the HDMI output. On the right side is a microSD card slot and a full-size USB 3.2 Gen 1 port. That USB port has a more modest maximum bandwidth of 5GB/s.
There's one big omission when it comes to connectivity, though – no headphone jack. If you use wireless audio gear that's fine, but it's an issue if you still use wired headphones. Asus includes a USB-C-to-audio adapter, which is helpful but a somewhat clumsy solution. Once you've plugged in the adapter and the charger, that's it for USB-C and Thunderbolt 4 connectivity. Above the display is a 720p webcam that works with Windows Hello. Quality isn't great – it's fine for business calls and family catch-ups, but that's all. A keyboard shortcut can be used to turn the webcam off, but there's no physical privacy shutter. There's no fingerprint reader on this machine, either. The ZenBook has decent design, but those omissions and its subtle design may give people cause to look elsewhere. We recently reviewed the Acer Swift 3, for instance, which costs $1,099 when configured with a prev-gen Core i7 and just $835 when loaded up with a Ryzen 7 4700U. That rig offers good build quality and brighter aluminum design, but no Thunderbolt 4, Iris graphics or light-up trackpad. If you're willing to stretch to $1,439 you can get a similarly configured Dell XPS 13 with the 11th-gen CPU and its stunning chassis, which combines aluminum and carbon fiber. That machine has Thunderbolt 4, too.
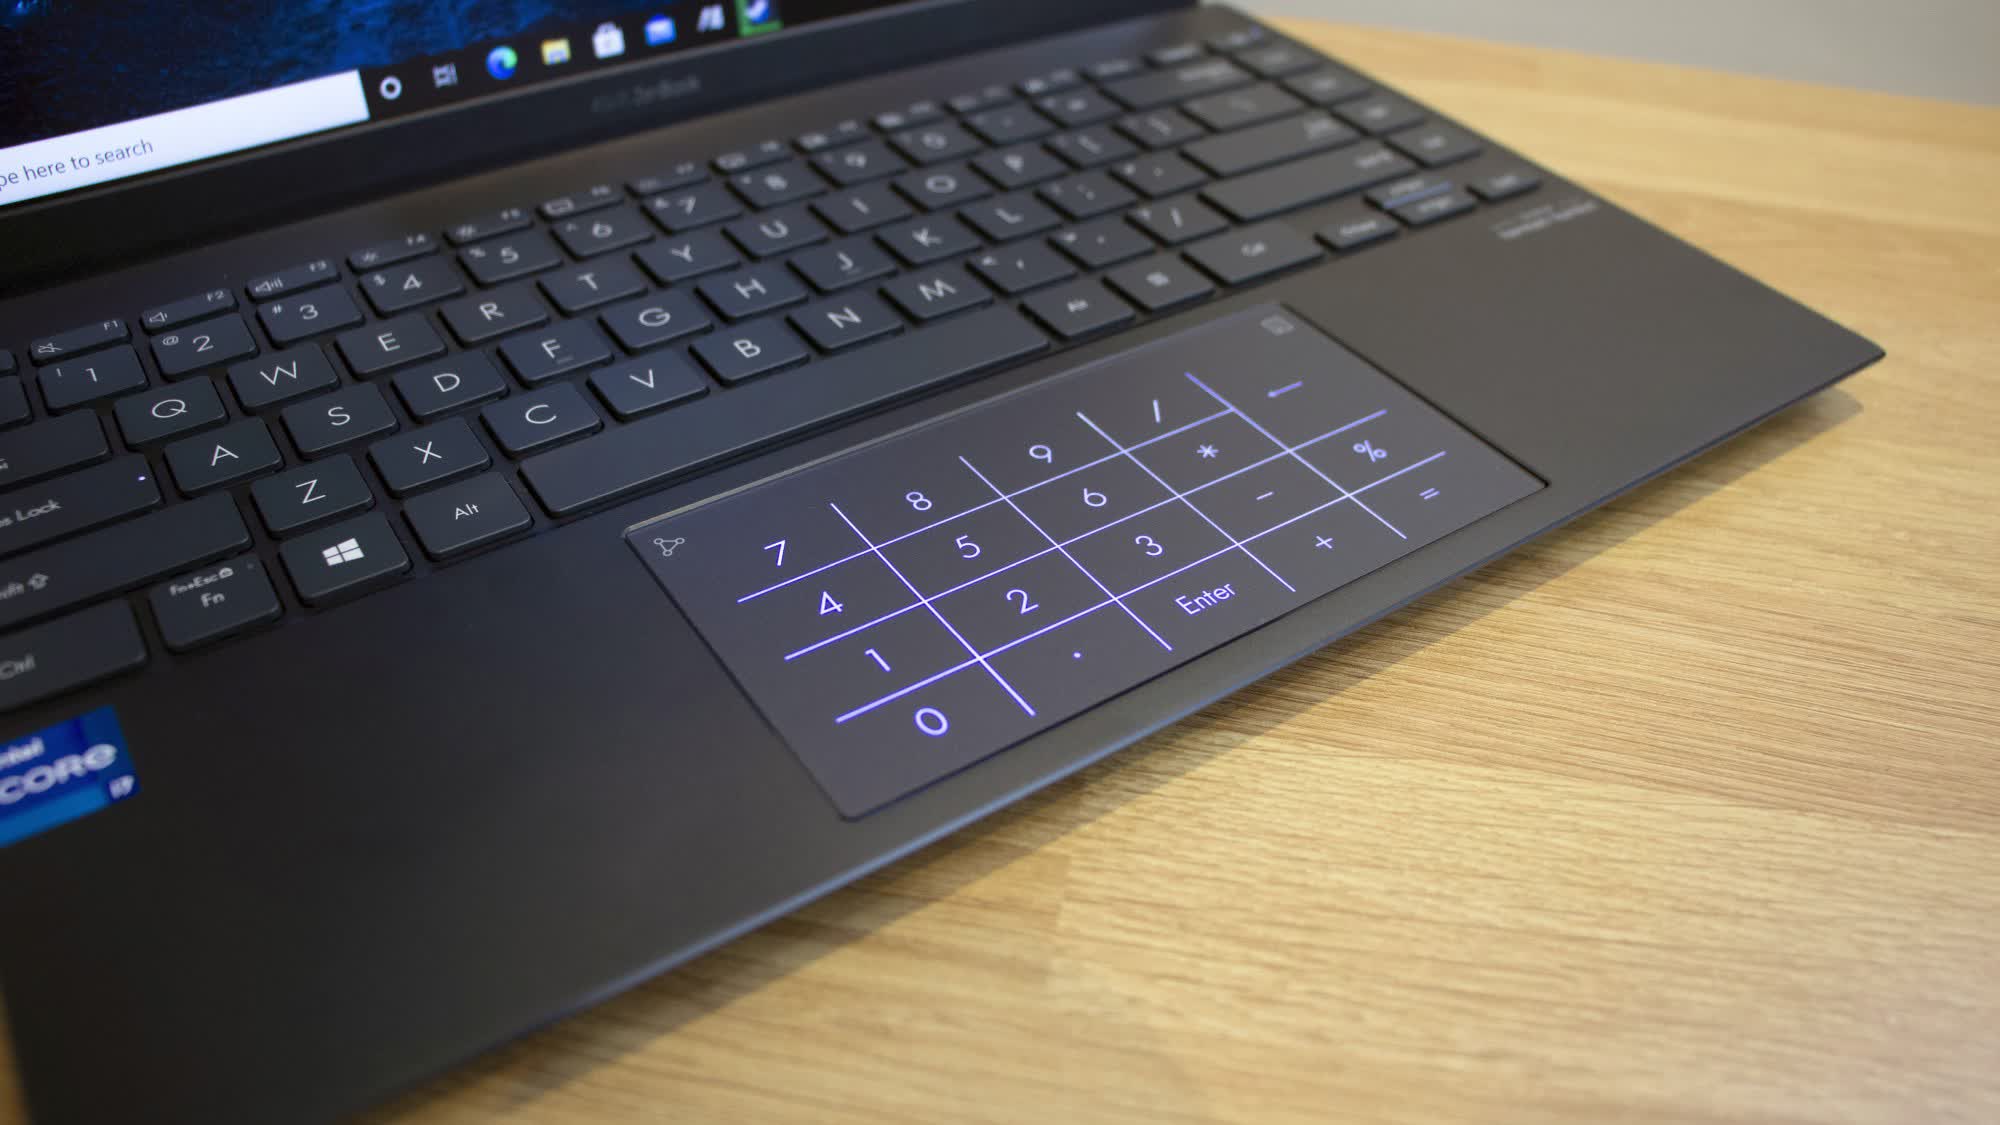
The ZenBook's keyboard is pretty standard for an ultraportable. The Return key isn't double-height, but Asus has crammed a solid amount of functionality in here regardless – there's a bonus column of keys on the right-hand side that includes Home, End, PgUp and PgDn buttons, and on the function row you get volume, display brightness and three-level white backlight keyboard controls. A button in the top-right corner of the trackpad activates the Asus NumberPad 2.0, which lays a virtual number pad over the trackpad. You can click on the pad to use the numbers while still using the trackpad's core functionality – it easily differentiated between the two. The keyboard's buttons are wide and large, with a clear font and a decent 1.4mm of travel. It's an impressive unit – the keys are slightly concave and have a slightly rubberized surface, so they coddle fingertips well, and the typing action is fast and balanced. It's a little on the crisp, and is well-suited to long typing sessions. The only downside is the noise as they're not exactly quiet.
The trackpad is wide and has solid functionality – it has multi-touch gesture support alongside the aforementioned number pad. The glass surface is smooth and responsive, and the two buttons are fast and shallow. The ZenBook may have a new Core i7 CPU and a keen sense of exterior style, but the $1,099 price is pretty affordable. That means the display is modest– it's a 14" 1080p IPS panel, but it's not a touchscreen (some may prefer this) and it doesn't have any fancy extras like a high refresh rate or HDR. It doesn't have the quality to handle the Adobe RGB or DCI-P3 color gamuts, either, so don't expect this display to handle color-sensitive professional workloads.
If you're happy enough to stick to the mainstream sRGB gamut, though, the ZenBook serves up great quality. The maximum brightness of 406cd/m2 is high enough to handle indoor and outdoor use, and it's paired with a good black level of 0.25cd/m2, which means dark areas in movies, TV shows and photos have decent depth. Those figures create a measured contrast ratio of 1,624:1, which is a top-notch result. It's better than the vast majority of IPS displays, and it means that the ZenBook's panel delivers huge vibrancy, nuance and depth. Uniformity is great, too – the brightness only deviated by 5% in the corners. That sRGB color reproduction is pretty good, too. The Delta E of 0.93 is fantastic – below the point where human eyes can detect deviations. The color temperature of 6,569K barely differs from the 6,500K ideal, and the screen displayed 98% of the sRGB gamut at a moderate volume of 101.5%. They're all top-tier results, and they mean that movies, TV shows, games and photos look fantastic – vibrant and accurate. It’s easily good enough to handle mainstream photo editing, too. The speakers are fine, if not outstanding. They're loud and they've got a surprising bass thump, but mid-range noises manage to be simultaneously harsh and muffled and the top-end is tinny. It's easy to find laptops with better audio kit. PerformanceThe Core i7-1165G7 is the key component in this machine. Tiger Lake brings significant improvements when compared to the blue firm's last laptop CPUs. The Willow Cove processing cores use an improved 10nm manufacturing process, which allows the CPU to be more efficient and flexible than older parts. Chips like the i7-1165G7 don't have precise TDPs anymore – instead, they have a thermal window that allows manufacturers to alter a CPU's power requirements and speeds based on a device's thermal abilities. The i7-1165G7 has a thermal window between 12 and 28W, and that means its base clock can veer between a modest 1.2GHz and a decent 2.8GHz. Those speeds are bolstered by a Turbo peak of 4.7GHz. Elsewhere, Tiger Lake includes Intel's Iris Xe graphics core, which has 96 execution units. It's an improvement over older Intel integrated GPUs, and here it's clocked to 1.3GHz. Tiger Lake is rounded out with LPDDR4x memory, PCI-E 4.0 support, and native support for Wi-Fi 6 and Thunderbolt 4. The ZenBook 14 UX425E theoretically is allowed to run the i7-1165G7 at its full speeds, and the specification is completed by 16GB of dual-channel memory clocked to 2,133MHz, a 1TB Intel 660p SSD, dual-band WiFi 6 and Bluetooth 5.1. If you want to use wired internet, you'll need to rely on the included USB adapter.
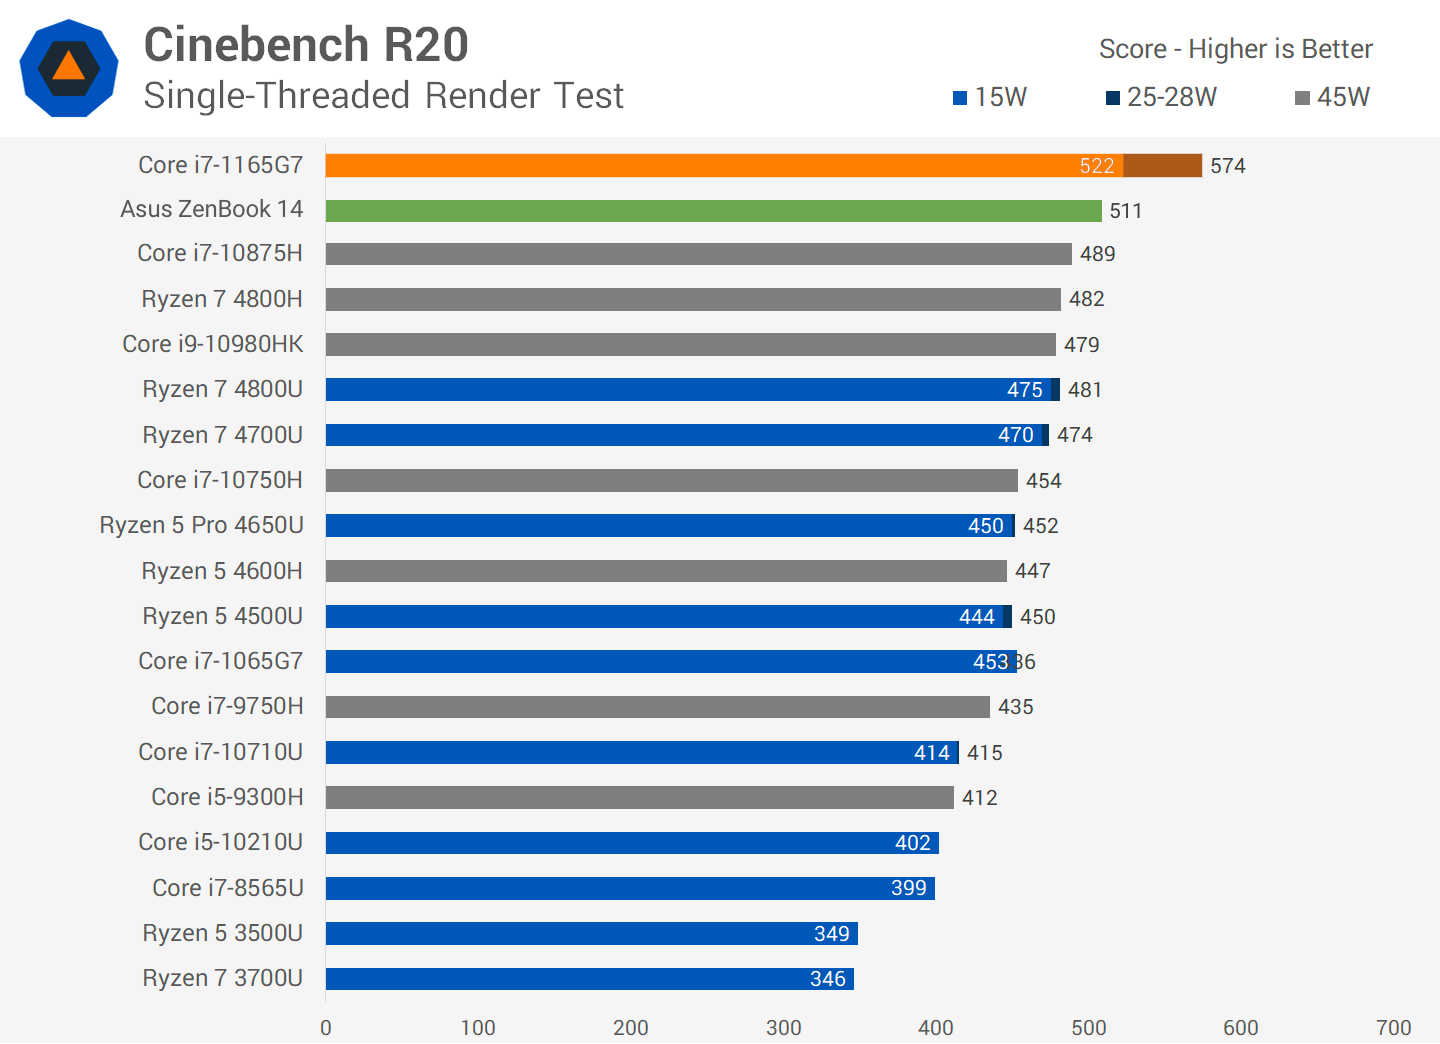
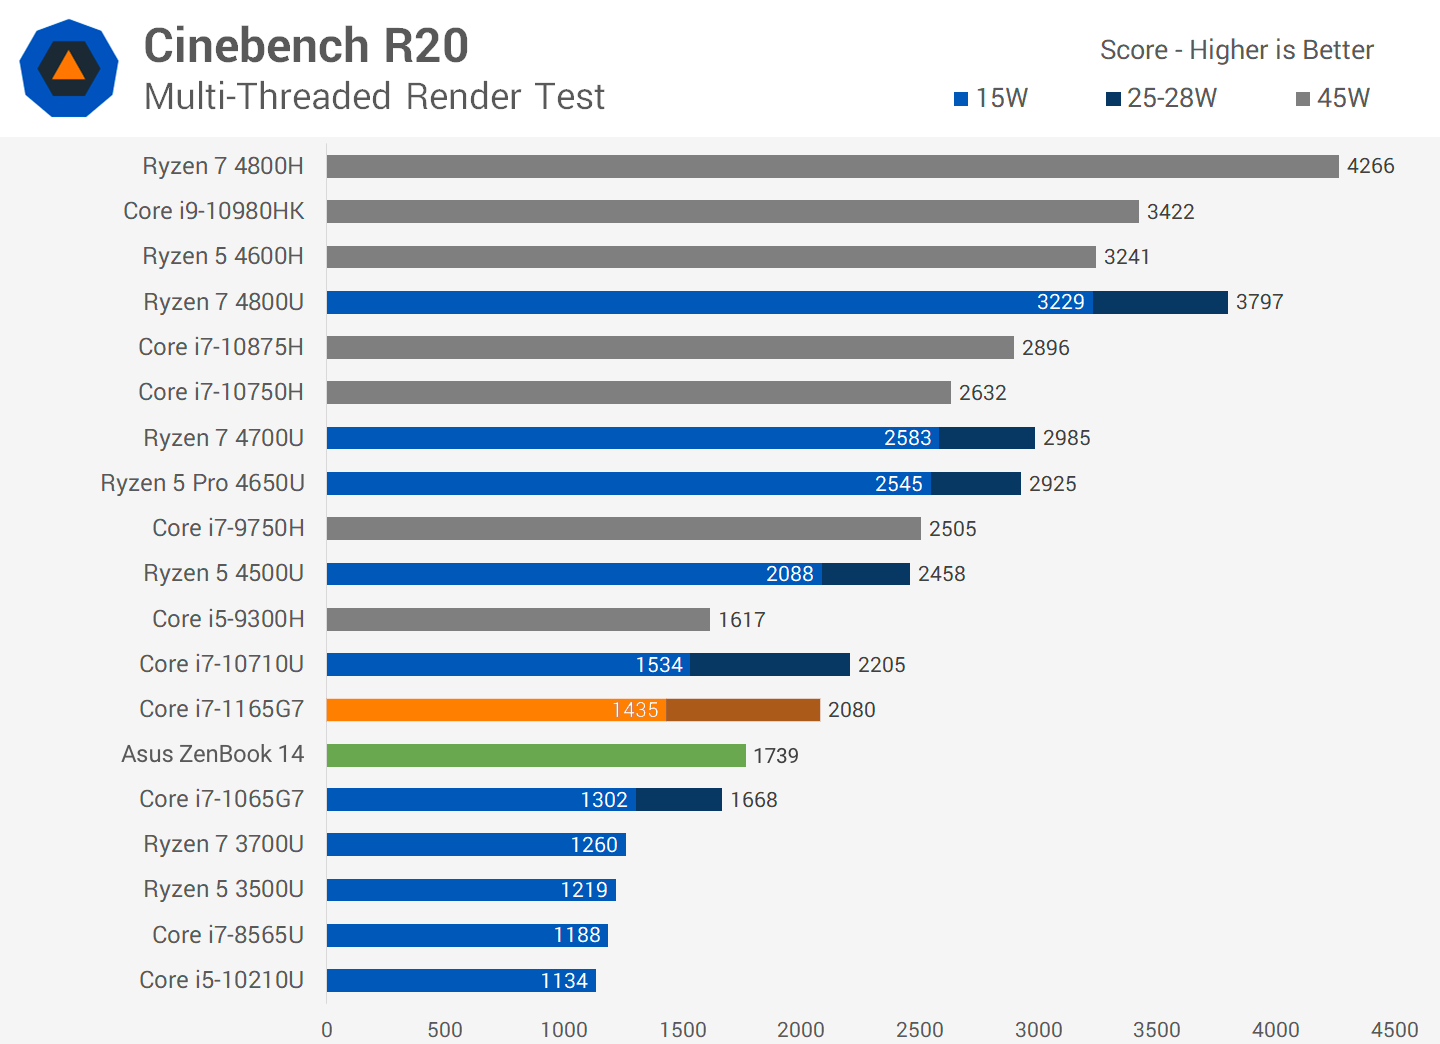
The new chip sounds good on paper, but it often couldn’t keep up with a competing AMD chip in benchmarks. In Cinebench R20's single-threaded test the i7-1165G7 scored 511 points – around fifty points better than AMD's rival Ryzen 5 4500U and Ryzen 7 4700U, and 58 points beyond the last-gen i7-1065G7. Loading up Cinebench's multi-core test saw the ZenBook score 1,739 points. That's underwhelming – more than 1,000 points behind the full-wattage Ryzen 7 4700U, and also behind other i7-1165G7 laptops we recently tested.
The CPU's below than expected performance can be explained by the ZenBook's clock speeds and temperatures. During Cinebench's single-core test the CPU peaked at 4.3GHz and rarely got beyond 4.1GHz, and in the multi-core test it peaked at 3.6GHz, but mostly hovered around 2.5GHz. In the single-core test the CPU's temperature peaked at 90 degrees, and it topped out at 96 degrees in the multi-core benchmark. It's clear that the CPU has nothing more to give inside the ZenBook. Further benchmarks saw this pattern repeat. The Asus’ PCMark 10 Productivity and Essentials scores of 6,583 and 6,324 are both behind the AMD CPUs and even the i7-1065G7, which indicates the seriousness of this laptop's throttling. In Blender, the Asus and its cut-back quad-core CPU took over fifteen minutes to complete the 720p Classroom benchmark, with clock speeds ducking down to 2.3GHz and then below 1.9GHz. Its Cryptography result of 14.3GB/s outpaced the Ryzen 5 4500U by a couple of gigabytes, but that test usually favors chips with stronger single-core ability.
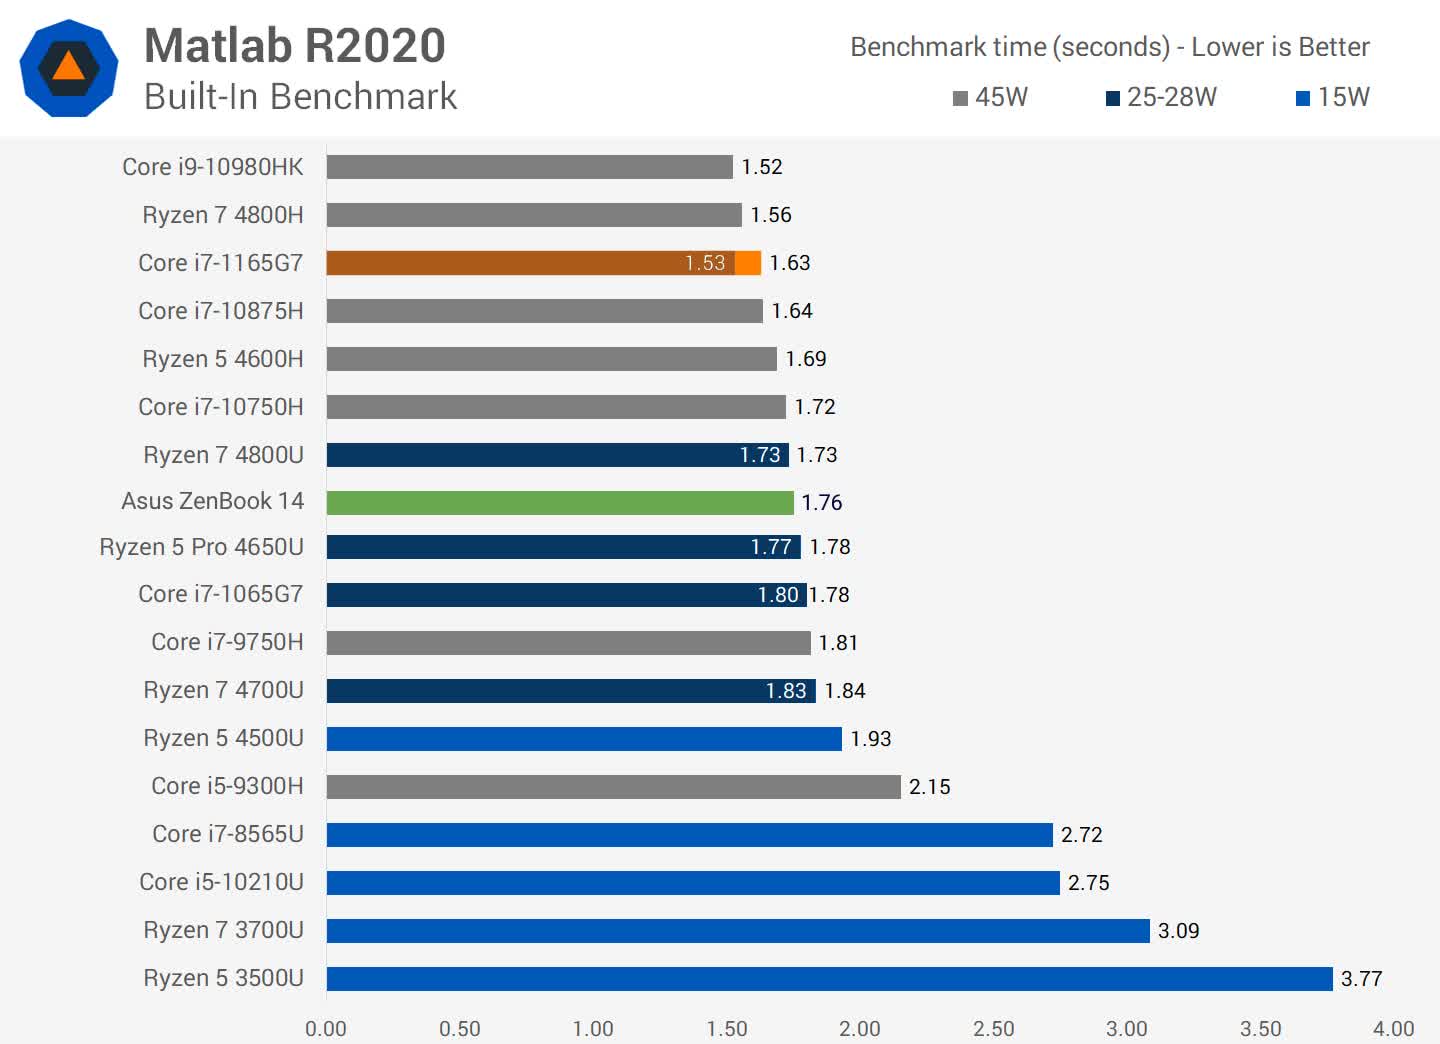
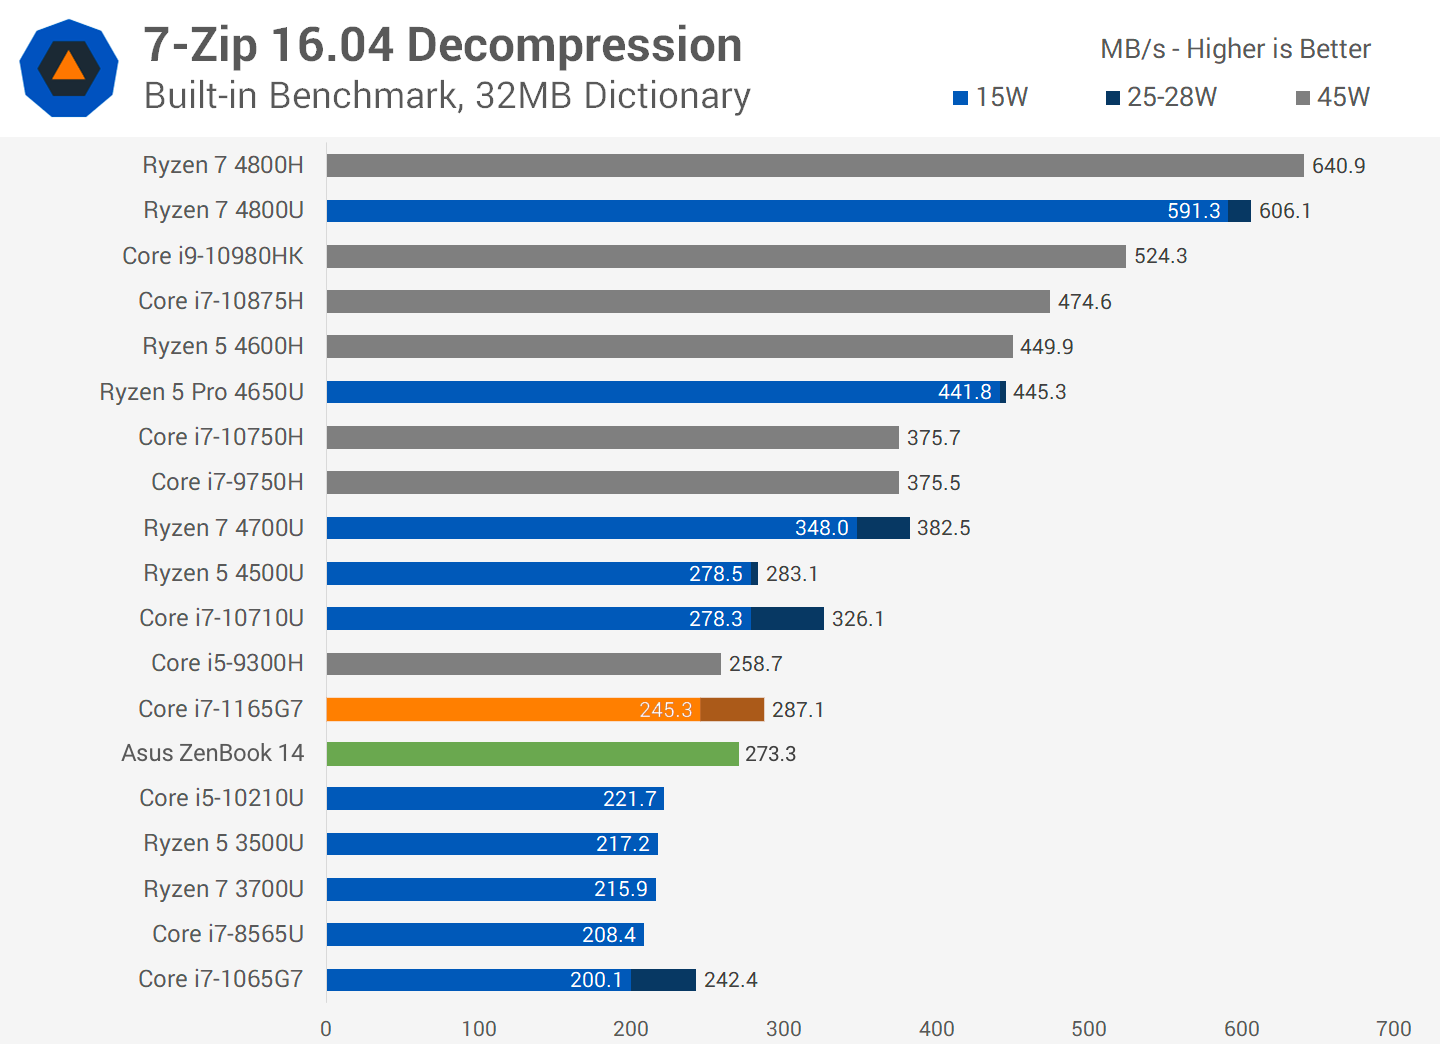
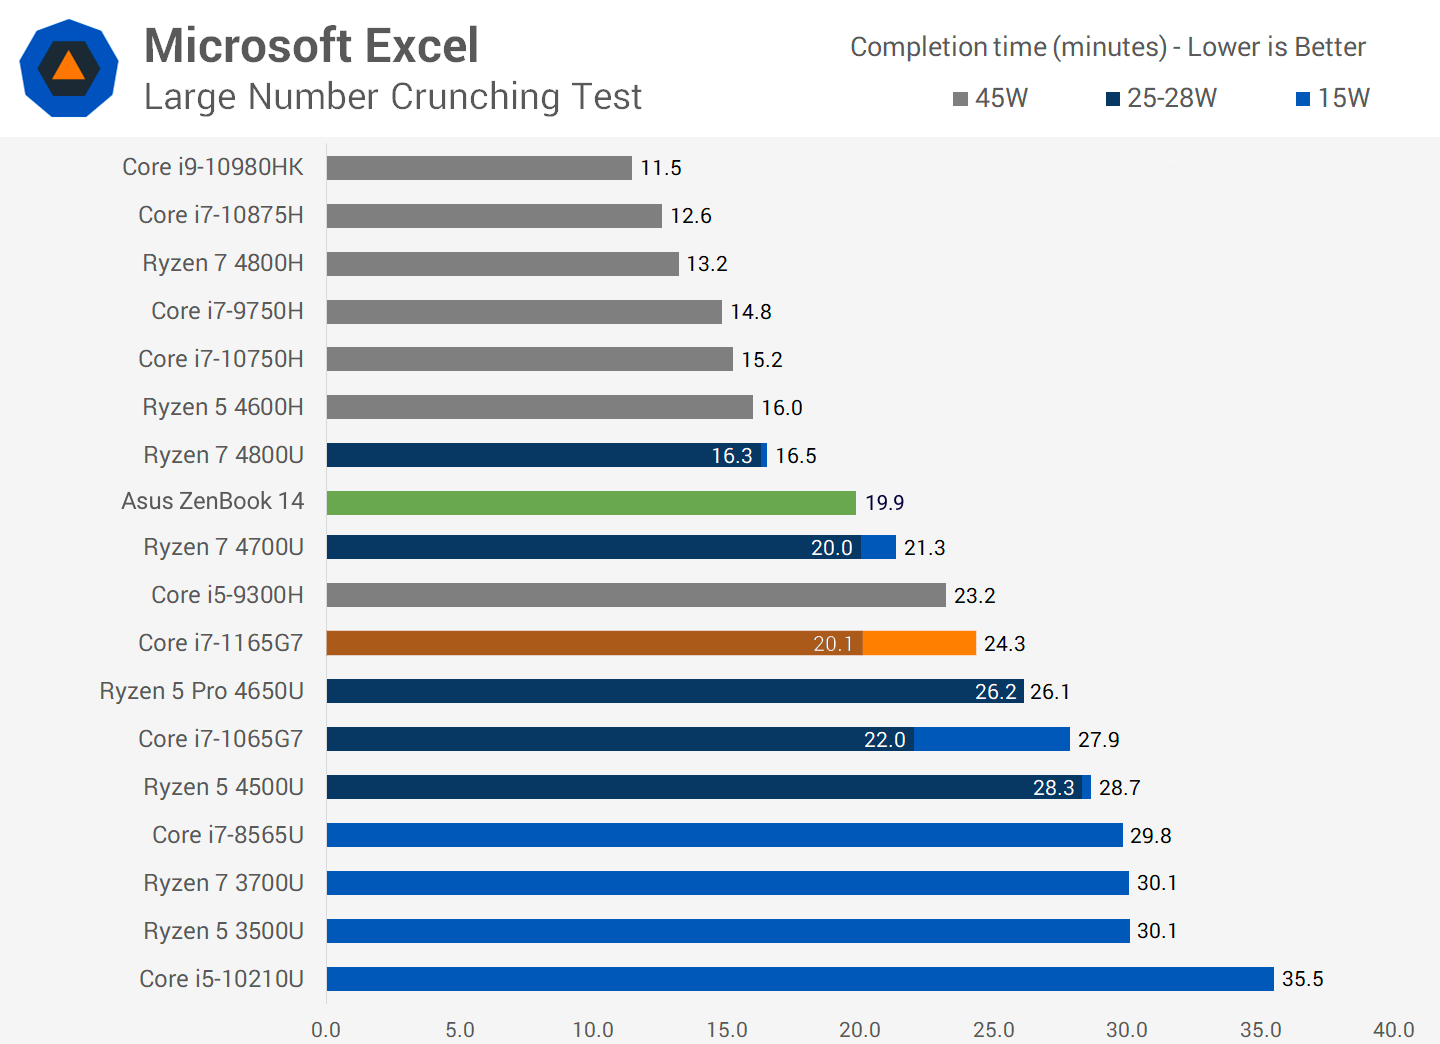
In Matlab, the i7-1165G7 was no faster than last year's Core i7 CPU and slower than AMD's chips, the Intel chip was slower in both 7-Zip benchmarks, and the Intel silicon only managed to beat AMD by a fine margin in the Microsoft Excel test – which relies on single-threaded pace. In the graphs you can see the ZenBook’s results compared to an average of four other laptops also using the Core i7-1165G7.
Now, it’s an underwhelming set of results, but it's not necessarily a terminal issue when it comes to mainstream real-world use. The ZenBook's solid single-core performance and four hyper-threaded cores mean that there's ample power for low-end and mainstream computing – the ZenBook zipped around browsers with loads of tabs, office applications, and other desktop apps with no issues and is just as effective as an AMD-powered machine.
The SSD's read and write speeds of 1,757MB/s and 1,761MB/s don't make use of the ZenBook's PCI-E 4.0 connection, but they're fast enough to keep the machine feeling snappy. Don't try and rely on this machine for tougher workloads, like content-creation or intense multi-tasking, but then again ultraportables are not really meant as desktop replacement machines.
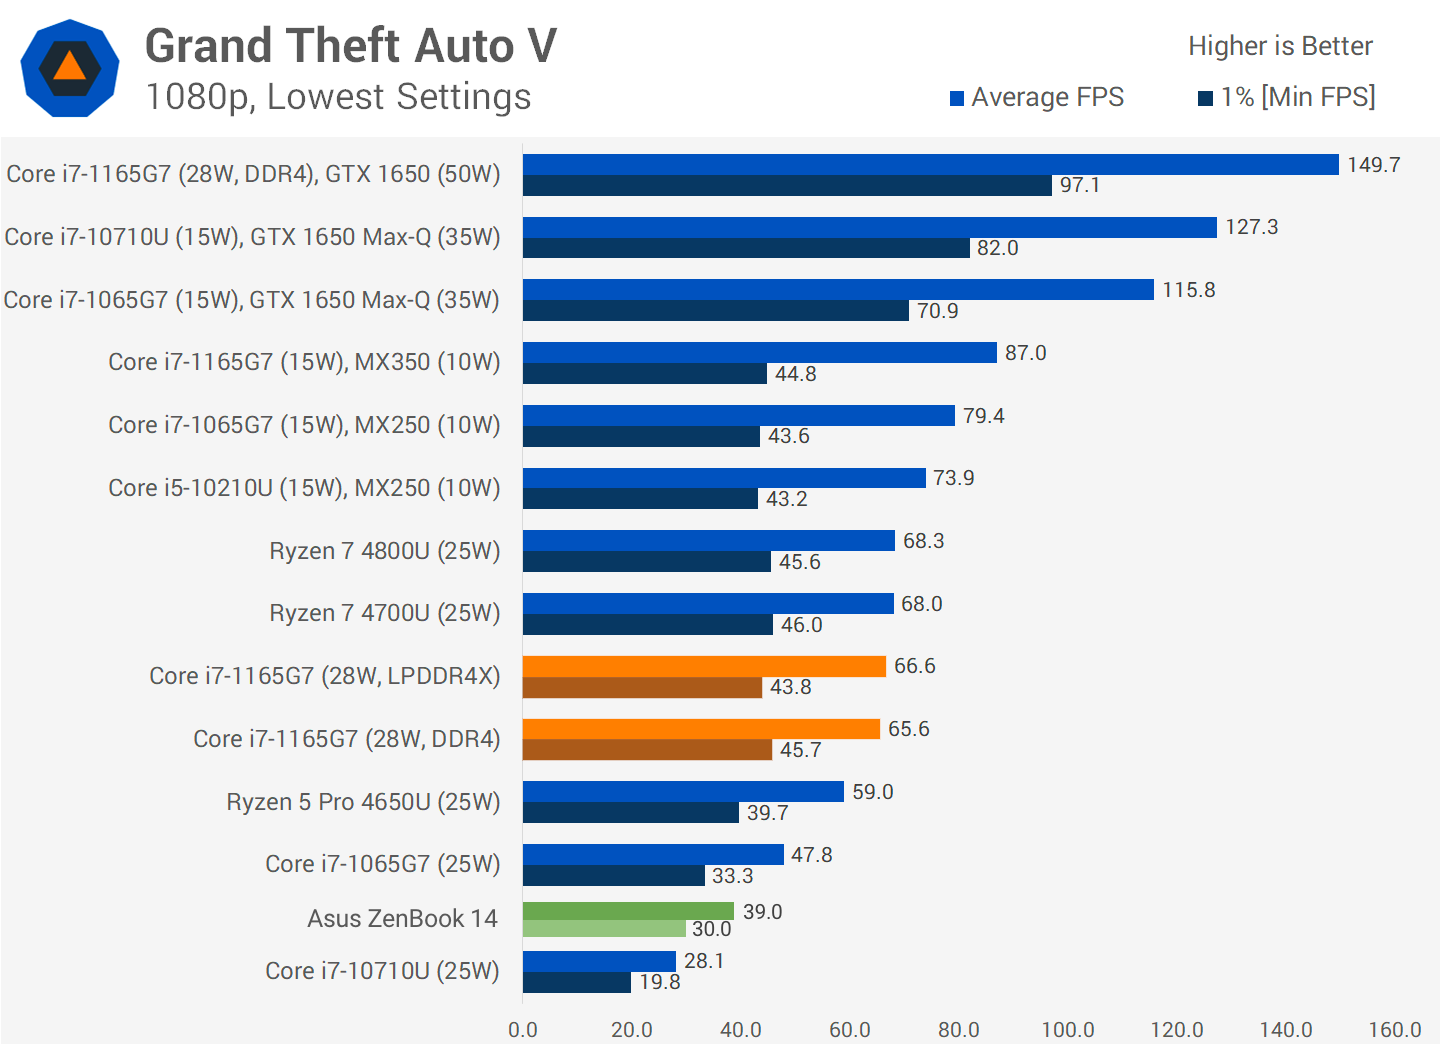
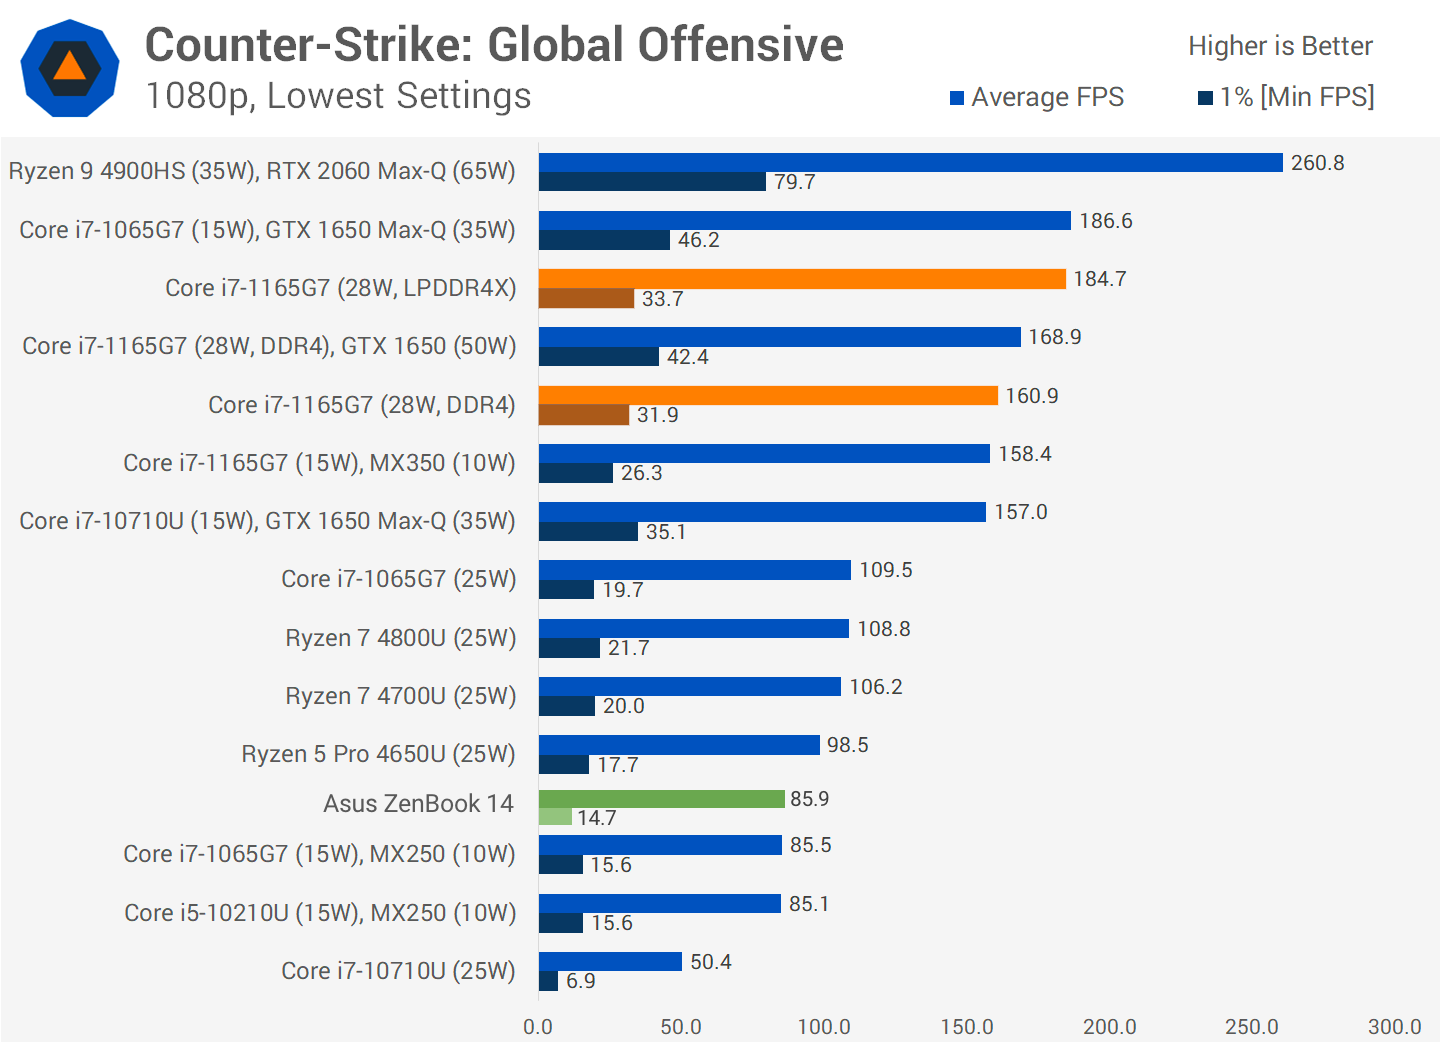
Intel's updated graphics chip proved underwhelming in 1080p gaming – at least compared to the Vega 6 and 7 hardware inside Ryzen 4000 chips. In GTA V the Intel-based Asus delivered an average of 28fps – but AMD's chips were more than twice as fast.
In Civilization VI, the Asus laptop averaged 21fps, which is miles behind AMD, but that game is very CPU-intensive and we've already seen the Intel CPU throttling in this laptop, so that's no surprise. The UX425 fell behind AMD-based laptops in CS:GO and F1 2019, too, and the Intel chip broadly returned the same sort of performance as its predecessor. The Asus will handle casual titles and older games, and it'll only cope with modern software if you drastically reduce the graphics settings. If you want any sort of gaming ability in an ultraportable, find one with an AMD Renoir chip. Battery LifeThere are some positives to be found elsewhere. The Asus is a decent thermal performer: fan noise is modest and the exterior remains cool throughout. It's just a shame that the decent thermal ability comes at the expense of clock speed. Its battery life is more than reasonable, too. The ZenBook has a 67Wh power unit, and in a work benchmark the ZenBook lasted for 18 hours and 45 minutes with the screen at half brightness and 13 hours and 7 minutes with the screen at maximum brightness. When playing video at full brightness the Asus handled 10 hours and 14 minutes, and at half brightness that time was extended to beyond fifteen hours. It's great longevity – no matter what you're doing with this machine you'll easily get through a working day, and you'll probably be able to handle your commute and an evening on the sofa too. Wrap UpThe Asus ZenBook 14 UX425 has a decent $1,099 price tag as configured, and goes down to $899 for the base model (8GB RAM/512GB SSD) that keeps the same Core i7 CPU. There are several areas where this laptop undoubtedly excels: the display is tremendous if you're happy to stick with a 1080p, non-touch and sRGB-friendly panel; the keyboard and trackpad are great, and the chassis is good-looking, slim and light. Its battery life is stellar, and the Tiger Lake CPU brings it on with Thunderbolt 4 and native Wi-Fi 6.
Normally a new CPU would be a cause for celebration on the performance department, but the Tiger Lake silicon is not fully utilized in this machine. Single-core performance is good and the ZenBook is snappy in everyday use, but the chip quickly hits its thermal limits and can never stretch its legs. Multi-core performance was never going to be a contest against AMD, the ZenBook can be used casually for heavy multitasking, but it’s no match for other notebooks better equipped to perform as desktop replacements. Ultimately, there's still plenty of reasons to buy the ZenBook – if you want an ultraportable that delivers on ultraportable aspects and value, the UX425E does deliver great battery life, screen quality and ergonomics in a good-looking package. Shopping Shortcuts |
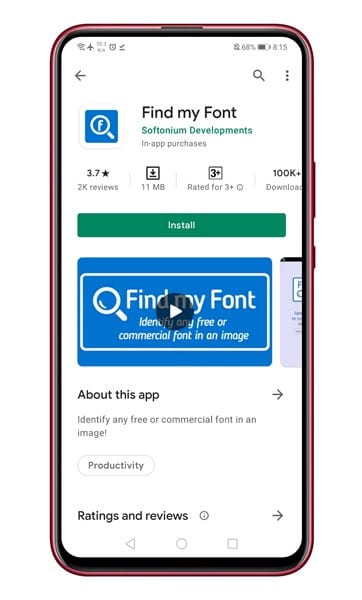
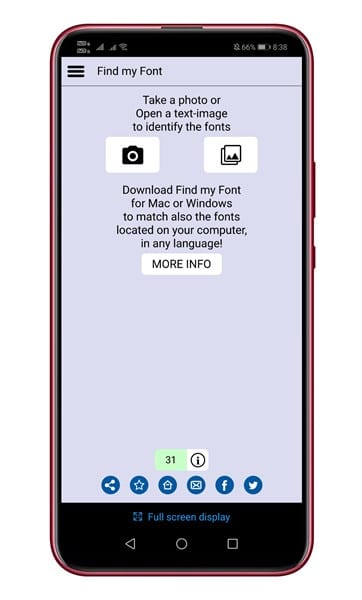
| How to Easily Identify Fonts in Images On Android Posted: 16 Dec 2020 10:13 PM PST While browsing the web from our smartphone, we often come across an image with a beautiful text that we want to use. Well, images with a little bit of text attract the most users, and they are perfect for advertisement purposes. On desktop computers, it's relatively easy to identify fonts used in any photo or image. However, things become a little bit challenging when it comes to Android. On Android, you need to rely on third-party apps to identify fonts used in any photo or image. So, if you are looking for ways to identify fonts on an Android smartphone quickly, then you have landed on the right webpage. In this article, we are going to share the best method to identify fonts on Android easily. Let's check out. Also Read: How To Fully Customize Your Android How to Easily Identify Fonts in Images on AndroidTo identify fonts on Android, we are going to use an app known as Find My Font. It's an app that lets you take a photo or load a gallery image to find free or commercial fonts used in the picture. Here's how to use the app. Step 1. First of all, download & install the Find my Font app on your Android device.
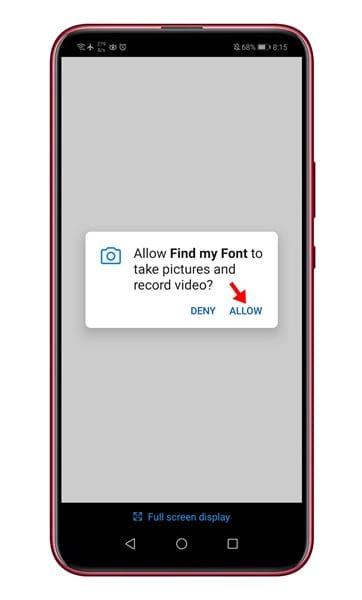
Step 2. Now open the app and grant the permissions.
Step 3. Now you will see the main interface of the app. Here you to capture a new picture or select an existing one from the gallery.
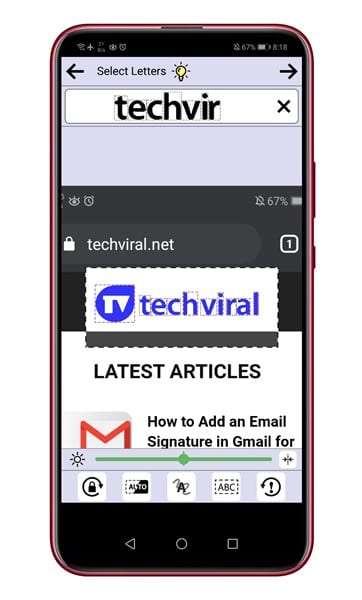
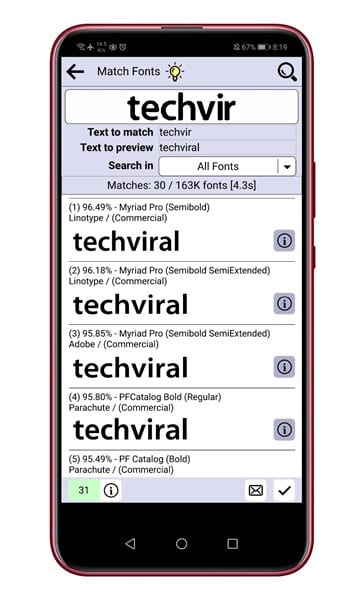
Step 4. After selecting the image, select the alphabets, and click on the right arrow button in the top right corner.
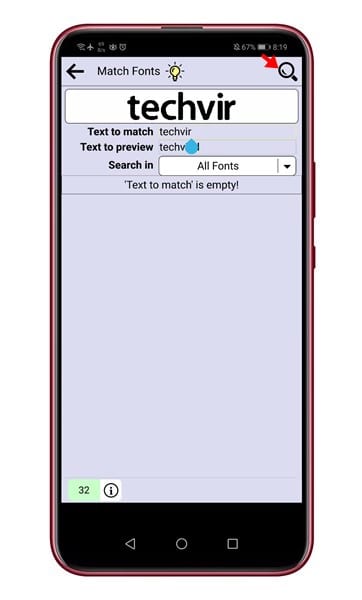
Step 5. Now enter the text to match and text to the preview field. Make sure to enter the alphabets that you have selected in the previous step. Once done, tap on the 'Search' button.
Step 6. Find my Font will now display all similar fonts. You can press the details icon behind the font name to download the font.
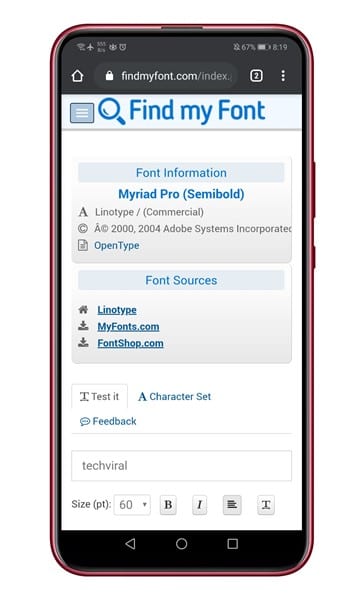
Step 7. You will be redirected to Find my font website. From there, you can find out more details about the font.
That's it! You are done. This is how you can identify fonts on Android. So, this article is all about how to identify fonts used in any Image on Android. I hope this article helped you! Please share it with your friends also. If you have any doubts related to this, let us know in the comment box below. |
| How to Play Google Stadia on Your iPhone and iPad Posted: 16 Dec 2020 03:40 PM PST Apple might not allow game streaming applications into the App Store, but that hasn't stopped Google from bringing Stadia to those with an iPhone or iPad. Here's how to start playing Stadia games on your iPhone or iPad. How to Use Stadia on iPhone or iPadTo begin, open your web browser of choice. For best results, Google recommends using Safari because it allows you to create a shortcut to the progressive web app (PWA)—more on that in the next section. But if you're partial to Google's web browser, you can use Chrome.
Next, select the search bar, navigate to stadia.google.com, and sign in with your Google account.
Before jumping into a game, if you own and want to use a Stadia or third-party Bluetooth controller, now is the time to connect or pair it with your iPhone or iPad. RELATED: How to Wirelessly Link a Stadia Controller to an Android Device You can now select a game from the "Home" tab. If you don't own any, you can purchase one from the Stadia Store.
When you're ready to start gaming, tap the play button found on the selected title's artwork.
Unfortunately, some of your browser's user interface will likely stick around while you're playing. To make it go away and play your game in full screen, you'll need to create a PWA shortcut. How to Add Stadia to iPhone or iPad Home ScreenAdding a Stadia shortcut to your iPhone or iPad's home screen is beneficial for multiple reasons. First, it allows for quick access to your games. Second, it allows you to game in full screen without parts of your web browser (such as tabs) getting in the way. Unfortunately, while Stadia works in every web browser on your iPhone or iPad, you can only create home screen shortcuts using Safari. Start by opening "Safari." If you can't find it on your phone or tablet, use Apple's built-in Spotlight search to locate the app.
Next, visit Stadia's website (stadia.google.com) and sign in with your Google account.
Tap on the Share icon found at the bottom of the screen on your iPhone or to the right of the address bar on your iPad.
From the menu that slides up from the bottom of your screen, scroll down and select the "Add to Home Screen" button.
A preview of the home screen shortcut will be displayed along with its associated URL. Tap the "Add" button found in the top-right corner of the overlay.
The Stadia shortcut will be automatically added to your iPhone or iPad's home screen.
Tap on the PWA to immediately launch Stadia on your Apple device. If you want to move the shortcut, you can long-press and drag the icon to a different home screen or place it within a folder. |
| How to Add an Email Signature in Gmail for Android Posted: 16 Dec 2020 01:07 PM PST As of now, there are hundreds of email services available on the web. However, out of all those, it was Gmail that stands out from the crowd. Compared to other email services, Gmail has more features, and it's pretty easy to use. Gmail is backed by the search giant Google itself, and it fulfills your everyday email needs. Over the years, Gmail has become one of the most favored email providers for small and large businesses. If you use Gmail for business purposes, it's best to set up an email signature. Previously, we have shared an article on how to add email signature in Gmail for desktop. Today, we are going to share the same thing for Android. Also Read: How to Add Email Signature in Gmail Steps to Add an Email Signature in Gmail for AndroidAn email signature comprises a few lines of text placed at the bottom of every outgoing email for those who don't know. It not only gives a professional touch to your emails; it also helps the recipient know a few details about your website, business name, contact details, and address. This article will share a detailed guide on how to add an email signature in Gmail for Android in 2020. Step 1. First of all, head to the Google Play Store and update the Gmail app for Android.
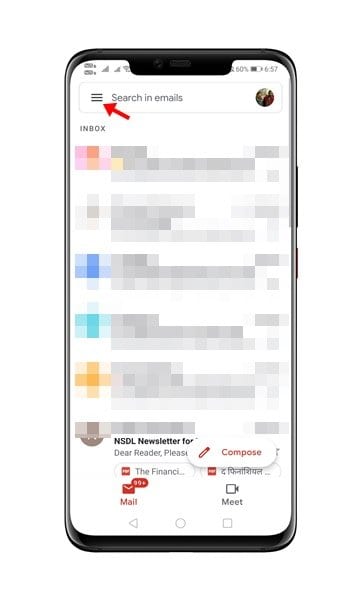
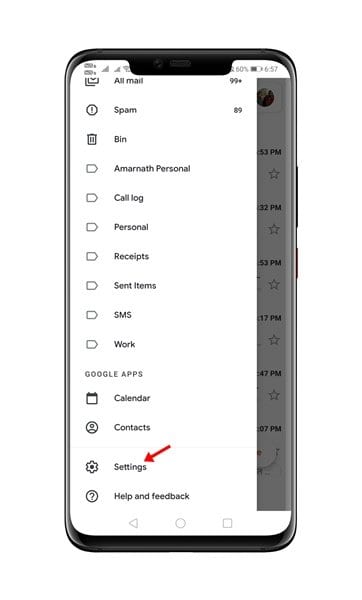
Step 2. Once done, open the Gmail app on your Android device. Now tap on the three horizontal lines to open the menu option.
Step 3. On the Menu, tap on the 'Settings'
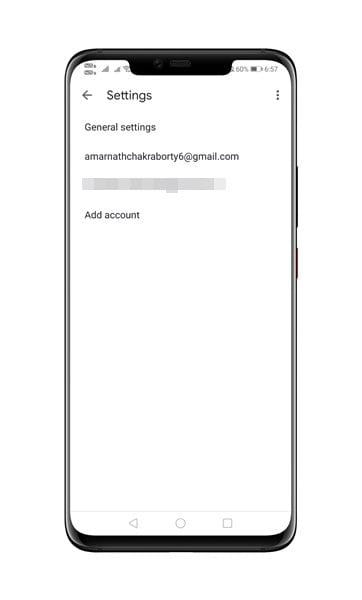
Step 4. Now select the Gmail account you are setting up the signature for.
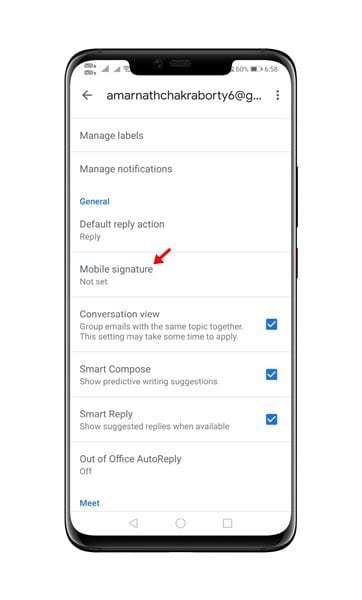
Step 5. Now tap on the 'Mobile Signature' option on the next screen.
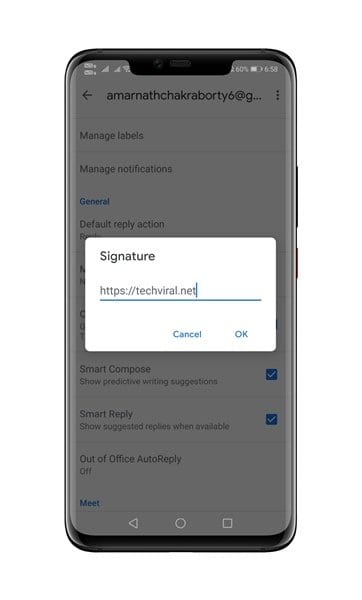
Step 6. Next, type the text for your signature. You can add your business details, contact details, etc. Once done, tap on the 'Ok' button.
That's it! You are done. This is how you can set an email signature on Gmail for Android. So, this article is all about how to set up an email signature on Gmail for Android. I hope this article helped you! Please share it with your friends also. If you have any doubts related to this, let us know in the comment box below. |
| How to Show, Hide, and Pin Teams and Channels in Microsoft Teams Posted: 16 Dec 2020 12:01 PM PST
Microsoft Teams is great for splitting work areas into different teams and channels, but it's easy to have far too many things in the sidebar for easy navigation. Here's how to clean things up a bit. One of the benefits of Microsoft Teams is that it's easy to create teams and channels. This means you can split up work streams, have fine-grained permissions for who can see what, and generally manage your collaboration and document access the way you want it. However, every benefit can become a drawback, and in this case, the drawback is that the number of teams and channels can quickly grow to the point where it's hard to find anything. This is especially true in a corporate environment where other people can add you to teams or channels. Fortunately, Microsoft Teams gives you tools to deal with this so that you control which teams and channels you see. Here's how to wrangle your Teams sidebar into something more organized.
Reorder Your TeamsThe first thing to do is to sort your teams into some kind of order. Grouping similar Teams together, or ordering them alphabetically, will help you visually scan them to find the team you want. You can do this by dragging and dropping teams into different positions in the sidebar. Click the team you want to move—in our case, it's the "Project Pegasus" team—and drag it into the right place.
Do this with all of your teams until they are in some kind of organized list.
Hide Teams You Don't Look AtNow that you have an ordered list, it's time to keep the important teams visible and hide the unimportant teams. It's common to have several teams that you barely glance at (especially teams that other people have added you to) but that you can't leave. You can hide these teams by clicking the three-dot icon next to the team name and selecting "Hide" from the menu.
This will create a new "Hidden Teams" section.
Click the arrow next to "Hidden Teams" to minimize the group and hide the hidden teams from sight.
From now on, you won't see the teams unless you open the "Hidden Teams" section by clicking the arrow next to it, and you won't get notifications from the hidden teams unless you are mentioned directly. To remove a team from "Hidden Teams," click the three-dot icon next to the team and select "Show" from the menu.
Hide Channels You Don't Look AtYou may have teams that you want to keep visible, but that also have some channels you never look at. Much like a whole team, you can hide individual channels. Click the three-dot icon next to the channel and select "Hide" from the menu.
This will create a new section in the team called "1 Hidden Channel."
If you hide more than one channel, the name will change to "2 hidden channels," "3 hidden channels," and so on. To view hidden channels, click the arrow next to "Hidden Channels" and select the channel name, or click "Show" to unhide the channel.
Pin Your Important ChannelsTo keep important channels visible all the time, you can pin them to the top of the sidebar. Click the three-dot icon next to the team and then select "Pin" from the menu.
This will create a new "Pinned" section at the top of the sidebar with the channel you've pinned visible below it.
You can pin as many channels as you like. We're only interested in the "Status Updates" channel in our project teams, so we've pinned those channels and dragged and dropped them into alphabetical order based on the project name.
To remove a team from the "Pinned" section, click the three-dot icon next to the channel and then select "Unpin" from the menu.
Pinned channels are visible in the "Pinned" section regardless of whether the team they are in is hidden or not. As we don't need to see the other channels in our project teams, we can hide each project team and make our list even cleaner.
By way of comparison, remember our sidebar was originally an unordered mess.
But with a few minutes of sorting, hiding, and pinning, we've turned it into something much cleaner and easier to use.
|
| How to See When Windows 10 Last Installed a Major Update Posted: 16 Dec 2020 09:45 AM PST
Every six months, Microsoft releases a new major Windows 10 update every six months, but Windows doesn't install them immediately. If you're not sure when you last updated, there are a few ways to check the most recent major update installation date. How to Check the Major Update Install Date in SettingsFirst, open your "Start" menu and click the gear icon to open "Settings." You can also press Windows+i on your keyboard.
In the "Settings" window, click "System."
On the "System" pane, scroll down to the bottom of the list and select "About" in the sidebar.
On the "About" page, scroll down to the "Windows specifications" section. You'll find the latest Windows major version install date to the right of the "Installed on" heading.
To see if you're running the latest major version of Windows 10, look at the version name, which is listed just above the "Installed on" date. Compare it to the latest version of Windows 10 and see if it matches. RELATED: What Is the Latest Version of Windows 10? If you need to report this information to someone else, Windows provides a handy way to quickly copy your system specifications (which includes the "Installed on" date) to the Clipboard. To do so, click the "Copy" button just below the "Windows specifications" list, and you can paste it later into a document, an email, or a message.
After that, close "Settings," and you're done. How to Check the Major Update Install Date from the Command PromptYou can also quickly check the latest Windows update install date from the Windows Command Prompt. First, open a prompt by clicking the "Start" menu and typing "command," then click the "Command Prompt" icon.
When the "Command Prompt" opens, type (or copy and paste) the following command and press "Enter": systeminfo | find "Original Install Date"
You'll see the latest major version install date (even the install time—down to the second) listed just after "Original Install Date" in the results that appear. When you're done, close the "Command Prompt" window. |

| You are subscribed to email updates from My Blog. To stop receiving these emails, you may unsubscribe now. | Email delivery powered by Google |
| Google, 1600 Amphitheatre Parkway, Mountain View, CA 94043, United States | |


0 nhận xét:
Đăng nhận xét