How to Quickly Clear All Notifications on Mac |
- How to Quickly Clear All Notifications on Mac
- How to Capture Screenshots On Android using Google Assistant
- How to Turn Off Fake Eye Contact in FaceTime on iPhone
- How to Adjust the Vibration Intensity of Your Android Phone
| How to Quickly Clear All Notifications on Mac Posted: 19 Dec 2020 08:19 AM PST  The Notification Center on the Mac is a one-stop destination for all the notifications from your installed apps. But sometimes, it can get a bit too much. Here's how to quickly clear them all on Mac. The Notification Center in macOS Big Sur or newer allows you to dismiss a single notification or clear all notifications from a single app. There's also a hidden feature for clearing all notifications that only shows up when you have more than three app notifications and you can expand the Notification Center. RELATED: How to Use Control Center on Mac To open the Notification Center, click the Date and Time button from the menu bar (next to the Control Center).
If you want to clear all notifications from a particular app, hover over a notification and then hold your cursor over the "X" icon. Click the "Clear All" button that appears.
To expand the Notification Center (when you have notifications from more than three applications), click the "More Notifications" button.
Now, you'll see the expanded Notification Center. Here, select the three-dot menu button and choose the "Clear All" button.
And just like that, all your notifications will disappear. When you go back to the Notification Center, you'll only see your widgets.
|
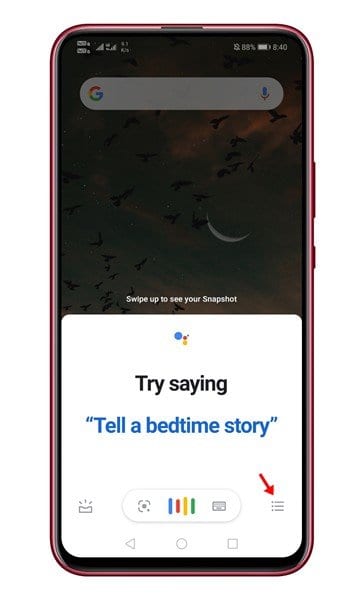
| How to Capture Screenshots On Android using Google Assistant Posted: 18 Dec 2020 04:32 PM PST If you have been using Android for a while, you might know that the operating system has a screenshot utility that triggers while holding the volume up + Home button. In some phones, it works by holding both the Volume Up + Volume Down buttons. The stock screenshot utility of Android smartphones works well. You need to open the page where you want to take the screenshot and press the physical buttons. However, what if the Volume or Home button of your phone is broken or not working? In that case, you can utilize the Google Assistant to capture a screenshot. It's much easy to capture screenshots using Google Assistant than by using the physical buttons. It not only looks cool, but it works even in the apps where screenshots were restricted. Also Read: How To Change the Google Assistant Voice on Android Steps to Capture Screenshots On Android using Google AssistantThis article will share a detailed guide on how to capture screenshots on Android using Google Assistant. Let's check out. Note: If you are using the Google Assistant standalone app, then head to the Google Play Store and update the app. Step 1. First of all, launch Google Assistant on your Android device. Step 2. Now tap on the three horizontal lines as shown below.
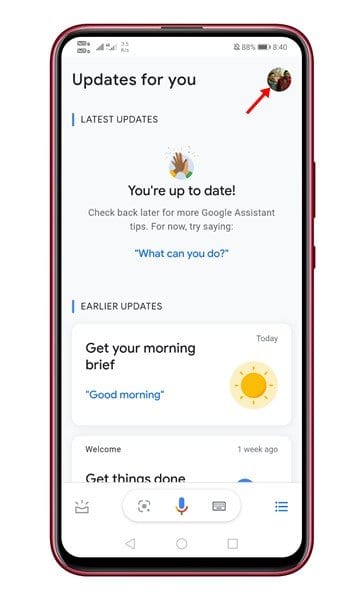
Step 3. Tap on the profile picture and select 'Settings.'
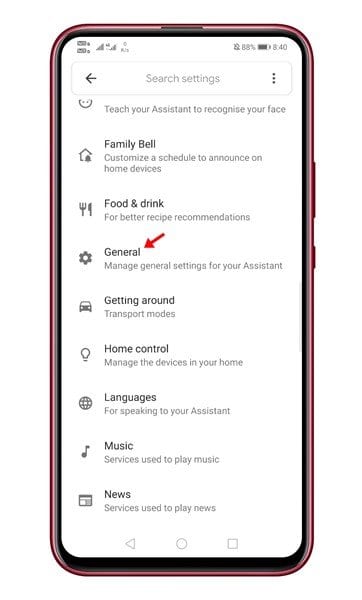
Step 4. Now scroll down and select 'General'
Step 5. Under the General section, enable the option 'Use Screen Content' and 'Donate Screen Captures.'
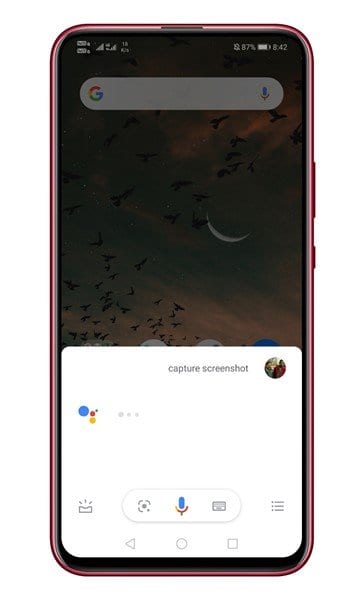
Step 6. Now open the app or webpage where you want to capture a screenshot. Launch the Google Assistant and tap on the 'Share Screenshot'. If the Share screenshot option is not available, type 'Screenshot' or speak 'Capture Screenshot.'
Step 7. Google Assistant will automatically capture the screenshot. You can save it on your Android or share it with your friends directly from the share menu.
That's it! You are done. This is how you can take screenshots using Google Assistant on Android. So, this article is all about how to capture screenshots using Google Assistant on Android. I hope this article helped you! Please share it with your friends also. If you have any doubts related to this, let us know in the comment box below. |
| How to Turn Off Fake Eye Contact in FaceTime on iPhone Posted: 18 Dec 2020 11:37 AM PST
On an iPhone XS or later running iOS 14 or higher, FaceTime digitally modifies your video feed so your eyes are always looking into the camera—even when they're not. If you find the idea of digitally altered eyeballs unsettling, this feature is easy to turn off. Here's how. First, open "Settings" on your iPhone.
In "Settings," tap "FaceTime."
In "FaceTime" settings, flip the switch beside "Eye Contact" to turn it off. This disables the fake "natural eye contact" feature.
You can now leave the "Settings" app. The next time you use FaceTime, your pupils will be exactly where you'd expect them to be. Reality wins—for now. Have fun in your call! RELATED: How to Make a FaceTime Call on iPhone, iPad, or Mac
|
| How to Adjust the Vibration Intensity of Your Android Phone Posted: 18 Dec 2020 10:01 AM PST Your phone, by default, is set to vibrate when you interact with it or receive a notification. But if its intensity is too jarring for you, Android allows you to easily customize your phone's vibration levels. Here's how to do it.
How to Adjust Vibration Intensity on a Stock-Like AndroidVisit your Android phone or tablet's Settings menu from the app drawer or by tapping the gear icon in the notification panel.
Scroll down and enter the "Accessibility" menu.
Under "Interaction Controls" located toward the bottom of the page, select "Vibration and Haptic Haptics" (or "Vibration and Haptic Strength").
Here, you can separately personalize your phone's haptic feedback strength and how strongly it buzzes when you get a phone call or a notification.
You can choose between three levels of intensity or turn it off completely. |

| You are subscribed to email updates from My Blog. To stop receiving these emails, you may unsubscribe now. | Email delivery powered by Google |
| Google, 1600 Amphitheatre Parkway, Mountain View, CA 94043, United States | |


0 nhận xét:
Đăng nhận xét