How to Change the Google Assistant’s Voice |
- How to Change the Google Assistant’s Voice
- How to Change Your Windows 10 Lock Screen Background
- AMD Ryzen 7 5800H Review
- Nvidia GeForce RTX 3060 Laptop GPU Review
- How to Listen to Apple Music on a Windows PC
- How to Prevent Members From Editing a WhatsApp Group’s Details
- How to Send Disappearing Messages in Signal
- How to Add Google Maps Shortcuts On Android Home Screen
- How to Delete Your Signal Account
- How to Transpose Excel Data from Rows to Columns (or Vice Versa)
| How to Change the Google Assistant’s Voice Posted: 08 Feb 2021 09:00 AM PST
Google Assistant has a voice that has become somewhat iconic over the years. People hear it and associate it with Google. However, you don't have to use this voice. There are several others to choose from. Since its launch in 2016, Google Assistant has had two default voices. The one most people recognize is from a voice actor named Antonia Flynn. At the time of writing, there are 11 voices in total available to you. We'll show you how to change it. To begin, open the Google Assistant app. On Android phones and tablets, this can be done by saying "Okay, Google," or by swiping in from the bottom-left or -right corner.
With an iPhone or iPad, you can tap the Google Assistant app from your home screen or App Library.
Next, sign in to your Google account (if you haven't done so already), then tap your profile icon to open the Assistant's Settings menu.
You'll now see a long list of things you can do with Google Assistant. The one we're looking for is "Assistant Voice."
The default voice is named "Red." There are several other voices to choose from, each named by color. Simply tap one of the colored bubbles to hear an audio sample.
At the time of writing, you can also have actor Issa Rae as the Assistant voice. This is called a "Cameo Voice" and isn't available everywhere.
Underneath the voice bubbles, you'll see which devices will use your selected voice.
If you're using the Android app, there is also a section at the very bottom called "Speech Output." Select "Phone" to choose how conversational the responses will be on this device.
Select from "Full," "Brief," or "None." The "None" option will only respond audibly if you're using hands-free methods.
That's all there is to it. Once you select a voice, it will be used from that point forward. If multiple people interact with a Google Assistant-enabled device in your home, such as a Nest or Home smart speaker or smart display, it will use each person's preferred voice selection using "Voice Match." |
| How to Change Your Windows 10 Lock Screen Background Posted: 08 Feb 2021 06:11 AM PST
Tired of seeing backgrounds provided by Microsoft on your Windows 10 lock screen? With a trip to Settings, you can choose a custom background image or even set up a custom slideshow from a group of images. Here's how to set it up. First, open "Settings" by clicking the "Start" button and selecting the small gear. Or you can press Windows+i on your keyboard.
In "Settings," select "Personalization."
In "Personalization," select "Lock screen" from the sidebar.
In Lock screen settings, locate the drop-down menu labeled "Background," which is just below the lock screen preview image. Click the menu, and you'll see three options. Here's what they do.
The default option is "Windows Spotlight," which pulls new Microsoft-provided photographic images from the Internet. If you'd like to use your own image, select "Picture" from the menu, then click "Browse" to select an image you'd like to use.
If you'd rather have a custom slideshow of images, select "Slideshow" from the drop-down menu. Next, choose an album of photos to use as the source of images. Windows will cycle through them on the lock screen, changing them every few seconds. You can pick your "Pictures" folder or click "Add a folder" to add a custom group of images to use.
When "Slideshow" is selected, you can also change slideshow options by clicking "Advanced slideshow settings" just below the "Choose albums" area. Once you choose, it, you can change options such as "Only use pictures that fit my screen" and whether the slideshow uses Camera Roll folders from your OneDrive.
When you have everything configured how you'd like, exit "Settings," and the changes will take effect immediately. You can press Windows+L on your keyboard to quickly bring up the lock screen and check. Have fun customizing Windows! RELATED: 30 Essential Windows Key Keyboard Shortcuts for Windows 10 |
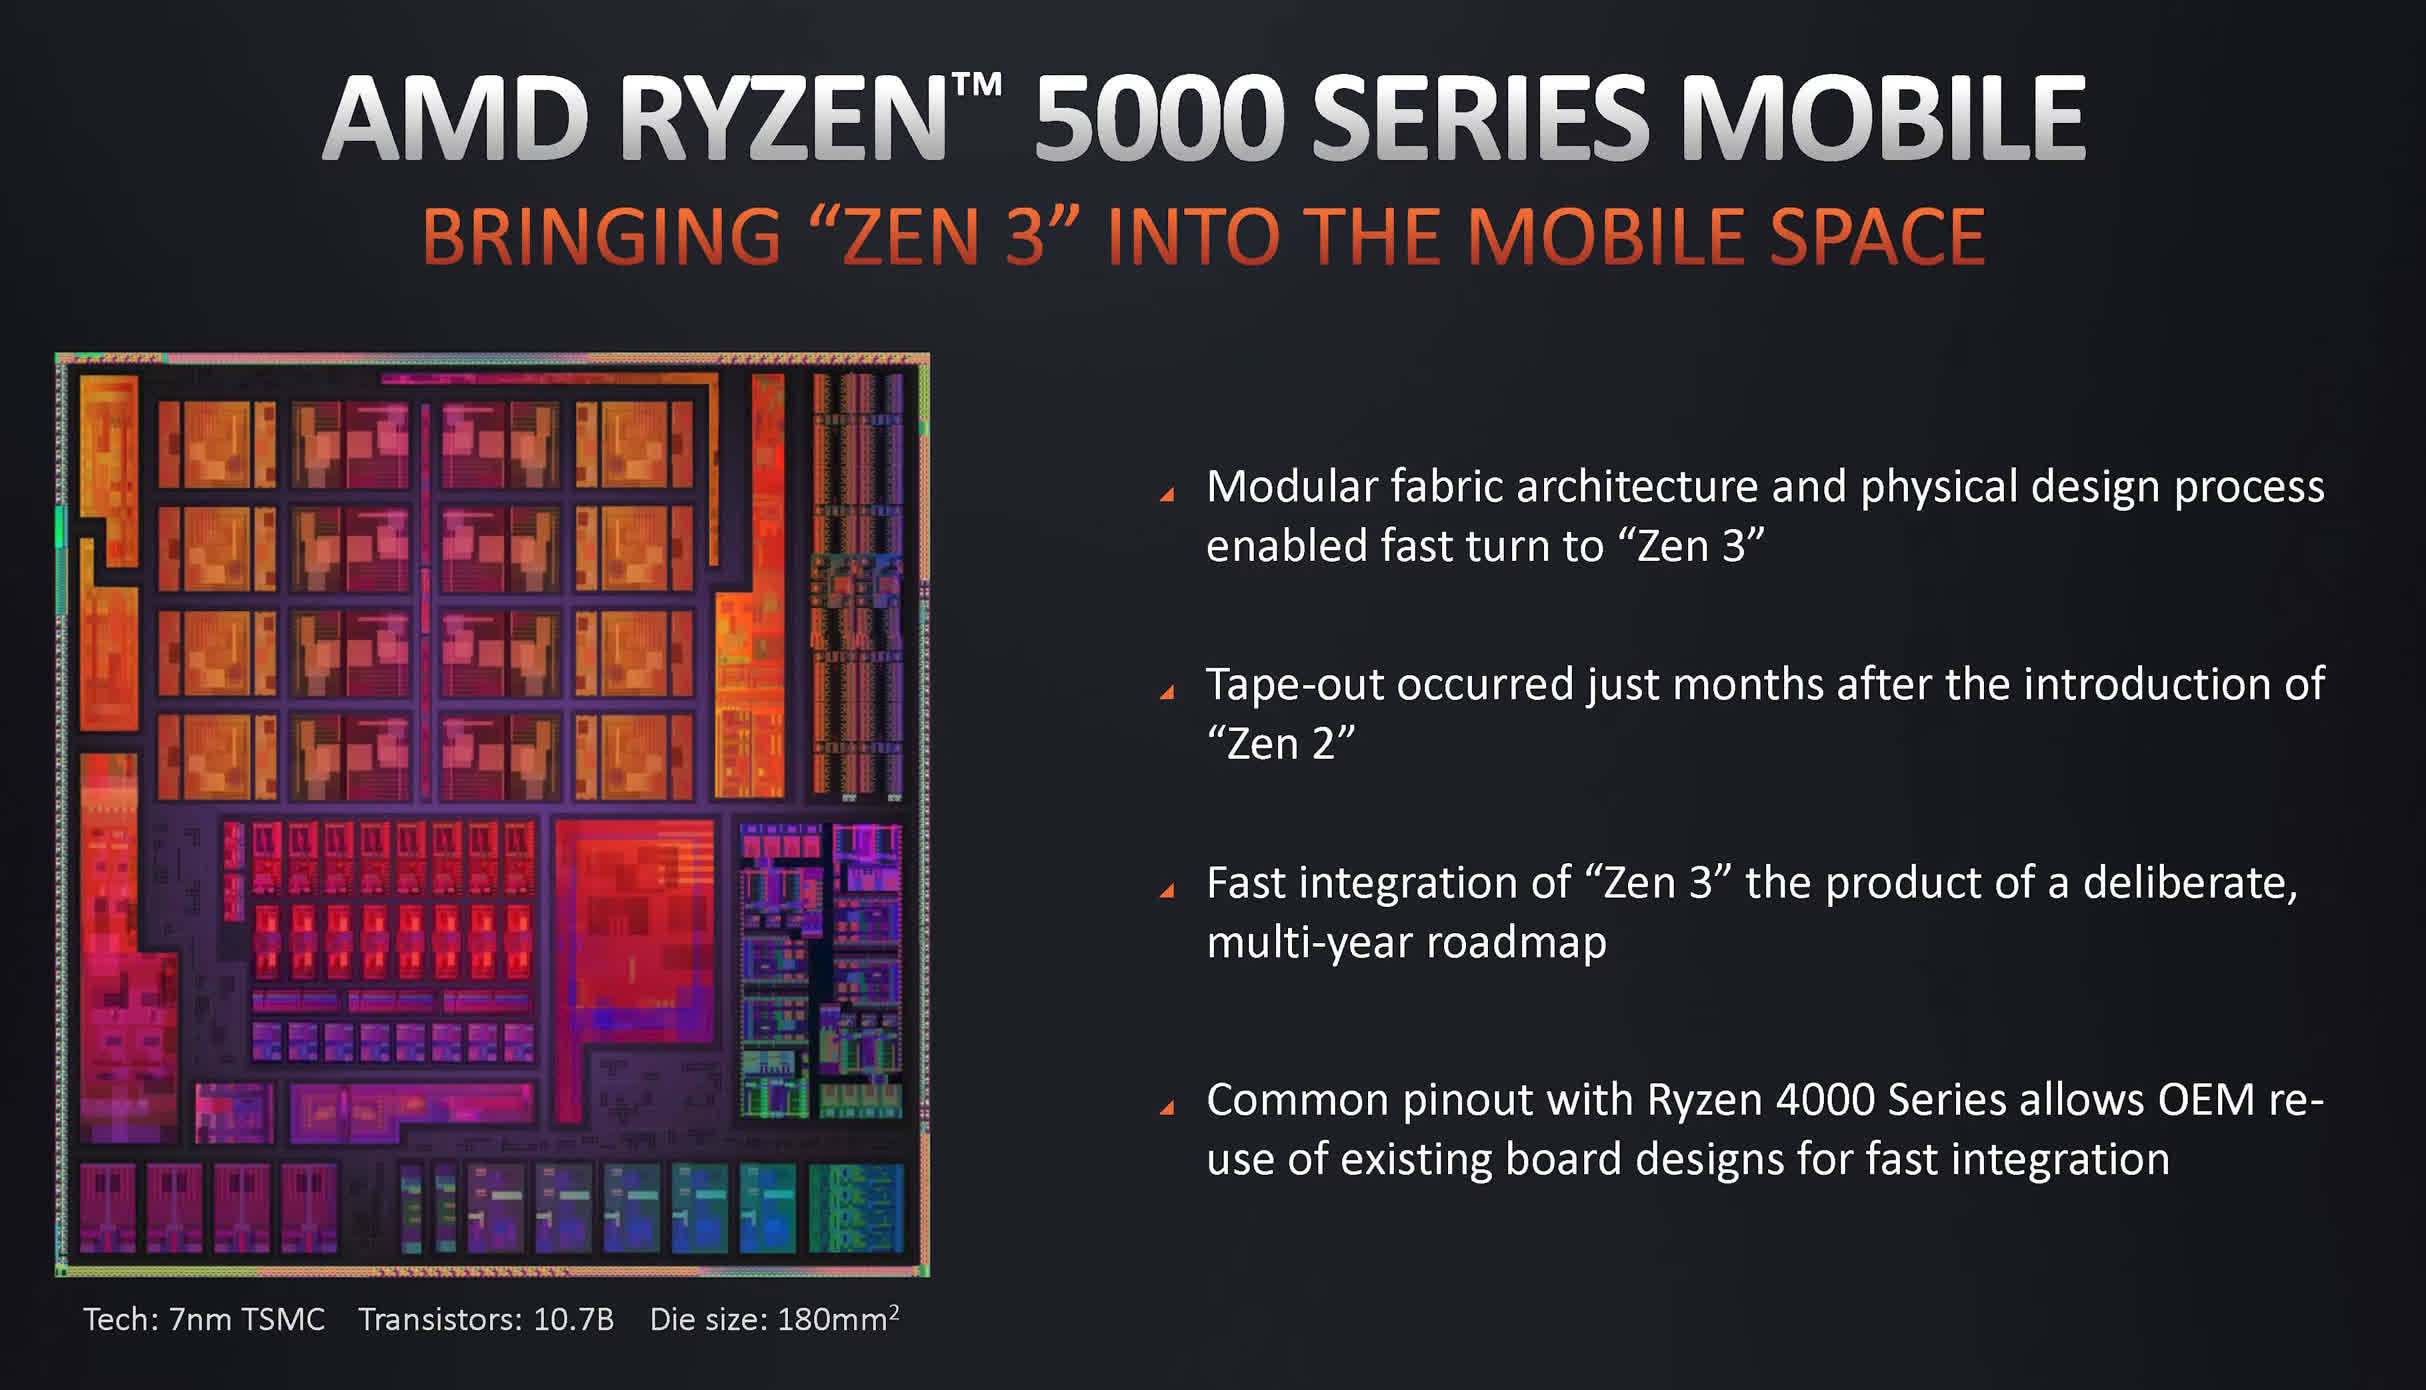
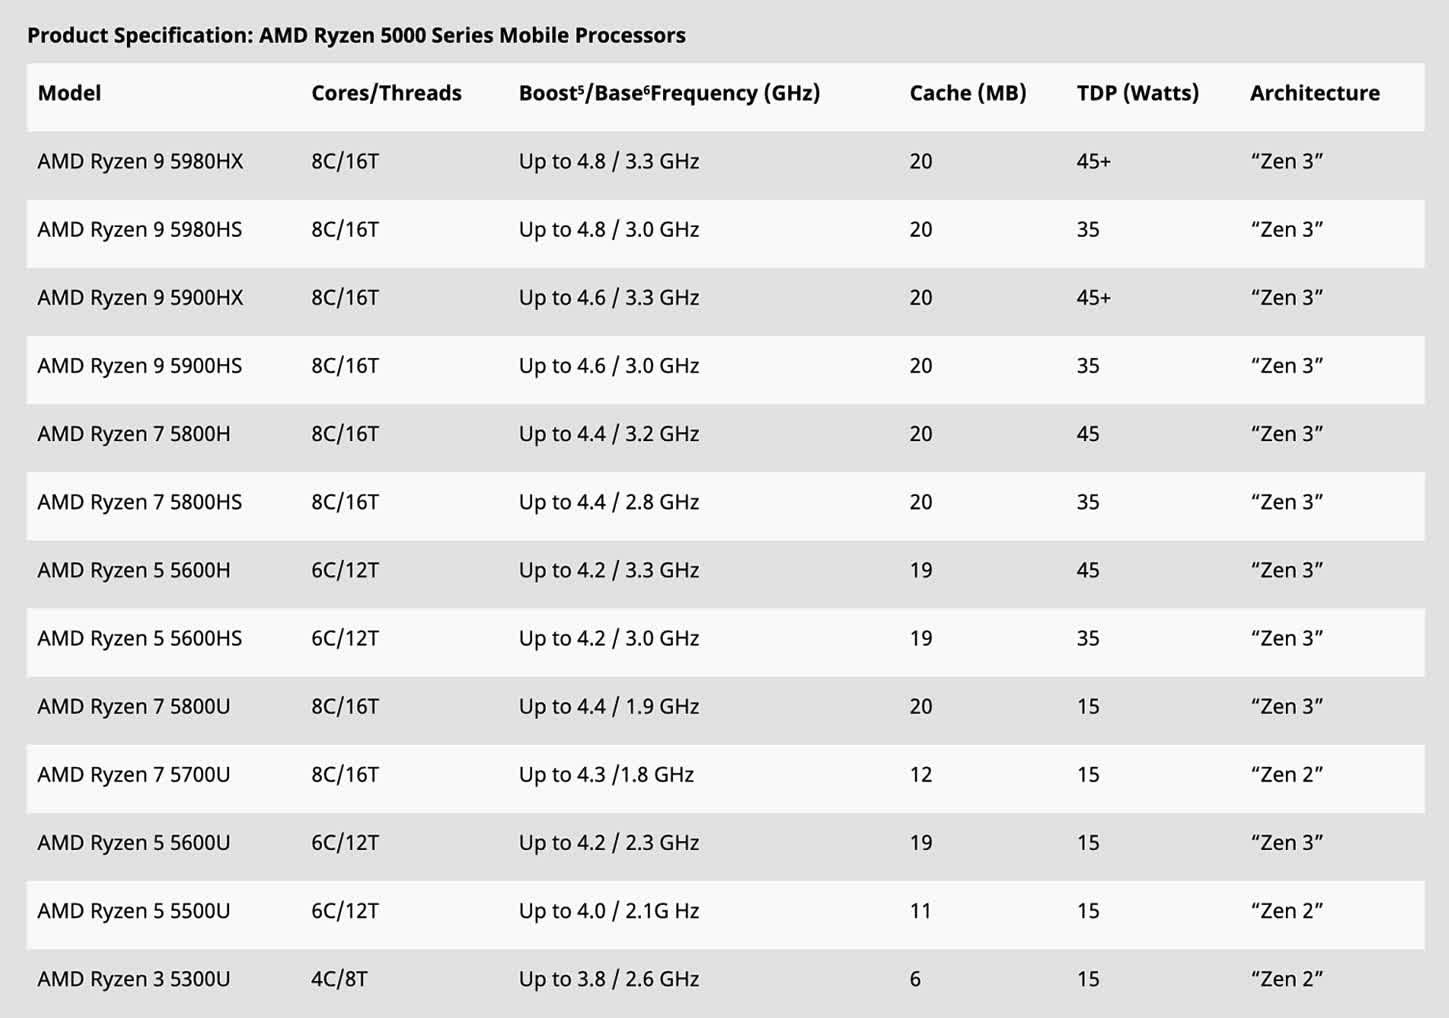
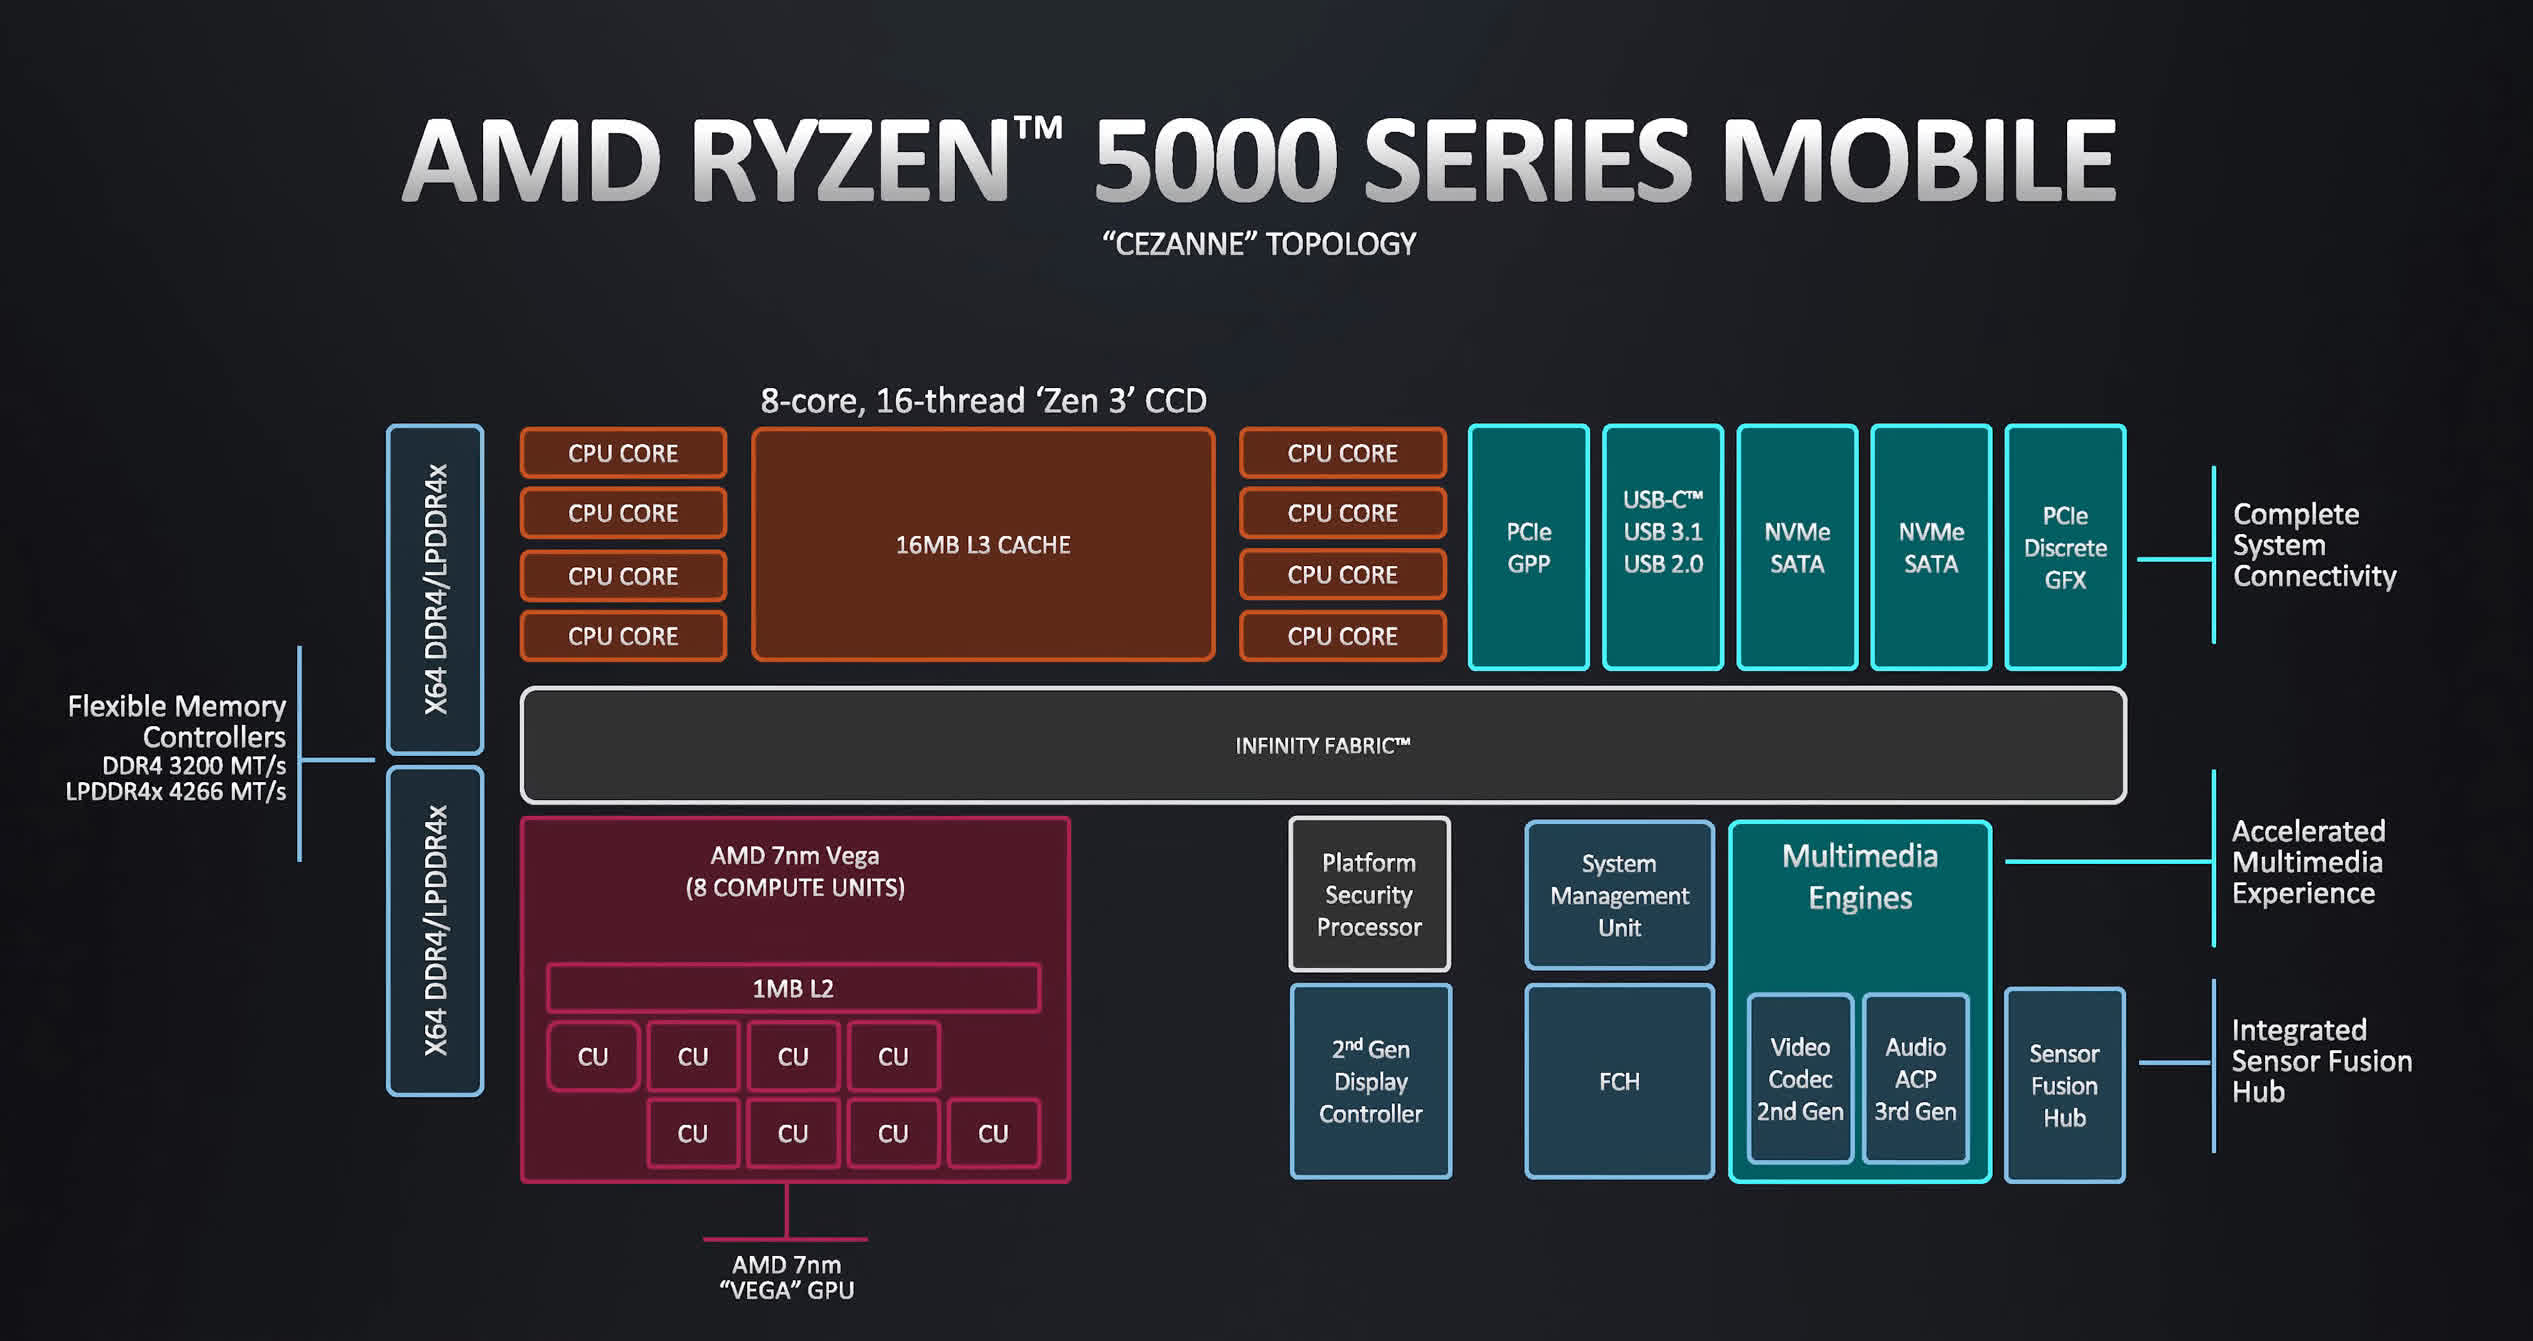
| Posted: 08 Feb 2021 04:59 AM PST The Ryzen 7 5800H is another new Zen 3-based APU that will form the backbone of AMD's gaming laptop platform and like the 4800H before it, we expect this to be the most popular processor in the series and found in a wide variety of laptop models. This is the second Ryzen 5000 mobile APU that we've had hands on time with so far. We previously checked out the Ryzen 9 5980HS in the impressive Asus ROG Flow X13 ultraportable and found it to perform quite well, but in this review we’ll shift our focus to this high-end mainstream laptop chip. The Ryzen 7 5800H brings with it a unified 8-core CCX and double the L3 cache compared to the 4800H. Zen 3 also increases IPC for the CPU cores, and AMD is able to clock these chips slightly higher, despite using the same TSMC 7nm process node. Outside of the CPU though, the 5800H largely keeps the same feature set, from the memory controller to PCIe support. The Ryzen 7 5800H features an unlocked 8 core, 16 thread design with 16 MB of L3 cache. On the CPU, we're looking at a 3.2 GHz base clock and 4.4 GHz boost, and it's really just in these clock speeds where the 5800H sits below the flagship 5900HX and 5980HX. On the GPU side we're getting an unlocked Vega design, with 8 compute units enabled clocked up to 2.0 GHz.
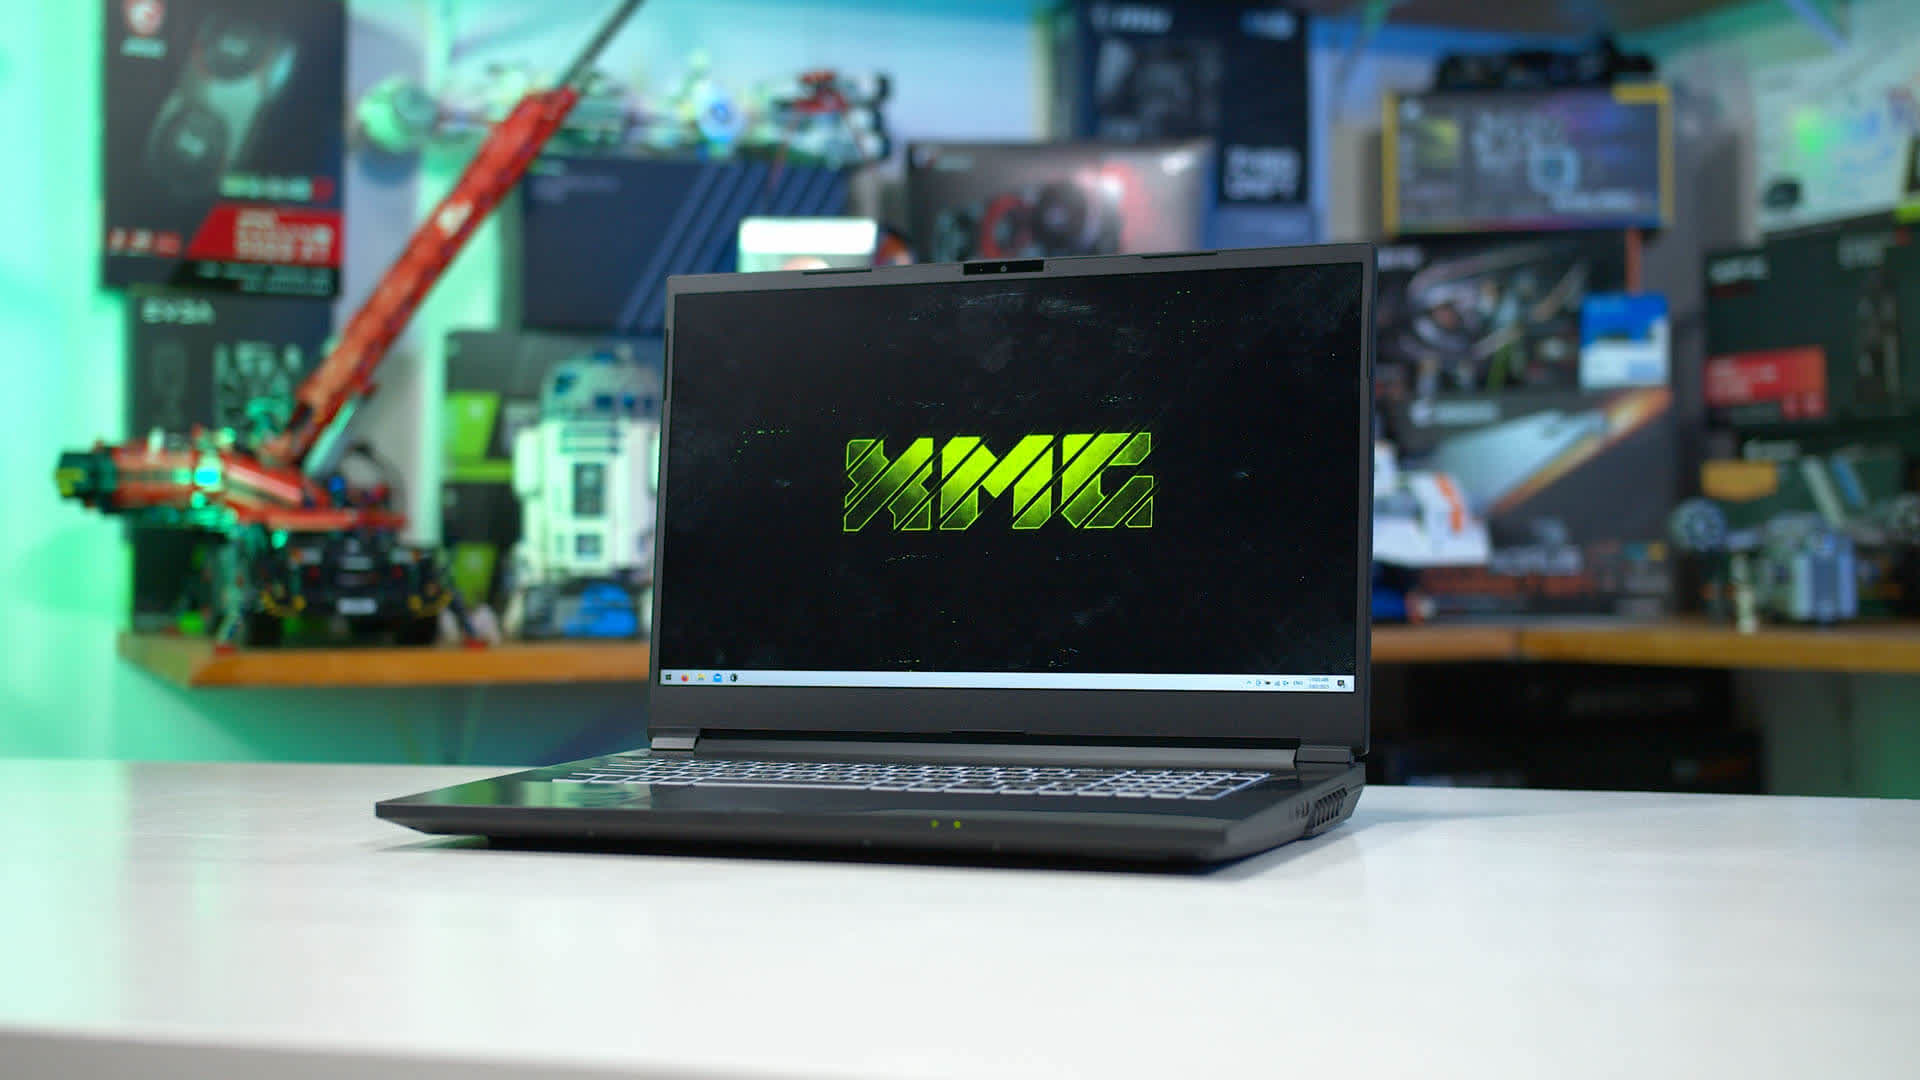
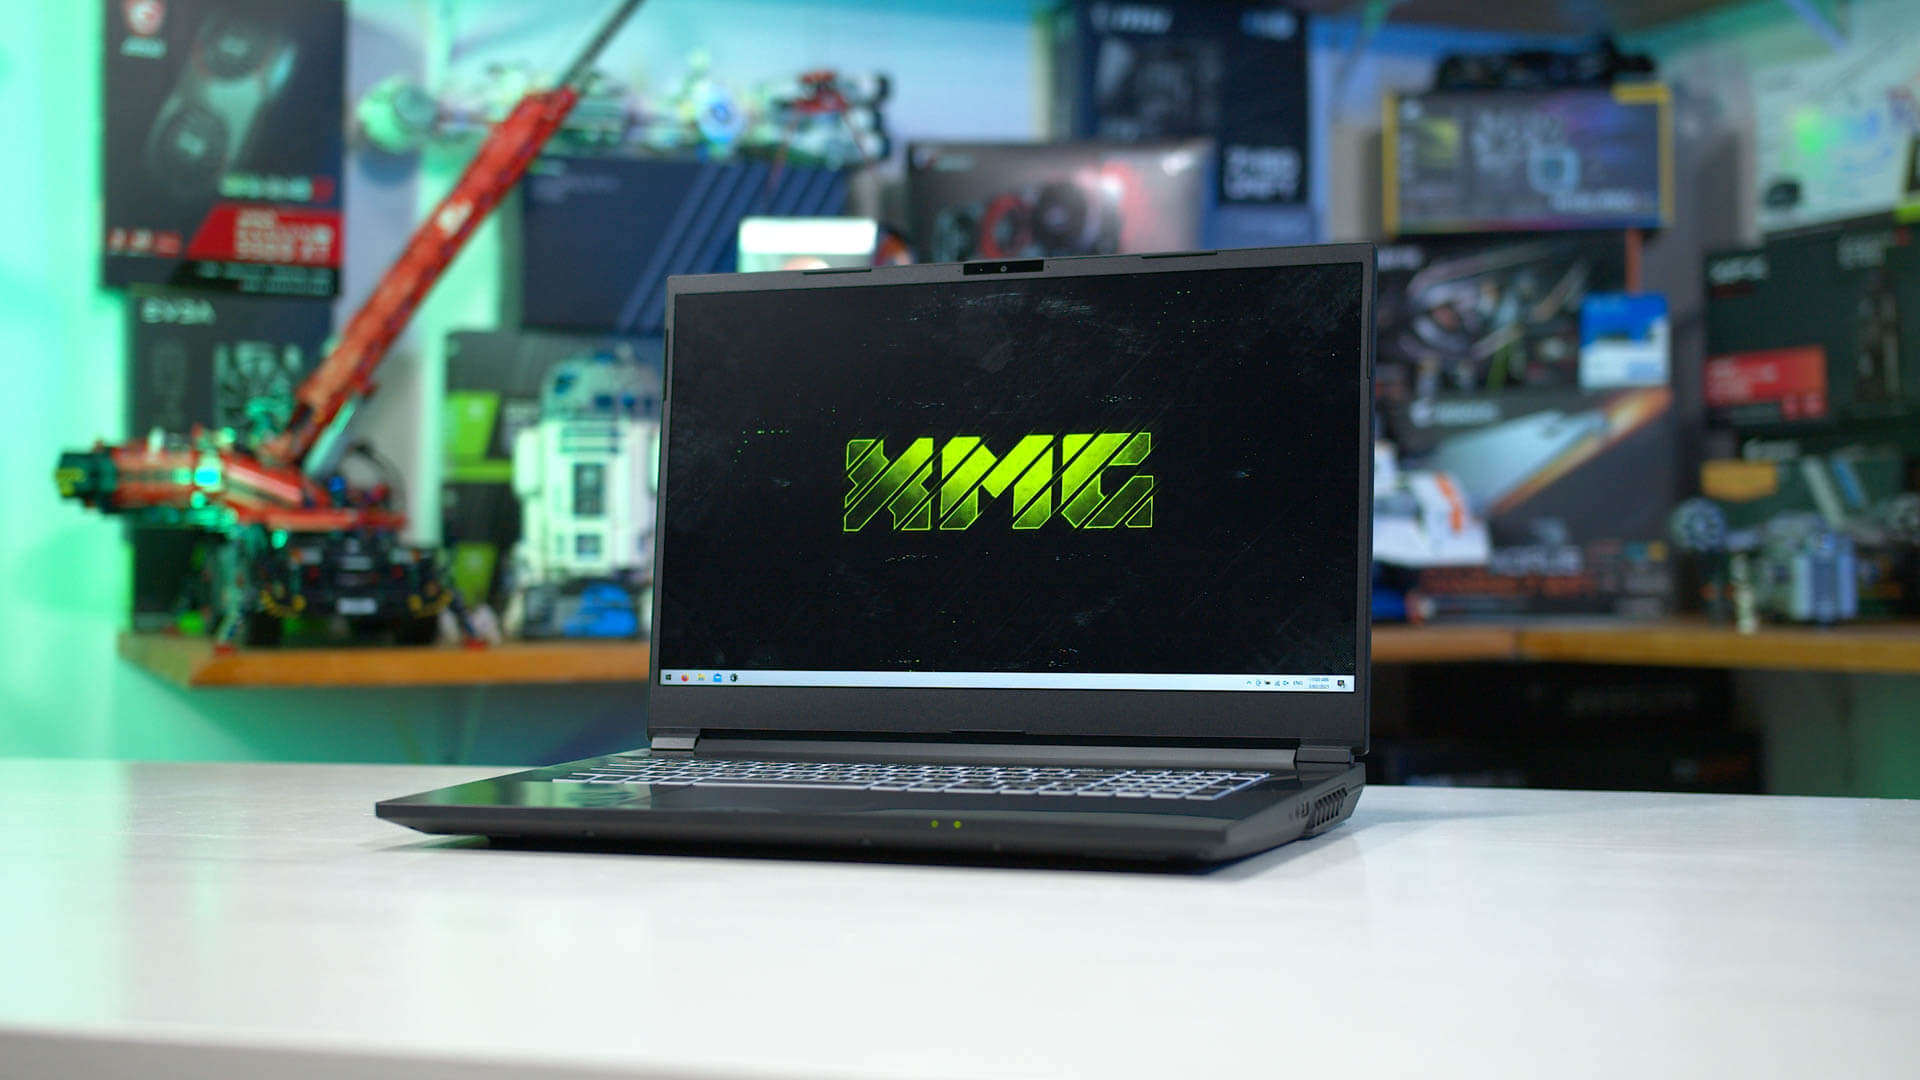
Compared to the last-gen 4800H, we observe the same 8-core CPU design with clock speeds increased by 300 MHz on the base clock, and 200 MHz on the boost. The increased IPC and extra L3 cache that will be providing the bulk of the improvements. We do get one extra GPU compute unit enabled, as well as a 400 MHz increase to frequency, however in most laptops that use the 5800H we suspect we'll be seeing discrete graphics added. Our laptop test system used for benchmarking today is the same XMG Apex 17 we used to test the new GeForce RTX 3060 laptop GPU. This is a solid test platform as in its ‘Entertainment’ mode it runs as AMD expects: with a 5-8 minute boost period up to 54W, before dropping down to 45W long term, the default TDP for this processor. This is similar to how we saw the Ryzen 7 4800H operate in systems last year. In addition to this 45W mode, there’s also a performance mode that sustains 54W indefinitely, something to keep in mind if you are interested in buying an Apex 17 when they go on sale later this year. That will give you a small bump to the performance we're showing in this review, but as with all our laptop testing we normalize for power to keep a fair playing field between laptop CPUs. The Apex 17 is sort of your classic mainstream laptop design aimed at mid-range to entry-level buyers that just want something basic with the best performance they can get for the dollar. There's plenty of cooling in here and if you so choose with a custom fan curve, the Apex can run near silently without losing any performance. There’s an RTX 3060 with up to 115W of base power inside, 16GB of DDR4-3200 memory and a 1080p 144Hz display. This laptop configuration would be a good choice if you're a budget conscious shopper and want a performance-oriented design. BenchmarksLet's get into the performance charts and we'll start with Cinebench R20 multi-threading as usual. You're not going to sit towards the top of this chart unless you have an eight core design, and with the IPC benefits that Zen 3 brings, the 5800H is able to sneak its way into top position.
In terms of a generation-on-generation performance leap, the 5800H is just 8 percent faster than the 4800H, but across the board this allows Ryzen to extend its lead on Intel, with at least a 30 percent advantage over the Core i9-10980HK when both are running at 45W long term.
Where Ryzen 5000 sees the bulk of its gains is in single-thread performance. In Cinebench R20, the 5800H is a more substantial 15% faster than the 4800H, so that allows the 5800H to leapfrog Intel's 8-core 10th-gen processors into the leading position among 45W processors. However, only clocking up to 4.4 GHz maximum is insufficient for beating Intel's Tiger Lake designs, and while they are only 28W processors, the 1165G7 and 1185G7 both deliver better single-thread performance in this test.
Our Handbrake test takes ~30 to 60 minutes to complete on most modern H-series chips, and here the 5800H is 8% faster than the 4800H on average. This is a modest gain. However there is an incentive in these CPU encoding workloads to upgrade from Intel, where the 5800H is 63% faster than the Core i7-10750H, and 28% faster than the 10980HK.
Blender was the workload where we saw the smallest gen-on-gen gains for Zen 3. The 5800H is fast and delivers good performance in this multi-thread workload, but the gains compared to the 4800H are negligible. Relative to Intel processors, you'll see performance 30 to 70 better than equivalent H-series parts in the Core i7 range and above.
Code compilation is one of Ryzen's stronger workloads. In GCC compilation, the 5800H completed the workload 18% faster than the 4800H, putting it well ahead of Intel's equivalent processors. In Chromium compilation, the 5800H is 13 percent faster than the 4800H and not as dominant relative to Intel.
Matlab benefits significantly from Ryzen's increased IPC and higher L3 cache. Generation on generation, the 5800H is 19% faster in this application using the built in benchmark, which like in the Cinebench R20 single-threaded test, pushes AMD's laptop processor ahead of Intel's Core i9-10980HK for the first time.
In Microsoft Excel, we see AMD benefiting from increased cache, posting a 15% gain over the Ryzen 7 4800H. This is enough to have the 5800H outperform Intel's chips up to the Core i7-10875H, however the Core i9-10980HK remains the fastest chip by a small margin.
In the PCMark 10 Essentials test, which measures basic application performance like loading times and web browsing, the Ryzen 7 5800H performs well, topping the charts. We're seeing a 9% improvement which is not huge, however this makes the 5800H about 5 percent faster than Intel's 10th-gen H-series parts. Realistically high end laptop CPUs from either brand will deliver solid all-round performance in basic apps.
In the applications test, the 5800H performs well, however the margins compared to Intel processors are slim that there is no real difference between a 5800H or 10875H for Office apps in practice. This CPU is a couple of percent behind the Core i7-1185G7 which is currently Intel's fastest processor for lightly-threaded apps.
In 7-Zip compression, increased IPC and more cache allows the Ryzen 7 5800H to take top spot on this chart. We're seeing some of the largest gains versus Ryzen 4000 here, with a sizable 25% performance increase. The 5800H ends up 6 percent faster than the Core i9-10980HK for multi-thread compression.
Decompression remains dominant for AMD, where the 8-core design can flex its muscles. Again, not the biggest gains versus the 4800H, and the 5800H is slightly slower than the 5980HS as this test is run entirely in the boost state, but either way you're left with great decompression performance with this processor.
Acrobat PDF exporting shows the 5800H neck and neck with Intel's H-series designs, although it is beaten in this heavily single-threaded workload by the Tiger Lake chips we've tested so far. We do see a large gain over the previous-gen 4800H, with the 5800H being 19% faster here.
In Adobe Photoshop, the Ryzen 7 5800H is able to go toe-to-toe with Intel for the first time in the 45W class. Previously, this was an application where Intel had a clear advantage over Ryzen, but that's no longer the case with the Zen 3 upgrade. The 5800H is now equivalent to a 10980HK for performance.
Another strong result for AMD is running an instance of the warp stabilizer effect in Premiere. Largely single-threaded, the 5800H is 16% faster than the 4800H, and at least 20 percent faster than Intel's H-series designs. That gap does narrow when factoring in Tiger Lake, although the 5800H is still a couple of percent ahead of the 1185G7 in this workload.
We'll move now into some GPU accelerated workloads and the combination of a Ryzen 7 5800H and RTX 3060 GPU is very strong in DaVinci Resolve, matching the performance that was previously only on offer in the largest, highest-end Intel configurations. We don't have any direct GPU equivalent results to give you in this workload just yet, but in a similar power class the 5800H and RTX 3060 combination easily outperforms previous designs that relied on high-end RTX 20 GPUs and Intel CPUs.
In Adobe Premiere using the Puget Systems export test, we see similar results. The 5800H in a mid-range configuration with an RTX 3060 is on par with higher-end Intel machines from last generation. Over time we'll get more clarity into exact matchups for Premiere exporting but the early results here are promising and show that allowing Ryzen to be paired with higher-end GPUs is a boon for content creators that want both strong CPU and GPU performance.
If you prefer running your encodes on the CPU rather than using GPU hardware acceleration, Ryzen is undoubtedly the best choice for Premiere. The 5800H completed our render test at least a minute faster than other configurations we've tested so far, and that includes previous-gen Ryzen designs, and a variety of Intel laptops. Gaming TestsWe won’t place a big focus on integrated GPU performance in this review for two reasons: 1) the graphics performance is very close to what we saw from the 4800H a year ago, and 2) because in the majority of Ryzen 7 5800H laptops, they'll be paired with some form of discrete GPU. However for those that are interested in how the integrated design fares…
In GTA V the 5800H delivers essentially the same performance as the 5980HS that we reviewed not that long ago, so the extra power available to use doesn't change the overall equation all that much.
In F1 2019, the 5800H is able to roughly match the Core i7-1165G7 for integrated graphics performance and delivers about 7% more FPS than the 5980HS. Nothing too amazing and again we don't expect many H-series designs to rely on the integrated GPU for gaming which are more often than not GPU limited. If you're wondering how the Ryzen 7 5800H stacks up in discrete gaming performance, you should check out our review of the GeForce RTX 3060 laptop GPU which shows how this mid-range GPU from Nvidia fairs using this very processor. Comparisons
The Ryzen 7 5800H sees a modest performance improvement over the Ryzen 7 4800H. The larger gains come in single-threaded performance, where the 5800H is ~15% faster. In multi-threaded workloads, you will also see gains, but less significant ones.
The 5800H is significantly faster than the Core i7-10750H in almost all workloads, whether that is single or multi-threaded. Intel's six-core mainstream processor is not very competitive, with the 5800H showing double digit percent better performance across the board. In many instances, the 5800H is over 50% faster.
The most direct competitor to the R7 5800H right now is the Core i7-10875H, Intel's 8-core H-series design. This CPU will receive an update to Tiger Lake later this year. In some applications the 5800H and 10875H trade blows, such as in PCMark, Excel and Photoshop. But there isn't an instance where the 5800H is slower than Intel's design, and when we look at multi-thread performance, the 5800H is usually in the range of 50% faster.
AMD's 5800H is generally faster than Intel's flagship Core i9-10980HK, although it does depend on the workload and there are some instances where the 5800H and 10980HK deliver basically the same performance. Multi-threading is a big strength of the 5800H, with the Zen 3 chip delivering 30% better performance in most instances. Lighter workloads see the 5800H within a margin of 5% faster or slower, so we’d call that to be even.
The 5800H isn't a true competitor to the Core i7-1185G7 as these parts sit in different power classes, however right now the Tiger Lake-based 1185G7 is Intel's best mobile processor for single threaded workloads. The 5800H is not as fast as the 1185G7 here, although it does depend on the workload. If I had to put a number on it, I'd say the 5800H is roughly 5% behind the best Tiger Lake can do for single-threading, although with the 1185G7 only offering four cores, it's a strong win in favor of AMD for multi-threaded tests. What We LearnedThe Ryzen 7 5800H is a solid tune-up of AMD's H-series mobile CPUs designed for performance notebooks. AMD identified a weakness with their previous design — single-thread performance — and took it to the mechanic to swap out the Zen 2 architecture for Zen 3. The results are good, giving the 5800H the best performance on offer in its class in the vast majority of workloads. The Ryzen 7 5800H is a solid tune-up of AMD's H-series mobile CPUs designed for performance notebooks. From a pure numbers standpoint, the gen-on-gen performance gains are respectable but modest: 10% better multi-threading, 15-20% better single-threading. However, as a lot of the work was already done with the prior generation to bring AMD's line-up into a competitive position, the 5800H didn't need huge gains to be a success. For those that already have a Ryzen 7 4800H system, we don't think there's much reason to consider an upgrade. However, with AMD extending their lead over Intel in multithreading, those with older laptops featuring other processors should see a substantial performance uplift moving to a Ryzen 5000 system. And that's not factoring in other platform upgrades you will likely get, in particular a faster discrete GPU. If you’re after a new performance-oriented laptop, we wouldn’t considering an Intel 10th-gen laptop, even those with the Core i9-10980HK inside, because the Ryzen 7 5800H is simply faster watt for watt. The exception to this rule would be if the Intel laptop is more affordable for an equivalent configuration, or if the Intel laptop you're interested in has a niche feature that you require. Until this generation, Intel laptops were paired with faster GPUs in higher-end models, but with Ryzen systems now including all the way up to RTX 3080 graphics, that's no longer a key difference. And while the Ryzen 7 5800H is the best mobile processor available in its price range right now, we are comparing AMD's newest generation to Intel's prior generation. Tiger Lake H-series chips with 8-core layouts are expected in the next few months, and it's definitely shaping up into an interesting battle given the strong gains Intel made in ultrabook-class CPUs. Those laptops are supposed to arrive in this or the next quarter, so it might pay off to wait a few months just to assess the competition and see if Ryzen 5000 supply is not an issue and you can actually purchase a new R7 5800H laptop at a reasonable price. Shopping Shortcuts |
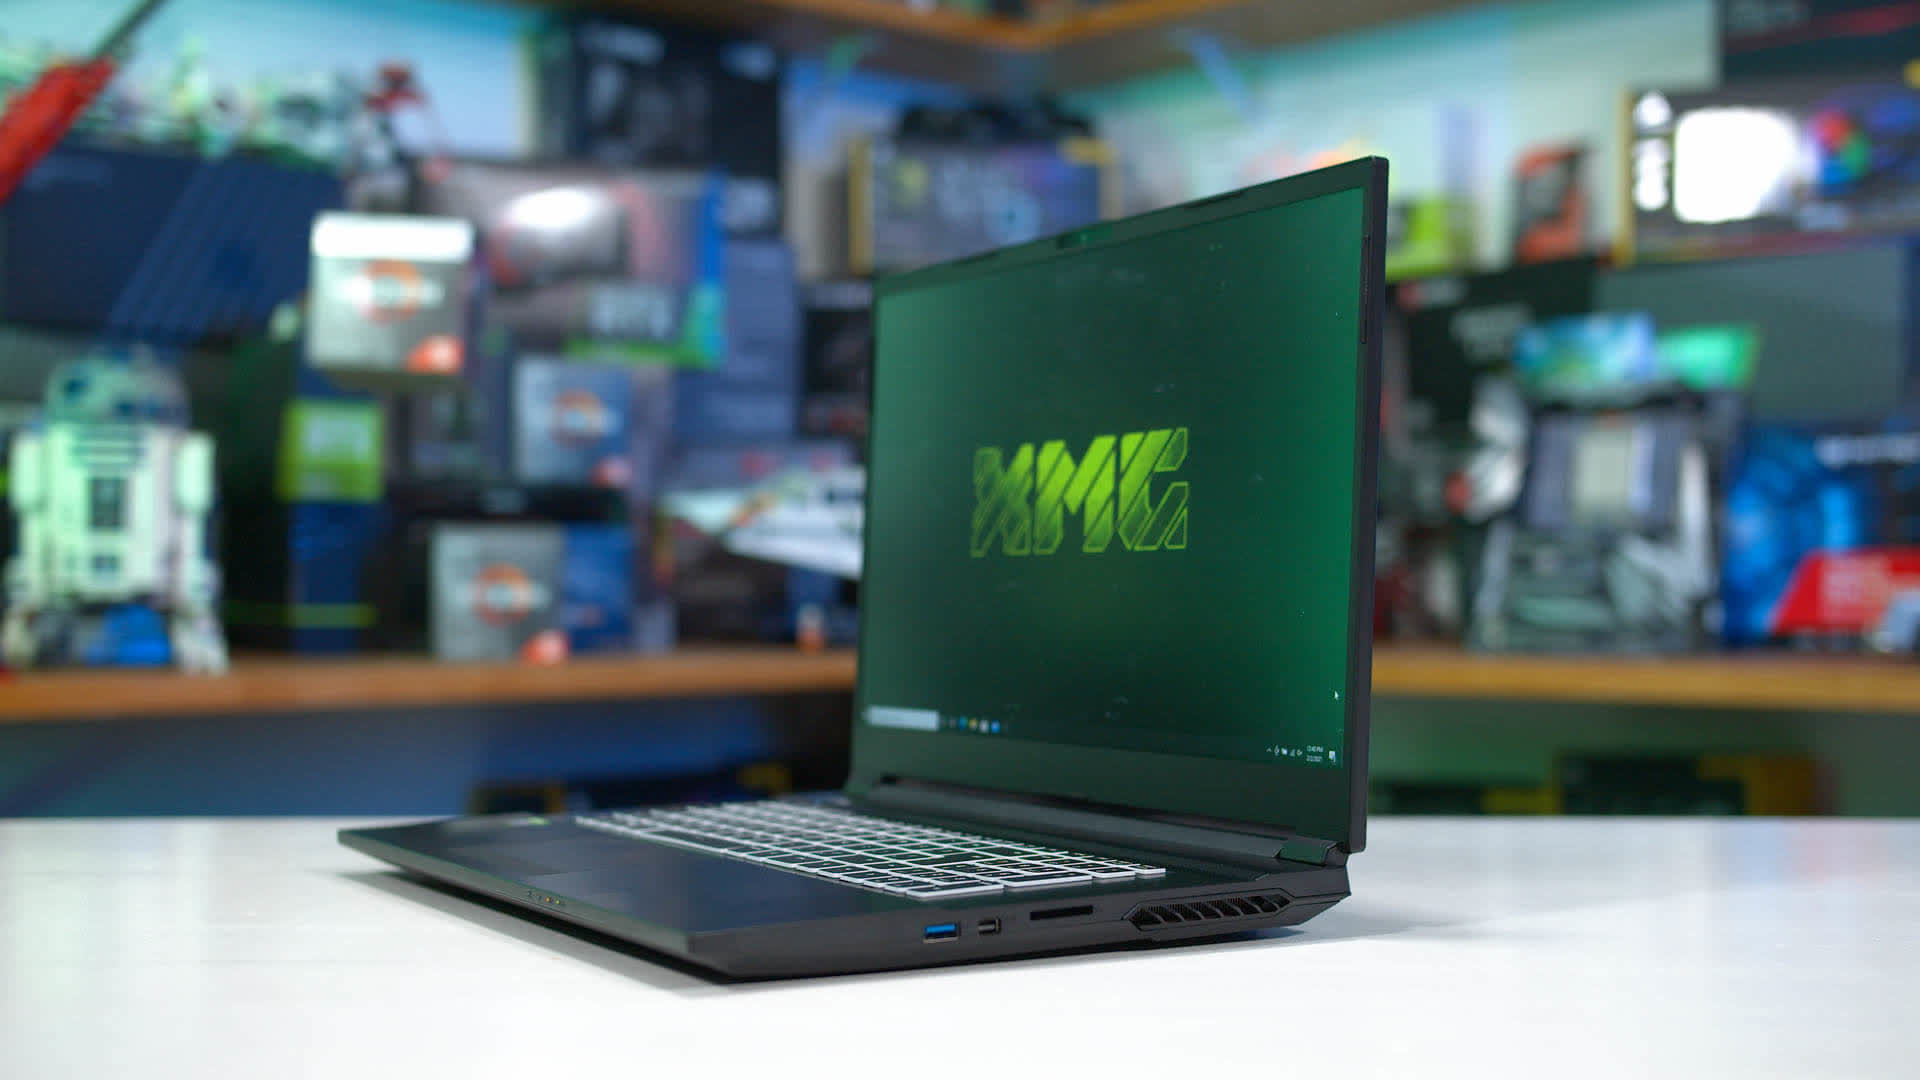
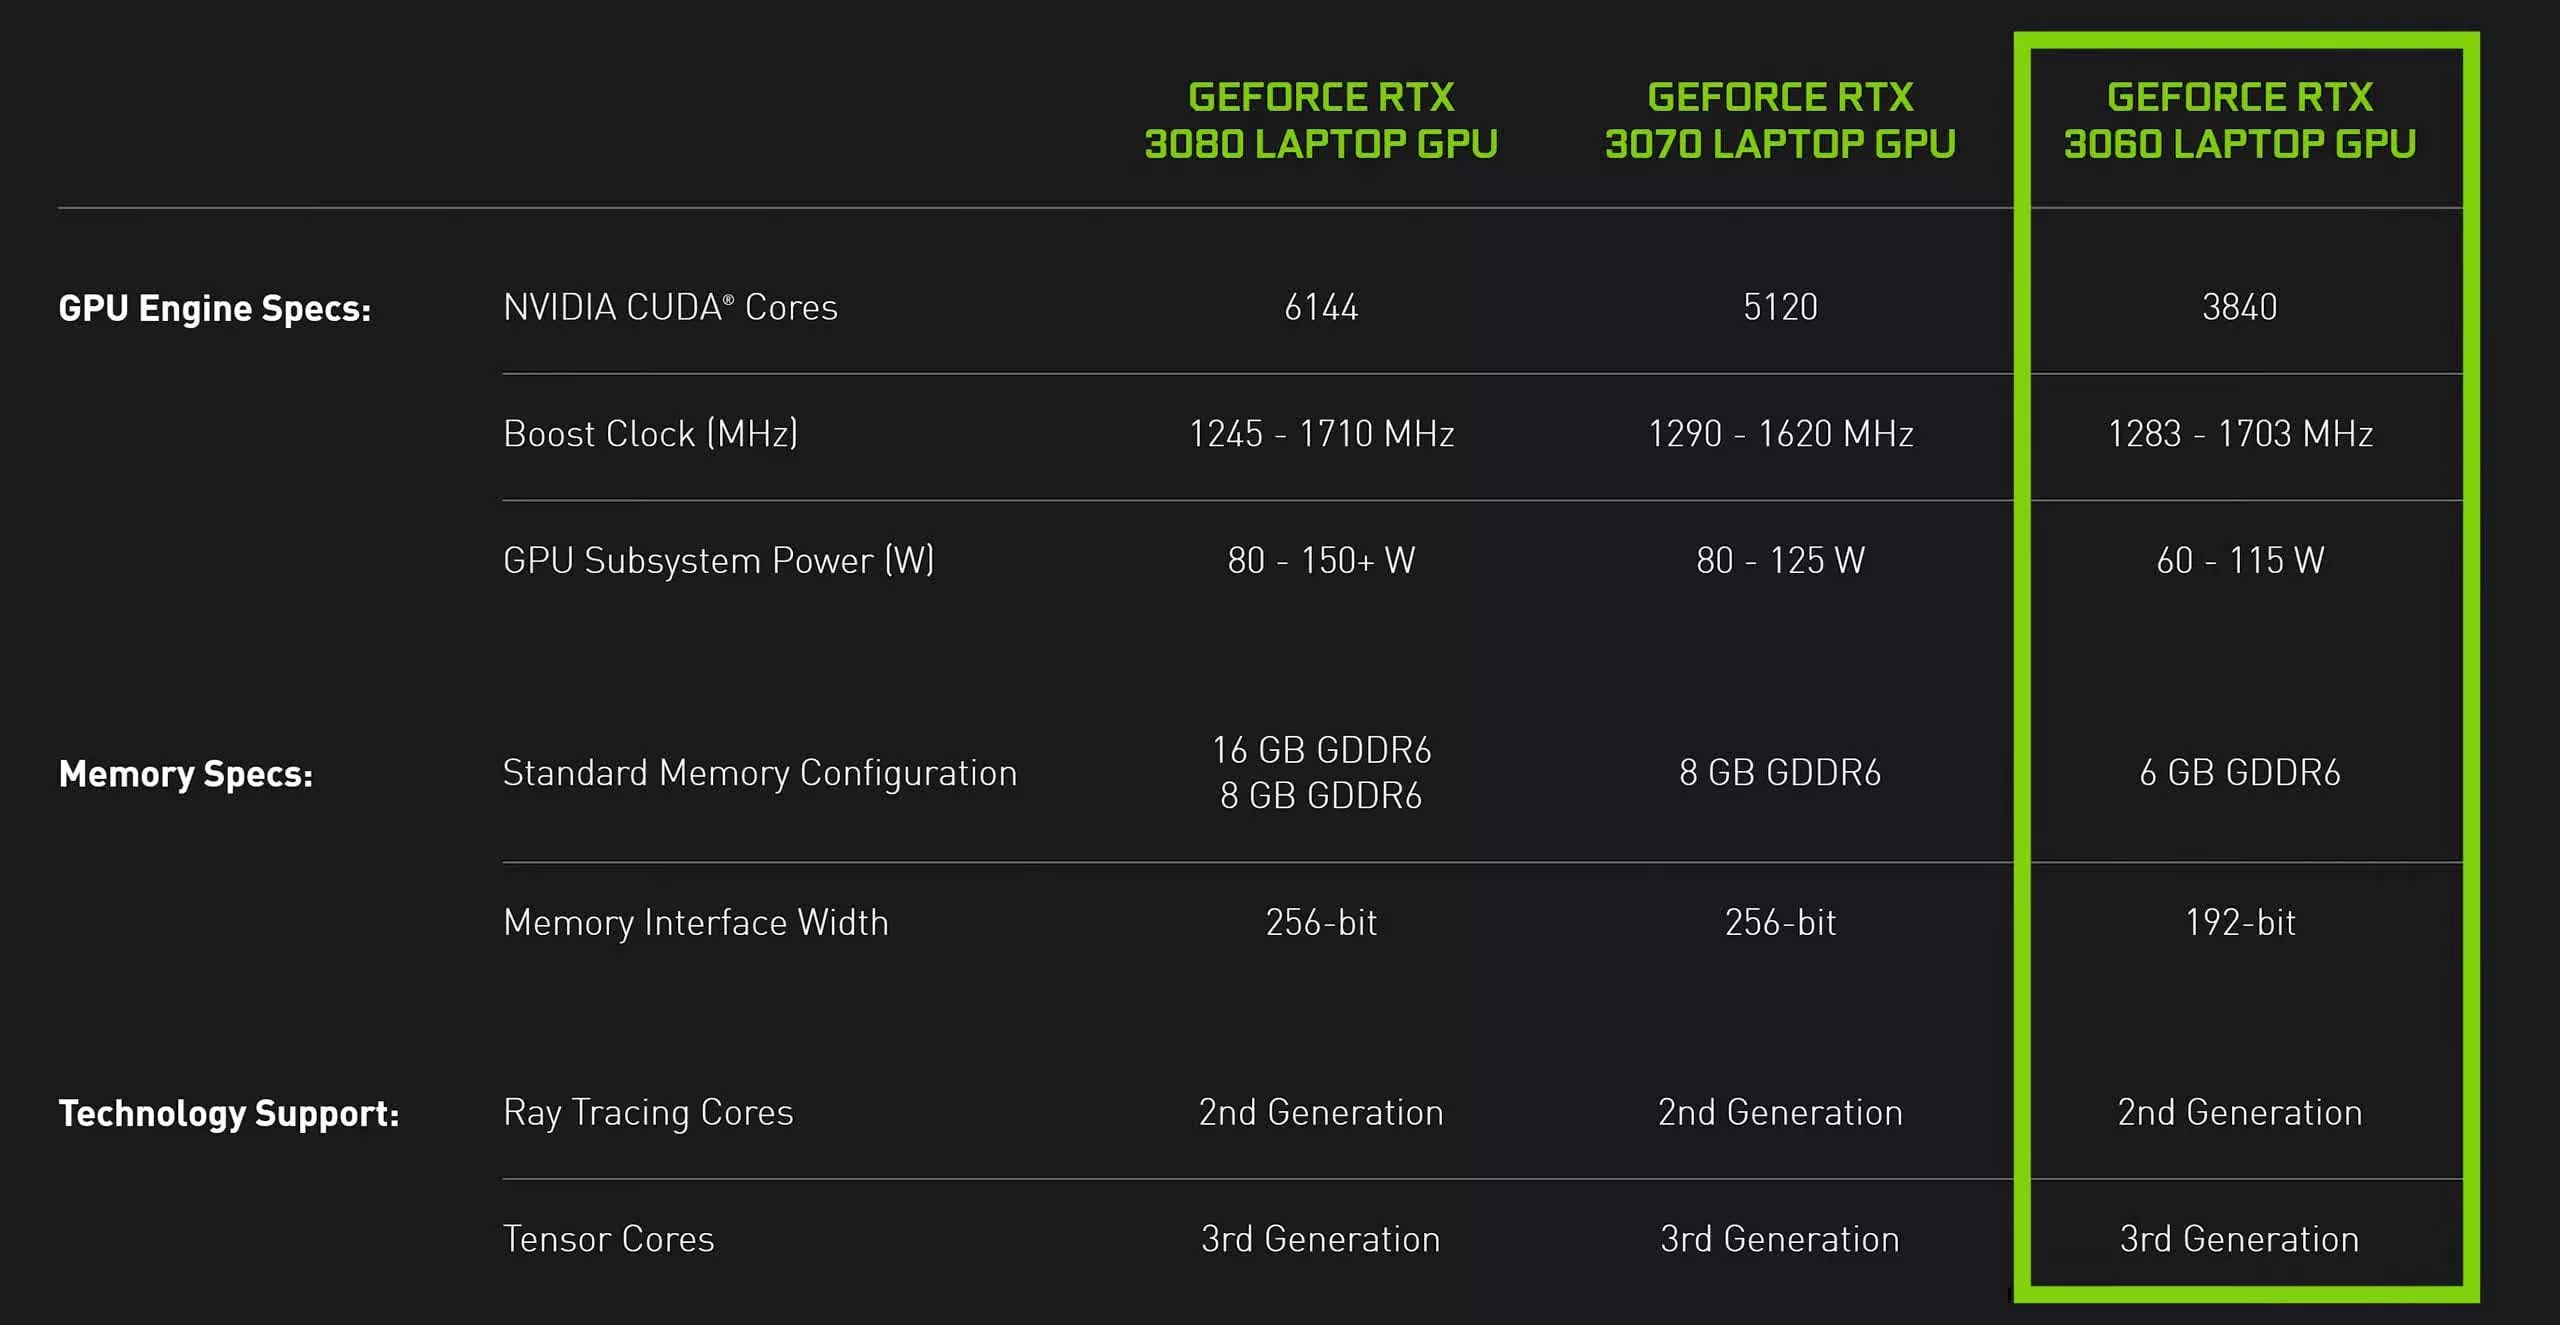
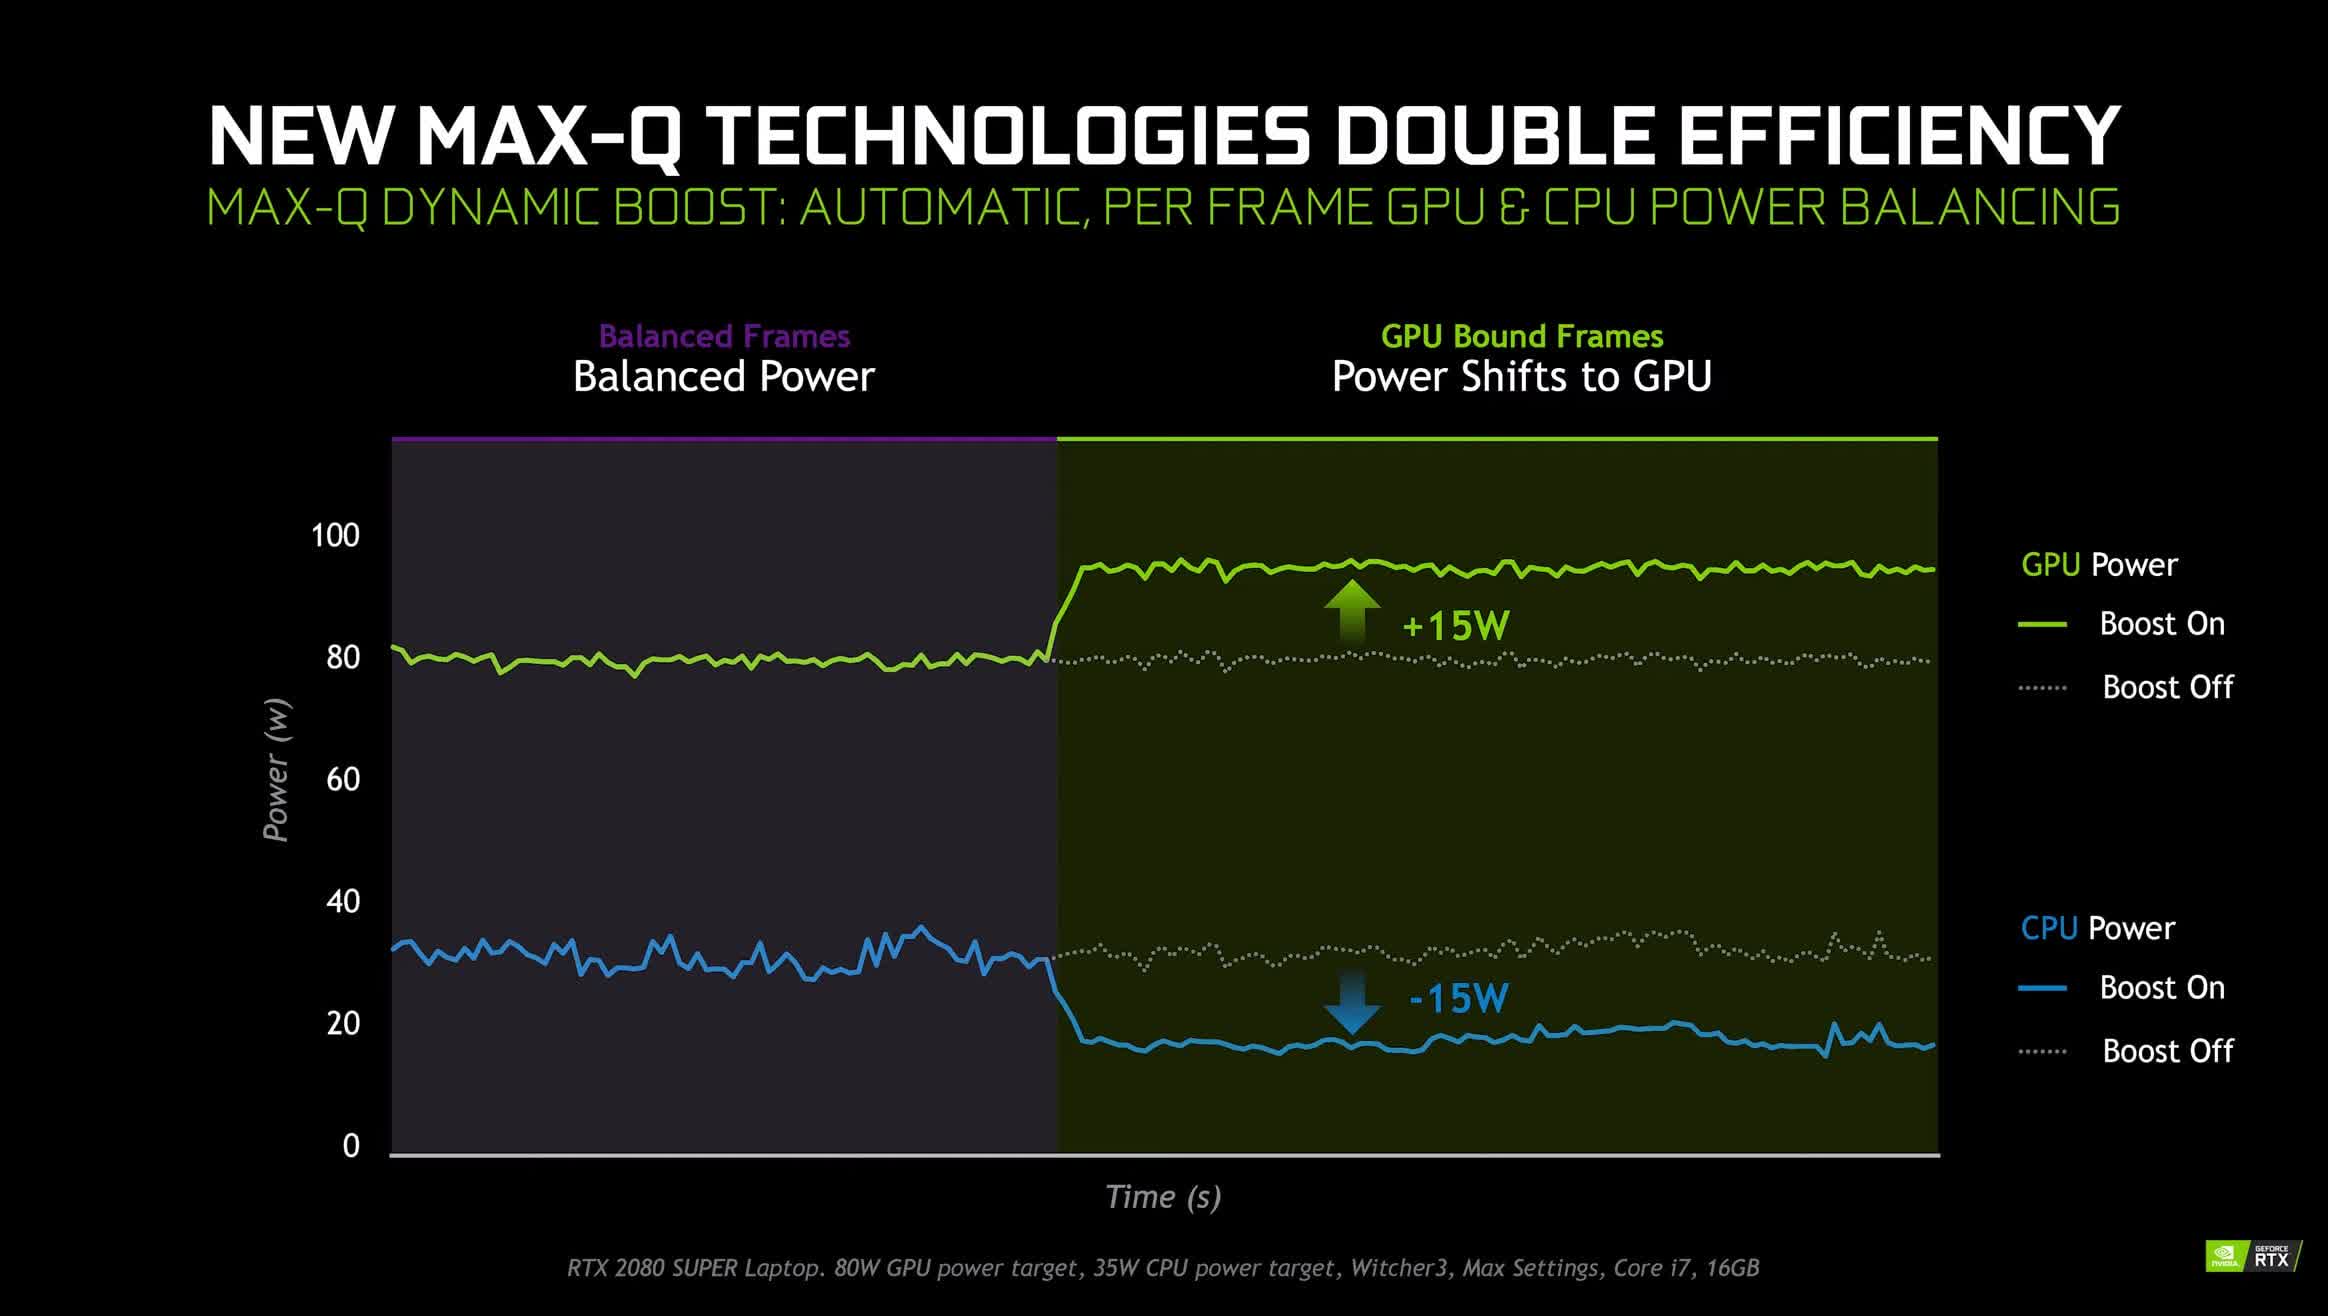
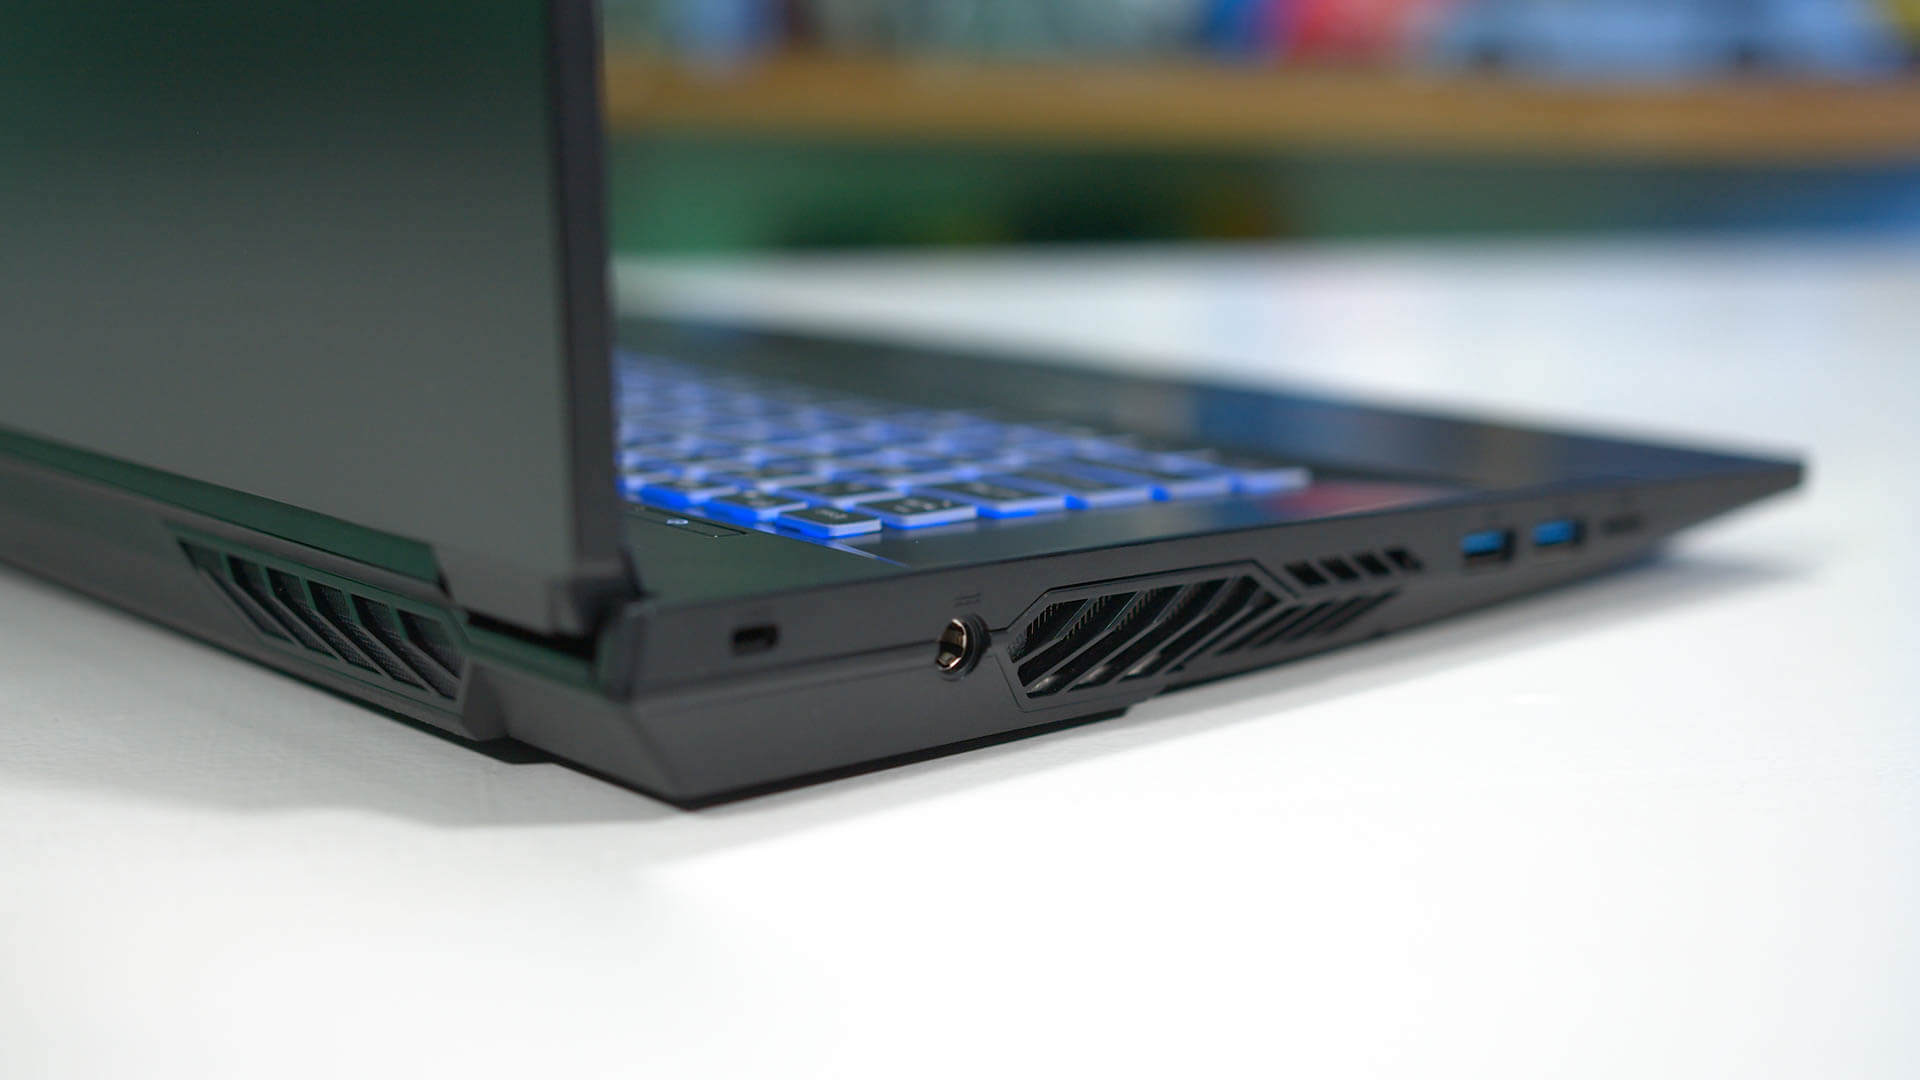
| Nvidia GeForce RTX 3060 Laptop GPU Review Posted: 07 Feb 2021 04:34 PM PST We're kicking off our reviews of Nvidia's RTX 30 laptop GPUs with a look at the GeForce RTX 3060, the more affordable of three new Ampere mobile GPUs released so far. It's a little unusual to be reviewing a laptop GPU variant before the desktop chip, but to align with the laptop release cycle and the launch of AMD's new Ryzen 5000 APUs, we're getting the RTX 3060 alongside the RTX 3070 and RTX 3080 all at the same time. The mobile RTX 3060 is using Nvidia's GA106 silicon with 3840 unlocked CUDA cores, more than what you'll find in the desktop equivalent. There are a range of power configurations that OEMs can use, anywhere from 60 to 115 watts, which brings with it a boost clock anywhere from 1283 MHz to 1703 MHz depending on the variant you get. Of course, one of the key talking points around this generation is Nvidia removing the “Max-Q” label, instead giving all configurations from the 60W model (previously Max-Q) up to 115W (Max-P) the same name, something we’re not big fans of. The memory configuration for all RTX 3060 laptop variants is 6GB of GDDR6 on a 192-bit bus, with clock speeds of either 14 Gbps or 12 Gbps depending on the power class. As this is a new GPU featuring the Ampere architecture, it's built on Samsung's 8nm process node and features all the new architectural benefits like 3rd-gen Tensor cores, 2nd-gen ray tracing cores, and dual FP32 pipelines. For laptops specifically, Nvidia has introduced a range of new technologies such as Dynamic Boost 2.0, WhisperMode 2.0 and Resizable BAR, to go along with previous stuff like Advanced Optimus. While these features fall under Nvidia's Max-Q umbrella, they aren't restricted just to low power variants; all RTX 30 GPUs can use them. Not all of these features are required to be used though by the laptop manufacturer. From what we've seen so far, uptake Dynamic Boost in particular has been far higher than in prior generations. For today's review, we'll be testing two variants of the RTX 3060 mobile GPU: one with a base power rating of 80W, and another with a base power of 115W. Note how we specify “base power” here as both come with Dynamic Boost 2.0, which is enabled by default. This balances system power load while gaming, and in some situations where CPU usage is light, it can enable the RTX 3060 to run up to 15W higher. Considering it's enabled out of the box on both systems, this is how we'll be testing these laptops and we'll be reporting a power range on our benchmark charts. Our RTX 3060 115-130W system today is the XMG Apex 17, a powerful beast of a system with significant cooling capacity. The RTX 3060 inside has a base clock of 1387 MHz and boost clock of 1702 MHz, along with 14 Gbps memory. It supports Dynamic Boost and Resizable BAR, but not WhisperMode or Advanced Optimus. The XMG Apex is powered by the Ryzen 7 5800H, a new Cezanne APU that just launched and we'll be reviewing in detail soon. There's also 16GB of dual-channel DDR4-3200 memory and a 17-inch 1080p 144Hz display. 1440p laptops are also starting to filter into the market now, but our testing for today will remain at 1080p. We'll look to add 1440p to the mix in the future. Our second RTX 3060 laptop is another XMG Apex 17 but equipped with a 80-95W GPU power configuration. The laptop is a slightly different model with a thinner chassis and smaller cooler. Clock speeds are 900 MHz base and 1425 MHz boost, also with 14 Gbps memory. This laptop features Dynamic Boost and WhisperMode, but not Resizable BAR or Advanced Optimus. Perhaps the lack of Resizable BAR is down to the use of an Intel CPU. There's also 16GB of dual-channel DDR4-3200 memory and a 17-inch 1080p 144Hz display. It's interesting to see that XMG and ODM Clevo have decided to make Ryzen 5000 processors the focus of the Apex 17 series. While many aspects to these chassis are similar, the AMD model is notably larger and has better cooling, allowing it to run the GPU at a higher power rating for better performance. This is opposite to previous generations where Intel was always given the higher end designs. With that said, both of these Apex models are the sort of entry-level chassis options that XMG offers. Core and Neo models sitting above with slimmer builds and more premium materials. BenchmarksWe’re starting off with some older games where we have more comparison data, then move into newer benchmarks with a smaller range of systems. Shadow of the Tomb Raider is up first, and immediately we're seeing pretty decent results.
There wasn't a huge difference between the power configurations of our RTX 3060 laptops in this test, but it did allow the 80-95W model to deliver 17% more performance than a 90W power configuration of the RTX 2060. So a similar power configuration here, just a decent chunk more performance out of the new RTX 30 series GPU. This places the RTX 3060 slightly above the RTX 2070 Super Max-Q in our charts. Meanwhile for those with a system a couple of generations old, say a GTX 1060 6GB for example, you're looking at more than 65% better performance in the same power class.
In Metro Exodus, the RTX 3060 is able to flex its muscles, especially with the 115W power configuration. In both instances, the new RTX 3060 is pretty similar to an RTX 2070 Super of the same power rating, putting it towards the top of the charts. At 80W we're seeing 16% more performance than the RTX 2060, although this extends to a 30% delta at 115W. Plus, if you're upgrading from an older system or something lower tier, the gains are much more substantial.
Control is extremely GPU limited on laptops, and as such shows some of the highest performance gains for the RTX 3060 over the 2060 at 1080p. We achieved a 27% higher frame rate when comparing at 80-95W, and 21% higher at the maximum 115W configuration. So generation on generation, in the same sort of laptop design with the same cooler, an RTX 3060 will be giving you a decent step up in terms of frame rate. This puts the 3060 slightly above the last generation RTX 2070 Super, but at a lower price point.
Borderlands 3 shows a solid performance improvement for the RTX 3060, pushing frame rates 17% higher in 80-95W range, and 19% higher in the 115-130W range, over the RTX 2060. This makes the 3060 about 5% faster than the RTX 2070 Super Max-Q in a lower power configuration, or equal to that GPU in a higher power configuration. And while we're not setting new records in the 90W power class with this GPU, we're getting 88% of the performance of the RTX 2080 Super Max-Q in a price range that's about half as expensive.
Red Dead Redemption 2 shows some of the strongest results in favor of the RTX 3060, with the new GPU delivering performance above the RTX 2070 Super in a watt for watt battle. The 3060 ends up 24% faster than the RTX 3060 in both power classes, and almost twice as fast as the GTX 1060 for people thinking of upgrading from a much older laptop. Really, now is the time to think about ditching your Pascal gaming system for something newer.
Tom Clancy's Rainbow Six Siege is a classic example of a competitive game running at medium settings. With new AMD CPUs in these systems, we're no longer suffering a huge performance penalty choosing an AMD-based laptop, so the end result is both RTX 3060 laptops deliver similar performance. Large gains for the RTX 3060 in this title over previous generation GPUs, which is going to be especially good if you buy a system with a 240 Hz display.
In Assassin's Creed Valhalla, the RTX 3060 is able to outperform the RTX 2070 Super Max-Q by a couple of frames, delivering a 17 percent performance gain over the RTX 2060 in a similar power class. Especially at 115W, this makes Valhalla quite playable on very high settings at 1080p, which wasn't previously the case.
Cyberpunk 2077 requires a lot of GPU horsepower for decent frame rates at 1080p on a laptop, and ultimately we'd recommend people turn down the quality settings one notch with a mid-range GPU like the RTX 3060. 17% more performance on offer than the RTX 2060 here in the lower power class, however the RTX 3060 does fall behind the RTX 2070 Super in this game.
Watch Dogs Legion, even at 1080p on Ultra settings, is quite punishing on the RTX 3060 and part of that comes down to Ultra settings needing 8GB of VRAM. The 3060 has just 6GB, which in some areas of the benchmark causes stuttering and a somewhat lower 1% low than the RTX 2070 Super despite similar average frame rates. We're still seeing a substantial 29% gain over the RTX 2060, another 6GB GPU, however we think having more VRAM for this game would be nice if you wanted to play on Ultra settings. With that said, how realistic ultra settings are for a laptop GPU is another question, and I'd probably turn down the preset one notch for actual gaming on a system like this.
Hitman 3 is the newest title in our benchmark suite, and for this test we are using the built-in test set to the Dartmoor level. This is an intensive test on both the CPU and GPU, with the RTX 3060 putting up a good showing relative to other products in the chart. It is only 15% faster than the RTX 2060 in a watt for watt battle, but utterly obliterates the GTX 1060 configuration which is hamstrung by just a quad-core Intel 7th-gen processor.
The final benchmark we'll be showing in detail today is Dirt 5. The results seen here don't differ too much from the previous results, but this is a newer and more performance intensive title in some ways. With 17 percent more performance than the RTX 2060 on offer, it allows the 80-95W configuration to match the RTX 2070 Super Max-Q. Performance BreakdownTime for some head to head comparisons featuring 20 games in our up-to-date laptop GPU benchmark test suite. When comparing the RTX 3060 (80 to 95W) with Dynamic Boost enabled, to the average of all our RTX 2060 laptops running at 90W, the RTX 3060 ends up 19% faster on average in the same power class.
Some results were not as high for the new RTX 30 series GPU, like Gears 5 and Cyberpunk with ray tracing enabled, while other games like Control and Watch Dogs Legion could be nearly 30 percent ahead on Nvidia's new GPU. In the higher power class — 115W-130W — we don't have as many games that can be used for a comparison. However, from the tests ran we can say that the RTX 3060 is 22% faster than the RTX 2060 on average. This suggests that the 3060 is delivering a similar improvement to efficiency over its Turing predecessor regardless of whether you get a mid-tier or higher-end power configuration.
Another useful comparison is that the RTX 3060 provides similar performance to the RTX 2070 Super when you’re on a similar power class. The one outlier here is Cyberpunk 2077 with ray tracing enabled, where 6GB of VRAM is not enough and causes a significant performance loss compared to the 8GB-equipped 2070 Super. Remove that result and the 3060 is a couple percent faster on average.
Not unlike what we've observed from previous generations, the higher 115W power configuration is 11% faster on average than the 80W config of the RTX 3060. While there is also a CPU difference at play here, most of our gaming benchmarks are GPU limited, with results ranging from a low single-digit improvement, to an uplift of 20% or more, depending on the game. These two power classes deliver fundamentally different performance and, of course, the 115W model is faster.
For those looking to upgrade coming from a GTX 10 series Pascal GPU of the same class, the RTX 3060 provides a huge 72% performance gain over the GTX 1060 6GB on average. For those looking to upgrade coming from a GTX 10 series Pascal GPU of the same class, the RTX 3060 provides a huge 72% performance gain over the GTX 1060 6GB on average. Factored into this is also the uplift moving from a dated Intel quad-core that was commonly used in 2017's laptops, to a new 8-core CPU that will be widespread across today's gaming systems. This is the primary comparison Nvidia is making for RTX 30 laptop GPUs and it makes sense given with these sorts of gains we think considering a gaming laptop upgrade is well worth it, especially for modern games.
The MaxQ naming issueClearly, the new RTX 3060 laptop GPU delivers on the performance front, that's why it's disappointing Nvidia has decided to confuse users with mixed naming schemes – in particular the removal of Max-Q branding. We've been banging on about this for years now, but the problem is bad enough that even mainstream media is catching on. Essentially, the problem is that the same GPU model is being used across several power configurations. Laptop makers usually only indicate what’s the basic GPU name (e.g. “RTX 3060”), but different power configurations all differ in performance as we just saw in this review, sometimes significantly so. Nvidia used to mitigate this somewhat by branding the lower power (and slower) variants as "Max-Q" and higher-power laptops with “Max-P.” And while there were still more sub-variants between the two extremes, this could at least give you some hint before you bought a new laptop. That's no longer possible with 2021’s laptops. Using today’s review as a basic example, we looked at two RTX 3060 laptop GPU configurations that used an 80W and 115W base power level. The performance difference was 10% on average. That's significant enough in our opinion, but we didn't test the even lower power 60W variant of the 3060 which could be 15-20% slower, which is basically an entirely different GPU class at that point. Now, Nvidia has said that they are encouraging laptop makers to be clear about the power and clock speeds of the laptops they sell. But let's be honest. What maker wants to admit their cooling solution is inadequate and that they’re using a slower GPU variant? The solution is simple, these GPUs should be given different names. The RTX 3060 at 115W could be the RTX 3060MX, the 80W model could be RTX 3060M and the 60W model could be RTX 3060Q. There, solved. What We LearnedOverall, there's a lot to like from the new RTX 3060 from a performance standpoint. The laptop GPU provides a notable performance uplift over previous parts of the same class and power level, which is something we couldn't say about Nvidia's Super refresh last year. The upgrade to the Ampere architecture and Samsung 8nm process presents a solid leap for laptop hardware; hardware that's constrained by power and requires new architectures and next-gen process nodes to provide a leap in efficiency and therefore performance per watt. When we compare two laptop GPUs in the same price segment, relative to its generation – RTX 3060 vs RTX 2060 – we get 20% better performance on average. So if we have two laptops with the same design, same cooling capacity, and likely a similar price tag, the newer RTX 30 series option is going to deliver a decent performance gain in today's games at 1080p. That's exactly what we’re looking for. The generation on generation performance leap with Ampere vs. Turing isn't as large as we got from the Pascal to Turing upgrade on laptops. The RTX 2060, for example, was about 28 percent faster in our 2019 testing compared to the GTX 1060. However, in this instance Nvidia also increased the price tag. That isn't the case with the RTX 3060. Shopping for a gaming laptopIn today's market, our conclusion above is not factoring in two key data points. First, this price comparison is based off the MSRP. We can’t say for sure if gaming laptops will see inflated pricing due to the current terrible market situation for GPU hardware. It also doesn't account for end-of-life discounts on RTX 2060 laptops, so initially there may be a bargain to be had on last-gen hardware. But if we are comparing launch pricing to launch pricing, the RTX 3060 is well positioned and buyers are getting better performance per dollar. Another way to look at it is that the RTX 3060 matches the performance of the RTX 2070 Super from the previous generation, a GPU that was two steps above in the hierarchy. Those laptops used to cost around $1,800 or more, while some RTX 3060 laptops should be as low as $1,000-1,200. It's hard to make a direct comparison right now as most RTX 30 series laptops aren't available to buy just yet, but the early signs are a very strong value proposition for the RTX 3060 class of laptops. It's also a promising landscape for those wanting to upgrade from a 4-year-old GTX laptop. Even when you don't factor in a drastic step up in CPU performance — from say the i7-7700HQ — new display tech and all the other benefits of modern laptops, the RTX 3060 alone is 70% faster than the GTX 1060 in the same power class. That's enough of a performance gain to justify an upgrade. From a performance standpoint and even without taking into consideration value-added features like ray tracing, DLSS, Dynamic Boost and so on, Nvidia is delivering the goods right now in the laptop market. Shopping Shortcuts |
| How to Listen to Apple Music on a Windows PC Posted: 07 Feb 2021 01:08 PM PST
If you subscribe to the Apple Music streaming music service, you probably usually listen on an Apple device such as a Mac, iPhone, or iPad. But you can also enjoy Apple Music on a Windows PC equally as well. Here's how. Method 1: Use the Apple Music Web PlayerApple has created a web-based music player with an interface similar to iTunes and the Music app that runs directly in your browser. To use it, simply open your favorite browser, then visit music.apple.com to get started.
Once you have the site loaded, click the "Sign In" button, and you can log in using your Apple account information.
As part of the login process, you might need to authenticate your login with a passcode on one of your Apple devices. Once you're signed in, you can search, browse, or play music just as you would in iTunes or the Apple Music app.
When you're done listening, bookmark the site and just close your browser. The next time you want to listen, click the bookmark and you'll be right back in where you left off. And don't forget—the web player works on Mac and Linux as well! Method 2: Install iTunesYou can also access the Apple Music service from iTunes. While Apple has migrated to the Music app on its Mac platform, iTunes is still alive and well on Windows 10. If you don't have iTunes already, you can download and install it from the Microsoft Store. Once it's installed, open "iTunes" and select Account > Sign In from the menu.
Once you login, you'll be able to access your iCloud music library and also your Apple Music subscription. To listen to Apple Music material, do a search or click "Browse."
For example, if you click "Browse," you can pick any artist on the Apple Music service and listen to the music almost instantly because the music will stream to iTunes from the internet—no downloads required.
Happy listening! |
| How to Prevent Members From Editing a WhatsApp Group’s Details Posted: 07 Feb 2021 11:28 AM PST  By default, WhatsApp allows every member to edit a group's name, description, and display picture. But, as an admin, if you don't want anyone to update these details without your approval, here's how you can restrict that access to yourself. Open the WhatsApp app on your iPhone or Android device. Under the "Chats" tab, tap your group's name.
Select your group's title at the top of the screen to visit its profile page.
Alternatively, you can long-press the group's name in the "Chats" tab, tap the three-dot menu icon in the top-right corner, and from the following dropdown, head into "Group Info" to view the group's profile page.
Navigate to "Group Settings."
Here, you can adjust what kind of rights admins and participants of a group have. Select the "Edit Group Info" option to specify which set of members can modify the group's basic details.
In the pop-up window, switch to "Only Admins." Tap the "OK" button to save the new preference.
Now, only the admins can edit your group's information and profile picture. As soon as you put this change into effect, WhatsApp will notify the group's participants about it with a note in the conversation. The option to edit the group's name, description, and icon will simply disappear from members' phones.
To restore the original settings, you can return to the same "Group Settings" menu and switch back to "All Participants" in the "Edit Group Info" pop-up. There are also other, similar perks that WhatsApp group admins can take advantage of. For instance, admins can revoke participants' ability to send messages in a group chat if, for instance, they'd like to broadcast an important announcement and don't want it to get buried under the deluge of other chatter. |
| How to Send Disappearing Messages in Signal Posted: 07 Feb 2021 07:02 AM PST  Don't want your messages sent through Signal to remain on someone's phone? You can use the Disappearing Messages feature to automatically delete all messages in a chat after a set time. Here's how to send disappearing messages in Signal. The Disappearing Messages feature works on a per-chat basis. It works for both one-on-one chats and groups. You can choose between one-second and one-week time frames (This is something you can't do on WhatsApp.). The app shows a visual timer next to disappearing messages. Disappearing messages are not a fool-proof privacy feature. Users can still forward messages, take screenshots, and even save the shared media to their camera roll before it's deleted. Signal does have a special feature for sending self-destructive photos and videos. They can't be saved, and disappear after they have been viewed once (like Snapchat). RELATED: What Is Signal, and Why Is Everyone Using It? Enable and Use Disappearing Messages on SignalThe Disappearing Messages feature needs to be enabled separately for each chat. The steps are different for iPhone and Android. If you're using an Android smartphone, open the conversation that you want to enable the disappearing messages feature for, then tap the three-dot menu icon from the top toolbar.
Here, select the "Disappearing Messages" feature.
Select the time frame and tap the "Done" button.
You will see the timer details in the top toolbar itself. If you're using an iPhone, tap the contact's profile name from the conversation view.
Next, tap the toggle next to the "Disappearing Messages" feature.
You'll see a slider below the feature name. You can swipe left and right on it to increase or decrease the timer.
With the feature activated, any message that you send (including photos and videos) will disappear from the chat after the timer is done. Each message will show its own timer in the chat.
If you want to disable the Disappearing Messages feature, tap the contact profile from the top of the conversation and toggle off the "Disappearing Messages" feature. Send Disappearing Photos and Videos on SignalSignal has a separate feature that lets you send disappearing photos and videos to anyone on the app. This can be in any conversation or group, even if you don't have the Disappearing Messages feature enabled. To use this, open a conversation in Signal and tap the "+" button (On Android, you'll find it on the right side of the toolbar.).
From here, you can use the camera to snap a photo, or you can choose one from the library.
Tap the infinity icon from the bottom-left corner.
This will turn into a "1X" icon. This means that the photo or video can only be viewed once (and you can only send one piece of media in this mode). Finally, tap the send button.
The media will show up in the chat without a preview. The recipient can tap the media to view it. Once they close it, the media will be gone forever.
Just switched over to Signal? Here are a couple of things you should know. |
| How to Add Google Maps Shortcuts On Android Home Screen Posted: 06 Feb 2021 02:27 PM PST Those days were gone when we used to have a dedicated GPS device for navigation. These days, we rely on our smartphones to get turn-by-turn direction. As of now, there are hundreds of navigation apps available for Android. However, out of all those, it was the Google Maps that stands out from the crowd. Compared to all other navigation apps for Android, Google Maps offers more features. With Google Maps, you can navigate all over the world through its street view, a Traffic view, and a Satellite view. The latest version of Google Maps can even help you beat traffic with real-time ETAs, traffic conditions, etc. Additionally, it can even help you find nearby hotels, bus stops, railway stations, and more. Also Read: How to Share Your Real-time Location in Google Maps Steps to Add Google Maps Shortcuts on Android Home ScreenWhile using Google Maps on Android, we found a unique feature that allows you to add maps shortcuts right on the home screen. With Home screen shortcuts, you no longer need to open the Google Maps app, search for the location, and find the turn-by-turn direction. You need to tap on the home screen shortcut to get the direction immediately. In this article, we will share a step-by-step guide on how to add Google Maps shortcuts on your Android home screen in 2021. So, let's check out. Step 1. First of all, head to the Google Play Store and install the latest version of Google Maps. Step 2. Open the Google Maps app and find the location that you want to create a shortcut for. Step 3. Once done, tap on the 'Directions' option. Step 4. You need to tap on the three-dot menu icon and select 'Add Route to home screen'. Step 5. You will see the new home screen Widget. Just tap on the 'Add automatically' button. Step 6. Now move to the home screen, and you will find the new shortcut. Tap on the Shortcut to get the turn-by-turn direction to the location. That's it! You are done. This is how you can add Google Maps shortcuts to your Android home screen. So, this article is all about how to add Google Maps route to Android home screen. I hope this article helped you! Please share it with your friends also. If you have any doubts related to this, let us know in the comment box below. |
| How to Delete Your Signal Account Posted: 06 Feb 2021 12:59 PM PST
Signal is one of the few popular messaging apps that offer end-to-end encryption. While the service is great, it might not be for everyone. If you're looking to say goodbye, here's how to delete your Signal account. While Signal does a pretty good job when it comes to privacy, no app is completely secure. Because Signal is based on phone numbers, anyone with your phone number can look you up if you're on Signal. This could pose a privacy risk down the line. RELATED: What Is Signal, and Why Is Everyone Using It? Thankfully, Signal makes it quite easy to delete your account in both the Android and iPhone app. Deleting your Signal account will delete all the data associated with it as well. This includes all the chat messages, media, contacts, and associated data. If you sign up again with the same number, you'll be starting with a blank slate. If you have any sensitive data in Signal, we recommend that you export it before starting the deletion process. How to Delete Your Signal Account on AndroidOn your Android smartphone, open the Signal app to get started. Next, tap your profile icon from the top-left corner.
Then, choose the "Advanced" option.
Now, tap the "Delete Account" button.
Here, you'll have to confirm your account by entering your phone number and choosing your country. Finally, tap the "Delete Account" button.
From the pop-up, choose the "Delete Account" link to confirm your action.
Your Signal account will be deleted and the app will shut down. You can now delete the app from your Android smartphone if you want. How to Delete Your Signal Account on iPhoneOpen the Signal app on your iPhone and tap your profile icon from the top-left corner.
Here, choose the "Advanced" option.
Now, tap the red "Delete Account" button.
From the pop-up message, select "Proceed" to confirm.
Signal will start the account deletion process in the background, and when it's done, the Signal app will shut itself down. When you open the app again, it will be blank. You can now delete the app from your iPhone or use it again with a different number or identity. RELATED: How to Delete Apps on an iPhone or iPad With iOS 13 |
| How to Transpose Excel Data from Rows to Columns (or Vice Versa) Posted: 06 Feb 2021 11:23 AM PST
If you started to enter data in a vertical arrangement (columns) and then decided it would be better in a horizontal one (rows), Excel has you covered. We'll look at three ways to transpose data in Excel. The Static MethodIn this method, you can quickly and easily transpose data from a column to a row (or vice versa), but it has one critical drawback: It's not dynamic. When you change a figure in the vertical column, for example, it won't automatically change it in the horizontal one. Still, it's good for a quick and simple fix on a smaller dataset. Highlight the area you want to transpose and then press Ctrl + C on the keyboard to copy the data.
Right-click the empty cell where you'd like to display your results. Under "Paste Options" click "Paste Special."
Check the box next to "Transpose" and then press the "OK" button.
Transpose Data with the Transpose FormulaThis method is a dynamic solution, meaning we can change the data in one column or row and it will automatically change it in the transposed column or row, too. Click and drag to highlight a group of empty cells. In an ideal world we'd count first, as the formula is an array and requires you to highlight exactly the number of cells you need. We're not going to do that; we'll just fix the formula later.
Type "=transpose" into the formula bar (without quotes) and then highlight the data you want to transpose. Instead of pressing "Enter" to execute the formula, press Ctrl + Shift + Enter instead.
As you can see, our data has been cut off because we didn't select enough empty cells for our array. That's okay. To fix it, click and drag the box at the bottom, right-hand side of the last cell and drag it out further to include the rest of your data.
Our data is there now, but the result is a little messed up because of our lack of precision. We're going to fix that now. To correct the data, just go back to the formula bar, and press Ctrl + Shift + Enter one more time.
Transposing Data with Direct ReferencesIn our third method of transposing Excel data we'll use direct references. This method enables us to find and replace a reference with the data we want to display instead. Click an empty cell and type in a reference and then the location of the first cell we want to transpose. I'm going to use my initials. In this case, I'll use bcA2.
In the next cell, below our first one, type in the same prefix and then the cell location to the right of the one we used in the previous step. For our purposes, that would be cell B2, which we'll type in as bcB2.
Highlight both of these cells and drag the highlighted area out by clicking and dragging the green box at the bottom right of our selection.
Press Ctrl+H on your keyboard to bring up the "Find and Replace" menu.
Type your chosen prefix, "bc" in our case (without quotes), into the "Find what" field, and then "=" (without quotes) into the "Replace with" field.
Click the "Replace All" button to transpose your data.
You might be wondering why we didn't just add "=A2" to the first empty cell and then just drag it out to autofill the rest. The reason for this is due to the way Excel interprets this data. It will indeed autofill the cell next to it (B2), but it will quickly run out of data because C3 is an empty cell and Excel reads this formula from left to right (because that's the way we're dragging when transposing our data) instead of top to bottom. |
| You are subscribed to email updates from My Blog. To stop receiving these emails, you may unsubscribe now. | Email delivery powered by Google |
| Google, 1600 Amphitheatre Parkway, Mountain View, CA 94043, United States | |







0 nhận xét:
Đăng nhận xét