How to Make a Voice or Video Call on Telegram |
- How to Make a Voice or Video Call on Telegram
- How to Enable (and Disable) Macros in Microsoft Office 365
- How to Uninstall or Disable Extensions in Mozilla Firefox
- How to Use Tab Groups & Bottom Tab Switcher in Chrome for Android
- How to Add Google Maps Shortcuts to Your Android Home Screen
| How to Make a Voice or Video Call on Telegram Posted: 05 Feb 2021 08:40 AM PST  Telegram isn't just about the large group chats and bots. Telegram has a great voice and video calling feature, too. Here's how to make voice and video calls on Telegram. While the chat messages are only server-side encrypted, voice and video calls in Telegram are end-to-end encrypted. RELATED: PSA: Telegram Chats Aren’t End-to-End Encrypted by Default Currently, Telegram only supports voice and video calls in one-on-one conversations. It has a separate Voice Chat feature where anyone in the Telegram group can drop in and talk. In this article, we will be focusing on making voice and video calls in private conversations. Make Voice or Video Calls in Telegram on AndroidYou can quickly place an audio or video call in Telegram using the menu option. To get started, open the Telegram app and select the contact you want to call.
Here, tap the three-dot menu icon found in the top-right corner.
From the menu, choose the "Call" option to start an audio call or the "Video Call" option to start a video call.
You can also switch to a video call after placing a voice call. To do this, just tap the "Start Video" button.
Once you're done with the call, just tap the red "End Call" button to stop the call.
Make Voice or Video Calls on Telegram for iPhoneYou can make voice and video calls from the contact's profile. To get started, open the Telegram app and choose the contact who you want to call. Here, tap the contact's name from the top of the screen.
You can choose the "Call" option if you want to make a voice call or the "Video" option if you want to make a video call.
You can convert a voice call into a video call by tapping the "Camera" button.
From the pop-up message, tap the "Switch" button.
To end the call, just tap the red "End" button.
Make Voice or Video Calls in Telegram for DesktopTelegram's Desktop app handles calls in a different way. Instead of directly starting a video call, you need to place a voice call first. From there, you can switch to the video call by turning on the camera. To get started, open the Telegram Desktop app on your computer, then navigate to the conversation that you want to start a call from.
Click the phone icon from the top-right corner of the screen to start the call.
Once the call is picked up, you can select the "Camera" button to turn on your camera and switch to a video call.
To end the call, click the "Decline" button.
If video calling isn't your thing, you can also use Telegram to send disappearing photos and videos. |
| How to Enable (and Disable) Macros in Microsoft Office 365 Posted: 05 Feb 2021 07:33 AM PST
If you repeatedly perform a task, you can save time by using a macro to automate that task. However, not all macros are created equal—some contain malicious code. Here's how to enable (or disable) macros in Microsoft Office 365. Security WarningMacros are used to automate tasks by mapping a sequence of keystrokes to perform a specific task. In Office, you can record a macro with no development background, but macros are code. Legitimate macros save you the time and effort of having to press the same keys or click the same buttons repeatedly. However, someone with ill intent can inject malicious code in an Office document via a macro and infect your computer and/or network. RELATED: Macros Explained: Why Microsoft Office Files Can Be Dangerous Always be cautious when downloading an Office document from the web and never open any documents from unreliable sources. Enable or Disable Macros for Office on Windows 10Macros are disabled by default, but you can easily enable them. If you open a file that contains macros, Microsoft Office will send a security warning via the Message Bar at the top of the document. To enable the macros in the file, click "Enable Content" in the Message Bar.
You can also enable macros in the "Security Warning" section. To do so, click the "File" tab.
Next, select "Info" from the pane on the left.
If the Office document contains macros, you'll see a yellow "Security Warning" section; click "Enable Content."
Click "Enable All Content" in the drop-down menu that appears.
The macros will now be enabled for the duration of the session. If you want to disable the macros, simply close the document, and then reopen it. How to Adjust Macro Settings on Windows 10Although it's recommended that you leave macros disabled by default, you can manage the macros settings in the Trust Center. To do so, click "File."
Next, select "Options" from the pane that appears on the left.
In the "Options" menu that appears ("Word Options" in our example), click "Trust Center."
In the "Microsoft Trust Center" section, click "Trust Center Settings."
You'll now be in the "Macro Settings" tab of the Trust Center. Here, you have the following four options:
Click the radio button next to the setting you prefer, and then click "OK." Enable or Disable Macros for Office on MacWhen you try to open an Office file containing macros on your Mac, a security warning will appear before the document opens. The message states that macros might contain viruses, and you should only enable macros if you trust the source.
Click "Enable Macros" to enable them, "Disable Macros" to disable them, or "Do Not Open" to prevent Office from opening the document. If you click "Enable Macros," the macros will be enabled for the duration of the session. If you want to disable the macros, simply close the document, and then reopen it. How to Adjust Macro Settings on a MacLeaving macros disabled is recommended for tighter security, although you can tell Office how to handle documents that contain macros. To do so, open an Office file, and then click the program menu at the top (we're using Word). Select "Preferences" from the menu.
In the "Personal Settings" section, select "Security & Privacy."
In the "Macro Security" section, you can choose from the following three options:
Just click the radio button next to the setting you prefer. |
| How to Uninstall or Disable Extensions in Mozilla Firefox Posted: 05 Feb 2021 06:12 AM PST
Extensions in Mozilla Firefox enable you to add all kinds of new features to the browser. But, if you're not using an extension, removing it can help speed up your browser and protect your privacy. Here's how to disable or remove an add-on from Firefox. First, open "Firefox." In any window, click the hamburger button (three horizontal lines) and select "Add-ons" from the menu.
An "Add-ons Manager" tab will open that lists all of your installed Extensions. If you'd like to disable an extension (which will leave the add-on installed but make it inactive), flip the switch beside it to turn it off.
Once disabled, the extension will move to a separate list of "Disabled" extensions below the "Enabled" list at the top of the page. If you need to enable it again later, just flip the switch beside it again to turn it on. If you'd like to completely uninstall and remove an extension, click the ellipses button (three dots) beside the extension in the list and select "Remove."
After selecting "Remove," you'll see a confirmation window pop-up asking if you really want to remove the extension. Click "Remove."
After that, the extension will be uninstalled completely. If you ever need to use that particular extension again, you'll need to reinstall it. A Quick Way to Remove an Extension Using the ToolbarIf your Firefox extension has an icon in the toolbar, you can uninstall the extension quickly by right-clicking the icon and selecting "Remove Extension" from the menu that pops up.
After that, you'll see a confirmation window appear. Click the "Remove" button, and the extension will be removed from Firefox completely. Happy browsing! |
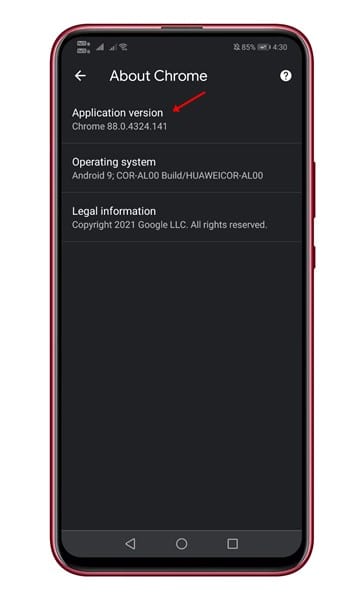
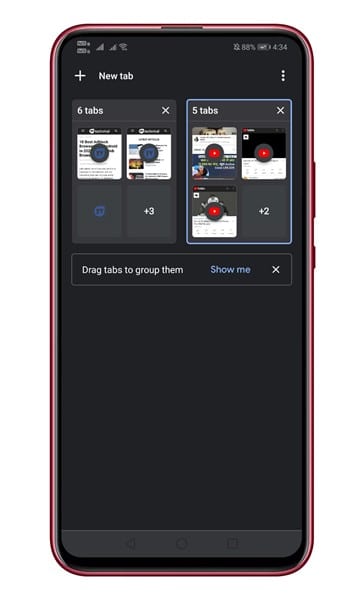
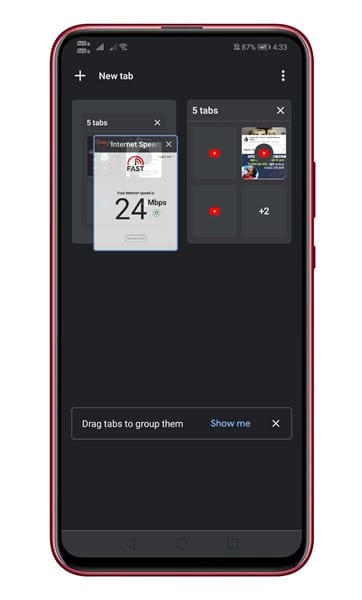
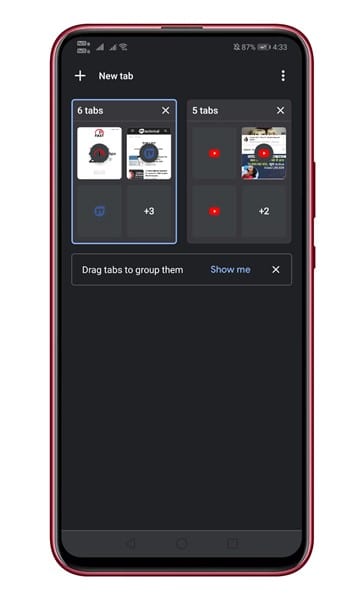
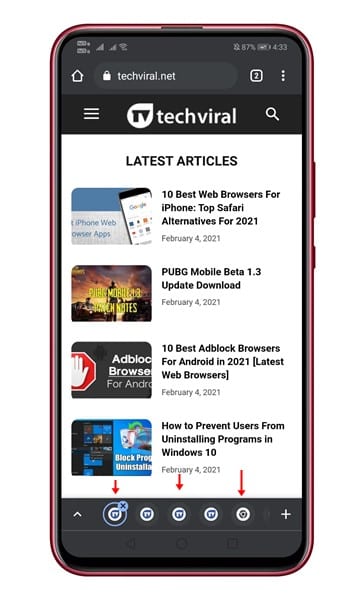
| How to Use Tab Groups & Bottom Tab Switcher in Chrome for Android Posted: 04 Feb 2021 10:16 AM PST The previous year, we have shared an article – How to Enable Bottom Tab Switcher on Chrome for Android. With the Bottom tab switcher, Google plans to change the way we switch between Chromebooks for Android. Previously, the feature was available only on the Chrome beta for Android. However, now it looks like the feature has arrived on the stable build as well. It's a tab management feature that adds a tab bar on the bottom of the screen. The new tab bar lists all opened tabs. Also, you can use the new tab group to group tabs together, almost like a folder. Grouping tabs into a folder could help you in multiple ways. It not only keeps the tabs organized but also provides you with quick access to your frequently used Chrome tabs. Also Read: How to Install & Use Desktop Chrome Extensions On Android Steps to use Tab Groups & Bottom Tab Switcher in Chrome for AndroidNow that the feature has arrived on Chrome's stable build, we have decided to share a step-by-step guide on using the new feature on Android. So, let's check out how to use the Tab Groups feature in Chrome for Android. Step 1. First of all, head to the Google Play Store and update the Chrome web browser. The feature is only available on the latest Chrome version 88 or newer. Step 2. Now open the Google Chrome web browser on Android and open multiple tabs. Step 3. For example, we have opened five tabs of Techviral website and five tabs of Youtube. The tabs will be automatically aligned into groups.
Step 4. If you want to add any existing tab into a group, long press on the tab, and then drag it into a group. Step 5. Similarly, you can create another group for your remaining tabs. Step 6. Now open a tab group and tap on any tab. You will notice a bottom tab switcher listing the existing tabs of the same group. The bottom tab switcher allows you to switch between the tabs in the group easily. That's it! You are done. This is how you can use Tab Groups in Google Chrome for Android. This article is all about how to use the new tab groups feature of Google Chrome for Android. If you have any doubts related to this, let us know in the comment box below. I hope this article helped you! Please share it with your friends also. |
| How to Add Google Maps Shortcuts to Your Android Home Screen Posted: 04 Feb 2021 09:13 AM PST
The days of needing a dedicated GPS unit for navigation are long gone. Thanks to Google Maps, all you need is a smartphone to get turn-by-turn directions. With home screen shortcuts on Android, it gets even easier to use. Typically, the process for getting directions involves opening the Google Maps app, searching for a location, finding the one you want, and starting navigation. If you're doing this every day, it can become a bit cumbersome. RELATED: How to Use the Assistant Driving Mode in Google Maps Google will surface frequently visited locations, making the process a bit easier, but we can improve this even more. By adding a shortcut to your home screen, you can bypass all of that and jump straight to navigation. To begin, open the Google Maps app on your Android device. Find the location that you would like to create a shortcut for.
Next, tap "Directions" on the location information card.
Select the three-dot menu icon in the top-right corner and select "Add Route to Home Screen."
A pop-up window will appear with a shortcut icon. You can tap and hold the icon to place it manually on your home screen, or tap "Add Automatically" to have it placed for you.
The shortcut will now be on your home screen. Tapping it will open Google Maps and automatically start turn-by-turn navigation to the location.
This is a great way to get easy access to your most frequent locations. You can keep all of these shortcuts in a home screen folder and always know where to find them. |
| You are subscribed to email updates from My Blog. To stop receiving these emails, you may unsubscribe now. | Email delivery powered by Google |
| Google, 1600 Amphitheatre Parkway, Mountain View, CA 94043, United States | |
0 nhận xét:
Đăng nhận xét