How to Use Telegram Without Sharing Your Contacts |
- How to Use Telegram Without Sharing Your Contacts
- Ryzen 5 5600X vs. Ryzen 7 5800X vs. Ryzen 9 5900X vs. 5950X: GPU Scaling Benchmark
- How to Mute Spotify Ads On Android Devices in 2021
- How to Take An Android Phone Screenshot Directly From PC
- How to Pause Family Bell Announcements From Google Assistant
| How to Use Telegram Without Sharing Your Contacts Posted: 11 Feb 2021 07:39 AM PST  While Telegram has a phone number-based authentication system, you can easily use the app without sharing any of your contacts. Telegram will still let you add users, and others can find you using your username. By default, Telegram syncs your contacts to its servers. When a new contact joins, you get a notification about it. Your contact will also come to know that you're using Telegram. If you want to keep your identity private, you can stop the Contact Sync feature. Telegram will still continue to work as it normally does. You can add users using their username, or you can create a separate contact in the Telegram app. Here's how it works on the Telegram app for Android and iPhone. Stop Contact Sharing in Telegram on AndroidYou can stop contact syncing in Telegram for Android from the Settings menu. To get started, open the Telegram app on your Android smartphone and tap the three-line menu icon from the top-left corner.
Here, choose the "Settings" option.
Go to the "Privacy and Security" option.
Tap the toggle next to the "Sync Contacts" option.
Now, Telegram will stop syncing new contacts, but the contacts that are already synced will still be available in the Telegram app. To delete app synced contacts, tap the "Delete Synced Contacts" button.
From the pop-up message, select the "Delete" button to confirm.
Telegram has now deleted all contacts from your in-app contact book. When you go to the "Contacts" section, you'll find it empty. Stop Contact Sharing in Telegram on iPhoneThe process of disabling contact sync is slightly different in the Telegram app for iPhone. Open the Telegram app on your iPhone and go to the "Settings" tab.
Navigate to the "Privacy and Security" section.
Scroll down and choose the "Data Settings" option.
Toggle on the "Sync Contacts" option to disable the contact sync feature.
Telegram will now stop uploading your local contact book with its servers. To delete all synced contacts, tap the "Delete Synced Contacts" option.
From the pop-up message, select the "Delete" button to confirm.
Now, when you go to the "Contacts" tab in Telegram, you'll find that it's empty. Did you know that Telegram doesn't have end-to-end encryption turned on for all chats? For that, you'll need to start a Secret Chat separately. |
| Ryzen 5 5600X vs. Ryzen 7 5800X vs. Ryzen 9 5900X vs. 5950X: GPU Scaling Benchmark Posted: 11 Feb 2021 04:56 AM PST Today we’re starting a new benchmark series looking at the balance between CPU and GPU performance. The first chapter of this series will focus on AMD's Zen 3 processors using a range of GPUs belonging to different tiers. Actually, you may recall this is something we’ve done before, going back to 2019. The first installment featured the GeForce RTX 2080 Ti, RTX 2070 Super, Radeon RX 5700 and RX 580, and the CPUs included the Core i9-9900K, Ryzen 9 3900X and Ryzen 5 3600. Since then, an entirely new generation of CPUs and GPUs have been released. This won't be quite the same as we’re testing Zen 3 now, but in the next articles we’ll add Intel CPUs and then perhaps we'll look at older CPUs, too.
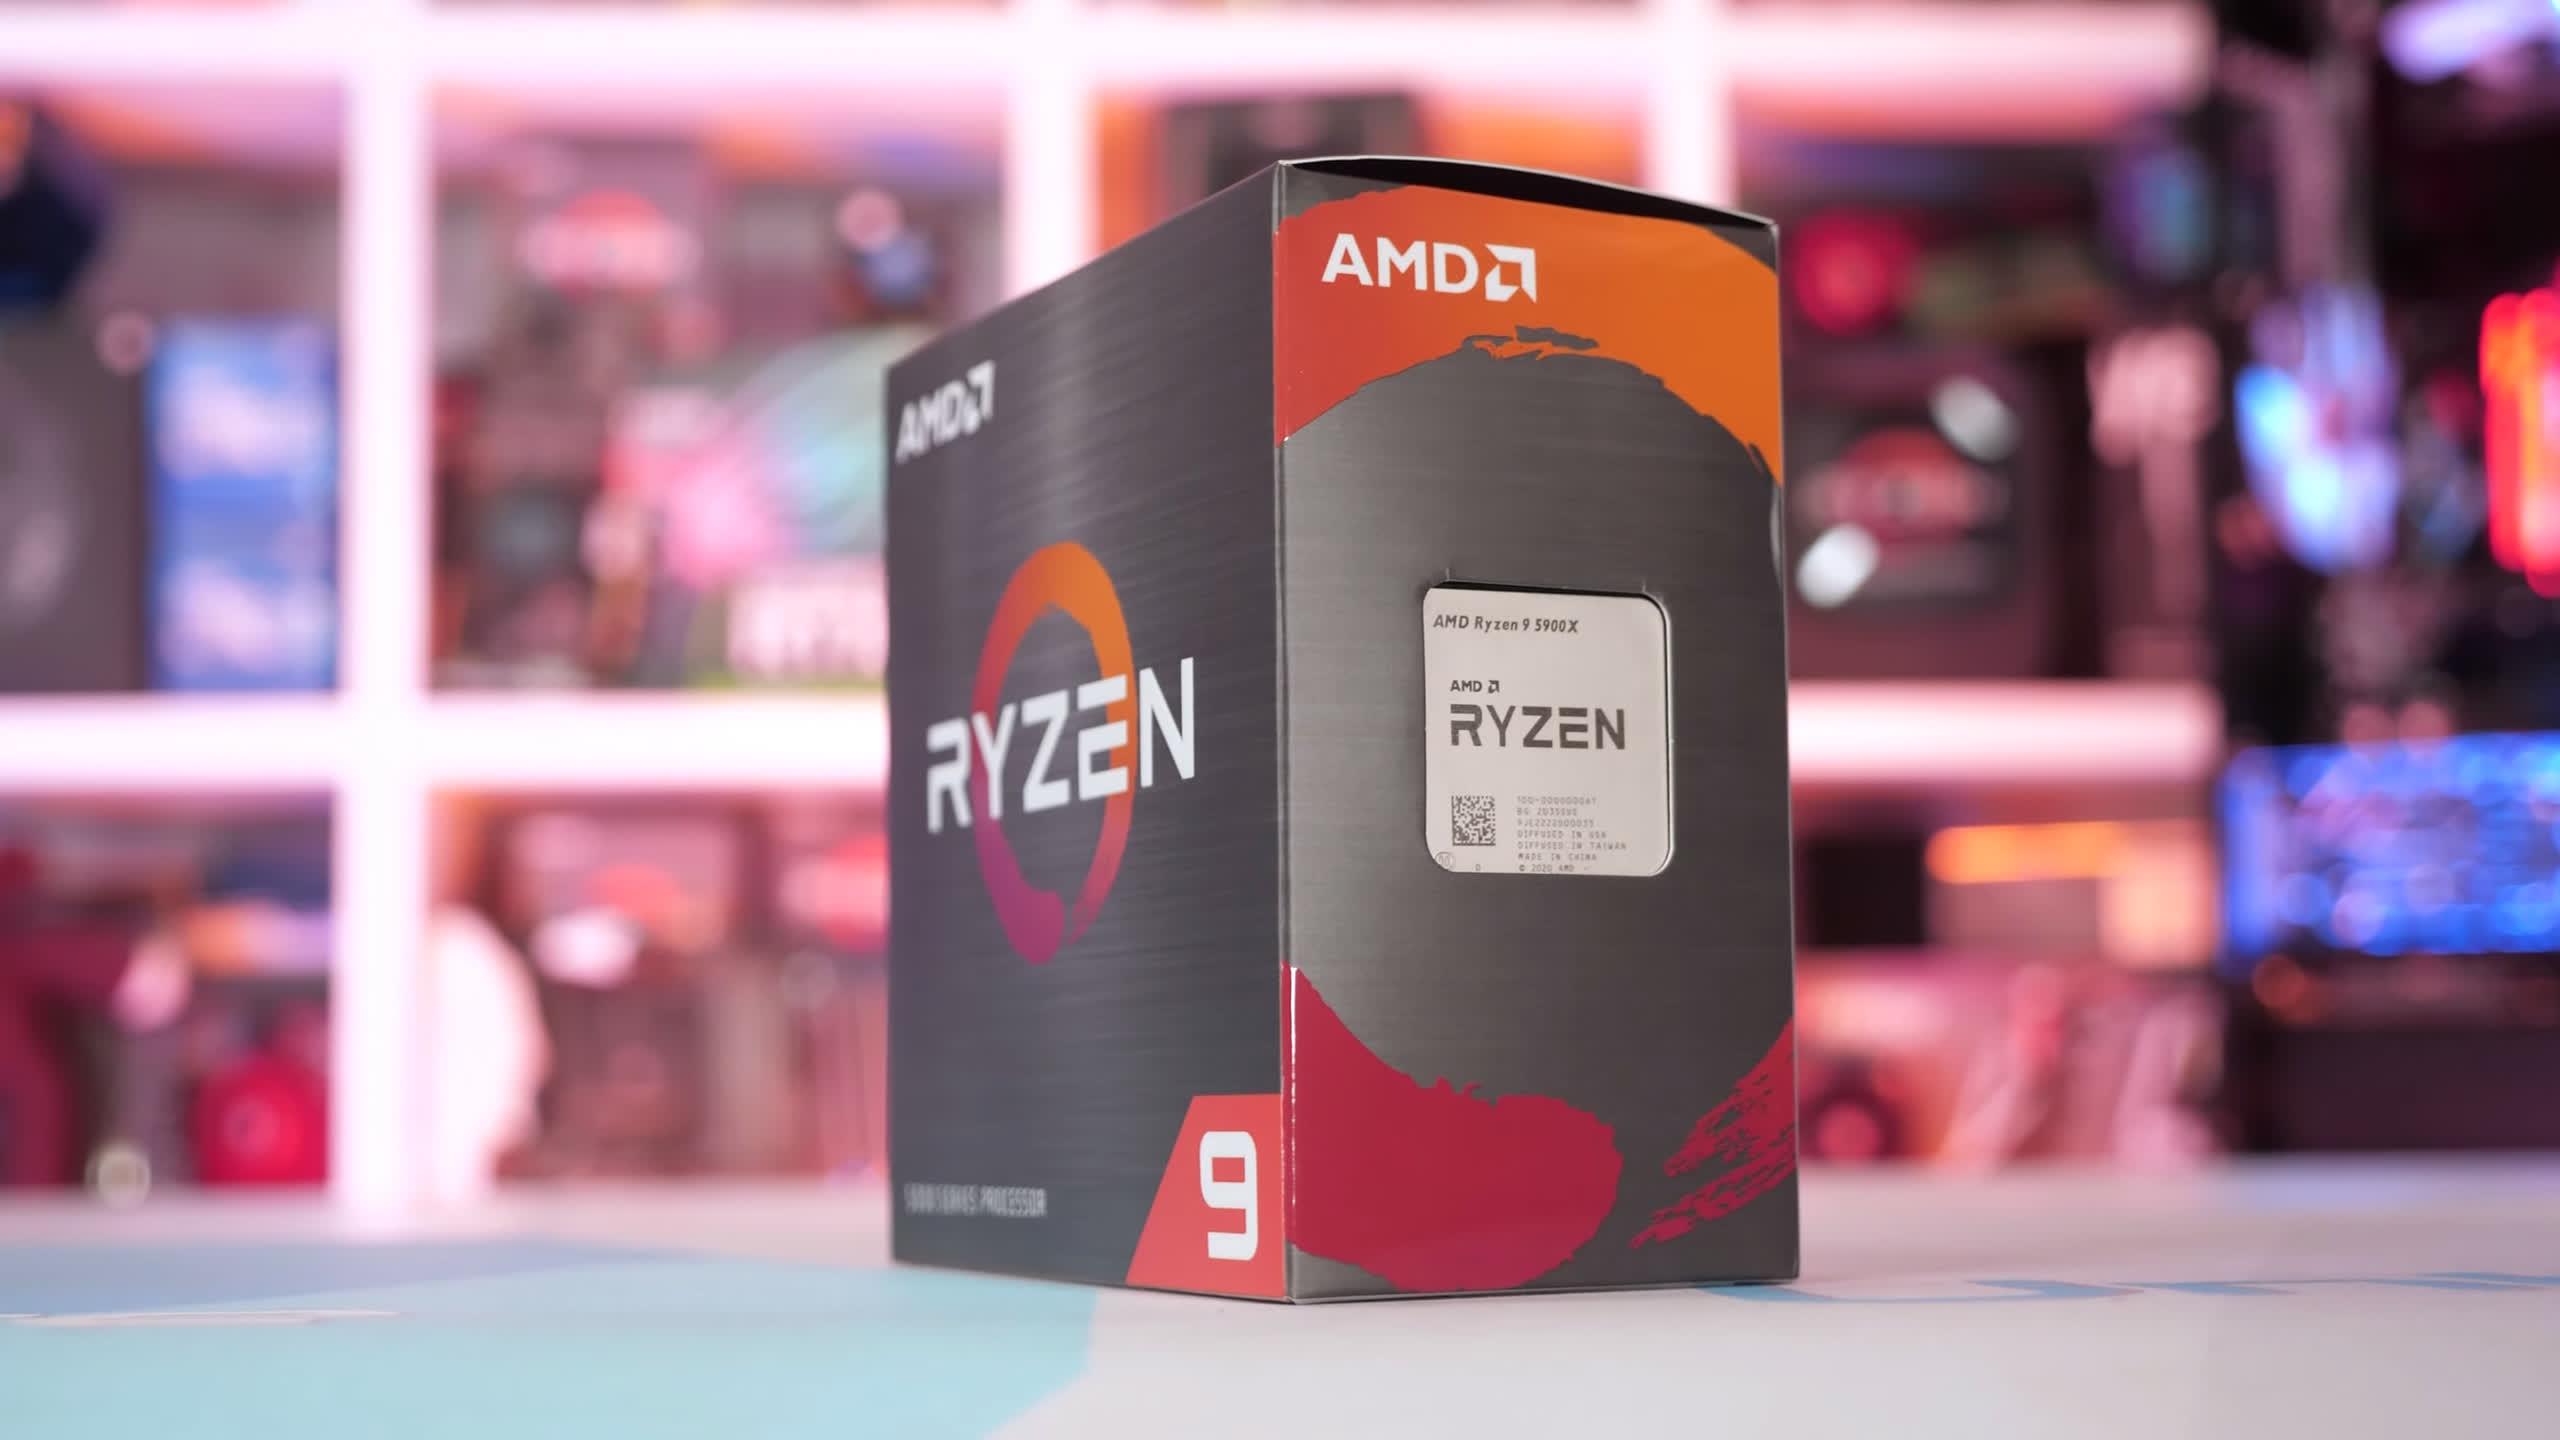
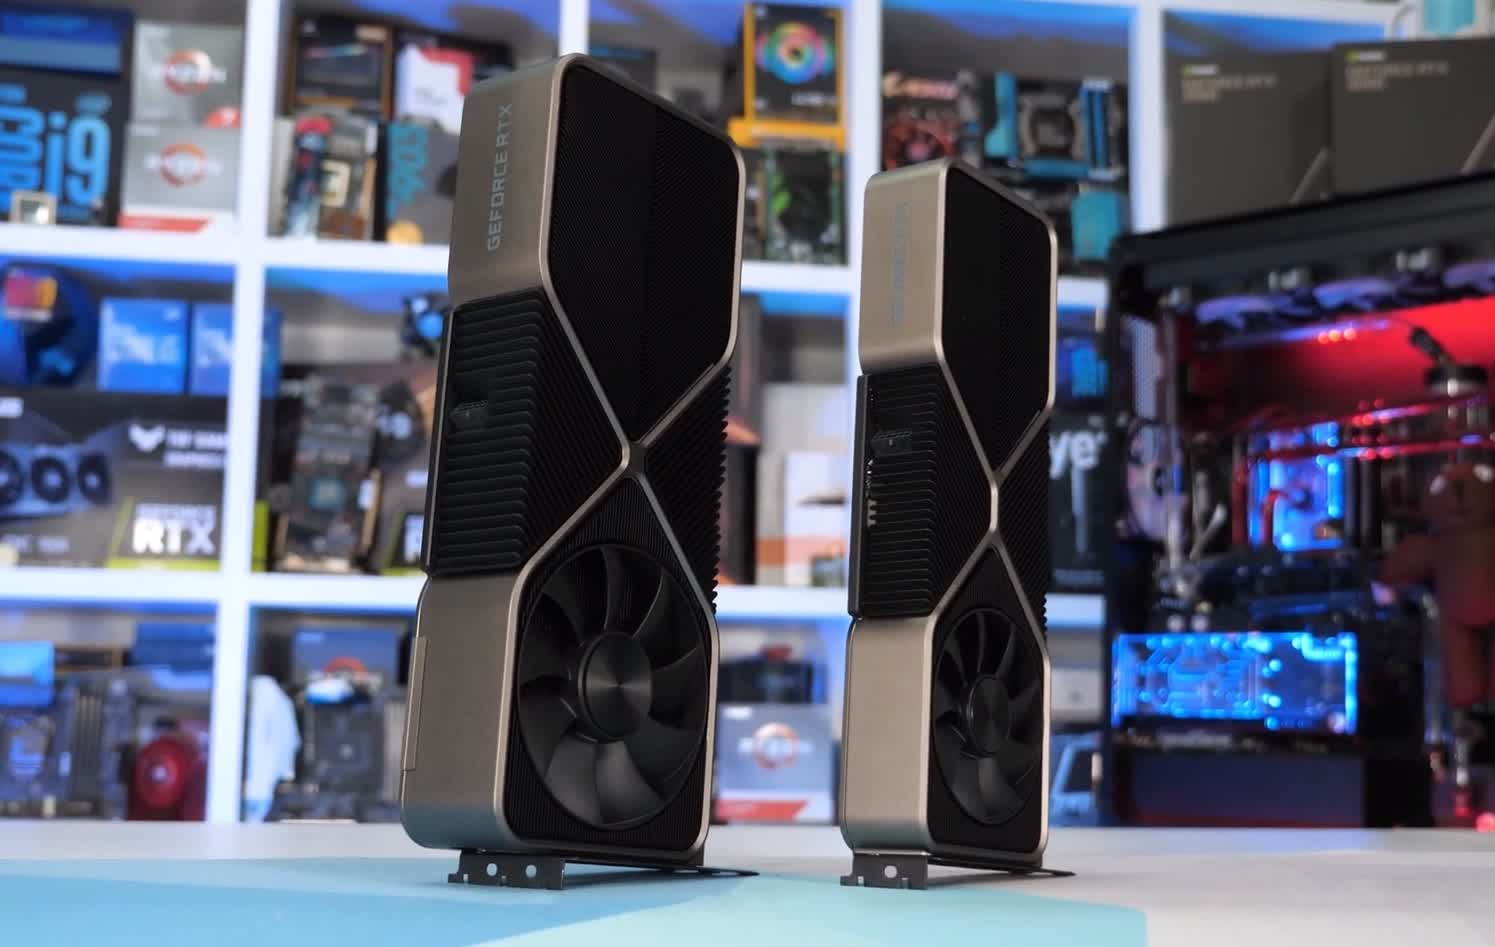
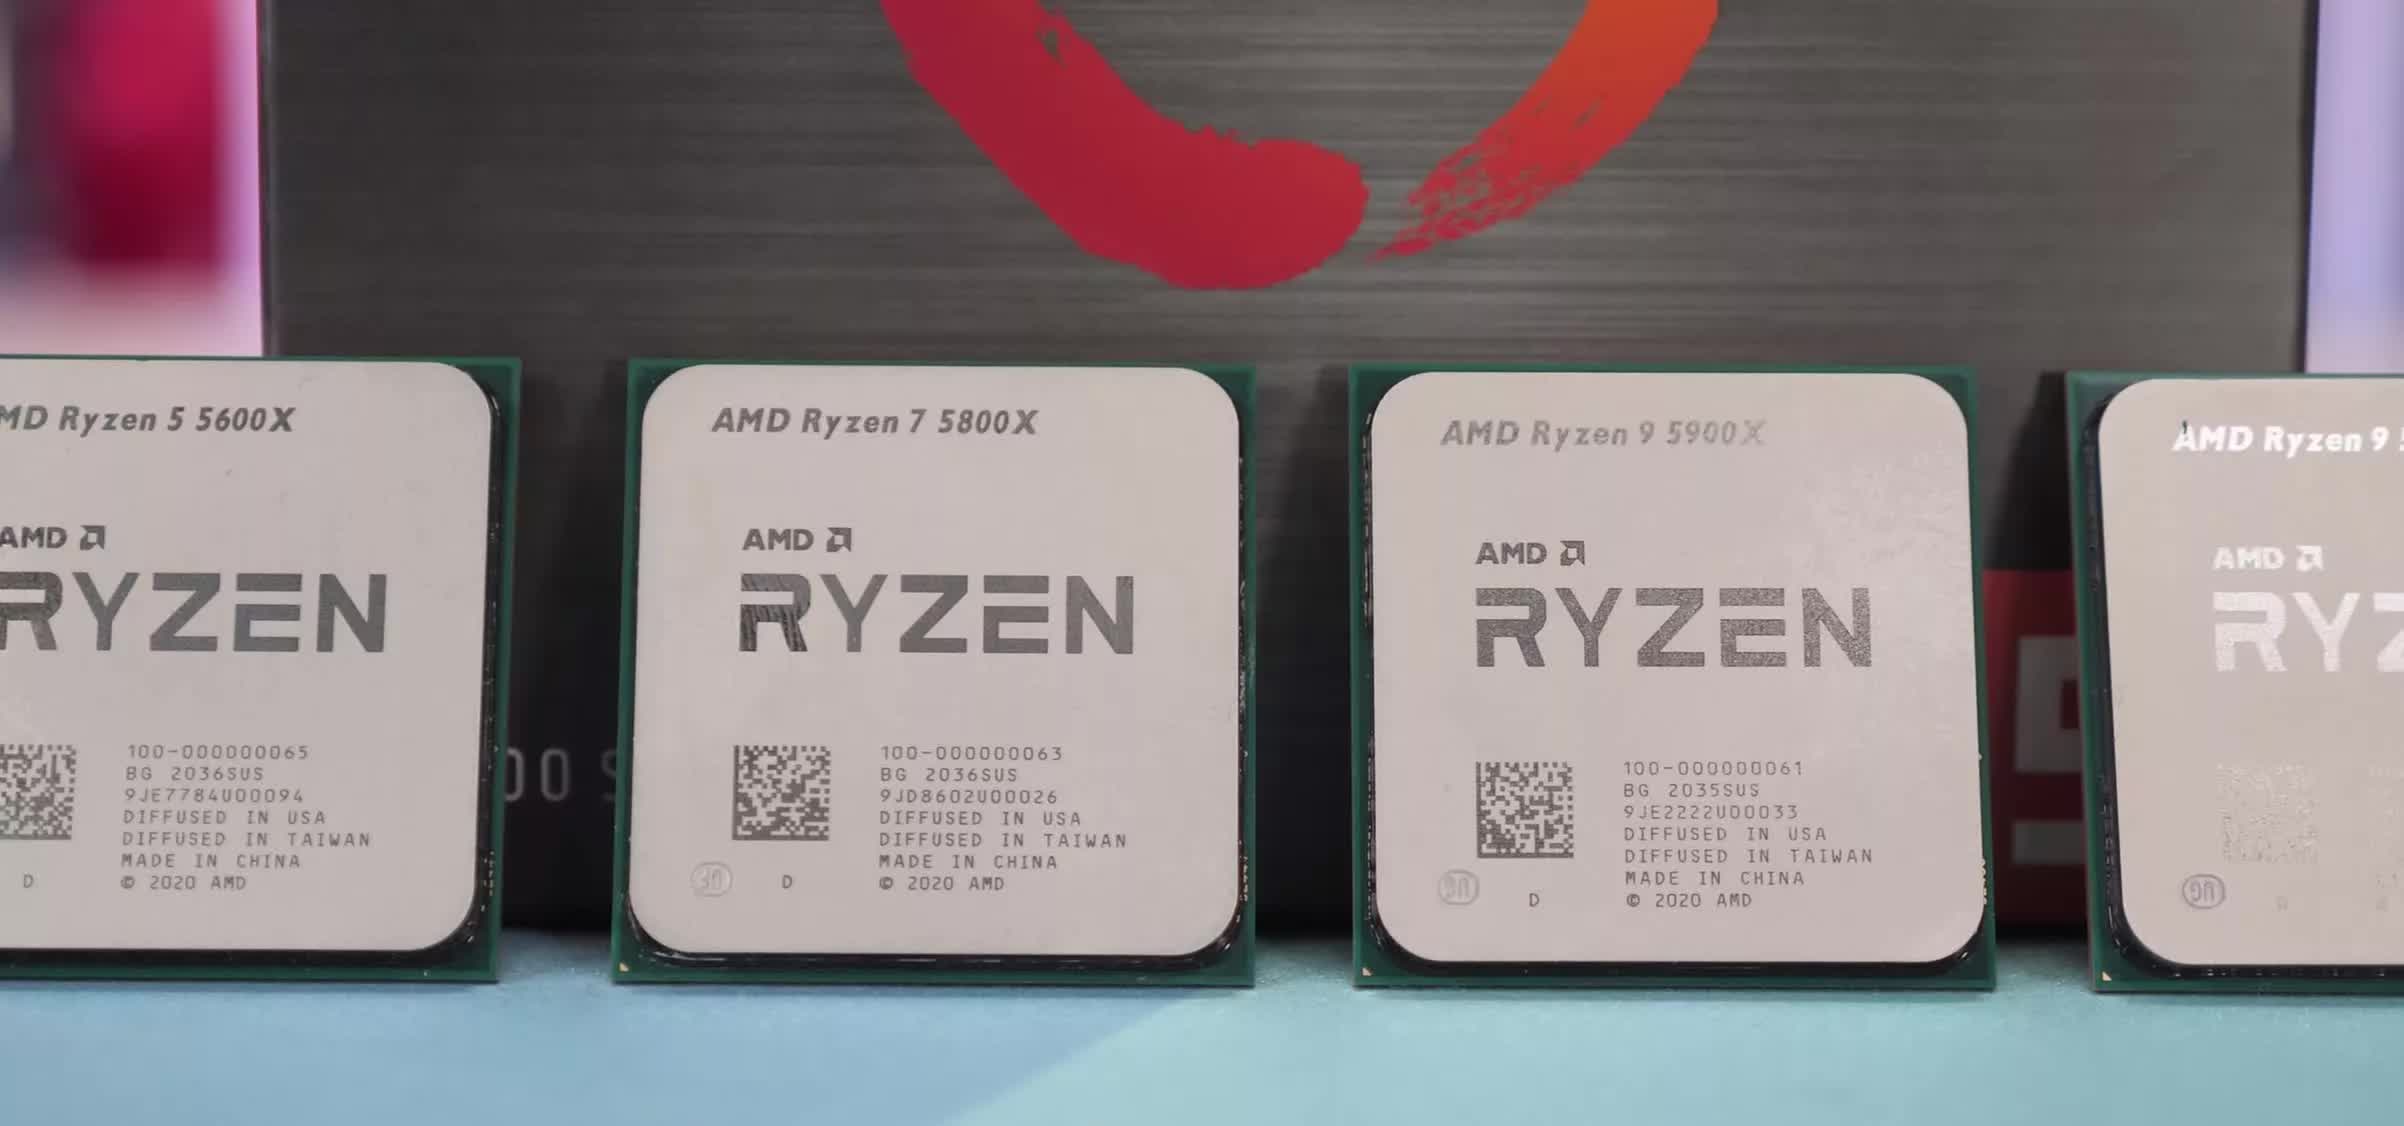
In this performance review we want to see how the Ryzen 5 5600X, Ryzen 7 5800X, Ryzen 9 5900X and R9 5950X compare in games using the GeForce RTX 3090, RTX 3070, Radeon RX 5700 XT and 5600 XT, using Ultra and Medium graphics quality presets at 1080p, 1440p and 4K. So you might be wondering why do this testing, what's the point of testing these CPU and GPU combinations? This is an extension of the testing shown in our day-one CPU reviews. In the CPU review the intention is to compare CPU gaming performance and therefore the focus is on CPU-limited testing by using a flagship GPU such as the RTX 3090 at a low-ish resolution such as 1080p.
This is ideal for showing which CPUs are truly faster for gaming, at least in the current range of games we test with, though it's also generally a good indicator of performance for the years to come as well. That said, it can be a little bit misleading if you're using that data as a buying guide, especially when comparing CPUs in different price ranges as the gains shown in the review won't necessarily translate to your setup as it's likely you'll be using a more affordable GPU — a more sensible GPU. You probably won't just play CPU demanding games either, so the idea of this follow up piece is to provide you with a more complete picture of CPU and GPU performance.
Now, all of the data we're about to look at is based on an average of three runs and quite incredibly that means each game saw at least 288 benchmark runs to record the data, so in total we're looking at around 1,700 benchmark runs to make this content and that explains why it's been extremely time consuming in our schedule for the past 2 weeks. We should note, we’re not expecting these results to be particularly exciting or unexpected, but we felt like starting with Zen 3 made the most sense as this data will serve as an excellent foundation for adding 10th and 11th-gen Core processors, as well as older CPUs. So this should develop into an interesting benchmark series. As for the test system, each CPU has been tested using 32GB of DR4-3200 CL14 memory in a dual-channel, dual-rank configuration on the Gigabyte X570 Aorus Xtreme and cooling them is the Corsair iCUE H115i Elite. Besides loading XMP, no other changes have been made to the BIOS for testing. Let's get into the results… Benchmarks
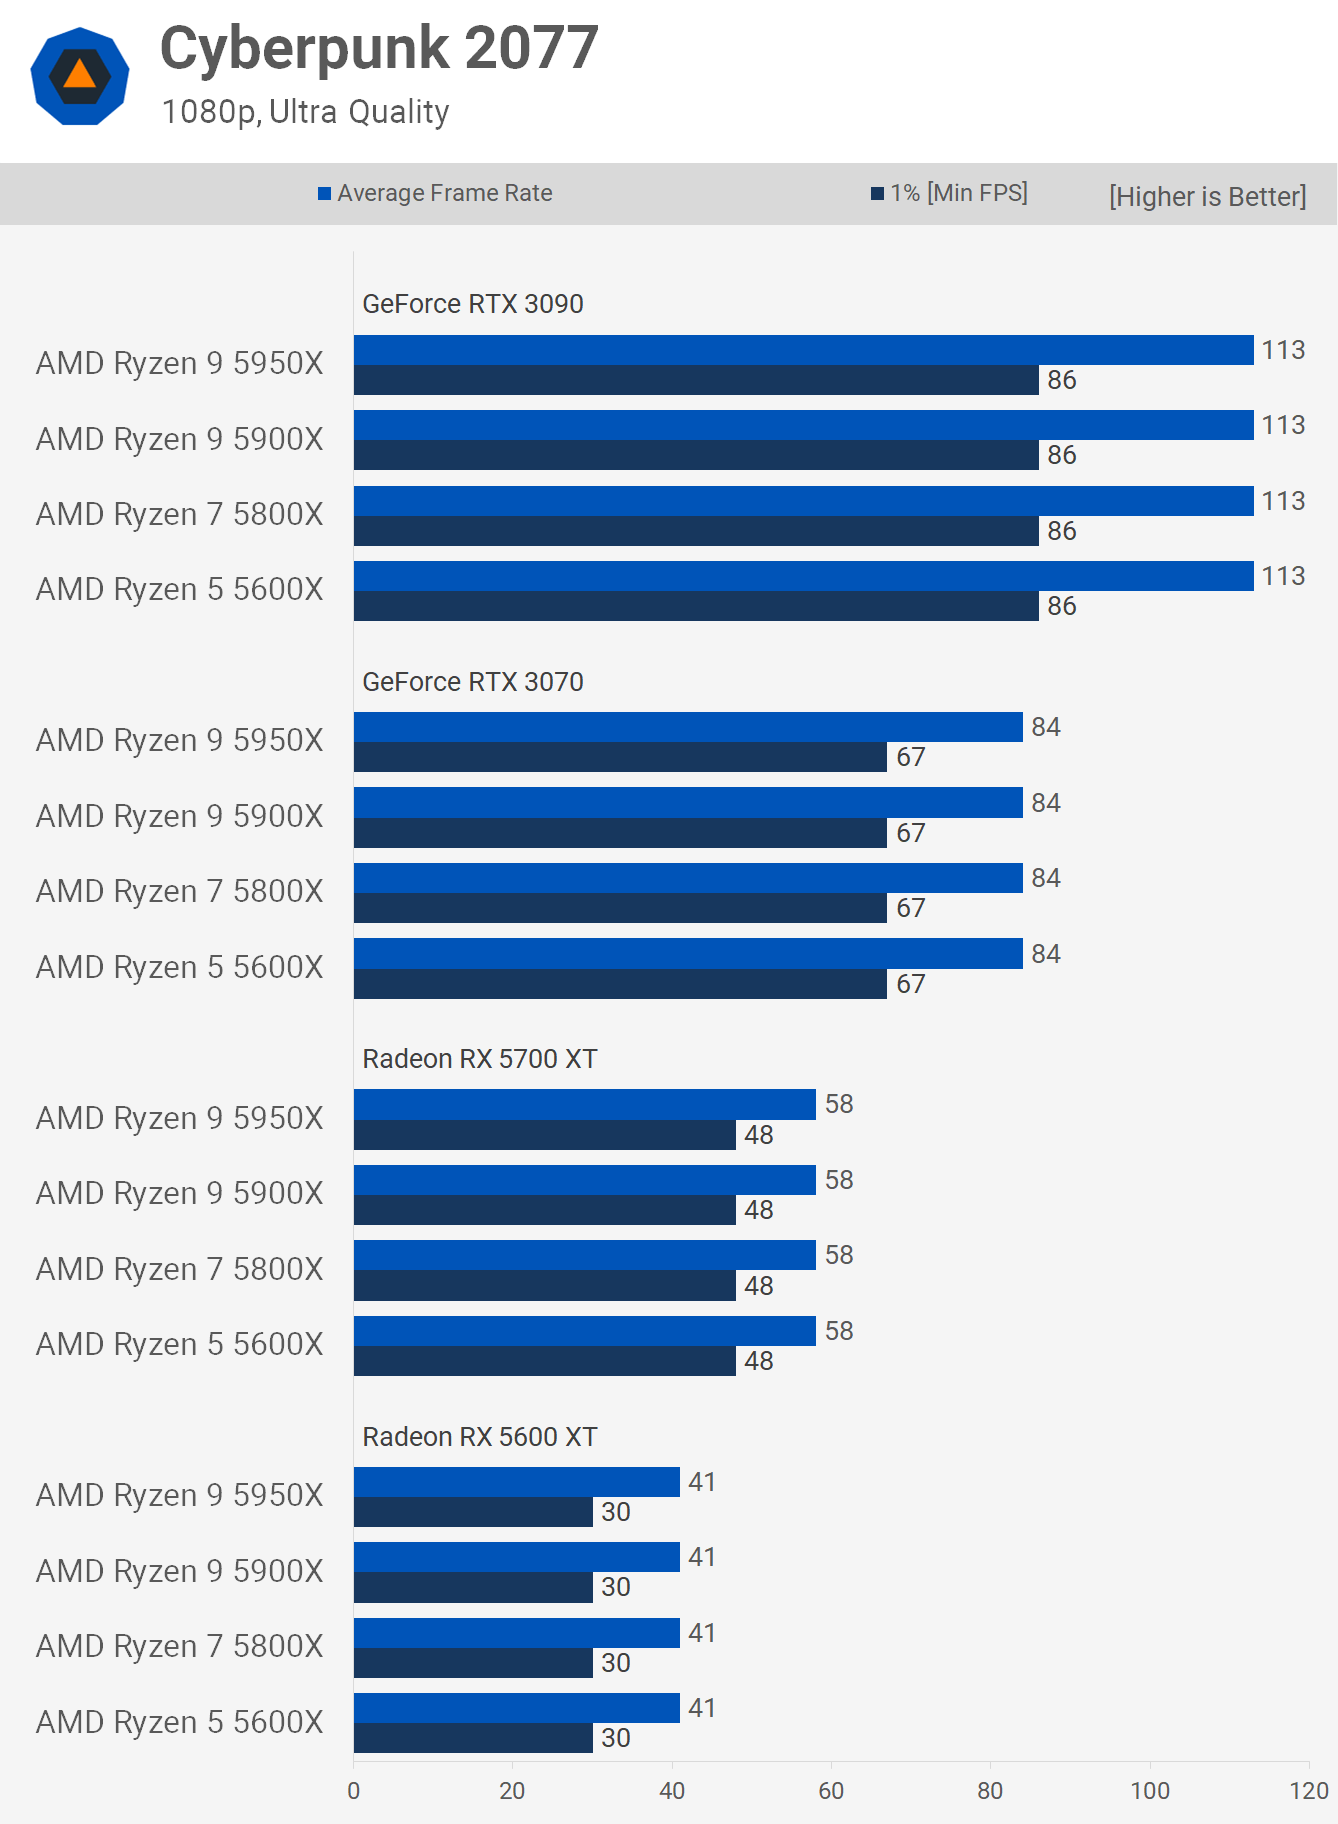
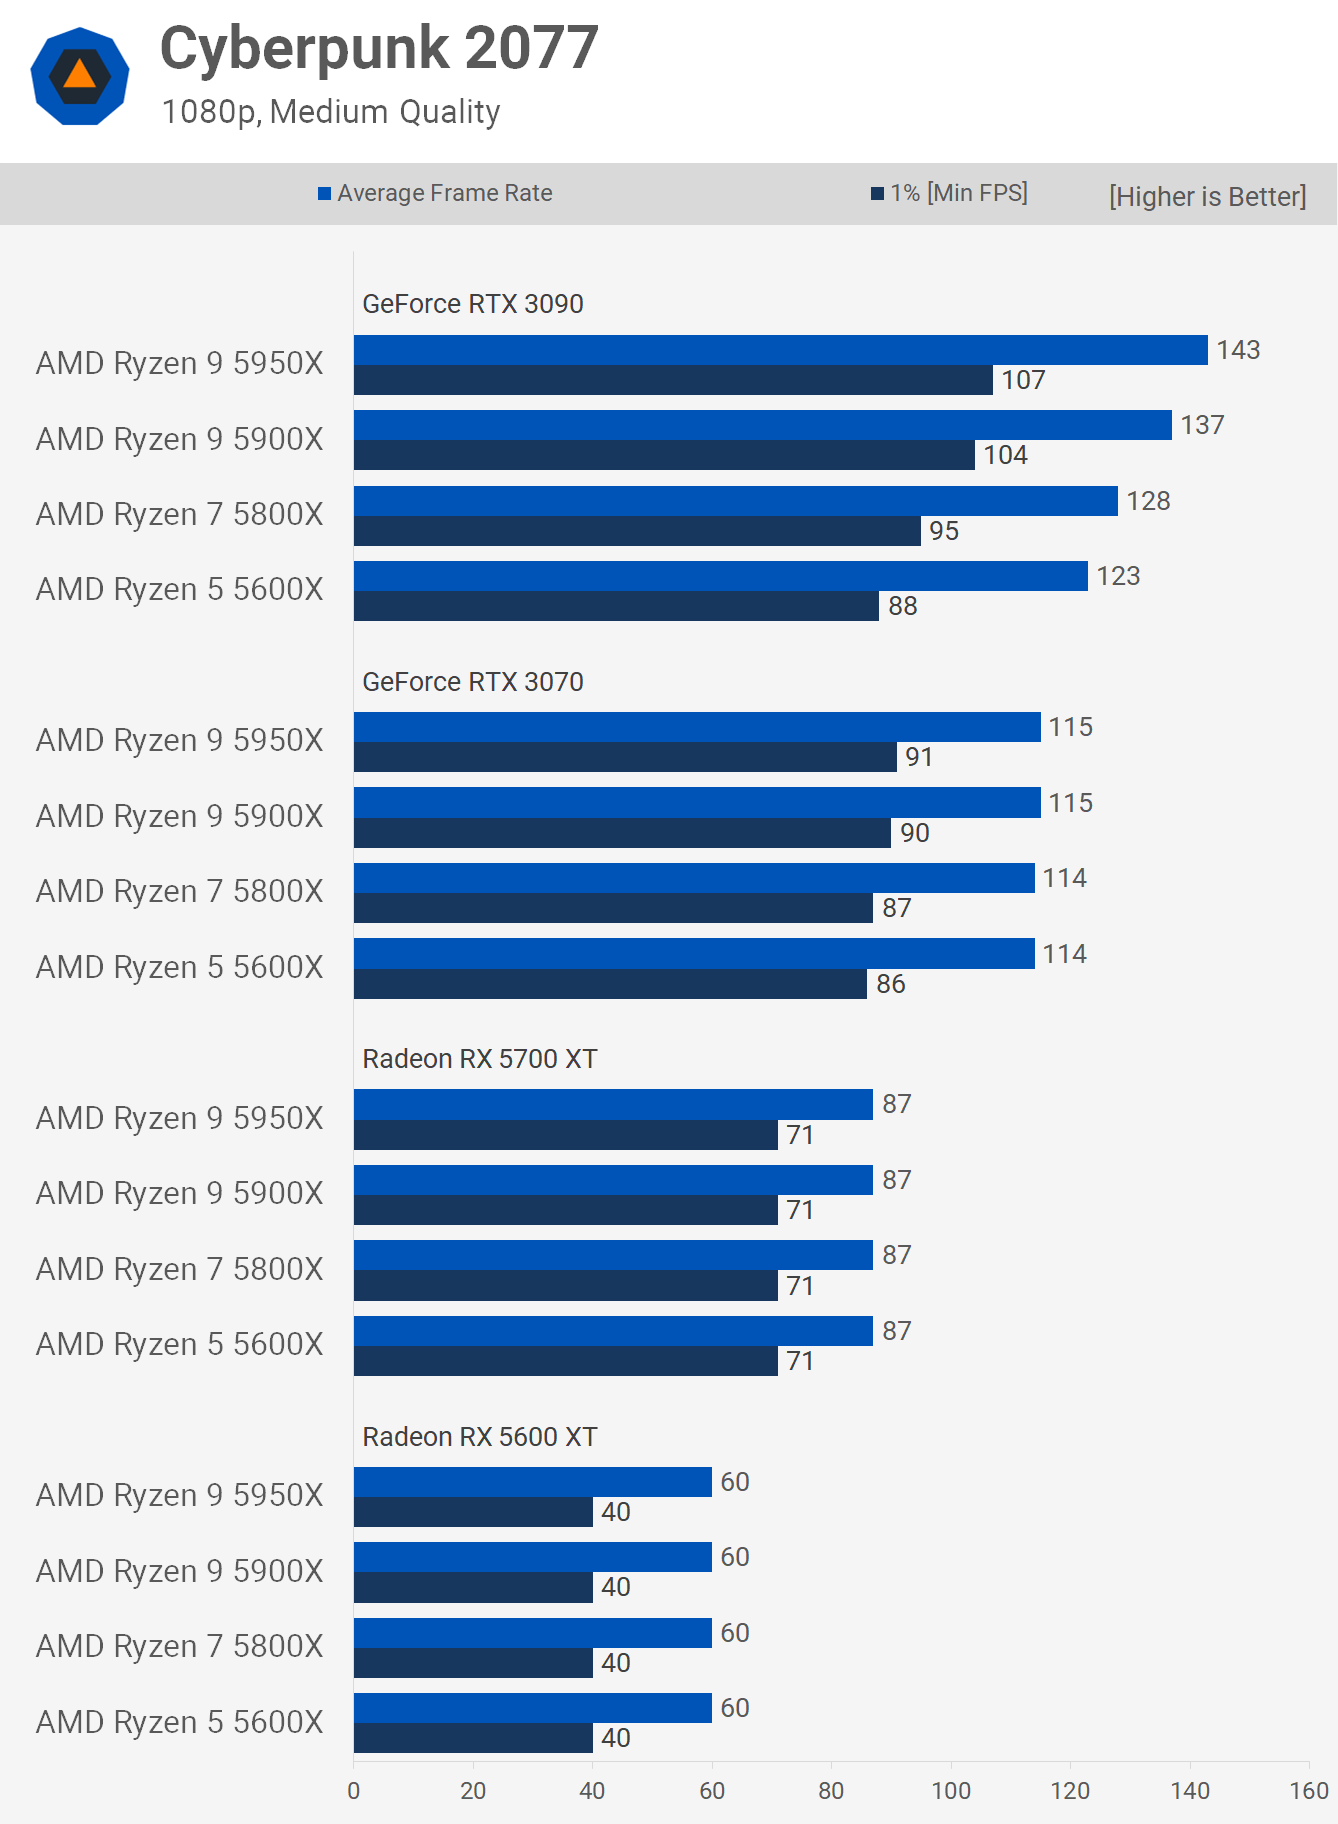
Starting with Cyberpunk 2077 at 1080p using the ultra quality preset we find that the game is entirely GPU limited with these new Zen 3 processors, even the 6-core/12-thread 5600X is able to extract maximum performance from the RTX 3090 here.
Reducing the quality preset to medium pushes frames rates above the 113 fps seen with the ultra preset and now we are seeing some variation in the performance. The 5950X for example is now up to 22% faster than the 5600X and we see fairly consistent scaling as the core count and frequency increases. That said, this is only seen with the RTX 3090, dropping down to the RTX 3070 sees the game become largely GPU limited, there is still some variation in the 1% low performance, but we're talking at most a 6% discrepancy. Once we drop down to the 5700 XT all CPUs are seen delivering the exact same level of performance.
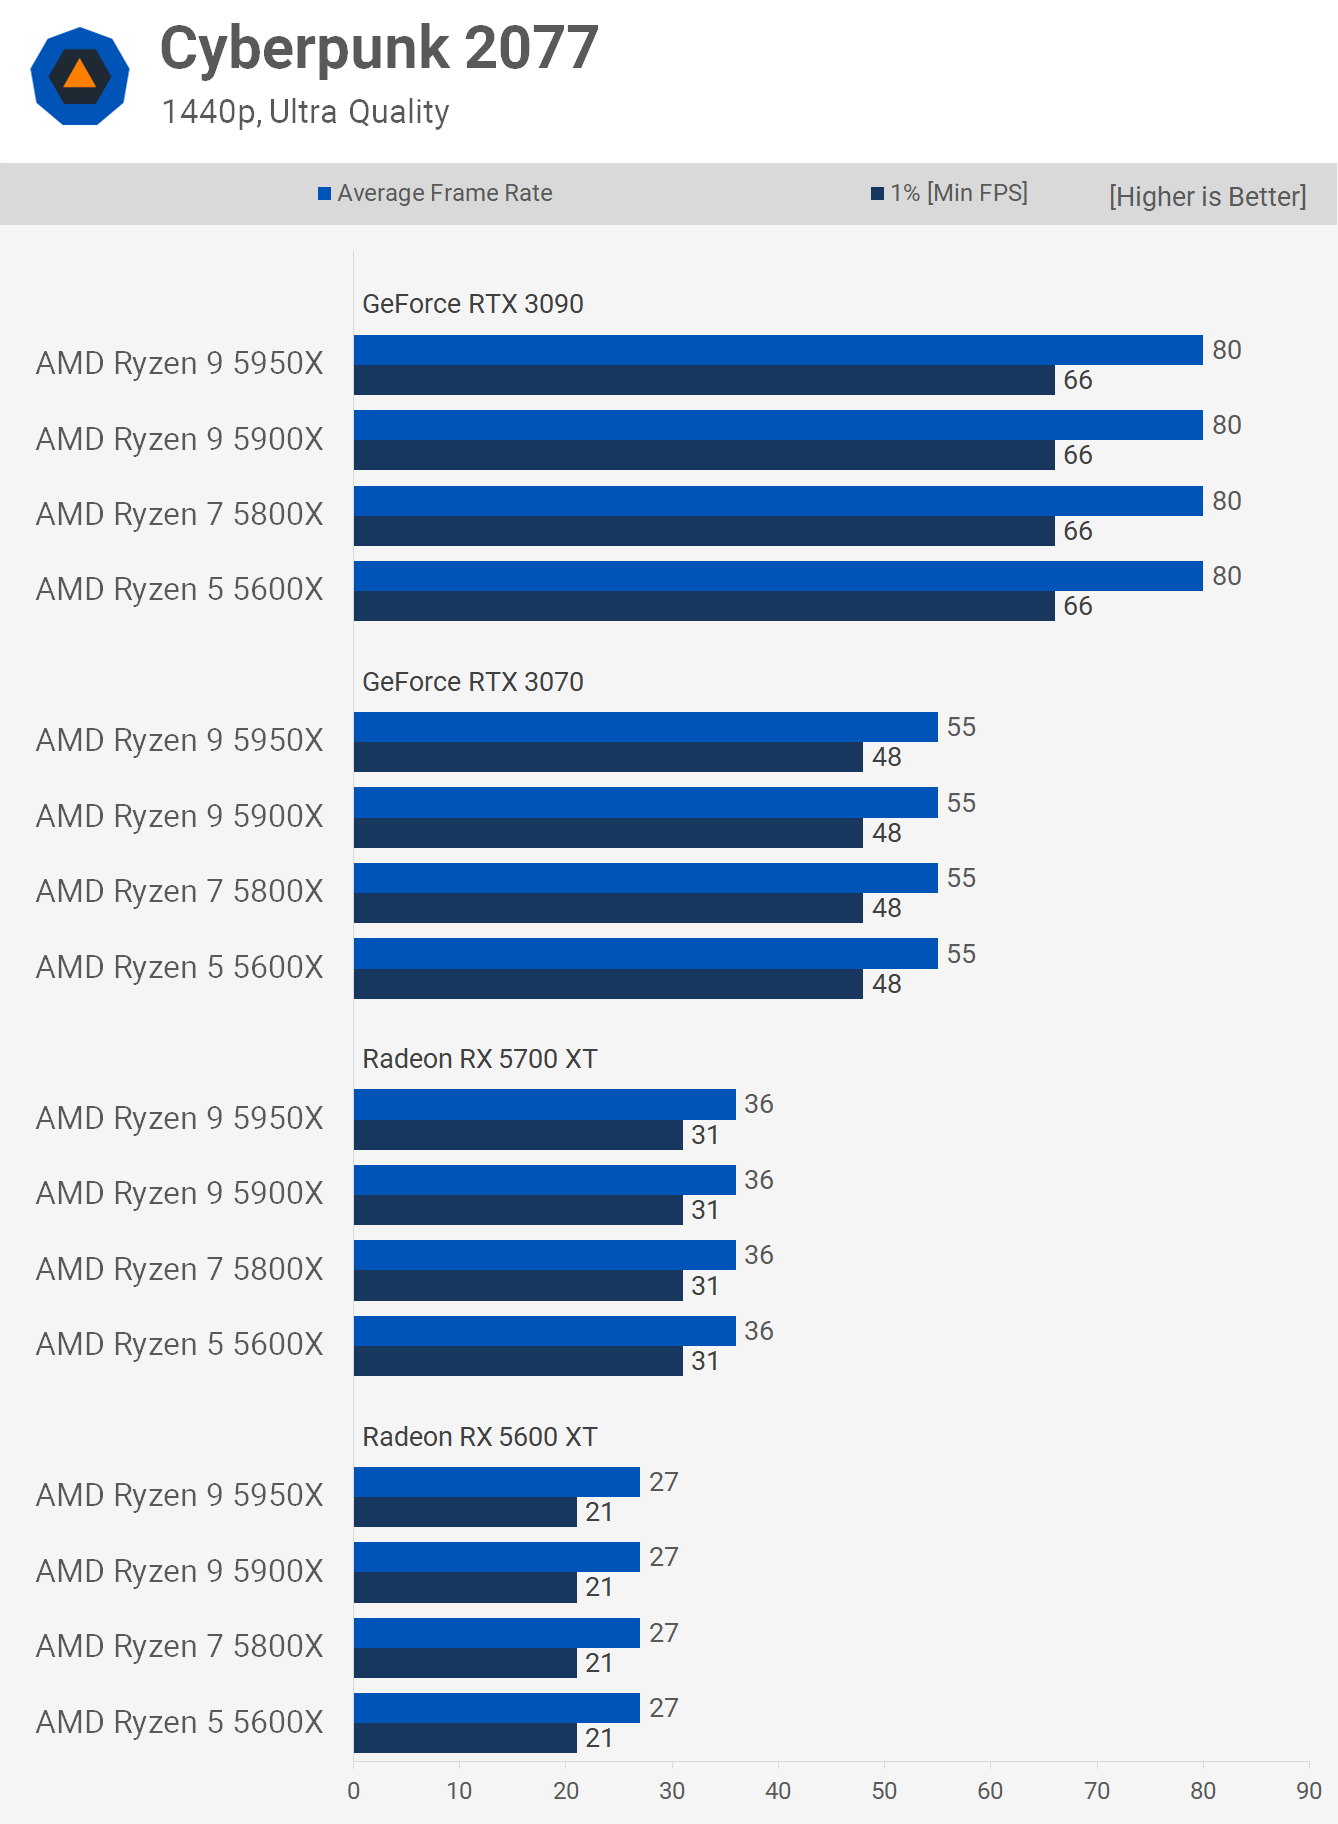
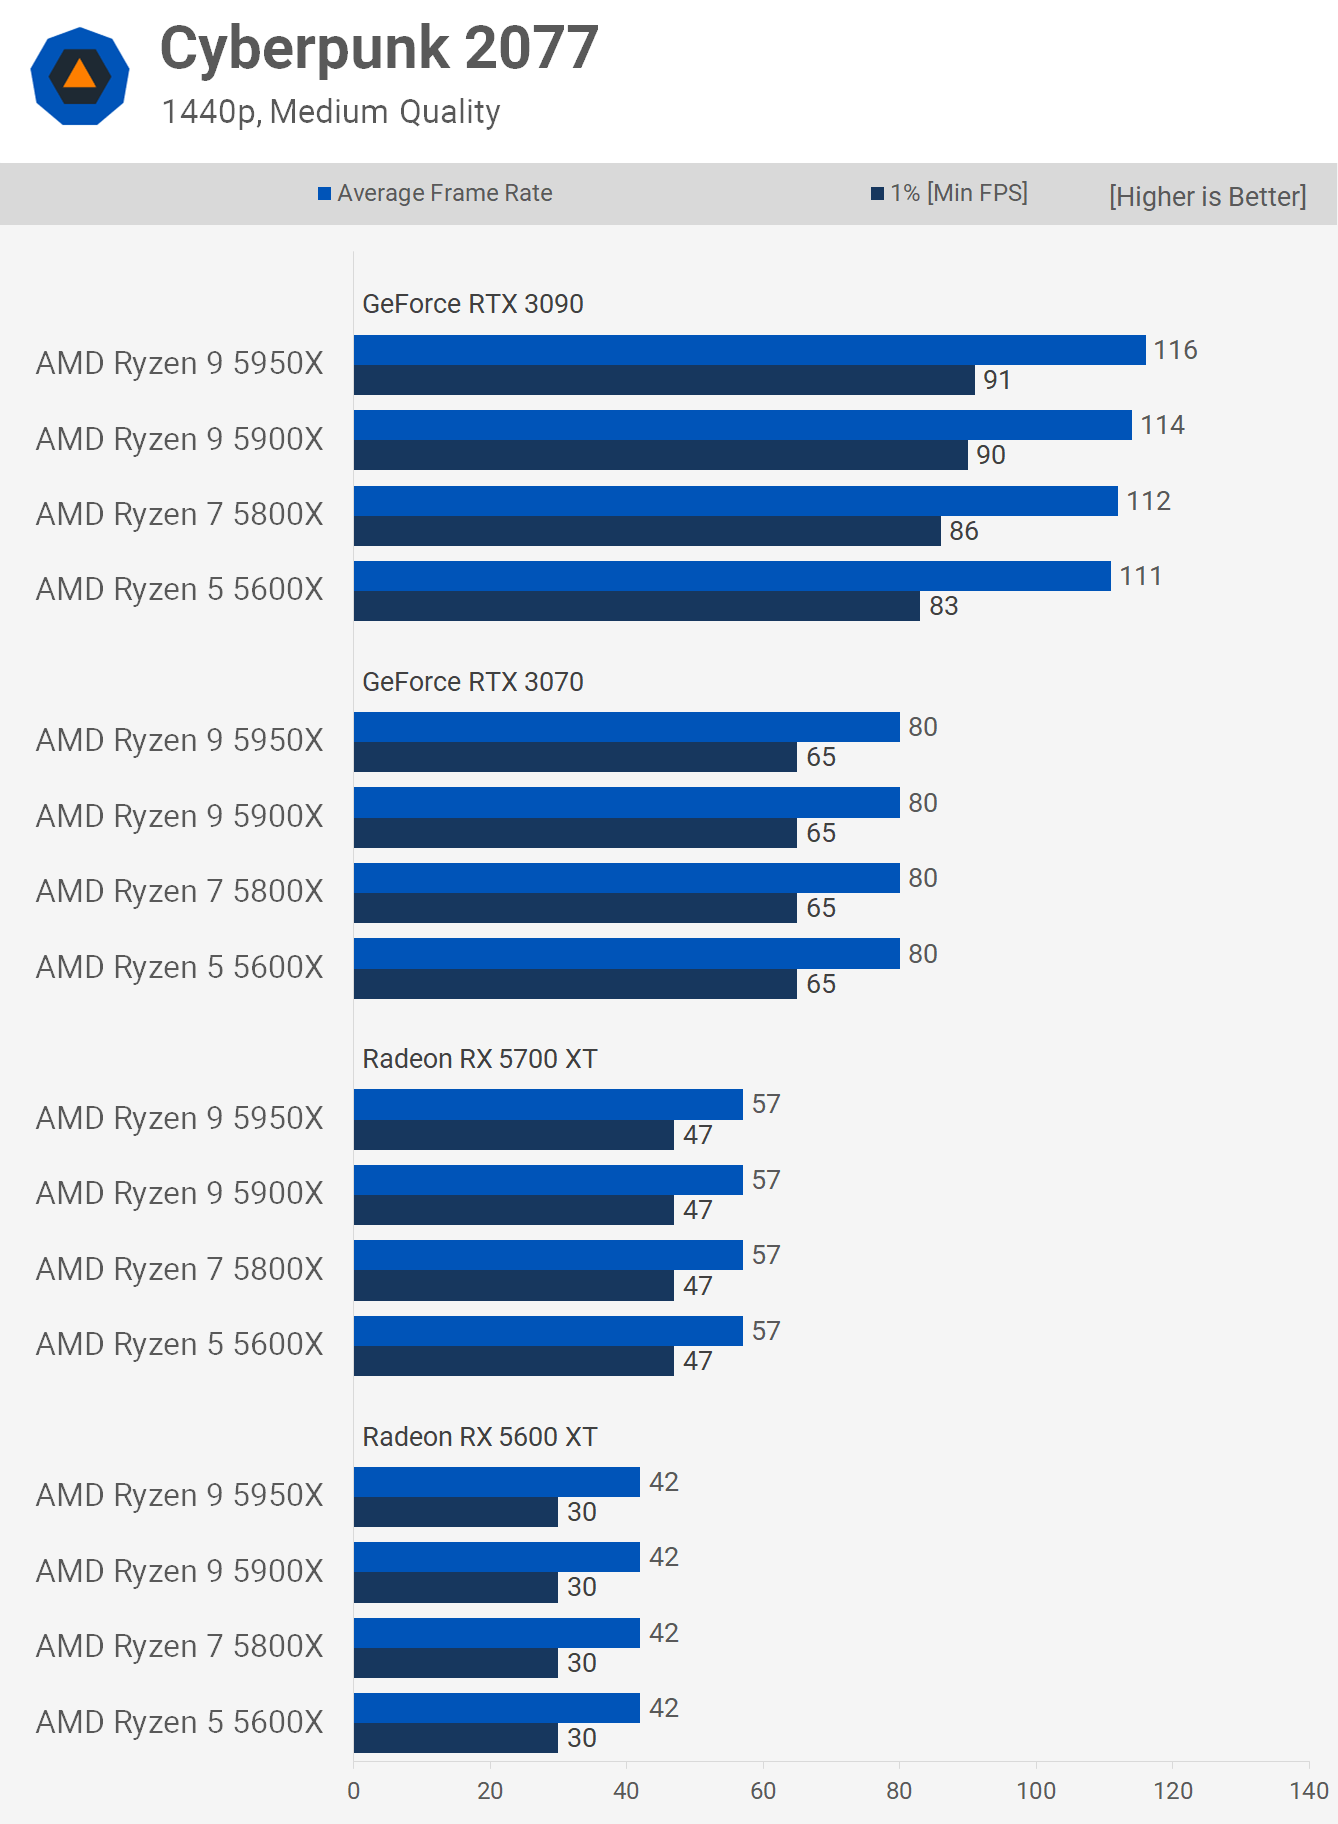
Naturally moving to 1440p with the ultra quality preset still sees the game entirely GPU limited, even with the RTX 3090, so let's move on to check out the medium quality preset.
Here we're seeing up to a 10% improvement in performance when going from the 5600X up to the 5950X, and this is seen when comparing the 1% low data using the RTX 3090. But once we drop down to the RTX 3070 the game is 100% GPU limited with no chance for the CPU to make a performance difference. Basically if you have an RTX 3070 or slower and play games like Cyberpunk 2077 at 1440p using just medium quality settings, it really doesn't matter which Zen 3 CPU you have, performance will be identical.
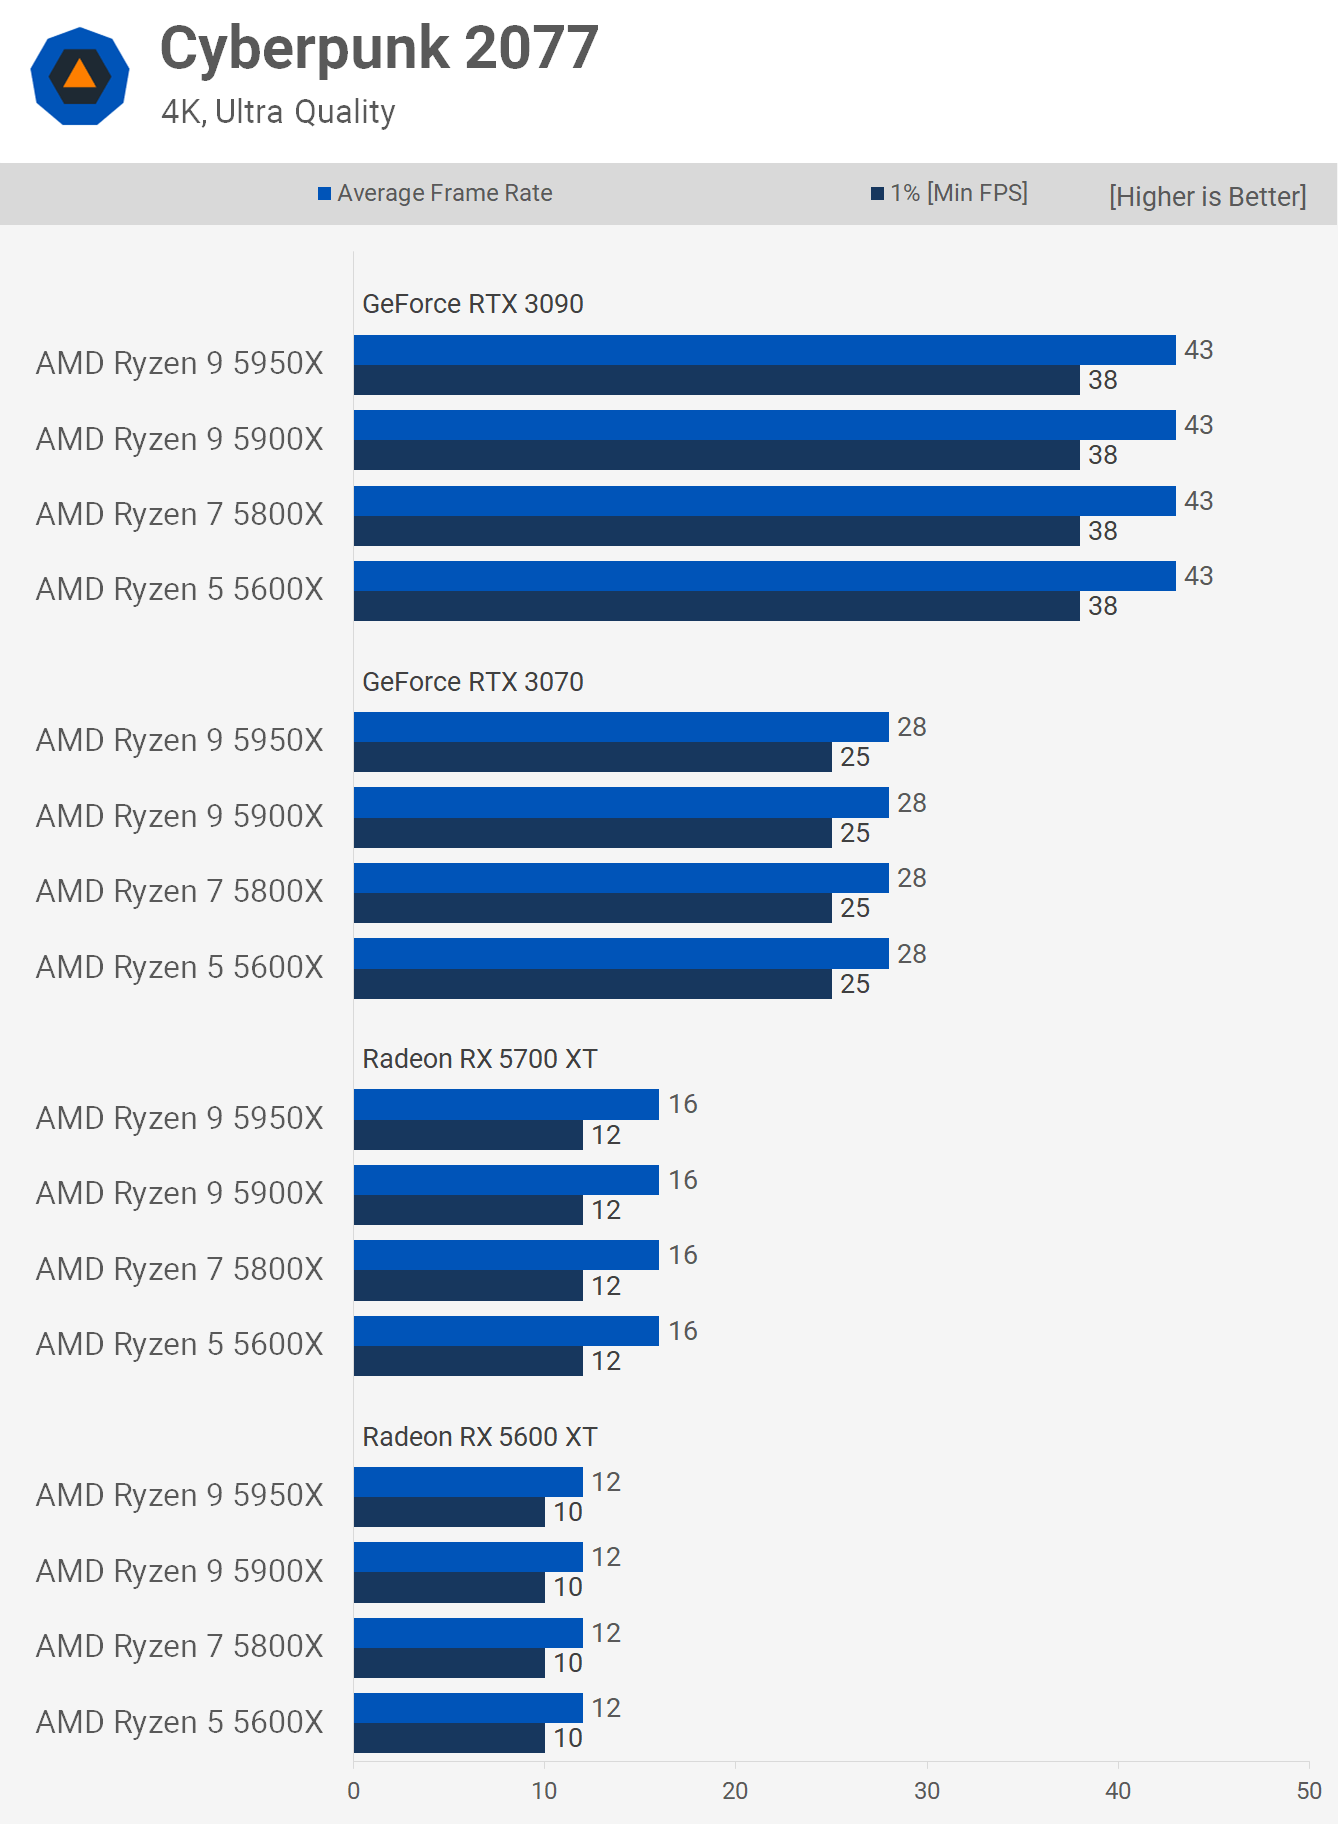
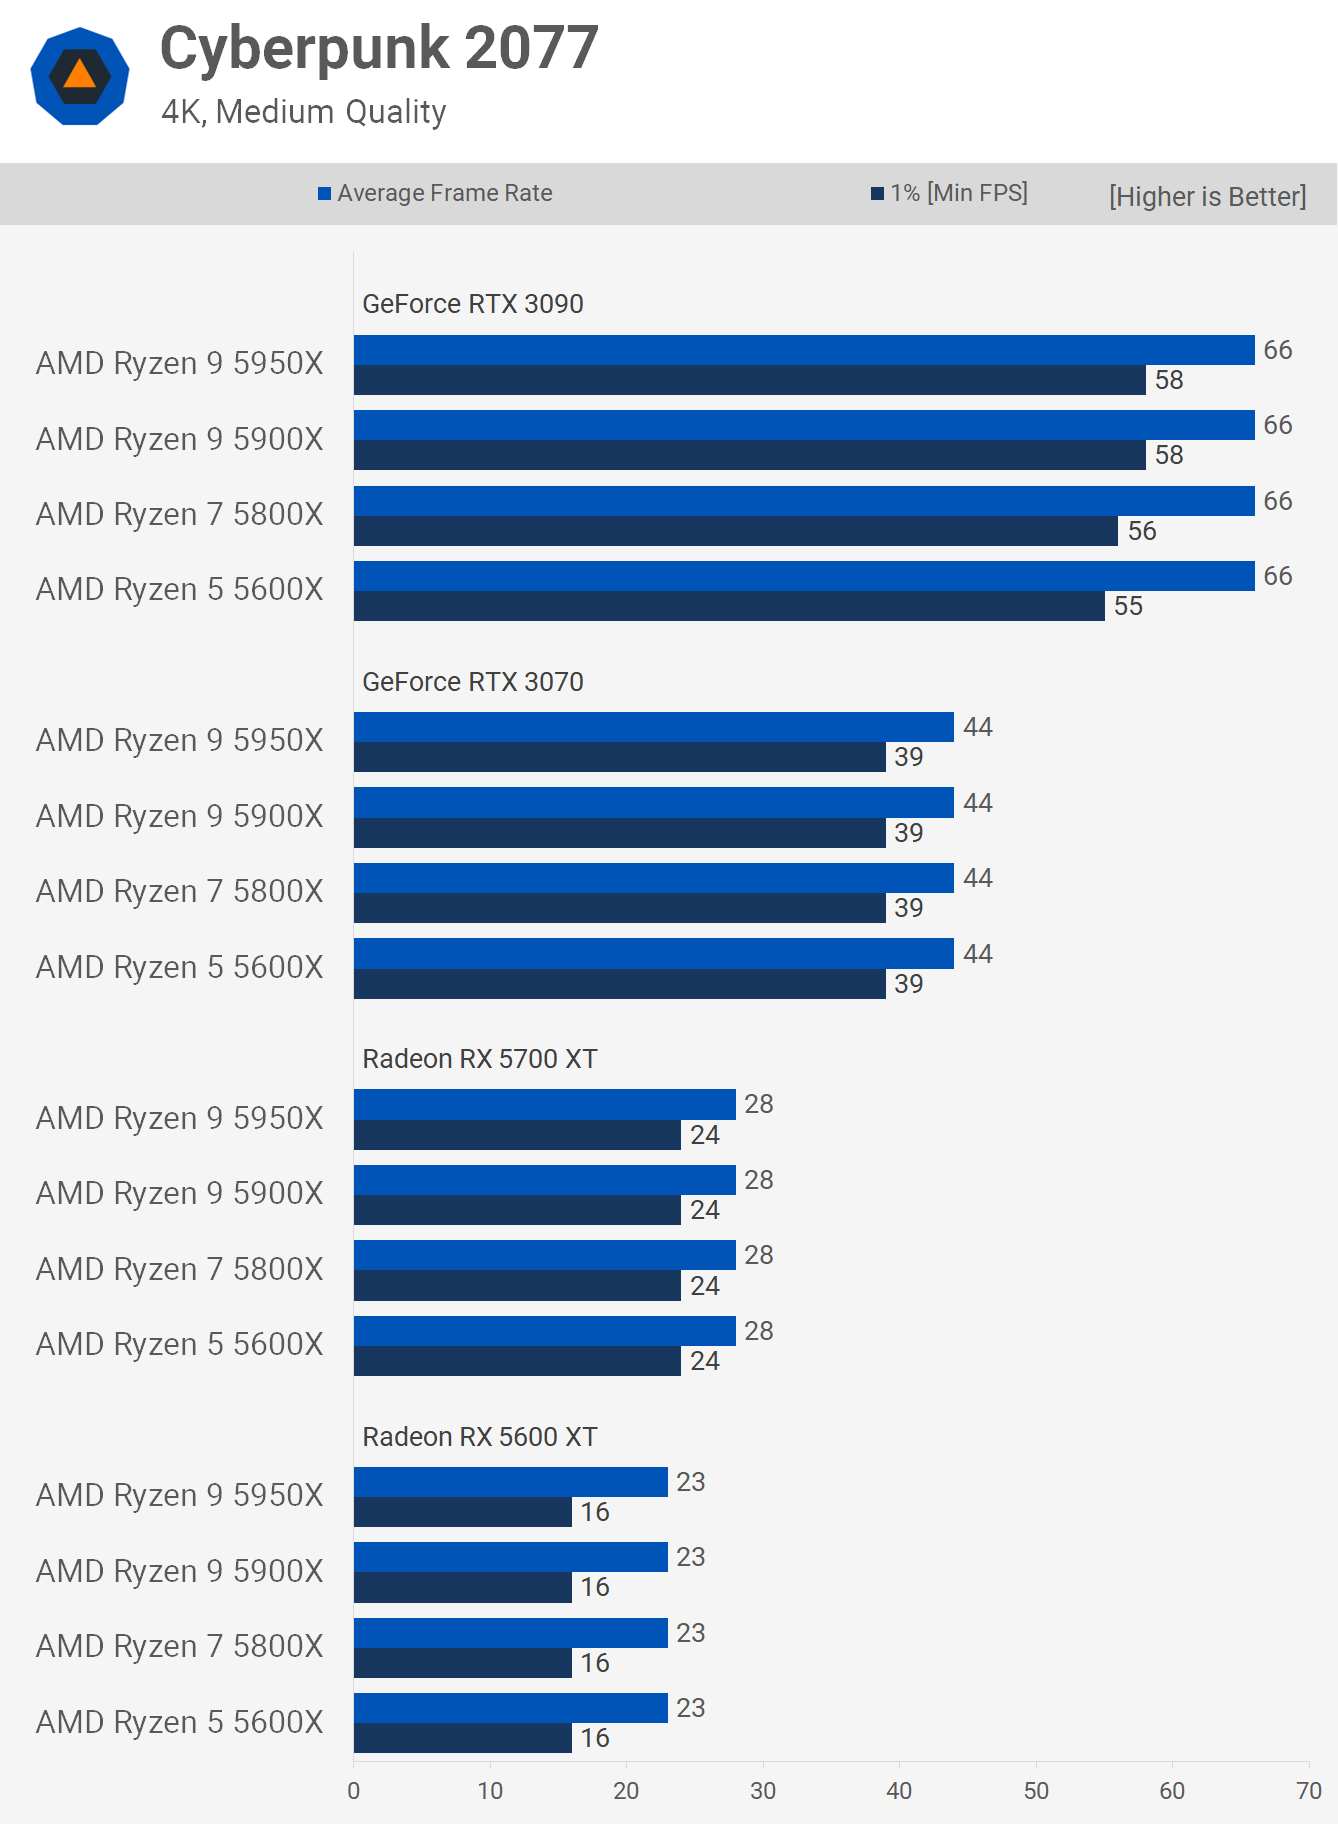
That being the case obviously we're seeing no difference in performance at 4K using the ultra quality settings and really it's only the RTX 3090 that is able to deliver a somewhat playable experience under these conditions anyway.
Dropping down to the medium quality preset certainly improves GPU performance but for the most part we're still GPU limited. That said we are seeing up to a 5% variation in 1% low performance with the RTX 3090, so the higher core count CPUs are helping to deliver a slightly smoother experience, though it's difficult to say if you'd ever be able to notice.
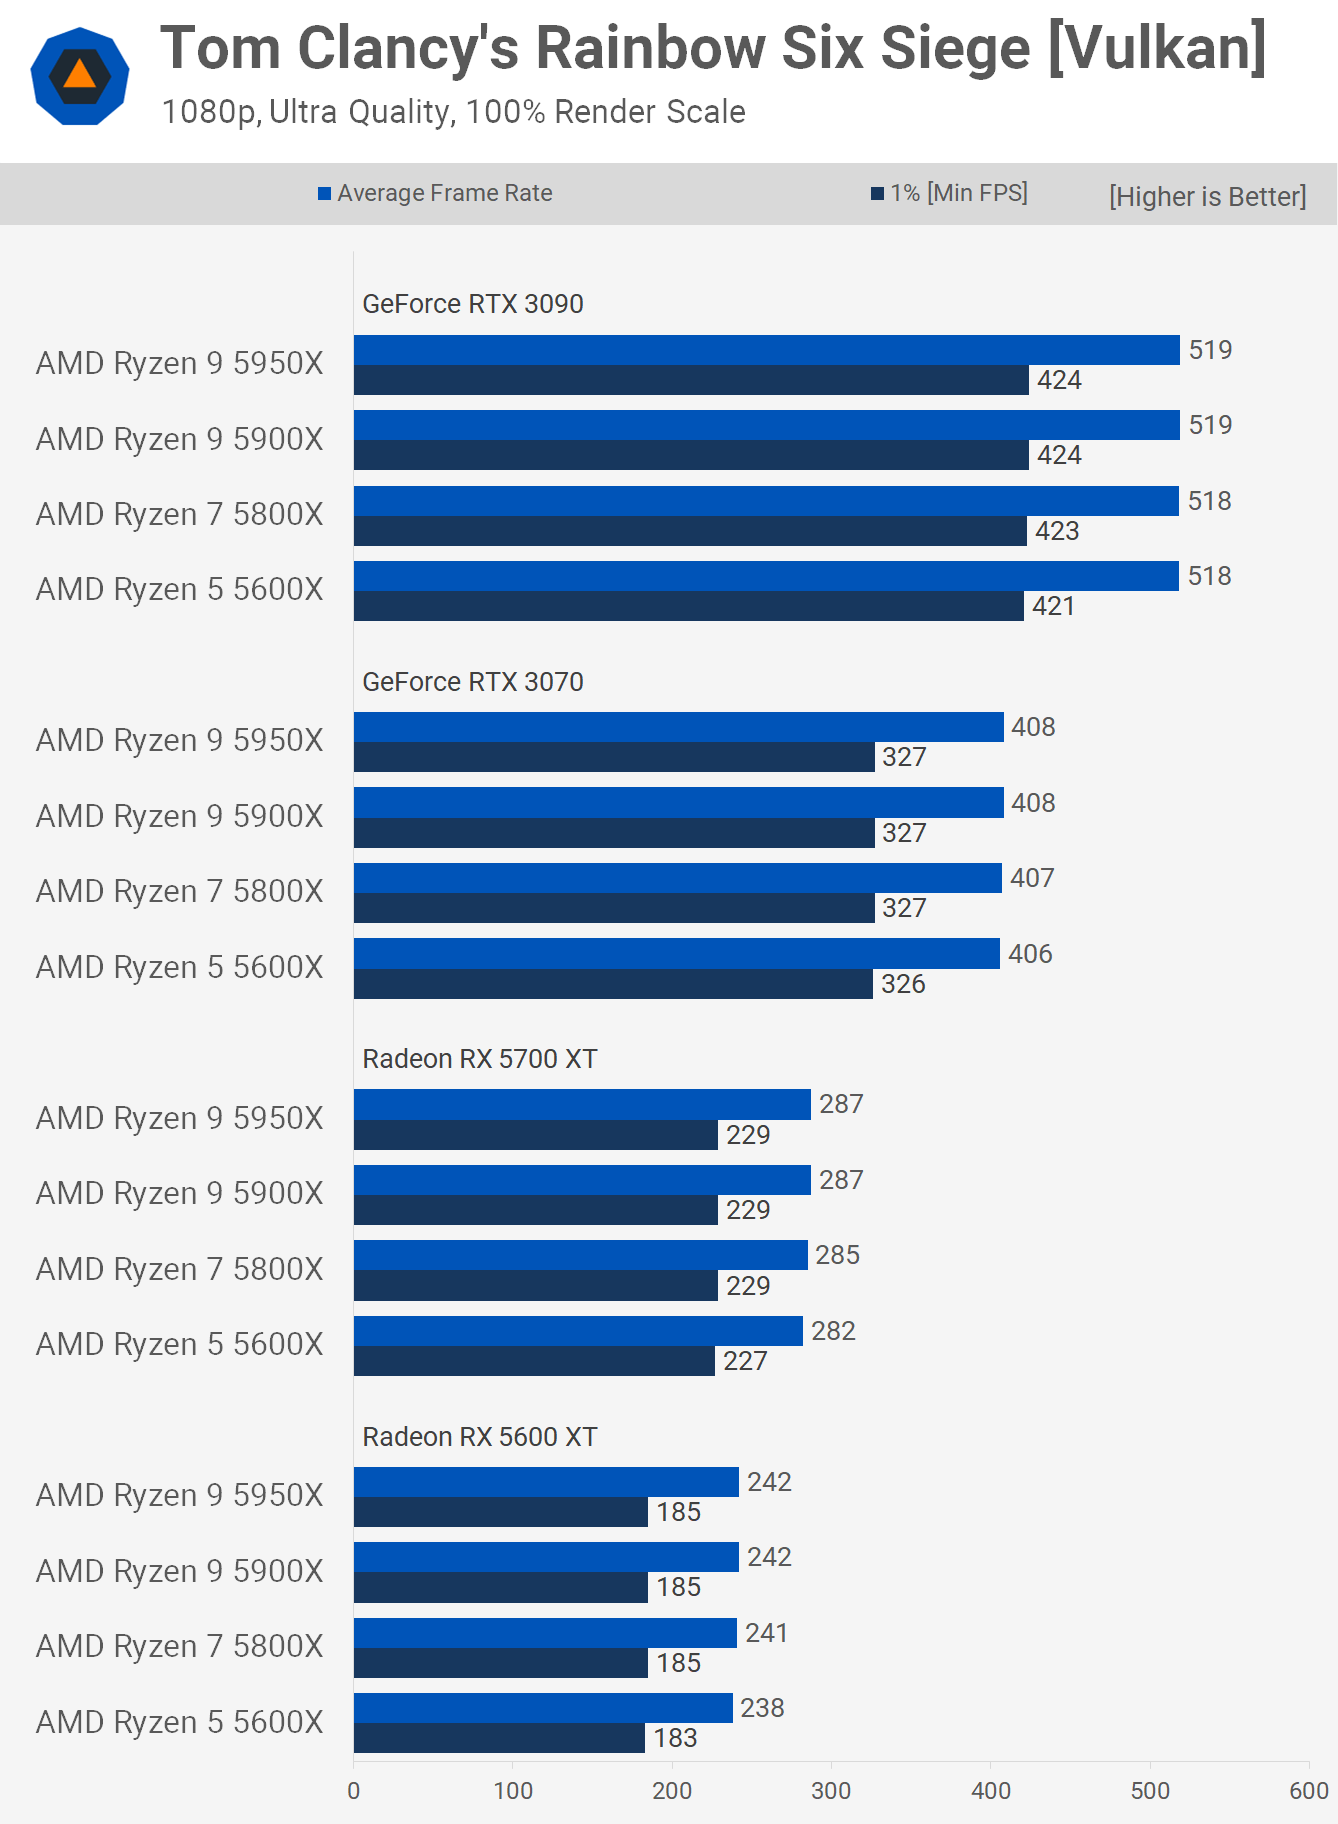
What about esports titles that run at hundreds of frames per second? How much difference is there between the various Zen 3 processors? Here we have Rainbow Six Siege results at 1080p using the ultra quality preset and there's really not much to talk about. Of course, this isn't a core heavy game, so providing the cores themselves are very fast, having 6 is more than enough and we're seeing that with the Ryzen 5 5600X.
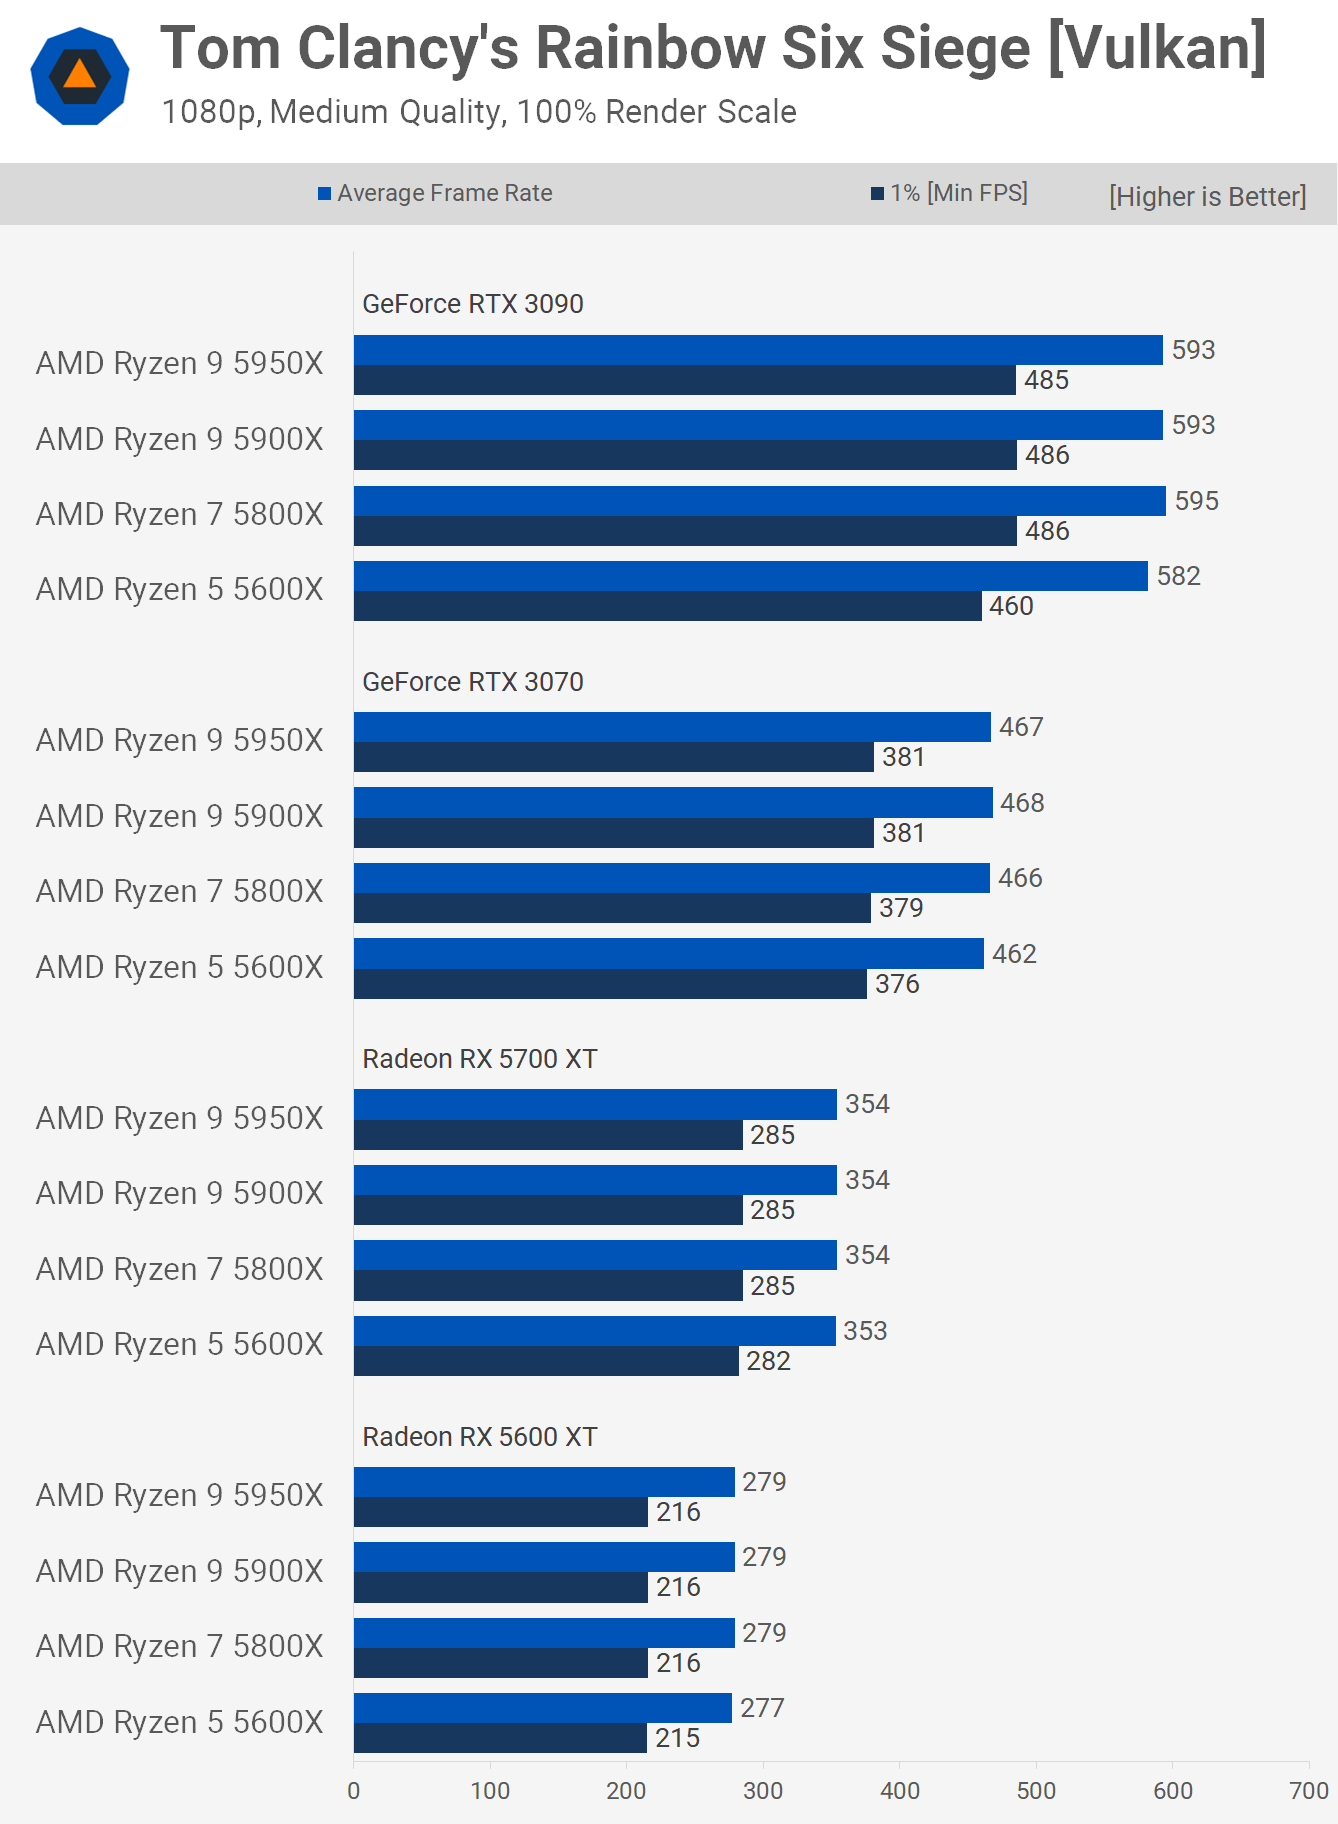
With the medium quality preset which sees the GeForce RTX 3090 pushing out almost 600 fps on average we see little to no difference in performance between the CPUs tested. The 5600X is up to 5% slower with the RTX 3090, but we're still talking about 460 fps for the 1% low and 582 fps on average. So for virtually all esports titles using competitive quality settings something like the 5600X is going to be more than sufficient.
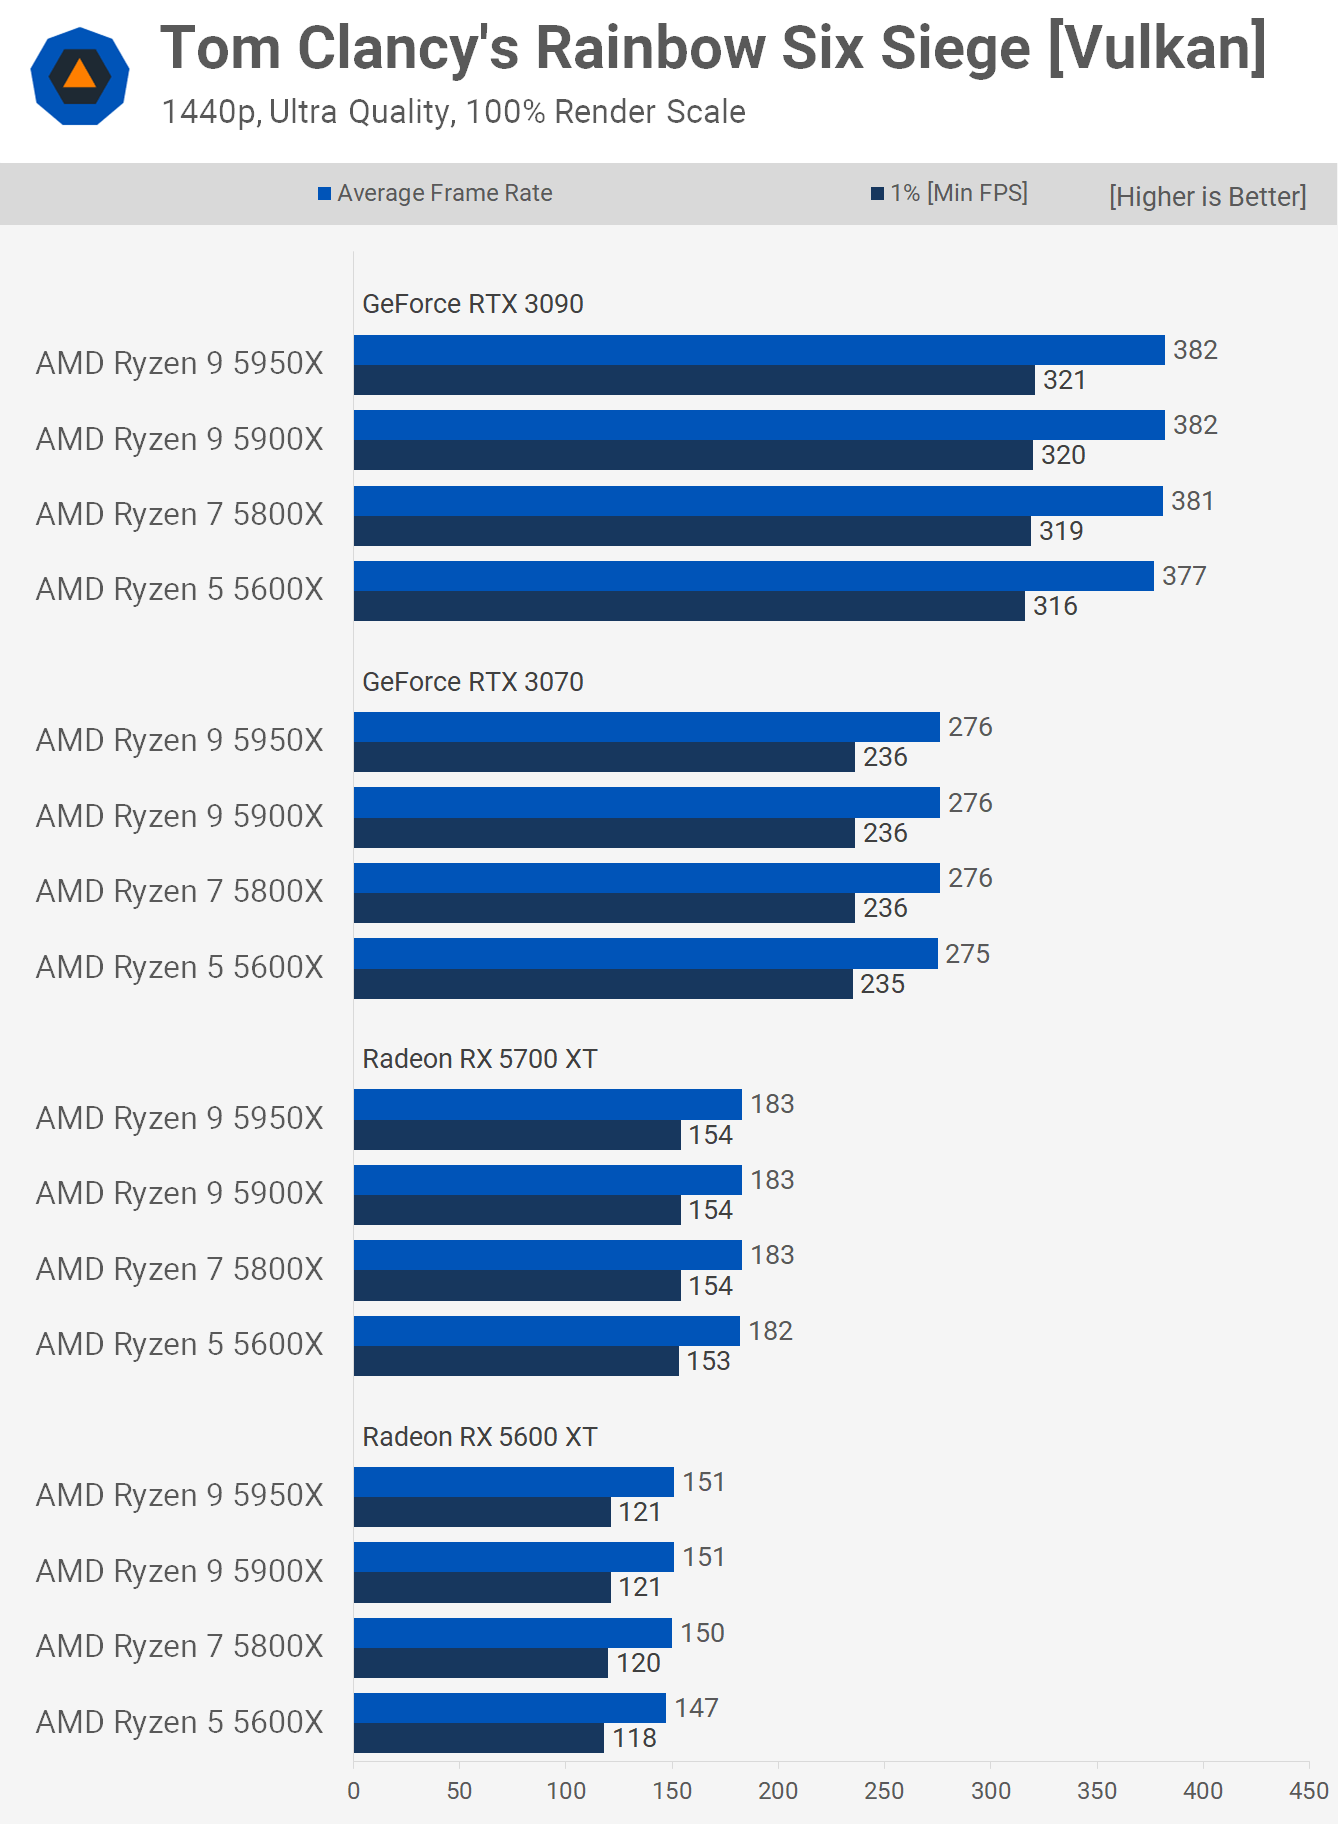
Jumping up to 1440p with the ultra quality preset sees the game become entirely GPU limited, so it really doesn't matter which Zen 3 processor you use, all will be able to get the most out of even the RTX 3090.
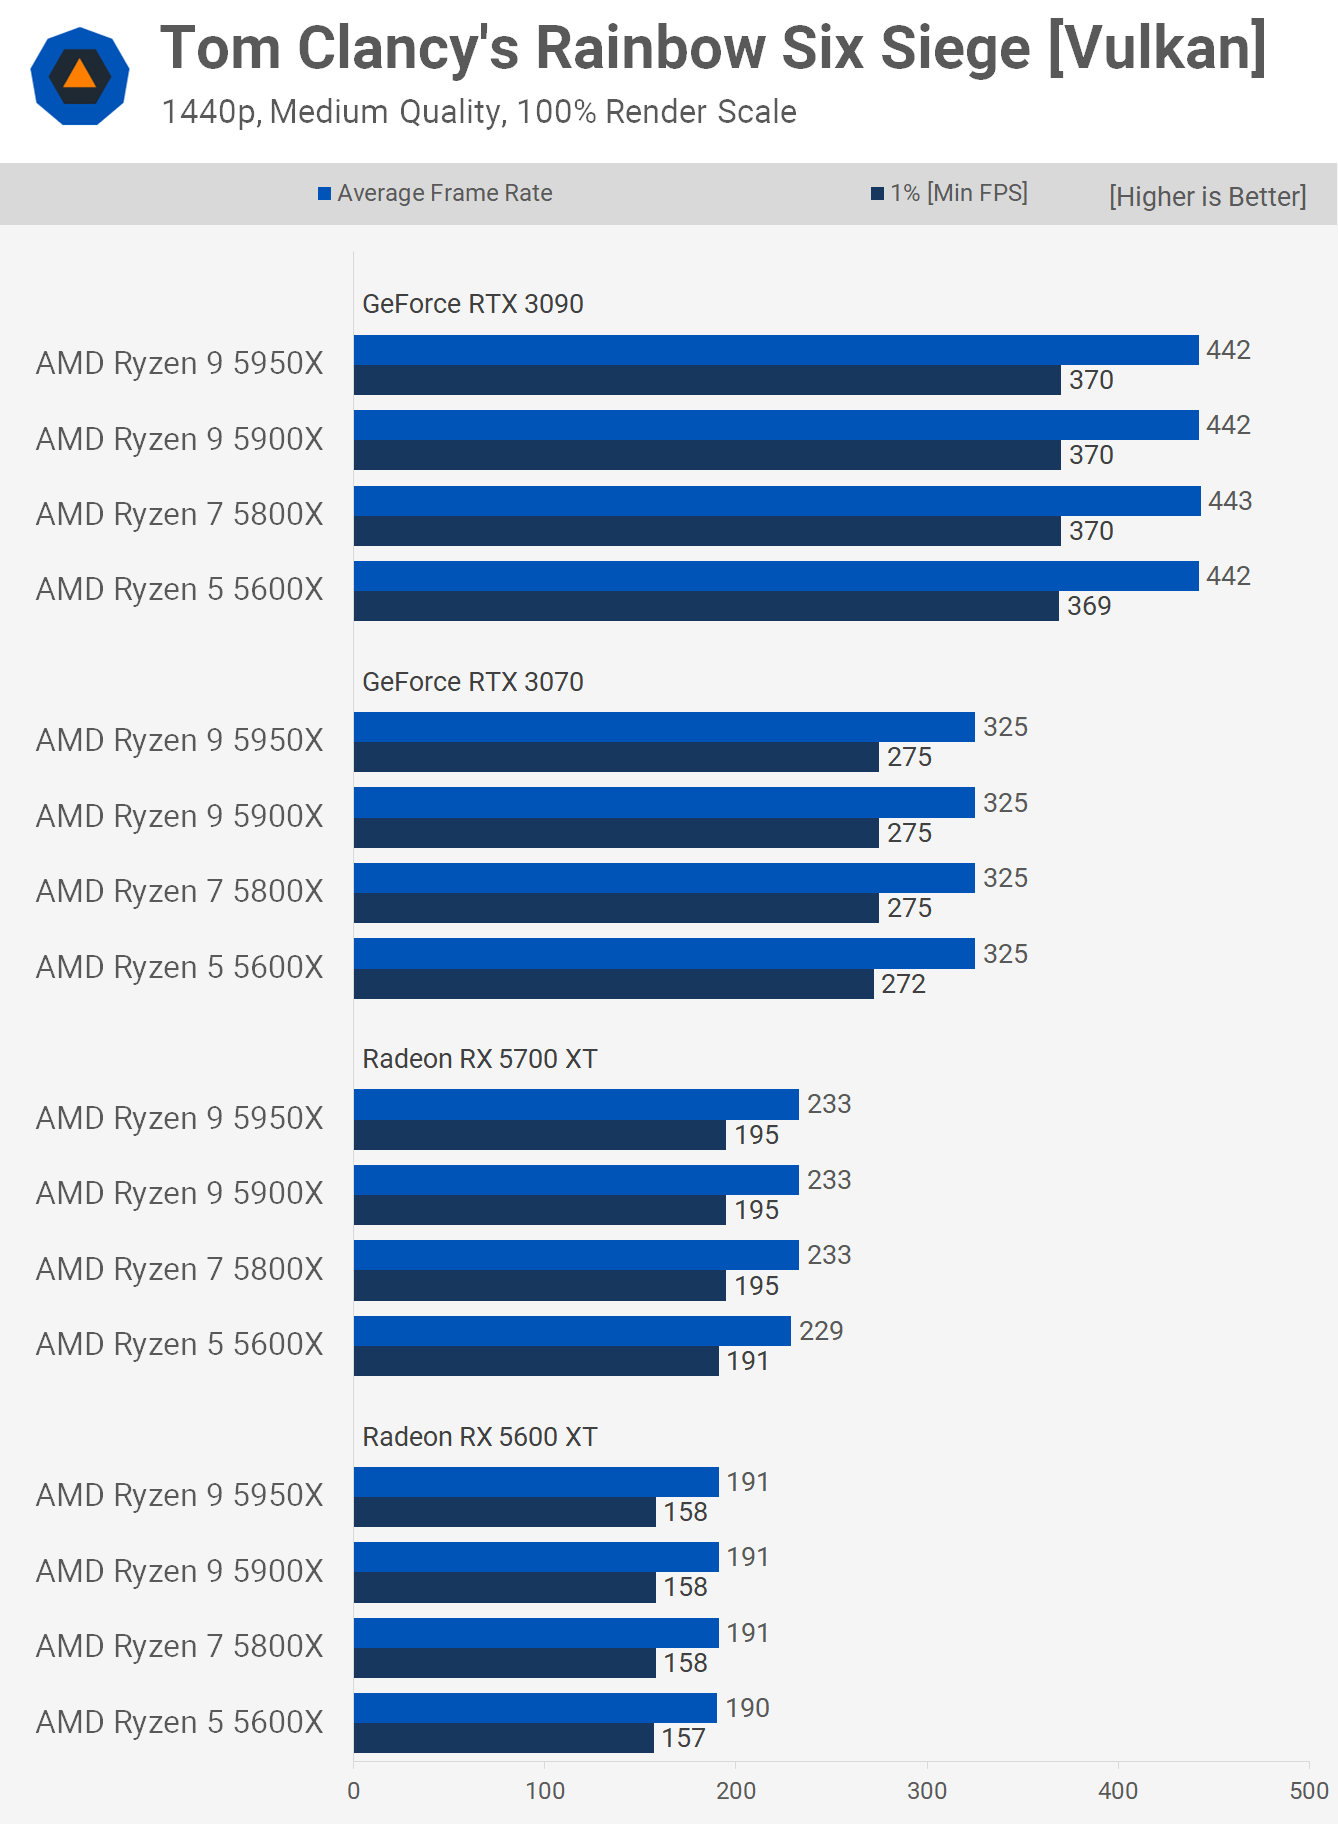
The same is true even with the medium quality preset, all four CPUs pushed the RTX 3090 to just over 440 fps on average, so again it really doesn't matter which of these CPUs you use for gaming with a title like Rainbow Six Siege, frame rate performance is going to be basically the same, if not the same.
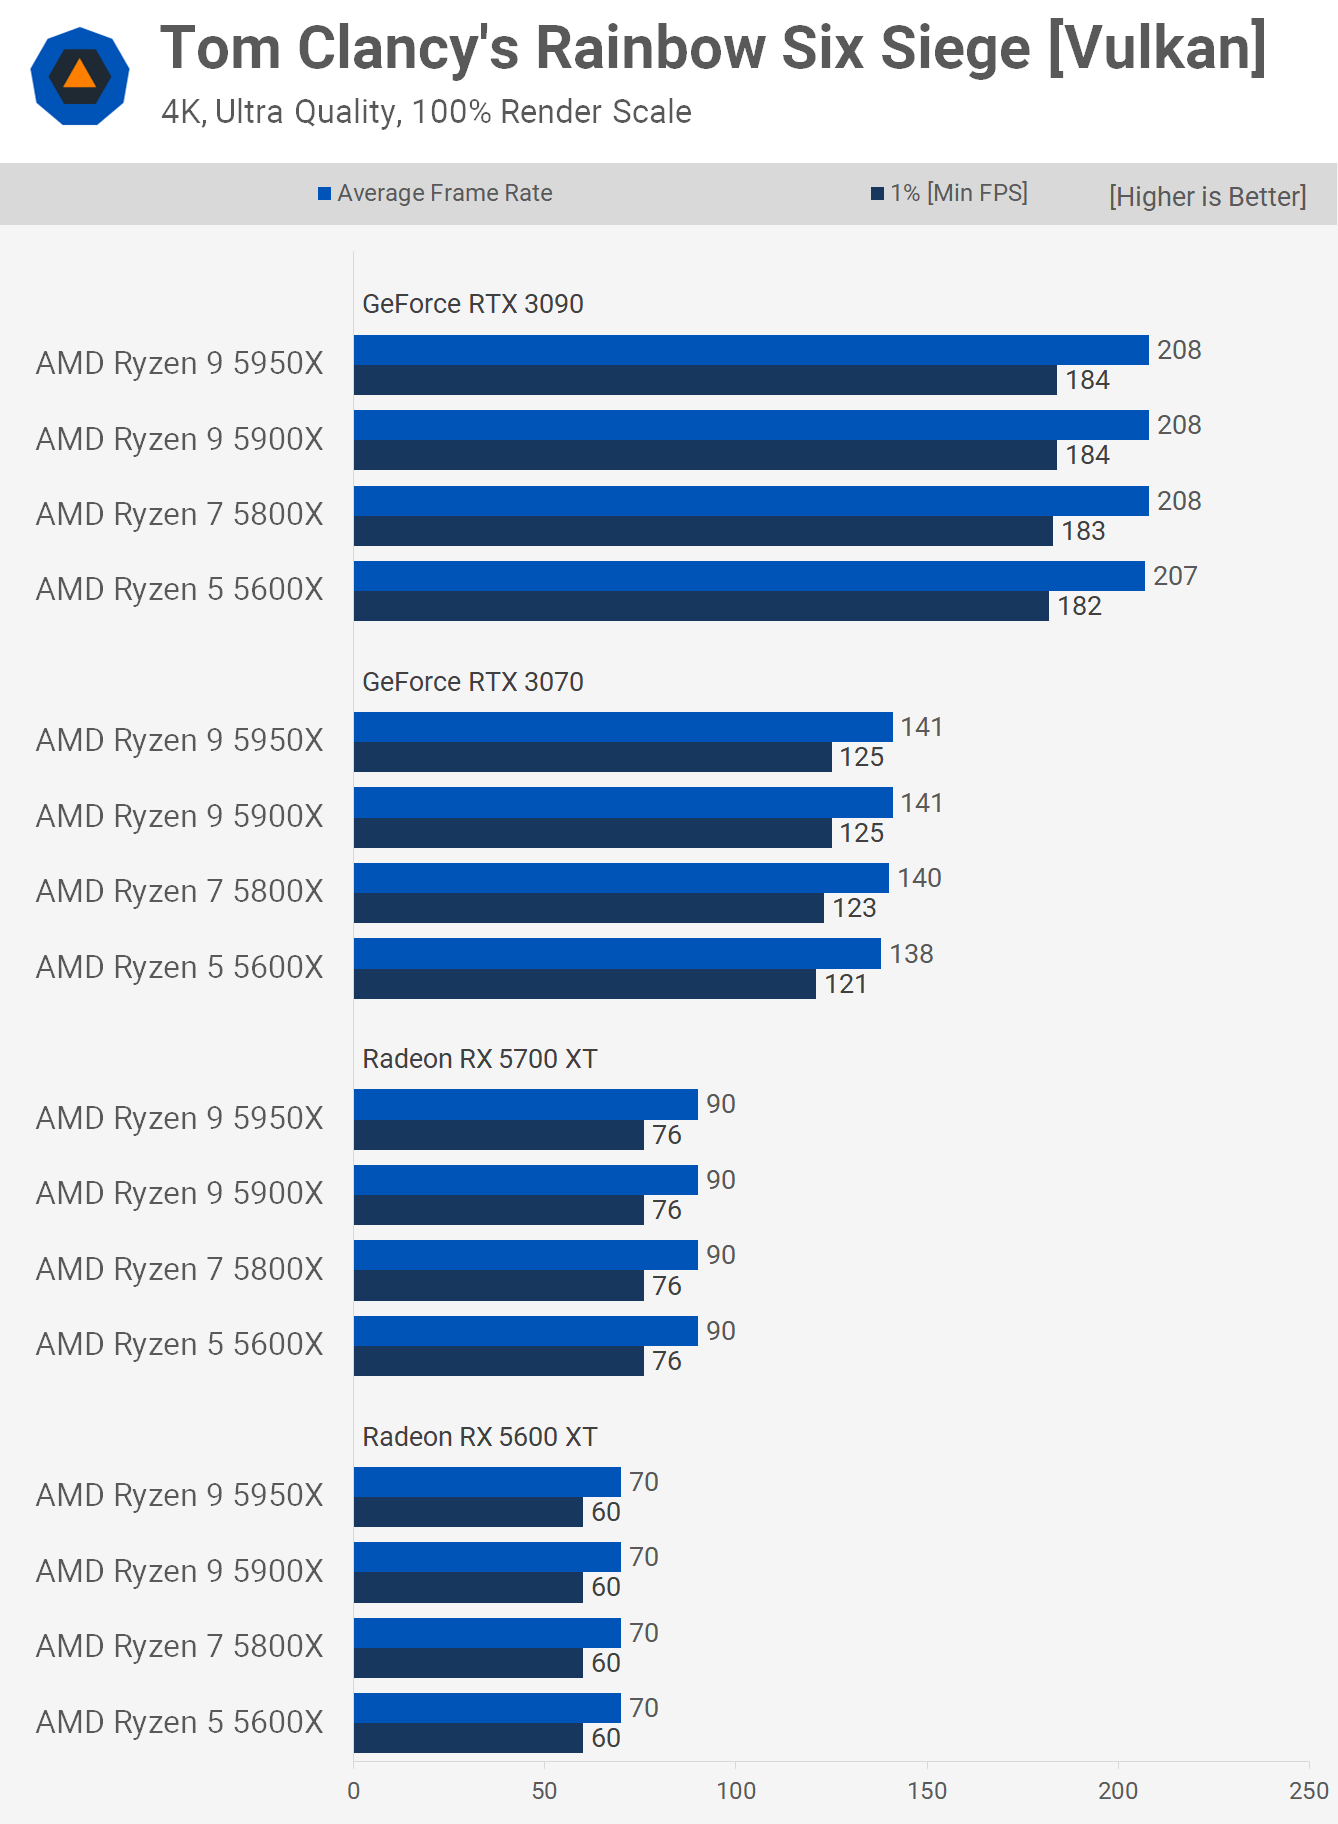
As expected there's no real difference in performance between the various Zen 3 CPUs at 4K, we're talking about a 3% variation in performance at most.
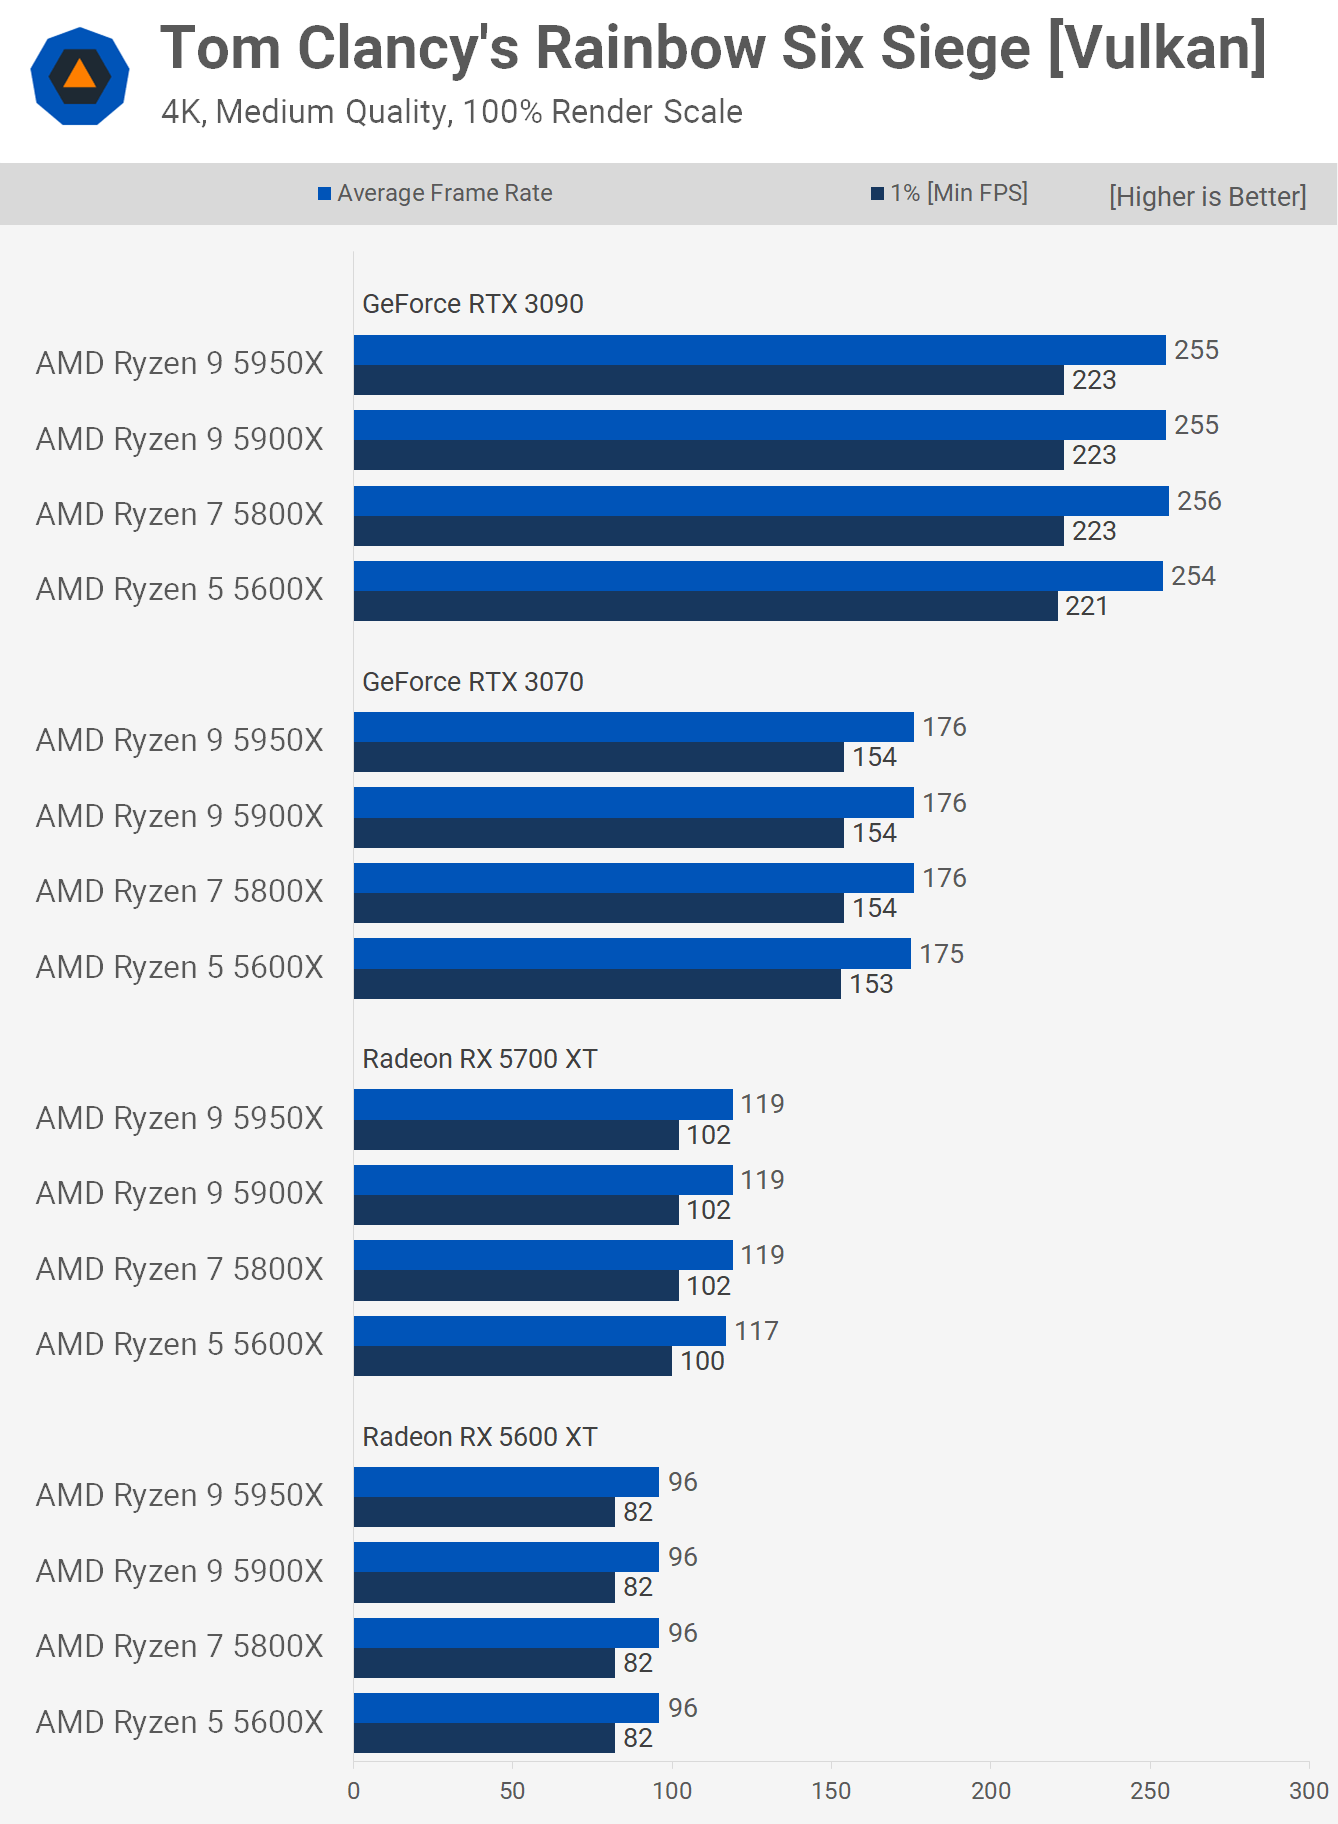
The same is true when using the medium quality preset at 4K, in fact we're seeing at most just a 2% variation in performance.
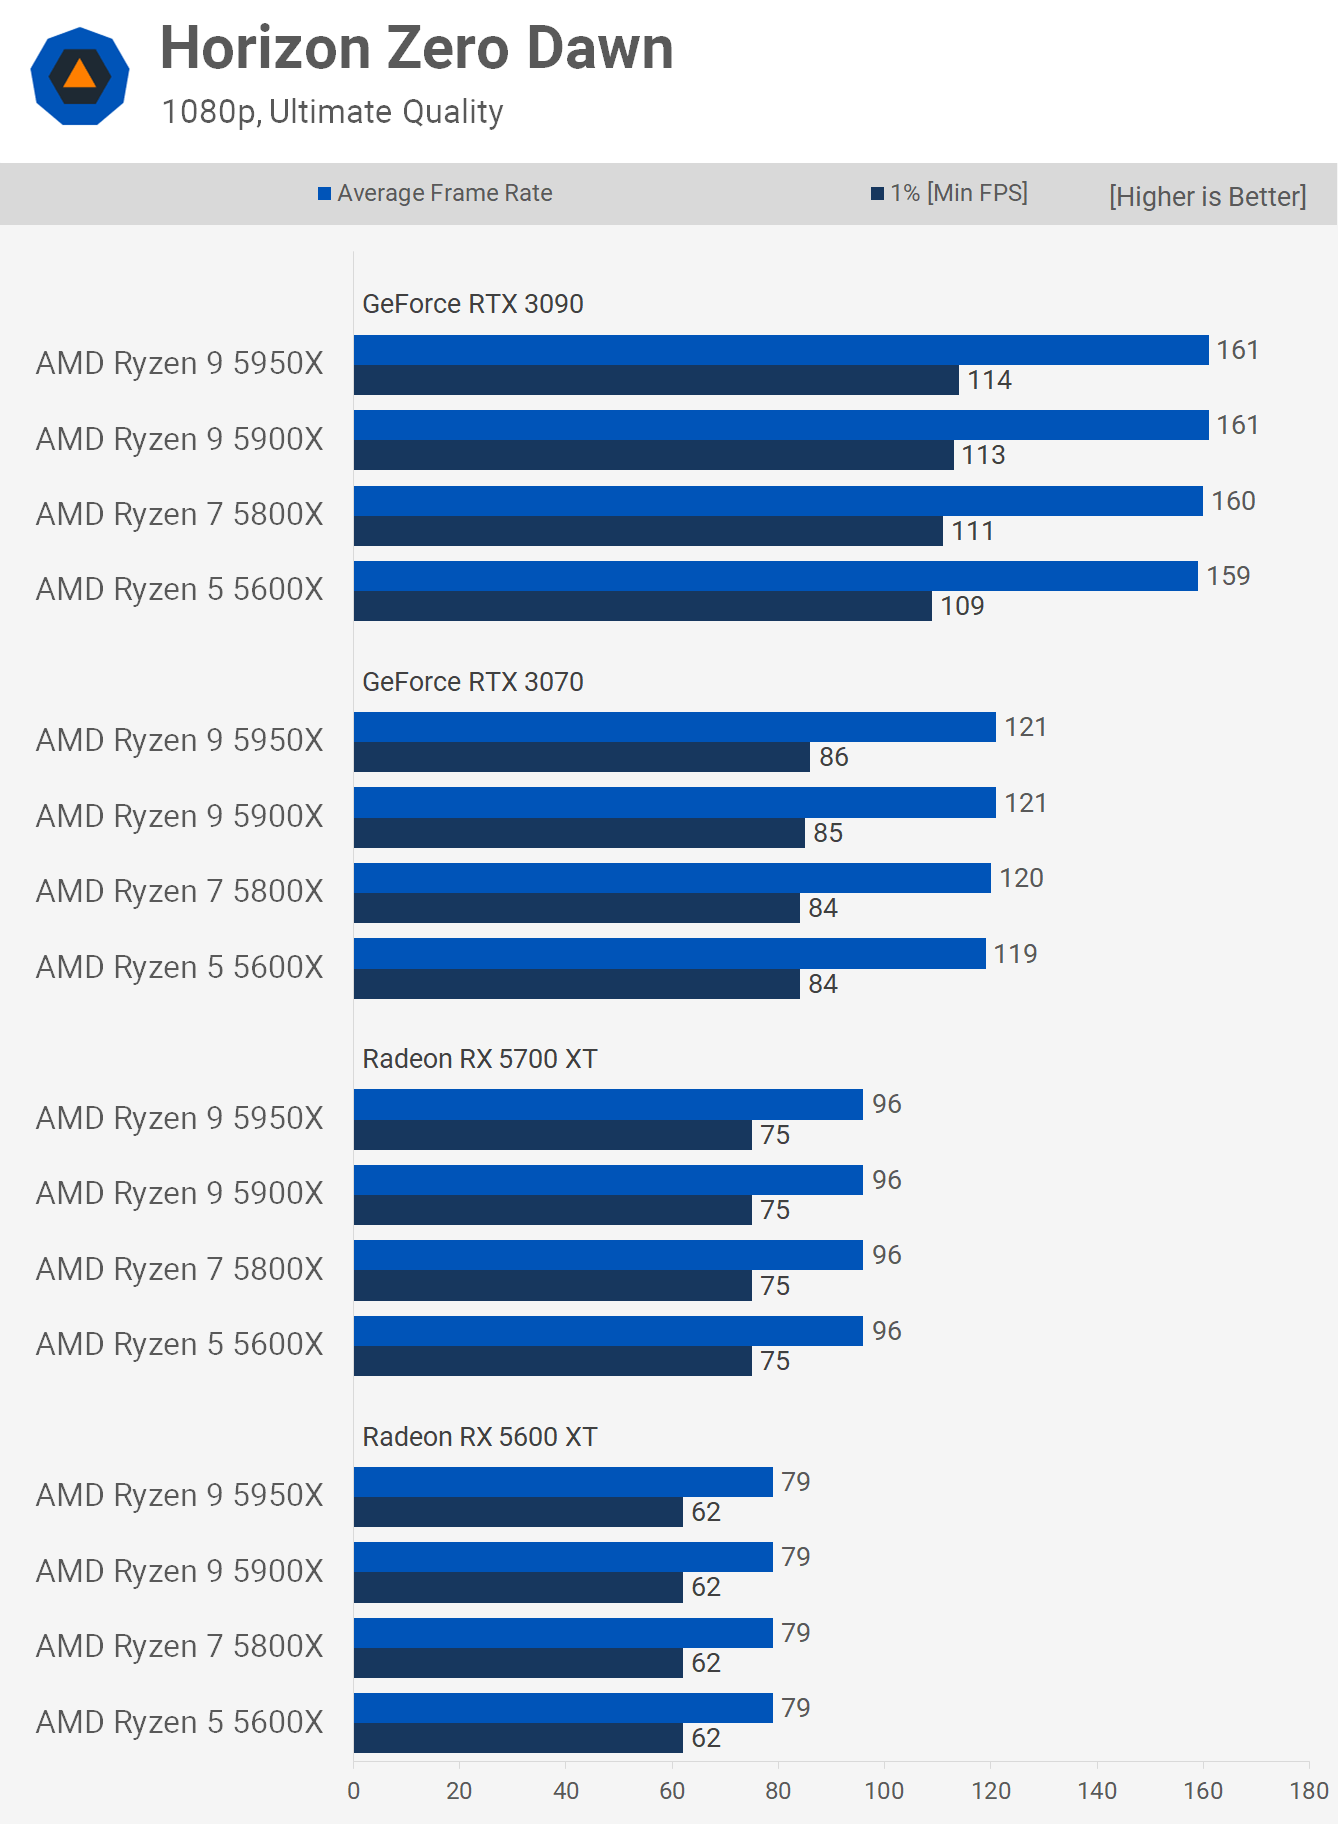
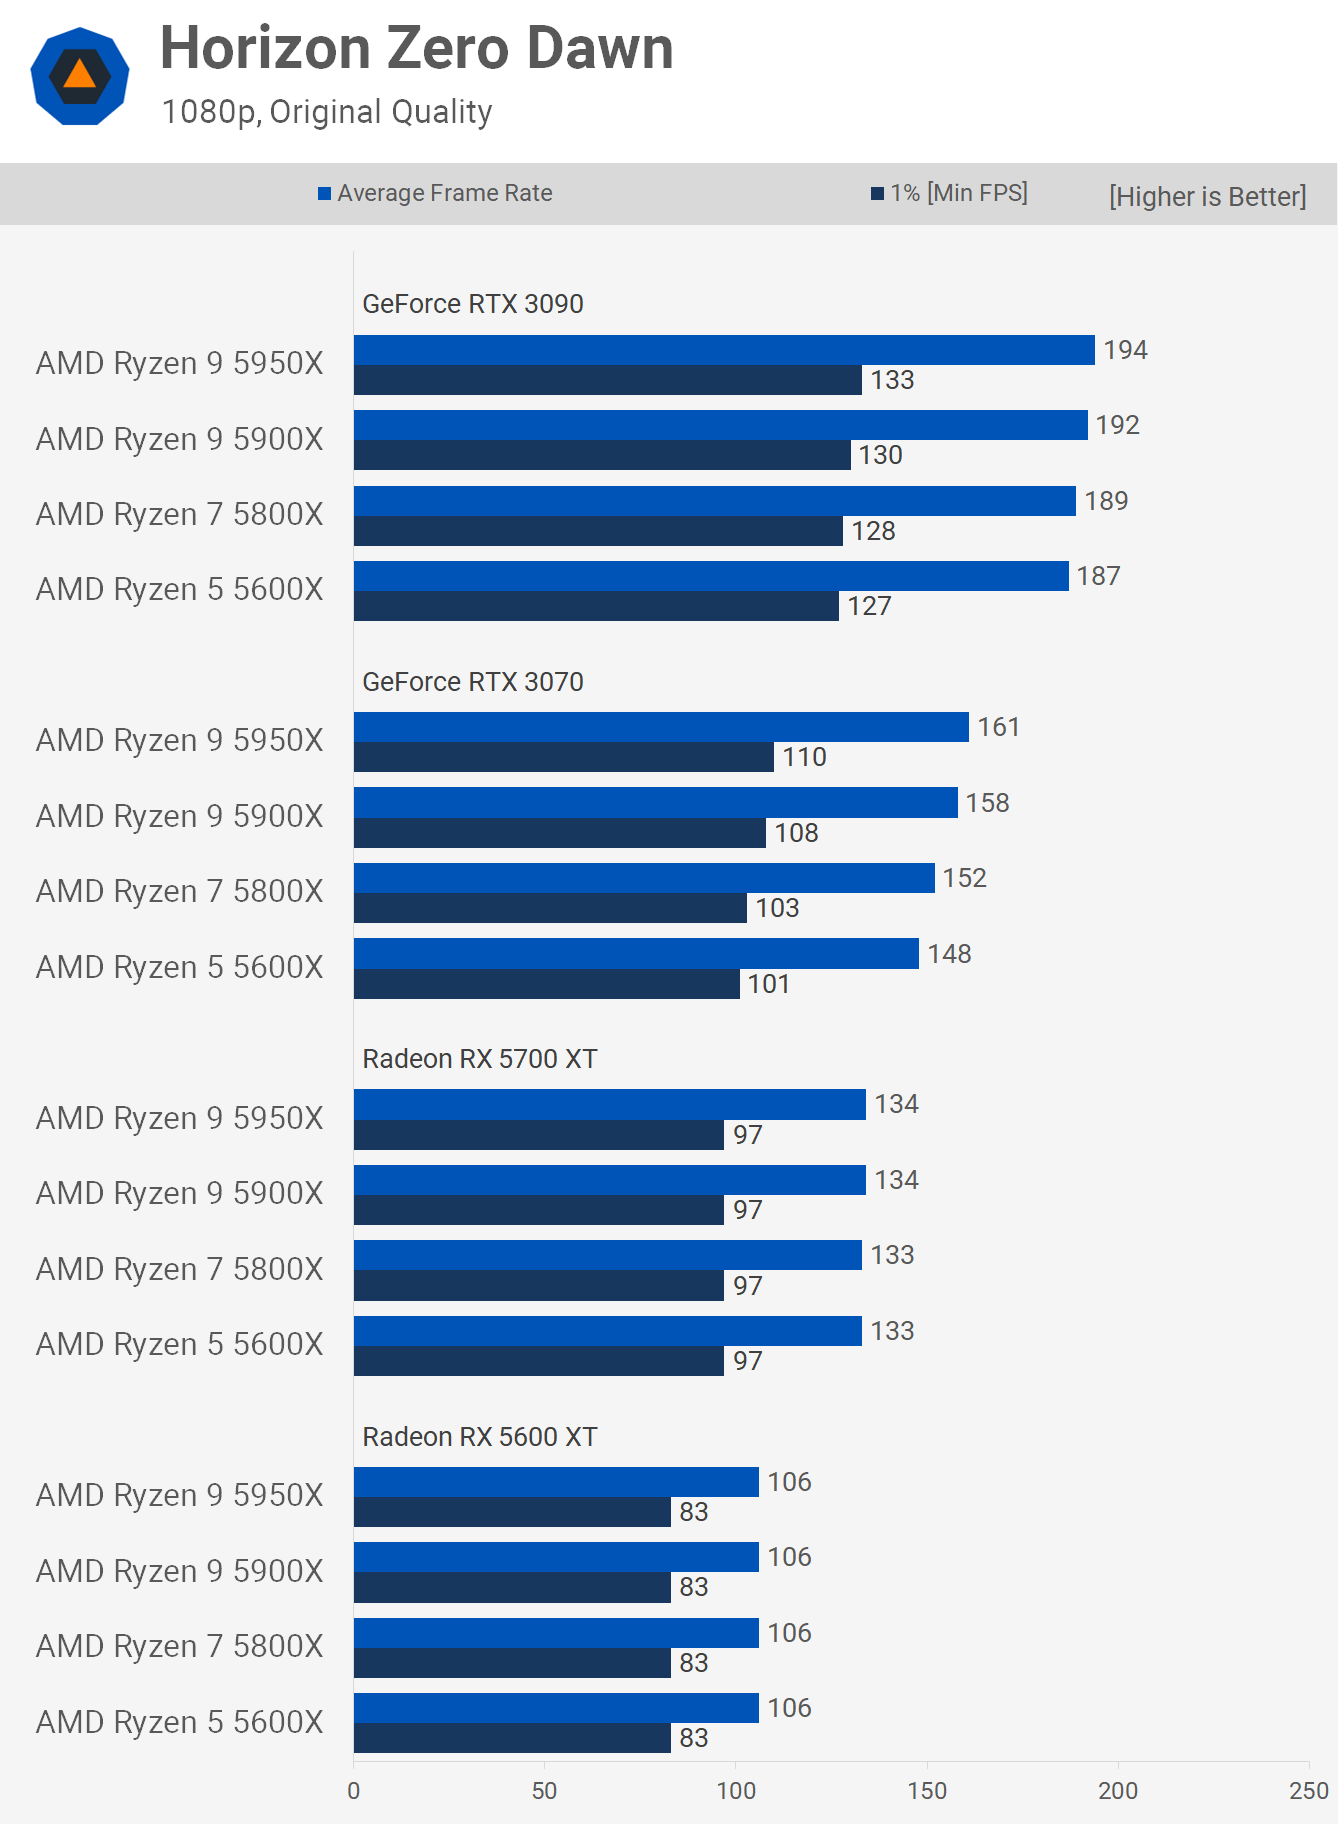
Horizon Zero Dawn isn't a very CPU demanding game and I've found in the past you'll be GPU limited even at 1080p with an RTX 3090 using any modern Intel or AMD CPU. That being the case you might think it's not a suitable game for this kind of test and while a case for that can certainly be made, I feel it's important to include new triple A titles that like most games, aren't limited by CPU performance, at least within reason. Here we're looking at no more than a 5% difference in performance between the lowest and fastest Zen 3 processor when looking at the 1% low performance with an RTX 3090.
Using lower quality settings, in this case the medium preset, we find that there is some variation in the results with the higher-end GeForce GPUs. That said we're still only talking about a 4-5% difference between the fastest and slowest Zen 3 CPUs. Then once we drop down to the 5700 XT the margins evaporate entirely.
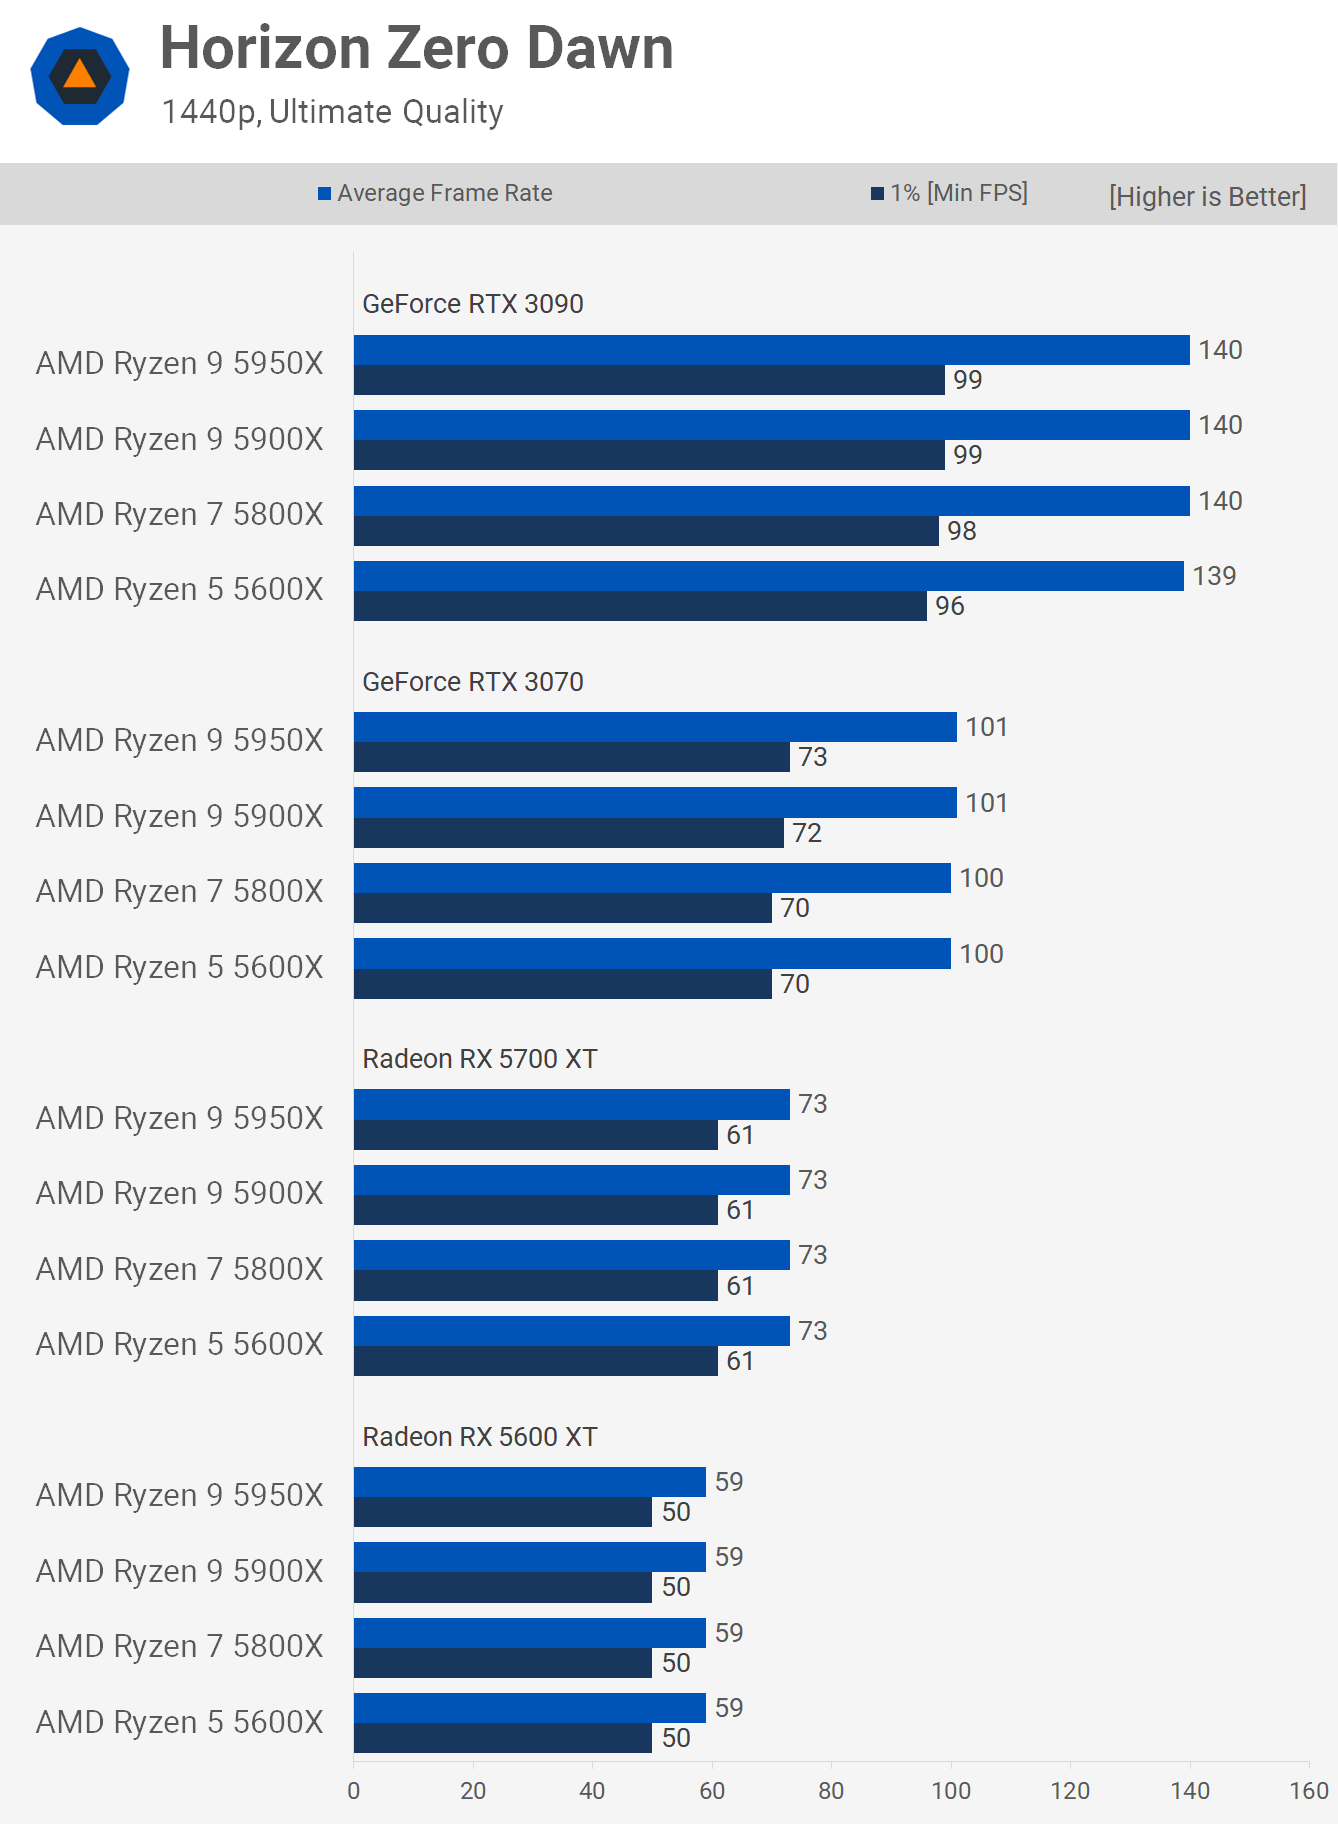
Jumping up to 1440p using the ultra or ultimate preset as it's called in the game we see virtually no difference between these CPUs, even with the RTX 3090.
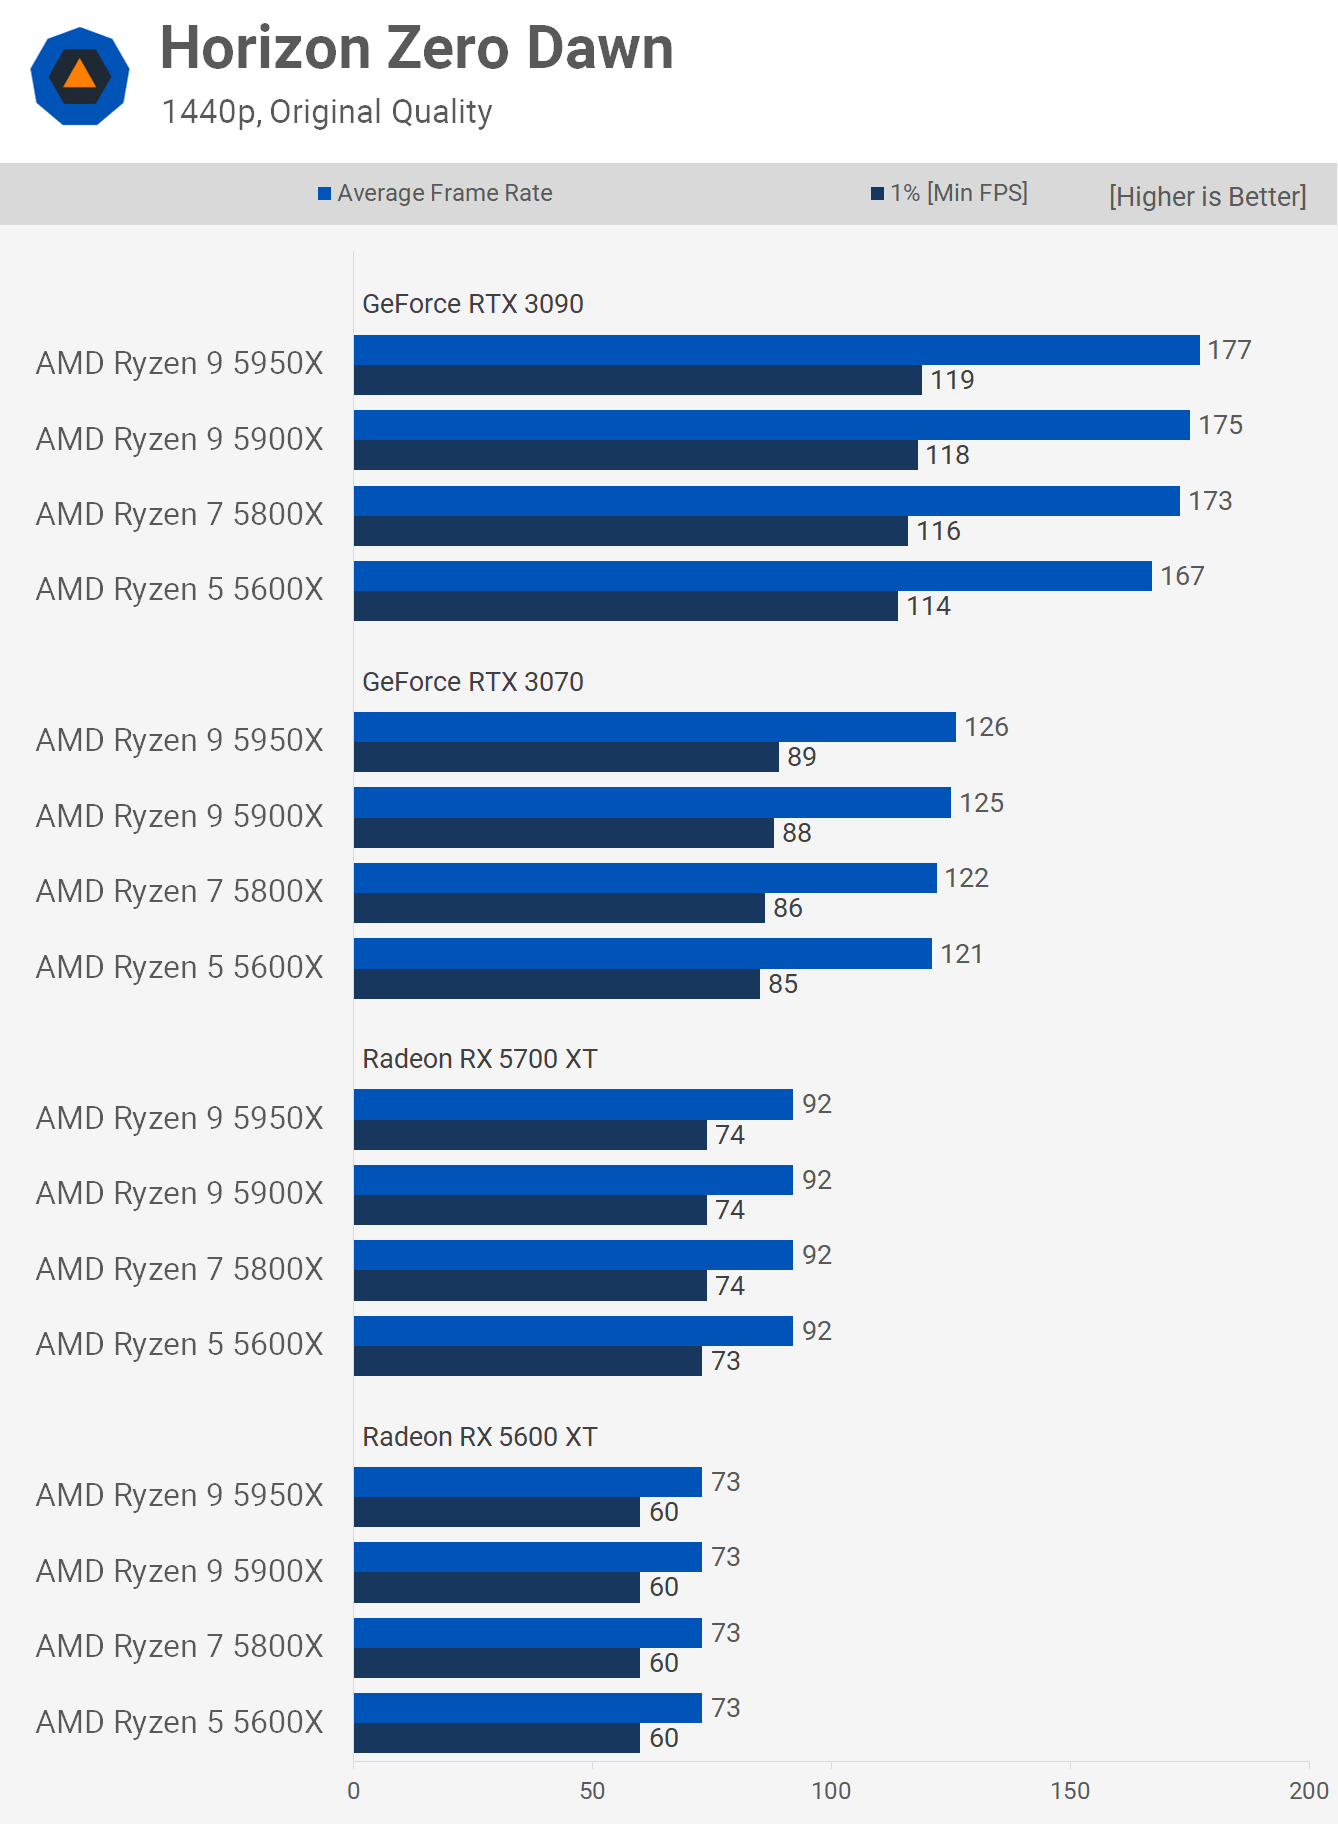
There is some difference at 1440p with the medium quality preset, but even with the RTX 3090 we're only talking about up to a 6% margin between the 5600X and 5950X.
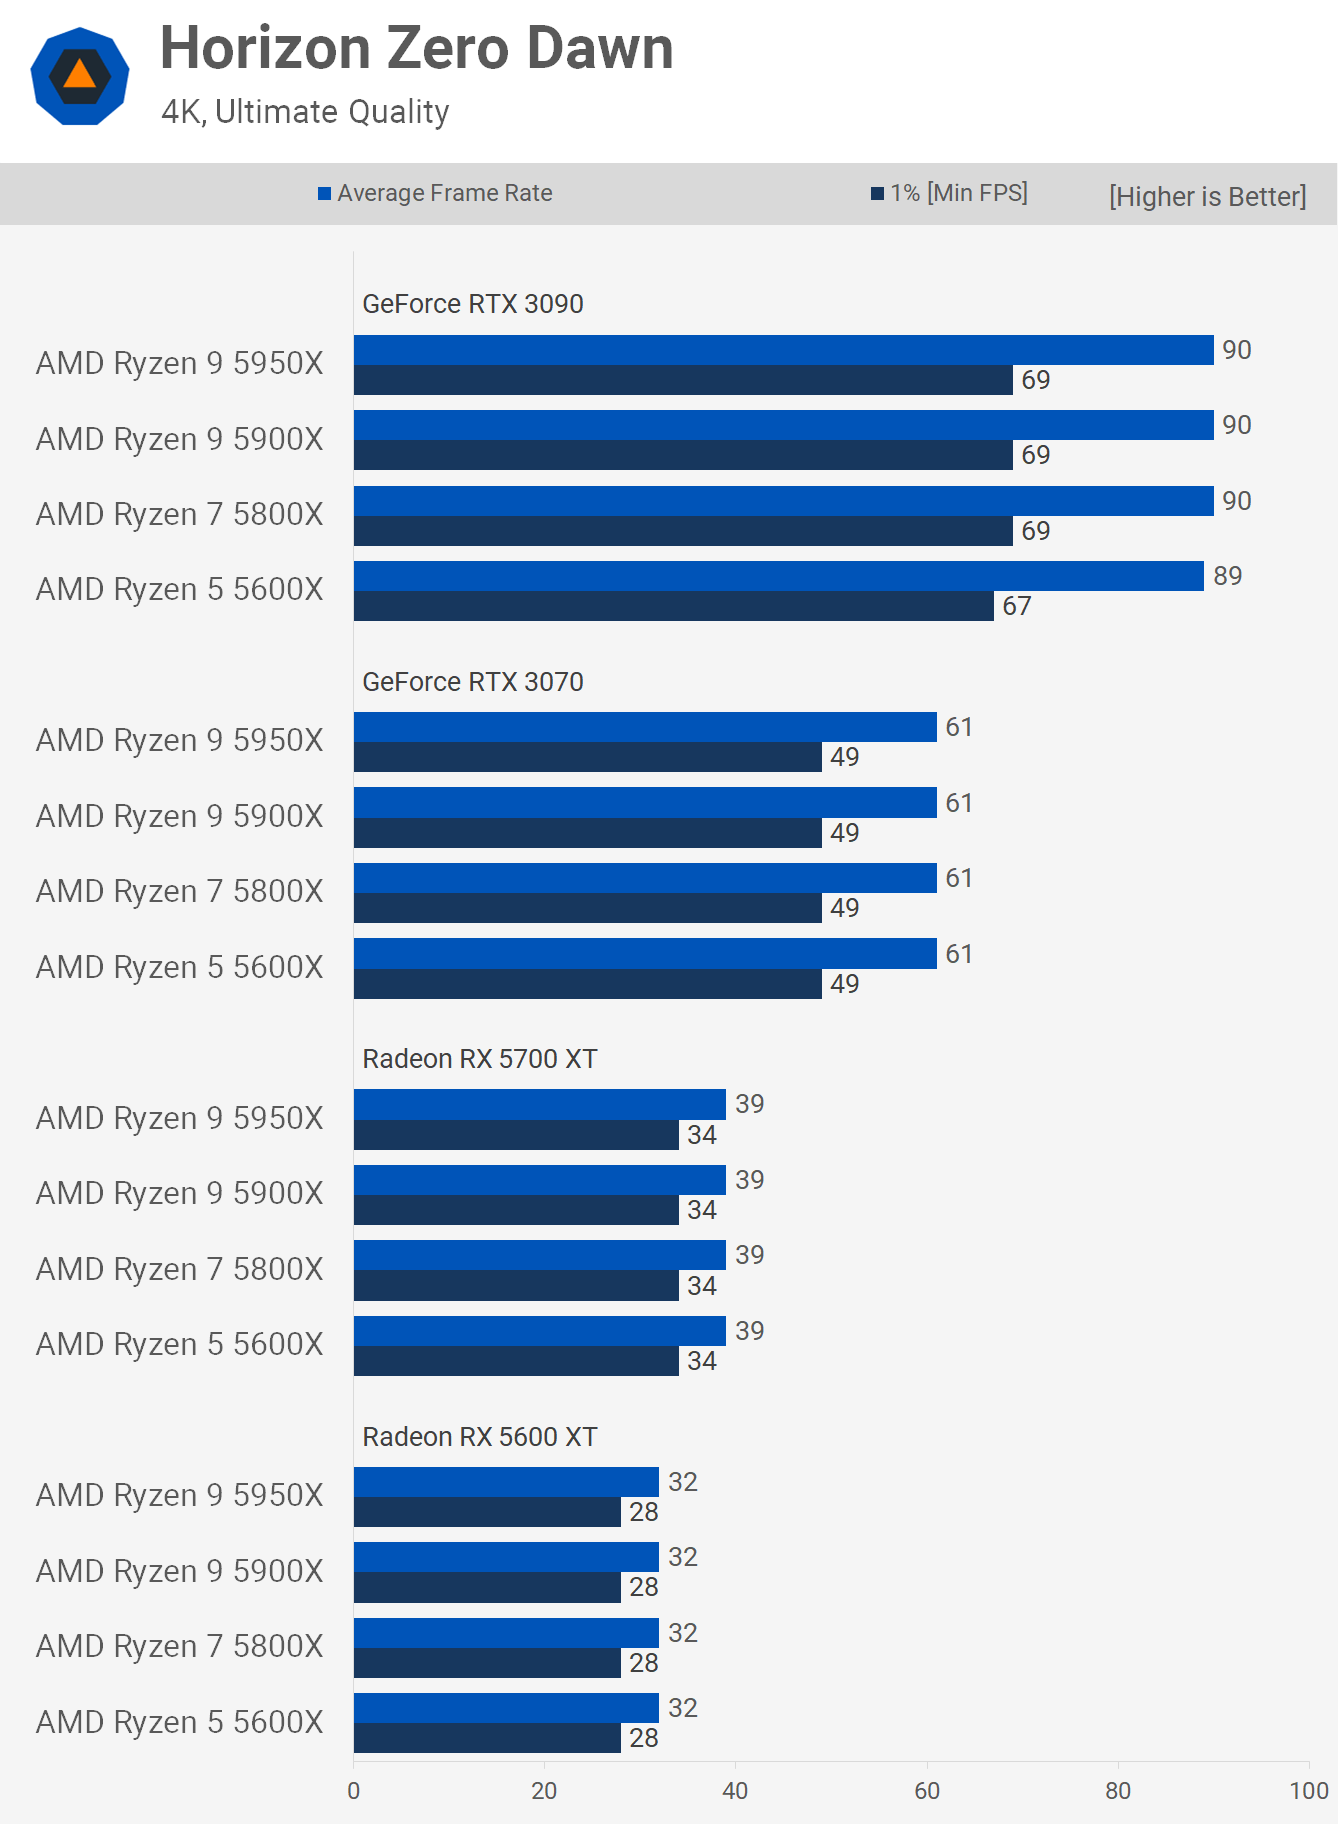
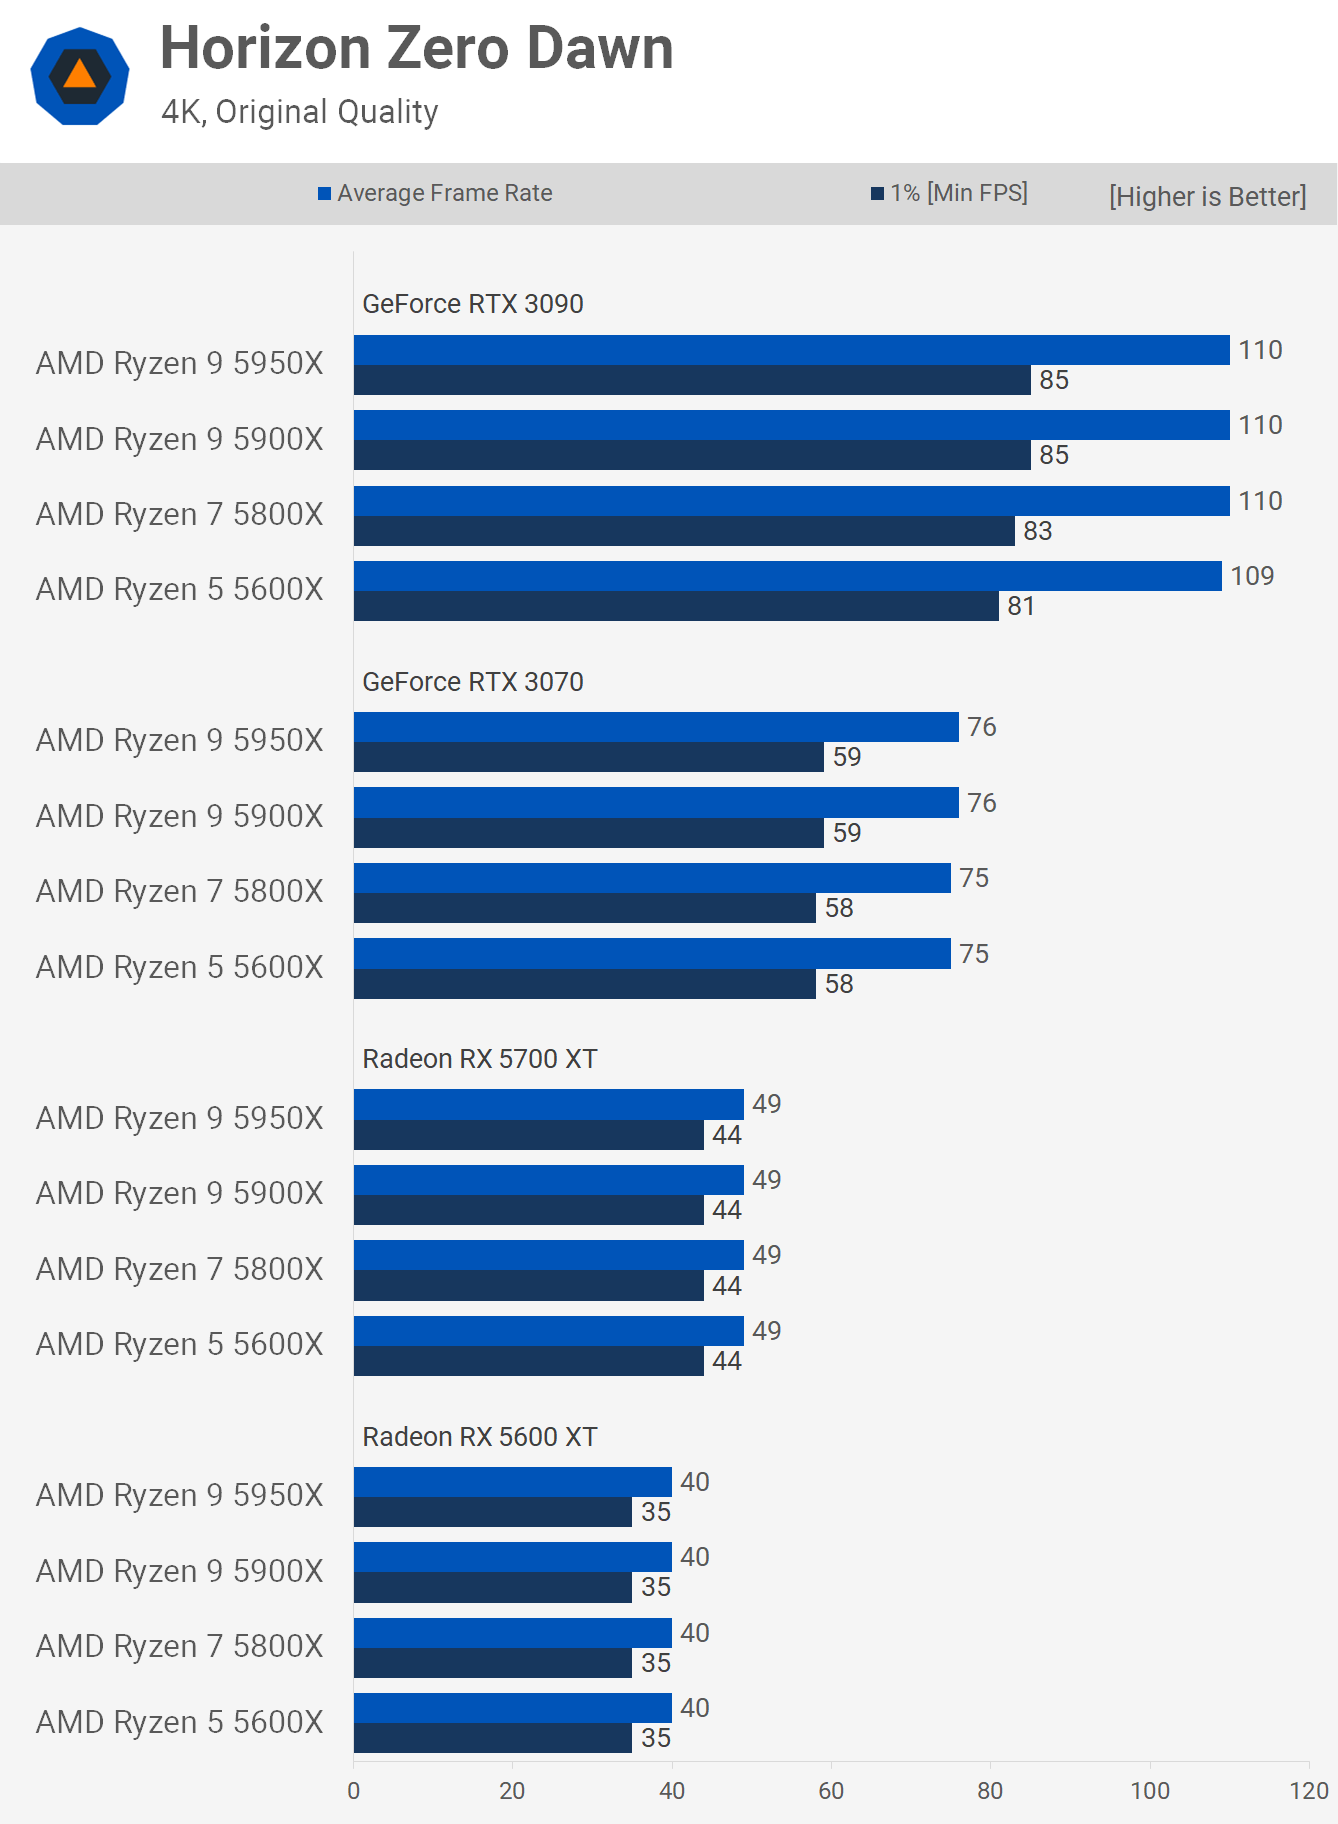
Naturally at 4K there's nothing to speak of in the way of performance margins, all four CPUs delivered the same or virtually the same performance with all four GPUs.
The same was also true using the medium quality preset, there is some small variation with the RTX 3090, but really nothing worth talking about.
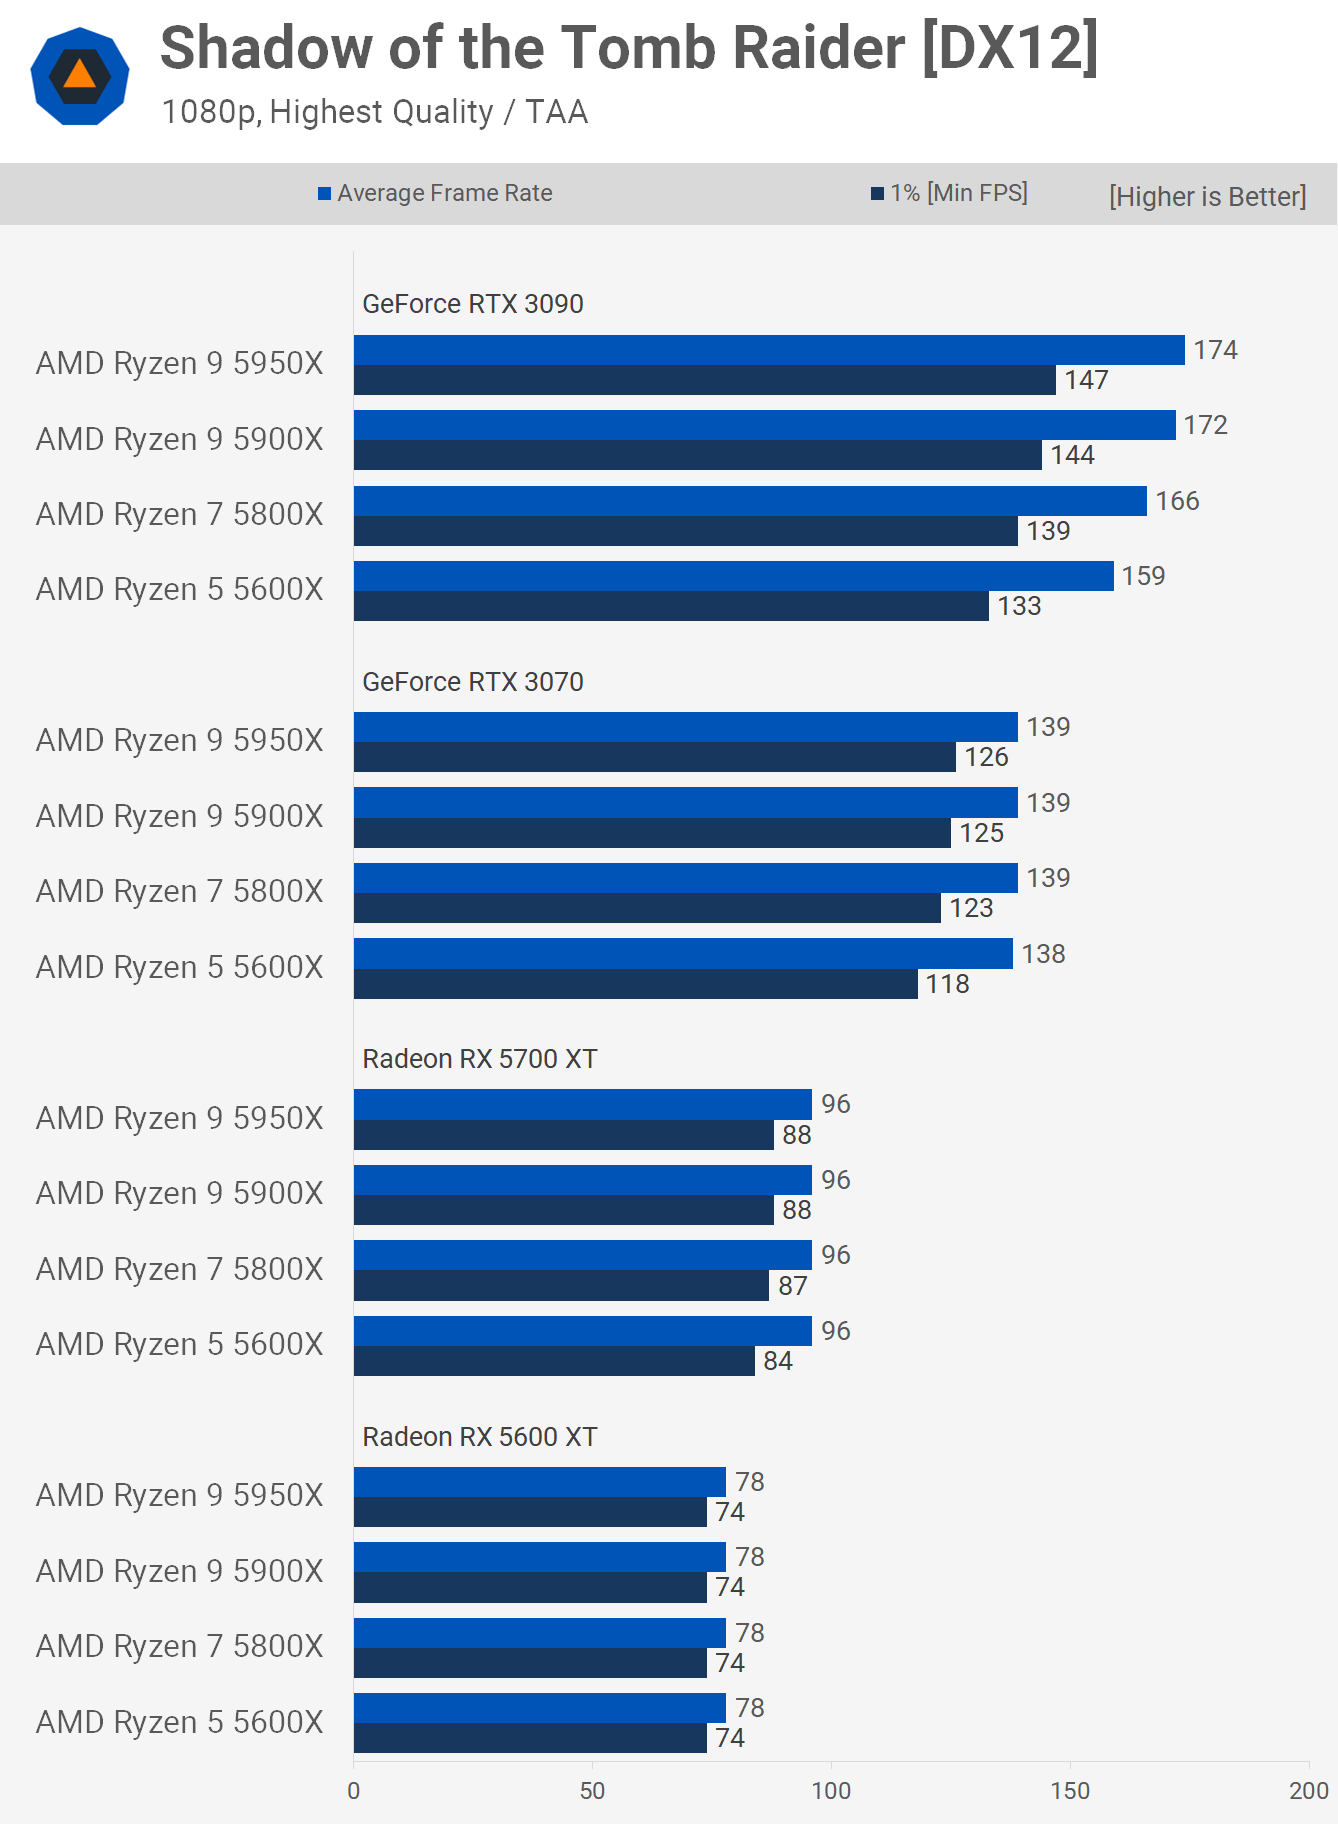
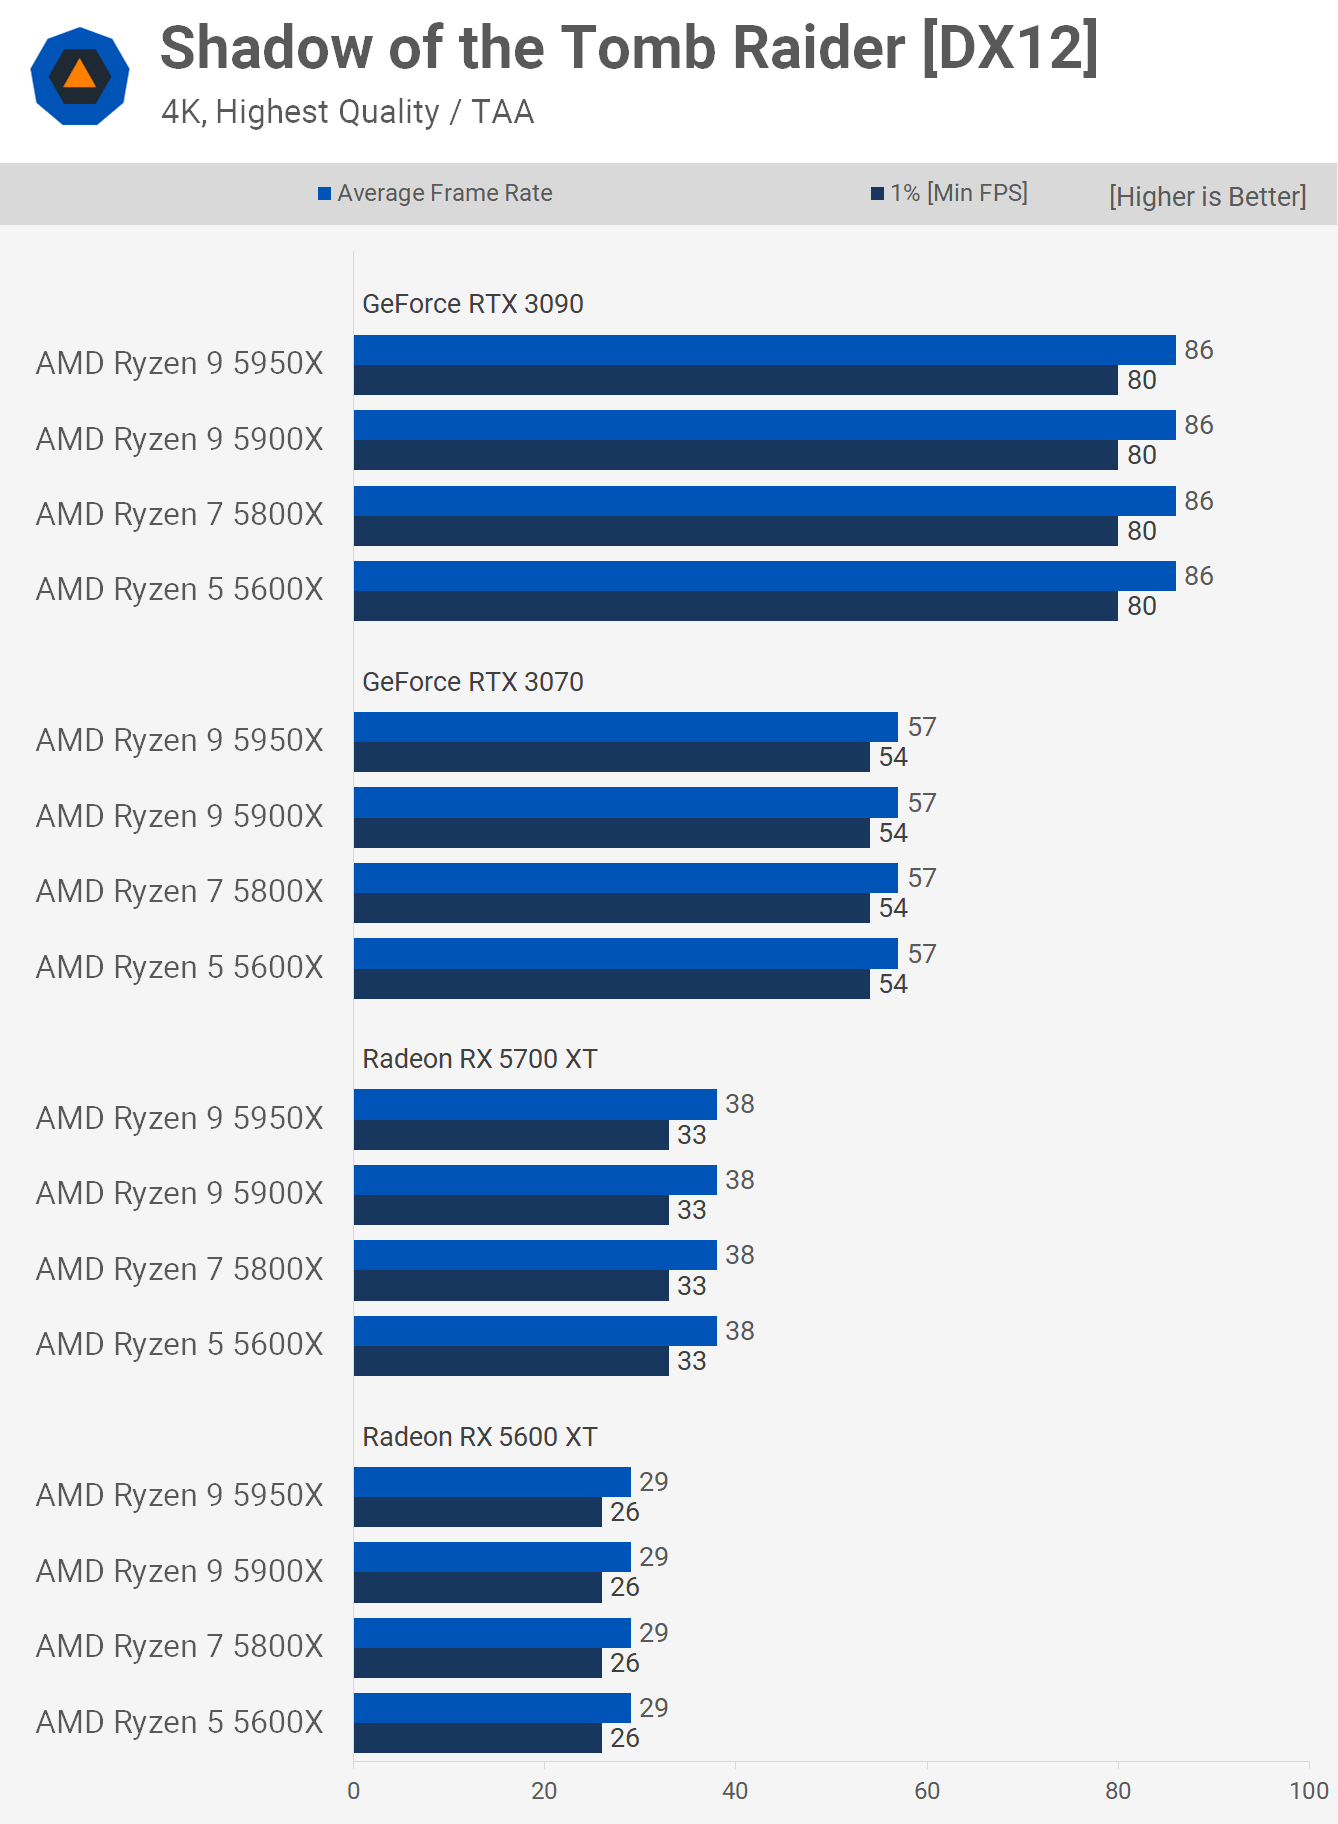
SoTR is a very CPU demanding title, much more so than most games. Tomb Raider heavily utilizes the CPU and not just one or two cores, but can spread the load quite evenly across many cores. The game plays just fine with the 5600X, but in some more extreme instances it does leave performance on the table, like what we're seeing here at 1080p with the RTX 3090. The 5950X was up to 11% faster than the 5600X when comparing 1% low performance with the RTX 3090 and 7% with the RTX 3070, in fact we're even seeing a 5% increase in 1% low performance with the 5700 XT.
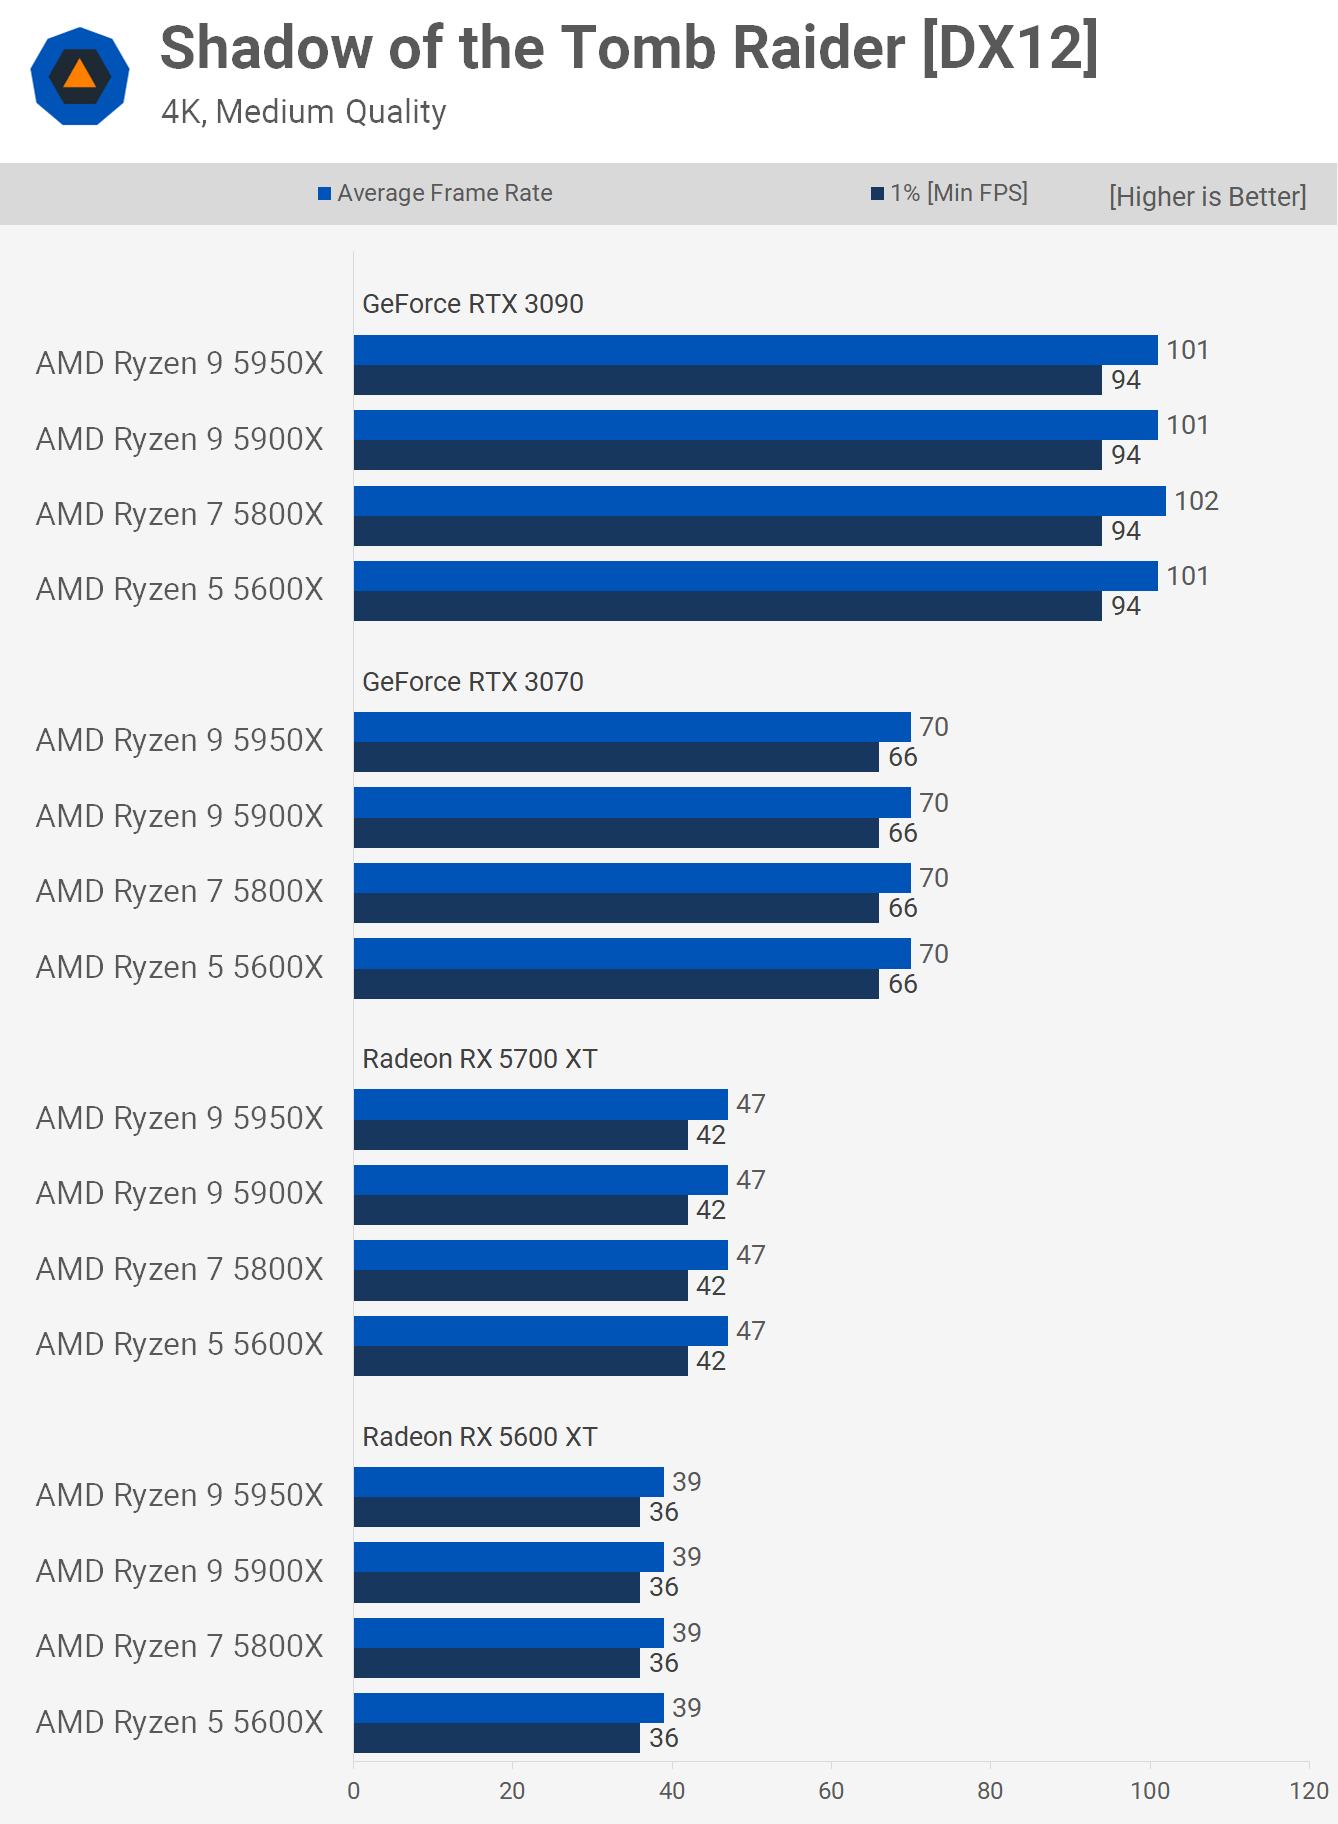
The margins grow quite considerably when lowering the visual quality settings to medium as the 5950X is up to 18% faster than the 5600X and quite interestingly that was seen with the RTX 3070, though we're only talking about a 7% difference when comparing the average frame rate. It's worth noting that once we dropped down to the 5700 XT that all four Zen 3 processors delivered the same level of performance.
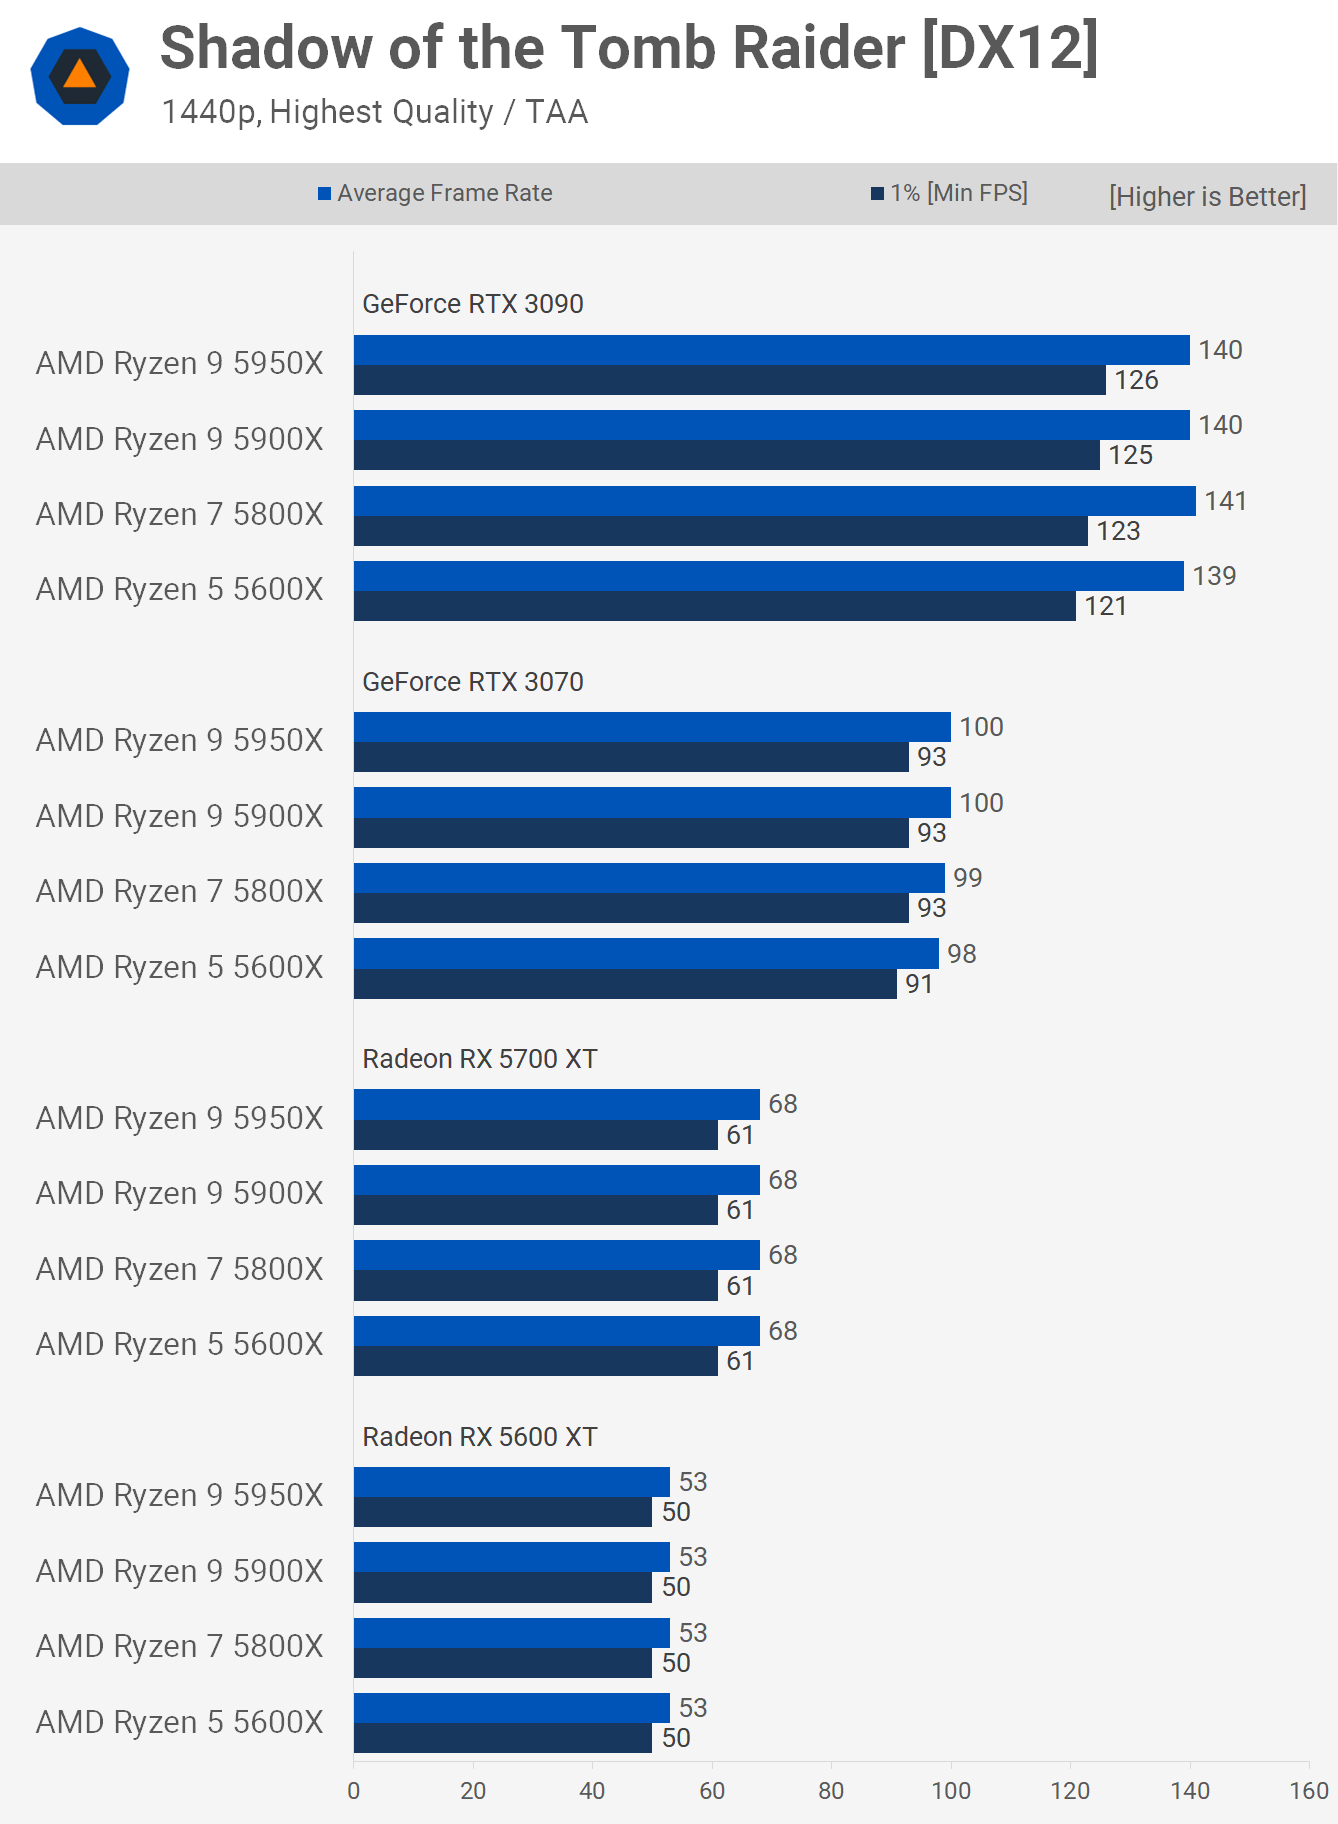
Increasing the resolution to 1440p virtually eliminates the performance differences seen previously as we're looking at no more than a 4% margin between the fastest and slowest CPUs tested. That was of course seen with the RTX 3090, once we drop down to the RTX 3070 that margin is reduced even further to just 2%.
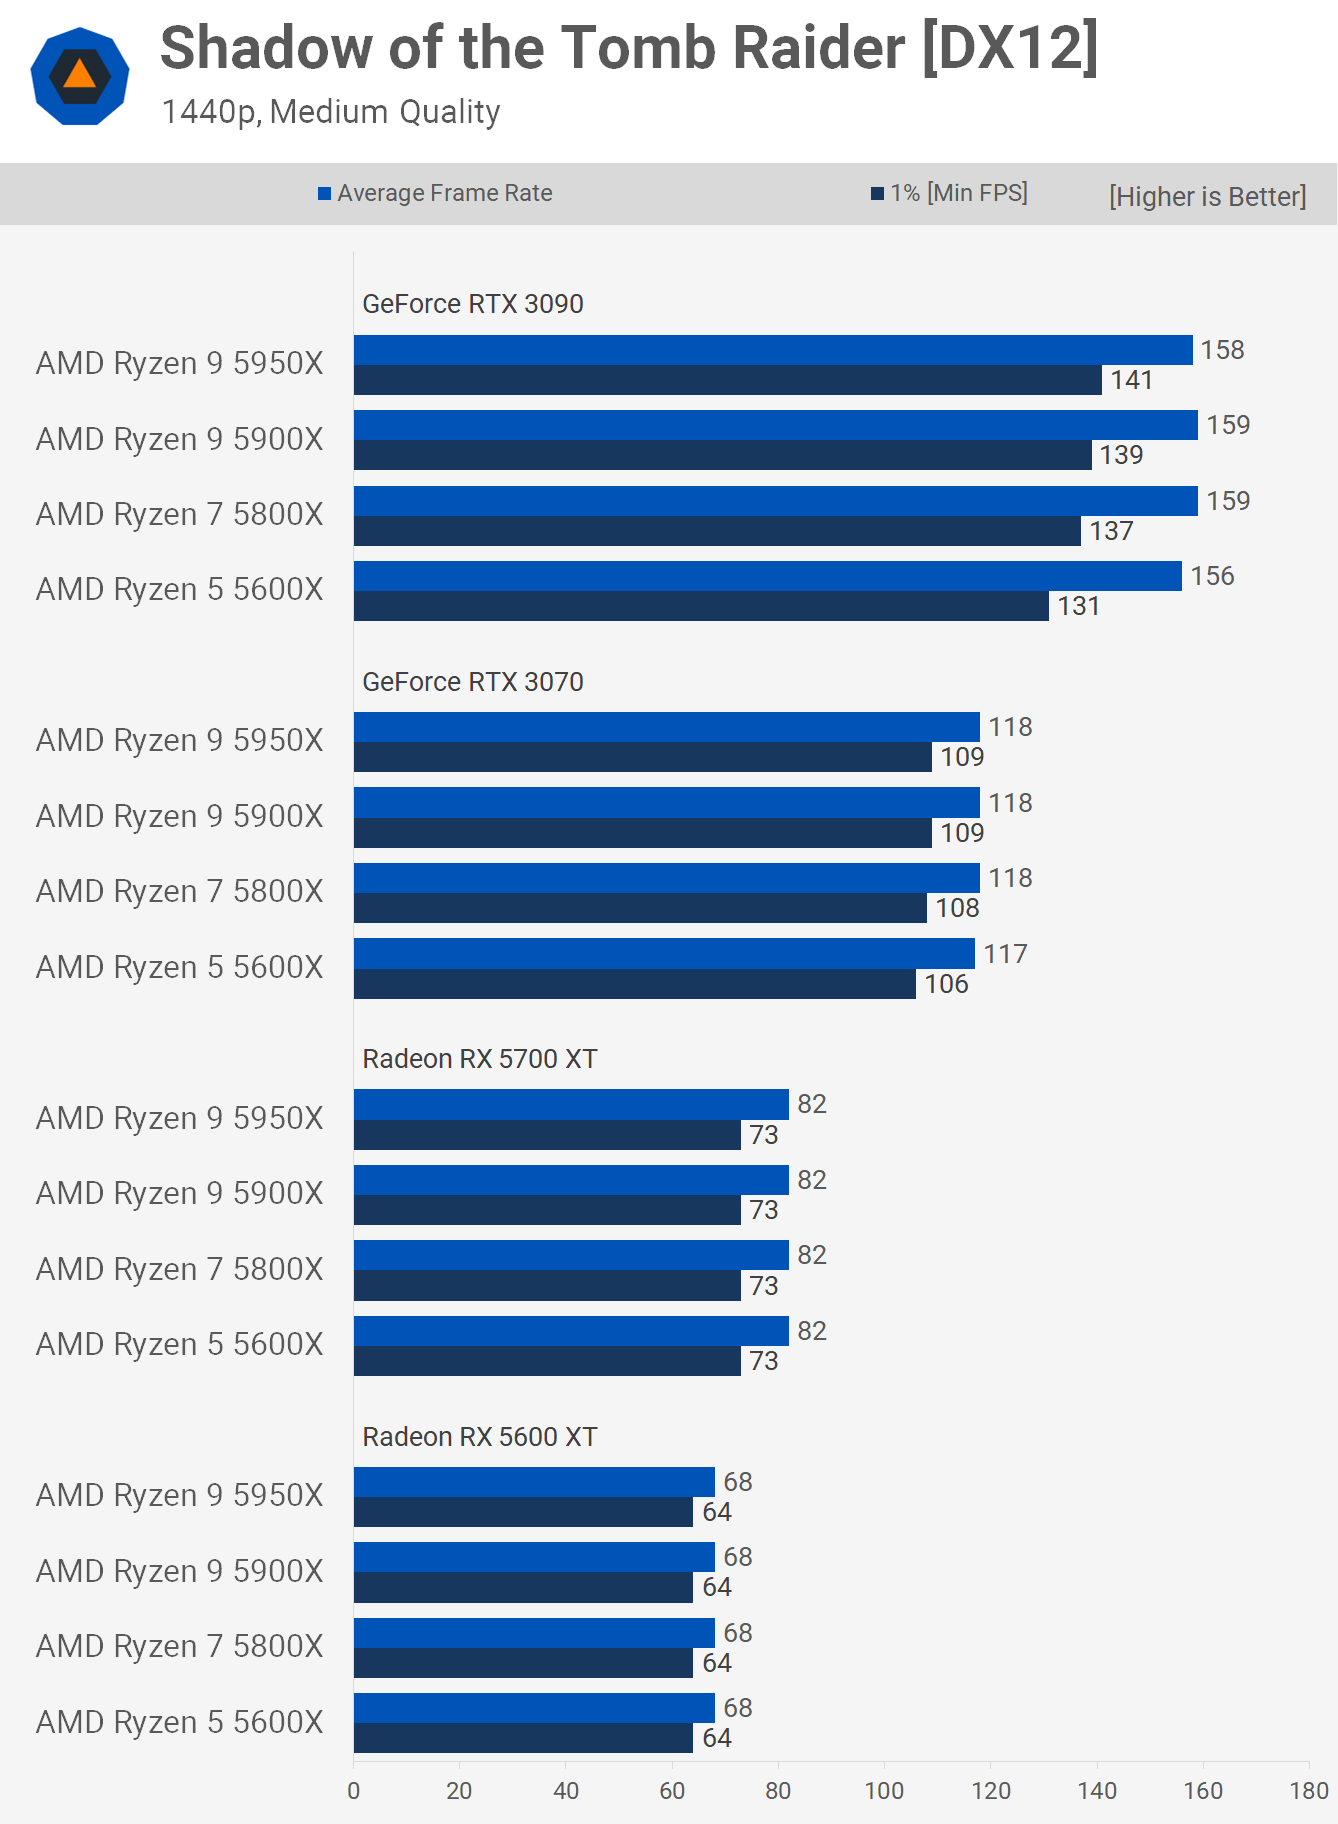
Using the medium quality preset at 1440p we see a small uptick in 1% low performance with the RTX 3090 as we increase the CPU core count, but even then we're only talking about an 8% improvement when going from the 5600X to the 5950X. Then with the RTX 3070 no real performance difference is seen.
As we've found previously the 4K resolution is just too extreme even for the RTX 3090 and as a result here we're heavily GPU bound, leaving no room for the CPU to influence performance by even a few frames.
The same is also true at 4K when using the medium quality preset, despite pushing over 100 fps on average, performance is virtually identical across the board.
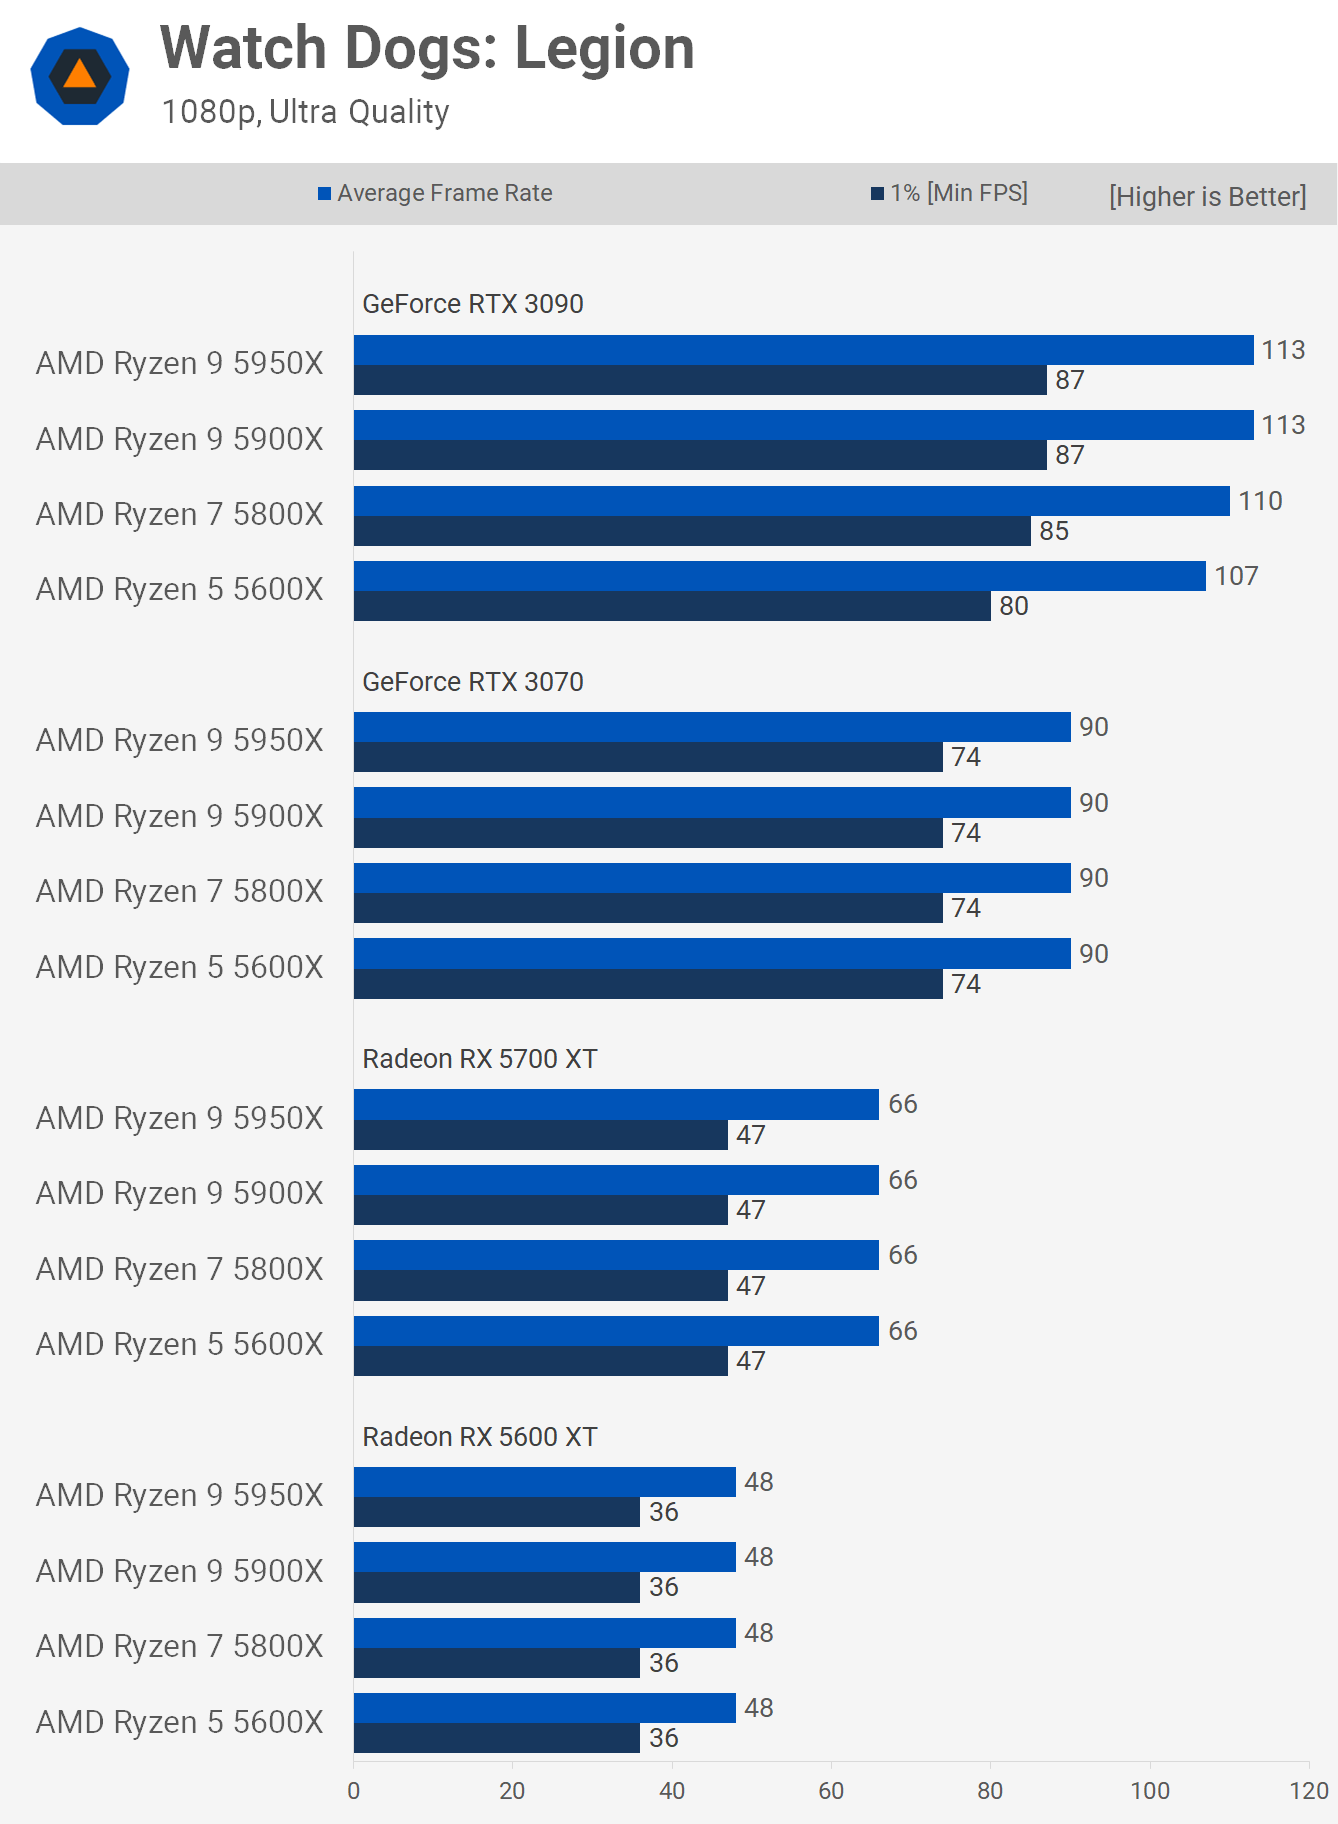
Moving on to Watch Dogs Legion and this is another new triple A title that's a lot like Horizon Zero Dawn in the sense that it's not very CPU demanding, again assuming you have a reasonably modern CPU. Testing at 1080p with the ultra quality settings shows very little difference in performance between the various Zen 3 processors. In fact even with the RTX 3090 we're only looking at a 9% performance uplift for the 1% low performance when going from the 5600X up to the 5950X. Given the 5950X clocks around 7% higher and packs more than twice as many cores, I'd say that's a very mild performance gain indeed.
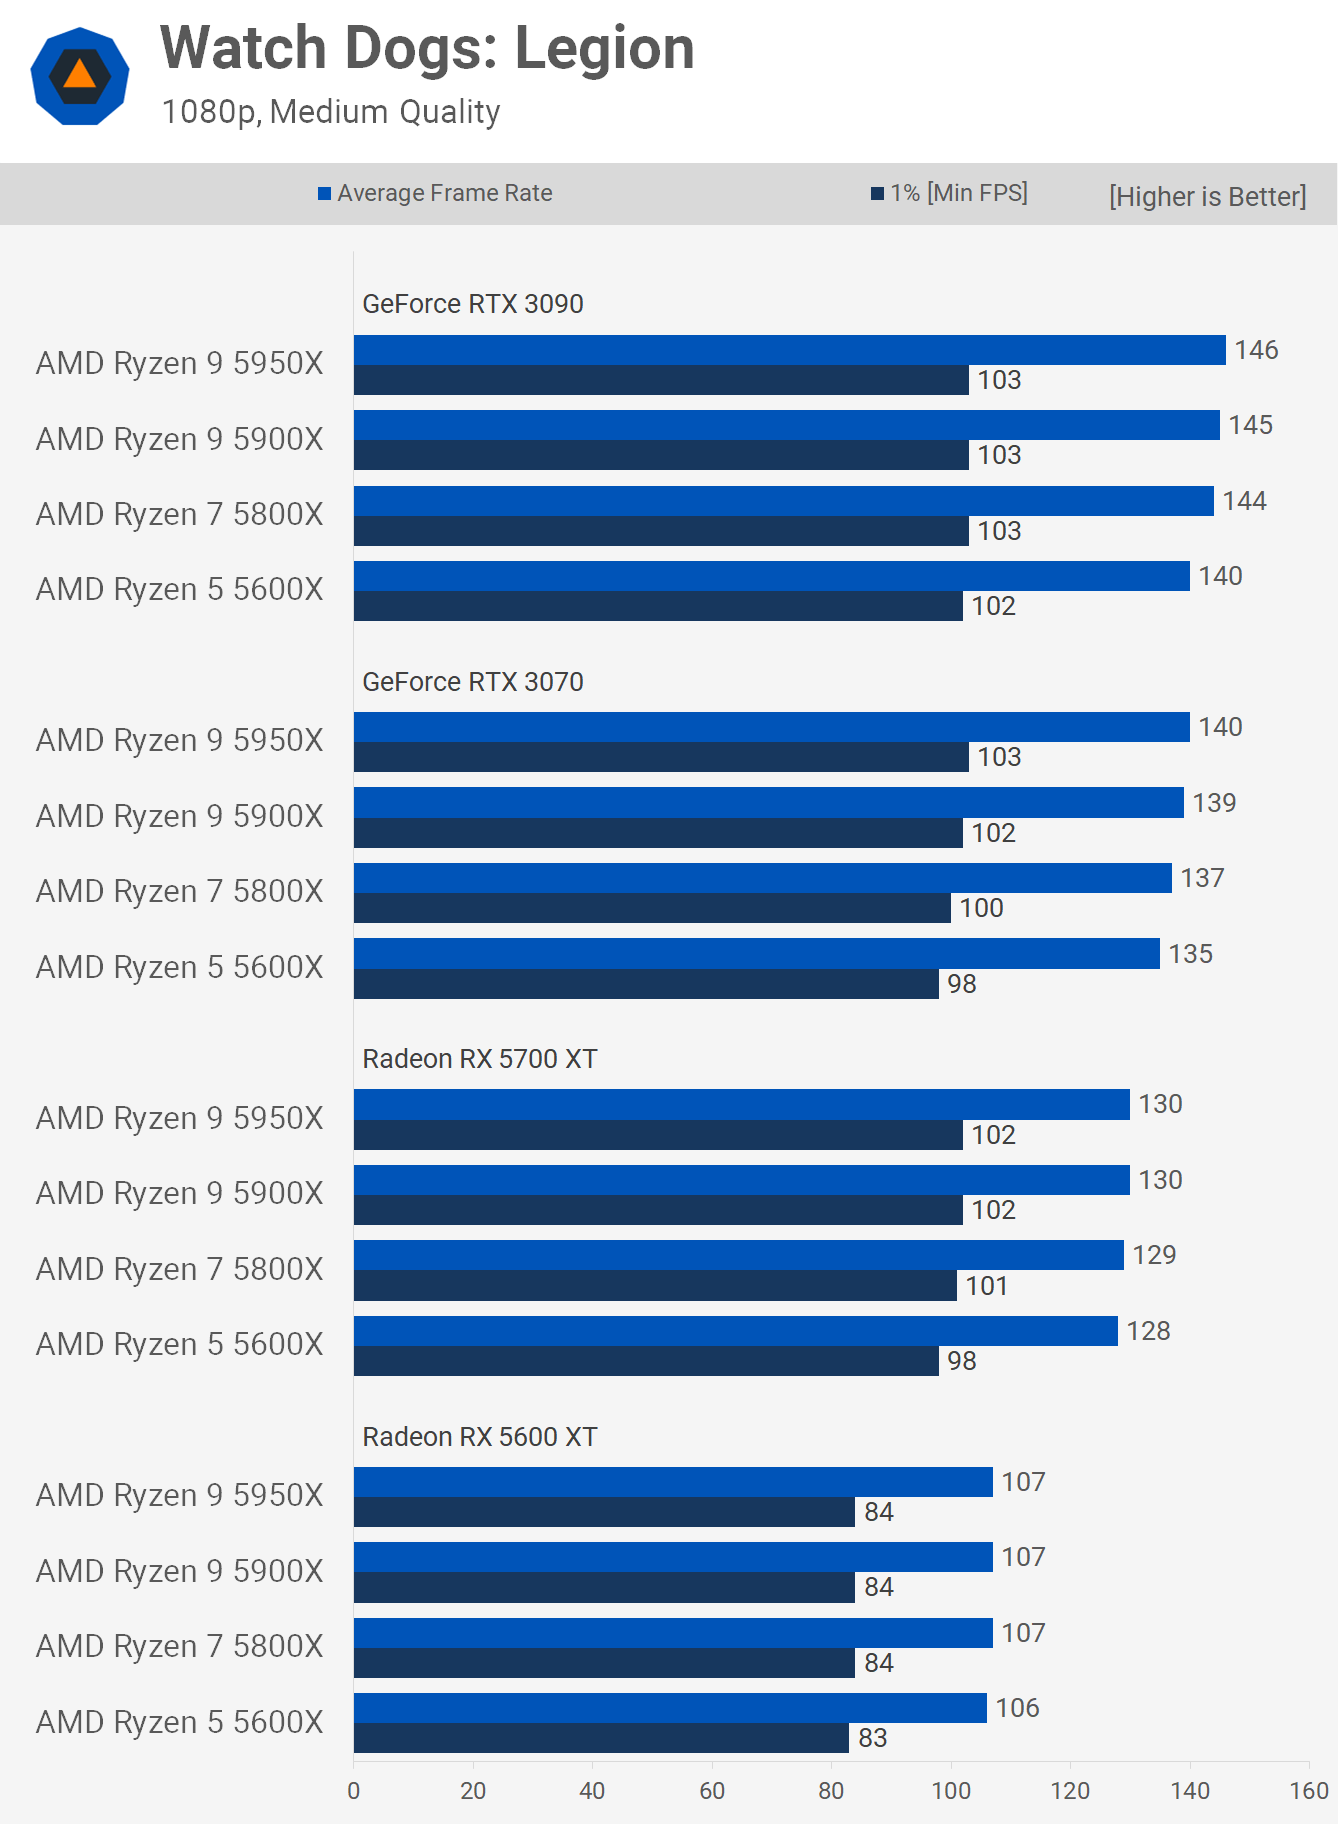
The 1080p medium results are quite interesting as we appear to be running into a single thread type limitation with the Zen 3 architecture. This is made evident by the performance from the 5700 XT right up to the mighty RTX 3090 which is all similar, suggesting a strong CPU bottleneck here and it's clearly not core related.
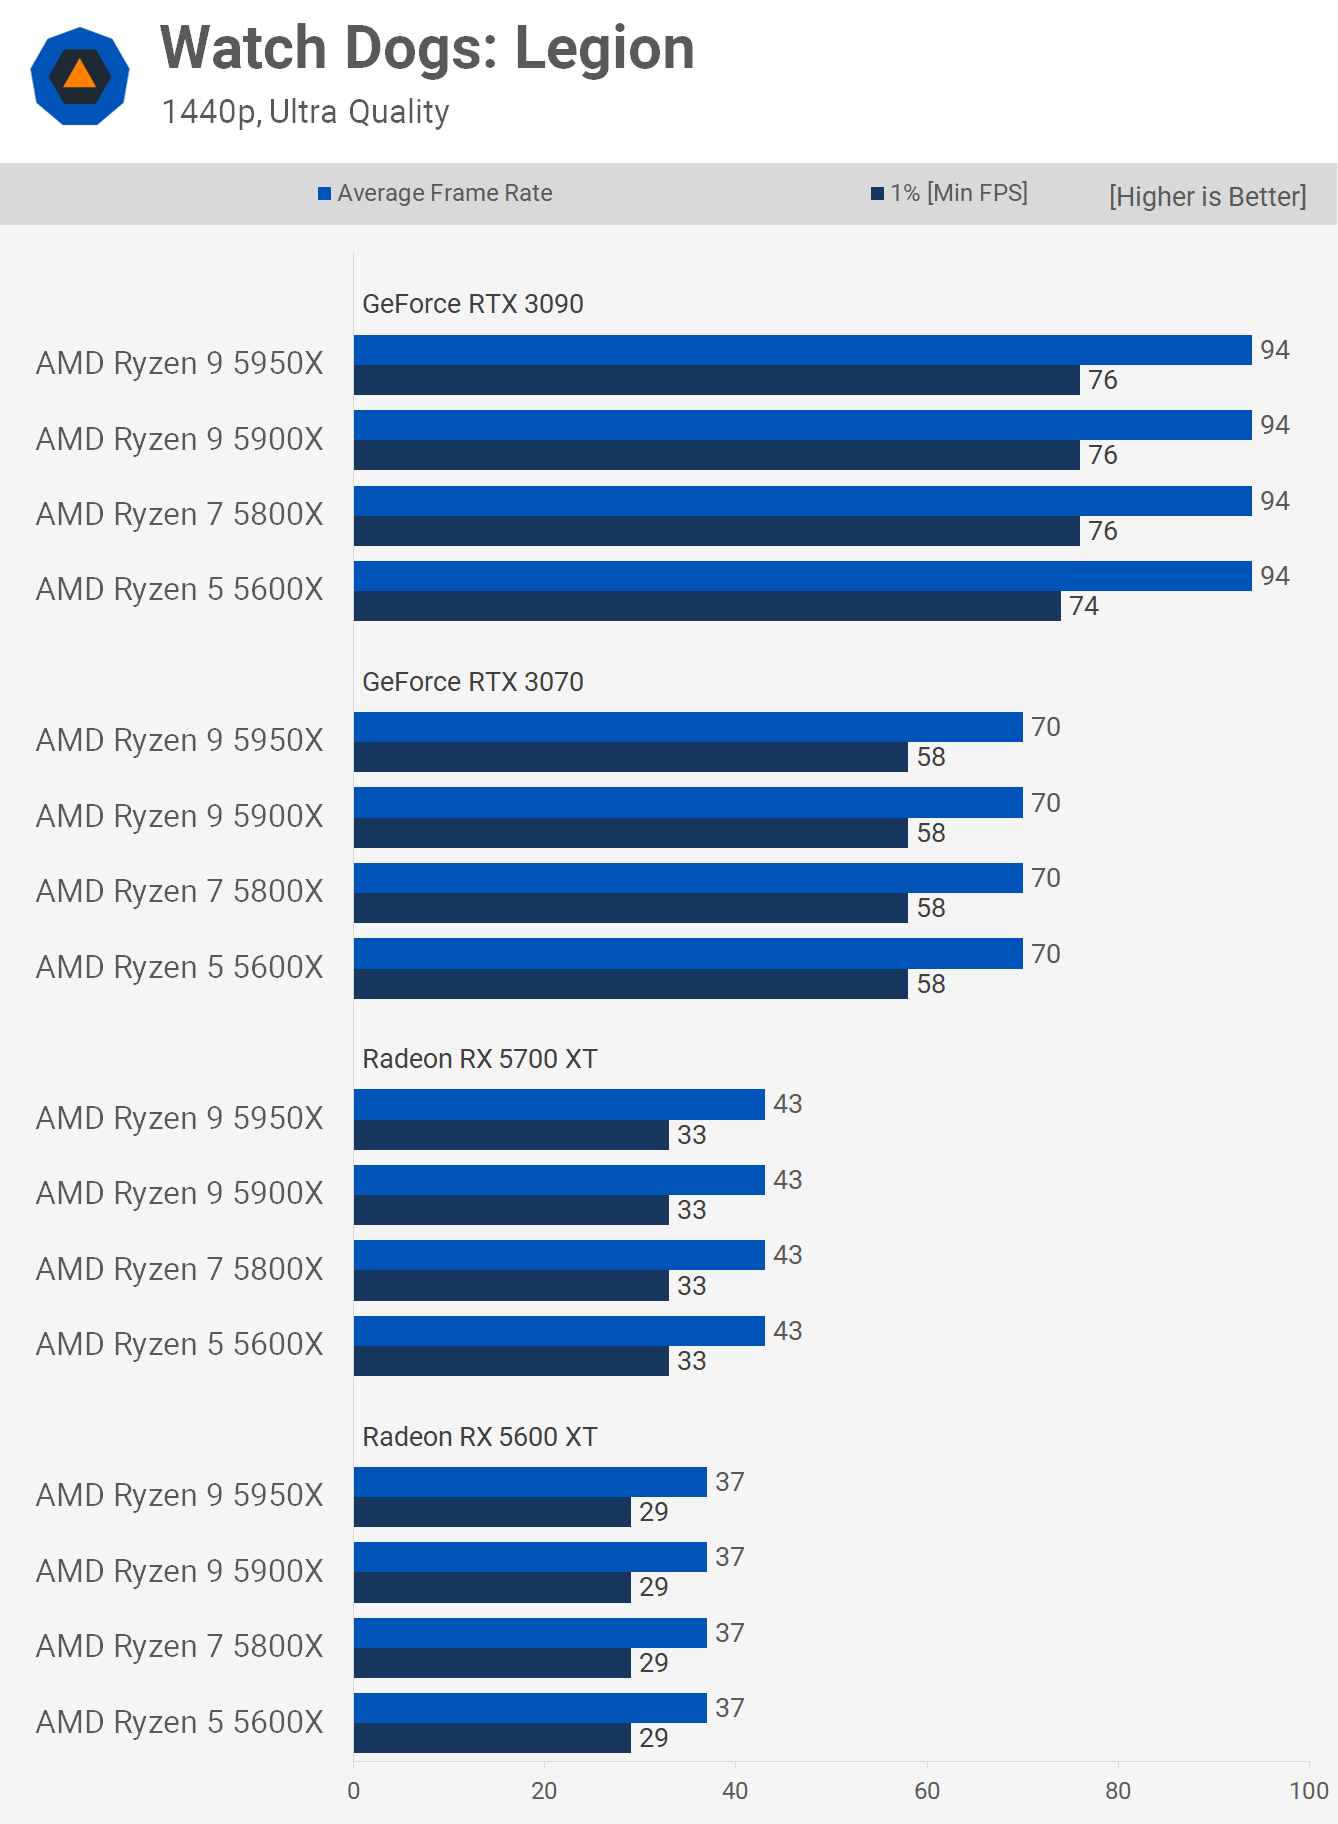
As you might have expected, jumping up to 1440p with the ultra quality preset we see no difference in performance between the various Zen 3 CPUs, even with the RTX 3090, so a hard GPU bottleneck here.
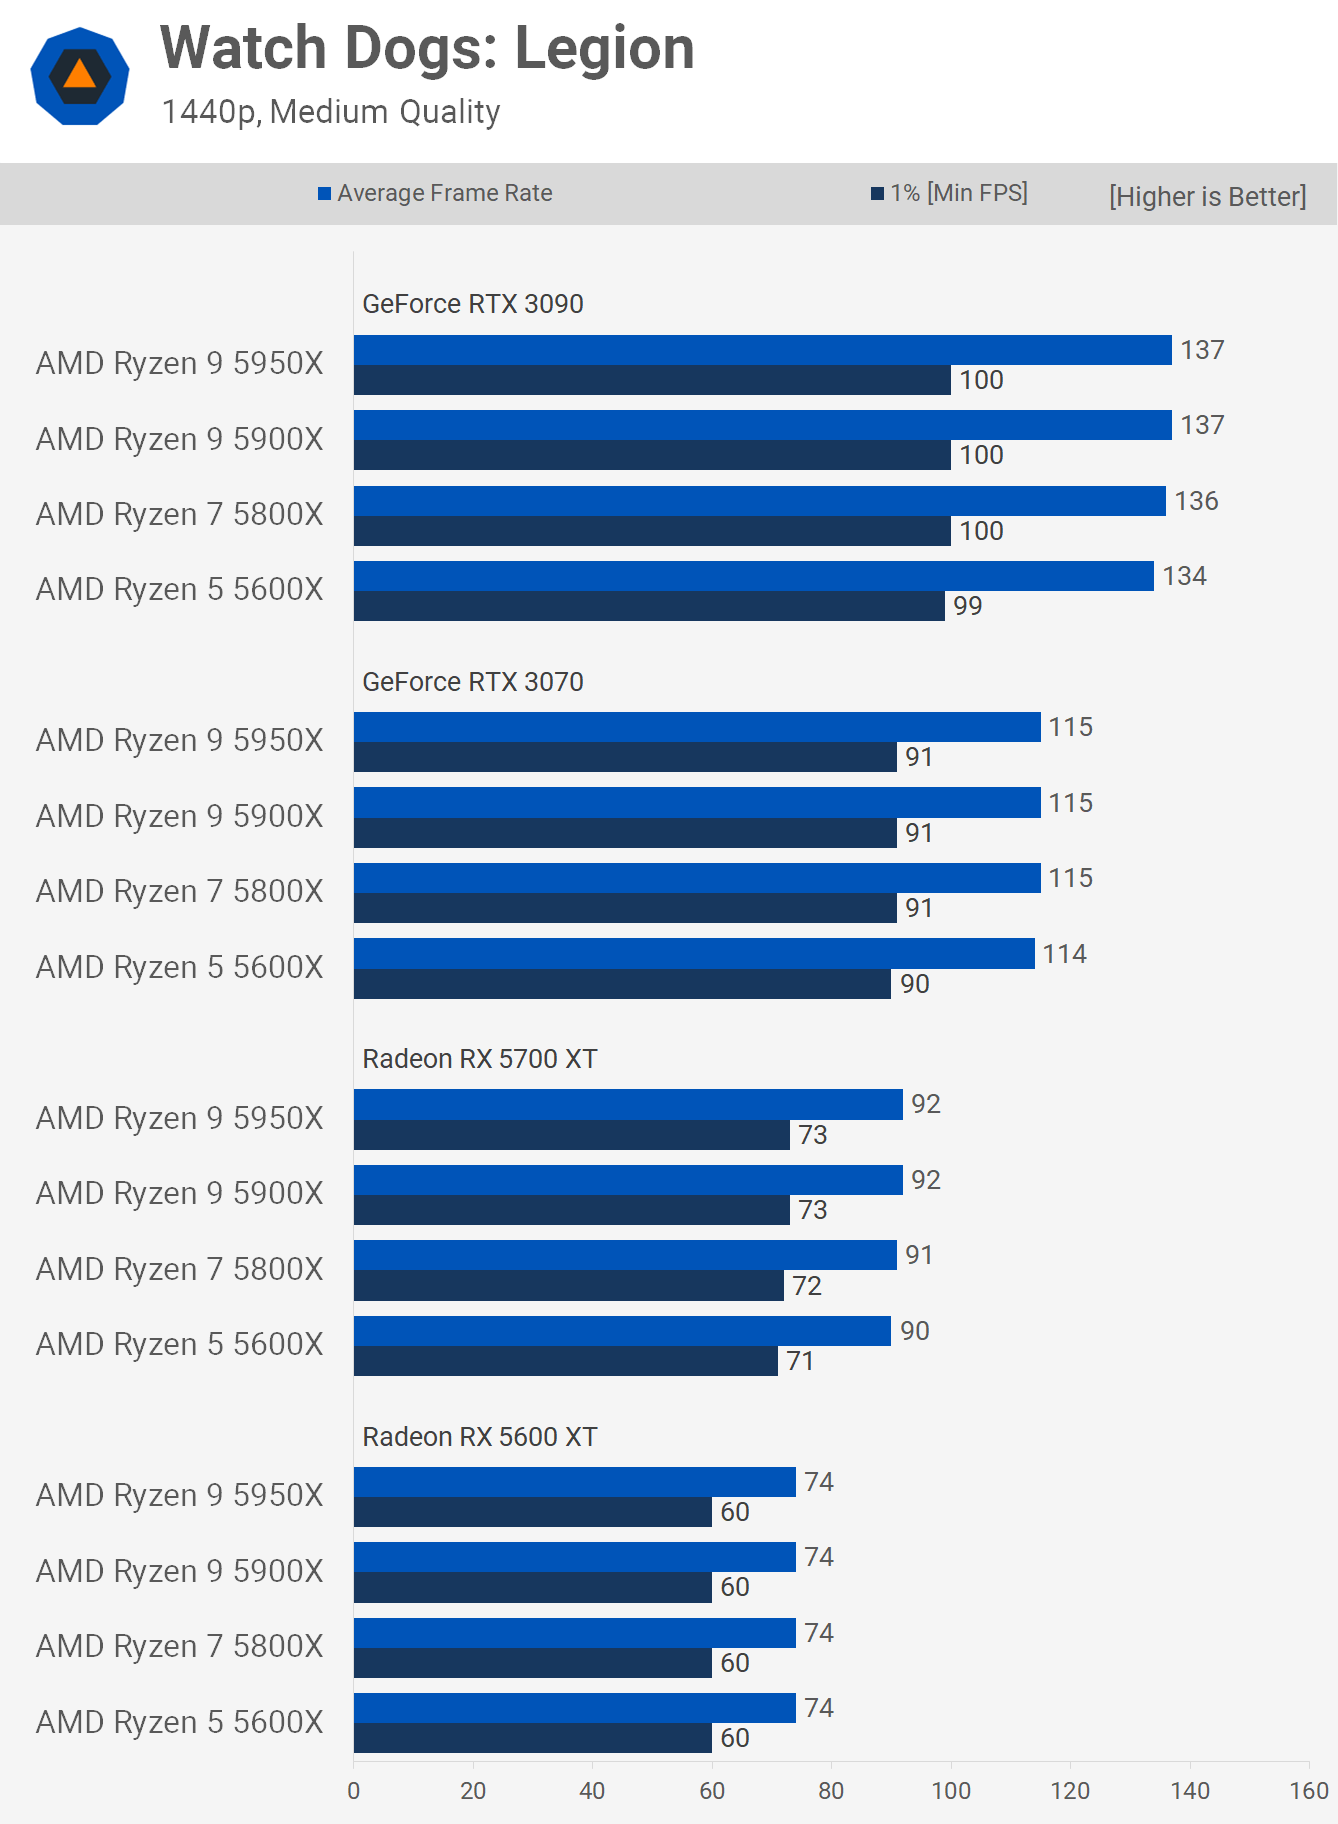
Even with the medium quality settings we're still looking at a strong CPU bottleneck with the RTX 3090 and of course anything slower.
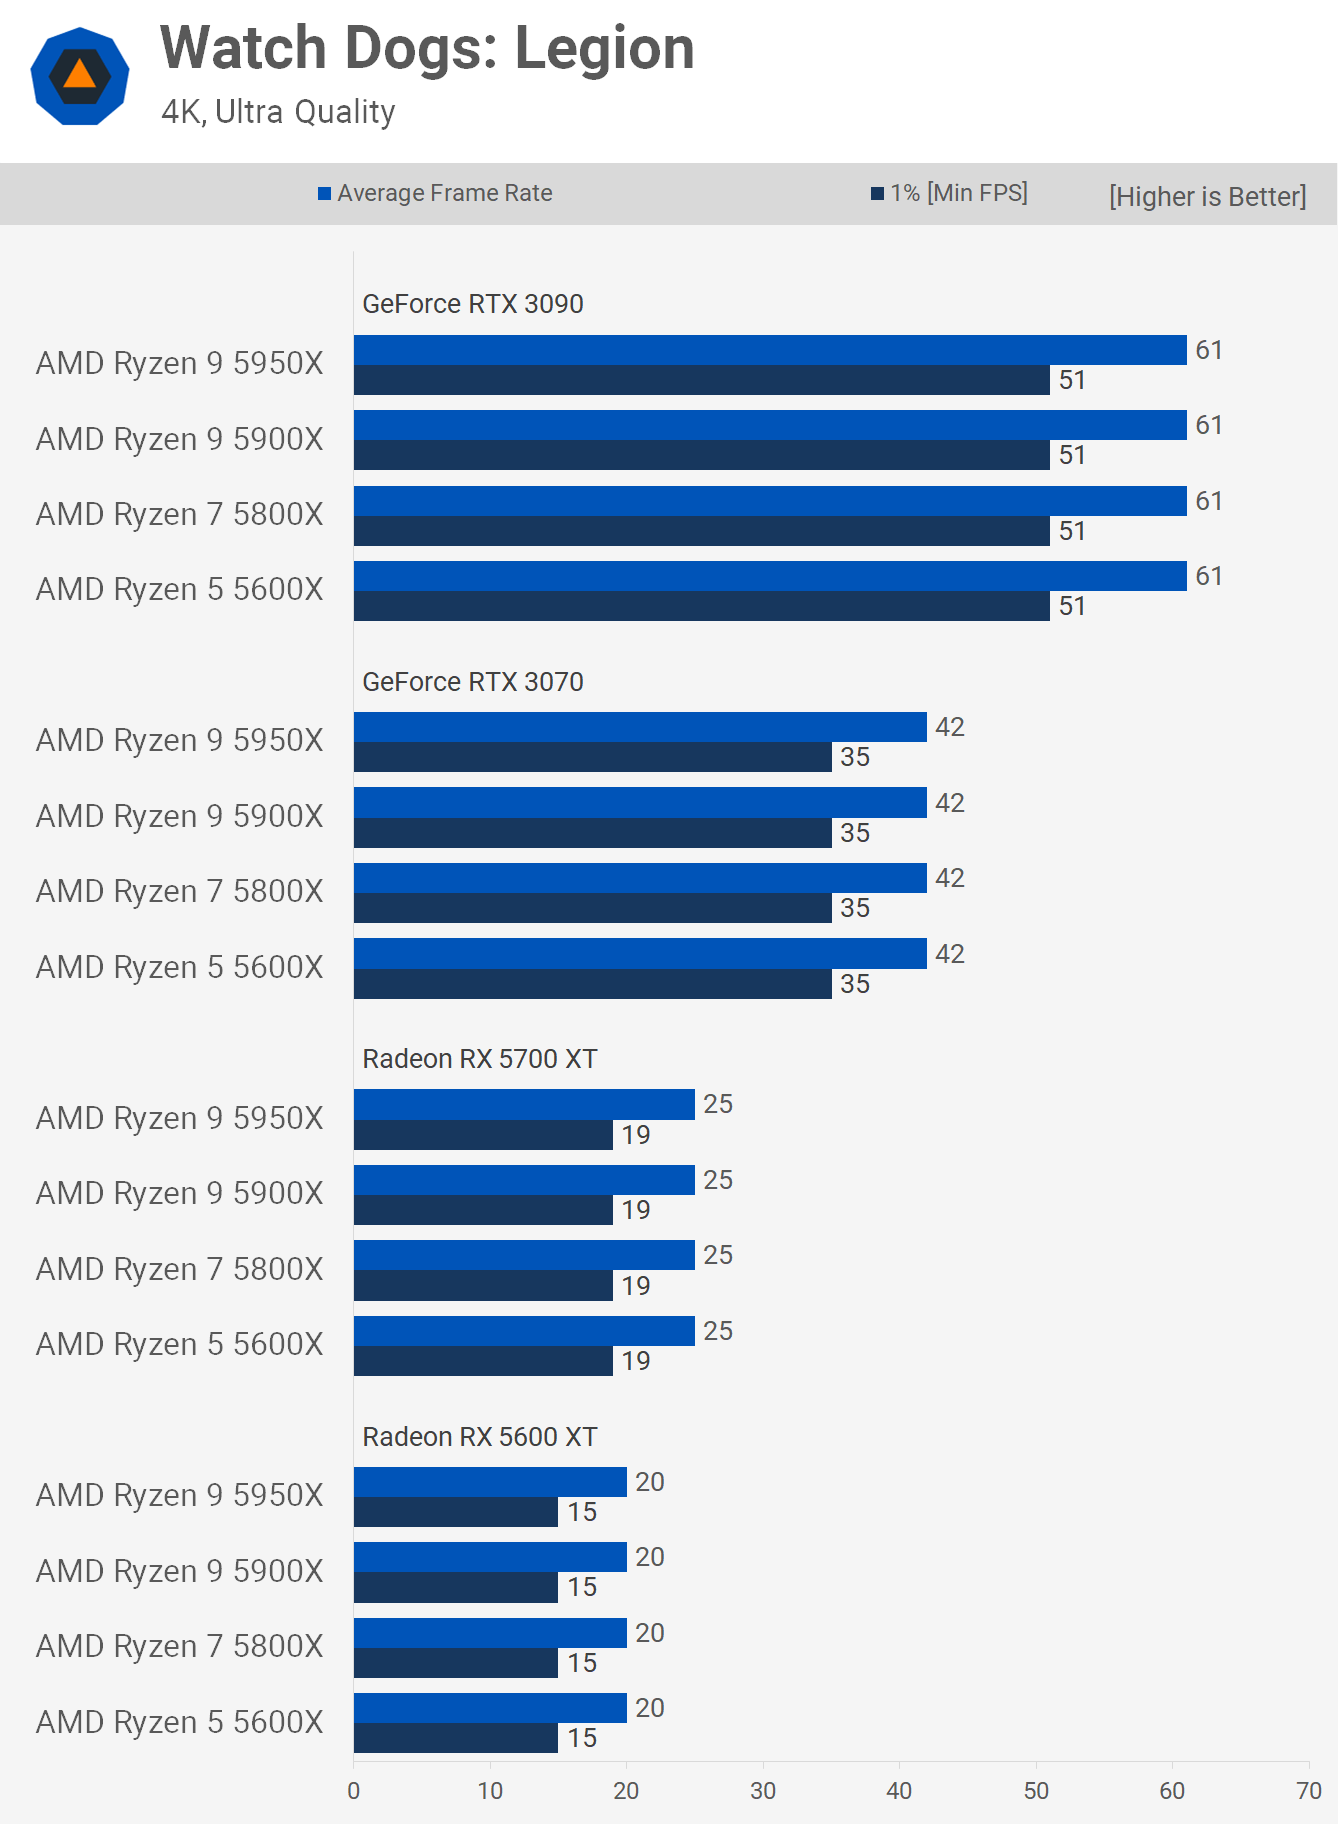
As you could have no doubt guessed the 4K ultra data is again heavily limited by the GPU, in fact we're looking at identical performance across the board.
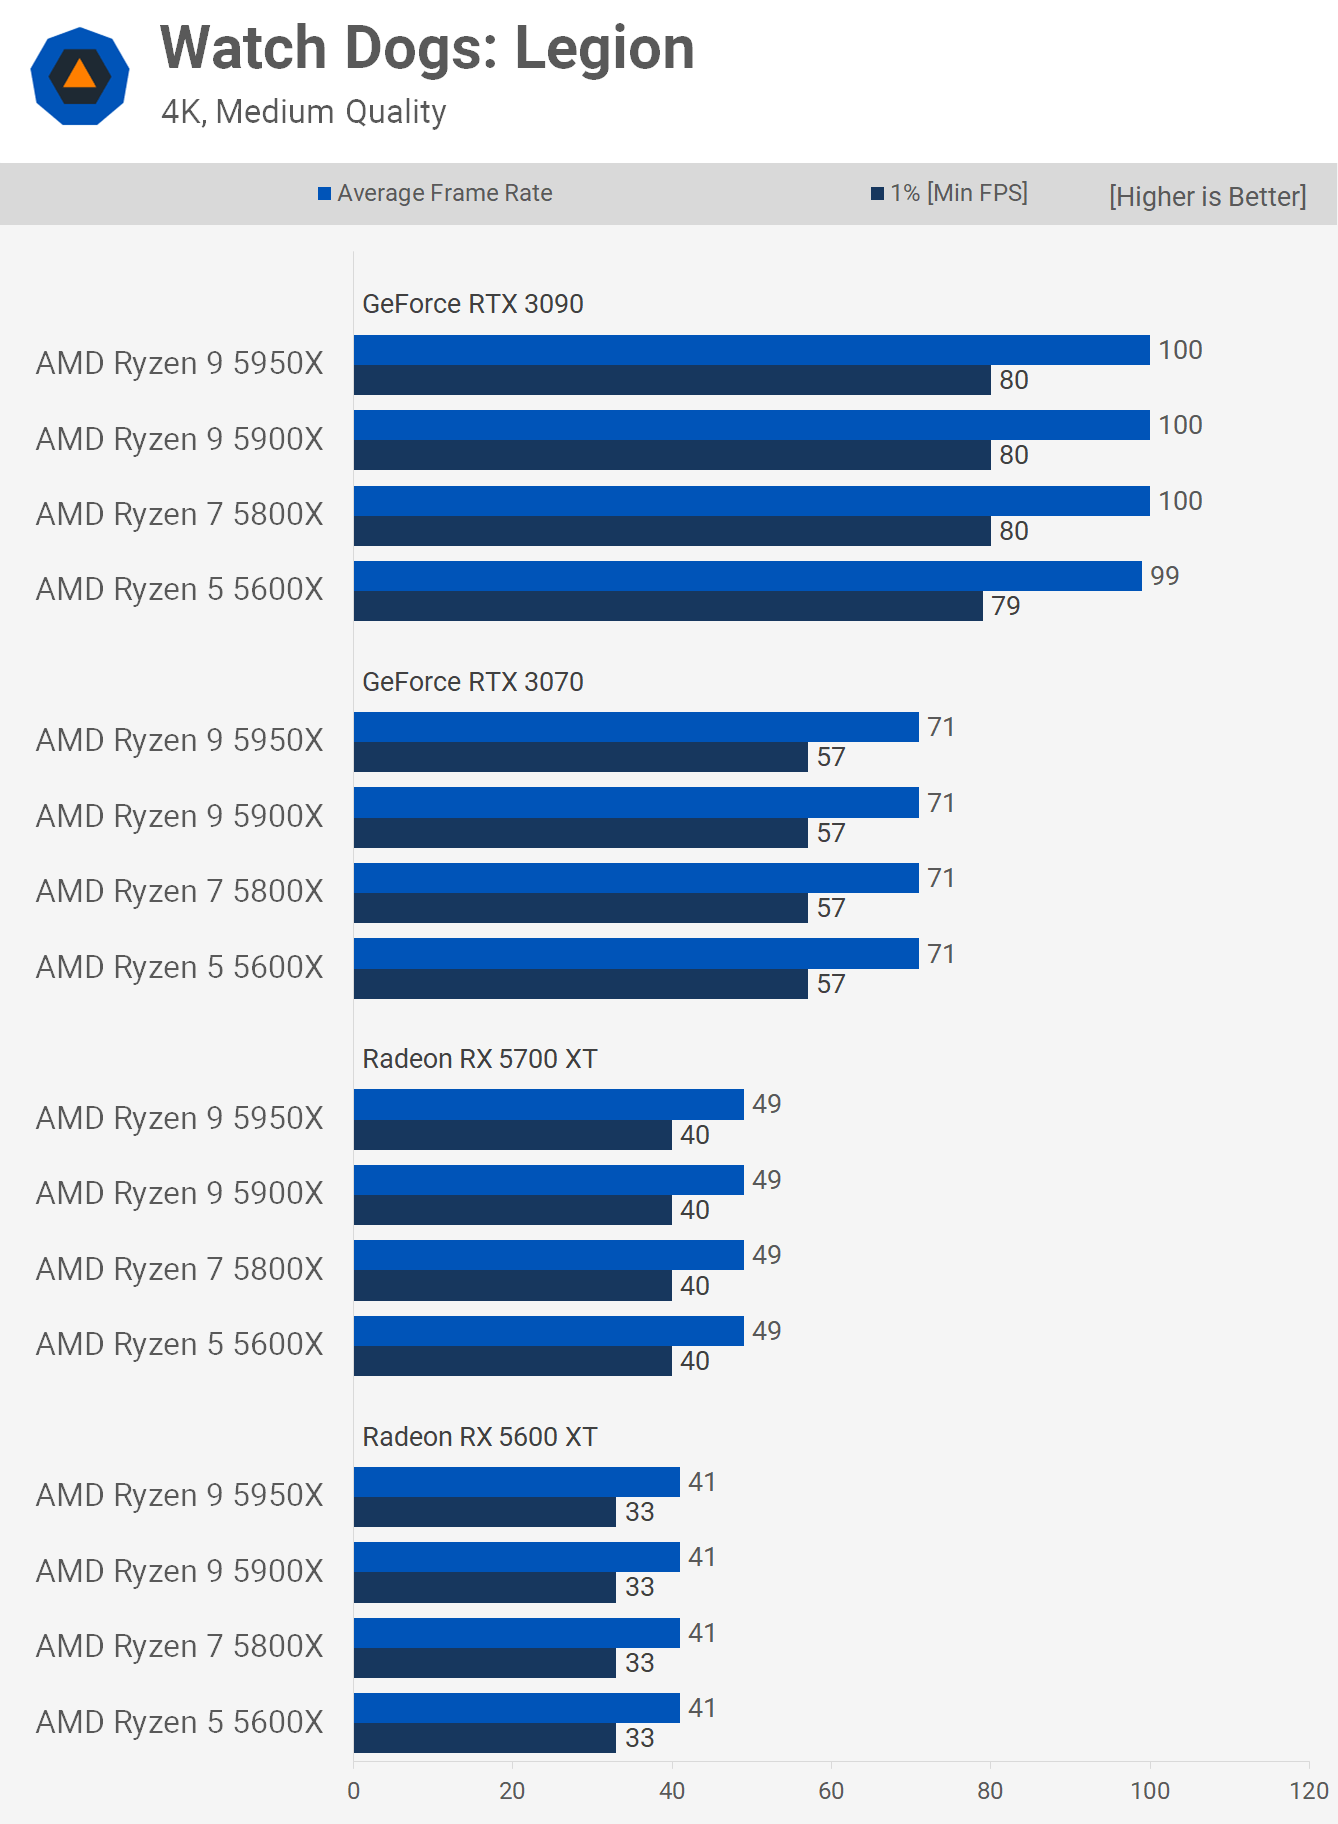
The same is also true of the 4K medium results, doesn't matter which of these Zen 3 CPUs you use, performance will be identical.
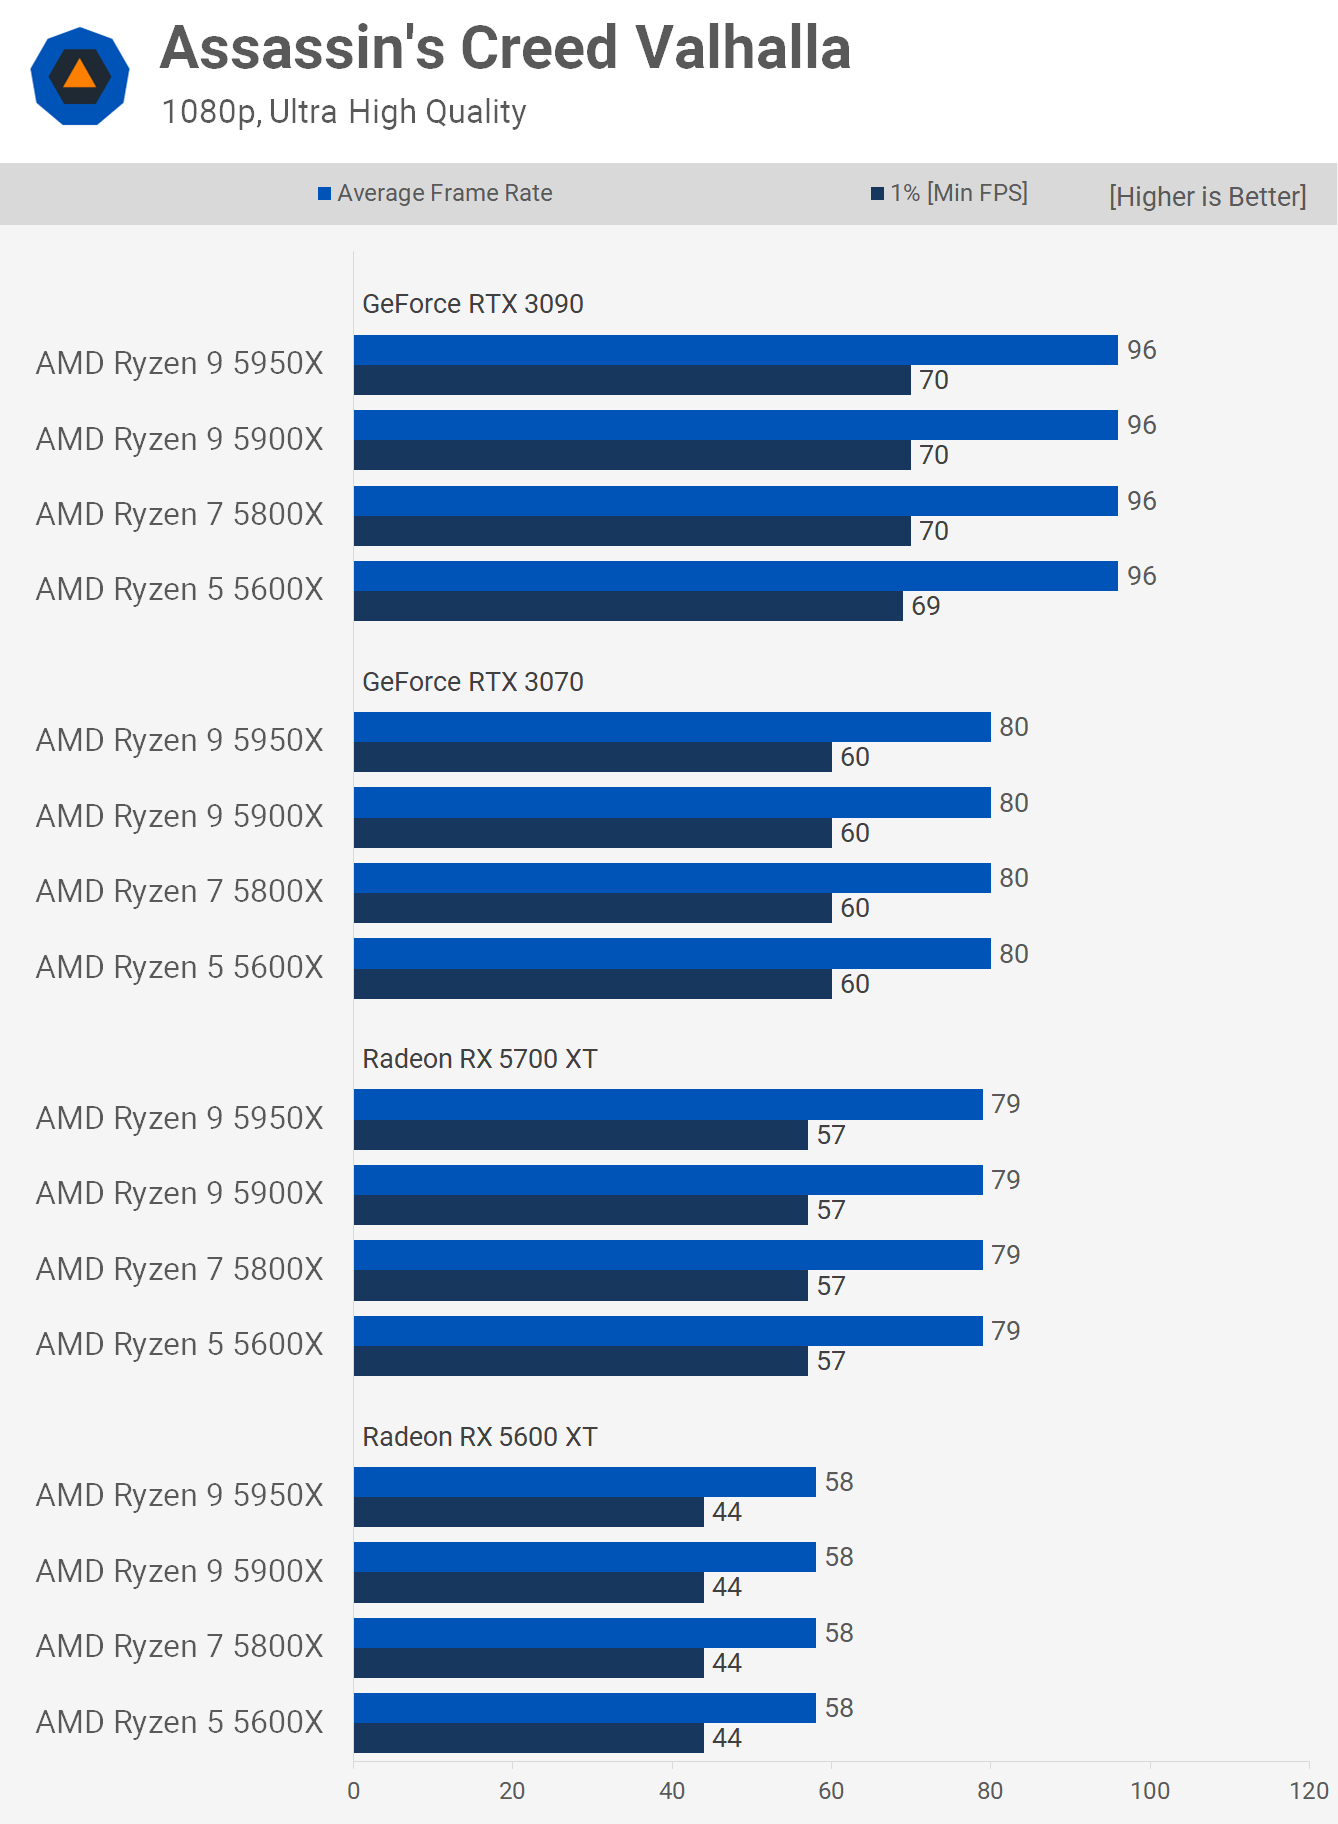
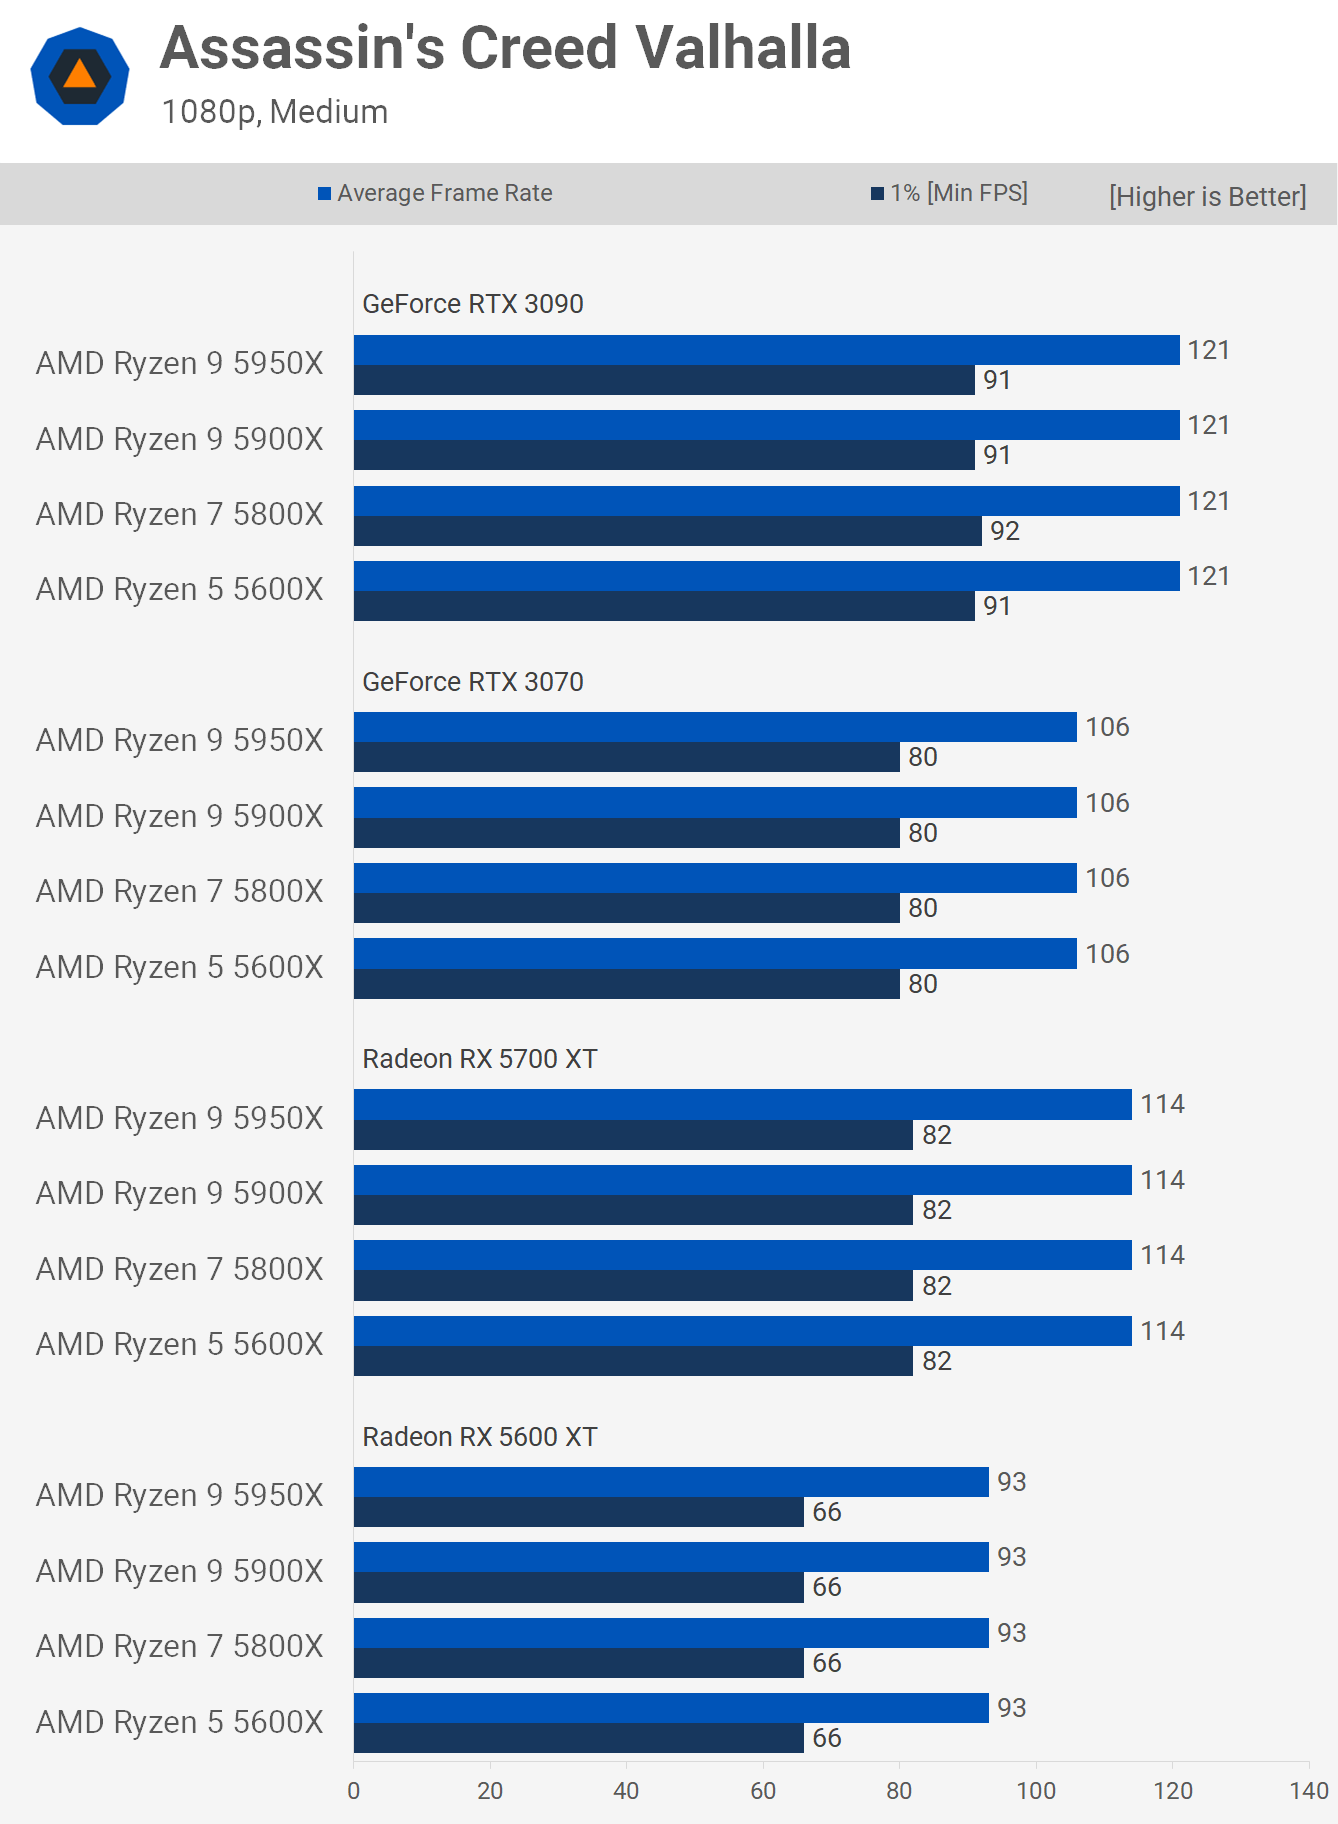
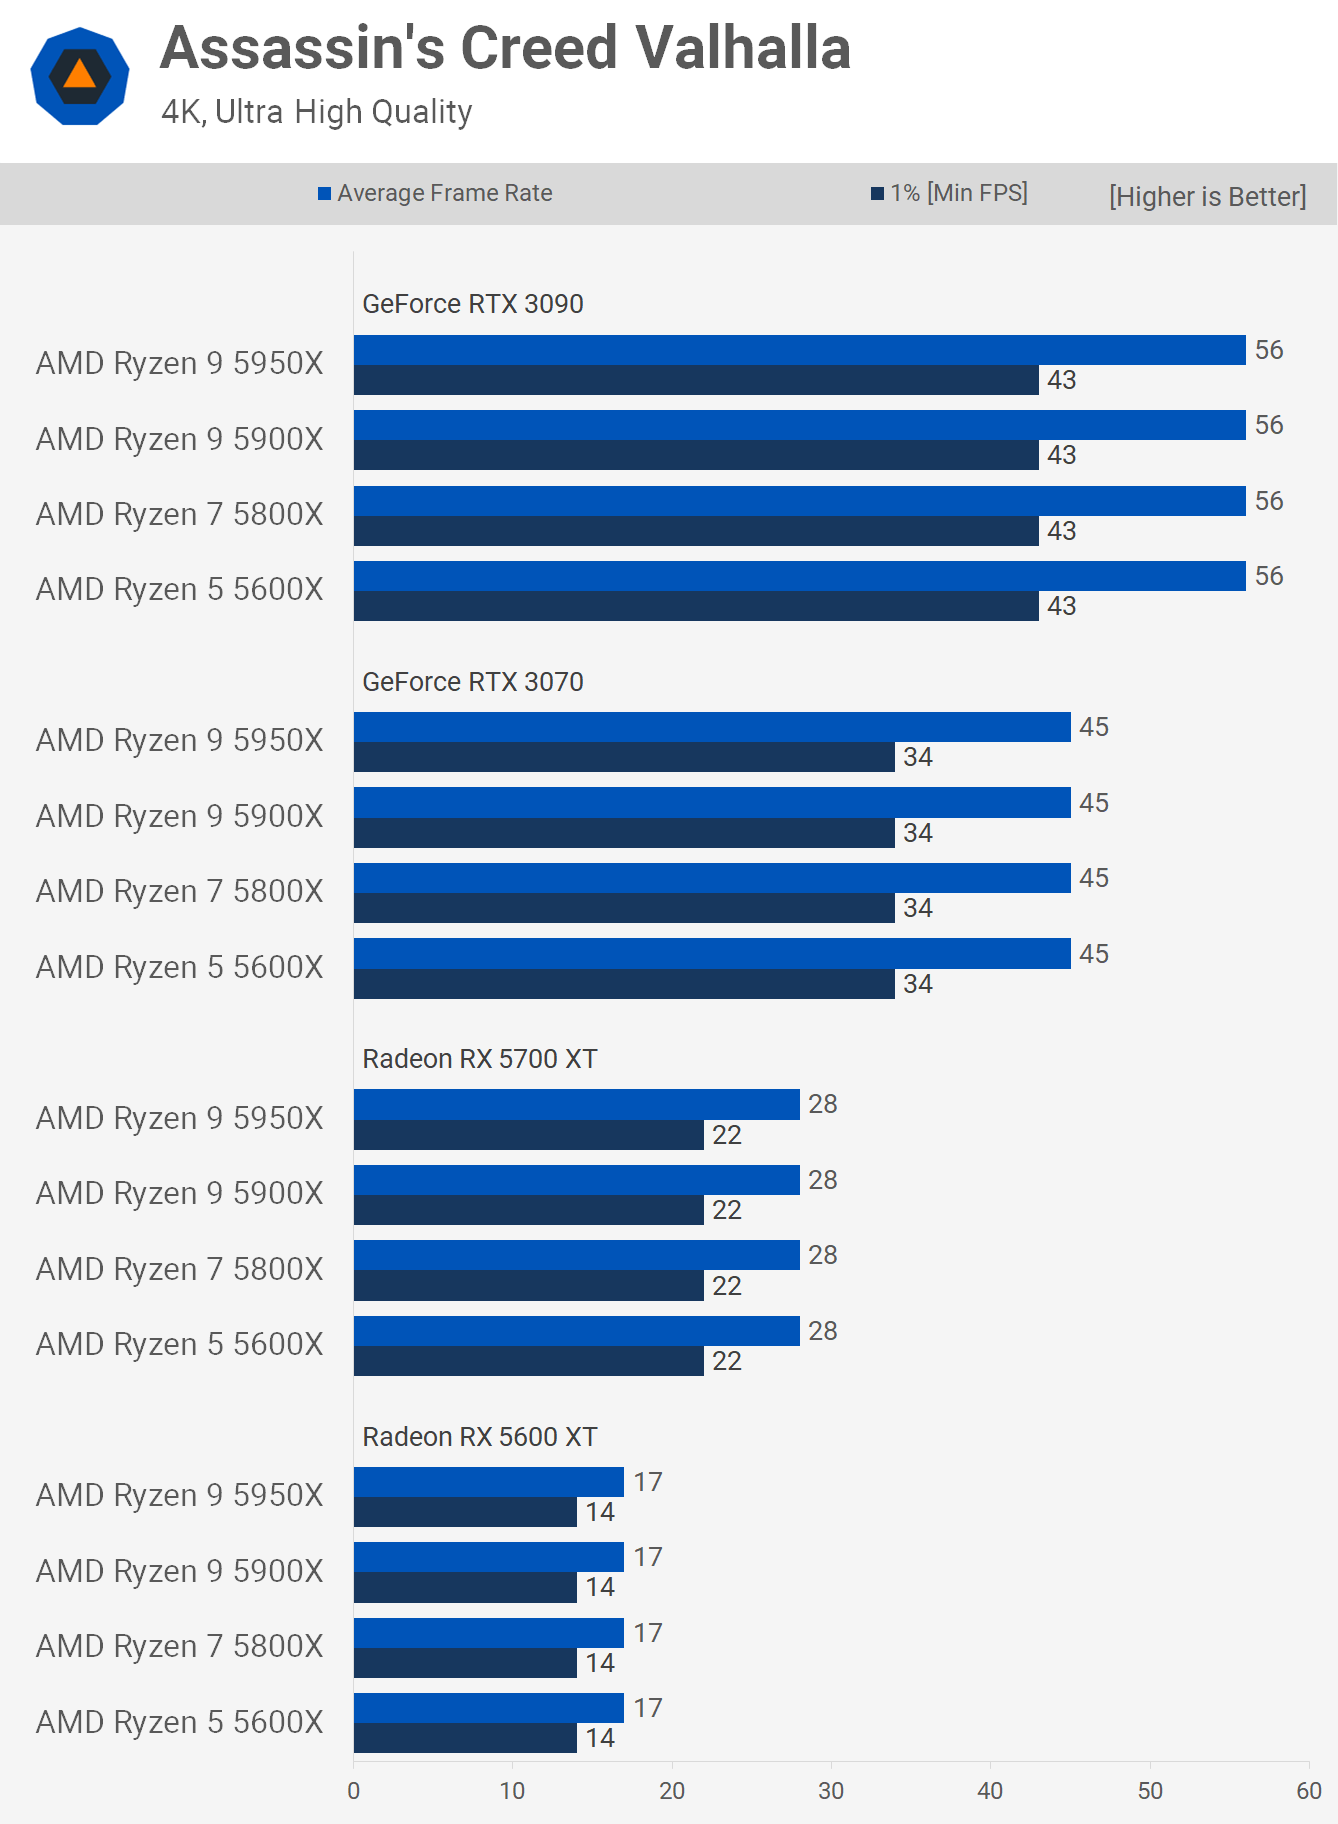
Typically, Assassin's Creed titles are very CPU demanding and AC Valhalla is not an exception, though if you have a CPU as capable as the 5600X, then that's all you'll need. Previous Assassin’s Creed titles were known to break quad-core CPUs (4-cores/4-threads), but they've always played well on 12-thread processors.
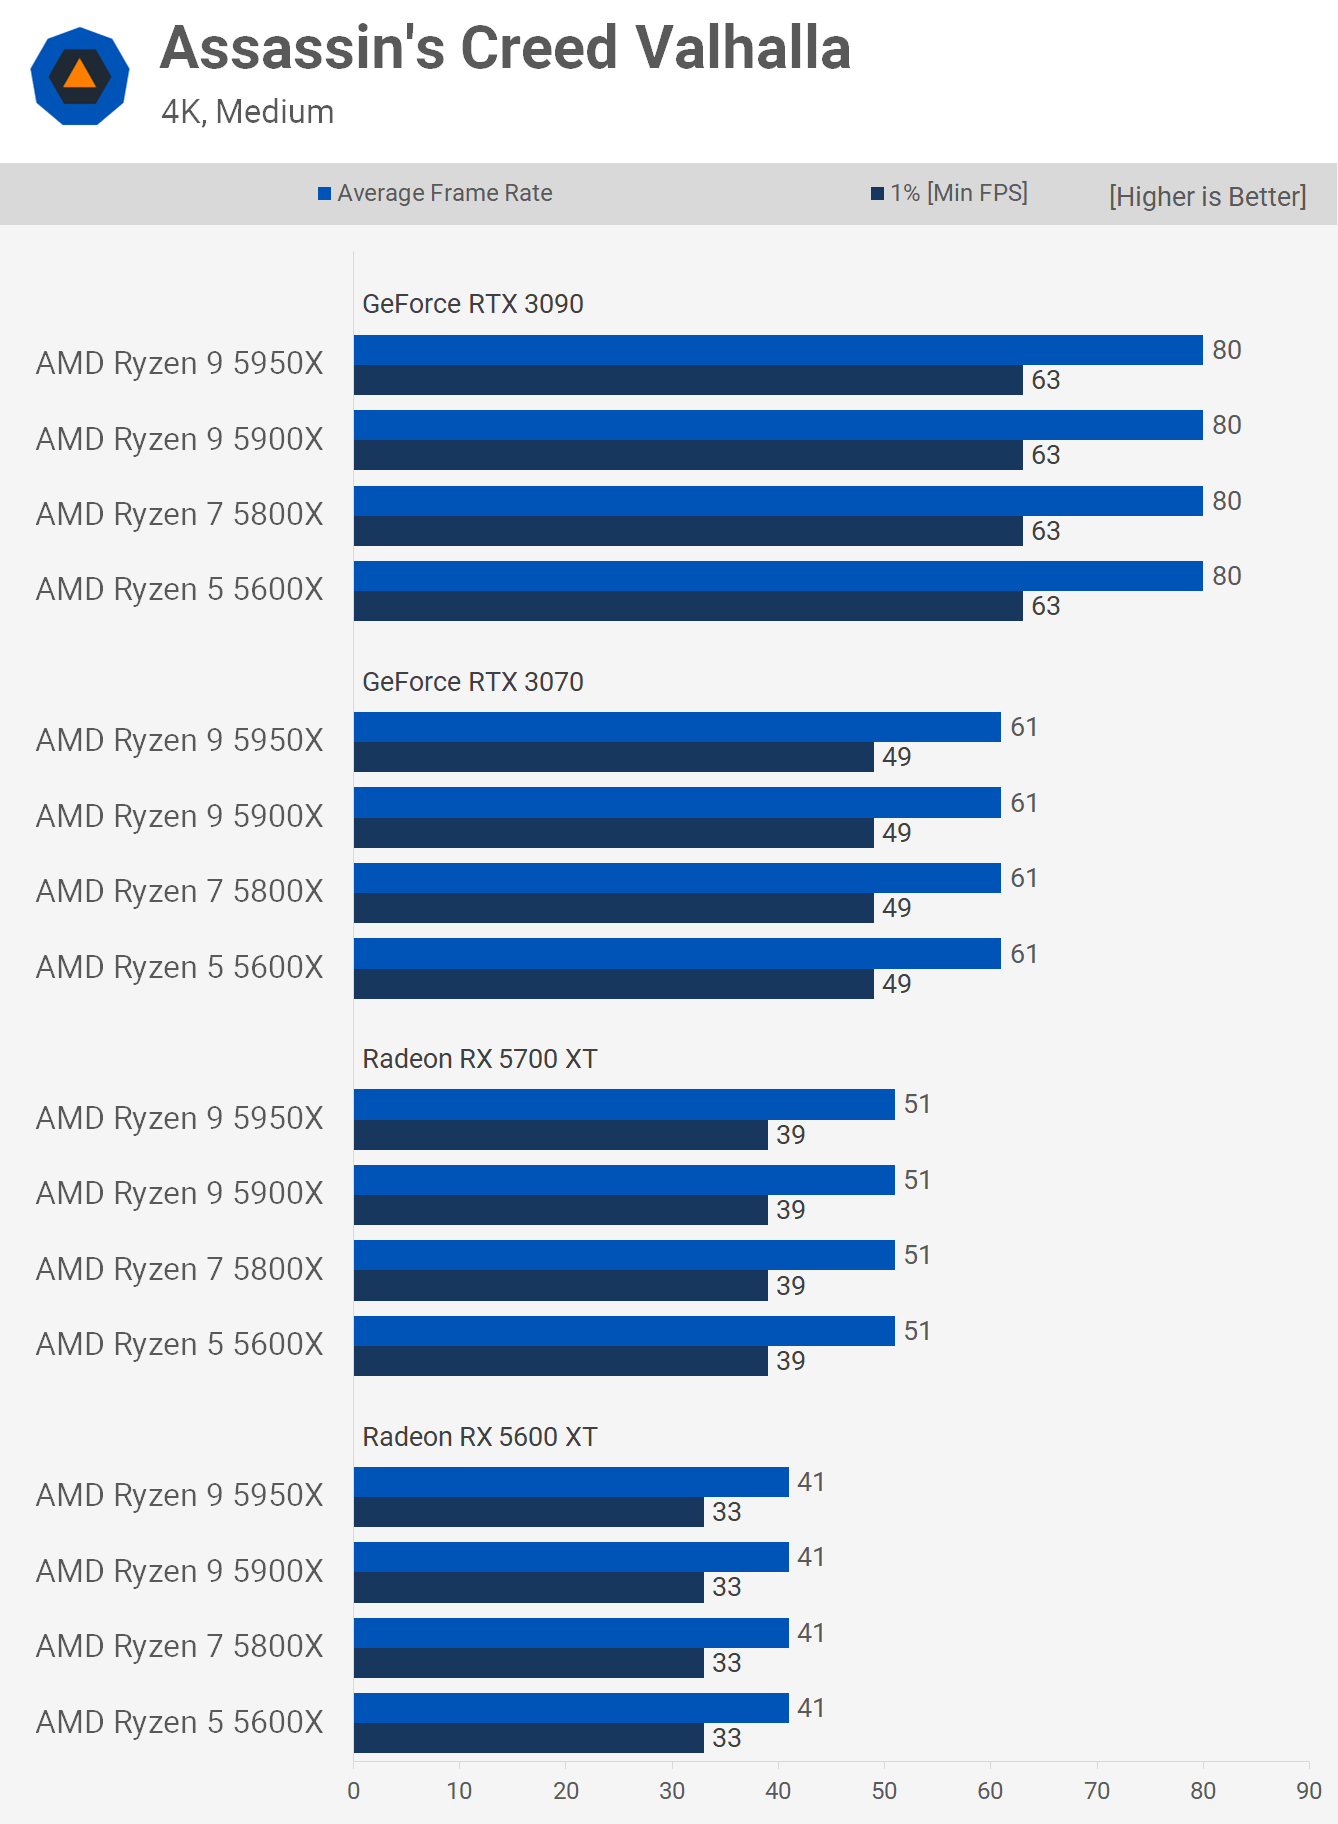
Using the medium quality settings we still find that the game is largely GPU limited, we also find a weird scenario where the 5700 XT performs better than the RTX 3070 and not much slower than the RTX 3090. This would typically suggest a CPU limitation and while that's possible at the high-end, it's not due to a lack of CPU cores.
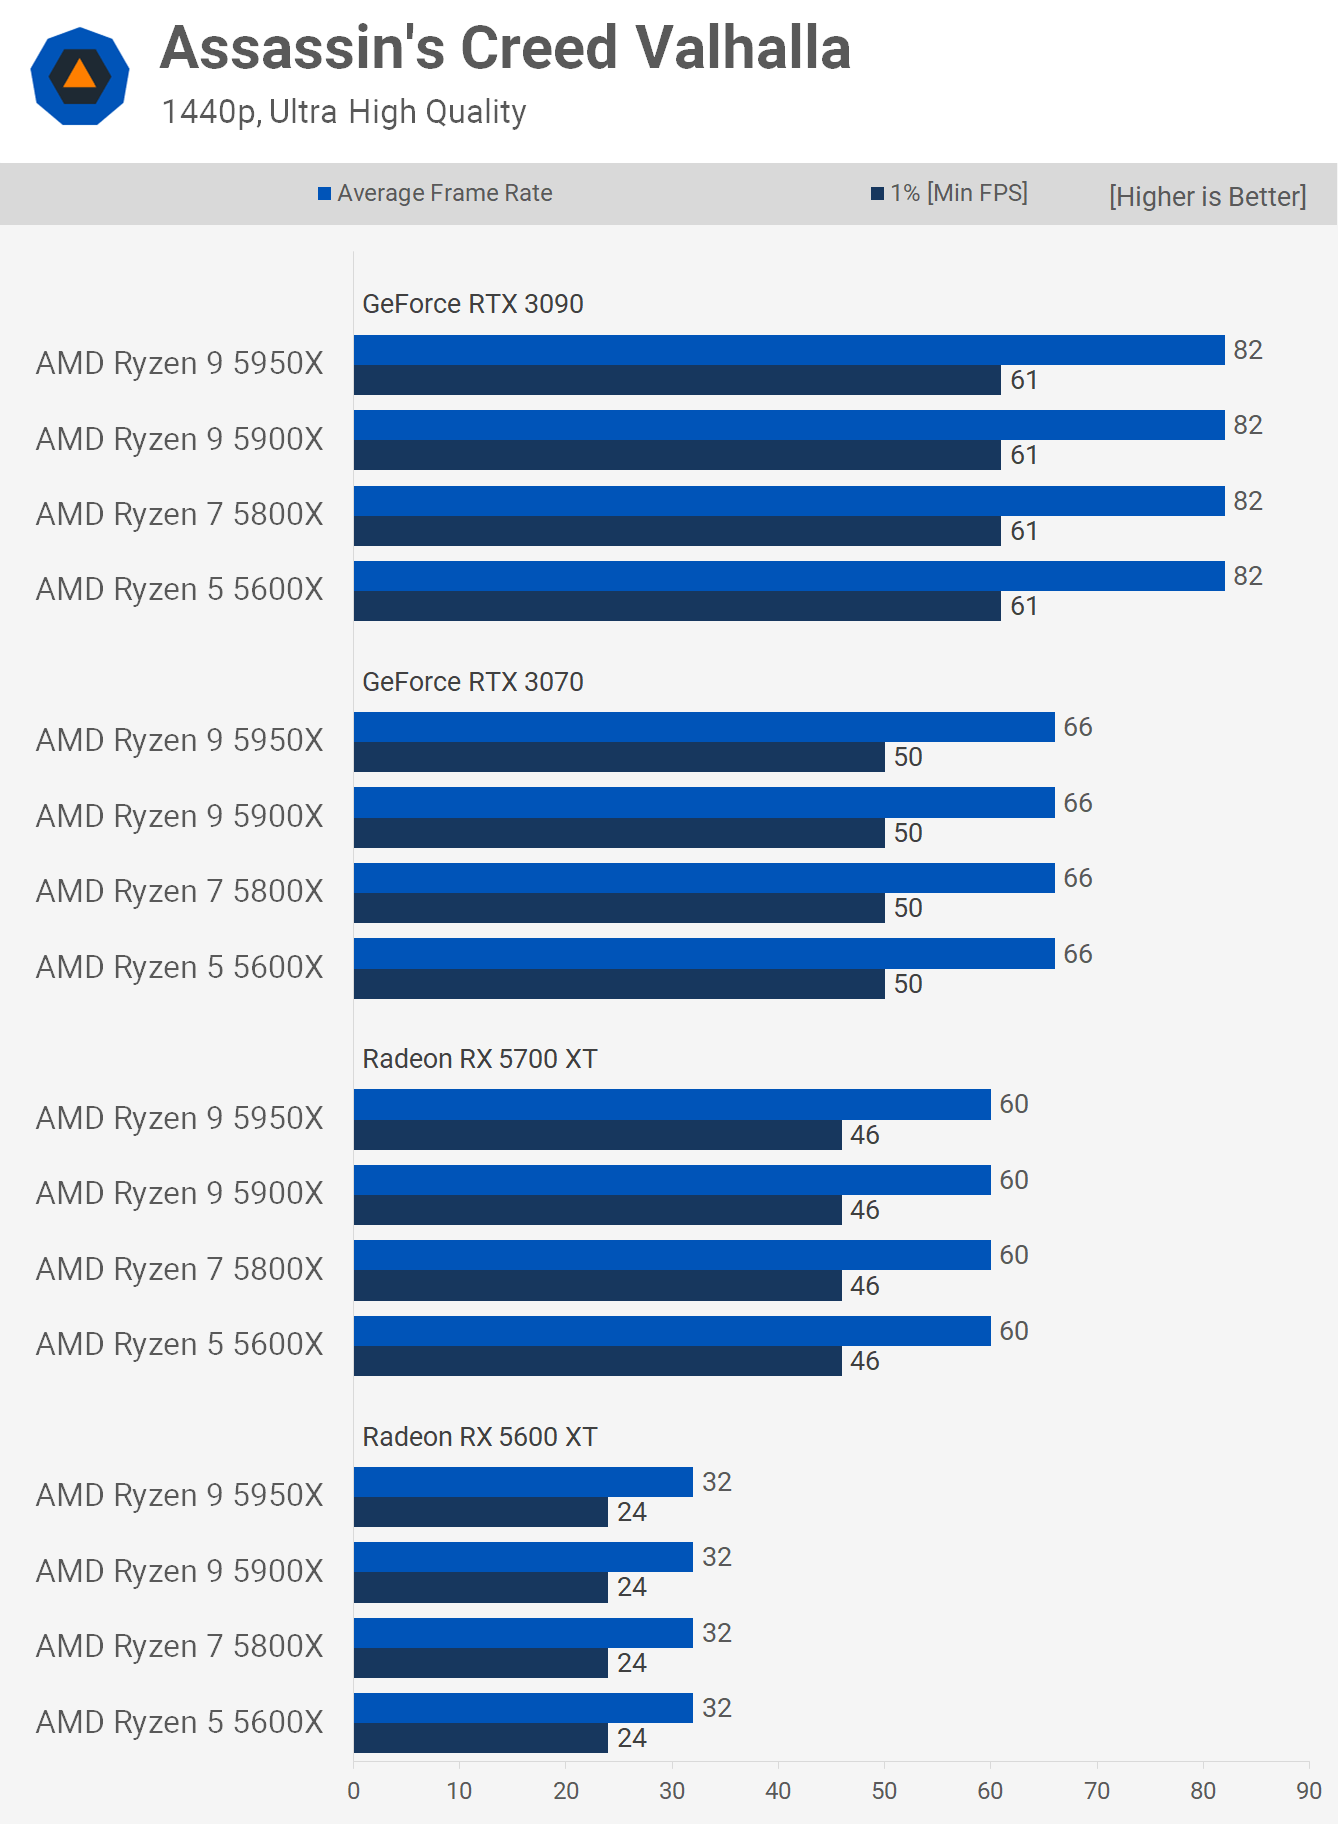
Scaling is more what you'd expect to see at 1440p with the ultra quality settings and clearly we are looking at a strong GPU limitation for all tested hardware configurations.
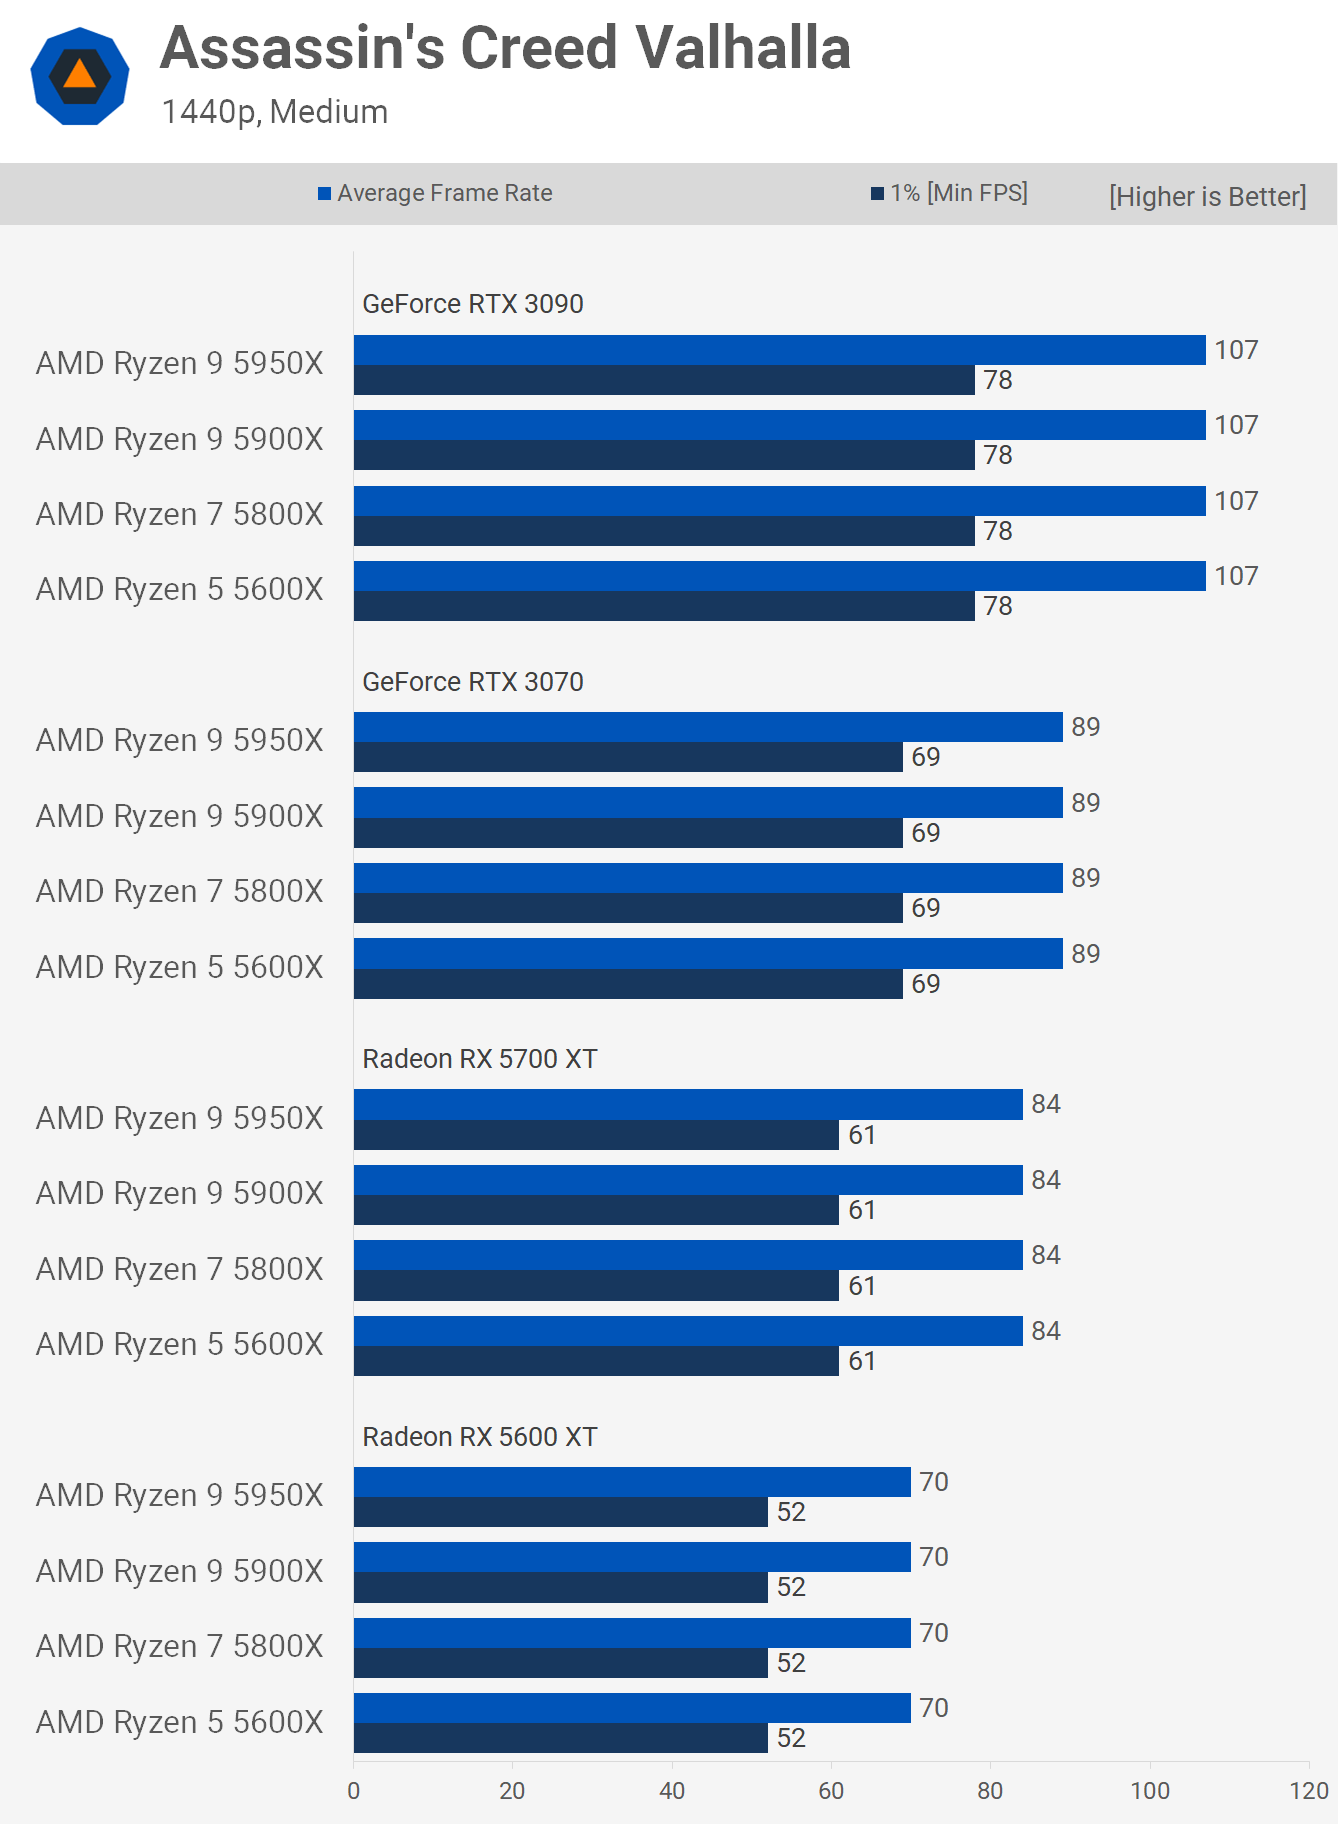
The same is true with the medium quality present at 1440p so here it doesn't matter which of these Zen 3 CPUs you use.
Then of course we find the same GPU limited performance at 4K using both the ultra and medium quality presets. Performance SummaryNothing shocking there, for the most part there’s little difference in terms of gaming performance between these four Zen 3 based processors, just as we found in our day-one content. On average, the 5950X is just 4% faster than the 5600X with the RTX 3090 at 1080p using the ultra quality settings and we've just seen a similar thing here, even when using medium quality settings. Actually let's quickly summarize the data…
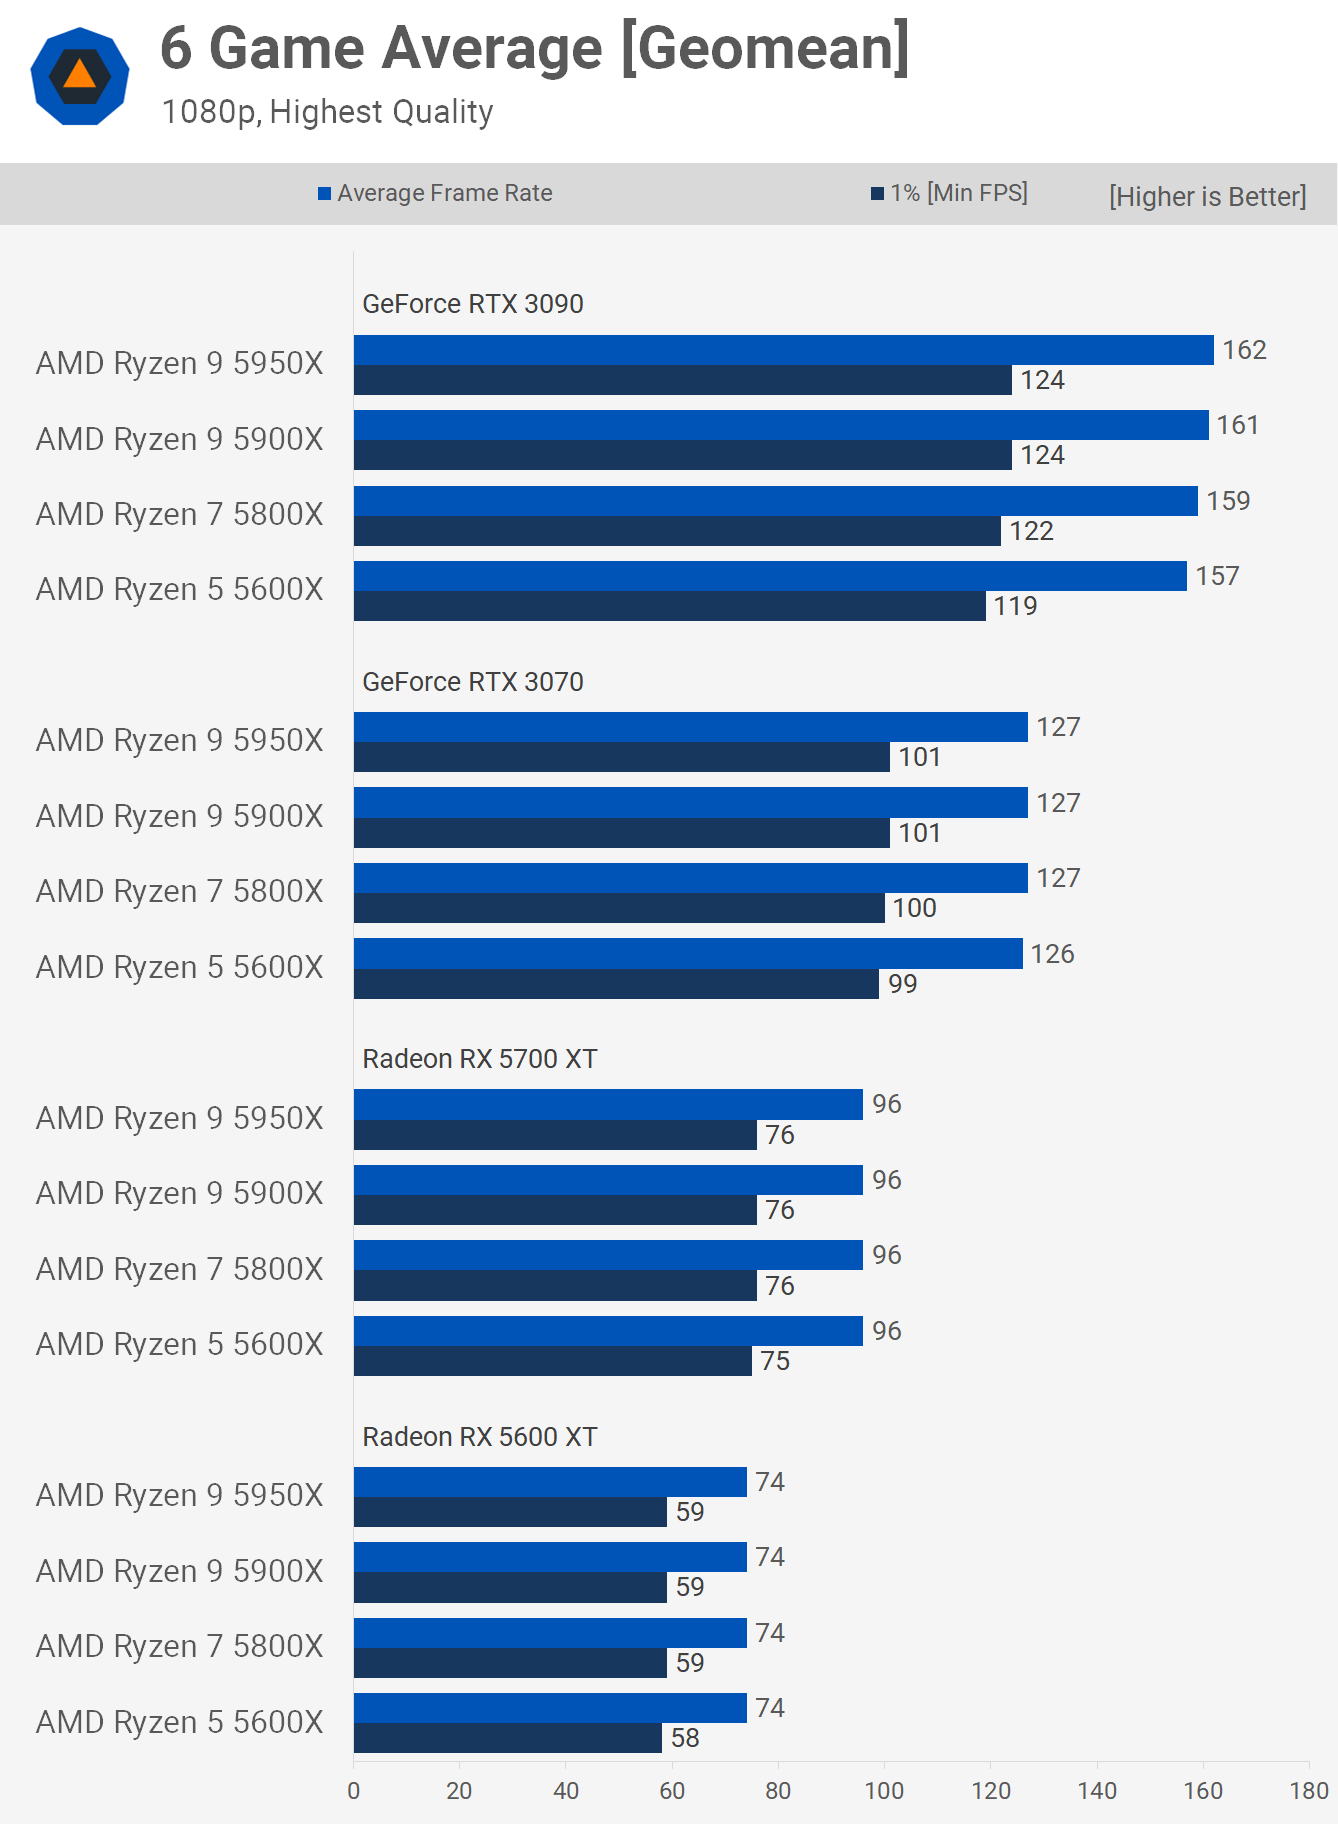
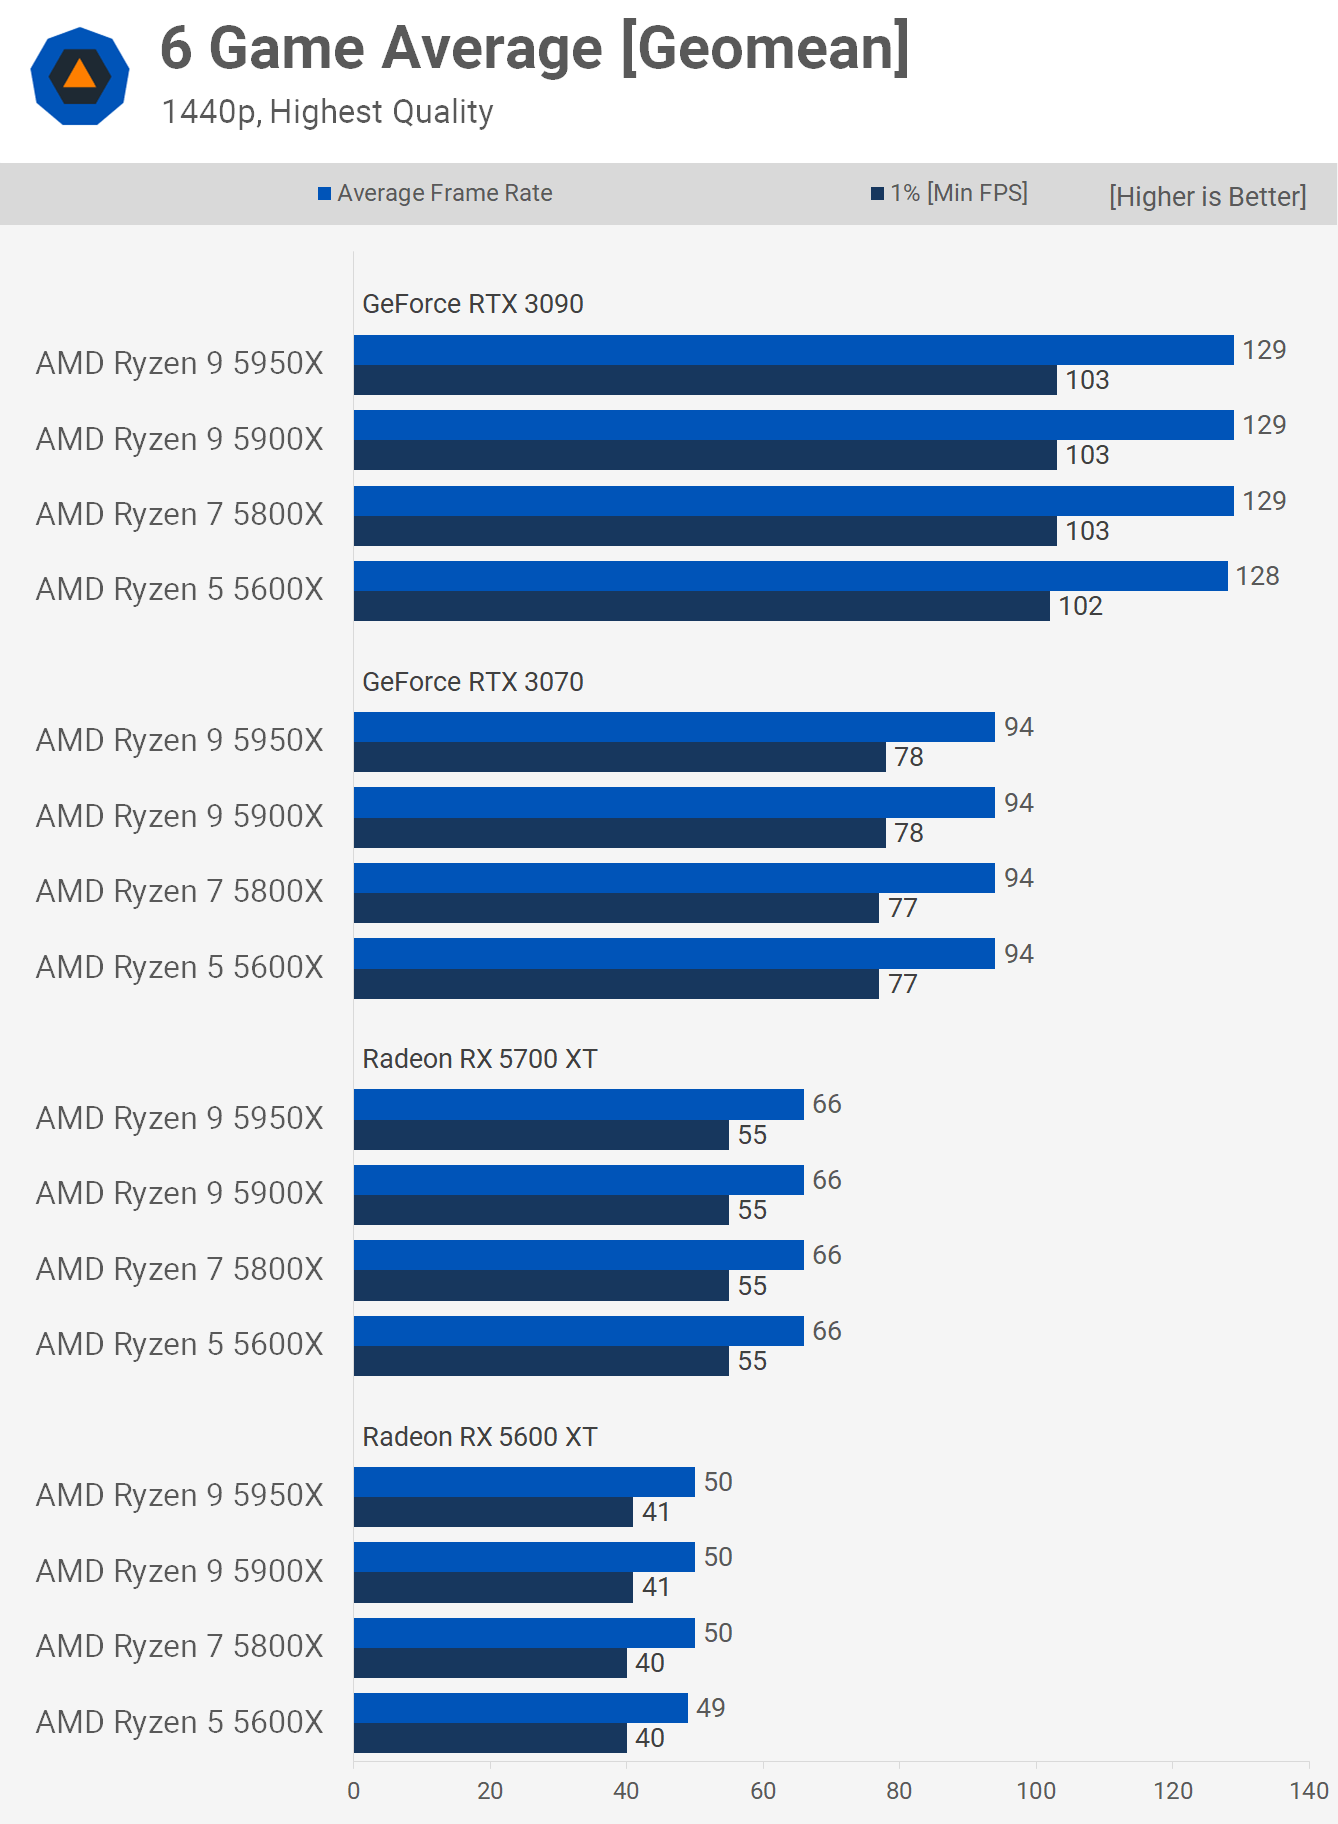
At 1080p using the ultra quality preset we found that on average there is no performance difference to be seen in modern games when using the RTX 3070, 5700 XT and 5600 XT. Again, as seen in the day one review, the 5950X only offers a ~4% performance boost over the 5600X, and with both delivering smooth performance in all games, there's little reason to go beyond the 6-core/12-thread processor.
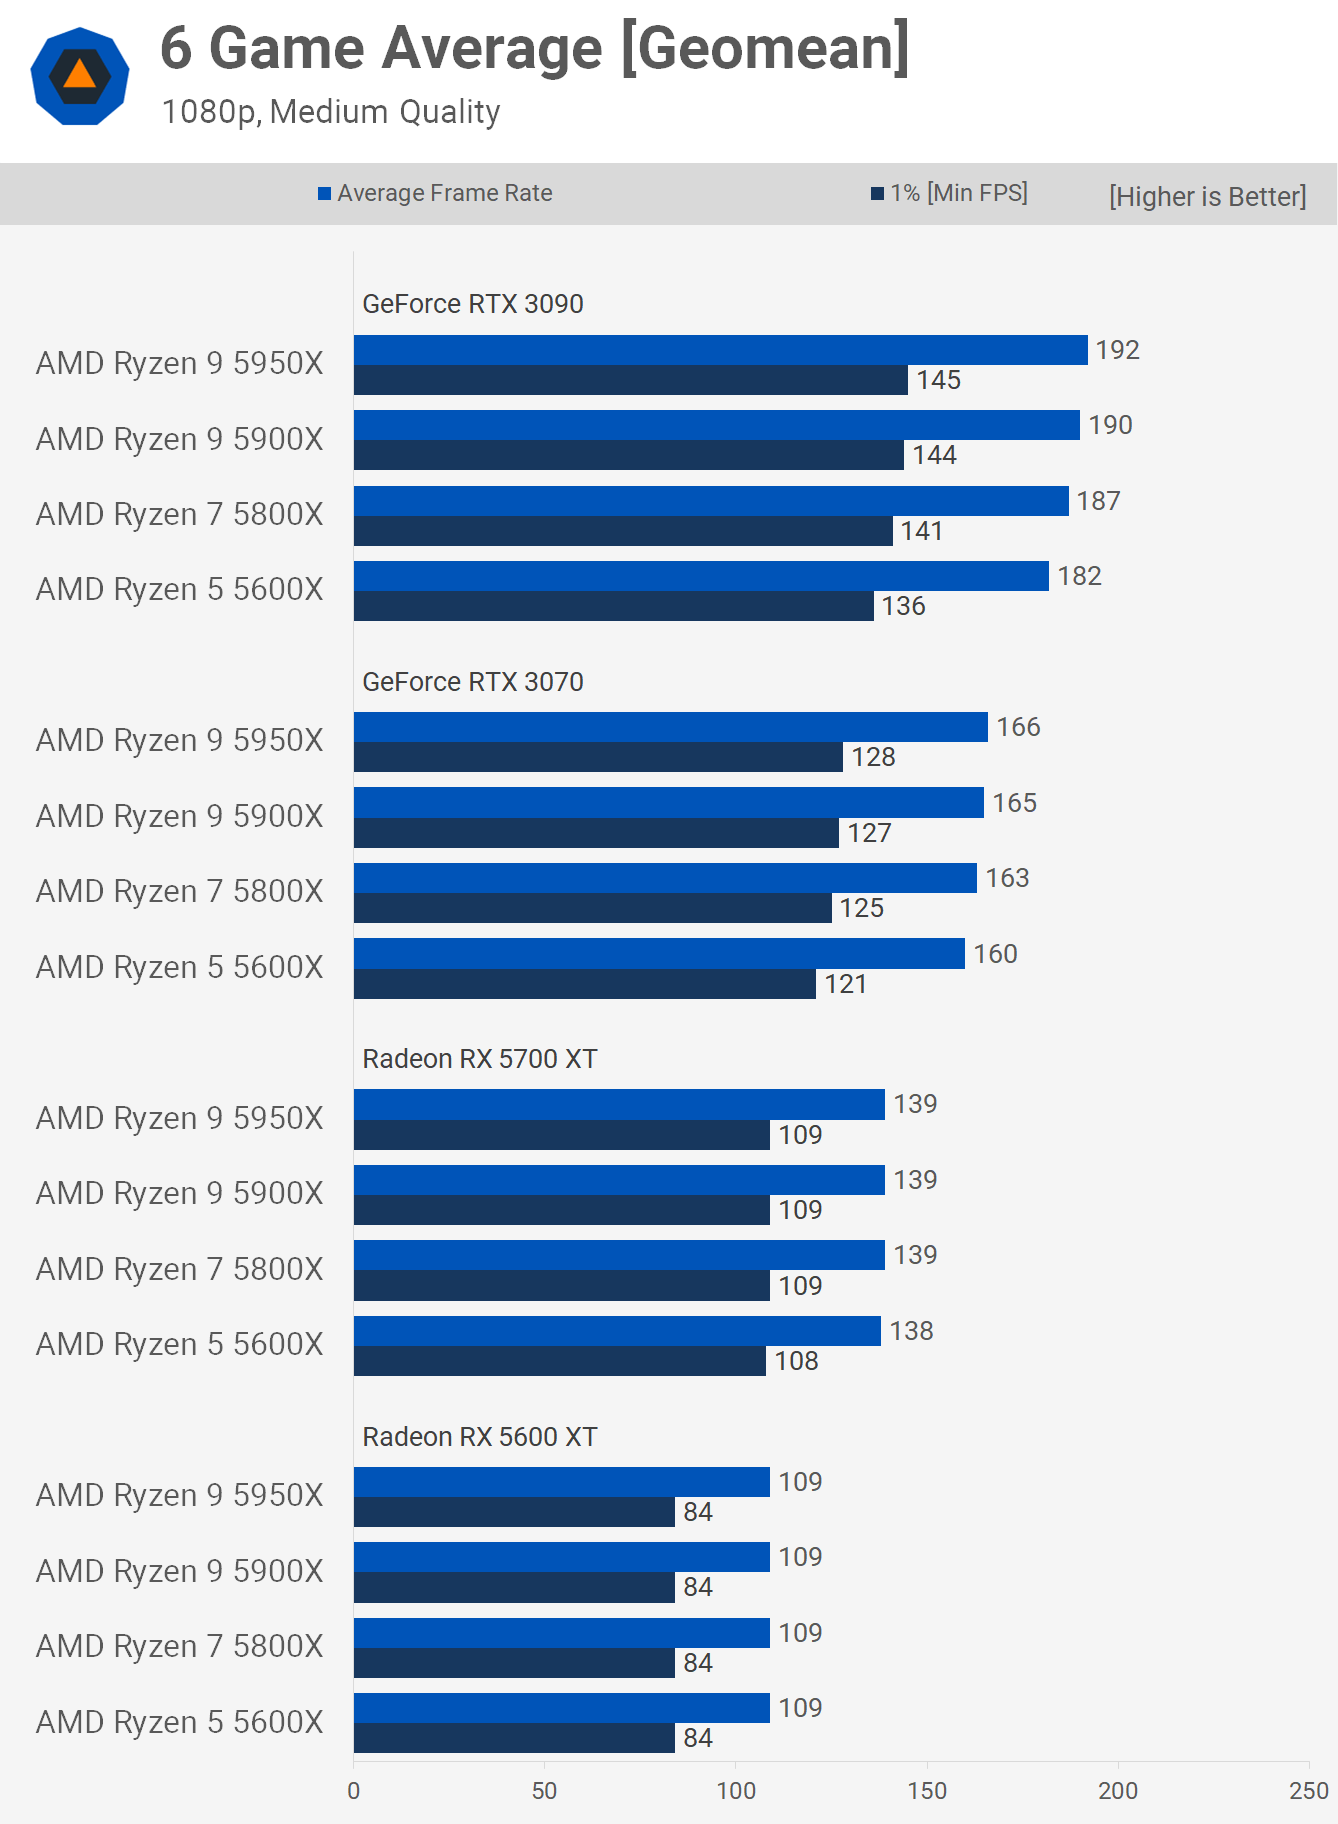
Even if you're gaming with lower quality settings, perhaps you're playing competitive titles, it still doesn't matter which CPU you choose. At most we're looking at a 4% variation in the results with the RTX 3090 and then nothing with the RTX 3070 or slower.
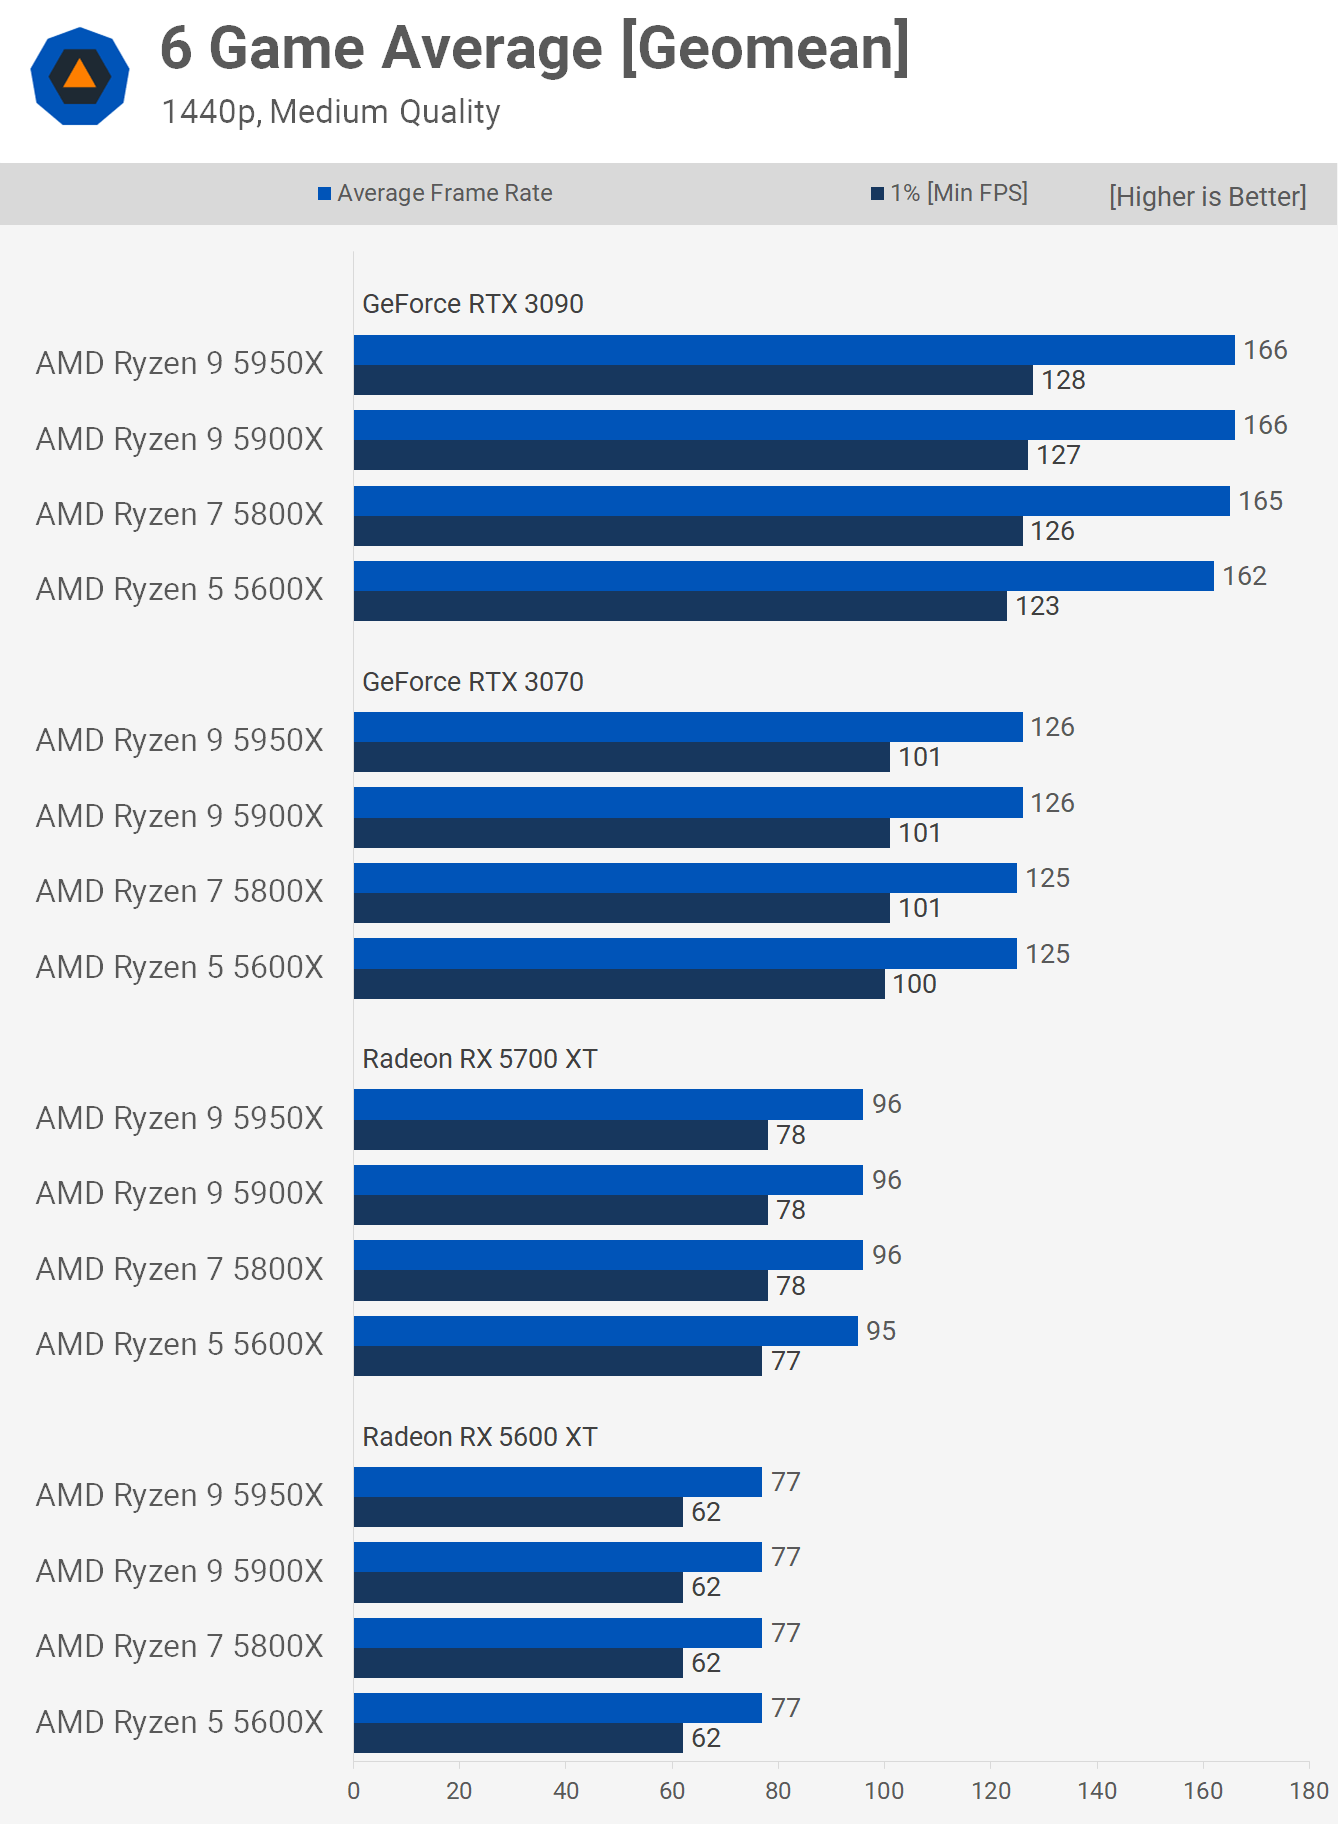
Moving up to 1440p using ultra quality settings you'll typically not see a difference in performance between the 5600X, 5800X, 5900X and 5950X, certainly nothing worth worrying about.
It's the same situation using the lower quality medium settings, for the most part even with an RTX 3090 you'll see little to no performance difference in the latest and greatest titles.
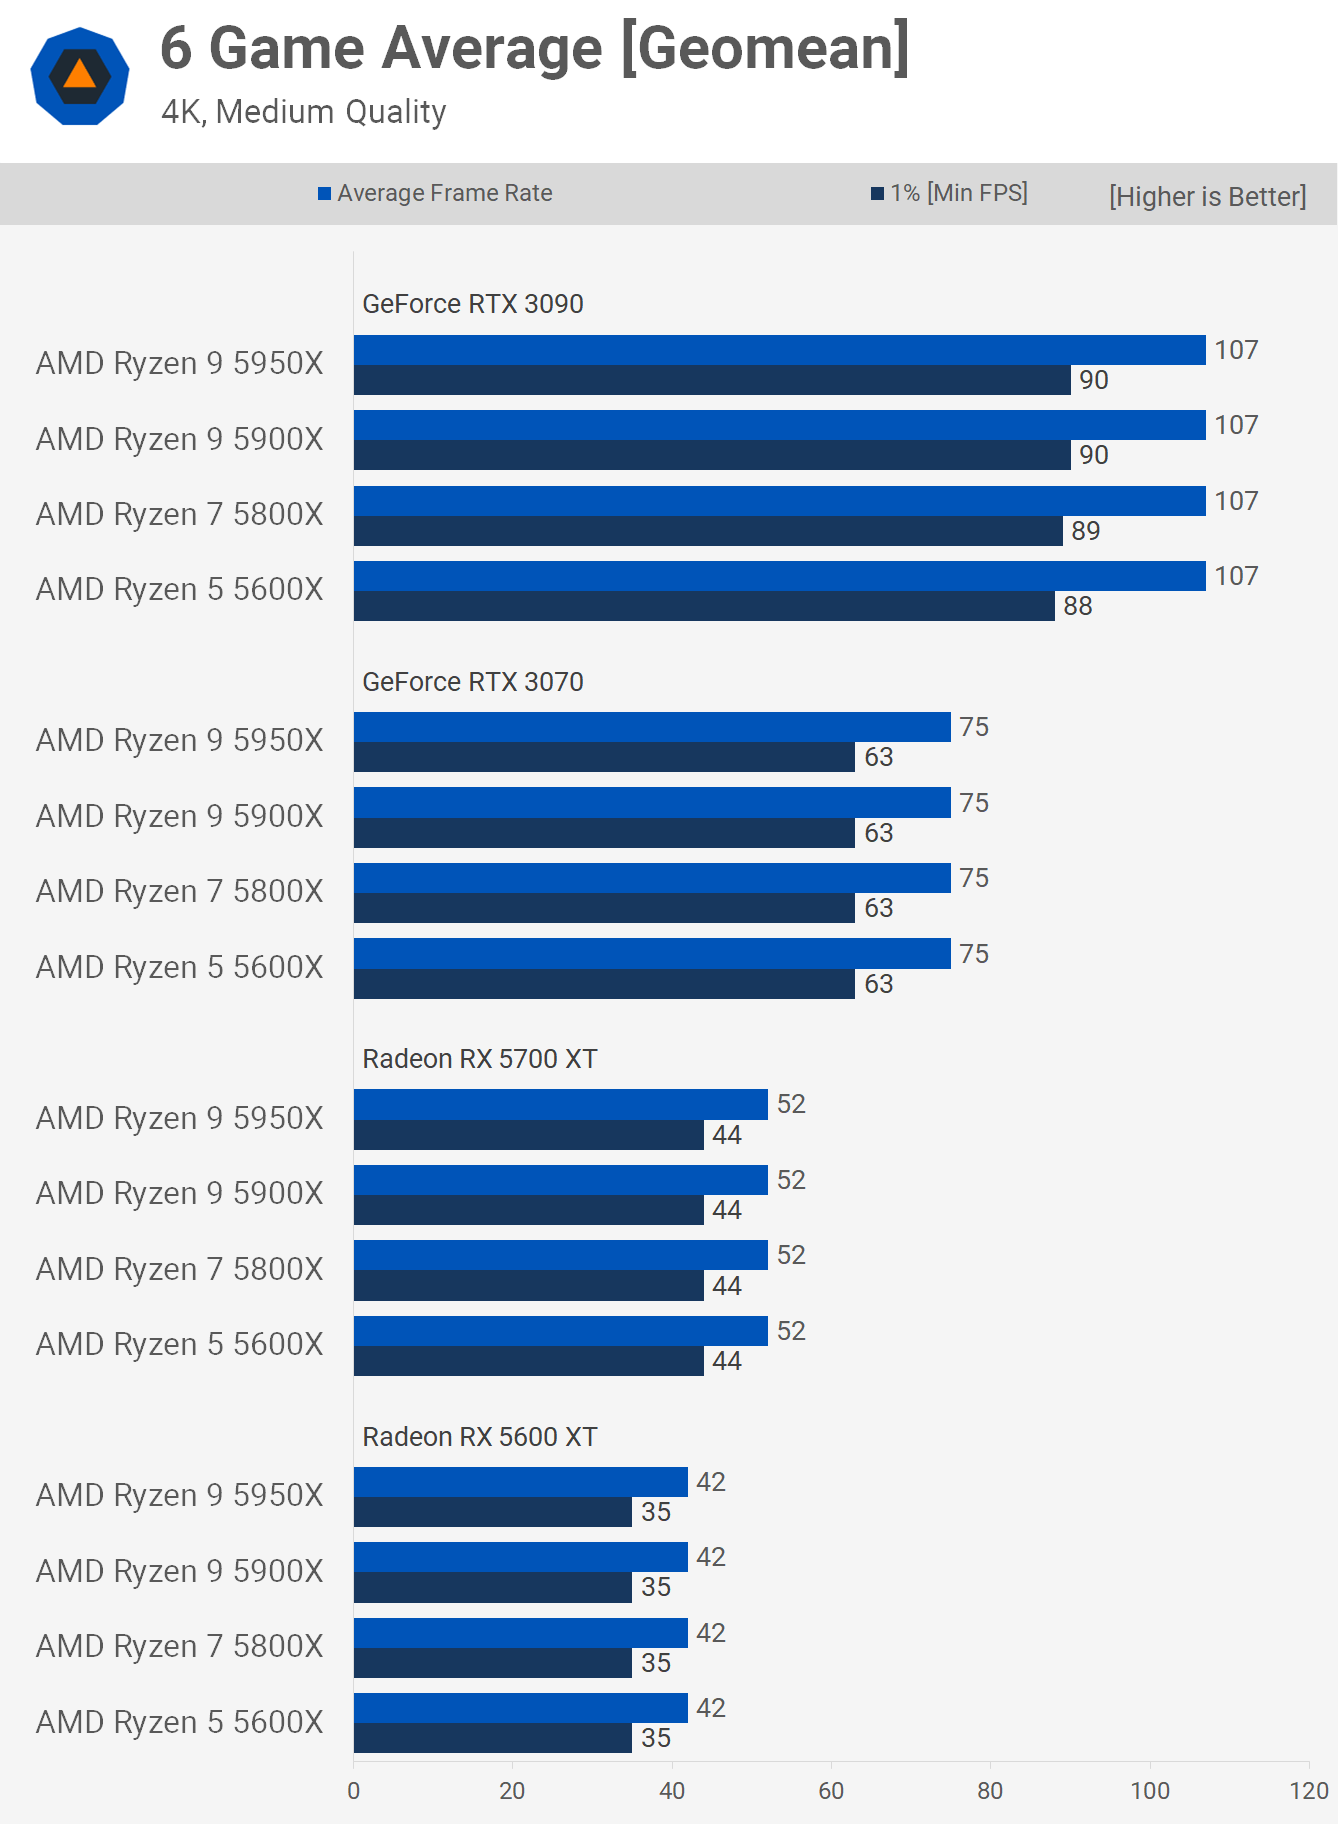
Obviously there's little point in discussing the 4K data, so here's a quick look the ultra settings and now an even quicker look at the medium quality results. What We LearnedNothing earth shattering came in after all that testing, but it does help put to rest a few questions we've seen going around regarding lower quality settings, competitive titles, core counts, and so on. Basically, it doesn't matter how fast your graphics card is, you can go right up to a GeForce RTX 3090 and you’ll sacrifice nothing by using a Ryzen 5 5600X. This applies whether you're playing esports titles using competitive quality settings, like what we saw in Rainbow Six Siege, or the latest and greatest AAA titles like Cyberpunk 2077. It doesn't matter how fast your graphics card is, you can go right up to an RTX 3090 and you’ll sacrifice nothing by using a Ryzen 5 5600X. This testing while quite boring will pave the way for some really interesting comparisons with older Ryzen CPUs and, of course, Intel CPUs, and that's something we plan to invest a lot of time in over the coming months. For example, it will be really interesting to see how the Zen+ range scales as we expect core count will play a more substantial role there, given the individual cores are slower.
Something we did find interesting when looking at the competitive gaming angle is the GPU comparison. In Rainbow Six Siege we were looking at well over 200 fps at all times with a Radeon RX 5600 XT, 216 fps for the 1% low and 279 fps for the average frame rate. This proves that for esports gaming you often only need a very basic graphics card and not a RTX 3060 Ti or better. For many of you, it won't be news to hear that competitive gaming is often more about the CPU than it is the GPU, even for games like Call of Duty, Battlefield V and PUBG. On a side note, we often find it a bit strange when readers appear to get upset that we don't often test CPU performance in titles like Rainbow Six Siege or Fortnite using competitive quality settings, but instead use a high-end GPU at 1080p with ultra quality settings. They argue this isn't how gamers play these games and therefore the results are useless, but we totally disagree with that. For example, we've just seen here that the 5600X paired with a Radeon RX 5600 XT is good for well over 200 fps at 1080p using competitive-type quality settings. However, our normal CPU test method which would use an RTX 3090 at 1080p saw all four CPUs push over 500 fps. So naturally if your GPU can render 500 fps using your desired competitive quality settings, the CPU in question will be able to achieve that. Even if the ultra quality settings halved the frame rates you're still looking at around 260 fps on average. We guess the lesson here is that sometimes you need to read a little further into the results to get the answers you're after. Shopping Shortcuts: |
| How to Mute Spotify Ads On Android Devices in 2021 Posted: 11 Feb 2021 12:20 AM PST As of now, there are hundreds of music streaming apps available for Android smartphones. However, if we have to pick any one of them, we would like Spotify. Compared to other music streaming apps for Android, Spotify has more content, and it offers a great music and podcast streaming service for free. However, the free account does have some limitations. You get to watch few ads between the songs in the Spotify free version. Although the premium plans are affordable, users still look for an alternate way to stream music for free. There are actually multiple ways to block ads on Spotify. For example, you can add custom DNS like AdGuard to block ads. However, you would need to use a DNS changer app for that. The only downside with the DNS changer app is that Spotify has secured the majority of them. Also Read: 10 Best Alternatives of Spotify That You Should Try Steps to Mute Spotify Ads On Android in 2021The remaining option is to mute the ads on SpotiThisthis art; we will share a detailed guide on how to mute ads on the Spotify Android app. Let's check out. Note: The app listed below mutes the Spotify ads but don't block them. If you want to remove the ads from the app fully, you need to purchase Spotify Premium. Step 1. First of all, head to the Google Play Store and search for the 'Mutify – Mute annoying ads' app. Step 2. Open the app and tap on the 'Install' button. Step 3. Once downloaded, open the Spotify app on your Android device and tap on the 'Settings' icon. Step 4. On the Settings, scroll down and enable the 'Device Broadcast Status' feature. Step 5. Now open the Mutify app on your Android and turn on the 'Mute ads' option. Step 6. Now just play the Spotify music, and Mutify will mute all ads. Step 7. To mute the ads from the songs, you need to change the music from within the Mutify app instead of Spotify. That's it! You are done. This is how you can mute the Spotify app on an Android smartphone. So, this article is all about how to mute Spotify ads on Android devices. I hope this article helped you! Please share it with your friends also. If you have any doubts related to this, let us know in the comment box below. |
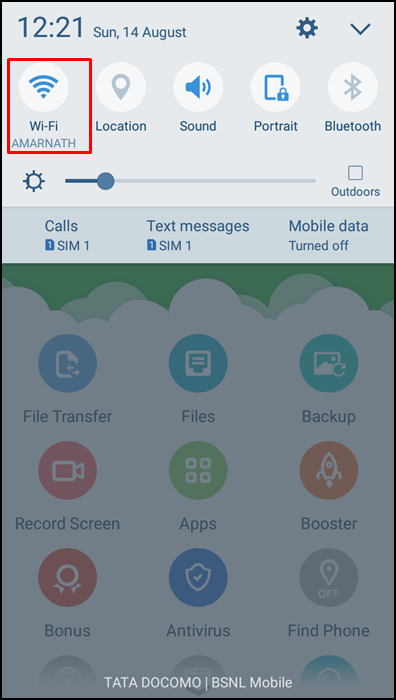
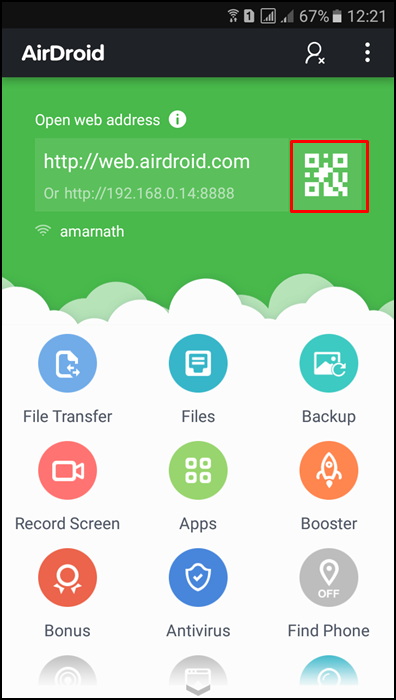
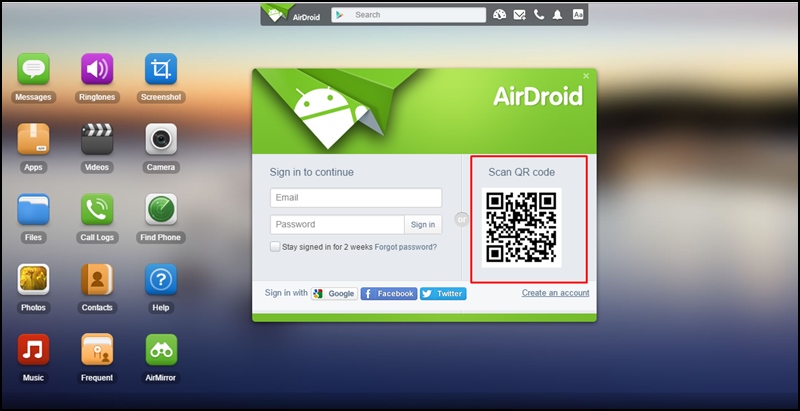
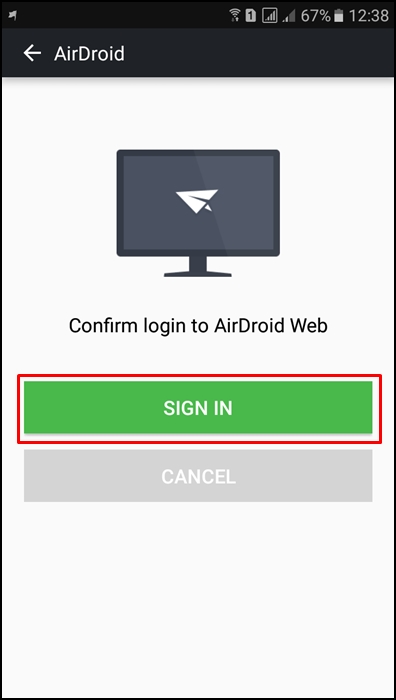
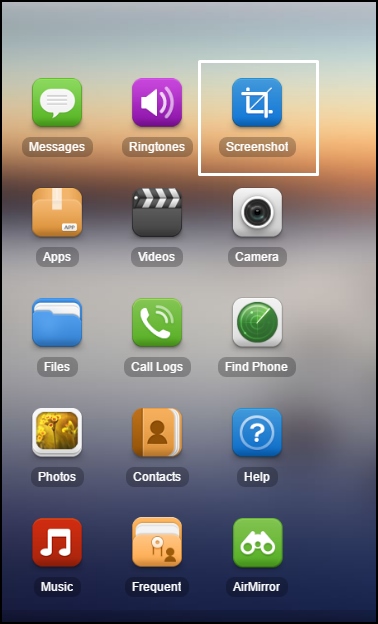
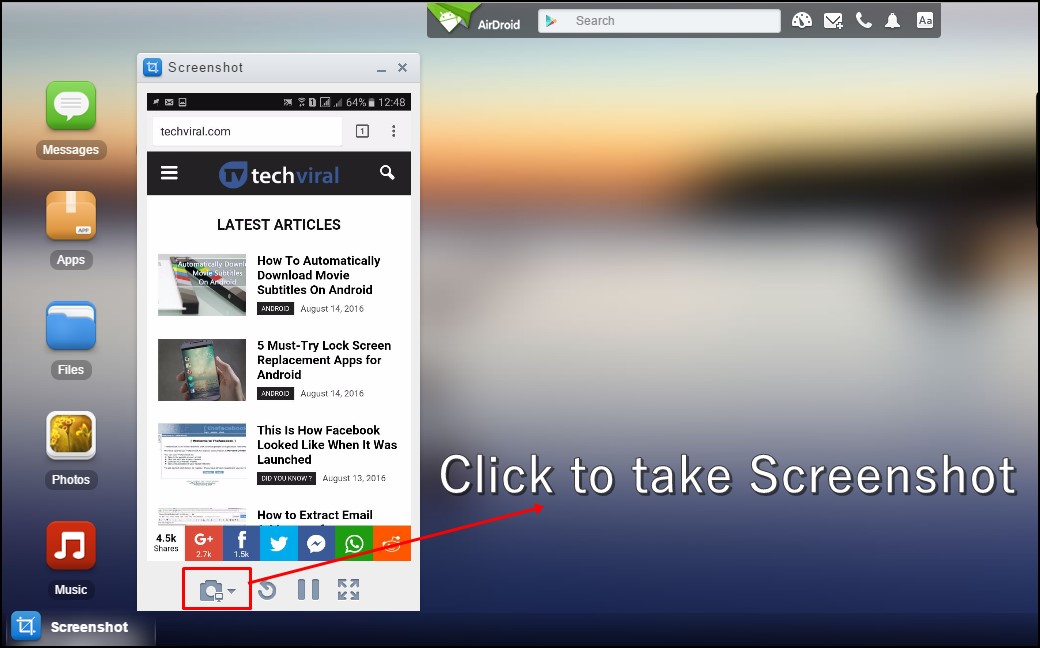
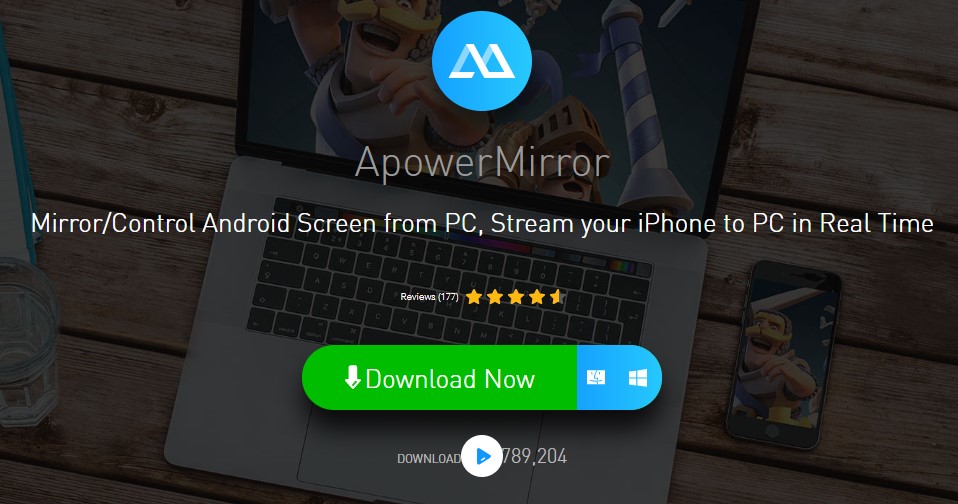
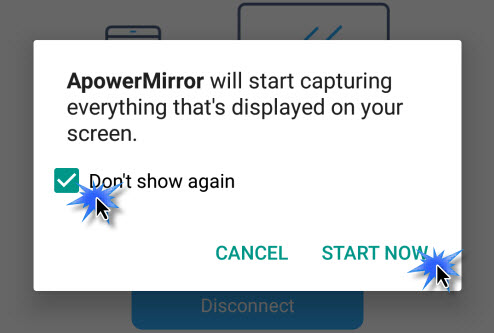
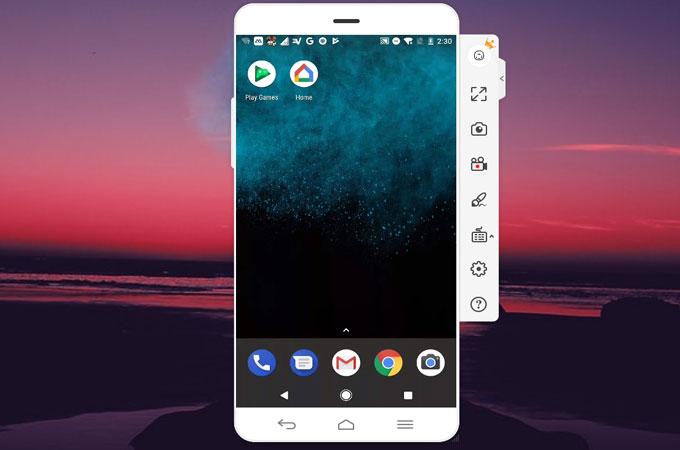
| How to Take An Android Phone Screenshot Directly From PC Posted: 10 Feb 2021 02:25 PM PST Here you will come to know how to Take An Android Phone Screenshot Directly From a PC. You will need to use the app, namely AirDroid, that will help you remotely manage your android from PC; at the same time, it gives you the feature of taking screenshots directly from your PC. Generally, when you want your android screenshots on your Windows PC, you need to take screenshots from your Android and then transfer those screenshots to your PC via Bluetooth, USB cable, or any other way. But this process is very time-consuming, and that's why we are here with a cool alternative for this with which you can take screenshots directly from your Android device, and there will be no need to press some buttons of your android. Also Read: How To Automatically Download Movie Subtitles On Android Steps to Take Android Phone Screenshots Directly From PCThe method is straightforward and depends on a cool app that will allow you to control your device on your PC, and with that, you can easily take screenshots from your PC and save them directly to your PC. Just follow some simple steps below to proceed. Step 1. First of all, on your android device, download and install the app AirDroid: File Transfer/Manage. Step 2. Now connect your Android and PC with a typical wifi network to access your device over that network. Step 3. Now launch the AirDroid app in your android, and you will see an IP address and a port number in the app, note it down. Or you can click on the QR Code scanner. Step 4. Now in your PC browser, open web.airdroid.com, and you will see the "Scan Qr Code" option Step 5. Now open the AirDroid app from your Android and scan the QR Code Given on your Computer screen. Now you need to accept the connection in your android device, and your Android is then successfully connected to your Windows PC. Step 6. Once connected, you can use the "Screenshot" option from the web version of AirDroid to take screenshots. That's it! You are done with this; you can save any screenshot by directly taking it from your PC screen. Using Android SDKWell, on a few Android smartphones, we got no option to take screenshots. However, you can take screenshots by connecting your Android device to your computer and using Google's Android SDK. Here's what you need to do. Step 1. First of all, download and install the Java Development Kit (JDK) on your computer from Oracle's website. Step 2. In the next step, you need to download the Android SDK from Google's Android Developers website. Step 3. In the next step, you need to right-click on the SDK Manager Shortcut and select 'Run as administrator.' Step 4. Finally, check the Android SD Platform-tools box and then install it. Step 5. Next, on your Android, turn on the USB Debugging mode. Step 6. After enabling the USB Debugging mode, connect your Android device to your computer via a USB Cable. Your computer will automatically detect and install the drivers. Step 7. Now head to the C:Program Files (x86)Androidandroid-SDK and then launch the ddms.bat Step 8. Now you will see the interface like below. Here you need to select your Android phone and then click on the device. Under the Device drop-down menu, select 'Screen Capture.' Step 9. It will take a screenshot of your current Android screen. To take other screenshots, tap on the 'Refresh' button. To save the screenshot, click on 'Save.' That's it; you are done! This is how you can take an Android phone screenshot directly from a PC by Using Android SDK. Using ApowerMirrorFor those who don't know, ApowerMirror is one of the best screen mirroring app available for the computer. The great thing about ApowerMirror is that it provides users a wide range of options after reflecting on the smartphone. For example, you can either choose to capture the screenshot, record the entire screen, operating Android features, etc. So, here's how you can use ApowerMirror to take an Android phone screenshot directly from your PC. Step 1. First of all, download & install ApowerMirror on your computer. Once downloaded, download the mobile app on your Android smartphone. Step 2. Now turn on the USB Debugging mode on your Android device and connect it with the computer. Step 3. Launch the ApowerMirror computer tool, and it will show you the list of connected devices. Simply select your Android smartphone and tap on 'Start Now.' Step 4. Now you will be able to see the entire Android screen on your PC. To take a screenshot, tap on the 'Screenshot' icon. That's it; you are done! This is how you can use ApowerMirror to take an Android phone screenshot directly from a PC. So above is all about Take An Android Phone Screenshot Directly From PC. With this method, you can easily take screenshots directly from your PC and easily save them on your Windows PC. Also, you can access lot more features of the AirDroid app on your Windows PC. I hope you like this cool trick, do share it with others too. Leave a comment below if you have any related queries with this. |
| How to Pause Family Bell Announcements From Google Assistant Posted: 10 Feb 2021 11:25 AM PST
Google Assistant speakers and displays can play scheduled announcements with a feature called "Family Bell." But what happens if your routine is going to be different for a while? There's an easy way to pause these announcements. If you're unfamiliar with the Family Bell feature, it's a great way to keep your household on schedule. Simply enter a phrase such as "it's bedtime," select days and times, and choose a smart speaker or display. Google Assistant will make the announcement at the selected time. RELATED: How to Schedule Announcements on Google Assistant Speakers and Displays It's possible to disable a Family Bell announcement if you don't need it, but if you intend to turn it on again later, you can pause it instead. We'll show you how. Open the "Google Home" app on your iPhone, iPad, or Android smartphone or tablet, then tap your profile icon in the top-right corner.
Select "Assistant Settings" from the menu.
Select "Family Bell" from the long list of settings.
At the top of the screen, you'll see a blue highlighted message that says "Pause bells while you're on break." Tap "Get Started."
Next, select the "First Date" box to open the calendar.
Select the beginning date of your break, then tap "Set."
Now select "Last Date."
Choose the end date of the break and tap "Set."
Check the box for any bells that you wish to pause and tap "Save" to finish.
You'll now see the break listed at the top of the Family Bell settings. Tap "Edit" to make changes.
That's it! The Family Bell won't go off during your break, and it will return to its usual behavior afterward. You won't have to worry about remembering to enable it again. |
| You are subscribed to email updates from My Blog. To stop receiving these emails, you may unsubscribe now. | Email delivery powered by Google |
| Google, 1600 Amphitheatre Parkway, Mountain View, CA 94043, United States | |






0 nhận xét:
Đăng nhận xét