How to Embed a Google Drawing Into Google Docs |
- How to Embed a Google Drawing Into Google Docs
- How to Stop Windows 10 From Automatically Using Tablet Mode
- How to Password Protect Photos On Android in 2020
- AMD Ryzen 7 4700U, Ryzen 5 4500U Review
- How To Record Screen On Android Without Root (No Root)
- How to Add Custom DNS Server On Android in 2020
- How to Customize Alert Messages for Specific Emails in Outlook
- How to Install a .watchface File on Apple Watch
- How to Choose a Custom Color for Your Start Menu
| How to Embed a Google Drawing Into Google Docs Posted: 27 Oct 2020 08:03 AM PDT
You can explain your data graphically, include a necessary visual, or make your document stand out. It's all easy to do when you embed Google Drawings into Google Docs. Google Docs offers a built-in tool for creating new drawings on the spot. Inserting them from there is simple. But if you use the official Google Drawings website, you can take your time and make magnificent visuals. Then in a few clicks, add that drawing to a document in Google Docs. Here, we'll show you how to do both. Embed a New Google Drawing in Google DocsHead to Google Docs, sign in with your Google Account, and open your document or create a new one. Place your cursor in the document where you want to embed the drawing and click Insert > Drawing > New from the menu.
Use the tools at the top of the Drawing window to create your masterpiece. You can use lines, shapes, text boxes, and images. When you finish, click "Save and Close" to insert the drawing into your document.
If you need to change your Google Drawing later, select it in the document and click "Edit" in the toolbar that displays.
Embed an Existing Google Drawing in Google DocsWith Google Drawings, you can do a bit more than with the Drawing tool in Google Docs. Along with the basics, it lets you create charts for data or diagrams for timelines and processes. The nice thing about Google Drawings is that your creations are automatically saved to your Google Drive. When you go to your document in Google Docs, click Insert > Drawing > From Drive.
Select the drawing or use the search box at the top to locate it and hit "Select."
Then choose if you would like to link to the source or insert the drawing unlinked and click the "Insert" button.
To Link or Not to LinkIf you decide to link the source, anyone who views your document will be able to see the drawing even if you don't share it separately through Google Drawings or Google Drive. In addition, you can make changes to the original file in Google Drawings and those edits will be visible in the Google Docs document. You'll see an "Update" button display on the drawing in the document to apply the changes.
If you choose the option to insert the drawing unlinked, it will reside in your document as its own entity. Whether you want to create a visual on the fly or insert one that you took you days to make, you can embed a Google Drawing easily into any Google Docs document. | ||||||||||||||||||||||||||||||||||||||||||||||||
| How to Stop Windows 10 From Automatically Using Tablet Mode Posted: 27 Oct 2020 07:02 AM PDT
Originally, Windows 10 would ask if you wanted to switch to Tablet Mode if you disconnected your keyboard or folded your convertible PC. Starting with the October 2020 Update, Windows 10 now automatically switches your machine to tablet mode without asking. If you prefer, it's easy to turn this off in Settings. Here's how. First, open Windows "Settings." The easiest way is to open the Start menu and click the small gear icon in the tiny sidebar on the left. Or you can press Windows+i on your keyboard.
In "Settings," click "System."
In the "System" sidebar, click "Tablet."
In "Tablet" settings, click the drop-down menu below "When I use this device as a tablet."
In the menu that appears, select either "Don't switch to tablet mode" or "Ask me before switching modes." Here's what each choice does.
Choose the option that matches your personal preference. You can also experiment with each choice to see which you like the best.
When you're done, close "Settings." After that, the next time you physically move your device into a tablet configuration, Windows 10 won't automatically switch to tablet mode. It's nice that even while adding new features, Windows still lets us have control over how these functions of our PCs work. RELATED: What is Tablet Mode in Windows 10 and How to Turn it On and Off
| ||||||||||||||||||||||||||||||||||||||||||||||||
| How to Password Protect Photos On Android in 2020 Posted: 27 Oct 2020 02:47 AM PDT Let's admit; we now use smartphones more than our PC. We store our essential files like important messages, business documents, private photos & videos, etc. on our smartphone itself. If we talk about the photos & videos, these are the files that we don't want to share with others. At the same time, we can't restrict our family members or friends from using our smartphone. So, in such a scenario, one needs to use a third-party app locker. If you have a Samsung device, you need to use the 'Secure Folder' feature to lock your private photos & videos. However, if you don't have a Samsung device, then you need to use KeepSafe Photo Vault. What is the KeepSafe Photo Vault?KeepSafe Photo Vault is one of the best photo vault applications available on the Google Play Store. With KeepSafe Photo Vault, you can put all your private photos behind a lock. It allows you to lock photos via a PIN, Pattern, or Fingerprint. The app's premium version offers few advanced features like you can assign individual PIN codes to access particular albums, take photos of intruders, create a fake KeepSafe vault, etc. Steps to Password Protect Photos on AndroidBelow, we have shared a step-by-step guide on how to password-protect photos on Android using the KeepSafe Photo Vault. Let's check out. Step 1. First of all, download & install Keepsafe photo vault on your Android device. Step 2. Once done, open the app and grant permission to encrypt your photos & videos. Step 3. On the next page, create an account with KeepSafe. Step 4. Now, set up a PIN to protect your images. Step 5. On the main screen, tap on the (+) button and click on 'Import Photos' Step 6. Now select the image files that you want to lock and tap on 'Import' Step 7. Once done, the images will be hidden from the gallery. You can view the photo from the KeepSafe photo vault. Step 8. To use the Pattern unlock, tap on the three dots, and select 'Settings'. On the next page, select 'Lock Screen' and then select 'Pattern'. Draw an unlock pattern and confirm the changes.
Step 9. To unlock the locked photos, open the KeepSafe Vault's image, and tap on the 'Export' button. On the next pop-up, tap on the 'Export'. The photo will be saved in the Public folder on your smartphone. That's it! You are done. This is how you can password protect photos on Android. So, this article is all about how to password-protect photos on Android smartphones. I hope this article helped you! Please share it with your friends also. | ||||||||||||||||||||||||||||||||||||||||||||||||
| AMD Ryzen 7 4700U, Ryzen 5 4500U Review Posted: 26 Oct 2020 08:25 PM PDT Today we're completing our testing of AMD's Ryzen Mobile 4000 APUs with a look at the Ryzen 7 4700U and Ryzen 5 4500U, two mainstream chips in the series that have become available in a wider range of laptops in the past few weeks. Testing all of AMD's Zen 2 APUs has been a challenge due to laptop availability – these chips launched way back in March – but today we can find several ultraportables from the likes of Lenovo, HP, Asus, Acer, and others sporting these processors, making this review to a must to follow up to our 4800U, 4800H, and other APU testing. The Ryzen 7 4700U is AMD's mainstream Ryzen 7 mobile processor, as it's the most widely available chip in the series along with the Ryzen 5 4500U. You get 8 cores and 8 threads, so like the 4500U, there's no SMT support, but we do get that increase from 6 to 8 cores. With that comes a small base clock decrease down to 2.0 GHz, but a boost increase up to 4.1 GHz. There's also 8 MB of L3 cache and 12MB of total cache on the processor. The CPU cores use the Zen 2 architecture and the entire chip is a monolithic die built on TSMC's 7nm node.
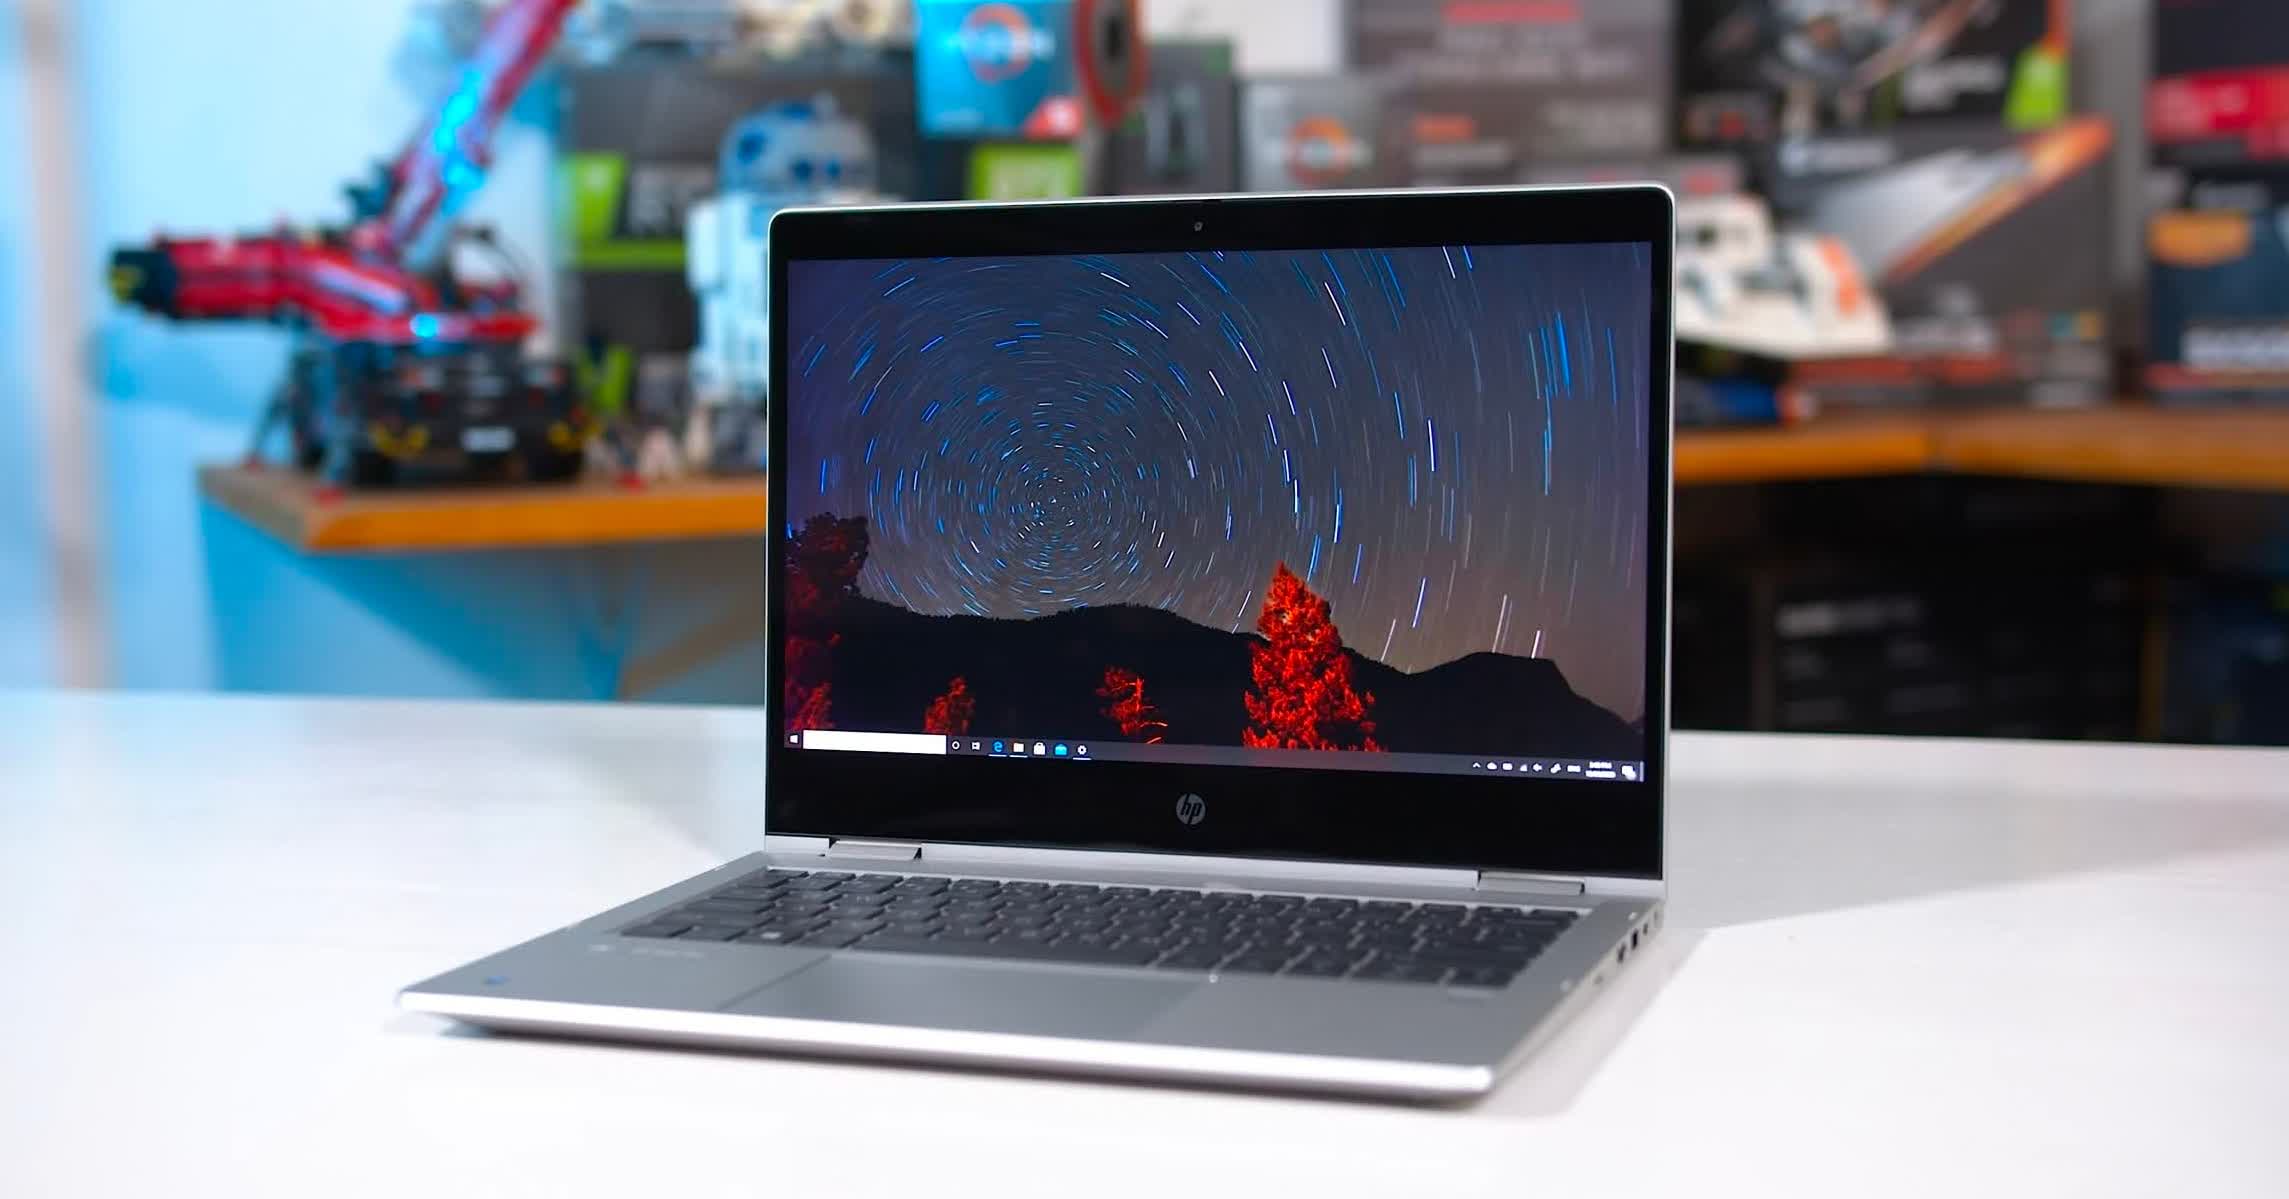
For the GPU, we see an increase over the Ryzen 5 4500U in both CU count and clock speed. We're getting 7 CUs in the 4700U, one short of a fully unlocked GPU, plus a 1600 MHz maximum clock speed. The Vega architecture is used on Ryzen 4000’s graphics. Sitting either side of the 4700U in this table are the two SMT-enabled parts, the 4800U and 4600U, and it'll certainly be interesting to see how 8 cores and 8 threads compares to 6 cores and 12 threads in these mobile processors. The test platform for today's video is the HP Probook x360 435 G7, an enterprise focused system that comes with a lot of security and management features built-in despite HP choosing not to use AMD's Pro SKUs. This is not the sort of laptop that we would personally buy and while some aspects to it are quite nice, we’re using it as a testbed primarily for the purpose of this review. For testing the only change we made to the system was swapping out the 16GB single-channel memory that the laptop shipped with, for 16GB of dual-channel memory using the same DDR4-3200 spec. Using a single DIMM will adversely impact performance, that’s why we test all laptops using a dual-channel configuration and thus later comparisons are more straightforward. Usual test notes also apply as well. This means we test all laptops and their APUs with the same power configurations, which gives us the most accurate apples-to-apples numbers we can achieve. This allows us to take a more generalized look at how the processors themselves perform, rather than how a specific laptop performs with any configuration the OEM decides to ship. Power is, of course, crucial to mobile hardware as there's usually a hard power limit with these systems to fit everything into the constrained thermal design. So we keep everything here on an equal playing field. The actual performance you see in a laptop will depend on how the manufacturer chooses to configure it, for example, whether they choose a 15W or 25W long term power limit, and how they configure the boost period. Sometimes you'll see performance faster than we show, sometimes slower, but it's important to keep this in mind. We've tested the Ryzen 7 4700U in both 15W and 25W long term power configurations. In keeping with most Ryzen laptops we've tested, both configurations have a boost period where power is increased to around 35W for up to a few minutes. At 15W this boost period is roughly 2 minutes, and at 25W it's roughly 5 minutes. Again, not all laptops will follow this pattern, but it's a common configuration. We'll be focusing on the 15W numbers today, but the 25W results are also in the charts. Let's get into it. BenchmarksStarting with Cinebench R20 as usual, the Ryzen 7 4700U is impressive. With 8 cores and 8 threads, the 4700U is almost twice as fast as the quad-core Core i7-1065G7 in this multi-thread workload, and also 60% ahead of the six-core Core i7-10710U. There's no doubting the latest Ryzen 7 parts are offering class leading multi-thread performance by a mile. Single thread performance is also respectable, coming in slightly faster than the 1065G7. Not a big margin there by any stretch, but considering where AMD used to be in mobile, matching what Intel has to offer is a good result.
However, there are more interesting numbers to consider here. While the 4700U is 20% faster than the 4500U in multi-thread and 5% faster for single-thread, the 8 core 8 thread design isn't faster than the 6 core 12 thread Ryzen 5 Pro 4650U a.k.a. Ryzen 5 4600U. We're looking at essentially the same performance. The 4700U does lead for single-thread, but is slightly slower for multi-thread. At first glance this might be a bit strange, but the benchmark numbers from AMD's launch event only show a 4% margin between these parts in Cinebench, the smallest margin between any of the Ryzen parts. So we guess from that perspective it's not that unusual to see a result like this. There's also quite a significant gap to the Ryzen 7 4800U. Adding SMT to the 8 core part, and perhaps with better binning as well, allows the 4800U to be 30 percent faster in this workload. For reference, adding SMT to the six core SKUs improved performance by 22 percent. So that's just another interesting point to note.
In Handbrake, the 4700U is marginally faster than the 4650U, in keeping with what we saw in Cinebench. It just seems like the 8C/8T design has similar overall efficiency for multi-core workloads relative to the 6C/12T approach when kept to the same power levels. However that's just comparing AMD to AMD. The 4700U is 92% faster than the Core i7-1065G7 in this workload, showing Ryzen's dominance over Ice Lake for any serious multi-core productivity work.
Blender is another workload where the 4700U is quite faster than Ice Lake, but the margins do close up relative to other AMD processors. The 4700U is actually slower than the 4650U here, and only 6 percent ahead of the 4500U. So there’s still a performance gap between Ryzen 5 and Ryzen 7 parts, at least the most common SKUs in that series. The gap is not as significant as in Handbrake or Cinebench where margins were closer to 20 percent.
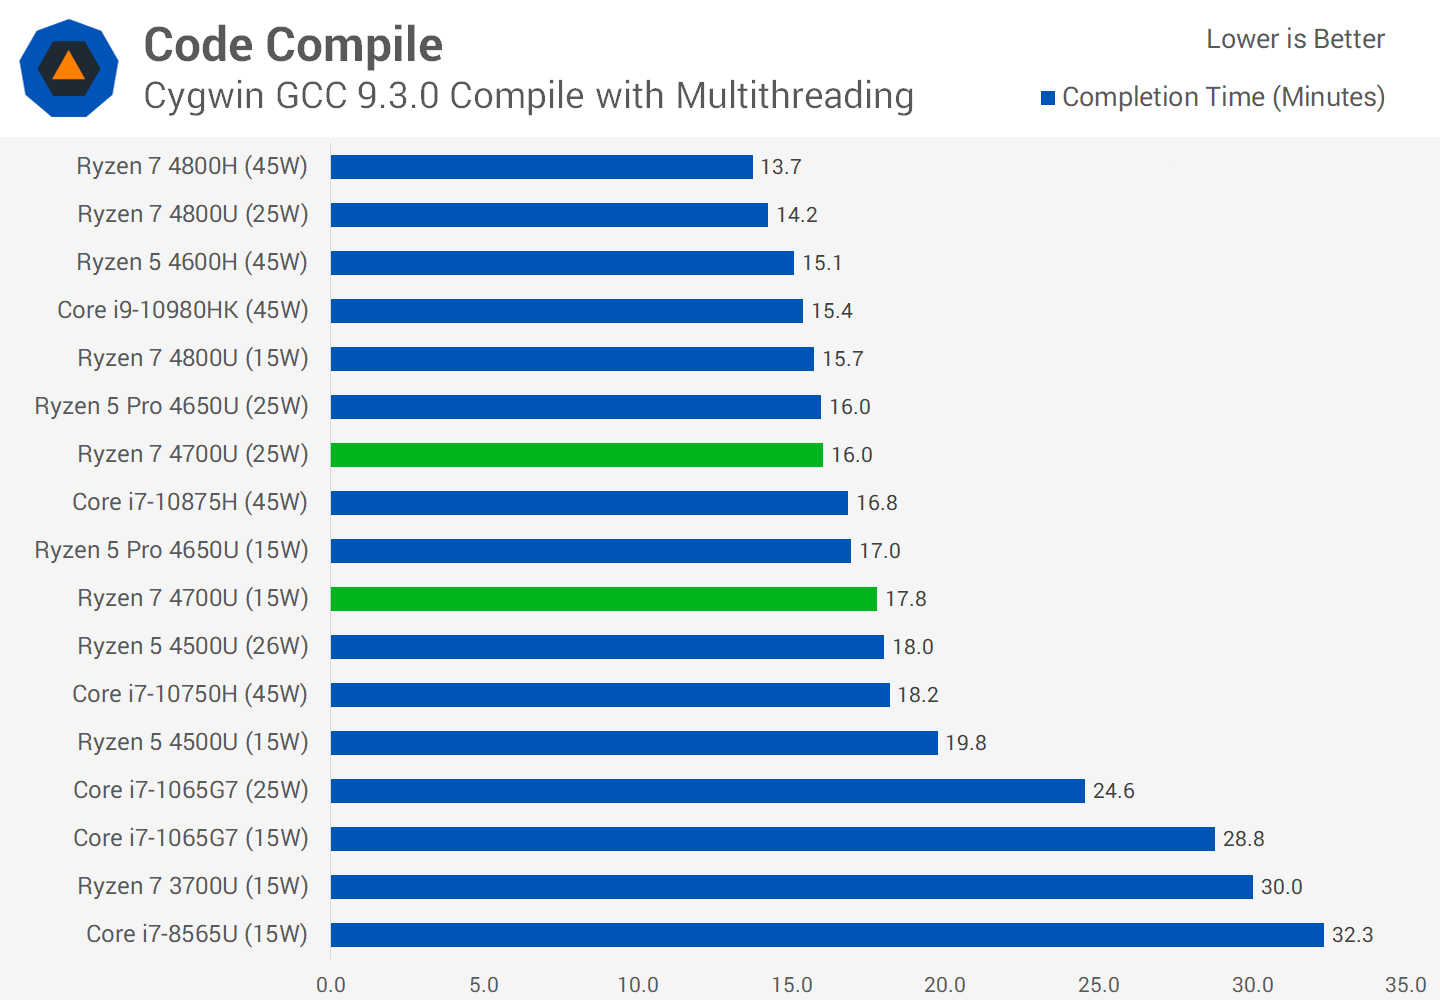
The 4700U remains a powerful processor for code compilation relative to lower tier U-series parts. For GCC compilation, the 4700U is 62% faster than the 1065G7 as it's able to harness its lead in both single thread and multi thread processing. We’re seeing just an 11% margin compared to the 4500U though, so Ryzen 5 is presenting a lot of value. Similar results for Chromium compilation as well if you are interested, this is a very long workload to run.
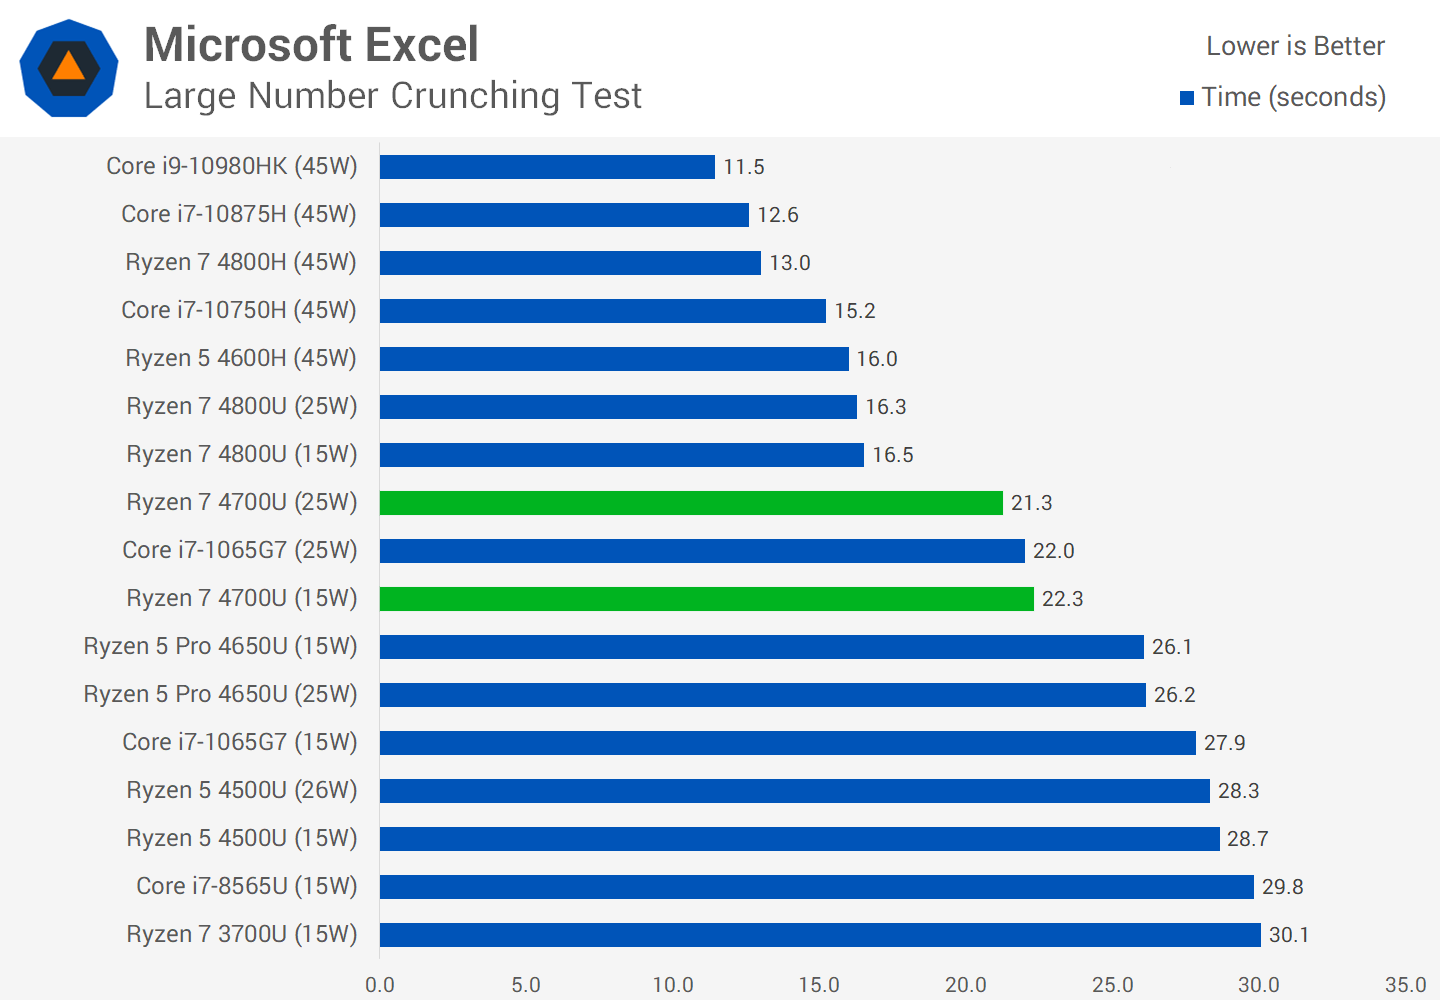
For Microsoft Excel, this is a situation where the 8 core, 8 thread design is better than 6 cores with 12 threads. Our number crunching benchmark presents a 25% lead for the 4700U over the 1065G7, but also quite large leads over the 4500U, at nearly 30%. Then the 4800U is another step up and like a lot of the workloads we've been showing so far, AMD's top of the line processor is definitely one to look out for with class leading performance.
In PCMark's productivity workload, the Ryzen 7 4700U is a capable chip that delivers excellent results for tasks that are quite common on a U-series notebook. The 8 core design without SMT is favored here over the SMT design in an outlier among our testing, leading to around a 10 percent improvement over other processors you might be considering like the 4500U or Ice Lake.
The Essentials workload, which covers app loading and web browsing, the 4700U is a strong performer but it's not that much faster than other U-series chips. There's just a few percent either way between most Ryzen APUs and Ice Lake, so right now there isn't much separating Renoir and Intel's 10th-gen parts. The 4800U does take a step above these chips, but for a lot of the basic stuff you'll be doing on a laptop, the 4700U is very capable.
Ryzen is an absolute beast for decompression, offering a huge performance lead over Intel. However, what we've seen in previous reviews is that AMD's chips really benefit from SMT in this test. The 4800U is 60% faster in this workload with its 16 versus 8 threads, and the 4650U with 12 threads is also a faster chip. With that said, cores are also important, allowing the 4700U to hold a 30 percent lead over the 4500U.
In MATLAB, there's not much separating the 4700U from 4500U, both deliver very similar performance and again the SMT-enabled parts are superior. Because of this, Ice Lake gets a rare win over the 4700U here, although it loses to the 4800U overall. We also see a very small performance lead for Ice Lake in Acrobat PDF to PNG exporting but in this single-thread workload margins are tight and quite similar to other single-core tests.
The final productivity test we're looking at is Adobe Photoshop. Like several other lightly-threaded workloads we've been looking at, we don't see huge margins between most U-series processors. The 4700U at 15W ended up 5% ahead of the i7-1065G7, and about 12% ahead of the Ryzen 5 4500U. Those are decent gains and definitely a reason to upgrade from a Ryzen 5 to Ryzen 7 part for people that do a lot of image editing on their devices. Gaming PerformanceNow time for some gaming benchmarks, to see how the extra compute unit and higher clock speeds translate into gains. In GTA V which also hits the CPU quite hard, there isn't much separating the Ryzen 7 4700U and 4800U, despite the 4800U having the faster GPU.
The CPU does appear to be playing a role here, and it delivers strong performance overall. We are seeing small gains on lower tier products like the 4500U and 4650U.
In Civilization VI, the 4700U isn't much faster than the 4500U or 4650U at 15W, there just isn't a ton of headroom for this chip to show what is has to offer. But at 25W, the taps are opened a bit and the 4700U ends up pulling away, with average frame rates about 10% higher than the six-core models. While the 4650U, for example, doesn't benefit much in this title from a higher power limit, the 4700U and also 4800U do benefit, so it's worth being on the lookout for laptops that can handle more juice.
In CS: GO, performance is good, especially at 25W, where the Ryzen 7 part is able to average over 100 FPS. We're not quite at the performance levels Ice Lake can deliver at 25W, but overall performance is good and we'd say these sorts of laptops are good enough for light esports titles at a native 1080p with competitive settings.
Gears 5 is a heavily GPU limited game running at Medium settings, and so far no integrated GPU is capable of a consistent 30 FPS experience at these settings. With that said, the 4700U is one of the better APUs here. This chip outperforms Ice Lake at 25W with a 37% margin, and narrowly beats the MX250 as well, when paired with the 1065G7. The 4800U is still the faster chip with a fully unlocked Vega design, it's about 16% ahead here, but the 4700U itself is 17% faster than the 4500U, so definitely a good reason to upgrade when paired with the other advantages of this chip.
The 4700U also delivers great performance in F1 2019 with the Ultra Low preset for an ultraportable. The 7 compute unit design stretches its legs here, particularly at 25W, delivering 44 FPS on average which is playable. Performance SummaryWhen reviewing the benchmark data on a head to head comparison, we see a similar story to past Ryzen reviews when comparing the Ryzen 7 4700U to the Core i7-1065G7. In multi-thread workloads, the 8 core design even without SMT is able to deliver up to twice the performance, with strong leads in important tasks like 7-Zip decompression and code compilation. The 4700U is also competitive in single-thread tests, holding its own for basic productivity tasks and photo editing. It's not a universally faster processor, but when the 4700U is faster, it tends to be a lot faster.
There are also plenty of reasons to upgrade your laptop from a 4500U to 4700U configuration during the purchase process. You can expect 20-30 percent better multi-thread performance, which is good scaling from the addition of two cores in the same power envelope. The 4700U also has the advantage of higher single-core turbo clocks, so 1T applications and basic tasks are faster, too. Getting 10% better performance in Photoshop is good for moving up a tier.
Where things get really interesting is comparing the 4700U to the 4650U. The 8 core 8 thread design does not appear to be more efficient than the 6 core 12 thread model in all workloads.
There are times when the 4700U is faster, like in Handbrake and Excel, but other times where the 4650U is faster, like code compilation and Blender. The 4700U does have the edge in gaming and lightly threaded tasks due to its higher spec configuration, but it's clear that adding more cores isn't necessarily better than just adding SMT.
As for the Ryzen 7 4700U versus 4800U, well it's clear the 4700U is quite a bit slower in most workloads. We're seeing 20 to 30 percent worse performance in multi-thread workloads, and single digit differences for lightly threaded tasks. The 4800U is a very powerful chip at 15W and sits at the top of AMD's product stack for a reason.
We think it's also worth showing just how much faster the 4700U is over the 3700U. The Ryzen 7 4700U is twice as fast in many multi-thread workloads, and up to 2.5x faster in Handbrake, where the new Zen 2 architecture is a lot better for handling that sort of test. Then for single-thread, the 3700U was really terrible. The 4700U is 30 to 40 percent faster, which is just crazy. What We LearnedHaving covered all key products in AMD’s mobile lineup, we now have a pretty comprehensive look at Ryzen Mobile 4000 spanning both the U and H series. In case you want to take a look, see our previous reviews for the 4800U, 4800H, 4900HS, 4600H and 4500U. There's a few chips still missing that we haven't tested, like the Ryzen 3 4300U, but we've covered all the big ones. The 4700U is much faster for multi-threaded workloads and roughly equal for single-thread relative to Ice Lake. And while we could spend much of this conclusion going through how much faster the 4700U is over Intel's 10th-gen processors, the fact is Intel is nearly ready to drop 11th-gen Tiger Lake, which will bring a boost to both single core and multi-threaded performance. Previews show Intel is getting an edge in single threaded tasks again, while unable to match Ryzen for multi-thread. We expect Tiger Lake to show up this holiday season in numerous laptops, in the meantime, let’s stick to the new and interesting takeaways from this testing. There is a decent performance gain between the Ryzen 5 4500U and Ryzen 7 4700U. These are the two most common Ryzen chips on the market and are the two configurations offered for most Ryzen laptops, so the difference between them we're sure is of interest to a lot of people. Previously, with many Intel generations there wasn't much separating Core i5 and Core i7 mobile CPUs. With Skylake back in 2015, for example, both i5 and i7 models had 2 cores and 4 threads, and the same GPU. The difference usually amounted to cache and clock speeds. The Core i7 was a bit higher specced, so you got a small performance upgrade. Even today, there’s limited segmentation in Intel's line-up. With Ryzen, the 4700U offers 20% gains on the 4500U in multi-thread workloads thanks to those two extra cores. That may give buyers a legitimate incentive to upgrade. You also get faster single-thread performance and better GPU performance, too, so the overall difference between these chips is significant. We think today’s review also answers the question of why the Ryzen 5 4600U is totally absent in the market. There's not much of a performance difference between it and the 4700U. In our opinion, having both the 4600U and 4700U is a bit unnecessary, we really only need one, and OEMs seem to think so as well. Their choice to favor the Ryzen 7 part, with its more marketable name and ability to be sold at higher price points makes sense from their perspective. Anyone that's bought a Ryzen 7 4700U device over the last few months it's been available should be pretty happy with what they've received. It's certainly a better choice performance-wise than any Ice Lake or Comet Lake processor, and we wouldn't recommend anyone buy a 10th-gen Intel laptop with Tiger Lake’s release now imminent. We do expect a fierce battle between Intel and AMD in the months ahead. So while the Ryzen 7 4700U is an excellent buy right now, when Tiger Lake hits the market that may change. In particular, we’d expect Tiger Lake to make strides forward in GPU and single-thread performance. Shopping Shortcuts | ||||||||||||||||||||||||||||||||||||||||||||||||
| How To Record Screen On Android Without Root (No Root) Posted: 26 Oct 2020 06:53 PM PDT Today there are more than billions of people who are using Android right now. This operating system relates to Google and compared to any other Mobile OS, Android has far more features and customization options. If you have been using an Android operating system for a while, then you might know that the OS doesn't have a screen recorder. However, there are plenty of third party screen recorder apps available on the Google Play Store. With those screen recorder apps, you can easily record all the screen activities on Android. Record Screen On Android Without Root (No Root)So, in this article, we are going to share some of the best screen recorder apps for Android that you can use today. So, let's check out. 1. AZ Screen RecorderIf you are searching for a high-quality screen recording app for your Android device, then you need to give this one a try. Guess what? AZ Screen Recorder can be used to record or live-stream your Android screen. The app is widely used by gamers who used to stream their gameplay videos on different video platforms. Features:
2. Rec.This is another Android app that records screen activity. This app is freely available and works without root. In this app, you have to set the bit rate and file saving path at the very first use. You can even record audio with this app and this app gives you 10 seconds when you click on ready to make you ready for the recording. Features:
3. MobizenThis is one of my favorite apps to record Android screen activities without rooting it. In this app, you can record screen, share data b/w computer, and your Android and lots of more options that are available in this app. Also, this app is freely available on the Google Play Store. Features:
4. Google Play GamesFor those who don't know, Google Play Games has a hidden screen recording functionality that can be utilized to record screen. You need to play any game from Google Play Games and exit the game once the recorder is on and it will record everything. Features:
5. Stream – Live Video CommunityIt is actually a twitch like a social networking platform. Here you can stream your Android device screen. All your recordings will be streamed live. Users can also choose to save the record screen directly on the phone for later use. Features:
6. Vysor
Vysor lets you view and controls your Android on your computer. Use apps, play games, control your Android with your mouse and keyboard. Go wireless, and mirror your Android to your desktop; great for presentations. The desktop client also has a screen recorder that records the Android screen. You can find our full guide on Vysor here. Features:
7. SCR Screen RecorderIt is a free, stable, high-quality screen-recording app! SCR Screen Recorder helps you record smooth and clear phone-screen videos. With a variety of features and no rooting needed, SCR Screen Recorder provides an easy way to record game videos, call videos, live shows, and more. Features:
8. Lollipop Screen RecorderIt is simple and easy to use screen recorder for devices running Android 5.0+. It uses official APIs added in Android Lollipop+ so it requires no rooting. Videos are stored in an easy to find the folder, so you can use your favorite applications to view, edit, and share them. Features:
9. ADV Screen RecorderIf you are searching for a screen recorder app for Android that lets you record screen in an easy way, then you need to give this app a try. The app works with both rooted and non-rooted devices and it lets you use the front or back camera while recording. It also has some other features like editing the recordings, trim video, etc. Features:
10. ScreenCam Screen RecorderThis app doesn't need any root access to record your screen and works on all phones with Android Lollipop 5.0 and above. You can also record audio along with the screen recording and get it beautifully combined with the recorded video. Features:
This is all about the Android Screen Recording Apps To Record your Screen Activity. If you know any other such screen recording apps, let us know in the comment box below. | ||||||||||||||||||||||||||||||||||||||||||||||||
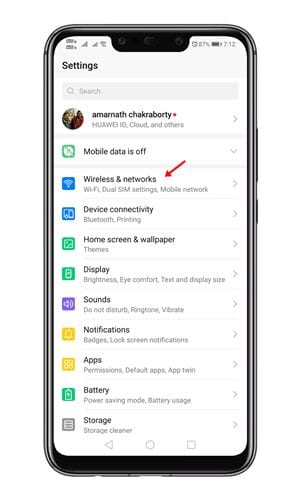
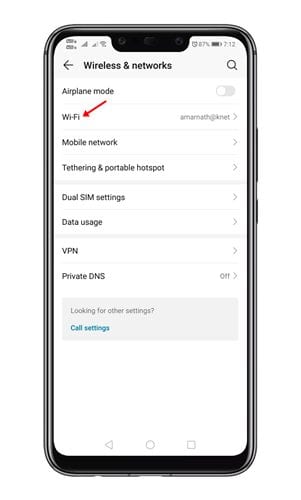
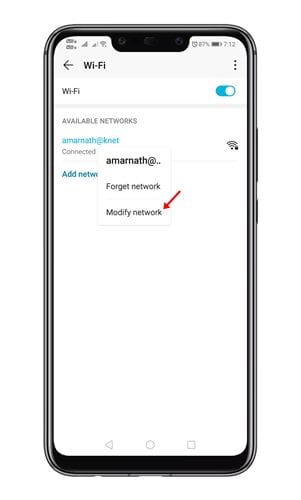
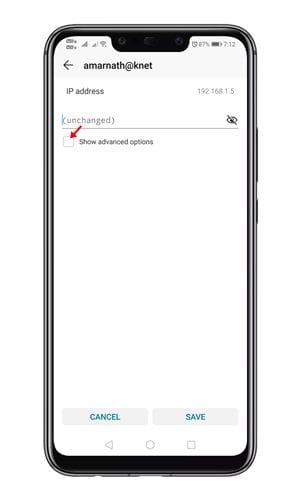
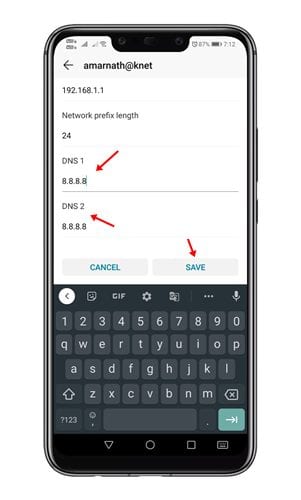
| How to Add Custom DNS Server On Android in 2020 Posted: 26 Oct 2020 05:45 PM PDT Domain name System or DNS is an important process that matches the domain names to its IP Address. When you enter a URL in the address bar, the DNS servers look at the IP Address of that domain. Once matched, it comments on the web server of the visiting website. Although it's an automated process, sometimes DNS tends to misbehave, especially the ones assigned by the ISPs. Unstable DNS servers often trigger errors as DNS lookup failed, DNS server not responding, etc. All of these DNS issues can be used by using a Custom DNS. As of now, there are hundreds of Public DNS servers available out there that you can use for free. Public DNS servers such as Google DNS, OpenDNS, Adguard DNS, etc, offer better protection and speed. Steps to Add Custom DNS Server On AndroidWe have already shared an article on how to change DNS servers on Windows. Today, we are going to share the same thing for Android. In this article, we are going to share a detailed guide on how to add a custom DNS server on the Android device. Let's check out. Step 1. First of all, open the App drawer of your Android and select 'Settings' Step 2. Under the Settings, tap on the 'Wireless & Networks' Step 3. On the next page, tap on the 'WiFi' Step 4. Now long press on the connected network and select the option 'Modify Network' Step 5. Enable the 'Show advanced options' Step 6. Now scroll down and find the 'DNS 1' and 'DNS 2' field. You need to enter the custom DNS server in both fields and tap on the 'Save' button. For a list of best public DNS servers, check out the article – Best Free & Public DNS Servers. That's it! You are done. This is how you can add a custom DNS server on Android. I hope this article helped you! Please share it with your friends also. | ||||||||||||||||||||||||||||||||||||||||||||||||
| How to Customize Alert Messages for Specific Emails in Outlook Posted: 26 Oct 2020 04:00 PM PDT
Email can overwhelm you with unimportant messages. Sometimes, though, you really need to know when a certain message hits your Inbox. Fortunately, you can set up custom alerts in Microsoft Outlook to make sure you don't miss the messages that are most important. To set up custom alerts, we're going to create a rule in Outlook on a desktop computer. This method, unfortunately, won't work in the Outlook web app; if you use that, you'll just have to keep your inbox as clear as possible. After you open Microsoft Outlook on your computer, click Home > Rules > Manage Rules & Alerts.
Click "New Rule."
In the "Rules Wizard" window, select the "Apply Rule on Messages I Receive" checkbox, and then click "Next."
You can choose any conditions you want. We're going to set up an alert for emails from a specific address. To do so, we select the "From People or Public Group" checkbox, and then click "People or Public Group" in the bottom box.
You can then select a contact from your address book or type the email address, and then click "OK."
Click "Next."
Scroll through the options and select the "Display a Specific Message in the New Item Alert Window" checkbox. Then, click "A Specific Message" in the bottom box.
Type the message you want to be displayed. You can use emoji if you want, so we've added two rotating emergency service lights to alert us when a message is important. After you type your message, click "OK."
Click "Finish" in the "Rules Wizard."
In the confirmation dialog box that appears, click "OK."
Click "OK" once again to close the "Rules and Alerts" window, and you're all set!
This rule will now apply whenever an email from the address you typed arrives in your inbox. It will display an alert, even if you've turned off desktop alerts.
An alert will remain visible until you close it. If an email arrives while you're away, you'll still see it when you return to your computer. | ||||||||||||||||||||||||||||||||||||||||||||||||
| How to Install a .watchface File on Apple Watch Posted: 26 Oct 2020 02:21 PM PDT  The Apple Watch allows you to customize clock faces to show all kinds of useful information. But did you know you can take those custom designs straight off someone's wrist? Here's how to install someone else's Apple Watch face. What is a .watchface File?Custom Apple Watch faces can be shared using a .watchface file. This file contains a template with information like which base clock face you're using, your choice of colors, and which complications have been used across the design.
It's important to stress that the .watchface files generated do not contain any personal information. So, a Watch face with an activity ring and date display won't include health data or calendar appointments. When the Watch face is applied to your own watch, your personal activity data and schedule will be used instead. When you share your Apple Watch face with another person, a .watchface file is generated and sent. You will likely only see this file if you share outside of Apple services like Messages or AirDrop. This file format is useful because it can be used to share your designs via other methods. RELATED: How to Share Your Apple Watch Face Installing a .watchface File on Your Apple WatchYou can install .watchface files on your Watch using your iPhone. How you install these files depends on how the other party is sharing their design. Generally, you only need to tap on the Watch face in a Messages conversation or accept an AirDrop transfer, and the Watch app will open and prompt you to "Add to My Faces." If you have the .watchface file in an email, locate the email on your iPhone and tap on the attached .watchface file. The Watch app should launch and prompt you to add the face to your Watch. The same is true for messenger apps like WhatsApp or Facebook messenger: Tap the file and follow the Watch app prompts.
If you have the .watchface file on your Mac, AirDrop is the quickest method of transfer. Right-click (or Control+click) on the file and choose Share > AirDrop. In the window that appears, choose your iPhone. If you don't see your iPhone, make sure that AirDrop is enabled and visible. When you receive the file on your iPhone, you'll be asked to open it in your choice of apps. Tap on "Watch" at the top of the list to open it directly in the Watch app and follow the prompts to add it to your faces. You could also save the file to Apple Notes for Mac, then open the corresponding note on your iPhone.
For Windows users, AirDrop isn't an option. We'd recommend placing the file on a cloud storage platform like Google Drive, OneDrive, or iCloud Drive for Windows. With the file uploaded, open the corresponding app on your iPhone and open the file in the Watch app to add it to your faces. If you don't use cloud storage, you could use a note-taking app that supports attachments like Evernote or OneNote. As a last resort, you can always email the file to yourself then open the email on your iPhone. How to Remove an Apple Watch FaceYou can easily remove any Watch face you have installed or created yourself either via the Watch app on your iPhone or on your Apple Watch directly. On your iPhone, launch the Watch app and tap "Edit" in the "My Faces" section. Tap the "Delete" icon followed by "Remove" to delete the face.
You can also do this on your Apple Watch. Tap and hold your Watch face until the "Edit" button appears. Swipe left and right to choose the Watch face you want to delete, then swipe up on the face to remove it. Give Your Watch a FaceliftThe ability to share your Apple Watch face was added to the Apple Watch as part of the watchOS 7 update in September 2020. Apple's wearable continues to take top honors for its design, activity tracking, and overall convenience. Periodic over-the-air updates help even older devices feel fresh with new features and improvements. Haven't updated your wearable for a while? Learn how to install the latest version of watchOS on your Apple Watch. | ||||||||||||||||||||||||||||||||||||||||||||||||
| How to Choose a Custom Color for Your Start Menu Posted: 26 Oct 2020 09:32 AM PDT
Starting with the October 2020 update, Windows 10 now defaults to a light theme that takes away accent colors from your taskbar and Start menu. If you'd like to select a custom color for your Start menu, there's an easy way to pick it in Settings. Here's how. First, launch "Settings" by opening the "Start" menu and clicking the gear icon on the left. (You can also press Windows+i on your keyboard.)
When "Settings" launches, click "Personalization."
In "Personalization" settings, click "Colors" from the sidebar.
In the "Colors" settings, locate the "Choose your color" drop-down menu. In the menu, select "Custom."
Upon selecting "Custom" from the color menu, two new choices will appear below. Under "Choose your default Windows mode," select "Dark." This Dark mode is required for colorizing your Start menu, but since you've already picked the "Custom" color scheme, you're free to use Light mode apps if you want. So under "Choose your default app mode," pick whichever option ("Light" or "Dark") you like the best.
Next, scroll down the Colors page and locate the "Choose your accent color" section. If you want the color to automatically match your desktop background image, put a check beside "Automatically pick an accent color from my background." Otherwise, click a color in the grid that you'd like to use for your Start menu and taskbar. You can also pick a custom color by clicking the "Custom color" button below the grid.
After that, locate the "Show accent color on the following surfaces" section and check the box beside "Start, taskbar, and action center." (If the "Start, taskbar, and action center" option is greyed out, make sure you select "Dark" as your default Windows mode above. It won't work in Light mode.)
The next time you open your Start menu, you'll see that it has changed to the accent color you selected.
Very nice. If you ever want to switch back to the standard Windows 10 theme, open Settings > Personalization > Colors and select "Light" in the "Choose your color" drop-down menu. Have fun customizing Windows! |
| You are subscribed to email updates from My Blog. To stop receiving these emails, you may unsubscribe now. | Email delivery powered by Google |
| Google, 1600 Amphitheatre Parkway, Mountain View, CA 94043, United States | |







0 nhận xét:
Đăng nhận xét