How to Uninstall Apps and Games on Google TV |
- How to Uninstall Apps and Games on Google TV
- Nvidia RTX 3080 Gaming Performance at 1440p: CPU or Architecture Bottleneck?
- How to Create a Venn Diagram in Microsoft PowerPoint
- How to Turn on Your Flashlight by Tapping the Back of Your Android Phone
- How to Hum to Search for a Song Using Google
- What Is MagSafe for iPhone 12, and What Can It Do?
- How to Change the Call Screen on Android Device
- What’s the Difference Between Chromecast and Google TV?
- How to Change Your Car Icon in Google Maps
| How to Uninstall Apps and Games on Google TV Posted: 17 Oct 2020 06:18 AM PDT
Installing apps and games helps you take full advantage of your Google TV streaming device. But, inevitably, you'll end up with some you don't want anymore. Here's how to uninstall apps and games on Google TV. Small streaming devices, like Chromecast with Google TV, usually don't have a ton of storage space. And everything you install uses some of it. This is why it's important to remove any apps and games you're not using anymore. RELATED: How to Set Up Your Chromecast with Google TV To get started, select "Apps" at the top of the Home screen.
Scroll down to the "Your Apps" section and find the app you want to uninstall. If you have a lot of apps and games installed, you'll first have to select "See All" to view the full list.
Select the app you want to remove, and then click and hold the Select or Enter button on your remote.
In the pop-up menu that appears, select "View Details."
This takes you to that app or game's listing in the Google Play Store, where you can select "Uninstall."
Select "OK" on the confirmation pop-up to proceed.
The app or game will be uninstalled and removed from your Google TV!
|
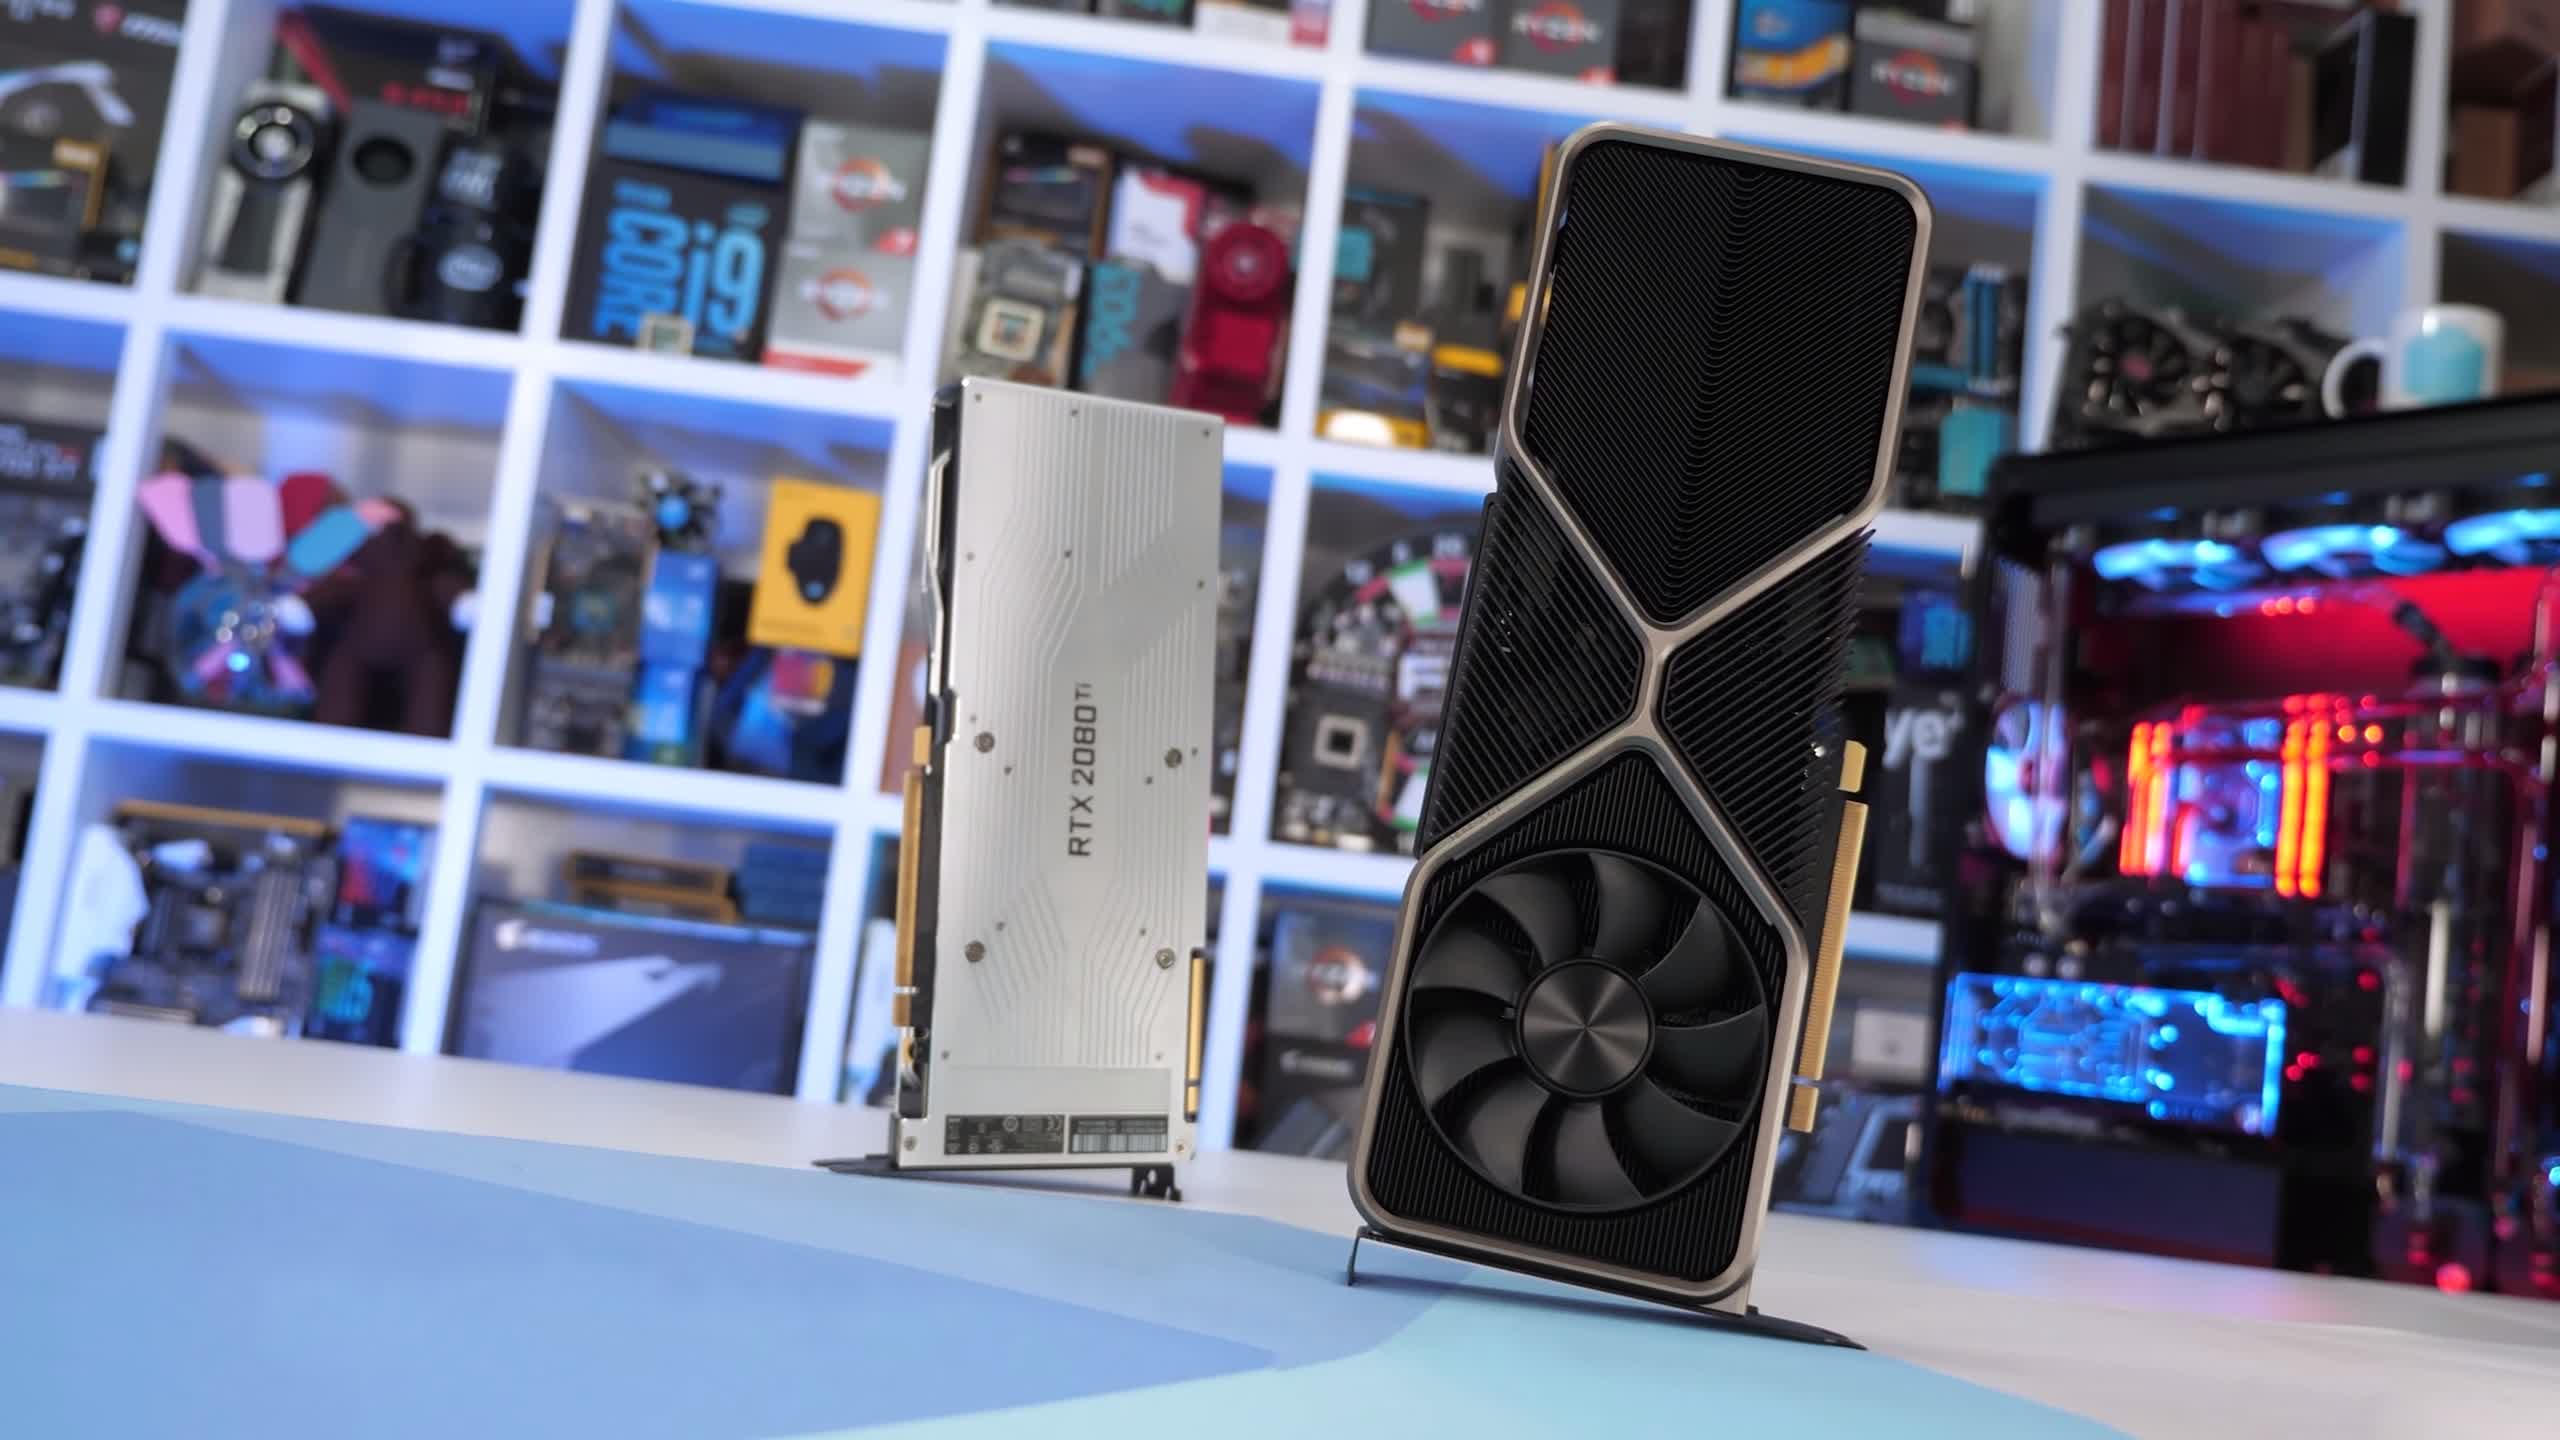
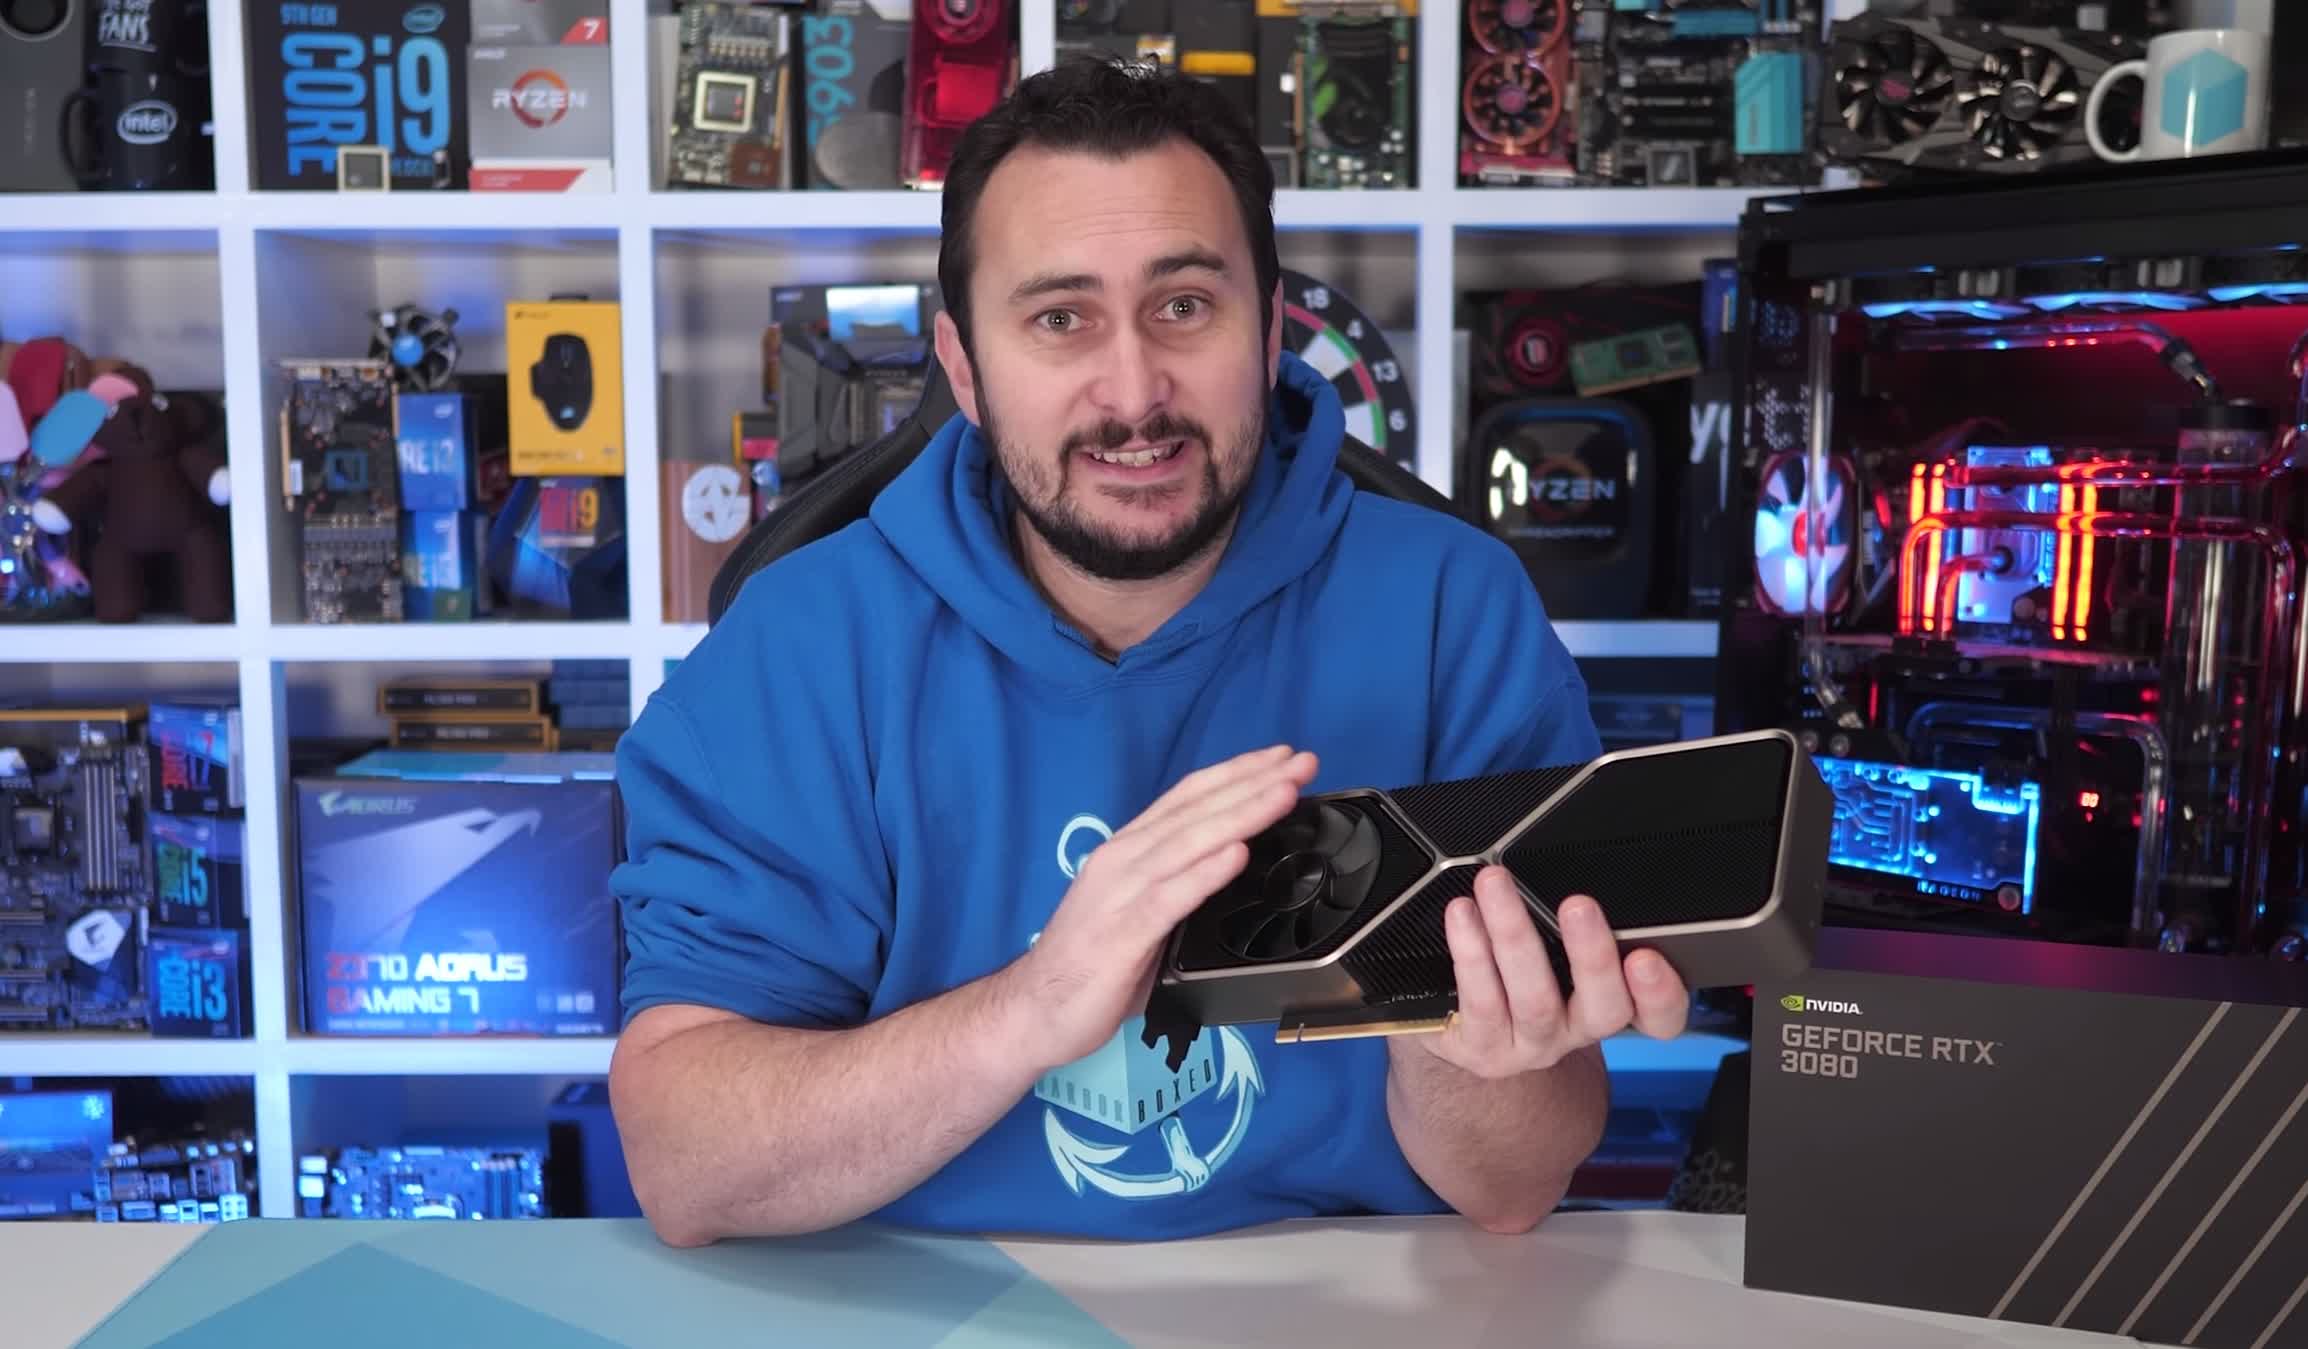
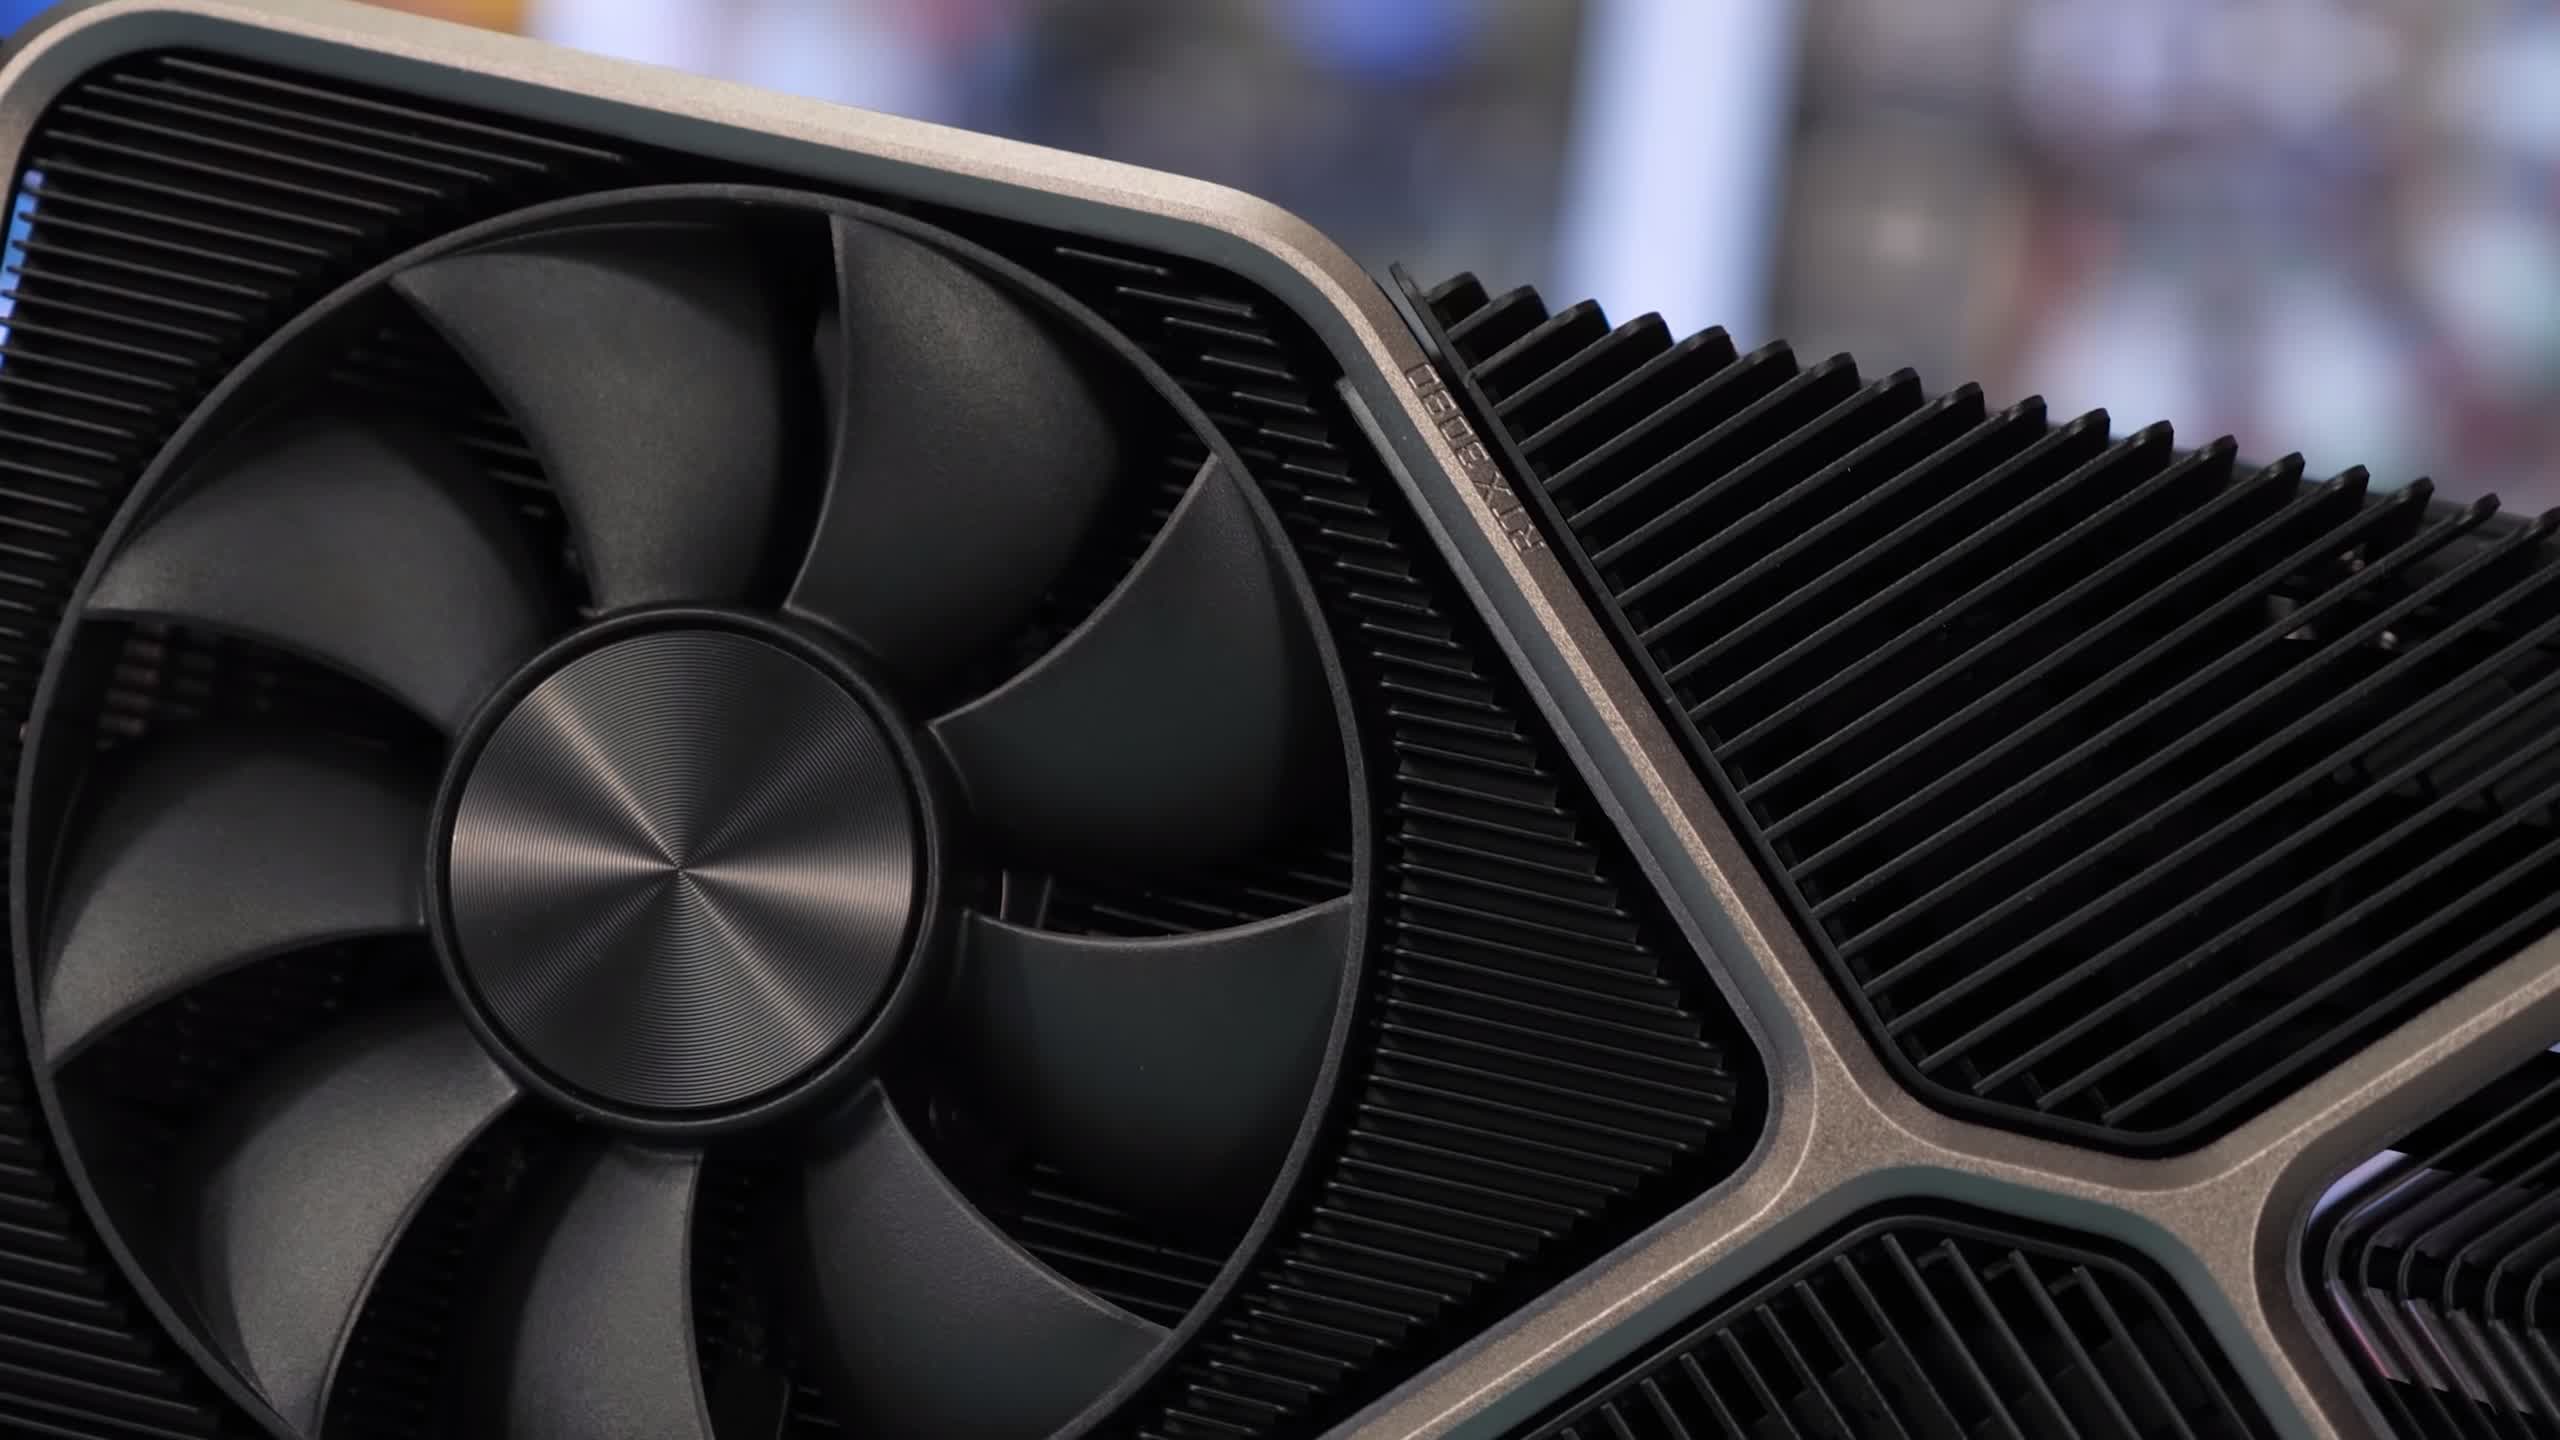
| Nvidia RTX 3080 Gaming Performance at 1440p: CPU or Architecture Bottleneck? Posted: 16 Oct 2020 08:32 PM PDT It’s time we get to explore something we've been eager to investigate since our day-one GeForce RTX 3080 review, and that’s the weaker-than-expected resolution scaling of the new Ampere architecture. Now before we get into it, do note, this article is not designed to change your opinion (our ours) about Ampere. The RTX 3080 is the best value high-end GPU on the market by a country mile… if you can get your hands on one. But back to Ampere and its interesting quirks, the aim here is to investigate and explain what's going on.
For those of you not up to speed, in our RTX 3080 review we found that gaming performance at 1440p was not as impressive relative to what was seen at 4K. We saw this as did many other reviewers, some of which simply suggested it was a CPU bottleneck, the RTX 3080 is powerful enough that even the latest and greatest CPUs can't keep up. But simply writing this off as a CPU issue didn’t sit right with us. In our review we tested with both the Ryzen 9 3950X and Core i9-10900K and both often saw the same resolution scaling. We noted part of the reason for the weaker than expected 1440p performance was down to the Ampere architecture and the change to the SM configuration. The two times FP32 design can only be fully utilized at 4K and beyond. This is because at 4K the portion of the render time per frame is heavier on FP32 shaders. At lower resolutions like 1440p, the vertice and triangle load is identical to what we see at 4K, but at the higher resolution pixel shaders and compute effect shaders are more intensive, so take longer and therefore can fill the SMs FP32 ALUs better.
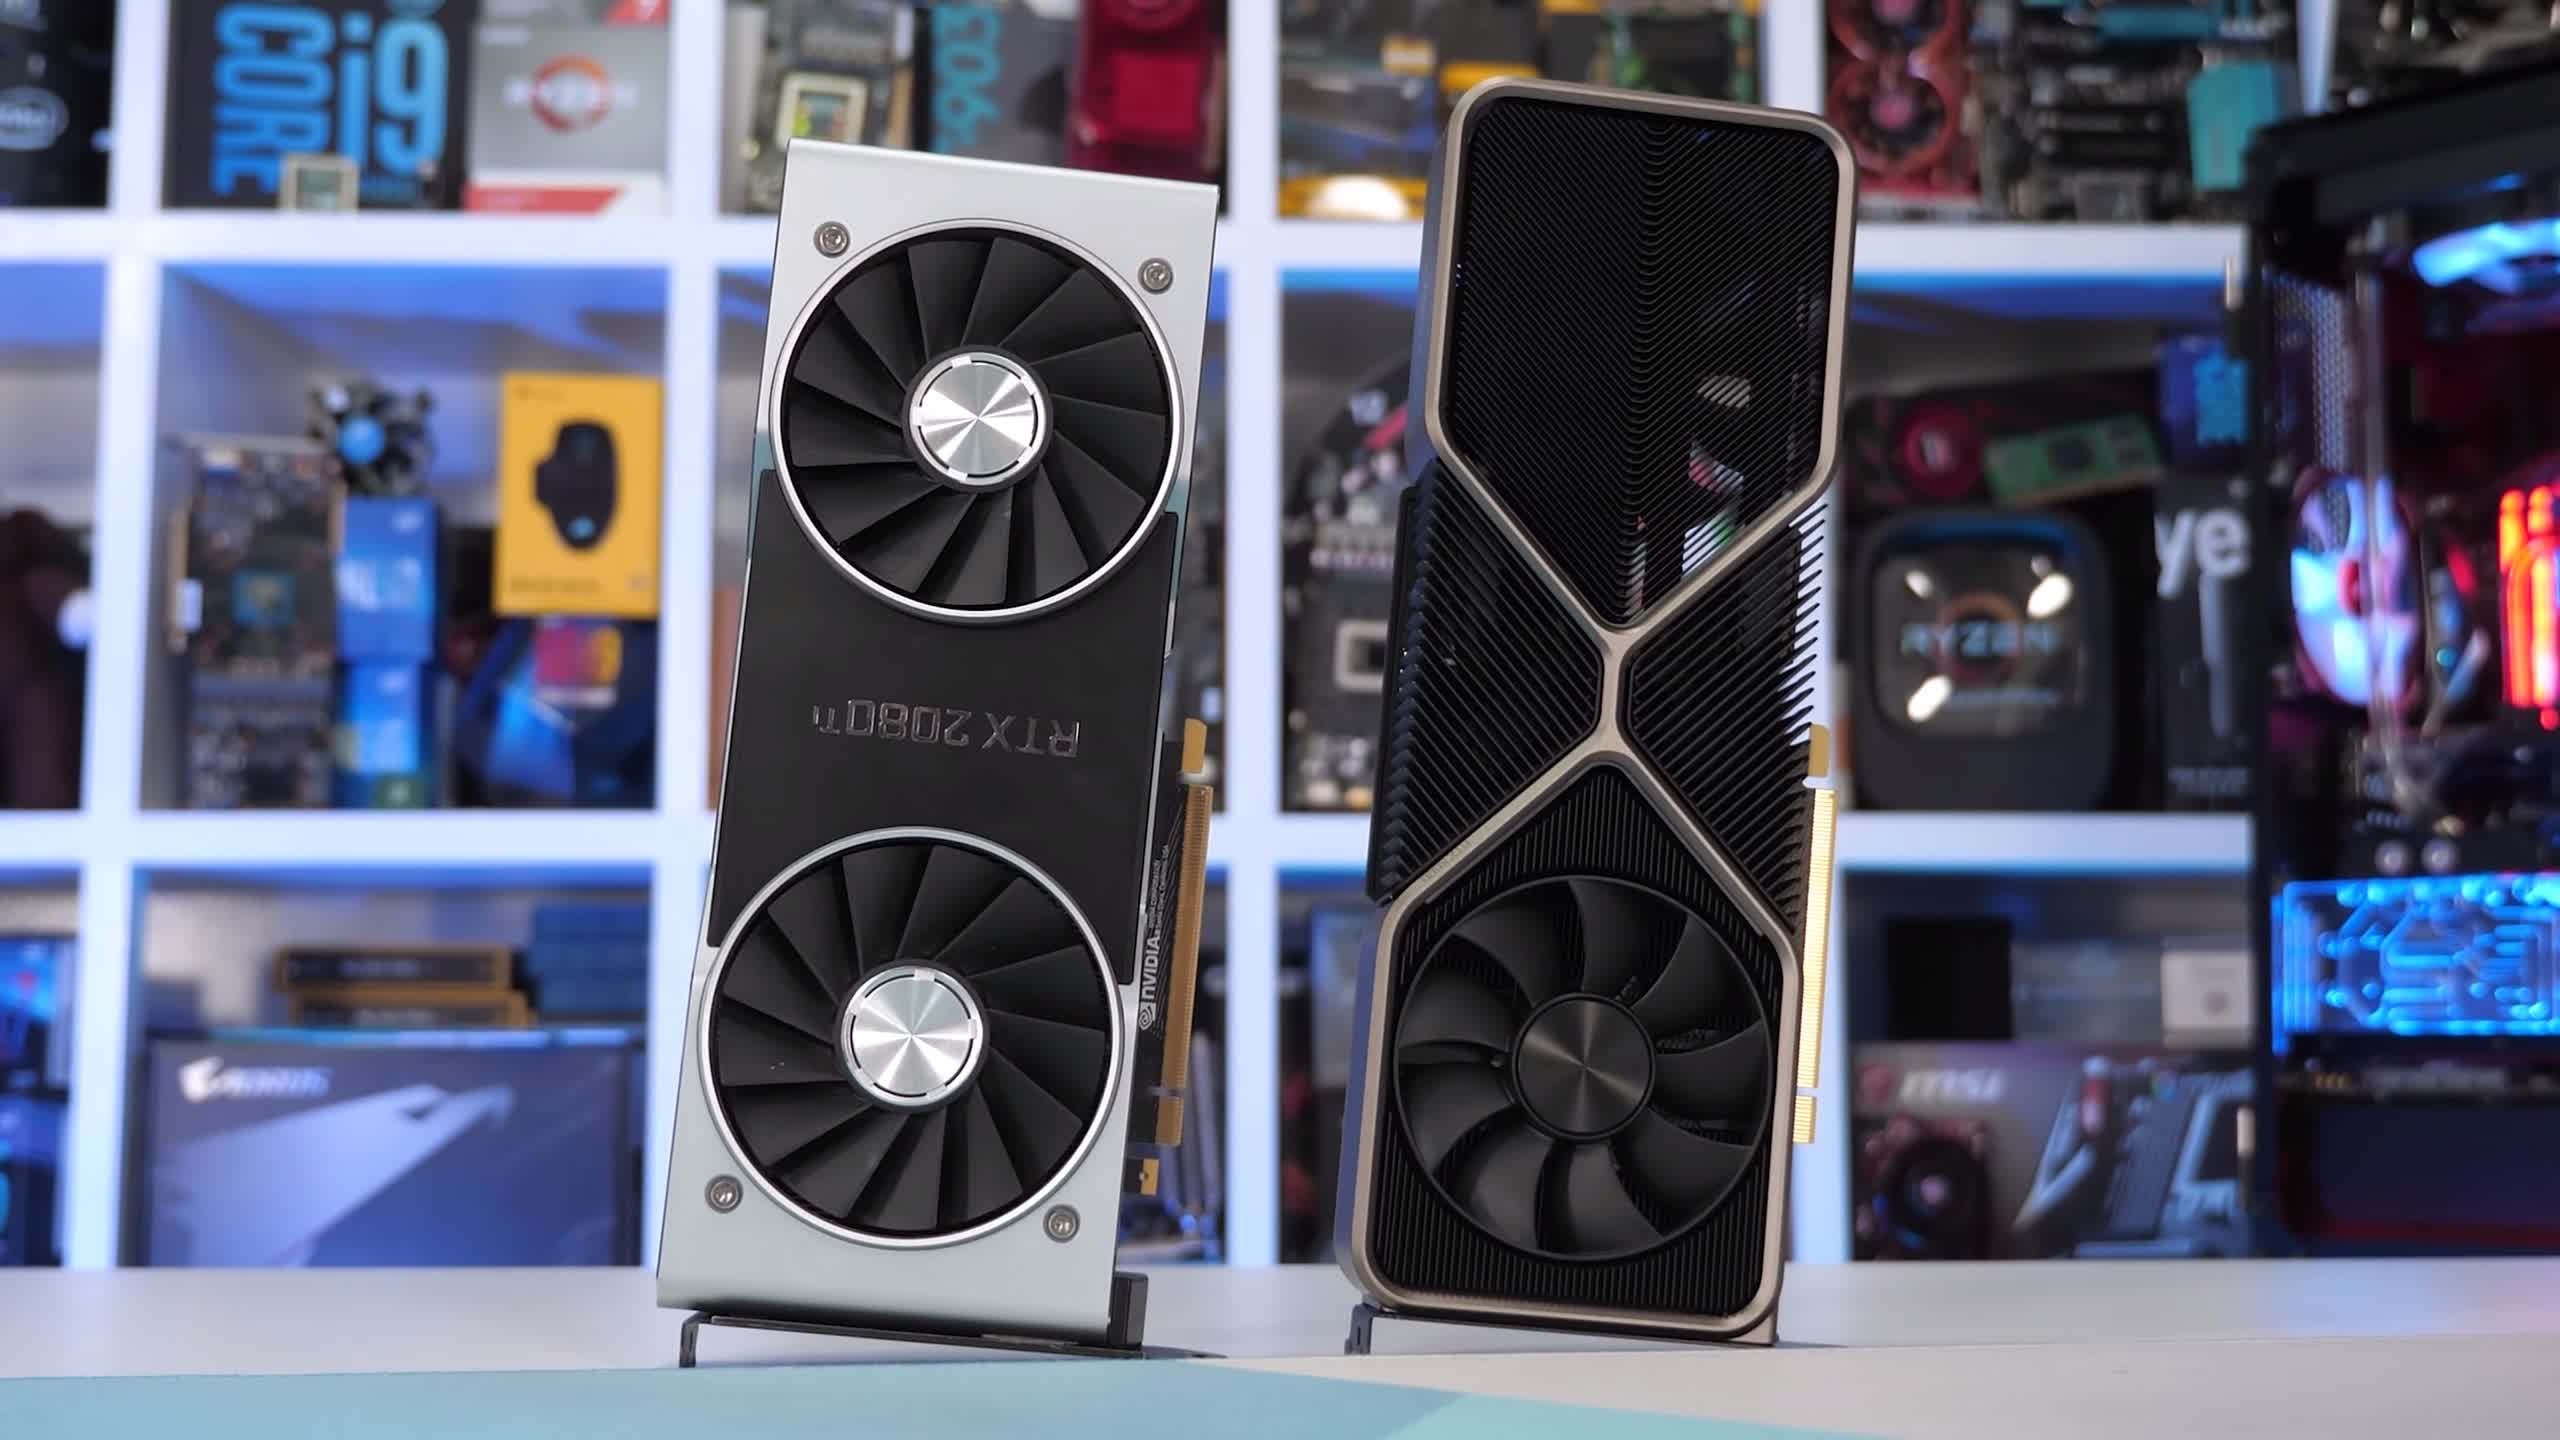
We often see high performance GPUs better utilized at higher resolutions for similar reasons, so that in itself isn't unusual. Higher resolutions always tend to put core-heavy GPUs to work better, but they also minimize other system’s bottlenecks. In our RTX 3080 review, we could also see how the RTX 2080 Ti extended its lead over the vanilla 2080 at 4K, going from ~23% faster at 1440p to ~28% faster at 4K. That’s only a 5% performance disparity and the scaling at 1440p and 4K looks very similar.
With the RTX 3080 we saw a 21% advantage over the 2080 Ti at 1440p and then a much larger 32% margin at 4K. We suggested this could be explained by the Ampere architecture’s nature which is more compute heavy, datacenter and AI oriented than gaming-first. So with this article we're going to explore how true that statement is by adding 1080p and 720p data to the 14 games we test with. If we’re seeing CPU performance influence the 1440p results, this will become very apparent with the 1080p data and extremely obvious at 720p. For this test we’ll be running a Core i9-10900K at stock clocks and comparing the RTX 3080 against the 2080 Ti. Turing isn’t necessarily the best architecture at efficiently scaling lower resolutions, but it does seem to be better than Ampere and considering there's no other GPU that comes close in terms of performance, it is what has to be used. Let’s get into the results. BenchmarksStarting with Death Stranding we see that frame rates for the 2080 Ti increased by 68% when moving from 4K to 1440p, and then 28% from 1440p to 1080p before maxing out at 201 fps at 720p. The RTX 3080 saw a 53% performance increase when dropping down to 1440p from 4K, and then just a further 11% increase from 1440p to 1080p.
By the time we hit the 1080p resolution we start to see the CPU limit performance, leaving very little headroom at 720p. That's interesting to note and it does mean that there's no CPU limitation at 1440p, so the weaker scaling cannot be blamed on the 10900K, not one bit.
Microsoft Flight Simulator 2020 is heavily limited by CPU performance as its DX11 implementation mostly hammers a single core. Based on what we're seeing here it's plausible that the RTX 3080 is limited with the 10900K at 1440p, though given we do see a little more performance at 1080p and then a hard limit at 720p, we'd say we're just shy of limiting the 3080 at 1440p in this title.
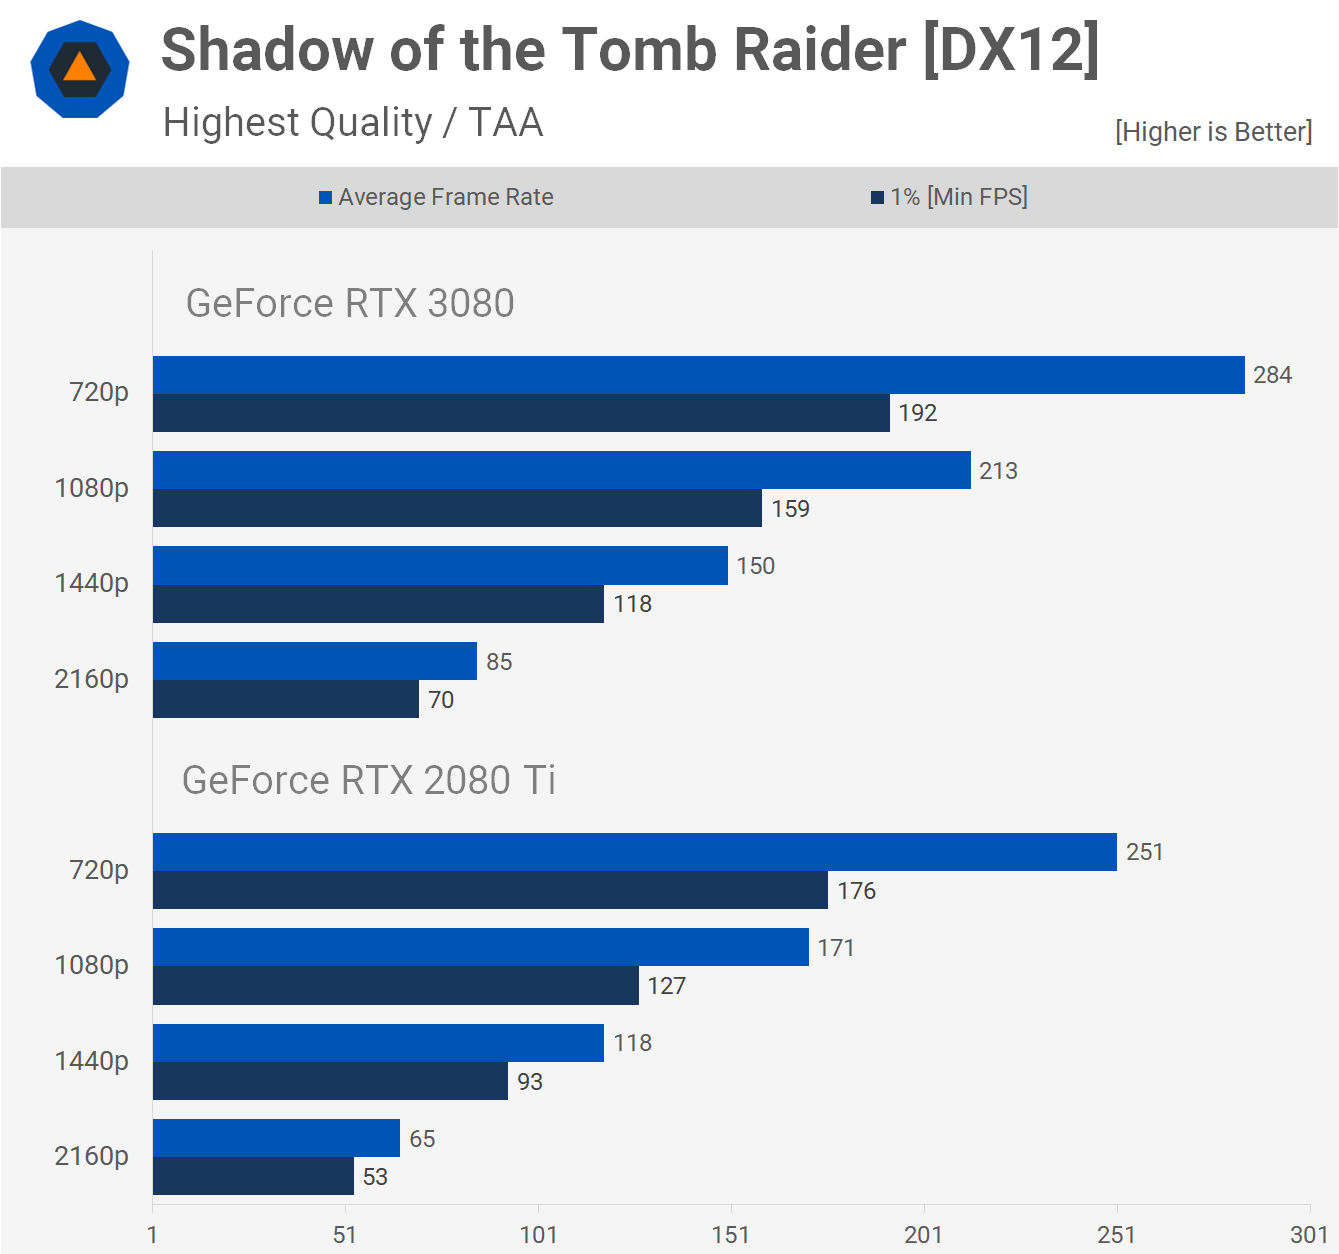
Now if you thought the RTX 3080 was in any way CPU limited in Shadow of the Tomb Raider, well you'd be wrong. Starting with the 2080 Ti results, we're seeing an 82% performance uplift when dropping the resolution from 4K to 1440p, then a 45% increase from 1440p to 1080p and a further 47% increase from 1080p to 720p. The RTX 3080 appears to scale reasonably well as performance is improved by 76% when dropping down to 1440p from 4K, then a 42% increase from 1440p to 1080p and finally a 33% increase from 1080p to 720p at which point the CPU might be starting to become the bottleneck. In other words, we’re seeing good scaling from the 3080 in this game.
Next up we have the Rainbow Six Siege where we're clearly not CPU limited at 1080p, let alone 1440p. As we often see in Vulkan-based titles, scaling for core-heavy GPUs is actually quite good here. Relative to the 2080 Ti, the RTX 3080 scales quite well, whereas the 2080 Ti sees a 98% improvement when lowering the resolution to 1440p, the RTX 3080 saw a 90% improvement.
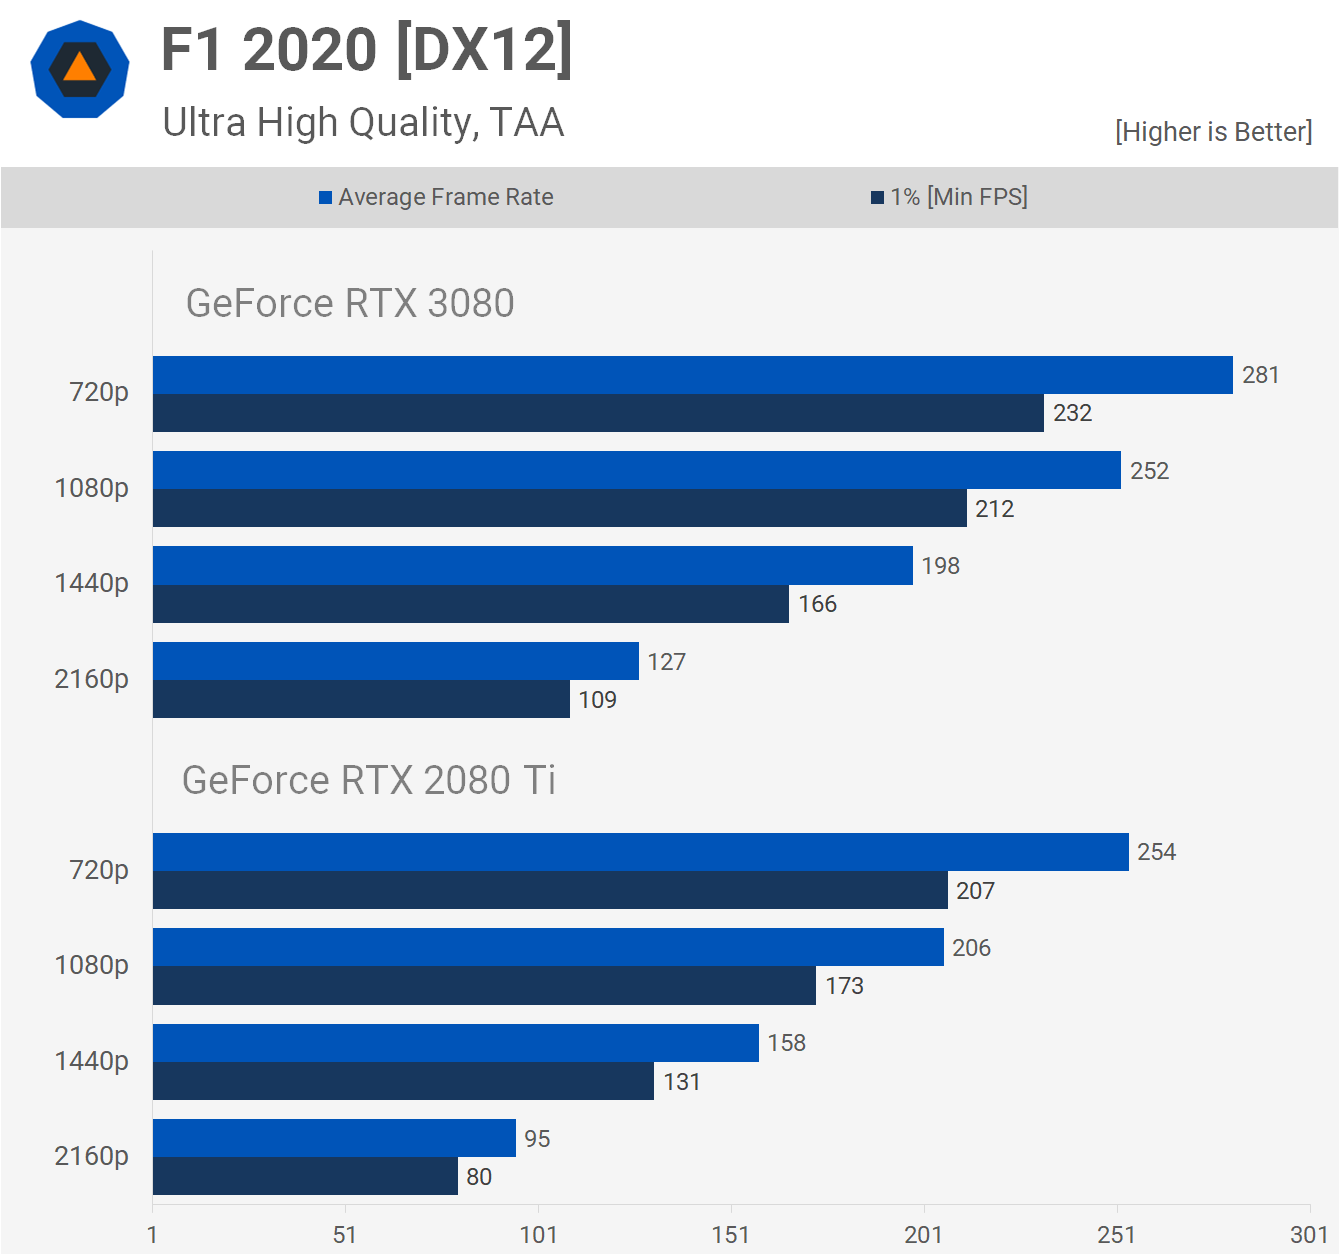
F1 2020 is another game where we're not CPU limited even at 1080p with the RTX 3080/10900K combo. Resolution scaling is also much better with the RTX 2080 Ti, which saw a 66% performance uplift when reducing the resolution from 4K to 1440p and then 30% from 1440p to 1080p. The RTX 3080 only saw a 56% performance improvement when lowering the resolution from 4K to 1440p and then 27% from 1440p to 1080p.
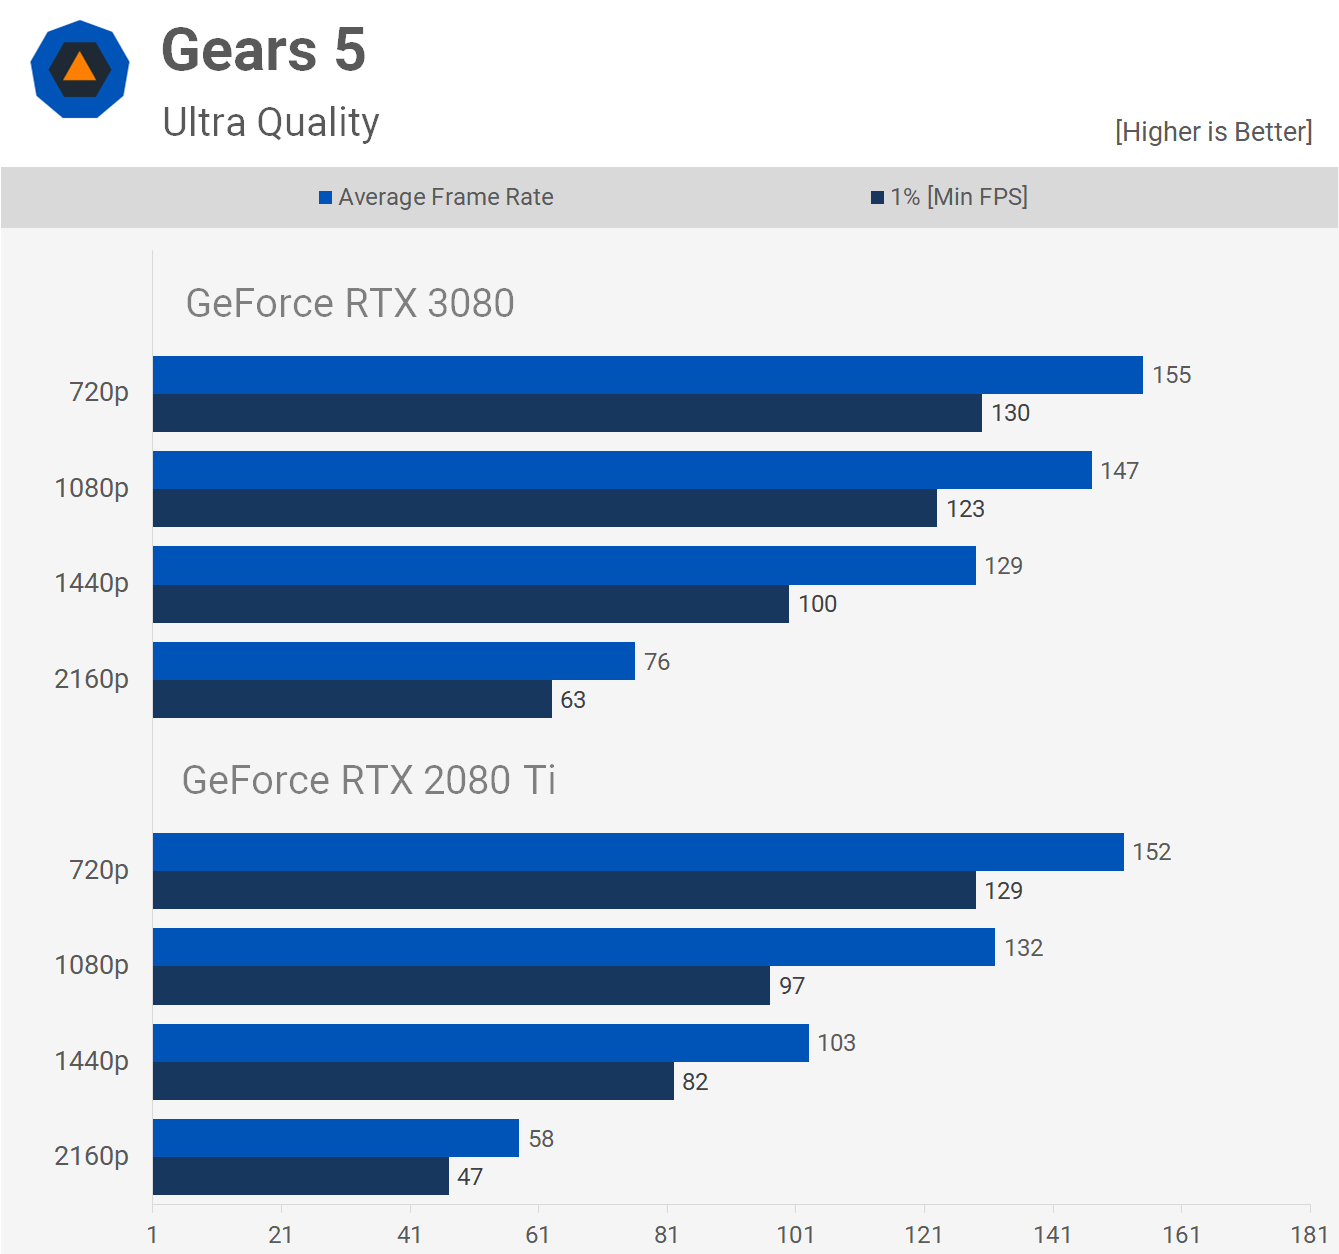
We also find no CPU bottleneck in Gears 5 with the RTX 3080, all the way down to 1080p. The 2080 Ti does scale better from 4K to 1440p, but it’s not a significant difference. The margin does widen when going from 1440p to 1080p, but we are starting to approach the hard limits of the CPU.
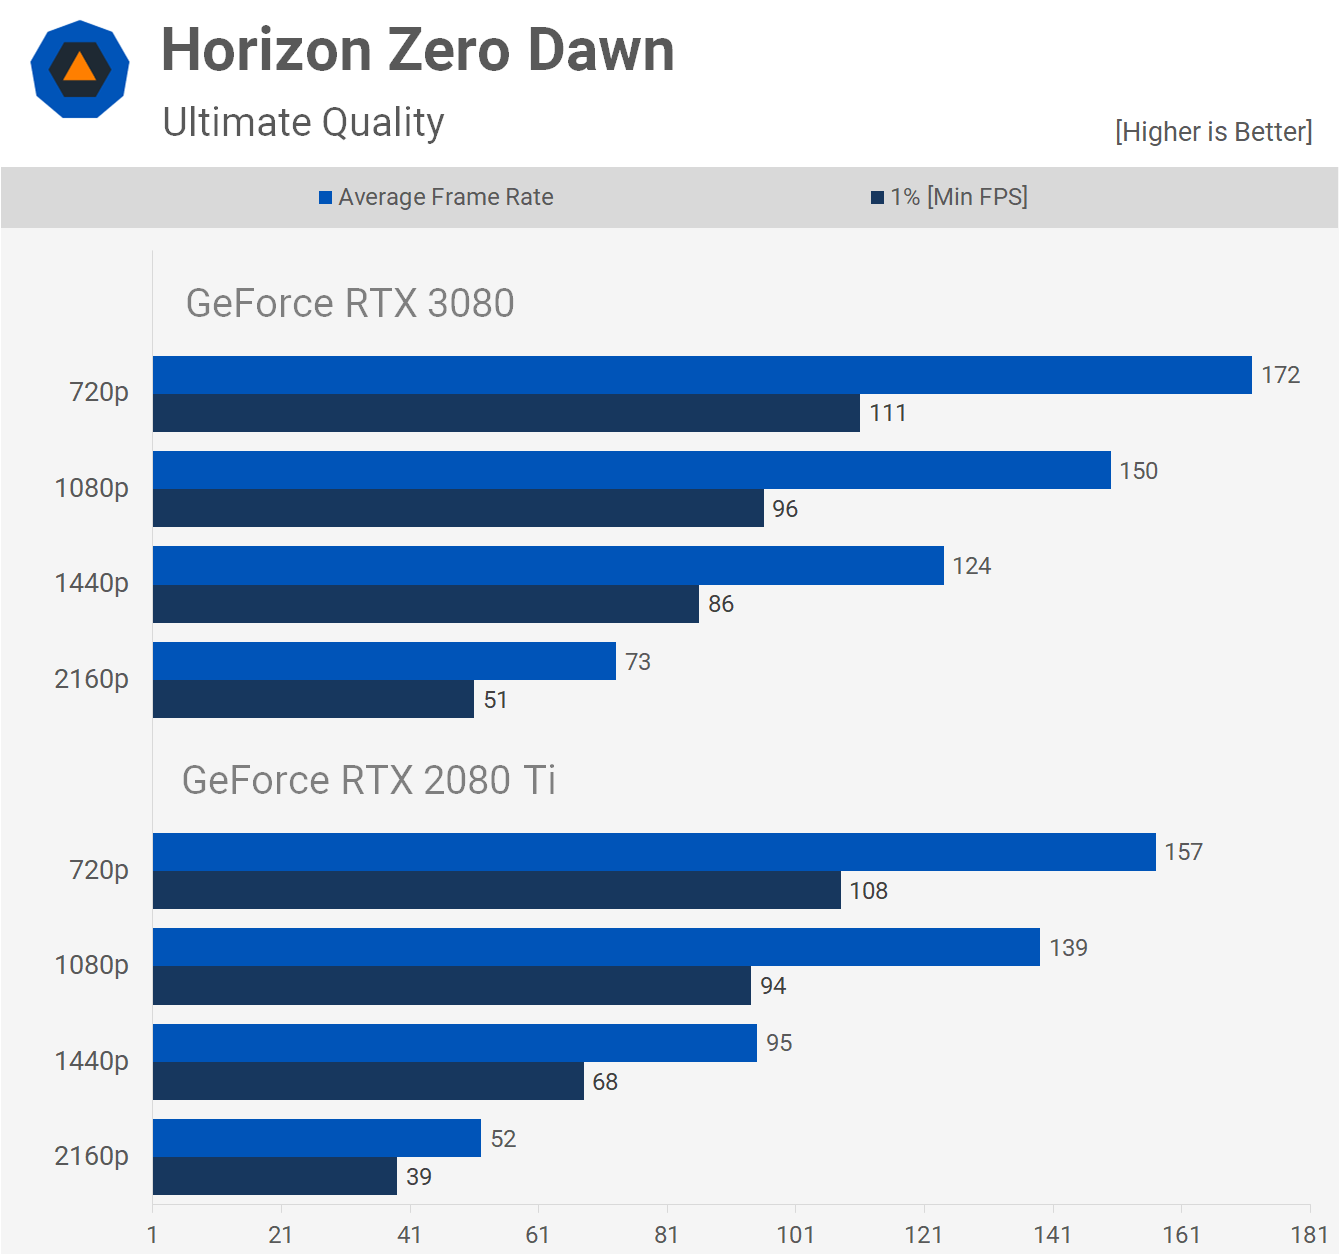
The RTX 2080 Ti scales considerably better in Horizon Zero Dawn. We see that from 4K to 1440p the Turing GPU enjoys an 83% performance boost, and then a 46% boost from 1440p to 1080p. The RTX 3080 sees a 70% performance increase when lowering the resolution from 4K to 1440p, and then just 21% from 1440p to 1080p despite not running into a CPU bottleneck. The game simply can't keep with all those CUDA cores loaded with work at these lower resolutions and therefore efficiency drops off considerably.
It's a similar story when testing with Assassin’s Creed Odyssey. The 2080 Ti saw a 49% jump when lowering the resolution to 1440p, while the 3080 gets bumped by just 34%, and a similar thing is seen when reducing the resolution from 1440p to 1080p.
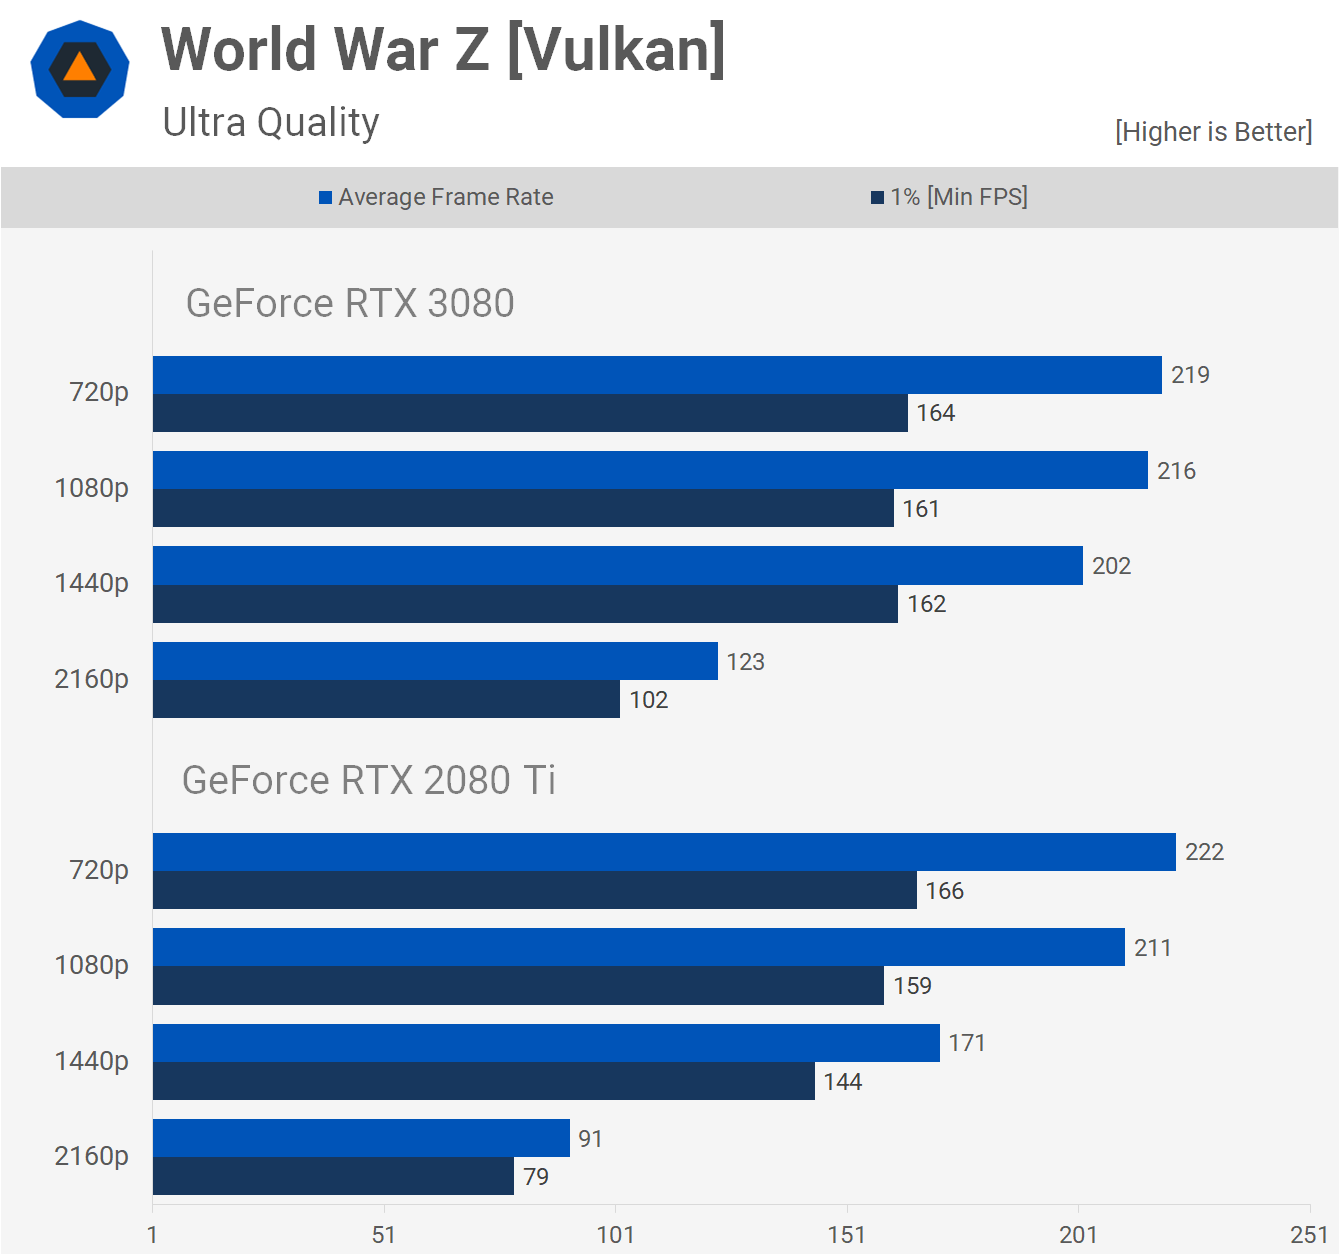
World War Z is another title based on the Vulkan API which sees good utilization for the RTX 3080, even at 1440p. In this instance we do run into a CPU bottleneck, evidenced by the 1% low results. These results are not an example of the Ampere architecture scaling poorly across lower resolutions, but rather an example of a game that does become CPU limited at 1440p even with a fast Core i9 CPU when coupled with a high performance GPU.
Metro Exodus is a bit strange when it comes to performance, though we are talking about frame rates up around 200 fps. There’s some kind of bottleneck going on with the RTX 3080, but we don't think it's necessarily the CPU, but rather a driver overhead issue that affects scheduling for core heavy GPUs like the RTX 3080. Either way, we think these results are very interesting. The 2080 Ti and 3080 deliver identical performance at 1080p, while the 2080 Ti gains more performance when lowering the resolution to 720p. Of course, this 720p performance metric is irrelevant for gaming as no one is going to use it, but it does show how Turing appears to scale better at lower resolutions.
Resolution scaling performance is fairly consistent in Resident Evil 3 between the 2080 Ti and 3080. Both saw roughly a 90% performance uplift when dropping from 4K to 144p, and then exactly 47% when going from 1440p to 1080p. It's not until we drop down to 720p that the 2080 Ti sees a larger performance gain, but we could also be reaching the limits of the CPU with the RTX 3080 which in absolute terms remains the faster GPU at all resolutions regardless.
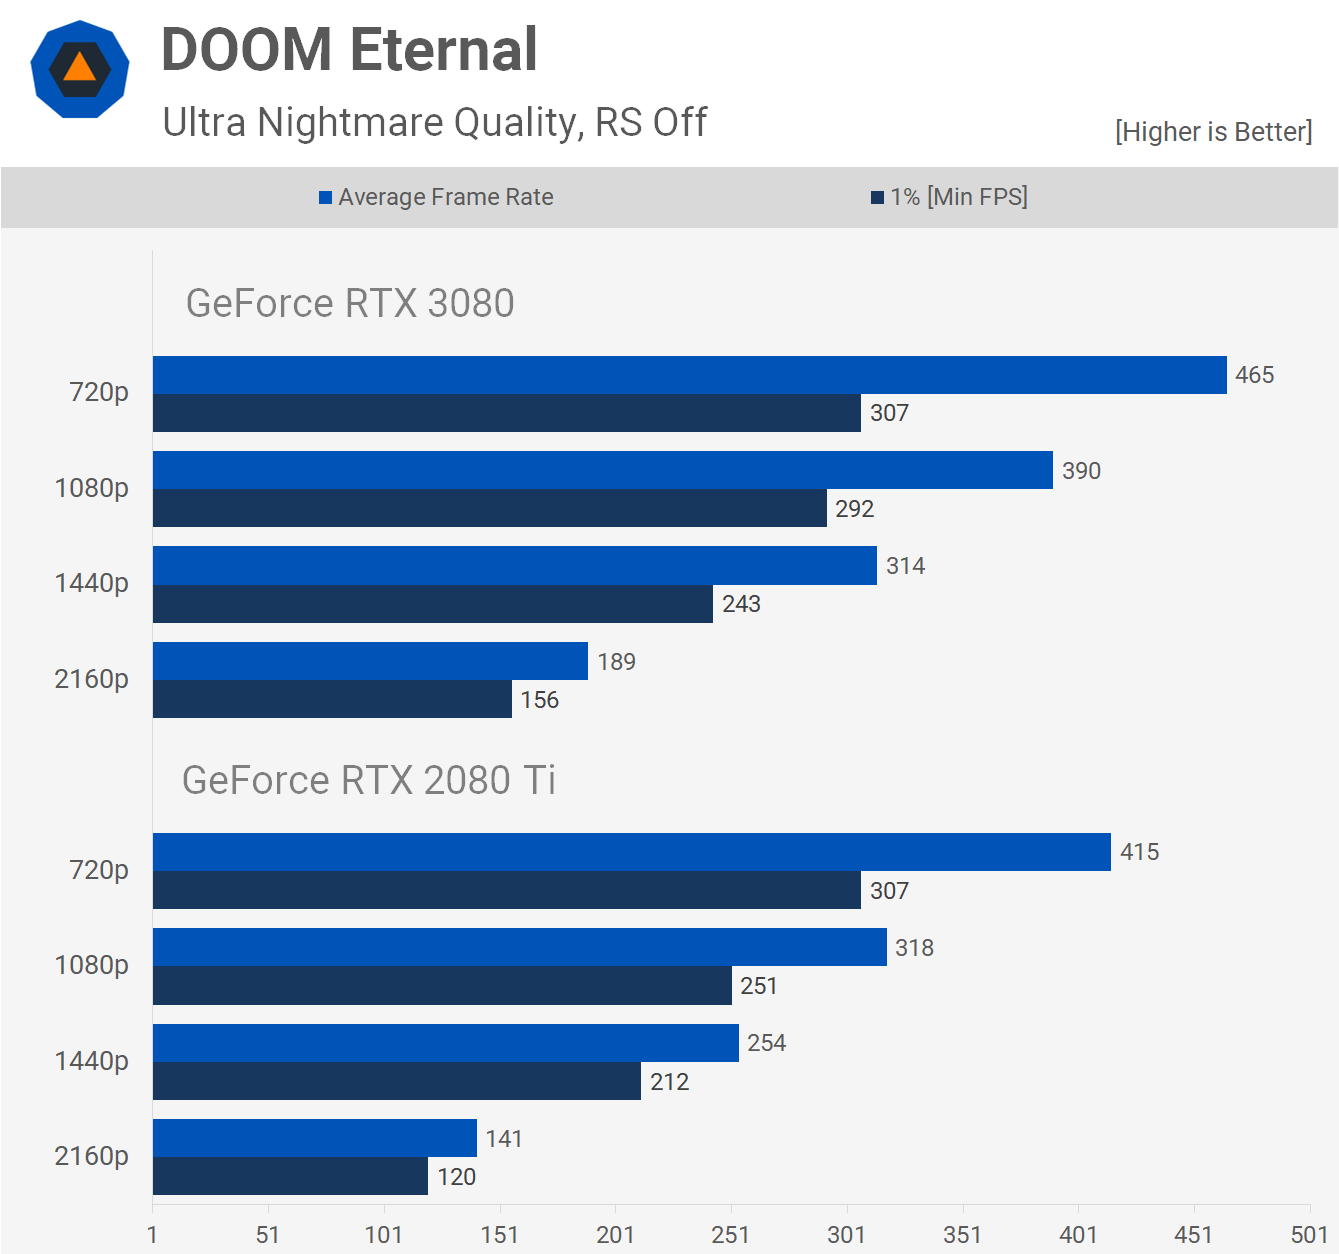
Moving on to Doom Eternal, this is a game you might have expected to scale well on the RTX 3080, at least I did. While not terrible, we’re getting much better margins with the 2080 Ti which saw an 80% performance increase when going from 4K to 1440p, the 3080 on the other hand saw a 66% improvement. There is no chance the CPU is limiting performance at 1440p given we see almost 50% more frames when dropping right down to 720p.
Despite what we saw in Doom Eternal, scaling between the 2080 Ti and 3080 is very consistent in Wolfenstein: Youngblood. Both saw a 75% performance boost when dropping the resolution from 4K to 1440p and frankly this is more what we expected to see in Doom.
Finally we have Hitman 2 which does start to limit the performance of the RTX 3080 at 1440p due to the CPU, though we think this is down to how the game is coded.
Here's a look at the 14 game average which lines up exactly with what we saw in our GeForce RTX 3080 review using the Ryzen 9 3950X. The 2080 Ti scales ~10% better from 4K to 1440p on average, with a similar margin seen when going from 1440p to 1080p. What We LearnedBased on the results we just saw, going into lower resolutions and not scaling performance as previous architectures, we can't always blame Ampere for this, while equally we can't always blame a CPU bottleneck. It will depend on the game and the hardware used for testing. It's clear though that in games like Assassin's Creed Odyssey, Doom Eternal, F1 2020, Horizon Zero Dawn and Rainbow Six Siege, the Ampere architecture is what limits 1440p performance relative to what's seen at 4K. In those games there was no CPU bottleneck at the 1440p resolution, and the same was true for even 1080p. Death Stranding is another game that didn't run into a CPU bottleneck at 1440p, but we did start to find the CPU limitations at 1080p. A similar situation was seen with Gears 5 and then some weirdness in Metro Exodus that was likely the result of a combination of things.
Then we found just three examples where you could blame the CPU for limiting 1440p performance, or at least it was right on the verge of doing so: Hitman 2, Microsoft Flight Simulator 2020 and World War Z. We also saw three examples where the Ampere architecture scaled very well, at least relative to the 2080 Ti: Resident Evil 3, Shadow of the Tomb Raider, and Wolfenstein Youngblood. So it's not always that 1440p performance is limited relative to the 4K throughput, and this was seen in our day-one review where the RTX 3080 ranged anywhere from ~70% faster than the vanilla RTX 2080 to as little as 40% when not CPU limited. Our overall outlook for the RTX 3080 has not changed, and that means the GPU is on average about 70% faster than the 2080 at 4K, and 50% faster at 1440p which is awesome.
It’ll be interesting to see if AMD can deliver a gaming-focused GPU with RTX 3080/3090-like performance at 4K and if so, if they can deliver a performance advantage at lower resolutions like 1440p where Ampere is often less impressive. Claiming the RTX 3080 is CPU limited at 1440p, assuming you're using Core i7-8700K or better, chances are more often than not you'll be wrong on that call. But this really wasn’t about right or wrong, but rather working out what's going on as that helps you work out what you do or don't need to upgrade. On that note, we'll have a follow up benchmark test with the RTX 3080 using the $200 Ryzen 5 3600, both running at stock and overclocked with manually tuned memory, then we’ll take those results and pit them against the 3950X and 10900K. Stay tuned for that comparison soon. Shopping Shortcuts: |
| How to Create a Venn Diagram in Microsoft PowerPoint Posted: 16 Oct 2020 05:27 PM PDT
One of Microsoft PowerPoint's charms is the ability to convey messages through illustrations, images, and SmartArt graphics. In its library of SmartArt graphics, PowerPoint provides a Venn diagram template, which you can completely customize to fit your needs. Insert a Venn DiagramOpen PowerPoint and navigate to the "Insert" tab. Here, click "SmartArt" in the "Illustrations" group.
The "Choose A SmartArt Graphic" window will appear. In the left-hand pane, select "Relationship."
Next, choose "Basic Venn" from the group of options that appear. Once selected, a preview and a description of the graphic will appear in the right-hand pane. Select the "OK" button to insert the graphic.
Once inserted, you can customize the Venn diagram. RELATED: How to Insert a Picture or Other Object in Microsoft Office Customize Your Venn DiagramThere are different ways you can customize your Venn diagram. For starters, you probably want to adjust the size. To do so, click and drag the corner of the SmartArt box. You can also resize individual circles within the diagram by selecting the circle and dragging the corner of its box.
Once resized, you can edit the text in each circle by clicking the circle and typing in the text box. Alternatively, you can click the arrow that appears at the left of the SmartArt box and then enter your text in each bullet.
To add additional circles to the diagram, just click "Enter" in the content box to add another bullet point. Similarly, removing a bullet point will remove that circle from the diagram.
To add text where the circles overlap, you'll need to manually add a text box and enter text. To add a text box, select "Text Box" in the "Text" group of the "Insert" tab.
You'll now notice your cursor changes to a down arrow. Click and drag to draw your text box, and then enter text.
Repeat this step until you've added all the text required for your Venn diagram.
PowerPoint also offers a few color variations for the SmartArt graphic. Select the SmartArt and then click the "Design" tab that appears. Here, choose "Change Colors" in the "SmartArt Styles" group.
Select the color scheme you like from the drop-down menu that appears.
You can also change the color of individual circles by right-clicking the border of the circle and selecting "Format Shape" from the context menu.
The "Format Shape" pane will appear in the right-hand side of the window. In the "Shape Options" tab, click "Fill" to display its options, click the box next to "Color," then select your color from the palette.
Repeat this process for each circle in the diagram until you're satisficed with the color scheme of your Venn diagram.
Assigning different colors to each circle in the diagram can make the relationship between subjects more distinct. |
| How to Turn on Your Flashlight by Tapping the Back of Your Android Phone Posted: 16 Oct 2020 02:03 PM PDT  There are certain smartphone functions that you want to be able to do quickly. Turning on the flashlight is one of them. We'll show you how to turn it on by simply tapping the back of your Android device. This is possible with an app called "Tap, Tap." Once enabled, it can perform functions when you tap the back of your device. The app is not available to download from the Google Play Store, but it can be easily sideloaded on any Android 7.0+ device. Before we proceed, follow our guide to get Tap, Tap installed and ready to go. RELATED: How to Perform Actions by Tapping the Back of Your Android Phone Now that you have Tap, Tap set up, we can configure the Flashlight gesture. Open the app and select either "Double Tap Actions" or "Triple Tap Actions." For this guide, we'll use Double Tap.
Next, tap the "Add Action" button at the bottom of the screen.
From the "Utilities" category, select "Flashlight." Alternatively, you can take a screenshot by tapping on the back of your phone.
The flashlight will now turn on when you tap the back of your Android device. Next, we can set up some "Requirements." These requirements need to be met in order for the Flashlight to turn on. You don't have to add requirements, but if you want to, tap "Add Requirement."
If you're worried about the flashlight turning on in your pocket, you could select the "Display On" requirement. This will ensure the flashlight doesn't turn on when the display is off (though, you may find that handy, too).
You're done! Now you always have quick access to your Android phone's flashlight when you're in a dark situation. RELATED: How to Take a Screenshot by Tapping the Back of Your Android Phone |
| How to Hum to Search for a Song Using Google Posted: 16 Oct 2020 09:17 AM PDT There's nothing quite as annoying as having a song stuck in your head and not being able to identify it. Thankfully, if you can hum the song out loud, Google Search can help you figure out what tune is stuck in your head. The Hum to Search feature is available in the Google mobile app and works with humming, whistling, or anything else you can do to mimic a tune. The results aren't always accurate, but it's a good place to start if an earworm is driving you crazy. First, open the Google app on your iPhone, iPad, or Android device and tap the "Microphone" icon in the search bar. On Android devices, you can also tap the "Microphone" icon from the Google Search widget found on your home screen.
When the listening screen appears, you'll see a "Search A Song" button. Tap it.
Start humming or whistling the song you're trying to identify. This tool can also identify real music that's playing.
If Google can find similar matches, the results will appear labeled with match percentages. Tap "More Results" if your song isn't in the top results.
If Google can't identify the song, you'll see a screen that says "Unable To Find Match." You can tap "Try Again" to give it another go.
In our testing, the feature is hit or miss. Hum to Search does a good job with popular songs and distinct melodies. Songs that don't have easy to hum tunes are harder to identify.
|
| What Is MagSafe for iPhone 12, and What Can It Do? Posted: 16 Oct 2020 05:28 AM PDT With the arrival of the iPhone 12 comes a new ecosystem of accessories for Apple smartphones. MagSafe makes it easier to wirelessly charge an iPhone, attach cases, and use a wide variety of other accessories. Here's why it's a major step forward for the iPhone. A New MagSafeIf you're scratching your head thinking you've heard "MagSafe" before, you're right. Apple previously used the name for its MacBook chargers prior to switching to USB-C. Back then, MagSafe wasn't a wireless technology. It was designed to easily snap on and off, allowing you to easily connect a charger to your MacBook even in the dark. The upshot of having the charger secured by a magnet meant that accidents were much less likely to result in a broken laptop. MagSafe for iPhone is a bit different. It's a fully wireless charging standard, but it's not just for charging. Most excitingly, it paves the way forward for an iPhone that doesn't need a Lightning port. That means better waterproofing and more room inside the chassis for other things, like a larger battery. MagSafe's wireless charging and accessory functionality is available on the iPhone 12, iPhone 12 Mini, iPhone 12 Pro, and iPhone 12 Pro Max. It will likely be included in future iPhones, too. Wireless Charging Takes Center StageApple first introduced wireless charging alongside the iPhone 8, but until now this has capped out at 7.5w. MagSafe doubles the throughput to 15w, bringing the iPhone in-line with most other fast-charging Android devices. But there's a catch. For an iPhone that uses MagSafe to reach those speeds, you'll need to use an Apple-approved charge. You'll be limited to the old 7.5w speed if you use any old "off-brand" Qi charger. This gives Apple greater control over the MagSafe ecosystem, a concept that most iPhone users are familiar with by now. But MagSafe isn't just about speed, it's also about ease of use. One of the biggest problems with wireless charging is finding the "sweet spot" where the charger and device close the circuit. This is something you'll be familiar with if you've ever put your smartphone on a wireless charging pad and returned 30 minutes later to see that it hasn't charged at all. MagSafe aims to solve this issue by snapping the charger into place on the back of the iPhone. This creates a perfect circuit every time, with enough magnetic force to keep the iPhone and charger firmly in place. Belkin's new three-in-one MagSafe wireless charger for iPhone, Apple Watch, and AirPods demonstrates this by showing the charger holding the iPhone 12 at a 45-degree angle. The first approved MagSafe charger is Apple's own basic $39 offering, with the company planning on introducing a travel-friendly MagSafe Duo that charges both your Apple Watch and iPhone. Both Belkin and Griffin will have their own third-party accessories available soon, and more manufacturers will undoubtedly jump on-board as device availability improves. Big News for CasesIn addition to a wireless charger and snap-on wallet, two first-party cases were announced for each variant of iPhone 12 alongside the MagSafe reboot. A clear plastic case and a solid color silicon case with MagSafe will get the magnet treatment in what could be a major shake-up to the way we apply and remove cases from our iPhones. Apple also teased a leather case in its presentation. Most cases have a lip to keep the case in place while in use. This stops your iPhone from falling out, but it can make removing a case difficult. Not only does popping an iPhone out of a tough plastic case require some force, it often deforms and warps the case with each application. It really should be easier to switch cases, clean your phone, or just enjoy a case-free iPhone, right? Enter MagSafe. With a magnetic grip keeping your iPhone in place, there's no need for a lip anymore. That's the design philosophy embraced by Apple with the arrival of the clear plastic and colored silicon Apple-branded cases that are launching alongside the iPhone 12 as well as a third-party magnetic case from Pitaka. The clear plastic case looks particularly dashing with its MagSafe magnetic ring on display. Cases are designed with accessories in mind, which means you should be able to snap any MagSafe-compliant accessory directly to the phone or to a MagSafe-compliant case. It remains to be seen how the new MagSafe cases handle being dropped. Since many rugged cases use lips to protect the outer edges of the iPhone's screen, you might find yourself in need of the new Ceramic Shield drop protection built into the iPhone 12 family, which promises four times better resistance against impacts. Of course, there will still be regular "dumb" cases for sale long into the future. Some might incorporate MagSafe for better charging performance while still relying on the added protection that a lip affords. A New Ecosystem of AccessoriesPerhaps the most exciting aspect of MagSafe is the accessories that have yet to be announced. With support for up to 15w power delivery, accessory identification via NFC, and a magnetometer built into every iPhone going forward, it remains to be seen what Apple and third-party manufacturers have in store. PopSocket, which makes wildly popular stick-on smartphone grips, has already announced plans to embrace MagSafe. The success of such a product surely depends on how strong the magnet connection between the device and the accessory is, so it will be interesting to see what the company comes up with. MagSafe is more than just a charging method, but battery cases and snap-on battery packs could become a reality. This would provide an easy way to vastly increase your iPhone's power capacity simply by snapping an accessory onto its back. It's not clear whether MagSafe has any overhead for data transfer in its initial form, although it's possible Apple could use MagSafe to "handshake" with devices to enable fast wireless data transfer. This could see the arrival of MagSafe drives (just as we have Lightning-USB combination drives today) for backup and data transfer. What about audiovisual accessories like lenses and microphones or audio interfaces? Apple was granted a patent for what can be loosely described as "MagSafe lenses" in 2014. Could companies like Square and PayPal use MagSafe for their card readers too? Time will tell, but Apple certainly seems to be steering us toward a wireless future. "Magnets, How Do They Work?"One issue that's been raised by Apple's decision to put magnets in your pocket with the iPhone 12 is the possibility of damage to items like credit cards and hotel room keys. While this is a real possibility, Apple says that the MagSafe wallet won't cause any more damage to these items than your smartphone normally would. Apple does this with shielding that's built into the wallet, so it's possible that a bare MagSafe connector could still cause issues. For now, it's best to put items with sensitive magnetic stripes (like gift cards and hotel keys) in another pocket. Most credit cards are resistant to magnetic interference—and, if you use a chip or contactless payments, then you have nothing to worry about. MagSafe isn't the only big change in the iPhone 12. Learn more about Apple's implementation of 5G in its latest smartphones. RELATED: What 5G Means for Apple’s iPhone 12 |
| How to Change the Call Screen on Android Device Posted: 16 Oct 2020 12:44 AM PDT Android is definitely one of the best mobile operating system ever made. Compared to every other mobile OS, Android offers more features and options. Along with all its unique features, Android is specifically known for its endless customization options. For customization, you can use launcher apps, icon packs, live wallpapers, etc. Also, there are apps available to replace the lock screen, add widgets, etc. Not many would know, but Android also allows users to change the default caller screen. Recently, we came across an Android app that changes your caller screen while using the default Phone app. That simply means that you no longer need to replace the dialer app to change the caller screen. Steps to Change the Call Screen On Android DeviceSo, in this article, we are going to share a detailed guide on how to change the caller screen on Android. Let's check out. Step 1. First of all, download & install the Vani Caller theme on your Android device.
Step 2. Once installed, open the app on your Android device. Step 3. Now you will be asked to grant three permissions. Make sure to grant every permission.
Step 4. Once done, you will be able to see all call screen themes. All of the themes were arranged in categories like abstract, themes, Live Wallpapers, etc.
Step 5. Just select the theme of your choice and tap on the (+) button.
Step 6. Now the app will show you a preview of the caller screen. Step 7. You will find two options there – 'Set for all' and a '(+)' option. Tap on the set for all options to make it the universal caller screen for every incoming call. If you want to set up a custom call screen for a particular contact, tap on the (+) option and select the contact.
That's it! You are done. Now you will see the new caller screen whenever you will receive an incoming call.
So, this was the best method to change your caller screen on Android. I hope this article helped you! Please share it with your friends also. If you have any doubts related to this, let us know in the comment box below. |
| What’s the Difference Between Chromecast and Google TV? Posted: 15 Oct 2020 01:28 PM PDT When it comes to branding, Google isn't the best at eliminating confusion. The lines between the company's streaming products got even blurrier with the introduction of the Chromecast with Google TV. So, what exactly is the difference between Chromecast and Google TV? Let's break it down! The mess that is Google Home and Nest is just one example of confusing Google branding, but its streaming media products might be even worse. There's Google TV versus Android TV, Android TV versus Chromecast, and now Chromecast versus Google TV. Yikes! What Is Chromecast?Chromecast is Google's name for its line of streaming media dongles. Typically, these devices don't include physical remotes. Rather, you just plug them into a TV's HDMI port to receive content from a mobile device. This is what makes a Chromecast a Chromecast: your phone, tablet, or computer is, essentially, the "remote." There isn't an interface on the TV you can navigate; it's simply a blank canvas waiting to receive content from another device. To do this, tap or click the Cast icon (shown in the image below) in a mobile app or Chrome browser. A list of devices you can cast to, including your Chromecast, will then appear.
You can cast videos, slideshows, music, or even screen mirror. This is made possible by a protocol called "Google Cast." Not only can Google Cast send streaming video to a Chromecast dongle connected to a TV, but it's also what sends music to Google Nest smart speakers. The term "Google Cast" only refers to the protocol, not consumer products. Devices that have the Google Cast technology are marketed as having "Chromecast built-in." This brings us to the confusingly named Chromecast with Google TV. It's not really a Chromecast in the way we described above. Rather, it includes a physical remote and an actual interface on the TV. It can, however, still receive content you cast from another device. What Is Google TV?
In short, Google TV is Android TV for televisions. Android TV devices, set-top boxes, and televisions run Android 9 or later, while Google TV is built on Android 10+. Unlike the Chromecast without Google TV devices we covered above, Google TV offers a more traditional Smart TV interface. Apps, games, TV shows, and movies appear on a Home screen that you can navigate with the included remote (or a remote app). RELATED: How to Control the Chromecast with Google TV with Your Phone Just like on Android phones and tablets, you can access the Google Play Store on Google TV. Most of the popular streaming services are available on Google TV devices, as are plenty of games. RELATED: How to Install Apps and Games on Google TV That's the main difference between Chromecast and Google TV: Chromecast doesn't have any apps (it just receives content). Google TV is a full operating system that can run apps and games. You'll also find the previously mentioned "Chromecast built-in" on Google TV devices. The remote and Home screen are meant to be the primary method of navigation. However, you can also cast content from your phone, tablet, or computer. Chromecast with Google TV does sound confusing, but it actually makes a lot of sense. Google TV devices are essentially Chromecasts because they can receive content you cast in exactly the same way. The only difference is you also have the Google TV interface. Which Is Best for You?Whether you should get a Chromecast or Google TV comes down to what you do on your television. The lines between the two are getting blurrier, though. A Chromecast is a simple, affordable way to convert any TV with an HDMI port into a smart TV. It's also great for casual viewing. Many people use Chromecasts in a secondary input to supplement a cable box. Chromecasts are also handy for parties or groups because anyone can connect to your Wi-Fi network and cast content to your TV. Many apps also include a queue feature so people can add videos to a list, and then watch them in order. Google TV is better if you prefer a more "lean-back" experience because you can browse through your services with a remote. The Home screen is full of recommendations, as well, which makes it easy to quickly launch movies or TV shows. These devices tend to be more powerful than Chromecast dongles. You can do things like sideload apps, change the screen saver, watch over-the-air TV, and connect gaming controllers. Generally, they can just do a lot more. Price is the final thing you have to consider. Fortunately, this is where the two have gotten closer. Chromecasts were traditionally much cheaper, hovering around $30 range, while Android TV devices went for $100 or more. At this writing, however, the Chromecast with Google TV is $50, making that price gap a lot smaller. So, if casting movies and TV shows is the main thing you want to do, a Chromecast is all you need. If you want casting abilities and an on-screen menu you can navigate, you want Google TV. |
| How to Change Your Car Icon in Google Maps Posted: 15 Oct 2020 11:55 AM PDT
Google Maps has a few quirky little features that can personalize your experience if you know where to find them. For instance, you can change the navigation icon to a car, SUV, or truck. Here's how. The default Google Maps navigation icon is the familiar triangle with an inverted base that you see on many navigation systems. That icon actually comes from the Asteroids game. You can change this icon to more closely match your mode of transportation. First, open the Google Maps app on your iPhone, iPad, or Android device and then select a location for navigation. Tap "Directions."
Next, select the "Start" button to begin the turn-by-turn navigation.
Now, simply tap the icon representing your location on the map.
You'll now see a few vehicle icons to choose from as well as the traditional triangle. Select one of the icons to proceed.
That's it! You'll now see the vehicle in place of the triangle icon when navigating.
|


| You are subscribed to email updates from My Blog. To stop receiving these emails, you may unsubscribe now. | Email delivery powered by Google |
| Google, 1600 Amphitheatre Parkway, Mountain View, CA 94043, United States | |


0 nhận xét:
Đăng nhận xét